child seat DODGE CHARGER SRT 2015 7.G Owner's Guide
[x] Cancel search | Manufacturer: DODGE, Model Year: 2015, Model line: CHARGER SRT, Model: DODGE CHARGER SRT 2015 7.GPages: 595, PDF Size: 16.43 MB
Page 92 of 595
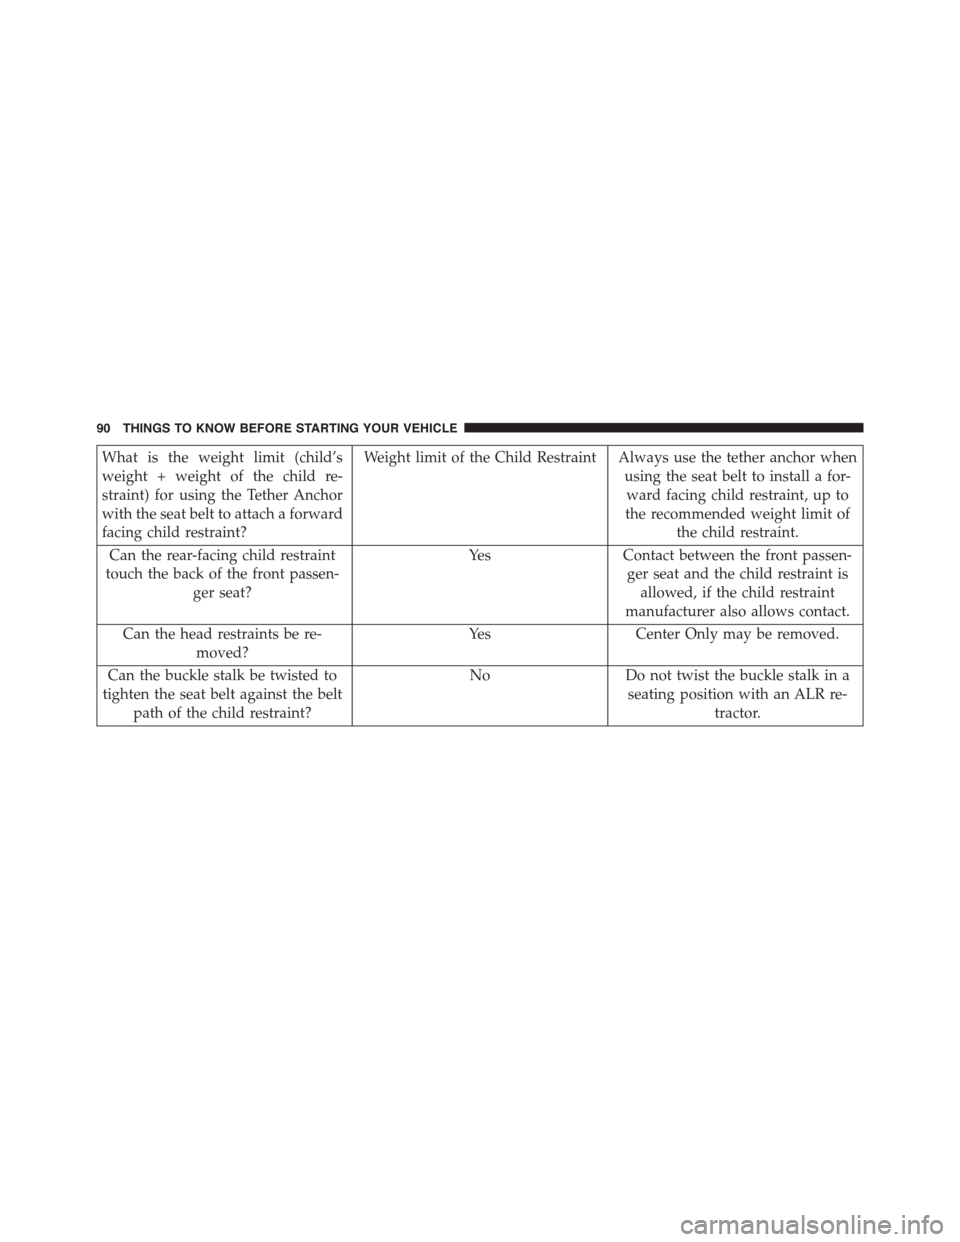
What is the weight limit (child’s
weight + weight of the child re-
straint) for using the Tether Anchor
with the seat belt to attach a forward
facing child restraint?
Weight limit of the Child Restraint Always use the tether anchor when
using the seat belt to install a for-
ward facing child restraint, up to
the recommended weight limit of
the child restraint.
Can the rear-facing child restraint
touch the back of the front passen-
ger seat?
YesContact between the front passen-
ger seat and the child restraint is
allowed, if the child restraint
manufacturer also allows contact.
Can the head restraints be re-
moved?
YesCenter Only may be removed.
Can the buckle stalk be twisted to
tighten the seat belt against the belt
path of the child restraint?
NoDo not twist the buckle stalk in a
seating position with an ALR re-
tractor.
90 THINGS TO KNOW BEFORE STARTING YOUR VEHICLE
Page 93 of 595
Installing A Child Restraint With A Switchable
Automatic Locking Retractor (ALR)
1. Place the child seat in the center of the seating
position. For some second row seats, you may need to
recline the seat and/or raise the head restraint to get a
better fit. If the rear seat can be moved forward and
rearward in the vehicle, you may wish to move it to its
rear-most position to make room for the child seat.
You may also move the front seat forward to allow
more room for the child seat.
2. Pull enough of the seat belt webbing from the retractor
to pass it through the belt path of the child restraint.
Do not twist the belt webbing in the belt path.
3. Slide the latch plate into the buckle until you hear a
“click.”
4. Pull on the webbing to make the lap portion tight
against the child seat.
5. To lock the seat belt, pull down on the shoulder part of
the belt until you have pulled all the seat belt webbing
out of the retractor. Then, allow the webbing to retract
back into the retractor. As the webbing retracts, you
will hear a clicking sound. This means the seat belt is
now in the Automatic Locking mode.
6. Try to pull the webbing out of the retractor. If it is
locked, you should not be able to pull out any web-
bing. If the retractor is not locked, repeat step 5.
7. Finally, pull up on any excess webbing to tighten the
lap portion around the child restraint while you push
the child restraint rearward and downward into the
vehicle seat.
2
THINGS TO KNOW BEFORE STARTING YOUR VEHICLE 91
Page 94 of 595
8. If the child restraint has a top tether strap and the
seating position has a top tether anchorage, connect
the tether strap to the anchorage and tighten the tether
strap. See the section “Installing Child Restraints
Using the Top Tether Anchorage” for directions to
attach a tether anchor.
9. Test that the child restraint is installed tightly by
pulling back and forth on the child seat at the belt
path. It should not move more than 1 inch (25.4 mm)
in any direction.
Any seat belt system will loosen with time, so check the
seat belt occasionally, and pull it tight if necessary.
Installing Child Restraints Using The Top Tether
Anchorage
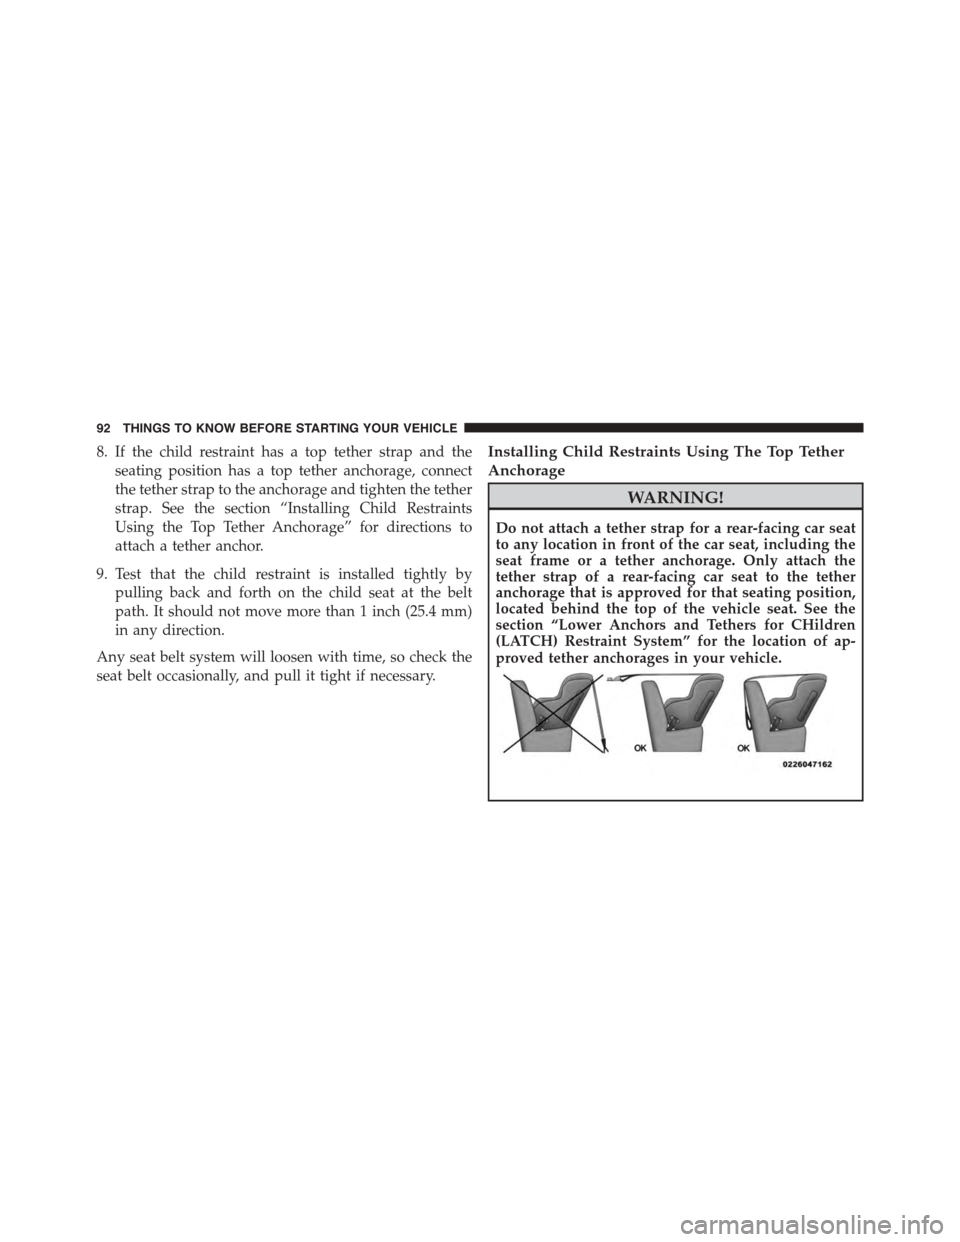
WARNING!
Do not attach a tether strap for a rear-facing car seat
to any location in front of the car seat, including the
seat frame or a tether anchorage. Only attach the
tether strap of a rear-facing car seat to the tether
anchorage that is approved for that seating position,
located behind the top of the vehicle seat. See the
section “Lower Anchors and Tethers for CHildren
(LATCH) Restraint System” for the location of ap-
proved tether anchorages in your vehicle.
92 THINGS TO KNOW BEFORE STARTING YOUR VEHICLE
Page 95 of 595
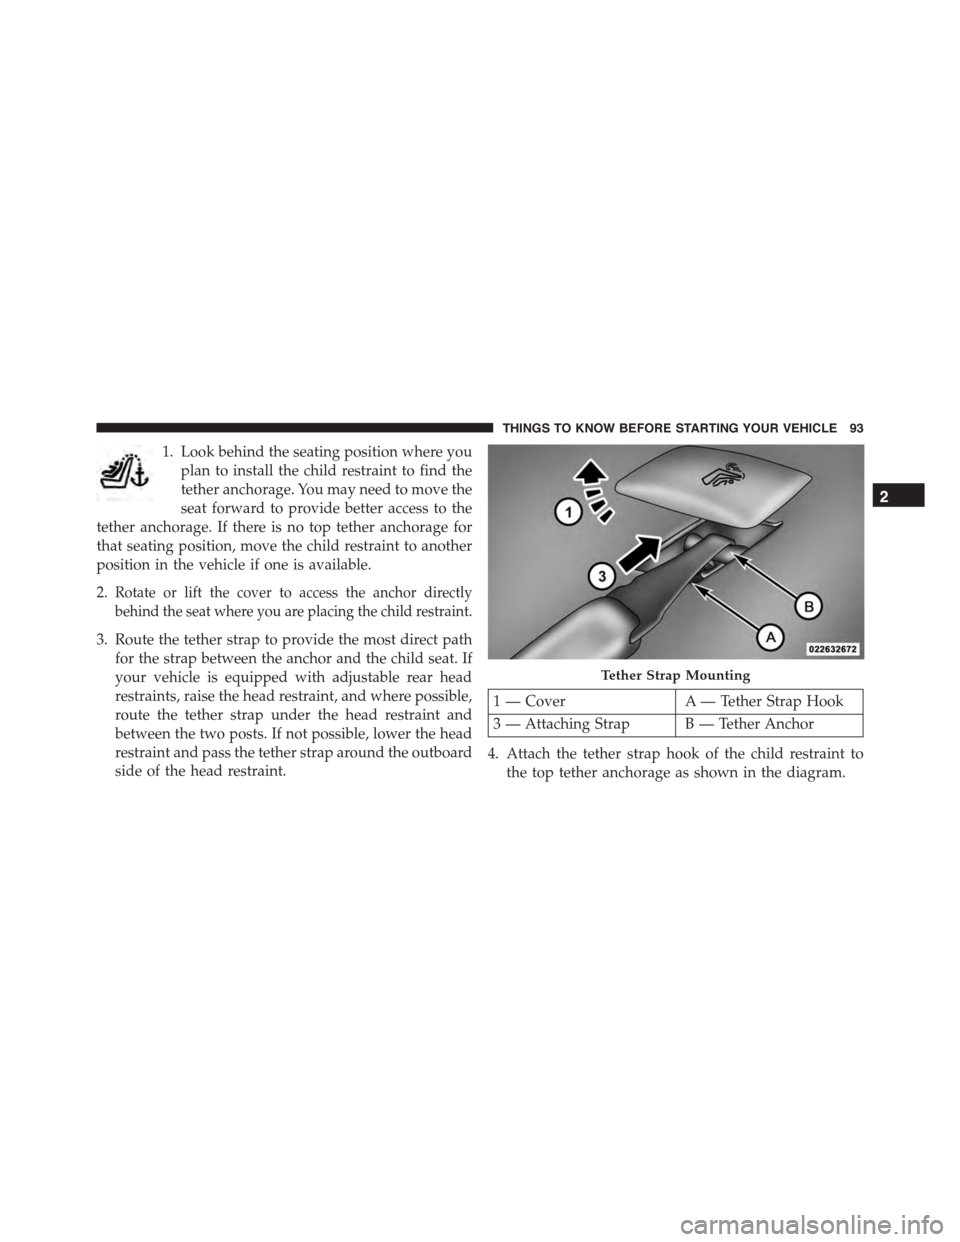
1. Look behind the seating position where you
plan to install the child restraint to find the
tether anchorage. You may need to move the
seat forward to provide better access to the
tether anchorage. If there is no top tether anchorage for
that seating position, move the child restraint to another
position in the vehicle if one is available.
2.Rotate or lift the cover to access the anchor directly
behind the seat where you are placing the child restraint.
3. Route the tether strap to provide the most direct path
for the strap between the anchor and the child seat. If
your vehicle is equipped with adjustable rear head
restraints, raise the head restraint, and where possible,
route the tether strap under the head restraint and
between the two posts. If not possible, lower the head
restraint and pass the tether strap around the outboard
side of the head restraint.
1 — CoverA — Tether Strap Hook
3 — Attaching Strap B — Tether Anchor
4. Attach the tether strap hook of the child restraint to
the top tether anchorage as shown in the diagram.
Tether Strap Mounting
2
THINGS TO KNOW BEFORE STARTING YOUR VEHICLE 93
Page 96 of 595
5. Remove slack in the tether strap according to the child
restraint manufacturer ’s instructions.
WARNING!
•An incorrectly anchored tether strap could lead to
increased head motion and possible injury to the
child. Use only the anchorage position directly
behind the child seat to secure a child restraint top
tether strap.
•If your vehicle is equipped with a split rear seat,
make sure the tether strap does not slip into the
opening between the seatbacks as you remove
slack in the strap.
Transporting Pets
Air Bags deploying in the front seat could harm your pet.
An unrestrained pet will be thrown about and possibly
injured, or injure a passenger during panic braking or in
a collision.
Pets should be restrained in the rear seat in pet harnesses
or pet carriers that are secured by seat belts.
SRT ENGINE BREAK-IN RECOMMENDATIONS
SRT Engine Break-In Recommendations: The following
tips will be helpful in obtaining optimum performance
and maximum durability for your new SRT Vehicle.
Despite modern technology and World Class manufac-
turing methods, the moving parts of the vehicle must still
wear in with each other. This wearing in occurs mainly
during the first 500 miles (805 km) and continues through
the first oil change interval.
94 THINGS TO KNOW BEFORE STARTING YOUR VEHICLE
Page 98 of 595
For the first 1500 mi (2414 km):
•Do not participate in track events, sport driving
schools, or similar activities during the first 1500 mi
(2414 km).
NOTE:Check engine oil with every refueling and add if
necessary. Oil and fuel consumption may be higher
through the first oil change interval.
SAFETY TIPS
Transporting Passengers
NEVER TRANSPORT PASSENGERS IN THE CARGO
AREA.
WARNING!
•Do not leave children or animals inside parked
vehicles in hot weather. Interior heat build-up may
cause serious injury or death.
•It is extremely dangerous to ride in a cargo area,
inside or outside of a vehicle. In a collision, people
riding in these areas are more likely to be seriously
injured or killed.
•Do not allow people to ride in any area of your
vehicle that is not equipped with seats and seat
belts.
•Be sure everyone in your vehicle is in a seat and
using a seat belt properly.
96 THINGS TO KNOW BEFORE STARTING YOUR VEHICLE
Page 141 of 595
WARNING!
•Be certain that the seatback is securely locked into
position. If the seatback is not securely locked into
position, the seat will not provide the proper sta-
bility for child seats and/or passengers. An improp-
erly latched seat could cause serious injury.
•The cargo area in the rear of the vehicle (with the
rear seatbacks in the locked-up or folded down
position) should not be used as a play area by
children when the vehicle is in motion. They could
be seriously injured in a collision. Children should
be seated and using the proper restraint system.
DRIVER MEMORY SEAT — IF EQUIPPED
This feature allows the driver to store up to two different
memory profiles for easy recall through a memory
switch. Each memory profile contains desired position
settings for the driver seat, side mirrors, adjustable
pedals (if equipped), and power tilt and telescopic steer-
ing column (if equipped) and a set of desired radio
station presets. Your Remote Keyless Entry (RKE) trans-
mitter can also be programmed to recall the same posi-
tions when the UNLOCK button is pushed.
NOTE:If your vehicle is equipped with two RKE trans-
mitters, one RKE transmitter can be linked to memory
position 1 and the other transmitter can be linked to
memory position 2.
The memory seat switch is located on the driver ’s door
trim panel. The switch consists of three buttons: The (S)
button, which is used to activate the memory save
function and the (1) and (2) buttons which are used to
recall either of two pre-programmed memory profiles.
3
UNDERSTANDING THE FEATURES OF YOUR VEHICLE 139
Page 232 of 595
POWER SUNROOF — IF EQUIPPED
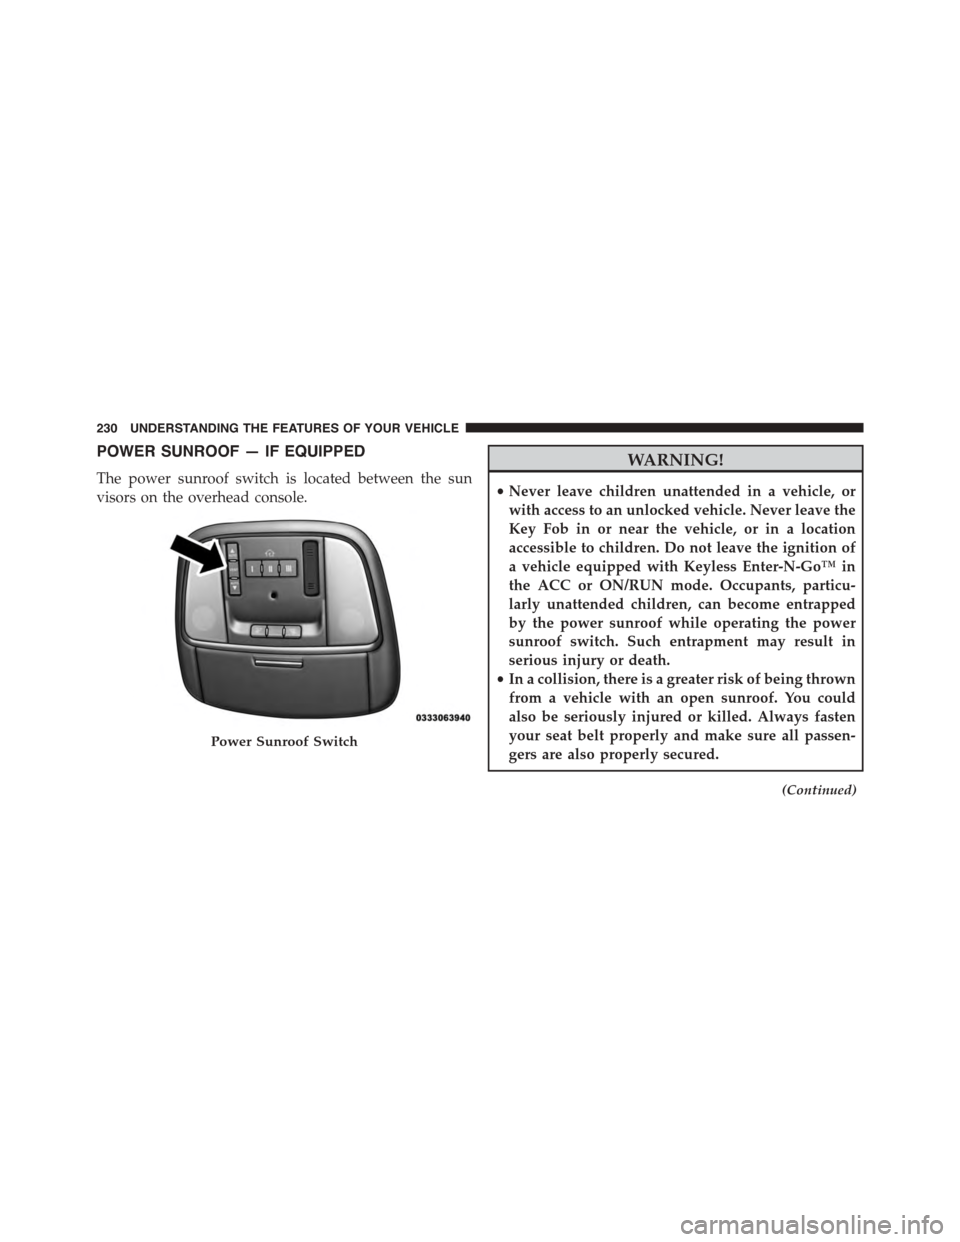
The power sunroof switch is located between the sun
visors on the overhead console.
WARNING!
•Never leave children unattended in a vehicle, or
with access to an unlocked vehicle. Never leave the
Key Fob in or near the vehicle, or in a location
accessible to children. Do not leave the ignition of
a vehicle equipped with Keyless Enter-N-Go™ in
the ACC or ON/RUN mode. Occupants, particu-
larly unattended children, can become entrapped
by the power sunroof while operating the power
sunroof switch. Such entrapment may result in
serious injury or death.
•In a collision, there is a greater risk of being thrown
from a vehicle with an open sunroof. You could
also be seriously injured or killed. Always fasten
your seat belt properly and make sure all passen-
gers are also properly secured.
(Continued)
Power Sunroof Switch
230 UNDERSTANDING THE FEATURES OF YOUR VEHICLE
Page 244 of 595
WARNING!
•Be certain that the seatback is securely locked into
position. If the seatback is not securely locked into
position, the seat will not provide the proper sta-
bility for child seats and/or passengers. An improp-
erly latched seat could cause serious injury.
•The cargo area in the rear of the vehicle (with the
rear seatbacks in the locked-up or folded down
position) should not be used as a play area by
children when the vehicle is in motion. They could
be seriously injured in a collision. Children should
be seated and using the proper restraint system.
•To help protect against personal injury, passengers
should not be seated in the rear cargo area. The rear
cargo space is intended for load carrying purposes
only, not for passengers, who should sit in seats
and use seat belts.
WARNING!
The weight and position of cargo and passengers can
change the vehicle center of gravity and vehicle
handling. To avoid loss of control resulting in per-
sonal injury, follow these guidelines for loading your
vehicle:
•Always place cargo evenly on the cargo floor. Put
heavier objects as low and as far forward as pos-
sible.
•Place as much cargo as possible in front of the rear
axle. Too much weight or improperly placed weight
over or behind the rear axle can cause the rear of
the vehicle to sway.
•Do not pile luggage or cargo higher than the top of
the seatback. This could impair visibility or be-
come a dangerous projectile in a sudden stop or
collision.
242 UNDERSTANDING THE FEATURES OF YOUR VEHICLE
Page 371 of 595
STARTING PROCEDURES
Before starting your vehicle, adjust your seat, adjust the
inside and outside mirrors, fasten your seat belt, and if
present, instruct all other occupants to buckle their seat
belts.
WARNING!
•When leaving the vehicle, always make sure the
ignition is in the OFF position, remove the Key Fob
from the vehicle, and lock the vehicle.
•Never leave children alone in a vehicle, or with
access to an unlocked vehicle. Leaving children in
a vehicle unattended is dangerous for a number of
reasons. A child or others could be seriously or
fatally injured. Children should be warned not to
touch the parking brake, brake pedal or the trans-
mission gear selector.
(Continued)
WARNING!(Continued)
•Do not leave the Key Fob in or near the vehicle (or
in a location accessible to children), and do not
leave the ignition (of a vehicle equipped with
Keyless Enter-N-Go™) in the ACC or ON/RUN
mode. A child could operate power windows, other
controls, or move the vehicle.
Automatic Transmission
The shift lever must be in the NEUTRAL or PARK
position before you can start the engine. Apply the brakes
before shifting into any driving gear.
5
STARTING AND OPERATING 369