tow DODGE CHARGER SRT 2015 7.G Owner's Guide
[x] Cancel search | Manufacturer: DODGE, Model Year: 2015, Model line: CHARGER SRT, Model: DODGE CHARGER SRT 2015 7.GPages: 595, PDF Size: 16.43 MB
Page 417 of 595
Towing With HSA
HSA will provide assistance when starting on a grade
when pulling a trailer.
WARNING!
•HSA is not a parking brake. Always apply the
parking brake fully when leaving your vehicle.
Also, be certain to leave the transmission in PARK.
•Failure to follow these warnings may cause the
vehicle to roll down the incline and could collide
with another vehicle, object or person, and cause
serious or fatal injury. Always remember to use the
parking brake while parking on a hill and that the
driver is responsible for braking the vehicle.
HSA Off
If you wish to turn off the HSA system, it can be done in
the Uconnect® settings. Refer to#Uconnect® Settings#in
#Understanding Your Instrument Panel#for further infor-
mation.
Ready Alert Braking
Ready Alert Braking may reduce the time required to
reach full braking during emergency braking situations.
It anticipates when an emergency braking situation may
occur by monitoring how fast the throttle is released by
the driver. When the throttle is released very quickly,
Ready Alert Braking applies a small amount of brake
pressure. This brake pressure will not be noticed by the
driver. The brake system uses this brake pressure to allow
a fast brake response if the driver applies the brakes.
5
STARTING AND OPERATING 415
Page 428 of 595
4. Cold tire inflation pressures for the front, rear, and
spare tires.
Loading
The vehicle maximum load on the tire must not exceed
the load carrying capacity of the tire on your vehicle. You
will not exceed the tire’s load carrying capacity if you
adhere to the loading conditions, tire size, and cold tire
inflation pressures specified on the Tire and Loading
Information placard and in the “Vehicle Loading” section
of this manual.
NOTE:Under a maximum loaded vehicle condition,
gross axle weight ratings (GAWRs) for the front and rear
axles must not be exceeded. For further information on
GAWRs, vehicle loading, and trailer towing, refer to
“Vehicle Loading” in this section.
To determine the maximum loading conditions of your
vehicle, locate the statement “The combined weight of
occupants and cargo should never exceed XXX lbs or
XXX kg” on the Tire and Loading Information placard.
The combined weight of occupants, cargo/luggage and
trailer tongue weight (if applicable) should never exceed
the weight referenced here.
Steps For Determining Correct Load Limit
1. Locate the statement “The combined weight of occu-
pants and cargo should never exceed XXX lbs or
XXX kg” on your vehicle’s placard.
2. Determine the combined weight of the driver and
passengers that will be riding in your vehicle.
3. Subtract the combined weight of the driver and pas-
sengers from XXX lbs or XXX kg.
426 STARTING AND OPERATING
Page 429 of 595
4. The resulting figure equals the available amount of
cargo and luggage load capacity. For example, if
“XXX” amount equals 1,400 lbs (635 kg) and there will
be five 150 lb (68 kg) passengers in your vehicle, the
amount of available cargo and luggage load capacity
is 650 lbs (295 kg) (since 5 x 150 lbs (68 kg) = 750 lbs
(340 kg), and 1400 lbs (635 kg) – 750 lbs (340 kg) =
650 lbs [295 kg]).
5. Determine the combined weight of luggage and cargo
being loaded on the vehicle. That weight may not
safely exceed the available cargo and luggage load
capacity calculated in step 4.
NOTE:
•If your vehicle will be towing a trailer, load from your
trailer will be transferred to your vehicle. The follow-
ing table shows examples on how to calculate total
load, cargo/luggage, and towing capacities of your
vehicle with varying seating configurations and num-
ber and size of occupants. This table is for illustration
purposes only and may not be accurate for the seating
and load carry capacity of your vehicle.
•For the following example, the combined weight of
occupants and cargo should never exceed 865 lbs
(392 kg).
5
STARTING AND OPERATING 427
Page 437 of 595
While studded tires improve performance on ice, skid
and traction capability on wet or dry surfaces may be
poorer than that of non-studded tires. Some states pro-
hibit studded tires; therefore, local laws should be
checked before using these tire types.
Run Flat Tires — If Equipped
Run Flat tires allow you the capability to drive 50 miles
(80 km) at 50 mph (80 km/h) after a rapid loss of inflation
pressure. This rapid loss of inflation is referred to as the
Run Flat mode. A Run Flat mode occurs when the tire
inflation pressure is of/or below 14 psi (96 kPa). Once a
Run Flat tire reaches the run flat mode it has limited
driving capabilities and needs to be replaced immedi-
ately. A Run Flat tire is not repairable.
It is not recommended driving a vehicle loaded at full
capacity or to tow a trailer while a tire is in the run flat mode.
See the tire pressure monitoring section for more infor-
mation.
Spare Tires — If Equipped
NOTE:For vehicles equipped with Tire Service Kit
instead of a spare tire, please refer to “Tire Service Kit” in
“What To Do In Emergencies” for further information.
CAUTION!
Because of the reduced ground clearance, do not take
your vehicle through an automatic car wash with a
compact or limited-use temporary spare installed.
Damage to the vehicle may result.
Spare Tire Matching Original Equipped Tire And
Wheel — If Equipped
Your vehicle may be equipped with a spare tire and
wheel equivalent in look and function to the original
equipment tire and wheel found on the front or rear axle
of your vehicle. This spare tire may be used in the tire
5
STARTING AND OPERATING 435
Page 462 of 595
WARNING!
Because the front wheels steer the vehicle, it is
important that you do not exceed the maximum front
or rear GAWR. A dangerous driving condition can
result if either rating is exceeded. You could lose
control of the vehicle and have a collision.
Overloading
The load carrying components (axle, springs, tires,
wheels, etc.) of your vehicle will provide satisfactory
service as long as you do not exceed the GVWR and the
front and rear GAWR.
The best way to figure out the total weight of your
vehicle is to weigh it when it is fully loaded and ready for
operation. Weigh it on a commercial scale to ensure that
it is not over the GVWR.
Figure out the weight on the front and rear of the vehicle
separately. It is important that you distribute the load
evenly over the front and rear axles.
Overloading can cause potential safety hazards and
shorten useful service life. Heavier axles or suspension
components do not necessarily increase the vehicle’s
GVWR.
Loading
To load your vehicle properly, first figure out its empty
weight, axle-by-axle and side-by-side. Store heavier items
down low and be sure you distribute their weight as
evenly as possible. Stow all loose items securely before
driving. If weighing the loaded vehicle shows that you
have exceeded either GAWR, but the total load is within
the specified GVWR, you must redistribute the weight.
Improper weight distribution can have an adverse effect
on the way your vehicle steers and handles and the way
the brakes operate.
460 STARTING AND OPERATING
Page 463 of 595
NOTE:
•Refer to the “Vehicle Certification Label” affixed to the
rear of the driver’s door for your vehicle’s GVWR and
GAWRs.
•Refer to the “Tire Placard” for your vehicle’s proper
tire pressure.
TRAILER TOWING
Trailer towing with this vehicle is not recommended.
RECREATIONAL TOWING (BEHIND
MOTORHOME, ETC.)
Recreational towing (with all four wheels on the ground,
or using a towing dolly) isNOT ALLOWED. The only
acceptable method for towing this vehicle (behind an-
other vehicle) is on a vehicle trailer with all four wheels
OFFthe ground.
CAUTION!
Towing this vehicle in violation of the above require-
ments can cause severe transmission damage. Dam-
age from improper towing is not covered under the
New Vehicle Limited Warranty.
5
STARTING AND OPERATING 461
Page 465 of 595
WHAT TO DO IN EMERGENCIES
CONTENTS
!HAZARD WARNING FLASHERS...........464
!IF YOUR ENGINE OVERHEATS............464
!WHEEL AND TIRE TORQUE
SPECIFICATIONS......................465
▫Torque Specifications...................465
!TIRE SERVICE KIT — IF EQUIPPED.........467
▫Tire Service Kit Storage.................467
▫Tire Service Kit Components And Operation . .468
▫Tire Service Kit Usage Precautions..........469
▫Sealing A Tire With Tire Service Kit.........472
!JUMP-STARTING PROCEDURES...........478
▫Preparations For Jump-Start..............478
▫Jump-Starting Procedure................480
!FREEING A STUCK VEHICLE.............482
!MANUAL PARK RELEASE — 8 SPEED
TRANSMISSION.......................484
!TOWING A DISABLED VEHICLE...........486
6
Page 473 of 595
WARNING!(Continued)
– If you are unsure of the condition of the tire or
the wheel.
•Keep Tire Service Kit away from open flames or
heat source.
•A loose Tire Service Kit thrown forward in a
collision or hard stop could endanger the occupants
of the vehicle. Always stow the Tire Service Kit in
the place provided. Failure to follow these warn-
ings can result in injuries that are serious or fatal to
you, your passengers, and others around you.
(Continued)
WARNING!(Continued)
•Take care not to allow the contents of Tire Service
Kit to come in contact with hair, eyes, or clothing.
Tire Service Kit is harmful if inhaled, swallowed,
or absorbed through the skin. It causes skin, eye,
and respiratory irritation. Flush immediately with
plenty of water if there is any contact with eyes or
skin. Change clothing as soon as possible, if there
is any contact with clothing.
•Tire Service Kit Sealant solution contains latex. In
case of an allergic reaction or rash, consult a phy-
sician immediately. Keep Tire Service Kit out of
reach of children. If swallowed, rinse mouth imme-
diately with plenty of water and drink plenty of
water. Do not induce vomiting! Consult a physician
immediately.
6
WHAT TO DO IN EMERGENCIES 471
Page 486 of 595
MANUAL PARK RELEASE — 8 SPEED
TRANSMISSION
WARNING!
Always secure your vehicle by fully applying the
parking brake, before activating the Manual Park
Release. Activating the Manual Park Release will
allow your vehicle to roll away if it is not secured by
the parking brake or by proper connection to a tow
vehicle. Activating the Manual Park Release on an
unsecured vehicle could lead to serious injury or
death for those in or around the vehicle.
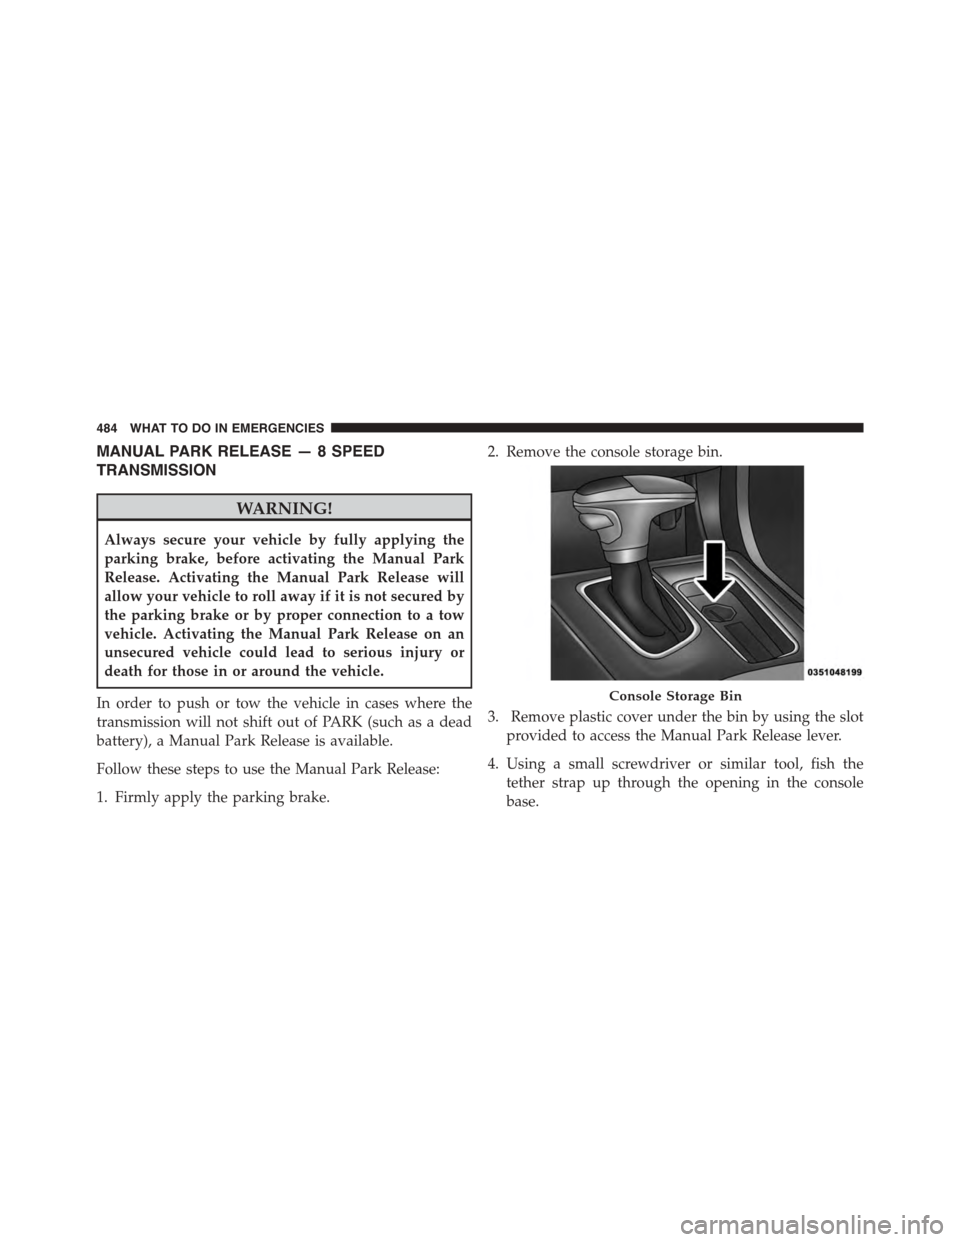
In order to push or tow the vehicle in cases where the
transmission will not shift out of PARK (such as a dead
battery), a Manual Park Release is available.
Follow these steps to use the Manual Park Release:
1. Firmly apply the parking brake.
2. Remove the console storage bin.
3. Remove plastic cover under the bin by using the slot
provided to access the Manual Park Release lever.
4. Using a small screwdriver or similar tool, fish the
tether strap up through the opening in the console
base.
Console Storage Bin
484 WHAT TO DO IN EMERGENCIES
Page 487 of 595
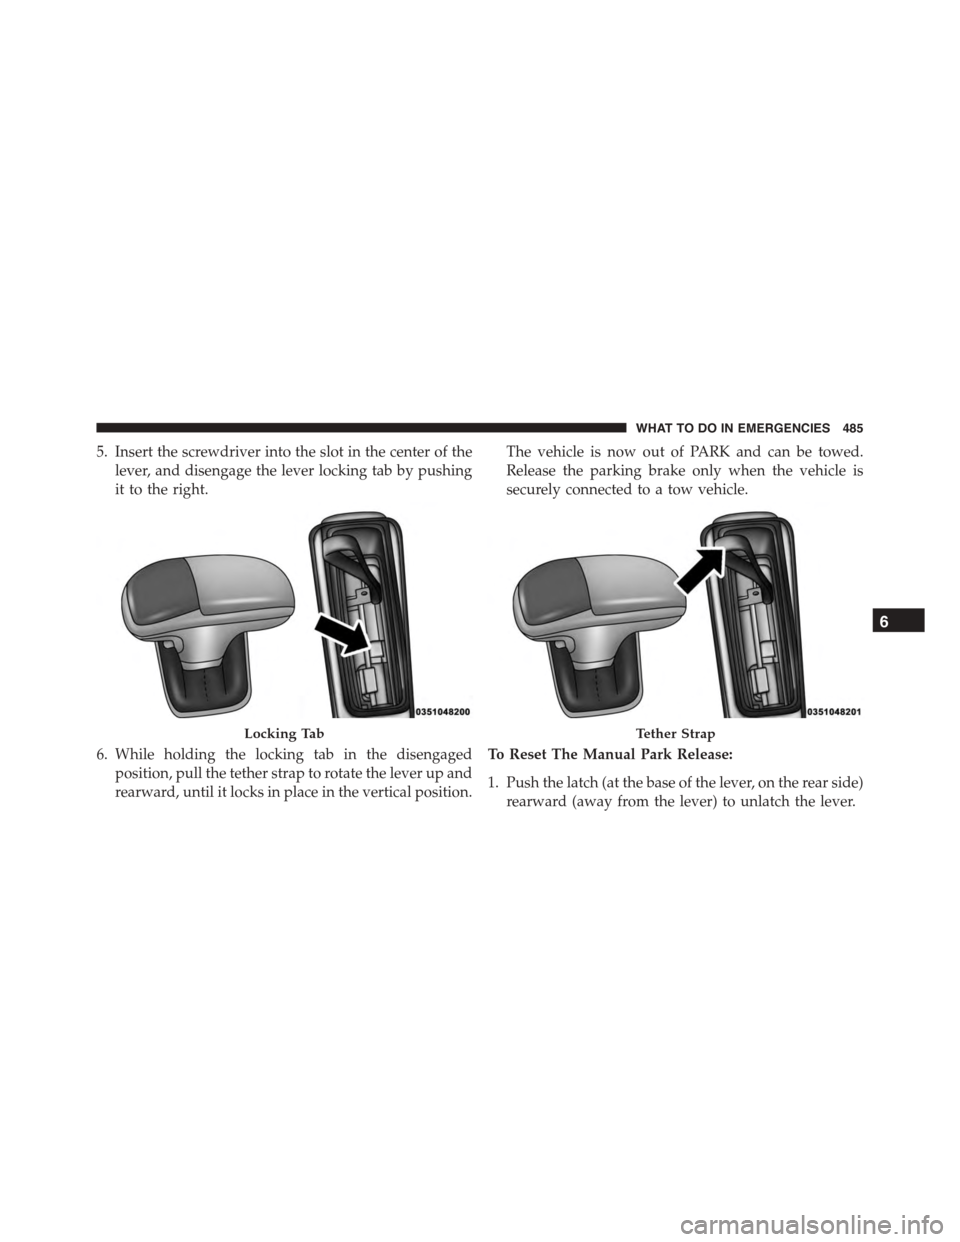
5. Insert the screwdriver into the slot in the center of the
lever, and disengage the lever locking tab by pushing
it to the right.
6. While holding the locking tab in the disengaged
position, pull the tether strap to rotate the lever up and
rearward, until it locks in place in the vertical position.
The vehicle is now out of PARK and can be towed.
Release the parking brake only when the vehicle is
securely connected to a tow vehicle.
To Reset The Manual Park Release:
1. Push the latch (at the base of the lever, on the rear side)
rearward (away from the lever) to unlatch the lever.
Locking TabTether Strap
6
WHAT TO DO IN EMERGENCIES 485