wipers DODGE CHARGER SRT 2015 7.G Owners Manual
[x] Cancel search | Manufacturer: DODGE, Model Year: 2015, Model line: CHARGER SRT, Model: DODGE CHARGER SRT 2015 7.GPages: 595, PDF Size: 16.43 MB
Page 104 of 595
!SEATS . . . . . . . . . . . . . . . . . . . . . . . . . . . . ..128
▫Power Seats — If Equipped..............128
▫Power Lumbar — If Equipped............130
▫Heated Seats — If Equipped.............131
▫Front Ventilated Seats — If Equipped.......134
▫Head Restraints......................134
▫Folding Rear Seat.....................138
!DRIVER MEMORY SEAT — IF EQUIPPED . . . .139
▫Programming The Memory Feature.........140
▫Linking And Unlinking The Remote Keyless
Entry Transmitter To Memory.............141
▫Memory Position Recall.................142
▫Easy Entry/Exit Seat...................142
!TO OPEN AND CLOSE THE HOOD.........144
!LIGHTS.............................145
▫Headlight Switch.....................145
▫Automatic Headlights — If Equipped.......146
▫Headlights On With Wipers (Available With
Automatic Headlights Only).............146
▫Automatic High Beam Headlamp Control —
If Equipped.........................147
▫Headlight Time Delay..................148
▫Daytime Running Lights (DRL) —
If Equipped.........................149
▫Lights-On Reminder...................149
▫Fog Lights — If Equipped...............149
▫Multifunction Lever...................150
102 UNDERSTANDING THE FEATURES OF YOUR VEHICLE
Page 105 of 595
▫Turn Signals.........................150
▫Lane Change Assist...................151
▫High/Low Beam Switch................151
▫Flash-To-Pass........................151
▫Front Map/Reading Lights — If Equipped . . .152
▫Courtesy Lights.......................153
▫Ambient Light — If Equipped............153
▫Interior Lights.......................154
!WINDSHIELD WIPERS AND WASHERS......155
▫Intermittent Wiper System...............156
▫Wiper Operation......................156
▫Windshield Washers...................157
▫Heated Windshield Washer Nozzles........158
▫Mist Feature.........................158
▫Headlights On With Wipers (Available With
Automatic Headlights Only).............158
▫Rain Sensing Wipers — If Equipped........159
!POWER TILT/TELESCOPING STEERING
COLUMN — IF EQUIPPED...............160
!HEATED STEERING WHEEL —
IF EQUIPPED.........................162
!ADJUSTABLE PEDALS — IF EQUIPPED......163
!ELECTRONIC SPEED CONTROL —
IF EQUIPPED.........................165
▫To Activate..........................166
▫To Set A Desired Speed.................166
▫To Deactivate........................167
3
UNDERSTANDING THE FEATURES OF YOUR VEHICLE 103
Page 148 of 595
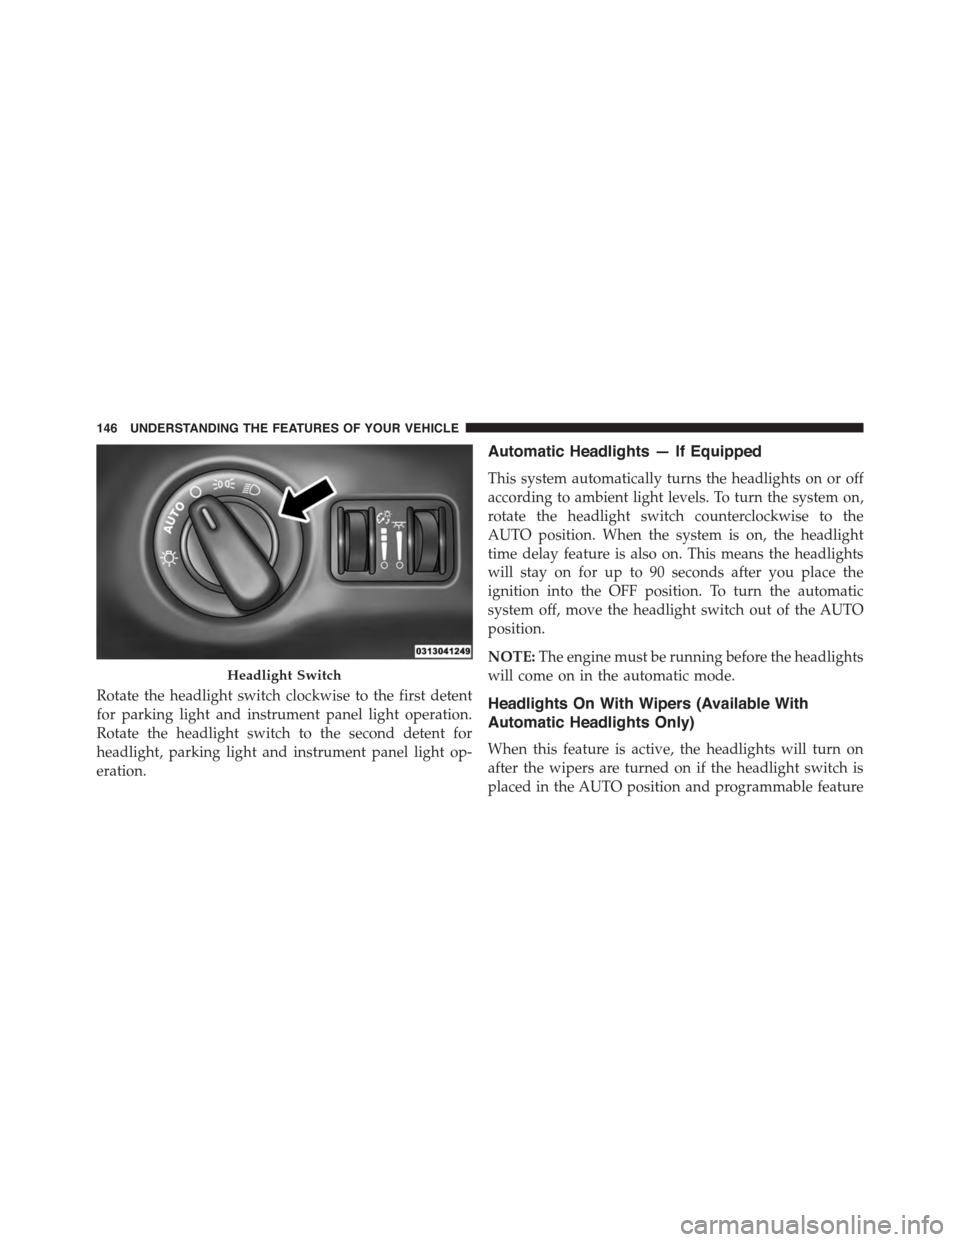
Rotate the headlight switch clockwise to the first detent
for parking light and instrument panel light operation.
Rotate the headlight switch to the second detent for
headlight, parking light and instrument panel light op-
eration.
Automatic Headlights — If Equipped
This system automatically turns the headlights on or off
according to ambient light levels. To turn the system on,
rotate the headlight switch counterclockwise to the
AUTO position. When the system is on, the headlight
time delay feature is also on. This means the headlights
will stay on for up to 90 seconds after you place the
ignition into the OFF position. To turn the automatic
system off, move the headlight switch out of the AUTO
position.
NOTE:The engine must be running before the headlights
will come on in the automatic mode.
Headlights On With Wipers (Available With
Automatic Headlights Only)
When this feature is active, the headlights will turn on
after the wipers are turned on if the headlight switch is
placed in the AUTO position and programmable feature
Headlight Switch
146 UNDERSTANDING THE FEATURES OF YOUR VEHICLE
Page 149 of 595
is set to ON. In addition, the headlights will turn off
when the wipers are turned off if they were turned on by
this feature.
NOTE:The Headlights On with Wipers feature can be
turned on or off using the Uconnect® System. Refer to
“Uconnect® Settings/Customer Programmable Fea-
tures” in “Understanding Your Instrument Panel” for
further information.
Automatic High Beam Headlamp Control — If
Equipped
The Automatic High Beam Headlamp Control system
provides increased forward lighting at night by automat-
ing high beam control through the use of a digital camera
mounted on the windshield. This camera detects vehicle
specific light and automatically switches from high
beams to low beams until the approaching vehicle is out
of view.
NOTE:
•The Automatic High Beam Headlamp Control can be
turned on or off using the Uconnect® System. Refer to
“Uconnect® Settings” in “Understanding Your Instru-
ment Panel” for further information.
•Broken, muddy, or obstructed headlights and taillights
of vehicles in the field of view will cause headlights to
remain on longer (closer to the vehicle). Also, dirt, film,
and other obstructions on the windshield or camera
lens will cause the system to function improperly.
If the windshield or Automatic High Beam Headlamp
Control mirror is replaced, the mirror must be re-aimed
to ensure proper performance. See your local authorized
dealer.
To Activate
1. Turn the headlight switch to the AUTO headlight
position.
3
UNDERSTANDING THE FEATURES OF YOUR VEHICLE 147
Page 157 of 595
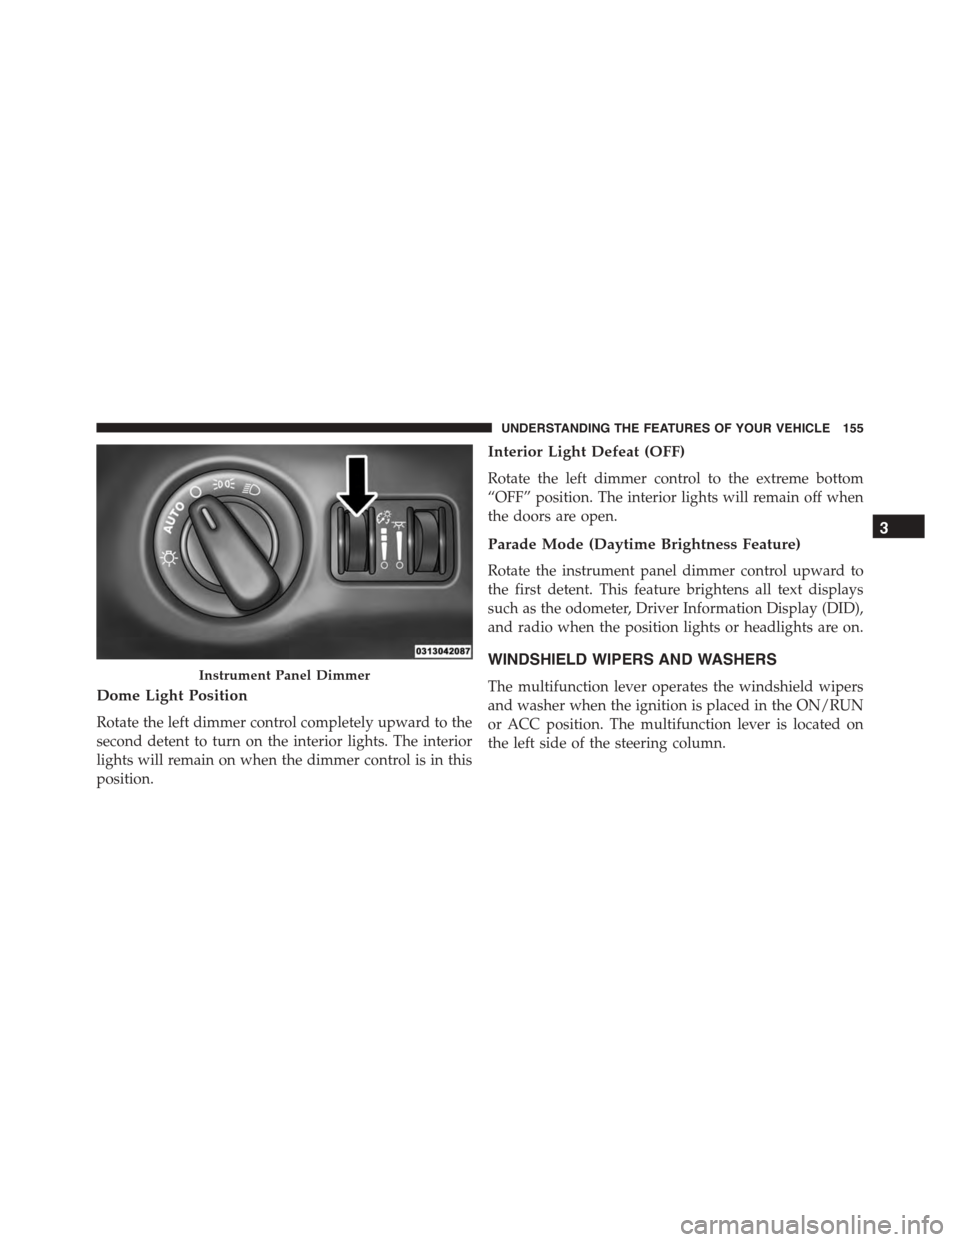
Dome Light Position
Rotate the left dimmer control completely upward to the
second detent to turn on the interior lights. The interior
lights will remain on when the dimmer control is in this
position.
Interior Light Defeat (OFF)
Rotate the left dimmer control to the extreme bottom
“OFF” position. The interior lights will remain off when
the doors are open.
Parade Mode (Daytime Brightness Feature)
Rotate the instrument panel dimmer control upward to
the first detent. This feature brightens all text displays
such as the odometer, Driver Information Display (DID),
and radio when the position lights or headlights are on.
WINDSHIELD WIPERS AND WASHERS
The multifunction lever operates the windshield wipers
and washer when the ignition is placed in the ON/RUN
or ACC position. The multifunction lever is located on
the left side of the steering column.
Instrument Panel Dimmer
3
UNDERSTANDING THE FEATURES OF YOUR VEHICLE 155
Page 158 of 595
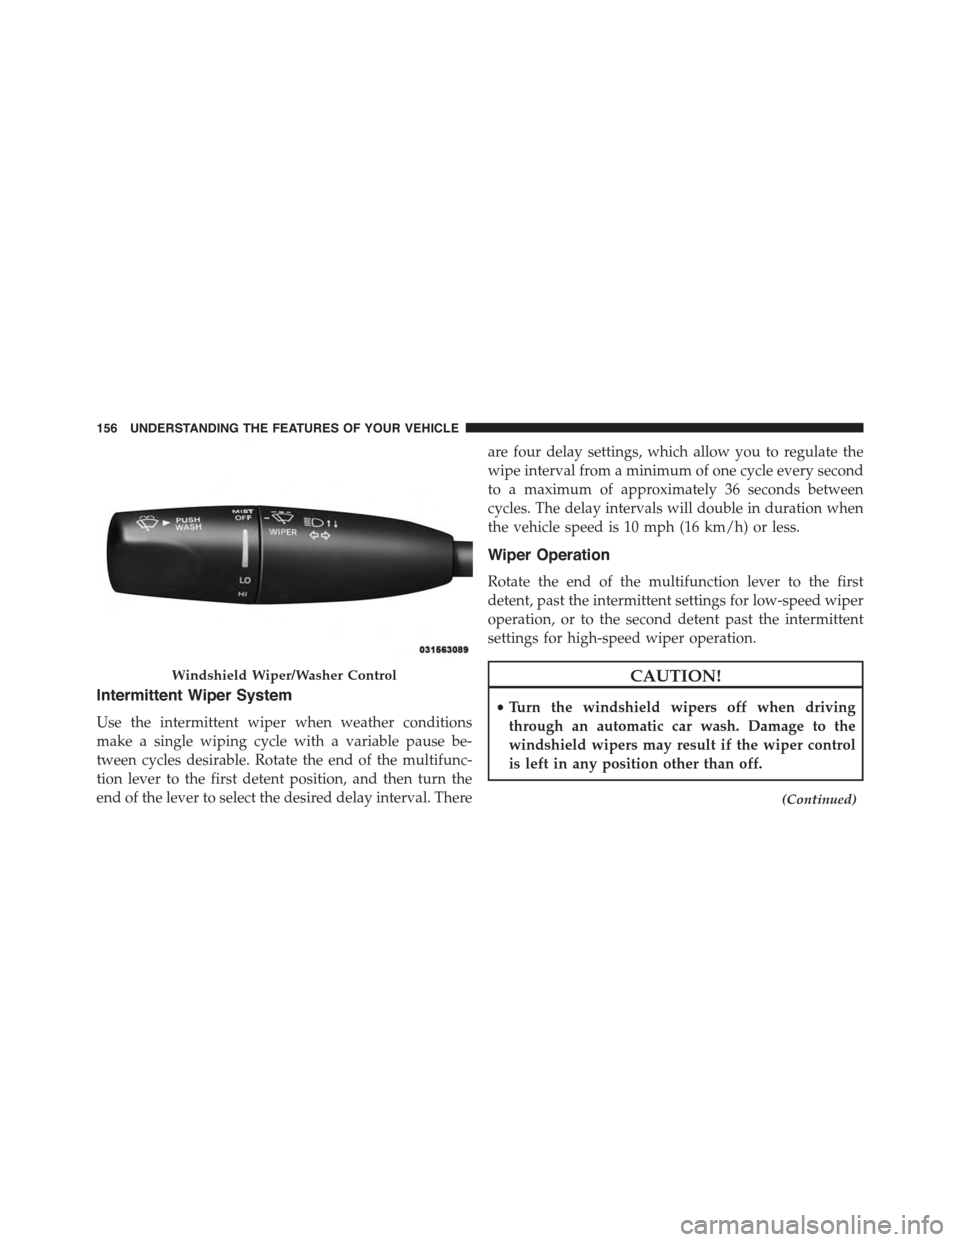
Intermittent Wiper System
Use the intermittent wiper when weather conditions
make a single wiping cycle with a variable pause be-
tween cycles desirable. Rotate the end of the multifunc-
tion lever to the first detent position, and then turn the
end of the lever to select the desired delay interval. There
are four delay settings, which allow you to regulate the
wipe interval from a minimum of one cycle every second
to a maximum of approximately 36 seconds between
cycles. The delay intervals will double in duration when
the vehicle speed is 10 mph (16 km/h) or less.
Wiper Operation
Rotate the end of the multifunction lever to the first
detent, past the intermittent settings for low-speed wiper
operation, or to the second detent past the intermittent
settings for high-speed wiper operation.
CAUTION!
•Turn the windshield wipers off when driving
through an automatic car wash. Damage to the
windshield wipers may result if the wiper control
is left in any position other than off.
(Continued)
Windshield Wiper/Washer Control
156 UNDERSTANDING THE FEATURES OF YOUR VEHICLE
Page 159 of 595
CAUTION!(Continued)
•In cold weather, always turn off the wiper switch
and allow the wipers to return to the “Park” posi-
tion before turning off the engine. If the wiper
switch is left on and the wipers freeze to the
windshield, damage to the wiper motor may occur
when the vehicle is restarted.
•Always remove any buildup of snow that prevents
the windshield wiper blades from returning to the
off position. If the windshield wiper control is
turned off and the blades cannot return to the off
position, damage to the wiper motor may occur.
Windshield Washers
To use the washer, push the multifunction lever inward
(toward the steering column) and hold it for as long as
washer spray is desired.
If you activate the washer while the windshield wiper
control is in the delay range, the wipers will operate for
two wipe cycles after releasing the lever and then resume
the intermittent interval previously selected.
If you activate the washer while the windshield wiper is
turned off, the wipers will operate for three wipe cycles
and then turn off.
WARNING!
Sudden loss of visibility through the windshield
could lead to a collision. You might not see other
vehicles or other obstacles. To avoid sudden icing of
the windshield during freezing weather, warm the
windshield with the defroster before and during
windshield washer use.
3
UNDERSTANDING THE FEATURES OF YOUR VEHICLE 157
Page 160 of 595
Heated Windshield Washer Nozzles
This feature utilizes a heating element to thaw out any ice
buildup that could occur at the outlets or within the
windshield washer nozzles. To activate, push the rear
window defroster button. When the rear window de-
froster times out, the heating element will also shut off. If
required, to reactivate the heated nozzles push the rear
window defroster button as needed.
NOTE:The heated washer nozzles only apply heat to the
nozzle outlets to prevent them from freezing and allow
the nozzles to dispense windshield washer fluid. Always
remove any buildup of snow or ice in front of the washer
nozzles as this will prevent the windshield washer fluid
from reaching the windshield.
Mist Feature
Rotate the end of the lever downward to the Mist
position to activate a single wipe cycle to clear off road
mist or spray from a passing vehicle. The wipers will
continue to operate until you release the multifunction
lever.
NOTE:The mist feature does not activate the washer
pump; therefore, no washer fluid will be sprayed on the
windshield. The wash function must be used in order to
spray the windshield with washer fluid.
Headlights On With Wipers (Available With
Automatic Headlights Only)
When this feature is active, the headlights will turn on
after the wipers are turned on if the headlight switch is
placed in the AUTO position and programmable feature
is set to ON. In addition, the headlights will turn off
when the wipers are turned off if they were turned on by
this feature.
158 UNDERSTANDING THE FEATURES OF YOUR VEHICLE
Page 161 of 595
NOTE:The Headlights On with Wipers feature can be
turned on or off using the Uconnect® System. Refer to
“Uconnect® Settings/Customer Programmable Fea-
tures” in “Understanding Your Instrument Panel” for
further information.
Rain Sensing Wipers — If Equipped
This feature senses moisture on the windshield and
automatically activates the wipers for the driver. The
feature is especially useful for road splash or overspray
from the windshield washers of the vehicle ahead. Rotate
the end of the multifunction lever to one of four settings
to activate this feature.
The sensitivity of the system can be adjusted with the
multifunction lever. Wiper delay position 1 is the least
sensitive, and wiper delay position 4 is the most sensi-
tive. Setting 3 should be used for normal rain conditions.
Settings 1 and 2 can be used if the driver desires less
wiper sensitivity. Setting 4 can be used if the driver
desires more sensitivity. Place the wiper switch in the
OFF position when not using the system.
NOTE:
•The Rain Sensing feature will not operate when the
wiper switch is in the low or high-speed position.
•The Rain Sensing feature may not function properly
when ice, or dried salt water is present on the wind-
shield.
•Use of Rain-X® or products containing wax or silicone
may reduce Rain Sensing performance.
3
UNDERSTANDING THE FEATURES OF YOUR VEHICLE 159
Page 294 of 595
next to setting, indicating that the setting had been
selected. Press the back arrow button on the touchscreen
to return to the previous menu.
•ParkView® Backup Camera Delay
When the vehicle is shifted out of REVERSE (with camera
delay turned OFF), the rear camera mode is exited and
the navigation or audio screen appears again. When the
vehicle is shifted out of REVERSE (with camera delay
turned ON), the rear view image with dynamic grid lines
will be displayed for up to 10 seconds after shifting out of
“REVERSE” unless the forward vehicle speed exceeds
8 mph (12 km/h), the transmission is shifted into
“PARK” or the ignition is switched to the OFF position.
To set the ParkView® Backup Camera Delay press the
“Controls” button on the touchscreen, the “settings”
button on the touchscreen, then the “Safety & Driving
Assistance” button on the touchscreen. Press the
“Parkview Backup Camera Delay” button on the touch-
screen to turn the ParkView® Delay ON or OFF.
•Rain Sensing Auto Wipers
When this feature is selected, the system will automati-
cally activate the windshield wipers if it senses moisture
on the windshield. To make your selection, press the
“Rain Sensing Auto Wipers” button on the touchscreen,
until a check-mark appears next to setting, indicating that
the setting had been selected. Press the back arrow button
on the touchscreen to return to the previous menu.
•Hill Start Assist — If Equipped
When this feature is selected, the Hill Start Assist (HSA)
system is active. Refer to “Electronic Brake Control
System” in “Starting And Operating” for system function
and operating information. To make your selection, press
the “Hill Start Assist” button on the touchscreen, until a
check-mark appears next to setting, indicating that the
setting had been selected. Press the back arrow button on
the touchscreen to return to the previous menu.
292 UNDERSTANDING YOUR INSTRUMENT PANEL