USB DODGE CHARGER SRT 2015 7.G Uconnect 8.4A
[x] Cancel search | Manufacturer: DODGE, Model Year: 2015, Model line: CHARGER SRT, Model: DODGE CHARGER SRT 2015 7.GPages: 429, PDF Size: 4.01 MB
Page 170 of 429
The internal wireless radio operates within guidelines
found in radio frequency safety standards and recom-
mendations, which reflect the consensus of the scientific
community. The radio manufacturer believes the internal
wireless radio is safe for use by consumers. The level of
energy emitted is far less than the electromagnetic energy
emitted by wireless devices such as mobile phones.
DEVICE CONNECTION AND AUDIO TIPS WITH
Uconnect®
•More than one phone or device can be paired to your
vehicle. The connected device with the highest priority
will be used. To transition between devices, Select
Phone > Settings, then press the desired device.
•Multiple devices may be connected at one time. For
example, a phone can be paired and connected for
hands-free calling and texting, while a USB media
source is connected for audio. However, only one
Bluetooth® connection can be used at a time.
•Phone calls will always have the highest priority
regardless of which connection is active (only the 9-1-1
Call and Assist will have a higher priority than the
phone). For example, if an App is launched and the
user receives a call, the user will be exited out of the
App and returned to the App when the call ends.
•After all devices are connected/paired, when switch-
ing to a different audio source, audio will auto-play
from the new source.
2
ALL ABOUT Uconnect® ACCESS 169
Page 171 of 429
•Current audio (AM/FM/SXM/AUX) will continue to
play when switching to a non-media type App.
•Current audio (AM/FM/SXM/AUX) is muted during
Assist and 9-1-1 Call.
•Phone calls will mute all audio except for NAV
prompts if guidance is currently active (audio will
resume after phone call is ended).
•All secondary incoming phone calls will be treated
similar to “call waiting” (except 9-1-1 Call).
•When connecting a second device via USB, that device
will have priority and auto play accordingly. A phone
that is already paired/connected will still be available
for hands-free calling and texting.
•Incoming calls received while entering a nav destina-
tion (before pressing “Go”) will cancel the nav entry.
The user is required to start over when the phone call
has ended.
170 ALL ABOUT Uconnect® ACCESS
Page 172 of 429
Uconnect® 8.4A — If Equipped
CONTENTS
!Uconnect® 8.4A SYSTEM.................173
!RADIO MODE.........................174
▫Setting Presets........................177
▫SiriusXM Satellite Radio Mode — If Equipped . .178
▫Audio..............................185
!MEDIA MODE.........................187
▫Disc Mode — If Equipped...............187
▫USB/iPod® Mode.....................189
▫AUX Mode..........................190
▫SD Card Mode — If Equipped............191
▫Bluetooth® Mode.....................193
!Uconnect® PHONE.....................195
▫Overview...........................195
▫Operation...........................198
▫Phone Call Features...................208
▫Uconnect® Phone Features..............213
▫Advanced Phone Connectivity............217
▫Things You Should Know About Your Uconnect®
Phone.............................217
▫General Information...................224
3
Page 174 of 429
Uconnect® 8.4A SYSTEM
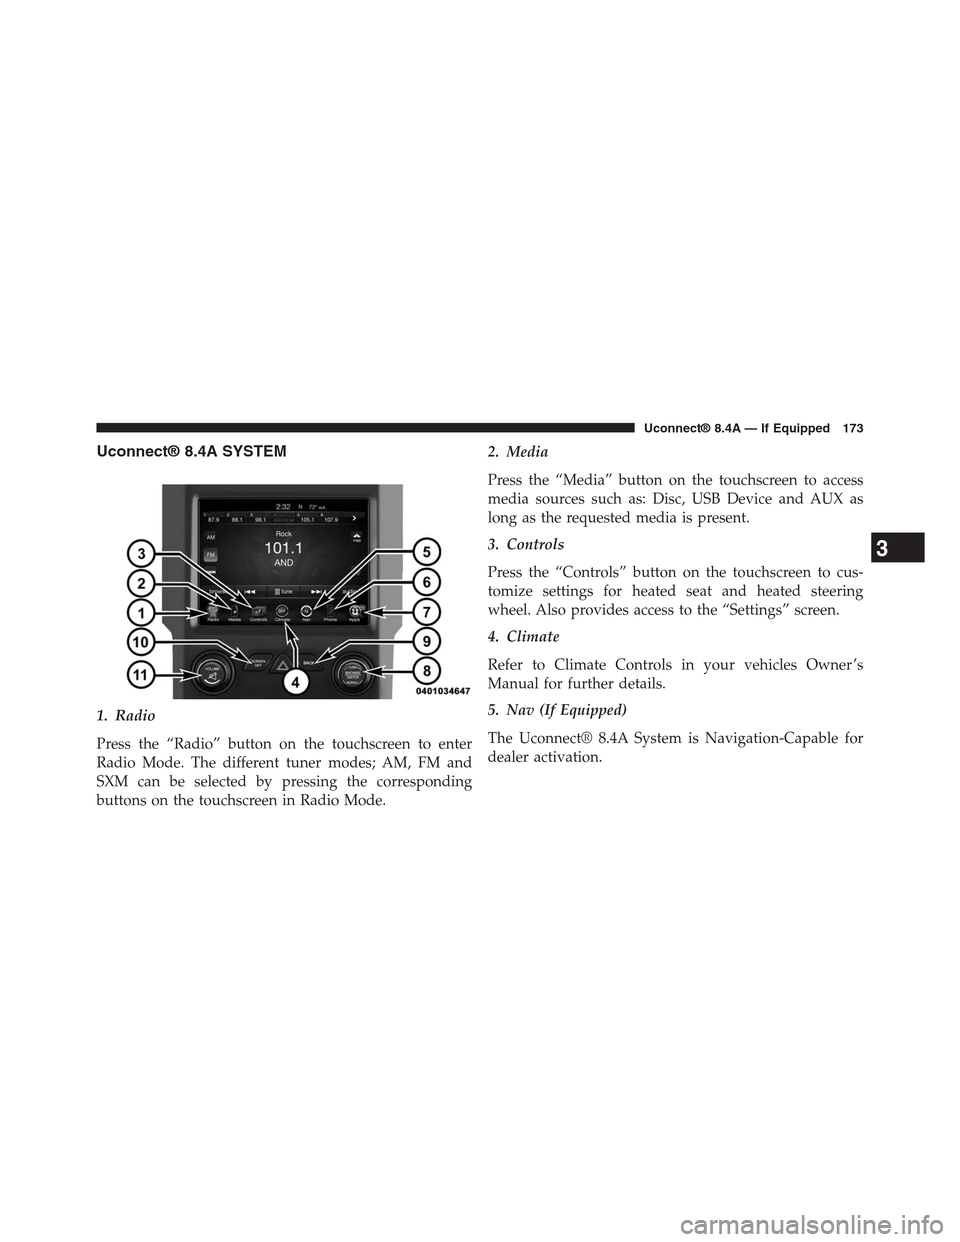
1. Radio
Press the “Radio” button on the touchscreen to enter
Radio Mode. The different tuner modes; AM, FM and
SXM can be selected by pressing the corresponding
buttons on the touchscreen in Radio Mode.
2. Media
Press the “Media” button on the touchscreen to access
media sources such as: Disc, USB Device and AUX as
long as the requested media is present.
3. Controls
Press the “Controls” button on the touchscreen to cus-
tomize settings for heated seat and heated steering
wheel. Also provides access to the “Settings” screen.
4. Climate
Refer to Climate Controls in your vehicles Owner ’s
Manual for further details.
5. Nav (If Equipped)
The Uconnect® 8.4A System is Navigation-Capable for
dealer activation.
3
Uconnect® 8.4A — If Equipped 173
Page 190 of 429
USB/iPod® Mode
Overview
USB/iPod® Mode is entered by either inserting a USB
device or iPod® and cable into the USB Port or press the
“iPod®” button on the left side of the display.
Seek Up/Seek Down
Press and release the Seek Upbutton on the touch-
screen for the next selection on the USB device/iPod®.
Press and release the Seek Downbutton on the
touchscreen to return to the beginning of the current
selection, or to return to the beginning of the previous
selection if the USB device/iPod® is within the first
three seconds of the current selection.
Browse
Press the “Browse” button on the touchscreen to display
the browse window. The left side of the browse window
displays a list of ways you can browse through the
contents of the USB device/iPod®. If supported by the
device, you can browse by Folders, Artists, Playlists,
Albums, Songs, etc. Press the desired button on the left
side of the screen. The center of the browse window
shows items and it’s sub-functions, which can be scrolled
by pressing the “Up” and “Down” buttons to the right.
The TUNE/SCROLL knob can also be used to scroll.
Media Mode
Press the “Media” button on the touchscreen to select the
desired audio source: USB.
Repeat
Press the “Repeat” button on the touchscreen to toggle
the repeat functionality. The Repeat button on the touch-
screen is highlighted when active. The Radio will con-
tinue to play the current track, repeatedly, as long as the
repeat is active.
3
Uconnect® 8.4A — If Equipped 189
Page 191 of 429
Shuffle
Press the “Shuffle” button on the touchscreen to play the
selections on the USB/iPod® device in random order to
provide an interesting change of pace. Press the “Shuffle”
button on the touchscreen a second time to turn this
feature off.
Info
Press the “Info” button on the touchscreen to display the
current track information. Press the “Info” button on the
touchscreen a second time to cancel this feature.
Tracks
Press the “trks” button on the touchscreen to display a
pop up with the Song List. The currently playing song is
indicated by an arrow and lines above and below the
song title. When in the trks List screen you can rotate the
TUNE/SCROLL knob to highlight a track (indicated by
the line above and below the track name) and then push
the ENTER/BROWSE knob to start playing that track.
Pressing the “trks” button on the touchscreen while the
pop up is displayed will close the pop up.
Audio
Refer to Radio Mode for adjusting the audio settings.
AUX Mode
Overview
AUX (Auxiliary Mode) is entered by inserting an AUX
device using a cable with a 3.5 mm audio jack into the
AUX port or by pressing the AUX button on the left side
of the display.
Inserting Auxiliary Device
Gently insert the Auxiliary device cable into the AUX
Port. If you insert an Auxiliary device with the ignition
190 Uconnect® 8.4A — If Equipped
Page 195 of 429
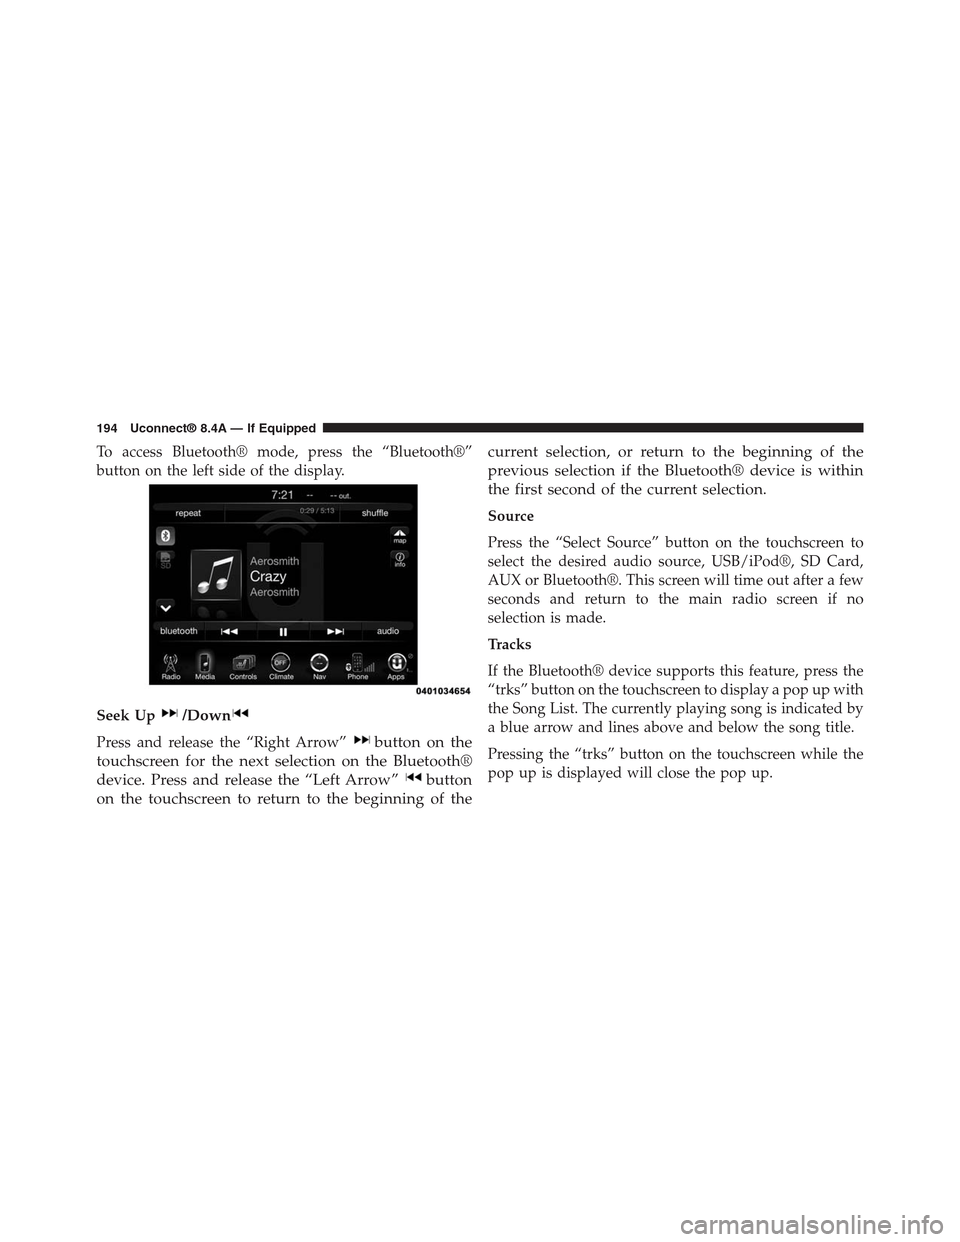
To access Bluetooth® mode, press the “Bluetooth®”
button on the left side of the display.
Seek Up/Down
Press and release the “Right Arrow”button on the
touchscreen for the next selection on the Bluetooth®
device. Press and release the “Left Arrow”button
on the touchscreen to return to the beginning of the
current selection, or return to the beginning of the
previous selection if the Bluetooth® device is within
the first second of the current selection.
Source
Press the “Select Source” button on the touchscreen to
select the desired audio source, USB/iPod®, SD Card,
AUX or Bluetooth®. This screen will time out after a few
seconds and return to the main radio screen if no
selection is made.
Tracks
If the Bluetooth® device supports this feature, press the
“trks” button on the touchscreen to display a pop up with
the Song List. The currently playing song is indicated by
a blue arrow and lines above and below the song title.
Pressing the “trks” button on the touchscreen while the
pop up is displayed will close the pop up.
194 Uconnect® 8.4A — If Equipped
Page 268 of 429
•GPS— Press this button on the touchscreen to change
the GPS display. Press the desired button on the
touchscreen.
•Decimal
•DMS
•DM
Copy device information to USB? (If Equipped)—
Press this button on the touchscreen to copy your radio
information to a USB jump drive through the available
USB port.
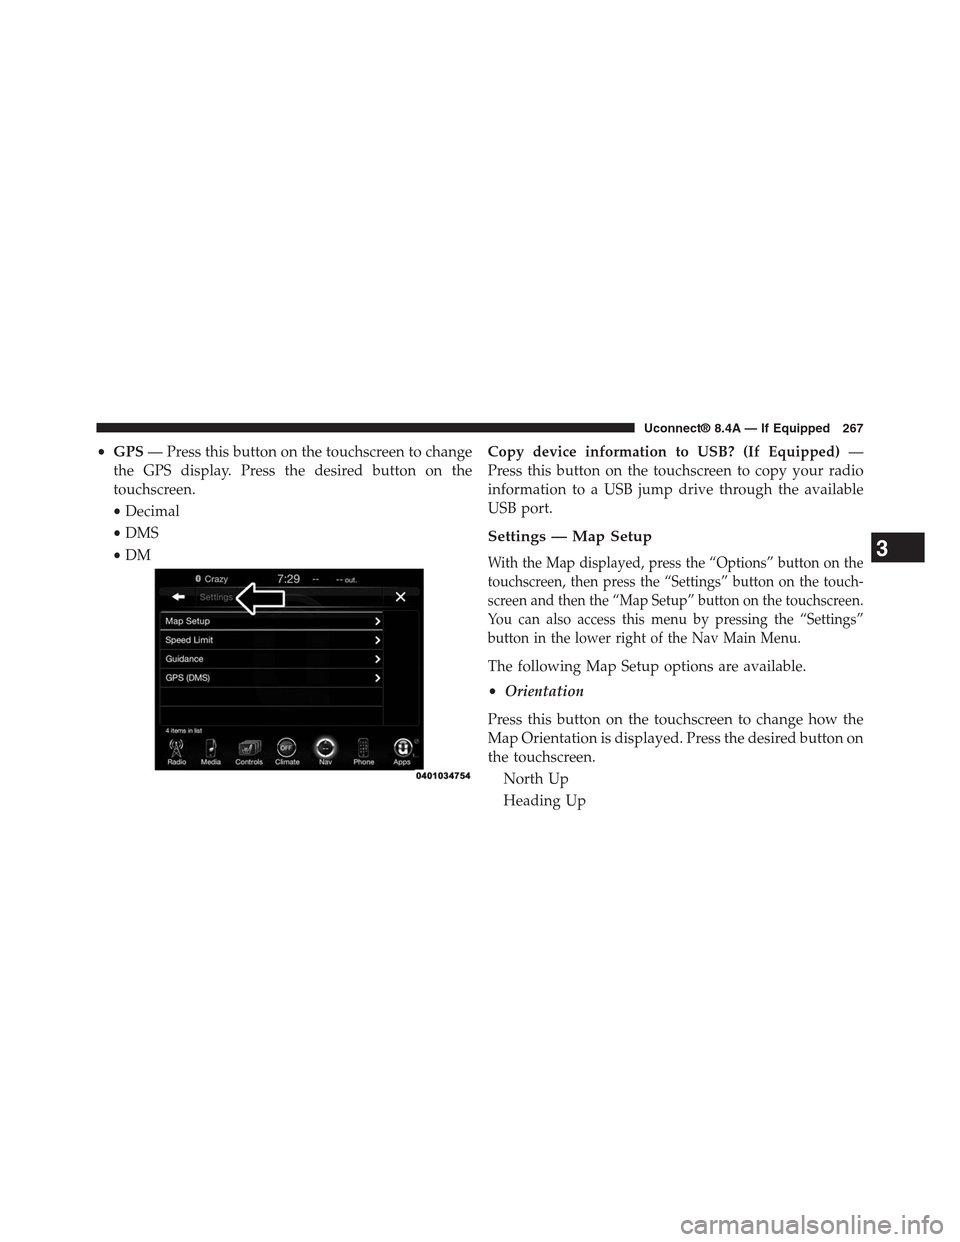
Settings — Map Setup
With the Map displayed, press the “Options” button on the
touchscreen, then press the “Settings” button on the touch-
screen and then the “Map Setup” button on the touchscreen.
You can also access this menu by pressing the “Settings”
button in the lower right of the Nav Main Menu.
The following Map Setup options are available.
•Orientation
Press this button on the touchscreen to change how the
Map Orientation is displayed. Press the desired button on
the touchscreen.
North Up
Heading Up
3
Uconnect® 8.4A — If Equipped 267
Page 290 of 429
Uconnect® 8.4AN — If Equipped
CONTENTS
!Uconnect® 8.4AN SYSTEM................291
!RADIO MODE.........................292
▫Setting Presets........................295
▫SiriusXM Satellite Radio Mode — If Equipped . .296
▫Audio..............................304
!MEDIA MODE.........................306
▫Disc Mode — If Equipped...............306
▫USB/iPod® Mode.....................308
▫AUX Mode..........................309
▫SD Card Mode — If Equipped............310
▫Bluetooth® Mode.....................312
!Uconnect® PHONE.....................314
▫Overview...........................314
▫Operation...........................317
▫Phone Call Features...................327
▫Advanced Phone Connectivity............332
▫Things You Should Know About Your Uconnect®
Phone.............................333
▫General Information...................339
!NAVIGATION.........................339
4
Page 292 of 429
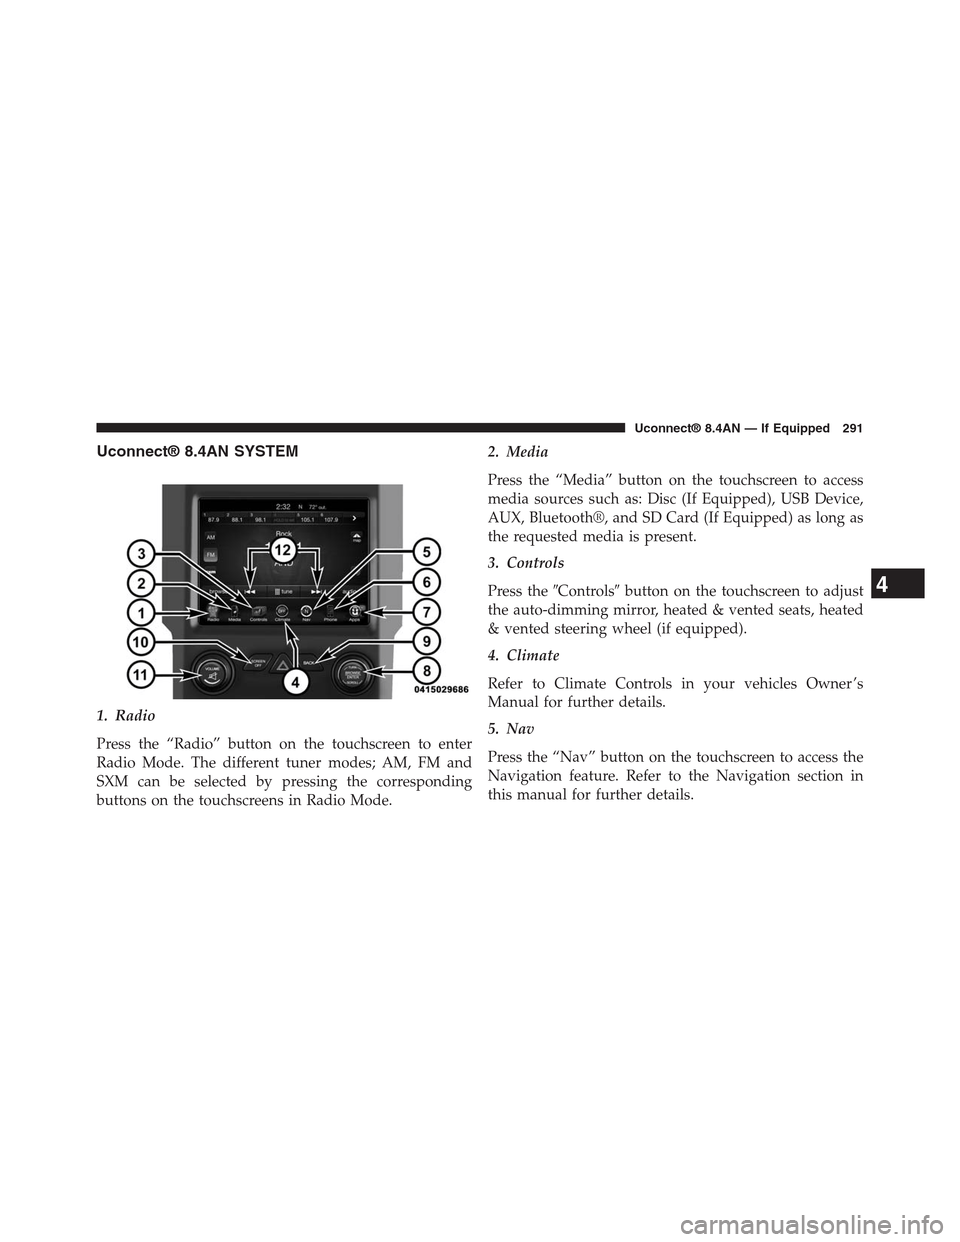
Uconnect® 8.4AN SYSTEM
1. Radio
Press the “Radio” button on the touchscreen to enter
Radio Mode. The different tuner modes; AM, FM and
SXM can be selected by pressing the corresponding
buttons on the touchscreens in Radio Mode.
2. Media
Press the “Media” button on the touchscreen to access
media sources such as: Disc (If Equipped), USB Device,
AUX, Bluetooth®, and SD Card (If Equipped) as long as
the requested media is present.
3. Controls
Press the#Controls#button on the touchscreen to adjust
the auto-dimming mirror, heated & vented seats, heated
& vented steering wheel (if equipped).
4. Climate
Refer to Climate Controls in your vehicles Owner ’s
Manual for further details.
5. Nav
Press the “Nav” button on the touchscreen to access the
Navigation feature. Refer to the Navigation section in
this manual for further details.
4
Uconnect® 8.4AN — If Equipped 291