DODGE DAKOTA 2004 3.G Owners Manual
Manufacturer: DODGE, Model Year: 2004, Model line: DAKOTA, Model: DODGE DAKOTA 2004 3.GPages: 300, PDF Size: 5.23 MB
Page 211 of 300
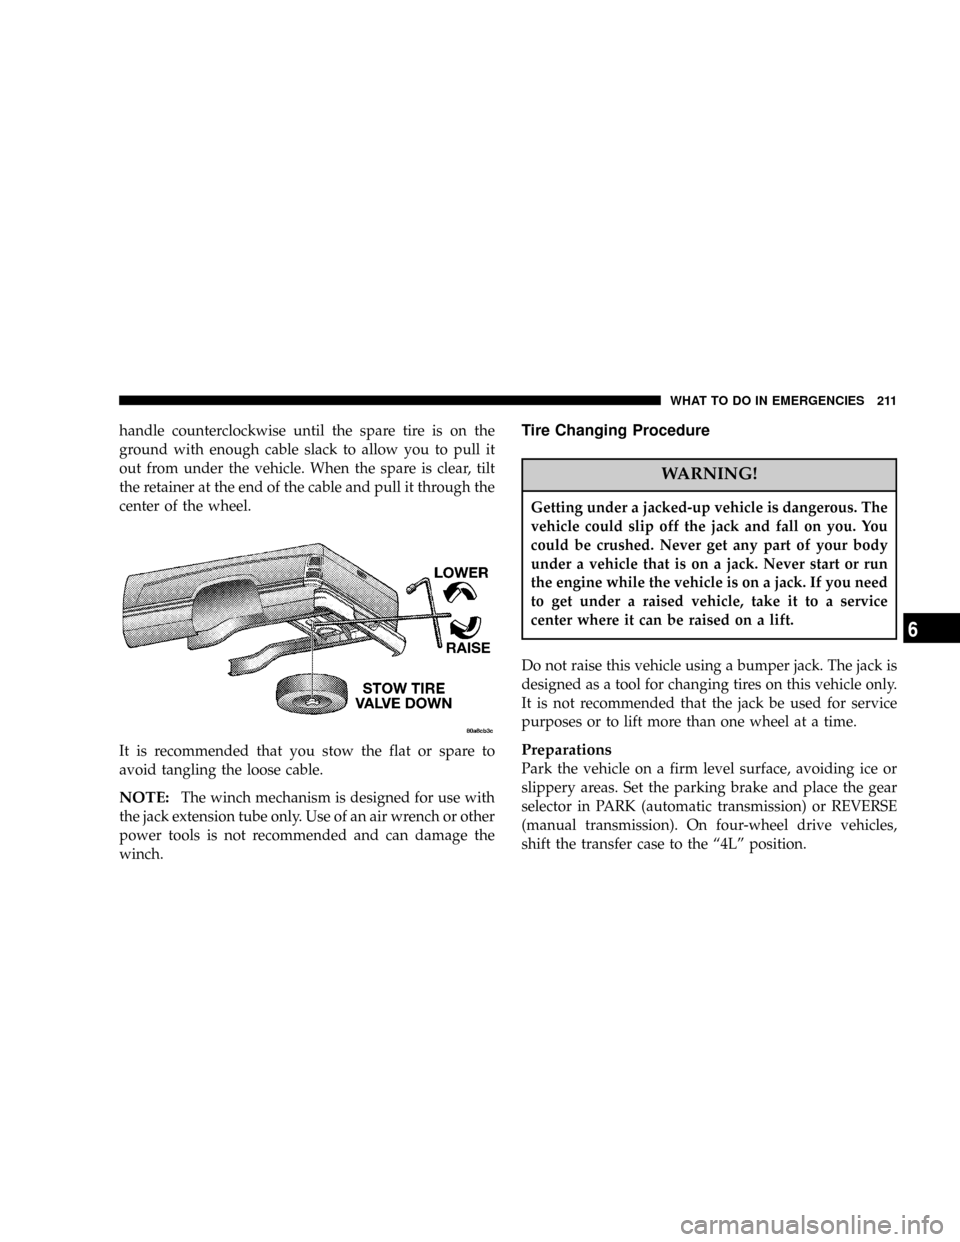
handle counterclockwise until the spare tire is on the
ground with enough cable slack to allow you to pull it
out from under the vehicle. When the spare is clear, tilt
the retainer at the end of the cable and pull it through the
center of the wheel.
It is recommended that you stow the flat or spare to
avoid tangling the loose cable.
NOTE:The winch mechanism is designed for use with
the jack extension tube only. Use of an air wrench or other
power tools is not recommended and can damage the
winch.
Tire Changing Procedure
WARNING!
Getting under a jacked-up vehicle is dangerous. The
vehicle could slip off the jack and fall on you. You
could be crushed. Never get any part of your body
under a vehicle that is on a jack. Never start or run
the engine while the vehicle is on a jack. If you need
to get under a raised vehicle, take it to a service
center where it can be raised on a lift.
Do not raise this vehicle using a bumper jack. The jack is
designed as a tool for changing tires on this vehicle only.
It is not recommended that the jack be used for service
purposes or to lift more than one wheel at a time.
Preparations
Park the vehicle on a firm level surface, avoiding ice or
slippery areas. Set the parking brake and place the gear
selector in PARK (automatic transmission) or REVERSE
(manual transmission). On four-wheel drive vehicles,
shift the transfer case to the ª4Lº position.
WHAT TO DO IN EMERGENCIES 211
6
Page 212 of 300
WARNING!
Do not attempt to change a tire on the side of the
vehicle close to moving traffic. Pull far enough off
the road to avoid the danger of being hit when
operating the jack or changing the wheel.
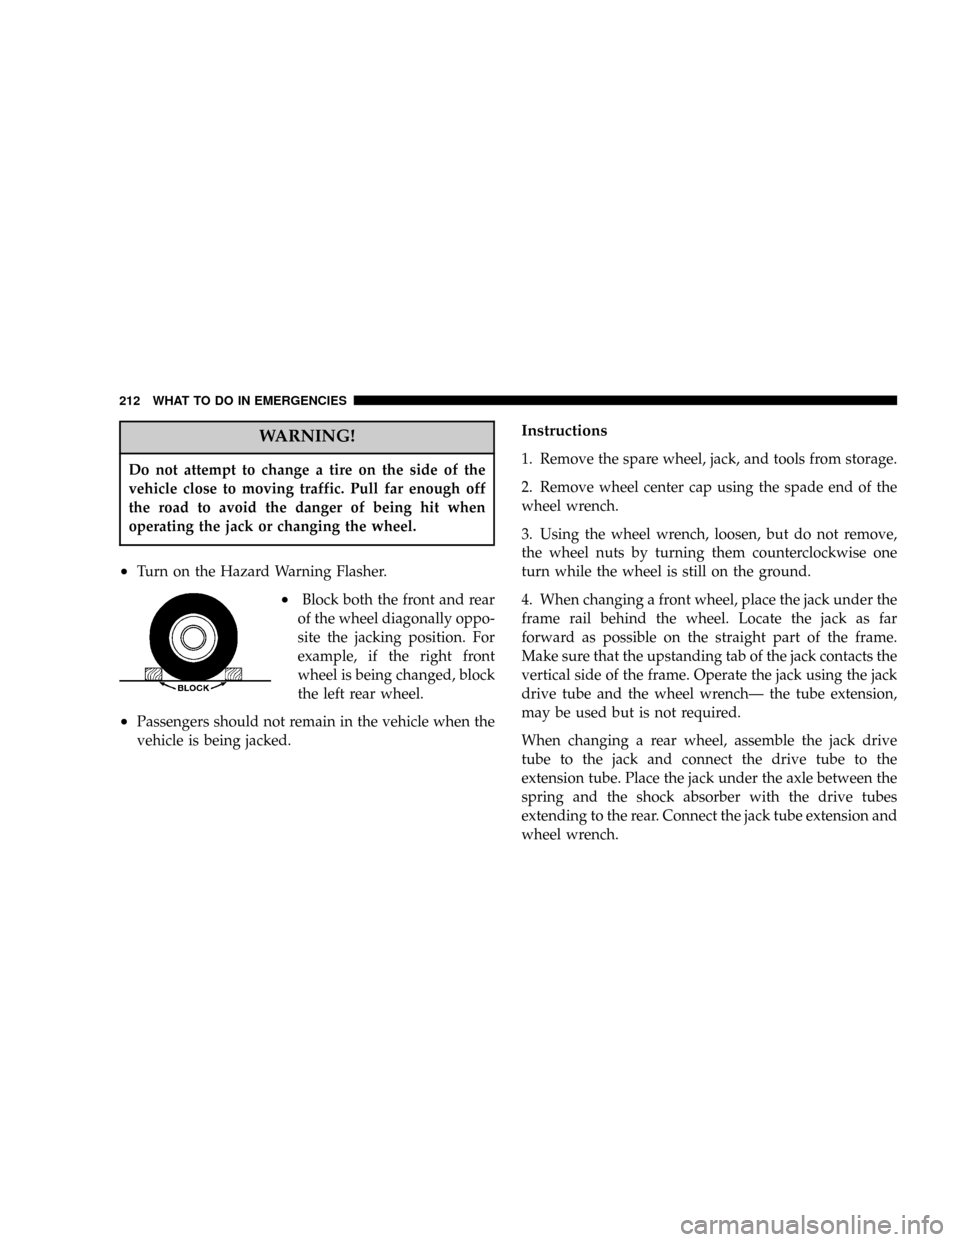
²Turn on the Hazard Warning Flasher.
²Block both the front and rear
of the wheel diagonally oppo-
site the jacking position. For
example, if the right front
wheel is being changed, block
the left rear wheel.
²Passengers should not remain in the vehicle when the
vehicle is being jacked.
Instructions
1. Remove the spare wheel, jack, and tools from storage.
2. Remove wheel center cap using the spade end of the
wheel wrench.
3. Using the wheel wrench, loosen, but do not remove,
the wheel nuts by turning them counterclockwise one
turn while the wheel is still on the ground.
4. When changing a front wheel, place the jack under the
frame rail behind the wheel. Locate the jack as far
forward as possible on the straight part of the frame.
Make sure that the upstanding tab of the jack contacts the
vertical side of the frame. Operate the jack using the jack
drive tube and the wheel wrenchÐ the tube extension,
may be used but is not required.
When changing a rear wheel, assemble the jack drive
tube to the jack and connect the drive tube to the
extension tube. Place the jack under the axle between the
spring and the shock absorber with the drive tubes
extending to the rear. Connect the jack tube extension and
wheel wrench.
212 WHAT TO DO IN EMERGENCIES
Page 213 of 300
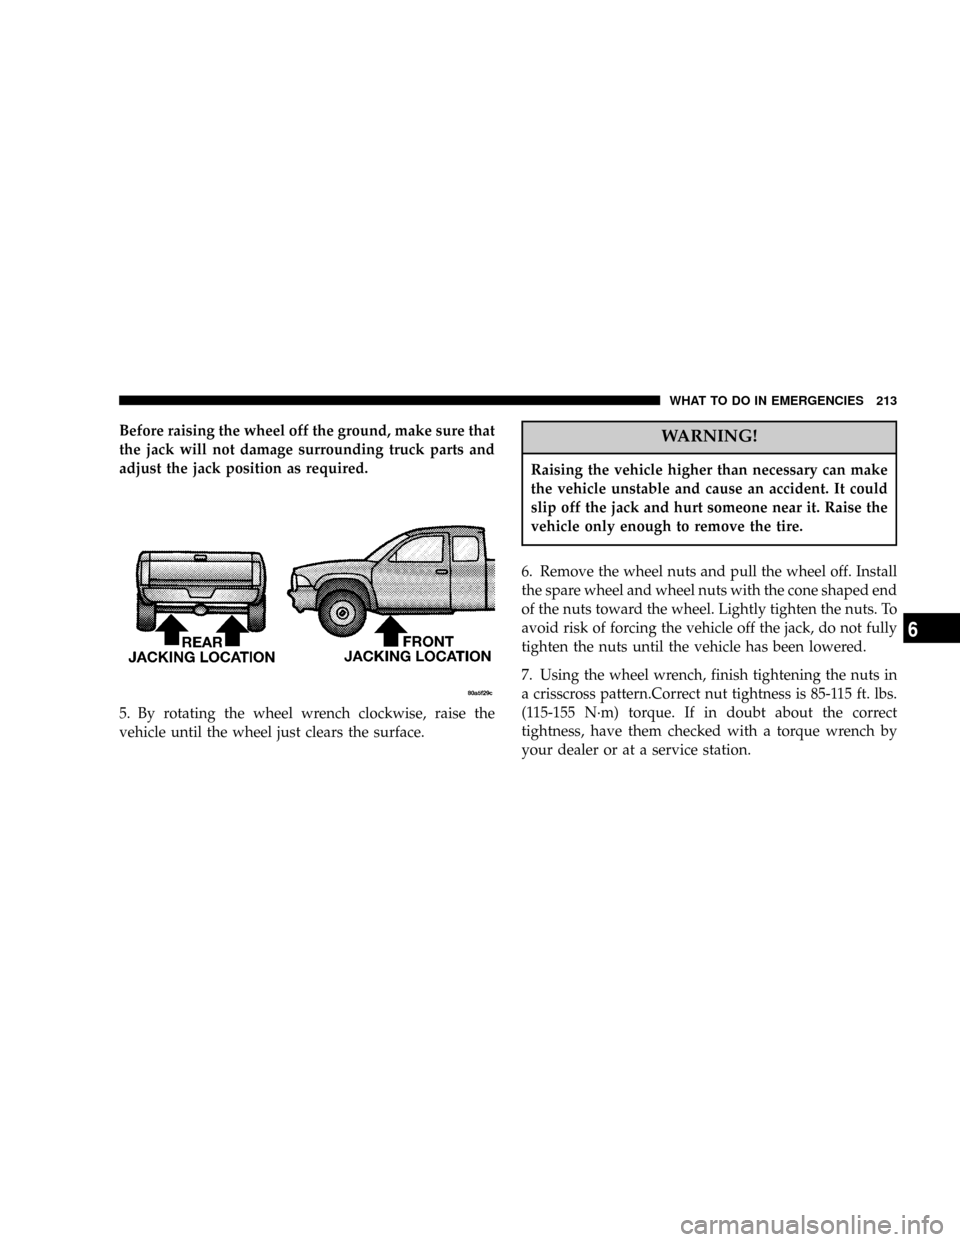
Before raising the wheel off the ground, make sure that
the jack will not damage surrounding truck parts and
adjust the jack position as required.
5. By rotating the wheel wrench clockwise, raise the
vehicle until the wheel just clears the surface.WARNING!
Raising the vehicle higher than necessary can make
the vehicle unstable and cause an accident. It could
slip off the jack and hurt someone near it. Raise the
vehicle only enough to remove the tire.
6. Remove the wheel nuts and pull the wheel off. Install
the spare wheel and wheel nuts with the cone shaped end
of the nuts toward the wheel. Lightly tighten the nuts. To
avoid risk of forcing the vehicle off the jack, do not fully
tighten the nuts until the vehicle has been lowered.
7. Using the wheel wrench, finish tightening the nuts in
a crisscross pattern.Correct nut tightness is 85-115 ft. lbs.
(115-155 N´m) torque. If in doubt about the correct
tightness, have them checked with a torque wrench by
your dealer or at a service station.
WHAT TO DO IN EMERGENCIES 213
6
Page 214 of 300
WARNING!
A loose tire or jack thrown forward in a collision or
hard stop could injure someone in the vehicle.
Always stow the jack parts and the extra tire and
wheel in the places provided.
8. Install wheel center cap and remove wheel blocks. Do
not install chrome or aluminum wheel center caps on the
spare wheel. This may result in cap damage.
9. Lower the jack to its fully closed position. Stow the
replaced tire, jack, and tools as previously described.
10. Adjust the tire pressure when possible.
NOTE:Do not oil wheel studs. For chrome wheels, do
not substitute with chrome plated wheel nuts.
WARNING!
Carefully follow these tire changing warnings to
help prevent personal injury or damage to your
vehicle:
²Always park on a firm, level surface as far from
the edge of the roadway as possible before raising
the vehicle.
²Block the wheel diagonally opposite the wheel to
be raised.
²Apply the parking brake firmly before jacking.
²Never start the engine with the vehicle on a jack.
²Do not let anyone sit in the vehicle when it is on
a jack.
²Do not get under the vehicle when it is on a jack.
²Only use the jack in the positions indicated.
²If working on or near a roadway, be extremely
careful of motor traffic.
214 WHAT TO DO IN EMERGENCIES
Page 215 of 300
To Stow The Flat Or Spare
Turn the wheel so that the valve stem is down. Slide the
wheel retainer through the center of the wheel and
position it properly across the wheel opening.
For convenience in checking the spare tire inflation, stow
with the valve stem toward the rear of the vehicle.
Attach the wheel wrench to the extension tube. Rotate the
winch mechanism until the wheel is drawn into place
against the underside of the vehicle. Continue to rotate
until you feel the winch mechanism slip or click 3 or 4
times. It cannot be overtightened. Push against the tire
several times to be sure it is firmly in place.
JUMP STARTING
WARNING!
²Battery fluid is a corrosive acid solution; do not
allow battery fluid to contact eyes, skin or cloth-
ing. Don't lean over battery when attaching
clamps or allow the clamps to touch each other. If
acid splashes in eyes or on skin, flush the con-
taminated area immediately with large quantities
of water.
²A battery generates hydrogen gas which is flam-
mable and explosive. Keep flame or spark away
from the vent holes. Do not use a booster battery
or any other booster source with an output that
exceeds 12 volts.
Check the Battery Test Indicator (if equipped). If a yellow
or bright colored dot is visible in the indicator (if
equipped), DO NOT jump-start the battery.
WHAT TO DO IN EMERGENCIES 215
6
Page 216 of 300
If the indicator (if equipped) is dark or shows a green dot,
proceed as follows:
1. Wear eye protection and remove all metal jewelry such
as watch bands or bracelets which might make an
unintended electrical contact.
2. Park the booster vehicle within cable reach but with-
out letting the vehicles touch. Set the parking brake, place
the automatic transmission in PARK or the manual
transmission in NEUTRAL and turn the ignition OFF on
both vehicles.
3. Turn OFF heater, radio and all unnecessary electrical
loads.
4. Connect one end of a jumper cable to the positive
terminal of the booster battery. Connect the other end of
the same cable to the positive terminal of the discharged
battery.WARNING!
Do not permit vehicles to touch each other as this
could establish a ground connection and personal
injury could result.
5. Connect the other cable, first to the negative terminal
of the booster battery and then to the engine of the
vehicle with the discharged battery. Make sure you have
a good contact on the engine.
216 WHAT TO DO IN EMERGENCIES
Page 217 of 300
WARNING!
Do not connect the cable to the negative post of the
discharge battery. The resulting electrical spark
could cause the battery to explode.
During cold weather when temperatures are below
freezing point, electrolyte in a discharged battery
may freeze. Do not attempt jump starting because
the battery could rupture or explode. The battery
temperature must be brought up above freezing
point before attempting jump start.
6. Start the engine in the vehicle which has the booster
battery, let the engine idle a few minutes, then start the
engine in the vehicle with the discharged battery.
7. When removing the jumper cables, reverse the above
sequence exactly. Be careful of the moving belts and fan.
WARNING!
Any procedure other than above could result in:
1. Personal injury caused by electrolyte squirting
out the battery vent;
2. Personal injury or property damage due to battery
explosion;
3. Damage to charging system of booster vehicle or
of immobilized vehicle.
TOWING A DISABLED VEHICLE
Proper towing or lifting equipment is required to prevent
damage to your vehicle. Use of safety chains is recom-
mended.Attach towing device to main structural mem-
bers of the vehicle Ð not to bumpers or associated
brackets. State and local laws applying to vehicles
under tow must be observed.
WHAT TO DO IN EMERGENCIES 217
6
Page 218 of 300

Four-Wheel Drive Vehicles
The manufacturer recommends towing with all wheels
off the ground. Acceptable methods are to tow the vehicle
on a flatbed or with one end of the vehicle raised and the
opposite end on a towing dolly.
Two-Wheel Drive Vehicles
Provided that the transmission is operable, tow with the
transmission in Neutral and the ignition key in the OFF
position along with the front wheels raised and the rear
wheels on the ground. The speed must not exceed 30
mph (50 km/h) and the distance must not exceed 15
miles (25 km).If the vehicle is to be towed more than 15 miles (25 km),
it must be towed on a flatbed, or with the rear wheels
raised and the front wheels on the ground, or with the
front end raised and the rear wheels on a towing dolly.
218 WHAT TO DO IN EMERGENCIES
Page 219 of 300

MAINTAINING YOUR VEHICLE
CONTENTS
mEngine Compartment 3.7L V6.............221
mEngine Compartment 4.7L V-8............222
mOnboard Diagnostic System Ð OBD II......223
mEmissions Inspection And Maintenance
Programs
............................224
mReplacement Parts.....................225
mDealer Service........................225
mMaintenance Procedures.................226
NEngine Oil..........................226
NEngine Oil Filter......................229
NDrive Belts Ð Check Condition And Tension . . 230
NSpark Plugs.........................230NIgnition Cables.......................230
NEngine Air Cleaner Filter................230
NEngine Fuel Filter.....................231
NCatalytic Converter....................231
NMaintenance-Free Battery................232
NAir Conditioner Maintenance.............233
NPower Steering Ð Fluid Check............234
NFront Suspension Ball Joints..............235
NSteering Linkage......................235
NDrive Shaft Constant Velocity
Joints Ð 4X4 Models...................235
NBody Lubrication.....................235
7
Page 220 of 300

NWindshield Wiper Blades................235
NWindshield Washers...................236
NExhaust System......................236
NCooling System.......................237
NEmission Related Components............241
NBrake System........................243
NClutch Hydraulic System................245
NManual Transmission..................245
NAutomatic Transmission................245
NTransfer Case........................248
NAxles..............................248
NSelection Of Lubricating Grease...........248
NAppearance Care And Protection From
Corrosion...........................249
mPower Distribution Center...............252
mFuse Block...........................253
mVehicle Storage........................254
mReplacement Light Bulbs................254
mBulb Replacement......................255
NHeadlights..........................255
NParking/Turn Signal Lights..............256
NRear Side Marker, Tail Lights, Turn Signals
And Backup Lights Ð Replacement........256
NLicense Lights........................257
NCenter High-Mounted Stoplight...........257
NFog Lights..........................257
mFluids And Capacities...................258
mRecommended Fluids, Lubricants And
Genuine Parts
.........................259
NEngine.............................259
NChassis............................260
220 MAINTAINING YOUR VEHICLE