tow DODGE DAKOTA 2011 3.G Owner's Manual
[x] Cancel search | Manufacturer: DODGE, Model Year: 2011, Model line: DAKOTA, Model: DODGE DAKOTA 2011 3.GPages: 76, PDF Size: 4.62 MB
Page 42 of 76
• If the light remains lit with the engine running, your vehicle will usually bedrivable; however, see an authorized service center immediately. If the light is
flashing when the engine is running, immediate service is required and you
may experience reduced performance, an elevated/rough idle or engine stall
and your vehicle may require towing.
- Airbag Warning Light
• If the light is not on during starting, stays on, or turns on while driving, havethe vehicle serviced by an authorized service center immediately.
- SVC (Service) 4WD Indicator Light
• If the light stays on or comes on during driving, it means that the 4WD systemis not functioning properly and that service is required. We recommend you do
not operate the vehicle. Have the vehicle serviced immediately.
- Transmission Temperature Warning Light
• This light indicates that there is excessive transmission fluid temperature thatmight occur with severe usage such as trailer towing. If this light turns on, stop
the vehicle and run the engine at idle, with the transmission in NEUTRAL, until
the light turns off. Once the light turns off, you may continue to drive normally.
Fuel Cap/Loose Gas Cap Message
• If a “gas cap” message (shown as gASCAP) appears, tighten the gas cap untila “clicking” sound is heard.
• Press the odometer reset button to turn the message off.
• If the message continues to appear for more than three days after tightening the gas cap, see your authorized service center.
Oil Change Indicator
Message
• If an “oil change” message (shown as CHAngE OIL) appears and a single chime sounds, it is time for your next required oil change.
Resetting The Light After Servicing
• Turn the ignition switch to the ON/RUN position (do not start engine).
• Fully depress the accelerator pedal three times within 10 seconds.
• Turn the ignition switch to the OFF/LOCK position.
IF YOUR ENGINE OVERHEATS
• In any of the following situations, you can reduce the potential for overheating by taking the appropriate action.
• On the highways — slow down.
• In city traffic — while stopped, shift transmission into NEUTRAL, but do not
increase engine idle speed.
WHAT TO DO IN EMERGENCIES
40
Page 44 of 76
JACKING AND TIRE CHANGING
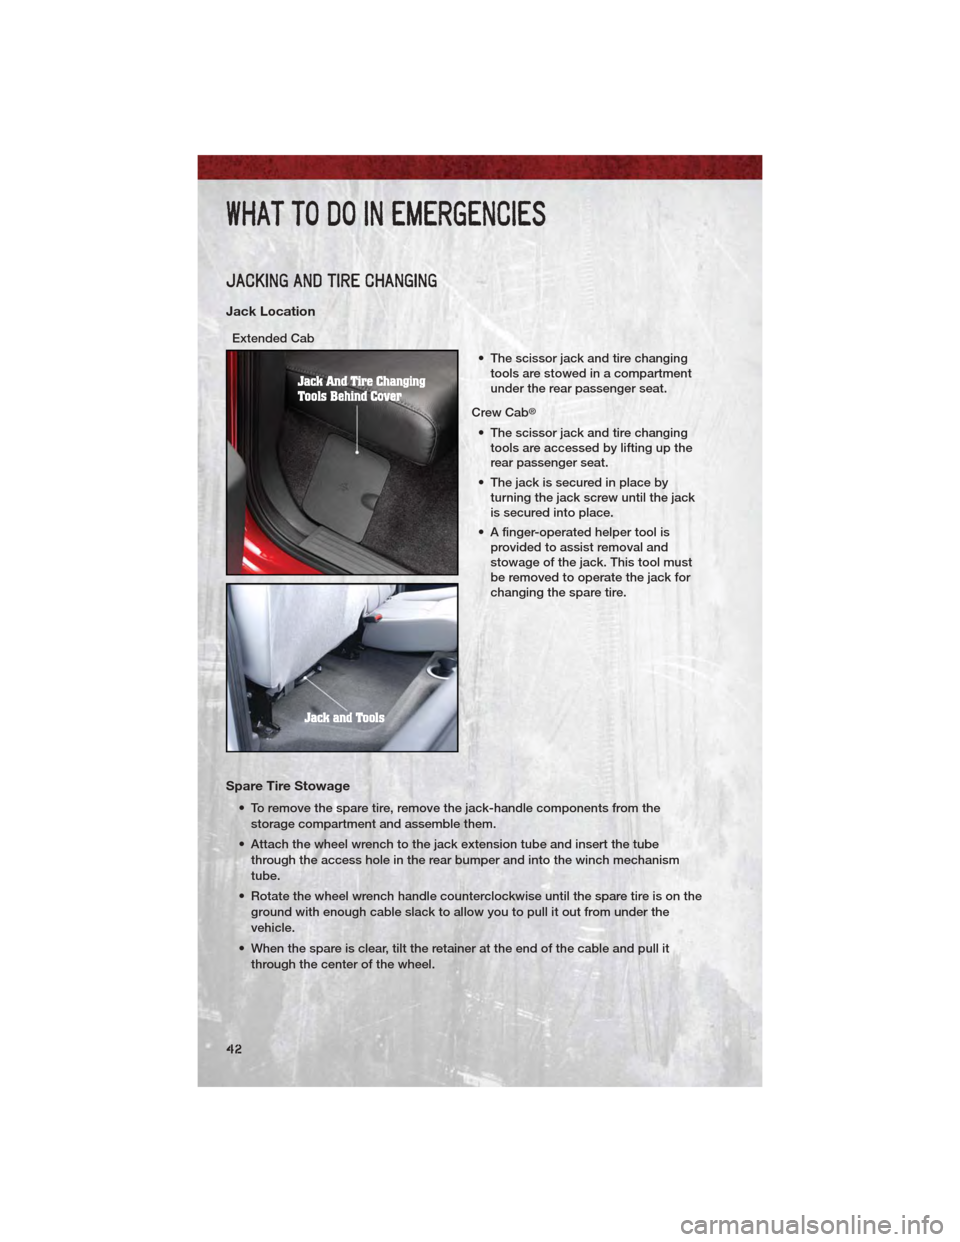
Jack Location
Extended Cab• The scissor jack and tire changingtools are stowed in a compartment
under the rear passenger seat.
Crew Cab
®
• The scissor jack and tire changing tools are accessed by lifting up the
rear passenger seat.
• The jack is secured in place by turning the jack screw until the jack
is secured into place.
• A finger-operated helper tool is provided to assist removal and
stowage of the jack. This tool must
be removed to operate the jack for
changing the spare tire.
Spare Tire Stowage
• To remove the spare tire, remove the jack-handle components from the
storage compartment and assemble them.
• Attach the wheel wrench to the jack extension tube and insert the tube through the access hole in the rear bumper and into the winch mechanism
tube.
• Rotate the wheel wrench handle counterclockwise until the spare tire is on the ground with enough cable slack to allow you to pull it out from under the
vehicle.
• When the spare is clear, tilt the retainer at the end of the cable and pull it through the center of the wheel.
WHAT TO DO IN EMERGENCIES
42
Page 48 of 76
• Raise the vehicle by turning the jack screw clockwise. Raise the vehicle onlyuntil the tire just clears the surface and enough clearance is obtained to install
the spare tire.
• Remove the lug nuts and wheel.
• Position the spare wheel/tire on the vehicle and install the lug nuts with the cone-shaped end toward the wheel. Lightly tighten the lug nuts clockwise. To
avoid the risk of forcing the vehicle off the jack, do not tighten the nuts fully
until the vehicle has been lowered.
• Lower the vehicle by turning the jack screw counterclockwise, and remove the jack and wheel blocks.
• Finish tightening the lug nuts. Push down on the wrench while tightening for increased leverage. Alternate nuts until each one has been tightened twice.
The correct wheel nut tightness is 120 to 160 ft lbs (163 to 217 N·m). If in doubt
about the correct tightness, have them checked with a torque wrench by your
authorized dealer or at a service station.
• Secure the jack and tools in their proper locations.
• For convenience in checking the spare tire inflation, stow with the valve stem toward the rear of the vehicle. Continue winching up the tire until you hear the
winch click three times.
NOTE: To Stow the Flat or Spare: The wheel retainer does not fit through the
center of the aluminum wheel. The tire must be stored in a safe manner in the bed
of the truck.
WARNING!
• Do not attempt to change a tire on the side of the vehicle close to moving traffic. Pull far enough off the road to avoid the danger of being hit when
operating the jack or changing the wheel.
• Getting under a jacked-up vehicle is dangerous. The vehicle could slip off the jack and fall on you. You could be crushed. Never get any part of your
body under a vehicle that is on a jack. If you need to get under a raised
vehicle, take it to a service center where it can be raised on a lift.
• The jack is designed to use as a tool for changing tires only. The jack should not be used to lift the vehicle for service purposes. The vehicle
should be jacked on a firm, level surface only. Avoid ice or slippery areas.
• If it is necessary to retrieve the spare tire from under the vehicle on the side of the vehicle close to moving traffic, pull far enough off the road to
avoid the danger of being hit.
• Do not attempt to change a tire on the side of the vehicle close to moving traffic. Pull far enough off the road to avoid being hit when operating the
jack or changing the wheel.
• Carefully follow these tire changing procedures to help prevent personal injury or damage to your vehicle: Always park on a firm, level surface as
far from the edge of the roadway as possible before raising the vehicle.
(Continued)
WHAT TO DO IN EMERGENCIES
46
Page 49 of 76
WARNING!(Continued)
• Raising the vehicle higher than necessary can make the vehicle lessstable and could cause it to slip off the jack and hurt someone near it.
Raise the vehicle only enough to remove the tire.
• A loose tire or jack, thrown forward in a collision or hard stop, could endanger the occupants of the vehicle. Always stow the jack parts and
the spare tire in the places provided.
JUMP-STARTING
• If your vehicle has a discharged battery it can be jump-started using a set of
jumper cables and a battery in another vehicle or by using a portable battery
booster pack.
• Jump-starting can be dangerous if done improperly so please follow the procedures in this section carefully.
NOTE: When using a portable battery booster pack follow the manufacturer’s
operating instructions and precautions.
Preparations for Jump-Start
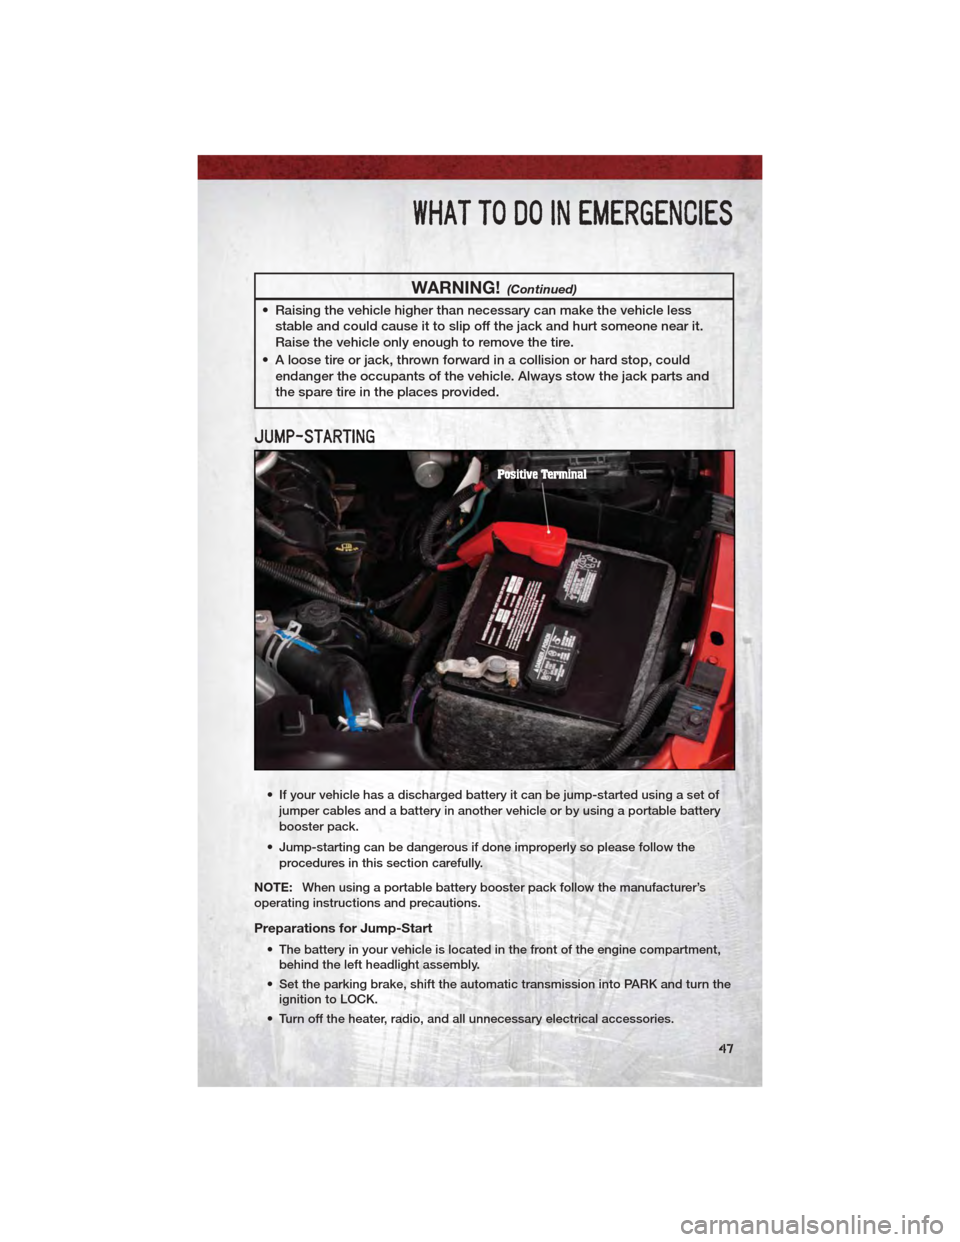
• The battery in your vehicle is located in the front of the engine compartment, behind the left headlight assembly.
• Set the parking brake, shift the automatic transmission into PARK and turn the ignition to LOCK.
• Turn off the heater, radio, and all unnecessary electrical accessories.
WHAT TO DO IN EMERGENCIES
47
Page 51 of 76
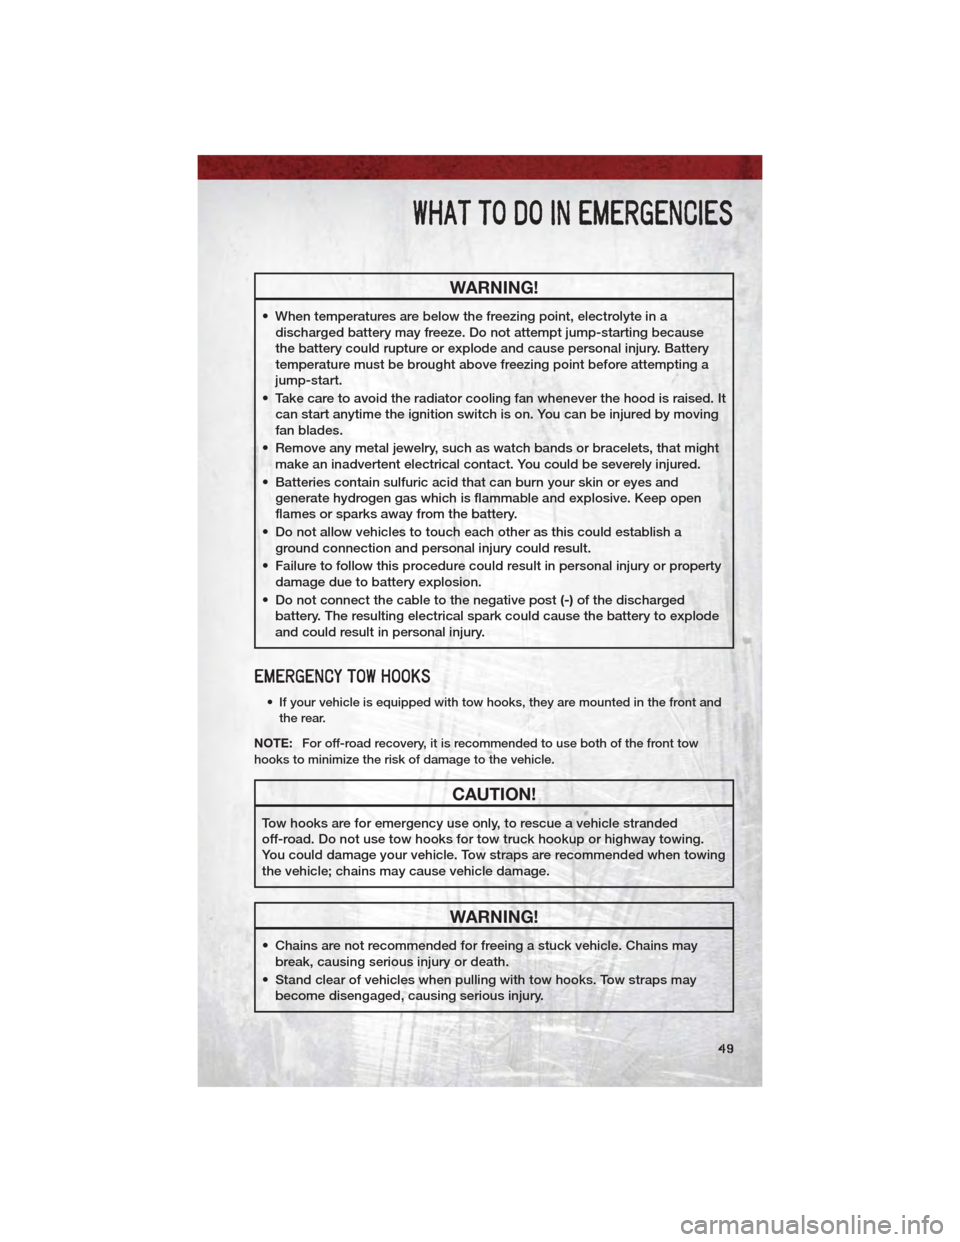
WARNING!
• When temperatures are below the freezing point, electrolyte in adischarged battery may freeze. Do not attempt jump-starting because
the battery could rupture or explode and cause personal injury. Battery
temperature must be brought above freezing point before attempting a
jump-start.
• Take care to avoid the radiator cooling fan whenever the hood is raised. It can start anytime the ignition switch is on. You can be injured by moving
fan blades.
• Remove any metal jewelry, such as watch bands or bracelets, that might make an inadvertent electrical contact. You could be severely injured.
• Batteries contain sulfuric acid that can burn your skin or eyes and generate hydrogen gas which is flammable and explosive. Keep open
flames or sparks away from the battery.
• Do not allow vehicles to touch each other as this could establish a ground connection and personal injury could result.
• Failure to follow this procedure could result in personal injury or property damage due to battery explosion.
• Do not connect the cable to the negative post (-)of the discharged
battery. The resulting electrical spark could cause the battery to explode
and could result in personal injury.
EMERGENCY TOW HOOKS
• If your vehicle is equipped with tow hooks, they are mounted in the front and
the rear.
NOTE: For off-road recovery, it is recommended to use both of the front tow
hooks to minimize the risk of damage to the vehicle.
CAUTION!
Tow hooks are for emergency use only, to rescue a vehicle stranded
off-road. Do not use tow hooks for tow truck hookup or highway towing.
You could damage your vehicle. Tow straps are recommended when towing
the vehicle; chains may cause vehicle damage.
WARNING!
• Chains are not recommended for freeing a stuck vehicle. Chains may break, causing serious injury or death.
• Stand clear of vehicles when pulling with tow hooks. Tow straps may become disengaged, causing serious injury.
WHAT TO DO IN EMERGENCIES
49
Page 52 of 76
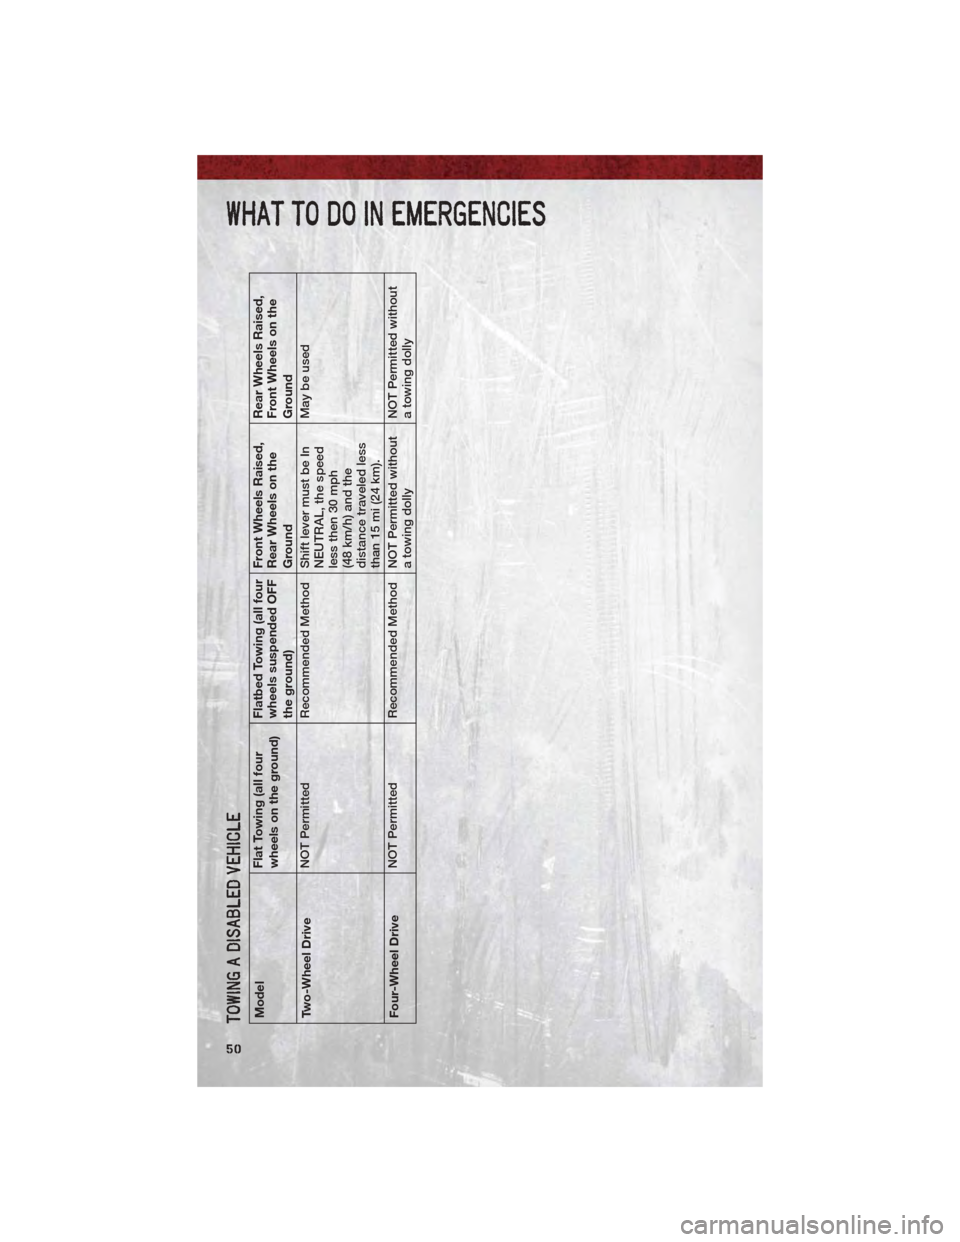
TOWING A DISABLED VEHICLEModelFlat Towing (all four
wheels on the ground)Flatbed Towing (all four
wheels suspended OFF
the ground)Front Wheels Raised,
Rear Wheels on the
GroundRear Wheels Raised,
Front Wheels on the
Ground
Two-Wheel Drive NOT Permitted
Recommended Method Shift lever must be In
NEUTRAL, the speed
less then 30 mph
(48 km/h) and the
distance traveled less
than 15 mi (24 km).May be used
Four-Wheel Drive NOT Permitted
Recommended Method NOT Permitted without
a towing dollyNOT Permitted without
a towing dolly
WHAT TO DO IN EMERGENCIES
50
Page 53 of 76
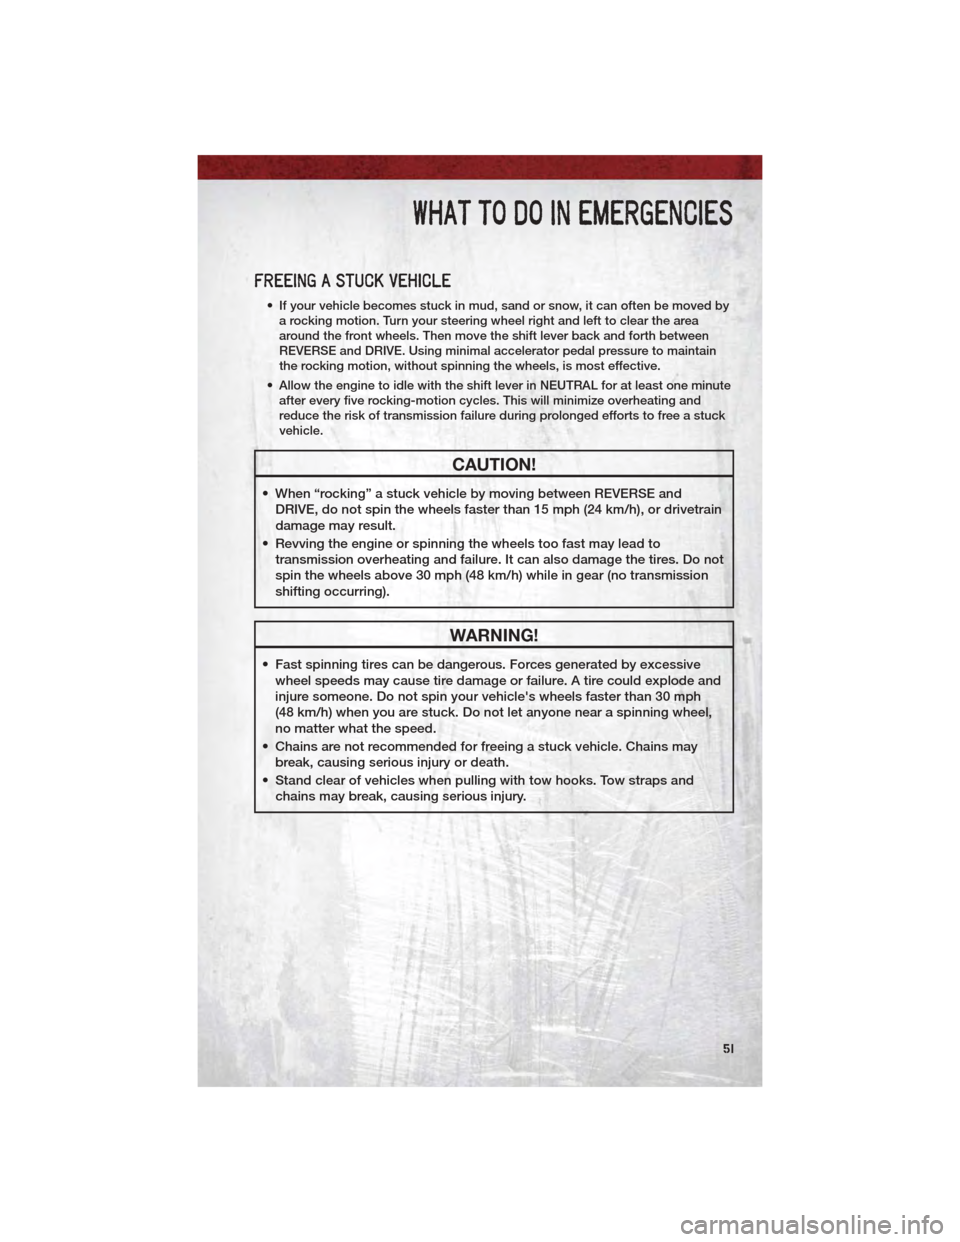
FREEING A STUCK VEHICLE
• If your vehicle becomes stuck in mud, sand or snow, it can often be moved bya rocking motion. Turn your steering wheel right and left to clear the area
around the front wheels. Then move the shift lever back and forth between
REVERSE and DRIVE. Using minimal accelerator pedal pressure to maintain
the rocking motion, without spinning the wheels, is most effective.
• Allow the engine to idle with the shift lever in NEUTRAL for at least one minute after every five rocking-motion cycles. This will minimize overheating and
reduce the risk of transmission failure during prolonged efforts to free a stuck
vehicle.
CAUTION!
• When “rocking” a stuck vehicle by moving between REVERSE andDRIVE, do not spin the wheels faster than 15 mph (24 km/h), or drivetrain
damage may result.
• Revving the engine or spinning the wheels too fast may lead to transmission overheating and failure. It can also damage the tires. Do not
spin the wheels above 30 mph (48 km/h) while in gear (no transmission
shifting occurring).
WARNING!
• Fast spinning tires can be dangerous. Forces generated by excessivewheel speeds may cause tire damage or failure. A tire could explode and
injure someone. Do not spin your vehicle's wheels faster than 30 mph
(48 km/h) when you are stuck. Do not let anyone near a spinning wheel,
no matter what the speed.
• Chains are not recommended for freeing a stuck vehicle. Chains may break, causing serious injury or death.
• Stand clear of vehicles when pulling with tow hooks. Tow straps and chains may break, causing serious injury.
WHAT TO DO IN EMERGENCIES
51
Page 60 of 76
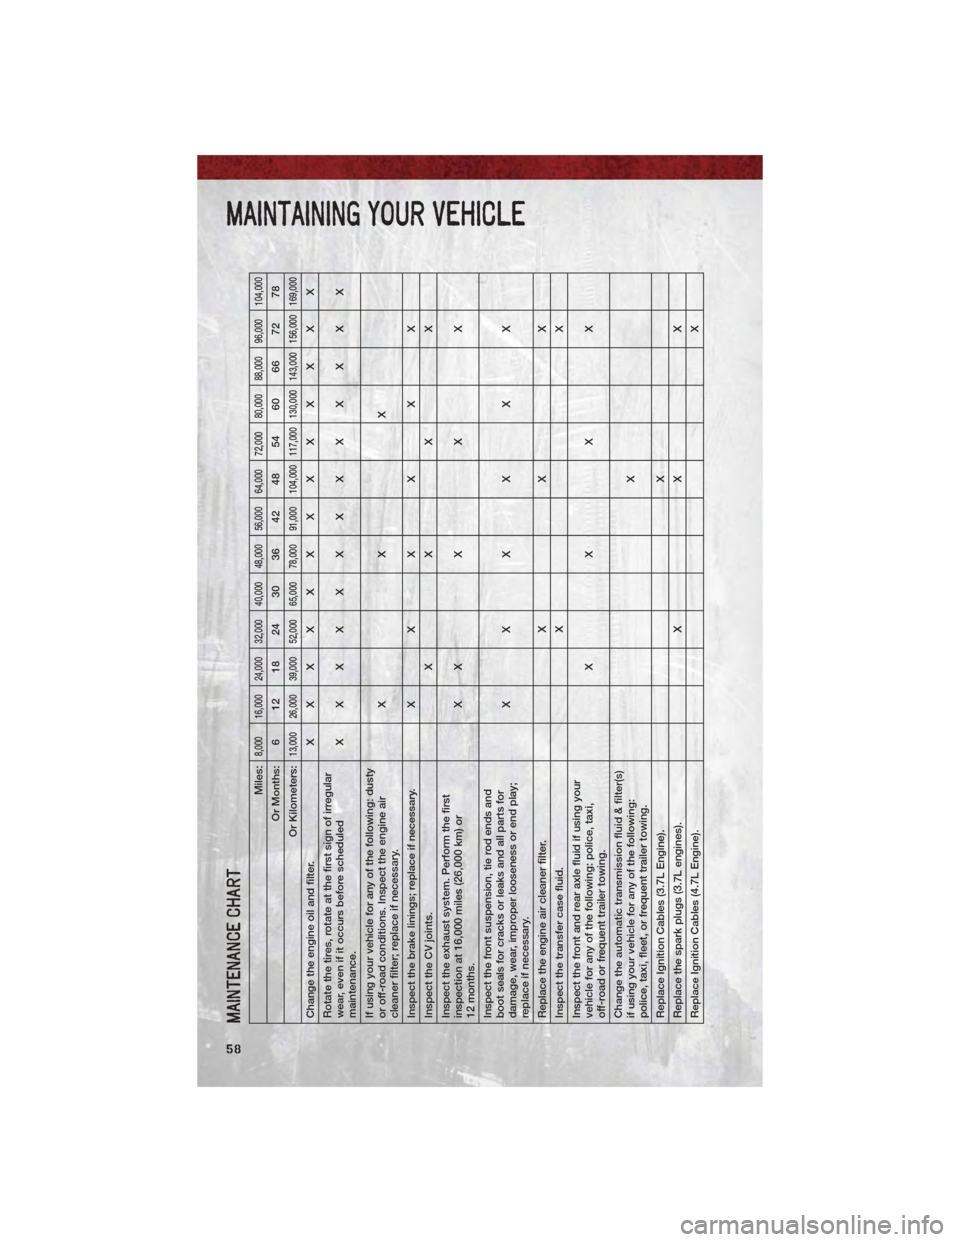
MAINTENANCE CHART
Miles:
8,000 16,000 24,000 32,000 40,000 48,000 56,000 64,000 72,000 80,000 88,000 96,000 104,000
Or Months: 6 12 18 24 30 36 42 48 54 60 66 72 78
Or Kilometers:
13,000 26,000 39,000 52,000 65,000 78,000 91,000 104,000 117,000 130,000 143,000 156,000 169,000
Change the engine oil and filter. XXXXXXXXXXXXX
Rotate the tires, rotate at the first sign of irregular
wear, even if it occurs before scheduled
maintenance. XXXXXXXXXXXXX
If using your vehicle for any of the following: dusty
or off-road conditions. Inspect the engine air
cleaner filter; replace if necessary. XXX
Inspect the brake linings; replace if necessary. X X X X X X
Inspect the CV joints. XXXX
Inspect the exhaust system. Perform the first
inspection at 16,000 miles (26,000 km) or
12 months. XXXXX
Inspect the front suspension, tie rod ends and
boot seals for cracks or leaks and all parts for
damage, wear, improper looseness or end play;
replace if necessary. XXXXXX
Replace the engine air cleaner filter. XXX
Inspect the transfer case fluid. XX
Inspect the front and rear axle fluid if using your
vehicle for any of the following: police, taxi,
off-road or frequent trailer towing. XXXX
Change the automatic transmission fluid & filter(s)
if using your vehicle for any of the following:
police, taxi, fleet, or frequent trailer towing. X
Replace Ignition Cables (3.7L Engine). X
Replace the spark plugs (3.7L engines). XXX
Replace Ignition Cables (4.7L Engine). X
MAINTAINING YOUR VEHICLE
58
Page 61 of 76
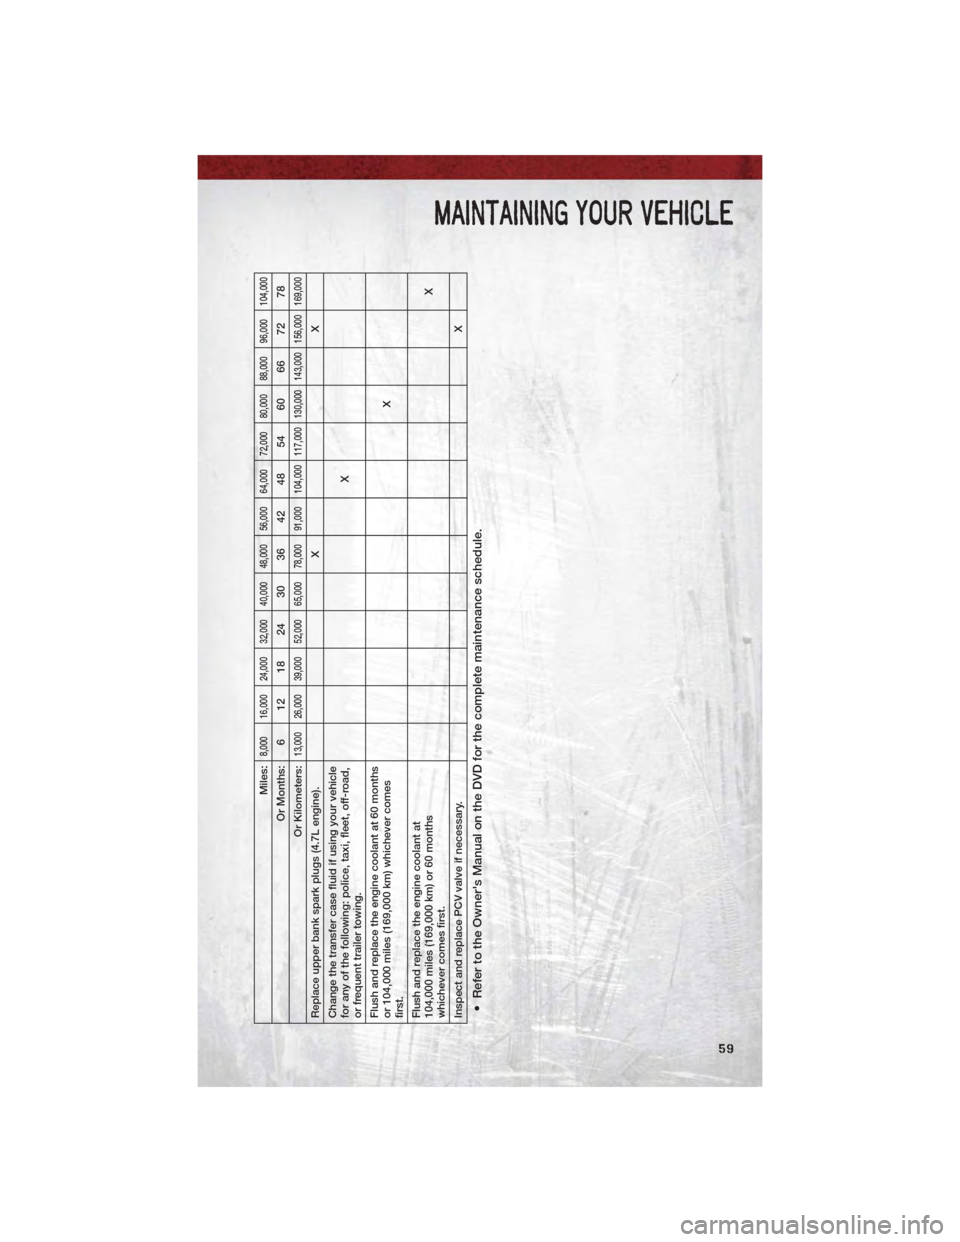
Miles:
8,000 16,000 24,000 32,000 40,000 48,000 56,000 64,000 72,000 80,000 88,000 96,000 104,000
Or Months: 6 12 18 24 30 36 42 48 54 60 66 72 78
Or Kilometers:
13,000 26,000 39,000 52,000 65,000 78,000 91,000 104,000 117,000 130,000 143,000 156,000 169,000
Replace upper bank spark plugs (4.7L engine). XX
Change the transfer case fluid if using your vehicle
for any of the following: police, taxi, fleet, off-road,
or frequent trailer towing. X
Flush and replace the engine coolant at 60 months
or 104,000 miles (169,000 km) whichever comes
first. X
Flush and replace the engine coolant at
104,000 miles (169,000 km) or 60 months
whichever comes first. X
Inspect and replace PCV valve if necessary. X• Refer to the Owner's Manual on the DVD for the complete maintenance schedule.
MAINTAINING YOUR VEHICLE
59
Page 64 of 76
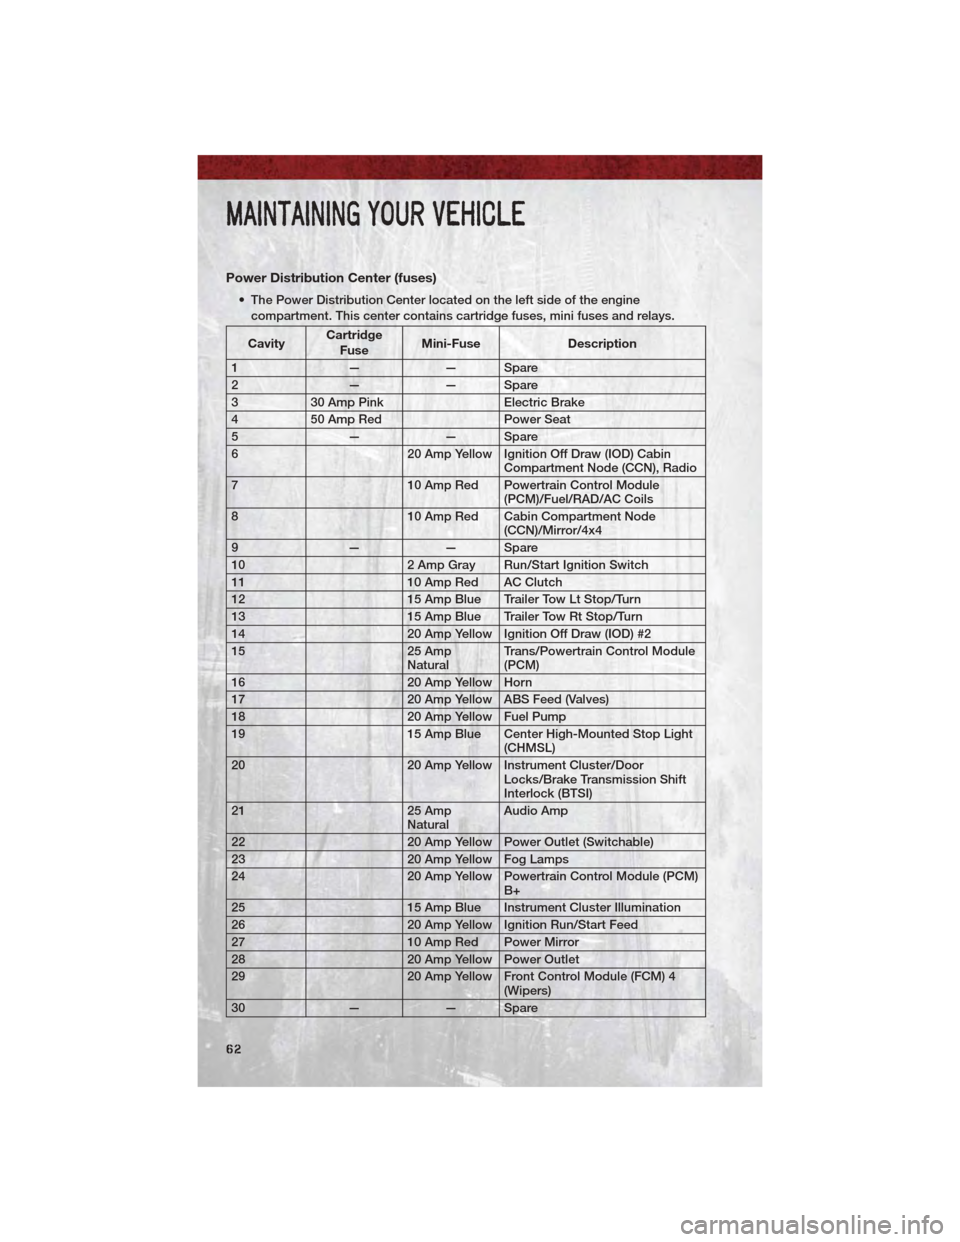
Power Distribution Center (fuses)
• The Power Distribution Center located on the left side of the enginecompartment. This center contains cartridge fuses, mini fuses and relays.
Cavity Cartridge
Fuse Mini-Fuse
Description
1 —— Spare
2 —— Spare
3 30 Amp Pink Electric Brake
4 50 Amp Red Power Seat
5 —— Spare
6 20 Amp Yellow Ignition Off Draw (IOD) Cabin
Compartment Node (CCN), Radio
7 10 Amp Red Powertrain Control Module
(PCM)/Fuel/RAD/AC Coils
8 10 Amp Red Cabin Compartment Node
(CCN)/Mirror/4x4
9 —— Spare
10 2 Amp Gray Run/Start Ignition Switch
11 10 Amp Red AC Clutch
12 15 Amp Blue Trailer Tow Lt Stop/Turn
13 15 Amp Blue Trailer Tow Rt Stop/Turn
14 20 Amp Yellow Ignition Off Draw (IOD) #2
15 25 Amp
Natural Trans/Powertrain Control Module
(PCM)
16 20 Amp Yellow Horn
17 20 Amp Yellow ABS Feed (Valves)
18 20 Amp Yellow Fuel Pump
19 15 Amp Blue Center High-Mounted Stop Light
(CHMSL)
20 20 Amp Yellow Instrument Cluster/Door
Locks/Brake Transmission Shift
Interlock (BTSI)
21 25 Amp
Natural Audio Amp
22 20 Amp Yellow Power Outlet (Switchable)
23 20 Amp Yellow Fog Lamps
24 20 Amp Yellow Powertrain Control Module (PCM)
B+
25 15 Amp Blue Instrument Cluster Illumination
26 20 Amp Yellow Ignition Run/Start Feed
27 10 Amp Red Power Mirror
28 20 Amp Yellow Power Outlet
29 20 Amp Yellow Front Control Module (FCM) 4
(Wipers)
30 —— Spare
MAINTAINING YOUR VEHICLE
62