parking brake DODGE DAKOTA 2011 3.G User Guide
[x] Cancel search | Manufacturer: DODGE, Model Year: 2011, Model line: DAKOTA, Model: DODGE DAKOTA 2011 3.GPages: 76, PDF Size: 4.62 MB
Page 5 of 76
WARNING!
• Pedals that cannot move freely can cause loss of vehicle control andincrease the risk of serious personal injury.
• Always make sure that objects cannot fall into the driver foot well while the vehicle is moving. Objects can become trapped under the brake
pedal and accelerator pedal causing a loss of vehicle control.
• Failure to properly follow floor mat installation or mounting can cause interference with the brake pedal and accelerator pedal operation
causing loss of control of the vehicle.
• Never use the ‘PARK’ position as a substitute for the parking brake. Always apply the parking brake fully when parked to guard against
vehicle movement and possible injury or damage.
• Refer to your Owner's Manual on the DVD for further details.
USE OF AFTERMARKET PRODUCTS (ELECTRONICS)
The use of aftermarket devices including cell phones, MP3 players, GPS systems,
or chargers may affect the performance of on-board wireless features including
Keyless Enter-N-Go and Remote Start range. If you are experiencing difficulties
with any of your wireless features, try disconnecting your aftermarket devices to
see if the situation improves. If your symptoms persist, please see an authorized
dealer.
CHRYSLER, DODGE, JEEP, RAM TRUCK, ATF+4, MOPAR and Uconnect are
registered trademarks of Chrysler Group LLC. COPYRIGHT ©2011 CHRYSLER GROUP LLC
INTRODUCTION/WELCOME
3
Page 10 of 76
KEY FOB
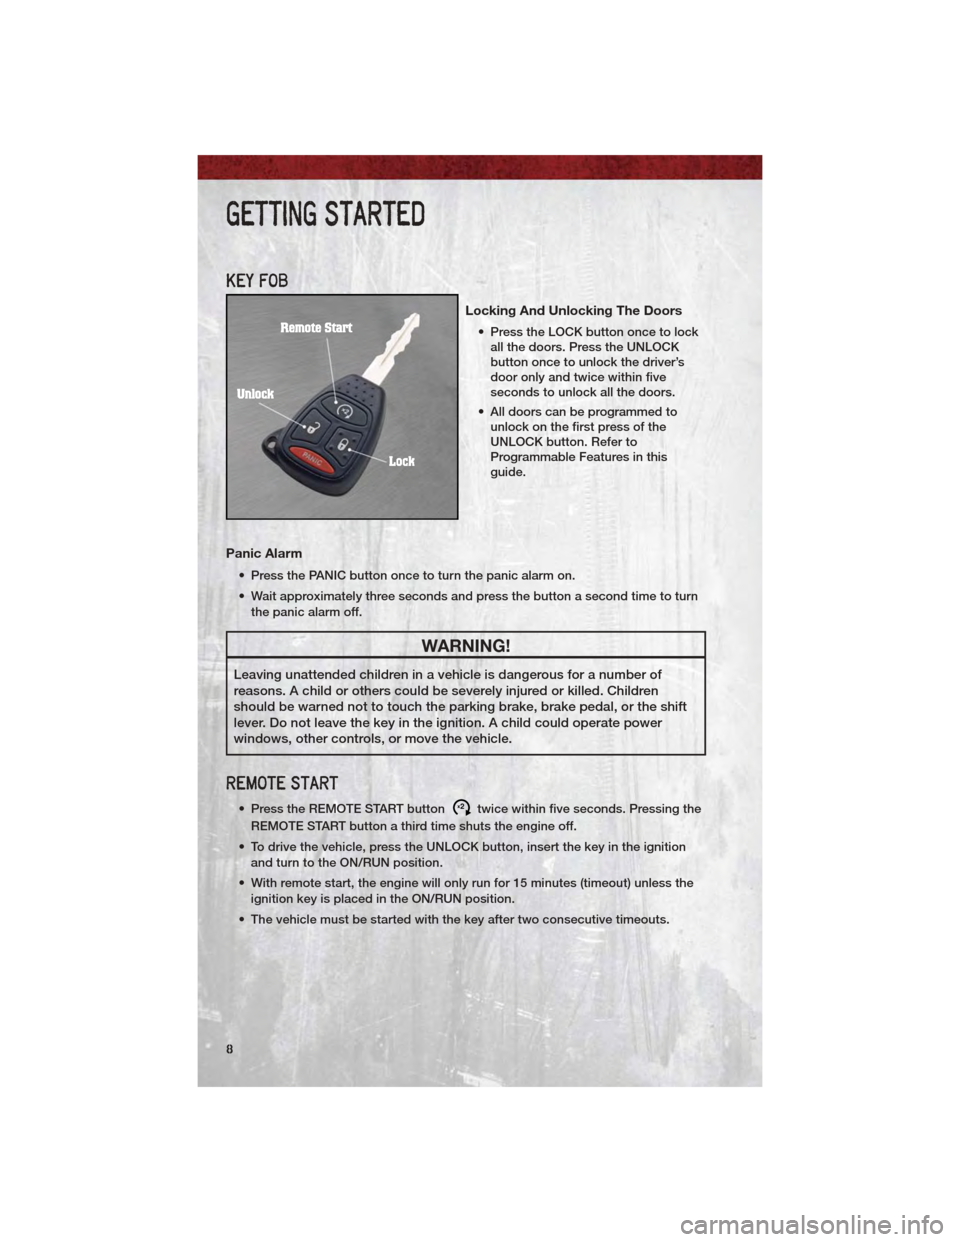
Locking And Unlocking The Doors
• Press the LOCK button once to lockall the doors. Press the UNLOCK
button once to unlock the driver’s
door only and twice within five
seconds to unlock all the doors.
• All doors can be programmed to unlock on the first press of the
UNLOCK button. Refer to
Programmable Features in this
guide.
Panic Alarm
• Press the PANIC button once to turn the panic alarm on.
• Wait approximately three seconds and press the button a second time to turn
the panic alarm off.
WARNING!
Leaving unattended children in a vehicle is dangerous for a number of
reasons. A child or others could be severely injured or killed. Children
should be warned not to touch the parking brake, brake pedal, or the shift
lever. Do not leave the key in the ignition. A child could operate power
windows, other controls, or move the vehicle.
REMOTE START
• Press the REMOTE START buttonx2twice within five seconds. Pressing the
REMOTE START button a third time shuts the engine off.
• To drive the vehicle, press the UNLOCK button, insert the key in the ignition and turn to the ON/RUN position.
• With remote start, the engine will only run for 15 minutes (timeout) unless the ignition key is placed in the ON/RUN position.
• The vehicle must be started with the key after two consecutive timeouts.
GETTING STARTED
8
Page 34 of 76
FOUR-WHEEL DRIVE OPERATION
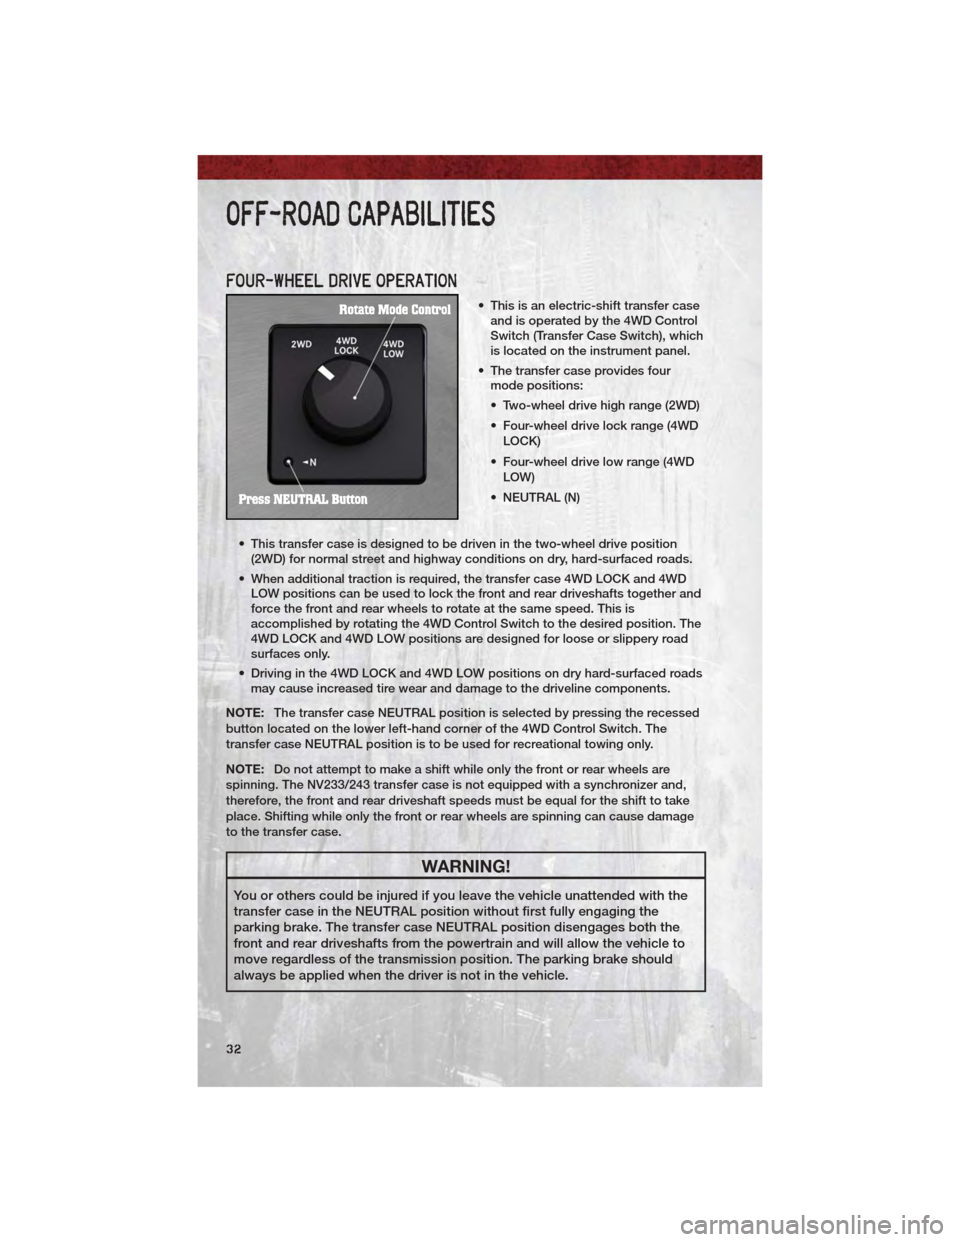
• This is an electric-shift transfer caseand is operated by the 4WD Control
Switch (Transfer Case Switch), which
is located on the instrument panel.
• The transfer case provides four mode positions:
• Two-wheel drive high range (2WD)
• Four-wheel drive lock range (4WD
LOCK)
• Four-wheel drive low range (4WD LOW)
• NEUTRAL (N)
• This transfer case is designed to be driven in the two-wheel drive position (2WD) for normal street and highway conditions on dry, hard-surfaced roads.
• When additional traction is required, the transfer case 4WD LOCK and 4WD LOW positions can be used to lock the front and rear driveshafts together and
force the front and rear wheels to rotate at the same speed. This is
accomplished by rotating the 4WD Control Switch to the desired position. The
4WD LOCK and 4WD LOW positions are designed for loose or slippery road
surfaces only.
• Driving in the 4WD LOCK and 4WD LOW positions on dry hard-surfaced roads may cause increased tire wear and damage to the driveline components.
NOTE: The transfer case NEUTRAL position is selected by pressing the recessed
button located on the lower left-hand corner of the 4WD Control Switch. The
transfer case NEUTRAL position is to be used for recreational towing only.
NOTE: Do not attempt to make a shift while only the front or rear wheels are
spinning. The NV233/243 transfer case is not equipped with a synchronizer and,
therefore, the front and rear driveshaft speeds must be equal for the shift to take
place. Shifting while only the front or rear wheels are spinning can cause damage
to the transfer case.
WARNING!
You or others could be injured if you leave the vehicle unattended with the
transfer case in the NEUTRAL position without first fully engaging the
parking brake. The transfer case NEUTRAL position disengages both the
front and rear driveshafts from the powertrain and will allow the vehicle to
move regardless of the transmission position. The parking brake should
always be applied when the driver is not in the vehicle.
OFF-ROAD CAPABILITIES
32
Page 40 of 76
• When the malfunction indicator is illuminated, the system may not be able todetect or signal low tire pressure as intended. TPMS malfunctions may occur
for a variety of reasons, including the installation of replacement or alternate
tires or wheels on the vehicle that prevent the TPMS from functioning properly.
Always check the TPMS malfunction telltale after replacing one or more tires
or wheels on your vehicle, to ensure that the replacement or alternate tires and
wheels allow the TPMS to continue to function properly.
CAUTION!
The TPMS has been optimized for the original equipment tires and wheels.
TPMS pressures and warning have been established for the tire size
equipped on your vehicle. Undesirable system operation or sensor damage
may result when using replacement equipment that is not of the same size,
type, and/or style. Aftermarket wheels can cause sensor damage. Do not
use tire sealant from a can, or balance beads if your vehicle is equipped
with a TPMS, as damage to the sensors may result.
- Engine Temperature Warning Light
• This light warns of an overheated engine condition.
• If the light turns on and a warning chime sounds while driving, safely pull overand stop the vehicle. If the A/C system is on, turn it off. Also, shift the
transmission into NEUTRAL and idle the vehicle. If the temperature reading
does not return to normal, turn the engine off immediately.
• We recommend that you do not operate the vehicle or engine damage will occur. Have the vehicle serviced immediately.
WARNING!
A hot engine cooling system is dangerous. You or others could be badly
burned by steam or boiling coolant. You may want to call an authorized
service center for service if your vehicle overheats.
BRAKE- Brake Warning Light
• The Brake Warning light illuminates when there is either a system malfunctionor the parking brake is applied. If the light is on and the parking brake is not
applied, it indicates a possible brake hydraulic malfunction, brake booster
problem or an Anti-Lock Brake System problem.
• We recommend you drive to the nearest service center and have the vehicle serviced immediately.
WHAT TO DO IN EMERGENCIES
38
Page 45 of 76
Preparations For Jacking
• Park on a firm, level surface. Avoid ice or slippery areas.
• Set the parking brake and shift the automatic transmission into PARK. OnFour-Wheel Drive vehicles, shift the transfer case to the 4L position.
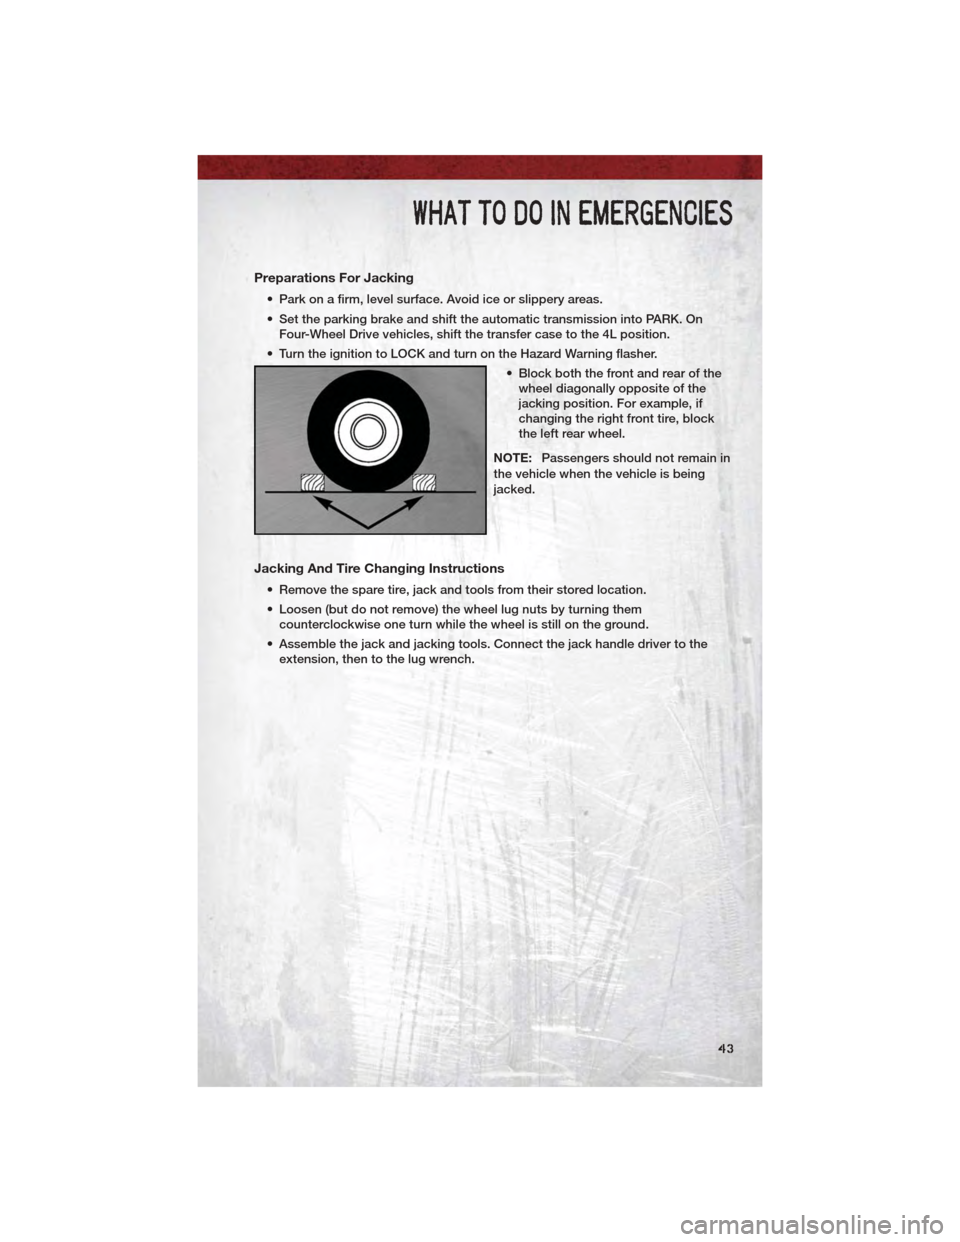
• Turn the ignition to LOCK and turn on the Hazard Warning flasher. • Block both the front and rear of thewheel diagonally opposite of the
jacking position. For example, if
changing the right front tire, block
the left rear wheel.
NOTE: Passengers should not remain in
the vehicle when the vehicle is being
jacked.
Jacking And Tire Changing Instructions
• Remove the spare tire, jack and tools from their stored location.
• Loosen (but do not remove) the wheel lug nuts by turning them counterclockwise one turn while the wheel is still on the ground.
• Assemble the jack and jacking tools. Connect the jack handle driver to the extension, then to the lug wrench.
WHAT TO DO IN EMERGENCIES
43
Page 49 of 76
WARNING!(Continued)
• Raising the vehicle higher than necessary can make the vehicle lessstable and could cause it to slip off the jack and hurt someone near it.
Raise the vehicle only enough to remove the tire.
• A loose tire or jack, thrown forward in a collision or hard stop, could endanger the occupants of the vehicle. Always stow the jack parts and
the spare tire in the places provided.
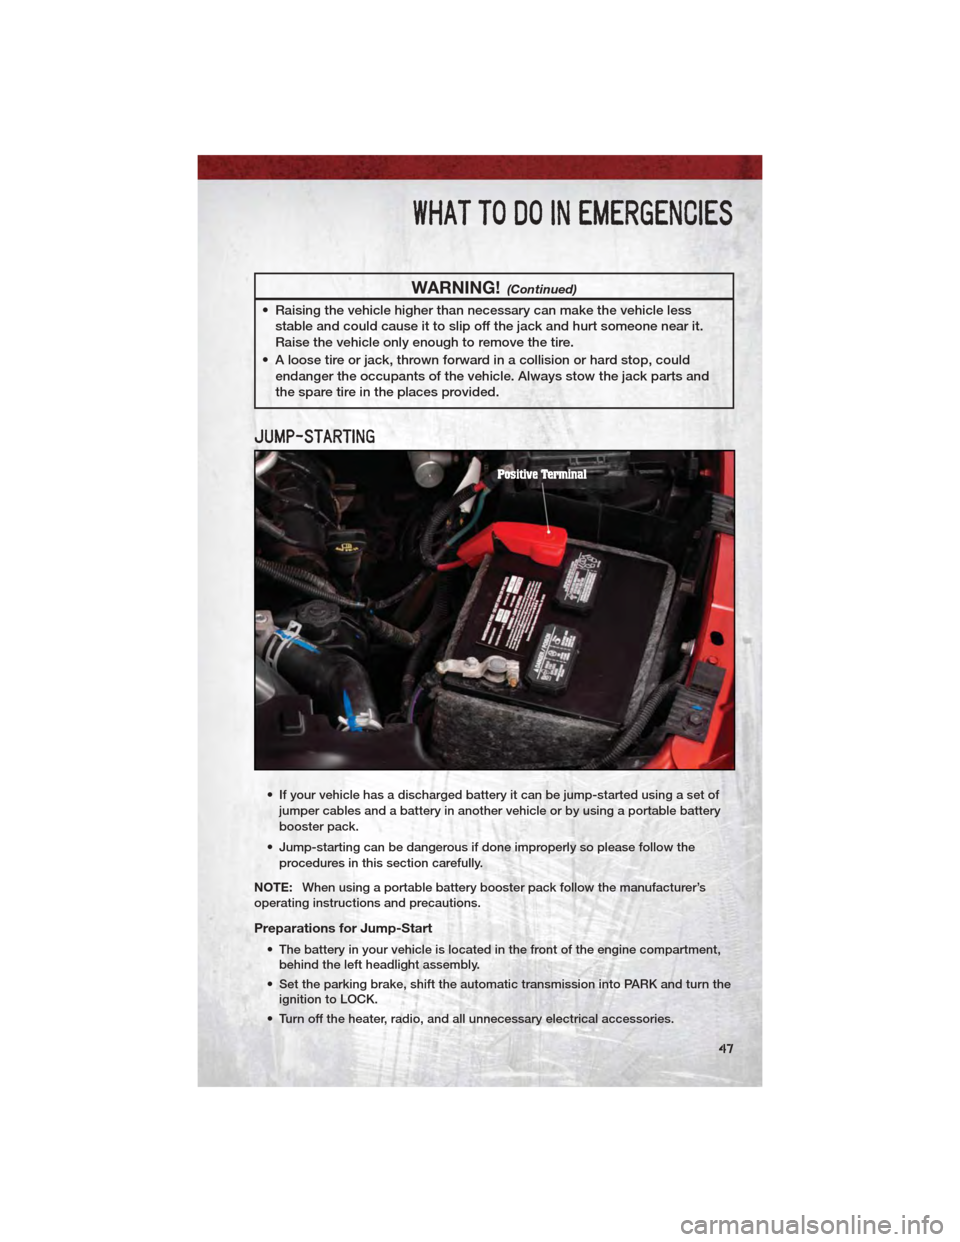
JUMP-STARTING
• If your vehicle has a discharged battery it can be jump-started using a set of
jumper cables and a battery in another vehicle or by using a portable battery
booster pack.
• Jump-starting can be dangerous if done improperly so please follow the procedures in this section carefully.
NOTE: When using a portable battery booster pack follow the manufacturer’s
operating instructions and precautions.
Preparations for Jump-Start
• The battery in your vehicle is located in the front of the engine compartment, behind the left headlight assembly.
• Set the parking brake, shift the automatic transmission into PARK and turn the ignition to LOCK.
• Turn off the heater, radio, and all unnecessary electrical accessories.
WHAT TO DO IN EMERGENCIES
47
Page 50 of 76
• If using another vehicle to jump-start the battery, park the vehicle within thejumper cables reach, set the parking brake and make sure the ignition is OFF.
Jump-Starting Procedure
• Connect the positive (+)end of the jumper cable to the positive (+)post of the
discharged vehicle.
• Connect the opposite end of the positive (+)jumper cable to the positive (+)
post of the booster battery.
• Connect the negative end (-)of the jumper cable to the negative (-)post of the
booster battery.
• Connect the opposite end of the negative (-)jumper cable to a good engine
ground (exposed metal part of the discharged vehicle’s engine) away from the
battery and the fuel injection system.
• Start the engine in the vehicle that has the booster battery, let the engine idle a few minutes, and then start the engine in the vehicle with the discharged
battery.
Once the engine is started, remove the jumper cables in the reverse sequence:
• Disconnect the negative (-)jumper cable from the engine ground of the vehicle
with the discharged battery.
• Disconnect the negative end (-)of the jumper cable from the negative (-)post
of the booster battery.
• Disconnect the opposite end of the positive (+)jumper cable from the positive
(+) post of the booster battery.
• Disconnect the positive (+)end of the jumper cable from the positive (+)post
of the discharged vehicle.
• If frequent jump-starting is required to start your vehicle you should have the battery and charging system inspected at your authorized dealer.
CAUTION!
• Accessories that can be plugged into the vehicle power outlets drawpower from the vehicle’s battery, even when not in use (i.e., cellular
phones, etc.). Eventually, if plugged in long enough, the vehicle’s battery
will discharge sufficiently to degrade battery life and/or prevent the
engine from starting.
• Do not use a portable battery booster pack or any other booster source with a system voltage greater than 12 Volts or damage to the battery,
starter motor, alternator or electrical system may occur.
• Failure to follow these procedures could result in damage to the charging system of the booster vehicle or the discharged vehicle.
WHAT TO DO IN EMERGENCIES
48