manual transmission DODGE DART 2013 PF / 1.G User Guide
[x] Cancel search | Manufacturer: DODGE, Model Year: 2013, Model line: DART, Model: DODGE DART 2013 PF / 1.GPages: 132, PDF Size: 4.13 MB
Page 3 of 132
INTRODUCTION/WELCOME
WELCOME FROM CHRYSLER
GROUP LLC...................2
CONTROLS AT A GLANCE
DRIVER COCKPIT ................4
INSTRUMENT CLUSTER ............6
GETTING STARTED
KEYFOB .....................8
REMOTE START.................9
KEYLESS ENTER-N-GO™ ............9
THEFT ALARM .................13
SEATBELT ...................15
SUPPLEMENTAL RESTRAINT SYSTEM (SRS) —
AIRBAGS ....................16
CHILD RESTRAINTS ..............17
FRONT SEATS .................19
REARSEAT ...................21
HEATEDSEATS ................22
HEATED STEERING WHEEL ..........23
TILT / TELESCOPING STEERING
COLUMN ....................23
OPERATING YOUR VEHICLE
ENGINE BREAK-IN RECOMMENDATIONS . . . 24
TURN SIGNAL/WIPER/WASHER/HIGH
BEAM LEVER ..................24
HEADLIGHT SWITCH ..............26
SPEED CONTROL ................27
MANUAL CLIMATE CONTROLS ........28
Uconnect® 8.4 MANUAL CLIMATE
CONTROLS ...................29
Uconnect® 8.4 AUTOMATIC CLIMATE
CONTROLS ...................30
POWER SUNROOF ...............32
WIND BUFFETING ...............33
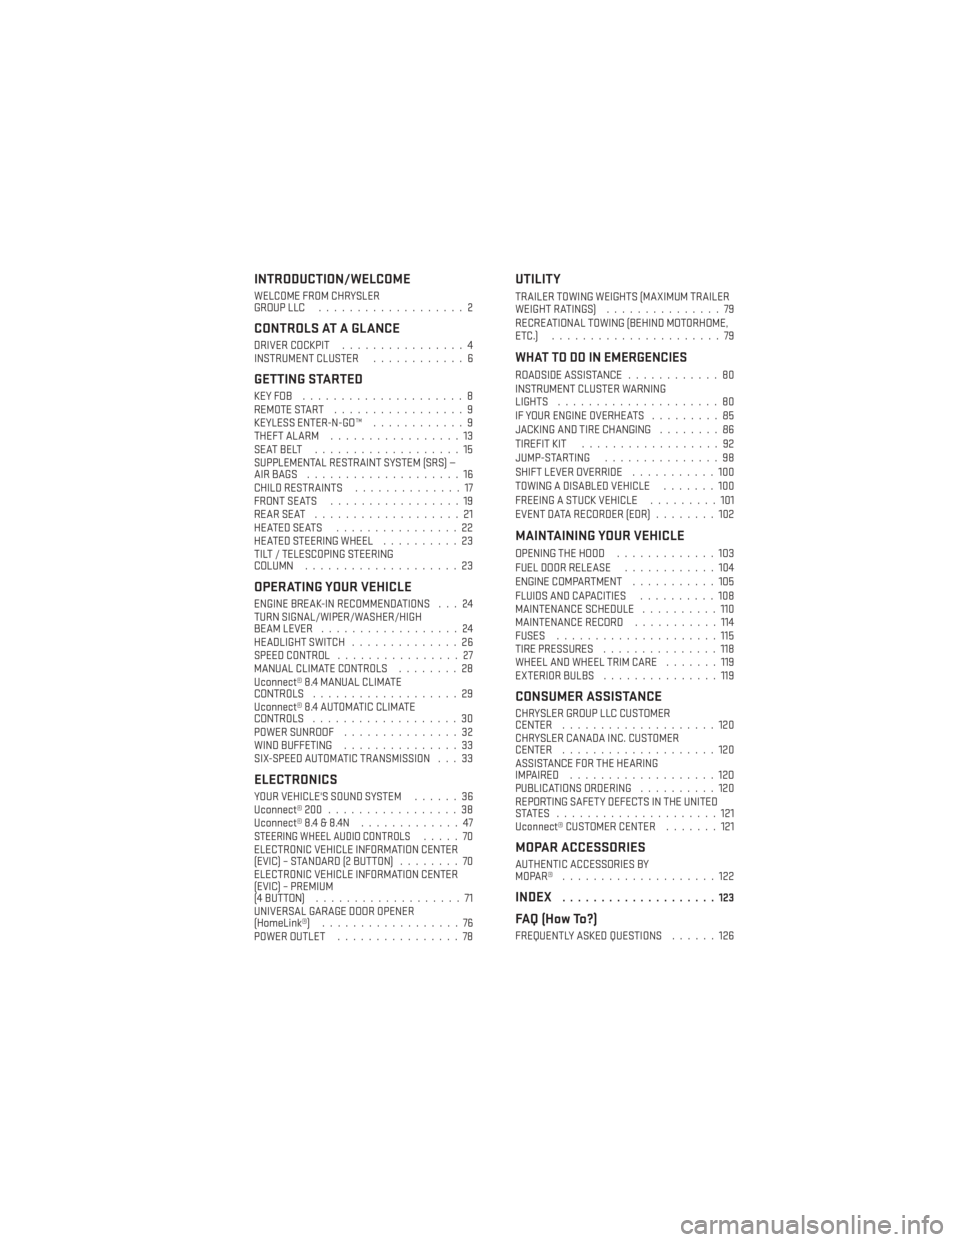
SIX-SPEED AUTOMATIC TRANSMISSION . . . 33
ELECTRONICS
YOUR VEHICLE'S SOUND SYSTEM ......36
Uconnect® 200 .................38
Uconnect® 8.4 & 8.4N .............47
STEERING WHEEL AUDIO CONTROLS.....70
ELECTRONIC VEHICLE INFORMATION CENTER
(EVIC) – STANDARD (2 BUTTON) ........70
ELECTRONIC VEHICLE INFORMATION CENTER
(EVIC) – PREMIUM
(4 BUTTON) ...................71
UNIVERSAL GARAGE DOOR OPENER
(HomeLink®) ..................76
POWER OUTLET ................78
UTILITY
TRAILER TOWING WEIGHTS (MAXIMUM TRAILER
WEIGHTRATINGS) ...............79
RECREATIONAL TOWING (BEHIND MOTORHOME,
ETC.) ......................79
WHAT TO DO IN EMERGENCIES
ROADSIDE ASSISTANCE ............80
INSTRUMENT CLUSTER WARNING
LIGHTS .....................80
IF YOUR ENGINE OVERHEATS .........85
JACKING AND TIRE CHANGING ........86
TIREFIT KIT ..................92
JUMP-STARTING ...............98
SHIFT LEVER OVERRIDE ...........100
TOWING A DISABLED VEHICLE .......100
FREEING A STUCK VEHICLE .........101
EVENT DATA RECORDER (EDR) ........102
MAINTAINING YOUR VEHICLE
OPENING THE HOOD.............103
FUEL DOOR RELEASE ............104
ENGINE COMPARTMENT ...........105
FLUIDS AND CAPACITIES ..........108
MAINTENANCE SCHEDULE ..........110
MAINTENANCE RECORD ...........114
FUSES .....................115
TIRE PRESSURES ...............118
WHEEL AND WHEEL TRIM CARE .......119
EXTERIOR BULBS ...............119
CONSUMER ASSISTANCE
CHRYSLER GROUP LLC CUSTOMER
CENTER....................120
CHRYSLER CANADA INC. CUSTOMER
CENTER ....................120
ASSISTANCE FOR THE HEARING
IMPAIRED ...................120
PUBLICATIONS ORDERING ..........120
REPORTING SAFETY DEFECTS IN THE UNITED
STATES .....................121
Uconnect® CUSTOMER CENTER .......121
MOPAR ACCESSORIES
AUTHENTIC ACCESSORIES BY
MOPAR® ....................122
INDEX....................123
FAQ (How To?)
FREQUENTLY ASKED QUESTIONS ......126
TABLE OF CONTENTS
Page 35 of 132
WARNING!
• Do not let children play with the sunroof, or leave children unattended in the vehiclewith the key fob in or near the vehicle. Occupants, particularly unattended children,
can become entrapped by the power sunroof while operating the power sunroof
switch. Such entrapment may result in serious injury or death.
• In a collision, there is a greater risk of being thrown from a vehicle with an open
sunroof. You could also be severely injured or killed. Always fasten your seat belt
properly and make sure all passengers are properly secured.
• Do not allow small children to operate the sunroof. Never allow your fingers, other
body parts, or any object to project through the sunroof opening. Injury may result.
WIND BUFFETING
• Wind buffeting can be described as a helicopter-type percussion sound. If buffeting
occurs with the rear windows open, adjust the front and rear windows together.
• If buffeting occurs with the sunroof open, adjust the sunroof opening, or adjust any window. This will minimize buffeting.
SIX-SPEED AUTOMATIC TRANSMISSION
• This vehicle may be equipped with a fuel efficient Dual-Dry Clutch, Six Speed AutomaticTransmission. This transmission offers a sportier driving experience with faster
AutoStick® shifting.
• During low-speed driving conditions in first gear, vehicle momentum changes may feel exaggerated in response to changes in accelerator pedal position. This behavior is
normal and is similar to vehicles equipped with a manual transmission.
NOTE:
• Very aggressive driving may result in some clutch odor similar to a manual transmission. An active warning message will display in the Instrument Cluster if cool down actions are
needed.
•
The first few shifts on a new vehicle may be somewhat abrupt. This is a normal condition,
and precision shifts will develop within a few hundred miles (kilometers).
• At low speeds you may hear mechanical noises similar to a manual transmission as the transmission changes gears. These noises are normal and will not damage the trans-
mission.
• Before and after the engine is started, you may hear a hydraulic pump for a short period of time. This noise is normal and will not damage the transmission.
Shifting The Transmission
• The transmission shift lever position (PRND) is displayed both on the shift lever and in the Electronic Vehicle Information Center (EVIC).
OPERATING YOUR VEHICLE
33
Page 36 of 132
• To drive, depress the brake pedal, press the button on the front of the shift lever and movethe shift lever from PARK or NEUTRAL to the DRIVE position.
• Manual shifts can also be made using the AutoStick® shift control.
• This transmission is programmed to prevent shifting from Reverse to Drive or Drive to Reverse, if vehicle speed is above 6 mph (10 km/h). This safety feature helps protect your
transmission from damage.
NOTE:
• When stopped on an incline, it is recommended that you always hold the vehicle in place using the brakes. On steep inclines, Hill Start Assist (HSA) will temporarily hold the car in
position when the brake pedal is released. If the accelerator pedal is not applied after a
short time, the car will roll back. Either reapply the brake (to hold the vehicle) or press the
accelerator to climb the hill.
• During acceleration, gear changes will feel smooth compared to a vehicle with a tradi- tional manual transmission. This is a benefit of the dual clutch design that avoids power
loss during up-shifts.
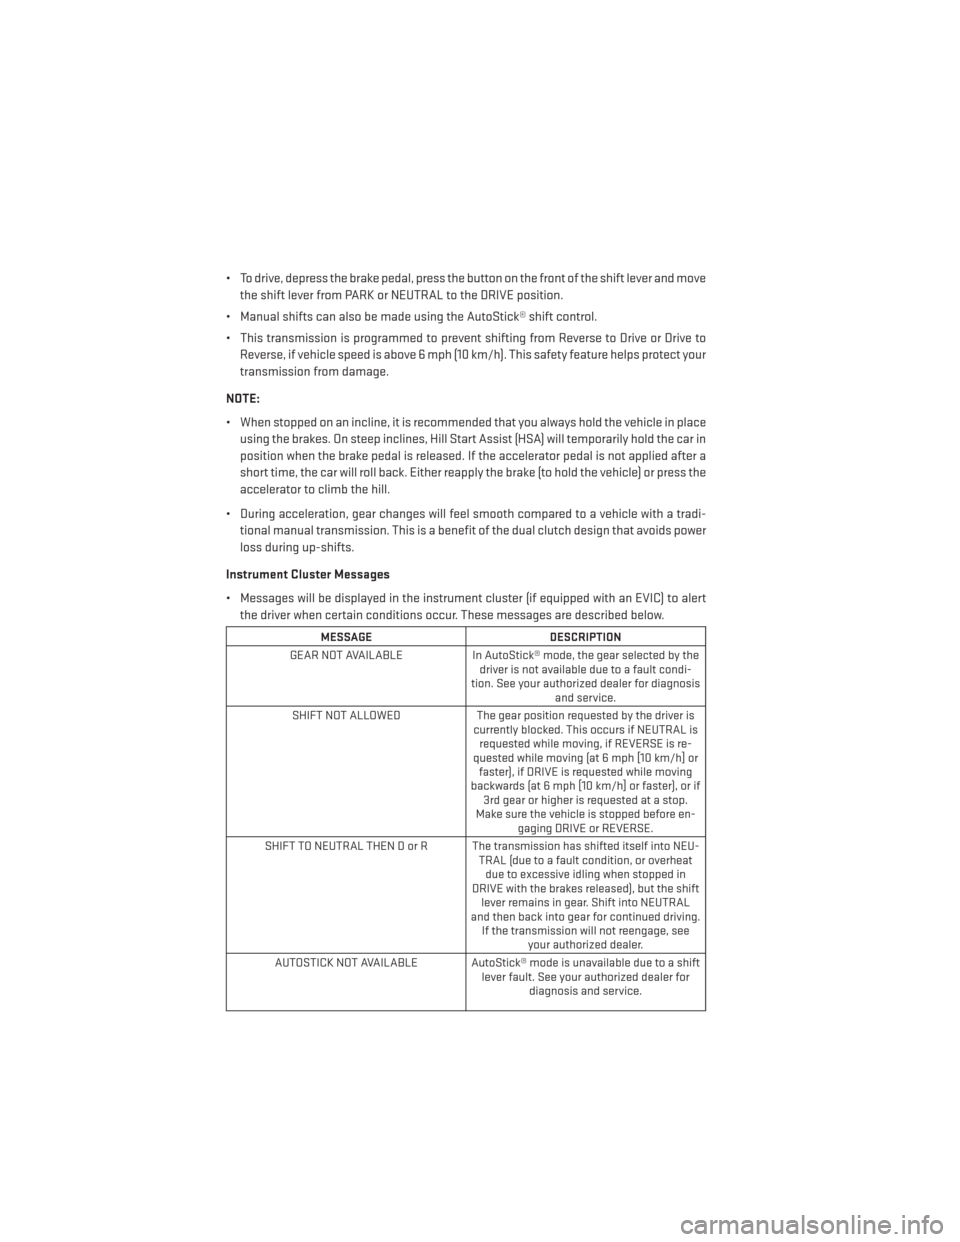
Instrument Cluster Messages
• Messages will be displayed in the instrument cluster (if equipped with an EVIC) to alert the driver when certain conditions occur. These messages are described below.
MESSAGE DESCRIPTION
GEAR NOT AVAILABLE In AutoStick® mode, the gear selected by the
driver is not available due to a fault condi-
tion. See your authorized dealer for diagnosis and service.
SHIFT NOT ALLOWED The gear position requested by the driver is
currently blocked. This occurs if NEUTRAL is requested while moving, if REVERSE is re-
quested while moving (at 6 mph [10 km/h] or faster), if DRIVE is requested while moving
backwards (at 6 mph [10 km/h] or faster), or if 3rd gear or higher is requested at a stop.
Make sure the vehicle is stopped before en- gaging DRIVE or REVERSE.
SHIFT TO NEUTRAL THEN D or R The transmission has shifted itself into NEU- TRAL (due to a fault condition, or overheatdue to excessive idling when stopped in
DRIVE with the brakes released), but the shift lever remains in gear. Shift into NEUTRAL
and then back into gear for continued driving. If the transmission will not reengage, see your authorized dealer.
AUTOSTICK NOT AVAILABLE AutoStick® mode is unavailable due to a shift lever fault. See your authorized dealer fordiagnosis and service.
OPERATING YOUR VEHICLE
34
Page 37 of 132
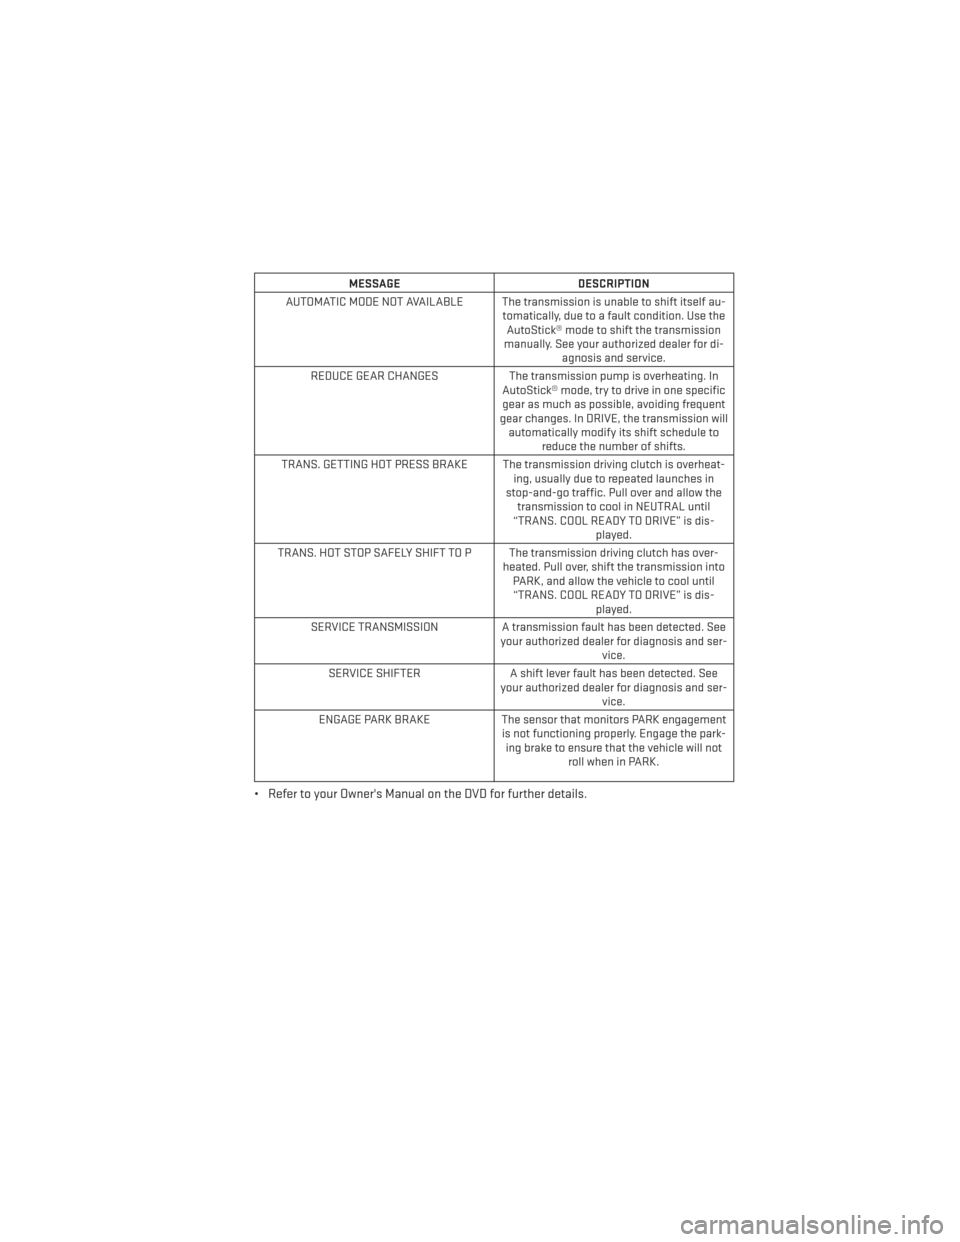
MESSAGEDESCRIPTION
AUTOMATIC MODE NOT AVAILABLE The transmission is unable to shift itself au- tomatically, due to a fault condition. Use theAutoStick® mode to shift the transmission
manually. See your authorized dealer for di- agnosis and service.
REDUCE GEAR CHANGES The transmission pump is overheating. In
AutoStick® mode, try to drive in one specific gear as much as possible, avoiding frequent
gear changes. In DRIVE, the transmission will automatically modify its shift schedule to reduce the number of shifts.
TRANS. GETTING HOT PRESS BRAKE The transmission driving clutch is overheat- ing, usually due to repeated launches in
stop-and-go traffic. Pull over and allow the transmission to cool in NEUTRAL until
“TRANS. COOL READY TO DRIVE” is dis- played.
TRANS. HOT STOP SAFELY SHIFT TO P The transmission driving clutch has over- heated. Pull over, shift the transmission intoPARK, and allow the vehicle to cool until“TRANS. COOL READY TO DRIVE” is dis- played.
SERVICE TRANSMISSION A transmission fault has been detected. See
your authorized dealer for diagnosis and ser- vice.
SERVICE SHIFTER A shift lever fault has been detected. See
your authorized dealer for diagnosis and ser- vice.
ENGAGE PARK BRAKE The sensor that monitors PARK engagement
is not functioning properly. Engage the park- ing brake to ensure that the vehicle will not roll when in PARK.
• Refer to your Owner's Manual on the DVD for further details.
OPERATING YOUR VEHICLE
35
Page 81 of 132
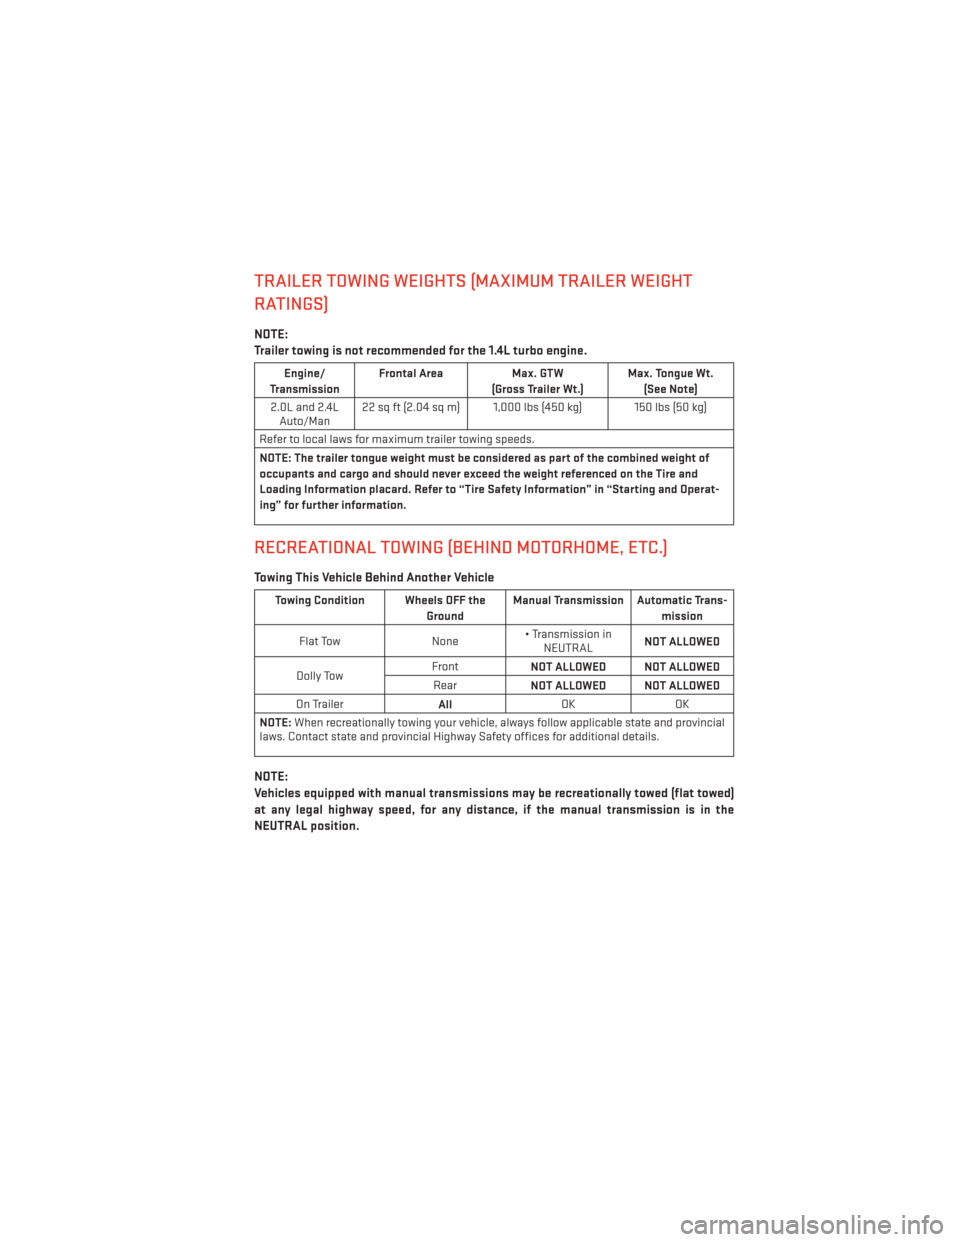
TRAILER TOWING WEIGHTS (MAXIMUM TRAILER WEIGHT
RATINGS)
NOTE:
Trailer towing is not recommended for the 1.4L turbo engine.
Engine/
Transmission Frontal Area
Max. GTW
(Gross Trailer Wt.) Max. Tongue Wt.
(See Note)
2.0L and 2.4L Auto/Man 22 sq ft (2.04 sq m) 1,000 lbs (450 kg) 150 lbs (50 kg)
Refer to local laws for maximum trailer towing speeds.
NOTE: The trailer tongue weight must be considered as part of the combined weight of
occupants and cargo and should never exceed the weight referenced on the Tire and
Loading Information placard. Refer to “Tire Safety Information” in “Starting and Operat-
ing” for further information.
RECREATIONAL TOWING (BEHIND MOTORHOME, ETC.)
Towing This Vehicle Behind Another Vehicle
Towing Condition Wheels OFF the GroundManual Transmission Automatic Trans-
mission
Flat Tow None• Transmission in
NEUTRAL NOT ALLOWED
Dolly Tow Front
NOT ALLOWED NOT ALLOWED
Rear NOT ALLOWED NOT ALLOWED
On Trailer AllOK
OK
NOTE: When recreationally towing your vehicle, always follow applicable state and provincial
laws. Contact state and provincial Highway Safety offices for additional details.
NOTE:
Vehicles equipped with manual transmissions may be recreationally towed (flat towed)
at any legal highway speed, for any distance, if the manual transmission is in the
NEUTRAL position.
UTILITY
79
Page 95 of 132
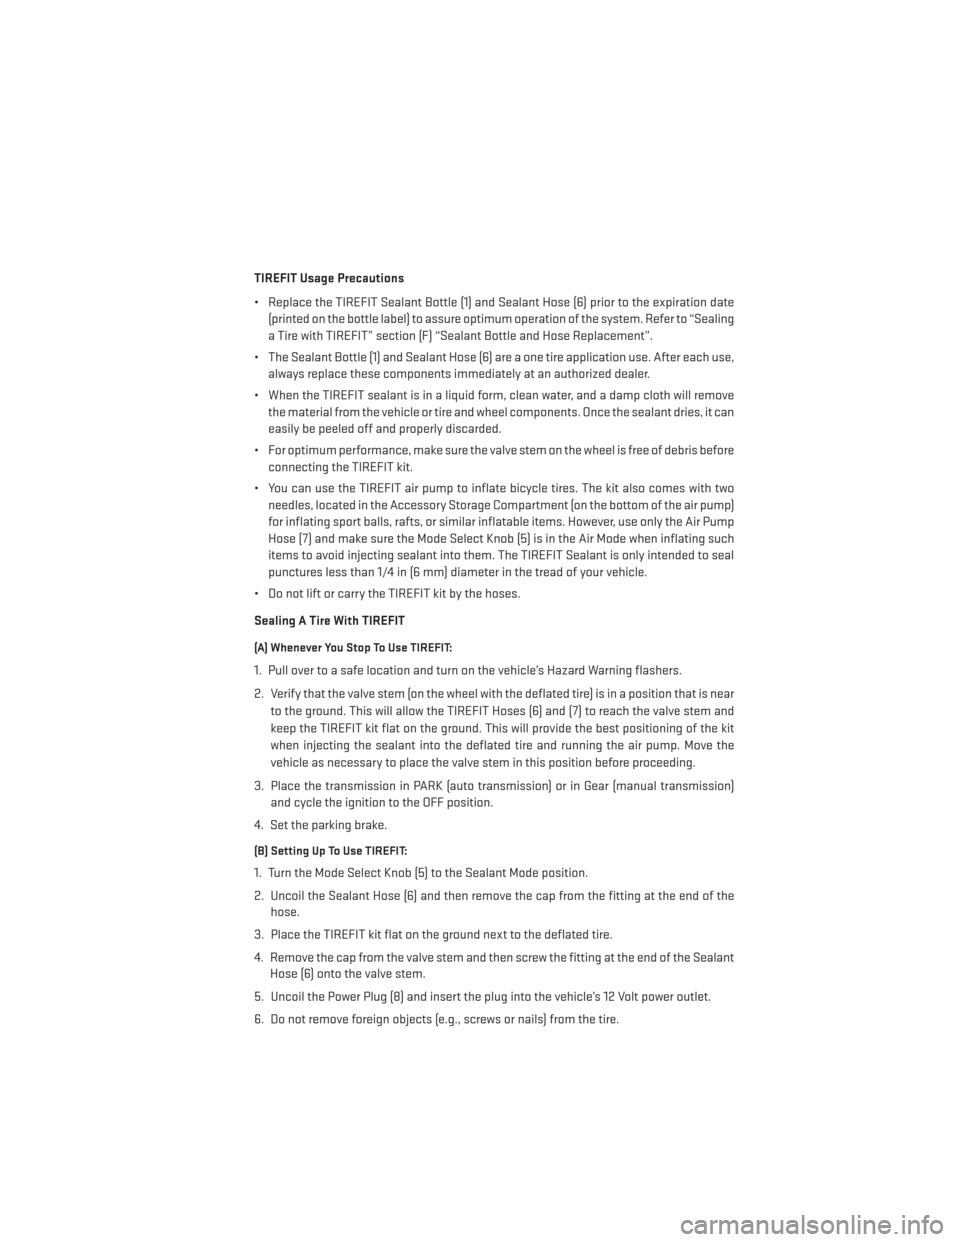
TIREFIT Usage Precautions
• Replace the TIREFIT Sealant Bottle (1) and Sealant Hose (6) prior to the expiration date(printed on the bottle label) to assure optimum operation of the system. Refer to “Sealing
a Tire with TIREFIT” section (F) “Sealant Bottle and Hose Replacement”.
• The Sealant Bottle (1) and Sealant Hose (6) are a one tire application use. After each use, always replace these components immediately at an authorized dealer.
• When the TIREFIT sealant is in a liquid form, clean water, and a damp cloth will remove the material from the vehicle or tire and wheel components. Once the sealant dries, it can
easily be peeled off and properly discarded.
• For optimum performance, make sure the valve stem on the wheel is free of debris before connecting the TIREFIT kit.
• You can use the TIREFIT air pump to inflate bicycle tires. The kit also comes with two needles, located in the Accessory Storage Compartment (on the bottom of the air pump)
for inflating sport balls, rafts, or similar inflatable items. However, use only the Air Pump
Hose (7) and make sure the Mode Select Knob (5) is in the Air Mode when inflating such
items to avoid injecting sealant into them. The TIREFIT Sealant is only intended to seal
punctures less than 1/4 in (6 mm) diameter in the tread of your vehicle.
• Do not lift or carry the TIREFIT kit by the hoses.
Sealing A Tire With TIREFIT
(A) Whenever You Stop To Use TIREFIT:
1. Pull over to a safe location and turn on the vehicle’s Hazard Warning flashers.
2. Verify that the valve stem (on the wheel with the deflated tire) is in a position that is near to the ground. This will allow the TIREFIT Hoses (6) and (7) to reach the valve stem and
keep the TIREFIT kit flat on the ground. This will provide the best positioning of the kit
when injecting the sealant into the deflated tire and running the air pump. Move the
vehicle as necessary to place the valve stem in this position before proceeding.
3. Place the transmission in PARK (auto transmission) or in Gear (manual transmission) and cycle the ignition to the OFF position.
4. Set the parking brake.
(B) Setting Up To Use TIREFIT:
1. Turn the Mode Select Knob (5) to the Sealant Mode position.
2. Uncoil the Sealant Hose (6) and then remove the cap from the fitting at the end of the hose.
3. Place the TIREFIT kit flat on the ground next to the deflated tire.
4. Remove the cap from the valve stem and then screw the fitting at the end of the Sealant Hose (6) onto the valve stem.
5. Uncoil the Power Plug (8) and insert the plug into the vehicle’s 12 Volt power outlet.
6. Do not remove foreign objects (e.g., screws or nails) from the tire.
WHAT TO DO IN EMERGENCIES
93
Page 96 of 132
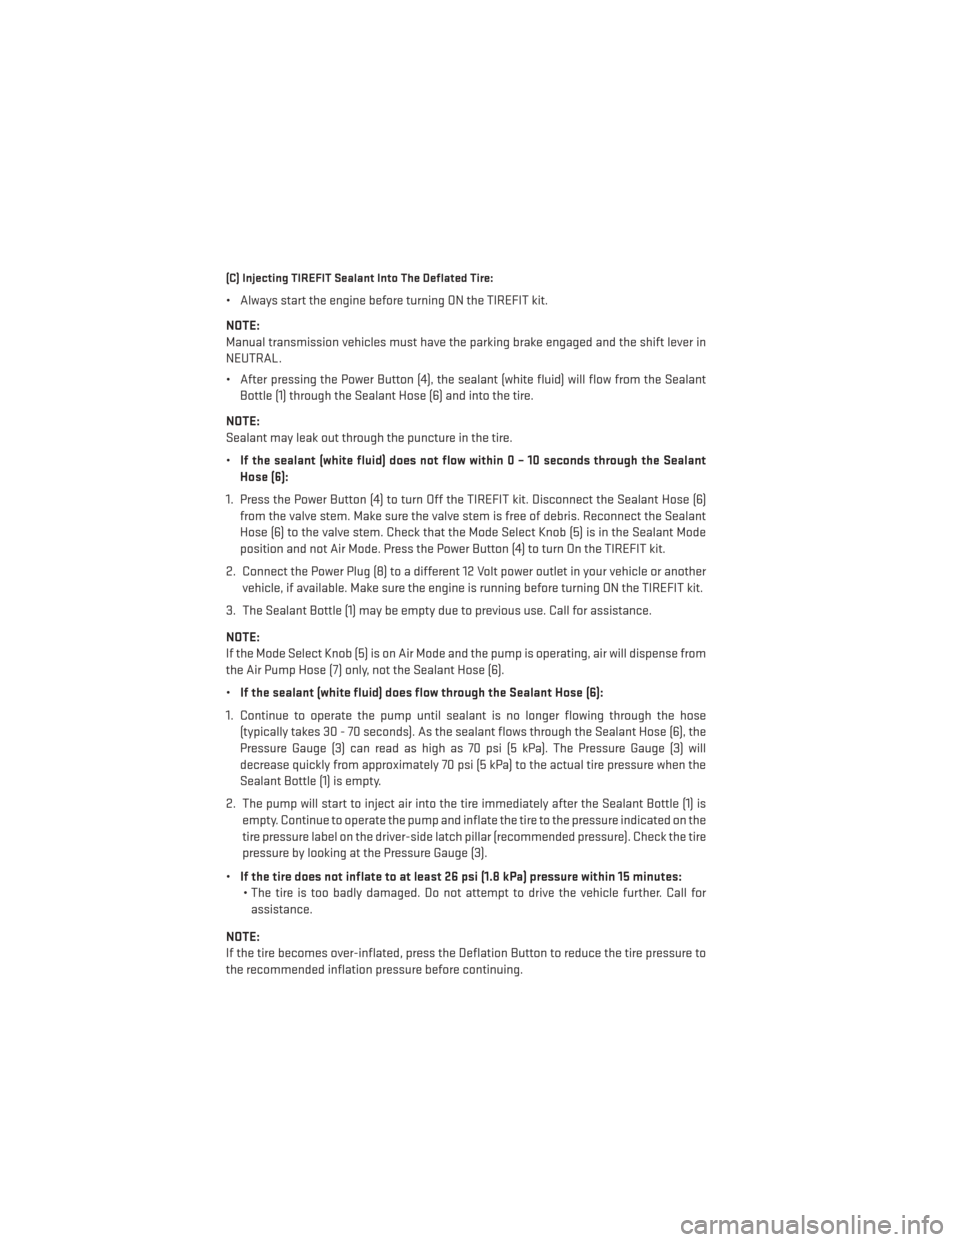
(C) Injecting TIREFIT Sealant Into The Deflated Tire:
• Always start the engine before turning ON the TIREFIT kit.
NOTE:
Manual transmission vehicles must have the parking brake engaged and the shift lever in
NEUTRAL.
• After pressing the Power Button (4), the sealant (white fluid) will flow from the SealantBottle (1) through the Sealant Hose (6) and into the tire.
NOTE:
Sealant may leak out through the puncture in the tire.
• If the sealant (white fluid) does not flow within 0 – 10 seconds through the Sealant
Hose (6):
1. Press the Power Button (4) to turn Off the TIREFIT kit. Disconnect the Sealant Hose (6) from the valve stem. Make sure the valve stem is free of debris. Reconnect the Sealant
Hose (6) to the valve stem. Check that the Mode Select Knob (5) is in the Sealant Mode
position and not Air Mode. Press the Power Button (4) to turn On the TIREFIT kit.
2. Connect the Power Plug (8) to a different 12 Volt power outlet in your vehicle or another vehicle, if available. Make sure the engine is running before turning ON the TIREFIT kit.
3. The Sealant Bottle (1) may be empty due to previous use. Call for assistance.
NOTE:
If the Mode Select Knob (5) is on Air Mode and the pump is operating, air will dispense from
the Air Pump Hose (7) only, not the Sealant Hose (6).
• If the sealant (white fluid) does flow through the Sealant Hose (6):
1. Continue to operate the pump until sealant is no longer flowing through the hose (typically takes 30 - 70 seconds). As the sealant flows through the Sealant Hose (6), the
Pressure Gauge (3) can read as high as 70 psi (5 kPa). The Pressure Gauge (3) will
decrease quickly from approximately 70 psi (5 kPa) to the actual tire pressure when the
Sealant Bottle (1) is empty.
2. The pump will start to inject air into the tire immediately after the Sealant Bottle (1) is empty. Continue to operate the pump and inflate the tire to the pressure indicated on the
tire pressure label on the driver-side latch pillar (recommended pressure). Check the tire
pressure by looking at the Pressure Gauge (3).
• If the tire does not inflate to at least 26 psi (1.8 kPa) pressure within 15 minutes:
• The tire is too badly damaged. Do not attempt to drive the vehicle further. Call for assistance.
NOTE:
If the tire becomes over-inflated, press the Deflation Button to reduce the tire pressure to
the recommended inflation pressure before continuing.
WHAT TO DO IN EMERGENCIES
94
Page 100 of 132
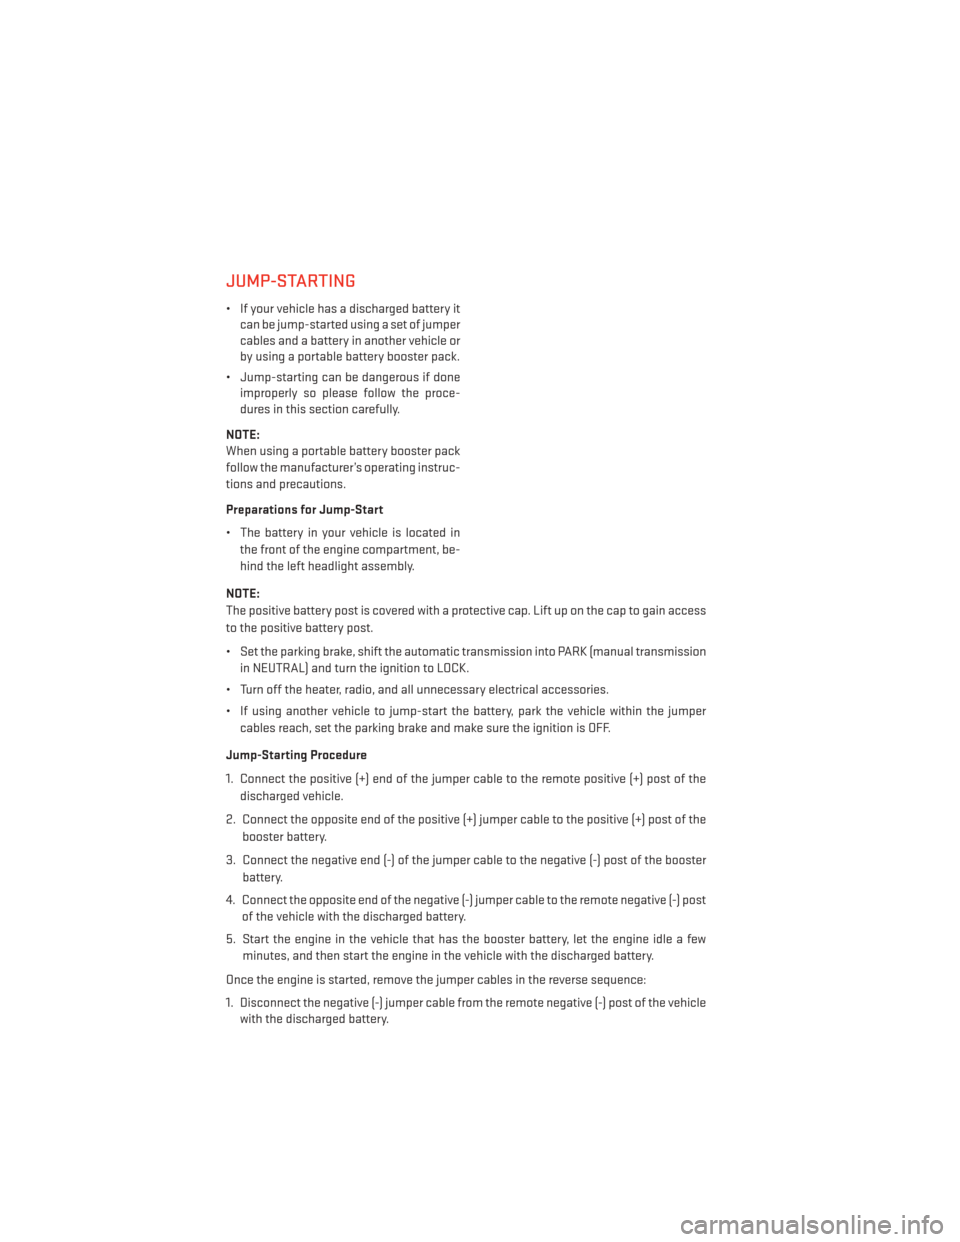
JUMP-STARTING
• If your vehicle has a discharged battery itcan be jump-started using a set of jumper
cables and a battery in another vehicle or
by using a portable battery booster pack.
• Jump-starting can be dangerous if done improperly so please follow the proce-
dures in this section carefully.
NOTE:
When using a portable battery booster pack
follow the manufacturer’s operating instruc-
tions and precautions.
Preparations for Jump-Start
• The battery in your vehicle is located in the front of the engine compartment, be-
hind the left headlight assembly.
NOTE:
The positive battery post is covered with a protective cap. Lift up on the cap to gain access
to the positive battery post.
• Set the parking brake, shift the automatic transmission into PARK (manual transmission in NEUTRAL) and turn the ignition to LOCK.
• Turn off the heater, radio, and all unnecessary electrical accessories.
• If using another vehicle to jump-start the battery, park the vehicle within the jumper cables reach, set the parking brake and make sure the ignition is OFF.
Jump-Starting Procedure
1. Connect the positive (+) end of the jumper cable to the remote positive (+) post of the discharged vehicle.
2. Connect the opposite end of the positive (+) jumper cable to the positive (+) post of the booster battery.
3. Connect the negative end (-) of the jumper cable to the negative (-) post of the booster battery.
4. Connect the opposite end of the negative (-) jumper cable to the remote negative (-) post of the vehicle with the discharged battery.
5. Start the engine in the vehicle that has the booster battery, let the engine idle a few minutes, and then start the engine in the vehicle with the discharged battery.
Once the engine is started, remove the jumper cables in the reverse sequence:
1. Disconnect the negative (-) jumper cable from the remote negative (-) post of the vehicle with the discharged battery.
WHAT TO DO IN EMERGENCIES
98
Page 102 of 132
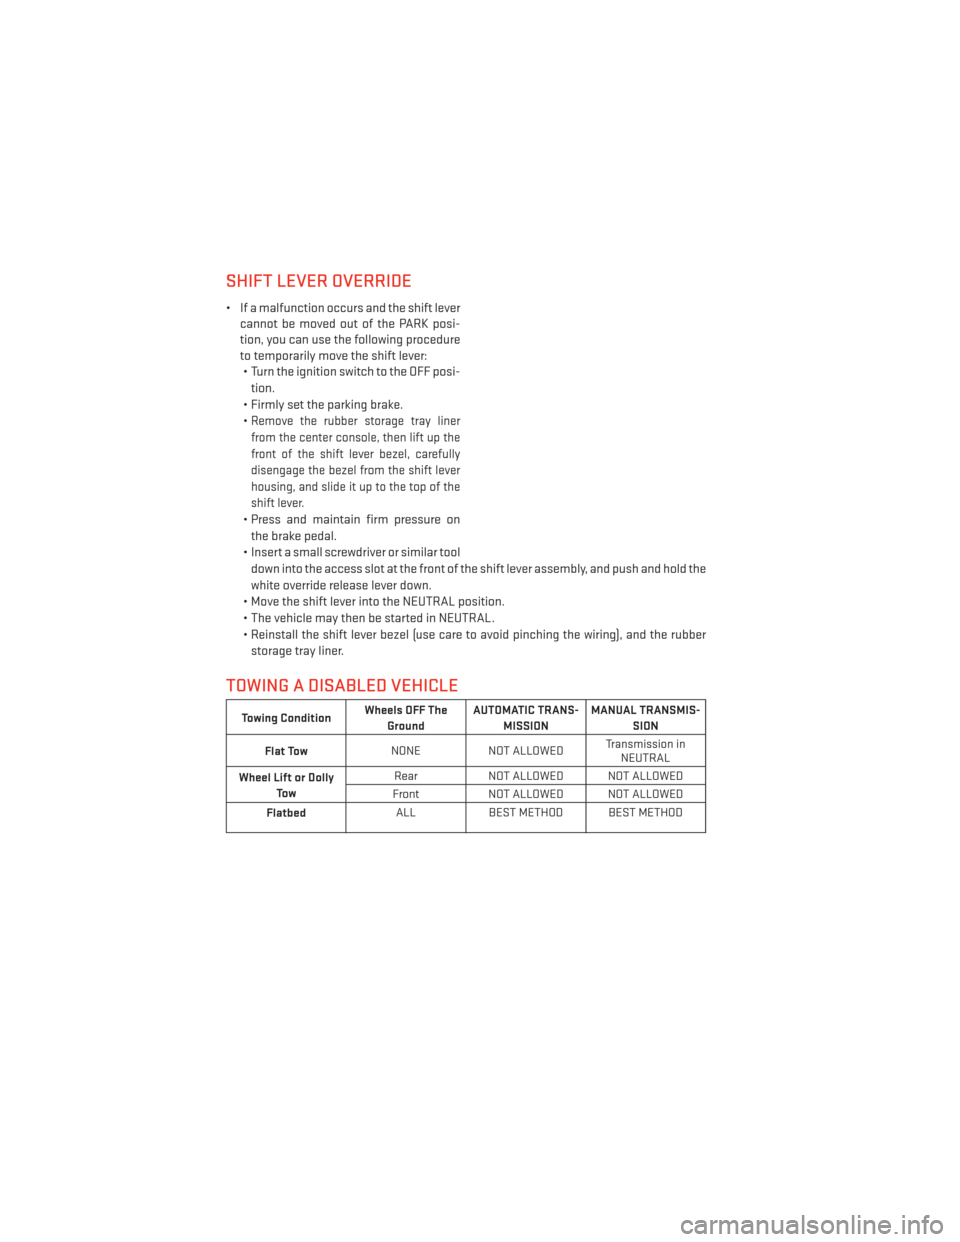
SHIFT LEVER OVERRIDE
• If a malfunction occurs and the shift levercannot be moved out of the PARK posi-
tion, you can use the following procedure
to temporarily move the shift lever:• Turn the ignition switch to the OFF posi-
tion.
• Firmly set the parking brake.
•
Remove the rubber storage tray liner
from the center console, then lift up the
front of the shift lever bezel, carefully
disengage the bezel from the shift lever
housing, and slide it up to the top of the
shift lever.
• Press and maintain firm pressure on the brake pedal.
• Insert a small screwdriver or similar tool down into the access slot at the front of the shift lever assembly, and push and hold the
white override release lever down.
• Move the shift lever into the NEUTRAL position.
• The vehicle may then be started in NEUTRAL.
• Reinstall the shift lever bezel (use care to avoid pinching the wiring), and the rubber storage tray liner.
TOWING A DISABLED VEHICLE
Towing Condition Wheels OFF The
Ground AUTOMATIC TRANS-
MISSION MANUAL TRANSMIS-
SION
Flat Tow NONE
NOT ALLOWED Transmission in
NEUTRAL
Wheel Lift or Dolly To w Rear
NOT ALLOWED NOT ALLOWED
Front NOT ALLOWED NOT ALLOWED
Flatbed ALL
BEST METHOD BEST METHOD
WHAT TO DO IN EMERGENCIES
100
Page 103 of 132
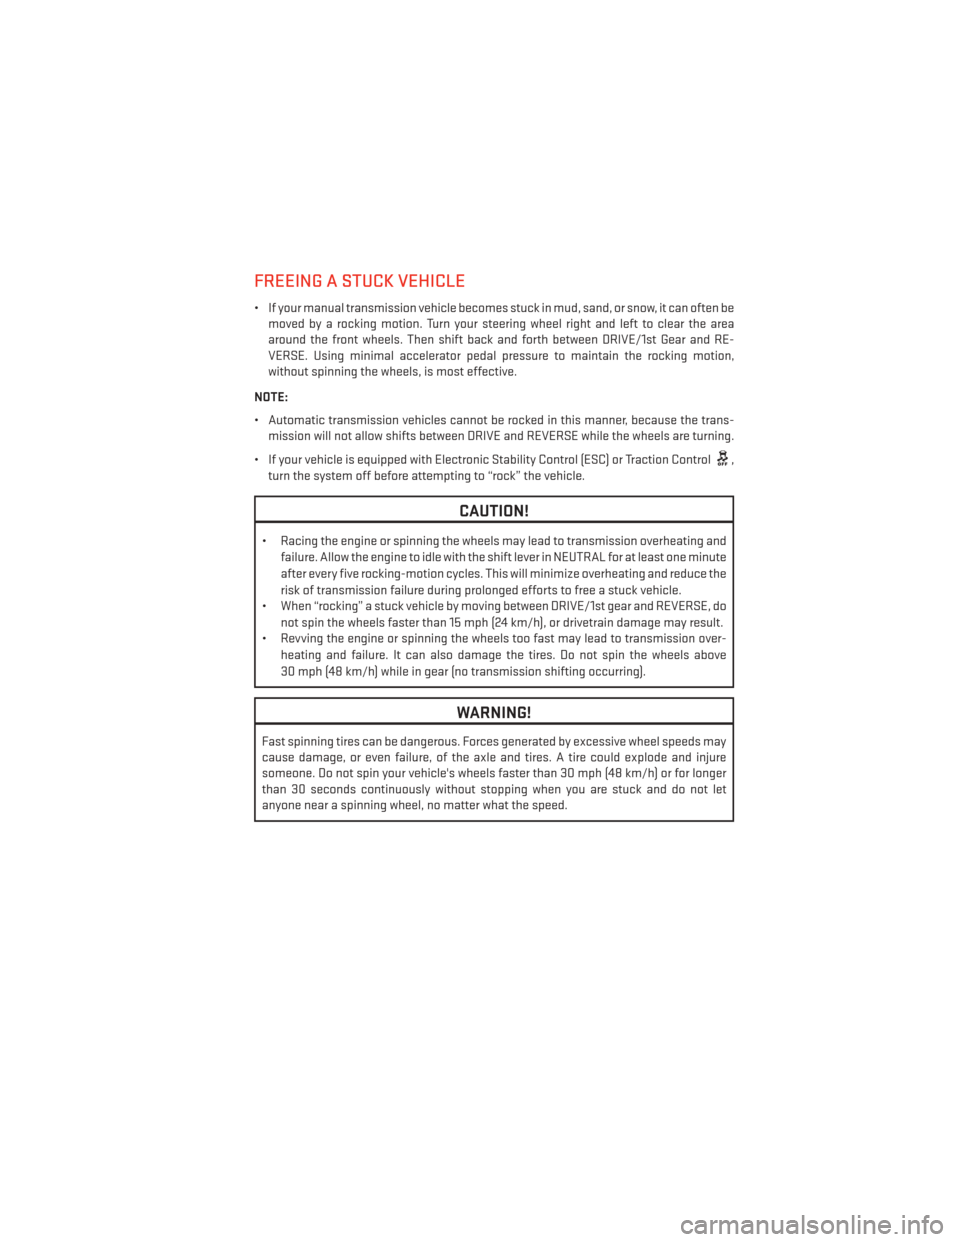
FREEING A STUCK VEHICLE
• If your manual transmission vehicle becomes stuck in mud, sand, or snow, it can often bemoved by a rocking motion. Turn your steering wheel right and left to clear the area
around the front wheels. Then shift back and forth between DRIVE/1st Gear and RE-
VERSE. Using minimal accelerator pedal pressure to maintain the rocking motion,
without spinning the wheels, is most effective.
NOTE:
• Automatic transmission vehicles cannot be rocked in this manner, because the trans- mission will not allow shifts between DRIVE and REVERSE while the wheels are turning.
• If your vehicle is equipped with Electronic Stability Control (ESC) or Traction Control
,
turn the system off before attempting to “rock” the vehicle.
CAUTION!
• Racing the engine or spinning the wheels may lead to transmission overheating and
failure. Allow the engine to idle with the shift lever in NEUTRAL for at least one minute
after every five rocking-motion cycles. This will minimize overheating and reduce the
risk of transmission failure during prolonged efforts to free a stuck vehicle.
• When “rocking” a stuck vehicle by moving between DRIVE/1st gear and REVERSE, do
not spin the wheels faster than 15 mph (24 km/h), or drivetrain damage may result.
• Revving the engine or spinning the wheels too fast may lead to transmission over-
heating and failure. It can also damage the tires. Do not spin the wheels above
30 mph (48 km/h) while in gear (no transmission shifting occurring).
WARNING!
Fast spinning tires can be dangerous. Forces generated by excessive wheel speeds may
cause damage, or even failure, of the axle and tires. A tire could explode and injure
someone. Do not spin your vehicle's wheels faster than 30 mph (48 km/h) or for longer
than 30 seconds continuously without stopping when you are stuck and do not let
anyone near a spinning wheel, no matter what the speed.
WHAT TO DO IN EMERGENCIES
101