transmission DODGE DART 2014 PF / 1.G User Guide
[x] Cancel search | Manufacturer: DODGE, Model Year: 2014, Model line: DART, Model: DODGE DART 2014 PF / 1.GPages: 140, PDF Size: 4.57 MB
Page 3 of 140
INTRODUCTION/WELCOME
WELCOME FROM CHRYSLER GROUP LLC . . . 2
CONTROLS AT A GLANCE
DRIVER COCKPIT................4
INSTRUMENT CLUSTER ............6
GETTING STARTED
KEYFOB .....................8
REMOTE START.................9
KEYLESS ENTER-N-GO™ ...........10
VEHICLE SECURITY ALARM ..........13
SEATBELT ...................15
SUPPLEMENTAL RESTRAINT SYSTEM (SRS) —
AIRBAGS ....................15
CHILD RESTRAINTS ..............17
FRONT SEATS .................20
REARSEAT ..................22
HEATEDSEATS ................22
TILT/TELESCOPING STEERING COLUMN . . . 23
HEATED STEERING WHEEL ..........24
OPERATING YOUR VEHICLE
ENGINE BREAK-IN RECOMMENDATIONS . . . 25
TURN SIGNAL/WIPER/WASHER/HIGH BEAM
LEVER......................25
HEADLIGHT SWITCH ..............27
SPEED CONTROL ................28
MANUAL CLIMATE CONTROLS ........30
Uconnect® 8.4 MANUAL CLIMATE
CONTROLS ...................31
Uconnect® 8.4 AUTOMATIC CLIMATE
CONTROLS ...................32
POWER SUNROOF ...............34
WIND BUFFETING ...............35
SIX-SPEED AUTOMATIC TRANSMISSION . . . 35
ELECTRONICS
YOUR VEHICLE'S SOUND SYSTEM ......38
Uconnect® 200 .................40
Uconnect® 8.4 & 8.4N .............49
STEERING WHEEL AUDIO CONTROLS ....72
ELECTRONIC VEHICLE INFORMATION CENTER
(EVIC) — STANDARD (2 BUTTON) ........73
ELECTRONIC VEHICLE INFORMATION CENTER
(EVIC) — PREMIUM (4 BUTTON) ........74
UNIVERSAL GARAGE DOOR OPENER
(HomeLink®) ..................78
POWER OUTLET ................81
UTILITY
TRAILER TOWING WEIGHTS (MAXIMUM
TRAILERWEIGHTRATINGS) .........82
RECREATIONAL TOWING (BEHIND
MOTORHOME, ETC.) ..............82
WHAT TO DO IN EMERGENCIES
ROADSIDE ASSISTANCE ............83INSTRUMENT CLUSTER WARNING LIGHTS..83
IF YOUR ENGINE OVERHEATS .........88
JACKING AND TIRE CHANGING ........89
TIREFIT KIT ...................95
JUMP-STARTING ...............101
SHIFT LEVER OVERRIDE ...........103
TOWING A DISABLED VEHICLE .......104
FREEING A STUCK VEHICLE .........104
EVENT DATA RECORDER (EDR) ........105
MAINTAINING YOUR VEHICLE
OPENING THE HOOD.............106
FUEL DOOR RELEASE ............107
ENGINE COMPARTMENT ...........108
FLUIDS AND CAPACITIES ...........111
MAINTENANCE SCHEDULE ..........113
MAINTENANCE RECORD ...........116
FUSES .....................117
TIRE PRESSURES ...............119
WHEEL AND WHEEL TRIM CARE ......120
EXTERIOR BULBS ...............121
CONSUMER ASSISTANCE
CHRYSLER GROUP LLC CUSTOMER
CENTER....................122
CHRYSLER CANADA INC. CUSTOMER
CENTER ....................122
ASSISTANCE FOR THE HEARING
IMPAIRED ...................122
PUBLICATIONS ORDERING ..........122
REPORTING SAFETY DEFECTS IN THE
UNITEDSTATES ................123
Uconnect® CUSTOMER CENTER .......123
MOPAR® ACCESSORIES
AUTHENTIC ACCESSORIES BY MOPAR® . . 124
FAQ (How To?)
FREQUENTLY ASKED QUESTIONS ......125
INDEX....................127
TABLE OF CONTENTS
Page 14 of 140
Engine Starting/Stopping
Starting
• With a valid Keyless Enter-N-Go™ Key Fobinside the vehicle.
• Place the shift lever in PARK or NEUTRAL.
• While pressing the brake pedal, press the ENGINE START/STOP button once. If the
engine fails to start, the starter will disen-
gage automatically after 10 seconds.
• To stop the cranking of the engine prior to the engine starting, press the button
again.
NOTE:
In case the ignition switch does not change
with the push of a button, the RKE transmit-
ter (Key Fob) may have a low or dead battery.
In this situation a back up method can be
used to operate the ignition switch. Put the nose side of the Key Fob against the ENGINE
START/STOP button and push to operate the ignition switch.
Stopping
1. Bring the vehicle to a complete stop.
2. Shift the transmission to PARK (P).
3. Push the ENGINE START/STOP button once. The ignition switch will return to the OFF position.
NOTE:
If the transmission is not in PARK and the vehicle is in motion, the ENGINE START/STOP
button must be held for two seconds with the vehicle speed above 5 mph (8 km/h) before
the engine will shut off.
Accessory Positions With Engine Off
NOTE:
The following functions are with the driver’s foot OFF the brake pedal (transmission in PARK
or NEUTRAL position).
1 — Engine START/STOP Button
GETTING STARTED
12
Page 15 of 140
Starting With The Ignition Switch In The OFF Position:
• Press the ENGINE START/STOP button once to change the ignition switch to the ACCposition.
• Press the ENGINE START/STOP button a second time to change the ignition switch to the ON/RUN position.
• Press the ENGINE START/STOP button a third time to return the ignition switch to the OFF position.
NOTE:
If the ignition switch is left in the ACC or
ON/RUN (engine not running) position and
the transmission is in PARK, the system will
automatically time out after 30 minutes of
inactivity and the ignition will switch to the
OFF position.
VEHICLE SECURITY ALARM
To Arm The System
Vehicles Not Equipped With Keyless Enter-N-Go™
Remove the key from the ignition switch and either press a power door LOCK switch while
the driver or passenger door is open or press the LOCK button on the Remote Keyless Entry
(RKE) transmitter. After the last door is closed, or if all doors are closed, the Vehicle Security
Alarm will arm itself in about 16 seconds. During that time, the Vehicle Security Light will
flash. If it does not illuminate, the Vehicle Security Alarm is not arming. In addition, if you
open a door during the arming period, the Vehicle Security Alarm will cancel the arming
process. If you wish to rearm the Vehicle Security Alarm after closing the door, you must
repeat one of the previously-described arming sequences.
You may also disarm the ultrasonic intrusion sensor during the 16 second arming period by
pressing the lock button three times with a delay of no more than five seconds between key
presses. The horn will pulse twice to acknowledge that the ultrasonic intrusion sensor has
been disabled.
NOTE:
• The driver’s door key cylinder and the trunk button on the RKE transmitter cannot arm or disarm the Vehicle Security Alarm.
• The Vehicle Security Alarm remains armed during trunk entry. Pressing the TRUNK button will not disarm the Vehicle Security Alarm. If someone enters the vehicle through
the trunk, and opens any door, the alarm will sound.
GETTING STARTED
13
Page 27 of 140
ENGINE BREAK-IN RECOMMENDATIONS
A long break-in period is not required for the engine and drivetrain (transmission and axle)
in your vehicle.
Drive moderately during the first 300 miles (500 km). After the initial 60 miles (100 km),
speeds up to 50 or 55 mph (80 or 90 km/h) are desirable.
While cruising, brief full-throttle acceleration within the limits of local traffic laws contrib-
utes to a good break-in. Wide-open throttle acceleration in low gear can be detrimental and
should be avoided.
The engine oil installed in the engine at the factory is a high-quality energy conserving type
lubricant. Oil changes should be consistent with anticipated climate conditions under
which vehicle operations will occur. For the recommended viscosity and quality grades,
refer to “Maintaining Your Vehicle.”
NOTE:
A new engine may consume some oil during its first few thousand miles (kilometers) of
operation. This should be considered a normal part of the break-in and not interpreted as an
indication of an engine problem or malfunction.
CAUTION!
Never use Non-Detergent Oil or Straight Mineral Oil in the engine or damage may result.
TURN SIGNAL/WIPER/WASHER/HIGH BEAM LEVER
Turn Signal/Lane Change Assist
• Tap the lever up or down once and the turn signal (right or left) will flash three times andautomatically turn off.
OPERATING YOUR VEHICLE
25
Page 37 of 140
WARNING!
• Do not let children play with the sunroof. Never leave children unattended in a vehicle,or with access to an unlocked vehicle. Do not leave the Key Fob in or near the vehicle,
and do not leave the ignition of a vehicle equipped with Keyless Enter-N-Go™ in the
ACC or ON/RUN mode. Occupants, particularly unattended children, can become
entrapped by the power sunroof while operating the power sunroof switch. Such
entrapment may result in serious injury or death.
• In a collision, there is a greater risk of being thrown from a vehicle with an open
sunroof. You could also be severely injured or killed. Always fasten your seat belt
properly and make sure all passengers are properly secured.
• Do not allow small children to operate the sunroof. Never allow your fingers, other
body parts, or any object to project through the sunroof opening. Injury may result.
WIND BUFFETING
Wind buffeting can be described as a helicopter-type percussion sound. If buffeting occurs
with the rear windows open, adjust the front and rear windows together.
If buffeting occurs with the sunroof open, adjust the sunroof opening, or adjust any window.
This will minimize buffeting.
SIX-SPEED AUTOMATIC TRANSMISSION
• This vehicle may be equipped with a fuel efficient Dual-Dry Clutch, Six Speed Automatic
Transmission. This transmission offers a sportier driving experience with faster
AutoStick® shifting.
• During low-speed driving conditions in first gear, vehicle momentum changes may feel exaggerated in response to changes in accelerator pedal position. This behavior is
normal and is similar to vehicles equipped with a manual transmission.
NOTE:
• Very aggressive driving may result in some clutch odor similar to a manual transmission. An active warning message will display in the Instrument Cluster if cool down actions are
needed.
• The first few shifts on a new vehicle may be somewhat abrupt. This is a normal condition, and precision shifts will develop within a few hundred miles (kilometers).
• At low speeds you may hear mechanical noises similar to a manual transmission as the transmission changes gears. These noises are normal and will not damage the trans-
mission.
• Before and after the engine is started, you may hear a hydraulic pump for a short period of time. This noise is normal and will not damage the transmission.
OPERATING YOUR VEHICLE
35
Page 38 of 140
Shifting The Transmission
• The transmission shift lever position (PRND) is displayed both on the shift lever and in theElectronic Vehicle Information Center (EVIC).
• To drive, depress the brake pedal, press the button on the front of the shift lever and move the shift lever from PARK or NEUTRAL to the DRIVE position.
• Manual shifts can also be made using the AutoStick® shift control.
• This transmission is programmed to prevent shifting from Reverse to Drive or Drive to Reverse, if vehicle speed is above 6 mph (10 km/h). This safety feature helps protect your
transmission from damage.
NOTE:
• When stopped on an incline, it is recommended that you always hold the vehicle in place using the brakes. On steep inclines, Hill Start Assist (HSA) will temporarily hold the car in
position when the brake pedal is released. If the accelerator pedal is not applied after a
short time, the car will roll back. Either reapply the brake (to hold the vehicle) or press the
accelerator to climb the hill.
• During acceleration, gear changes will feel smooth compared to a vehicle with a tradi- tional manual transmission. This is a benefit of the dual clutch design that avoids power
loss during up-shifts.
Instrument Cluster Messages
• Messages will be displayed in the instrument cluster (if equipped with an EVIC) to alertthe driver when certain conditions occur. These messages are described below.
MESSAGE DESCRIPTION
GEAR NOT AVAILABLE In AutoStick® mode, the gear selected by
the driver is not available due to a fault
condition. See your authorized dealer for diagnosis and service.
SHIFT NOT ALLOWED The gear position requested by the driver is
currently blocked. This occurs if NEUTRAL is requested while moving, if REVERSE is
requested while moving (at 6 mph [10 km/h]
or faster), if DRIVE is requested while moving
backwards (at 6 mph [10 km/h] or faster), or if 3rd gear or higher is requested at a stop.Make sure the vehicle is stopped before engaging DRIVE or REVERSE.
OPERATING YOUR VEHICLE
36
Page 39 of 140
MESSAGEDESCRIPTION
SHIFT TO NEUTRAL THEN D or R The transmission has shifted itself into NEUTRAL (due to a fault condition, or over-
heat due to excessive idling when stopped in
DRIVE with the brakes released), but the shift lever remains in gear. Shift into NEUTRAL
and then back into gear for continued driving. If the transmission will not reengage, see your authorized dealer.
AUTOSTICK NOT AVAILABLE AutoStick® mode is unavailable due to a
shift lever fault. See your authorized dealer for diagnosis and service.
AUTOMATIC MODE NOT AVAILABLE The transmission is unable to shift itself automatically, due to a fault condition.
Use the AutoStick® mode to shift the trans-
mission manually. See your authorized dealer for diagnosis and service.
REDUCE GEAR CHANGES The transmission pump is overheating.
In AutoStick® mode, try to drive in one
specific gear as much as possible, avoiding frequent gear changes. In DRIVE, the trans- mission will automatically modify its shiftschedule to reduce the number of shifts.
TRANS. GETTING HOT PRESS BRAKE The transmission driving clutch is over- heating, usually due to repeated launches instop-and-go traffic. Pull over and allow the transmission to cool in NEUTRAL until“TRANS. COOL READY TO DRIVE” is displayed.
TRANS. HOT STOP SAFELY SHIFT TO P The transmission driving clutch has over- heated. Pull over, shift the transmission intoPARK, and allow the vehicle to cool until “TRANS. COOL READY TO DRIVE” is displayed.
SERVICE TRANSMISSION A transmission fault has been detected.
See your authorized dealer for diagnosis and service.
SERVICE SHIFTER A shift lever fault has been detected.
See your authorized dealer for diagnosis and service.
ENGAGE PARK BRAKE The sensor that monitors PARK engagement
is not functioning properly. Engage the
parking brake to ensure that the vehicle will not roll when in PARK.
• Refer to your Owner's Manual on the DVD for further details.
OPERATING YOUR VEHICLE
37
Page 81 of 140
Before You Begin Programming HomeLink®
Ensure that your vehicle is parked outside of the garage before you begin programming.
For efficient programming and accurate transmission of the radio-frequency signal, it is
recommended that a new battery be placed in the hand-held transmitter of the device that
is being programmed to the HomeLink® system.
Erase all channels before you begin programming. To erase the channels, place the ignition
switch into the ON/RUN position, then press and hold the two outside HomeLink® buttons
(I and III) for up to 20 seconds or until the red indicator flashes.
NOTE:
Erasing all channels should only be performed when programming HomeLink® for the first
time. Do not erase channels when programming additional buttons.
If you have any problems, or require assistance, please call toll-free 1-800-355-3515 or, on
the Internet at www.HomeLink.com for information or assistance.
Programming A Rolling Code
• For programming Garage Door Openers that were manufactured after 1995. TheseGarage Door Openers can be identified by the LEARN or TRAIN button located where the
hanging antenna is attached to the Garage Door Opener. It is NOT the button that is
normally used to open and close the door. The name and color of the button may vary by
manufacturer.
• Place the ignition switch into the ON/RUN position.
• Place the hand-held transmitter 1 to 3 in (3 to 8 cm) away from the HomeLink® button you wish to program while keeping the HomeLink® indicator light in view.
• Simultaneously press and hold both the HomeLink® button you want to program and the hand-held transmitter button.
• Continue to hold both buttons and observe the indicator light. The Homelink® indicator will flash slowly and then rapidly after Homelink® has received the frequency signal from
the hand-held transmitter. Release both buttons after the indicator light changes from
slow to rapid.
• At the garage door opener motor (in the garage), locate the LEARN or TRAINING button. This can usually be found where the hanging antenna wire is attached to the garage door
opener motor. Firmly press and release the LEARN or TRAINING button.
NOTE:
You have 30 seconds in which to initiate the next step after the LEARN button has been
pressed.
ELECTRONICS
79
Page 84 of 140
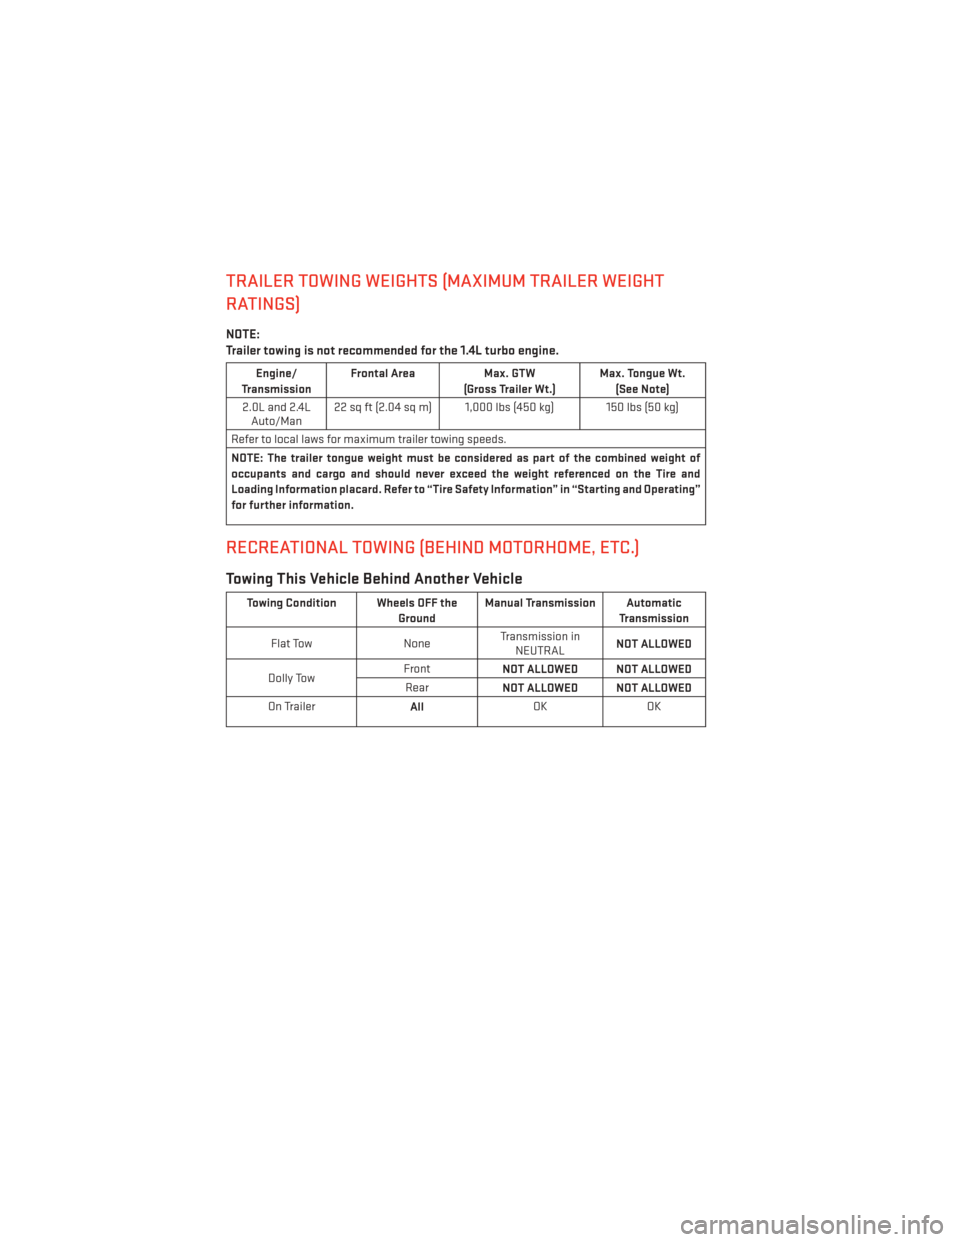
TRAILER TOWING WEIGHTS (MAXIMUM TRAILER WEIGHT
RATINGS)
NOTE:
Trailer towing is not recommended for the 1.4L turbo engine.
Engine/
Transmission Frontal Area
Max. GTW
(Gross Trailer Wt.) Max. Tongue Wt.
(See Note)
2.0L and 2.4L Auto/Man 22 sq ft (2.04 sq m) 1,000 lbs (450 kg) 150 lbs (50 kg)
Refer to local laws for maximum trailer towing speeds.
NOTE: The trailer tongue weight must be considered as part of the combined weight of
occupants and cargo and should never exceed the weight referenced on the Tire and
Loading Information placard. Refer to “Tire Safety Information” in “Starting and Operating”
for further information.
RECREATIONAL TOWING (BEHIND MOTORHOME, ETC.)
Towing This Vehicle Behind Another Vehicle
Towing Condition Wheels OFF the GroundManual Transmission Automatic
Transmission
Flat Tow NoneTransmission in
NEUTRAL NOT ALLOWED
Dolly Tow Front
NOT ALLOWED NOT ALLOWED
Rear NOT ALLOWED NOT ALLOWED
On Trailer AllOK
OK
UTILITY
82
Page 87 of 140
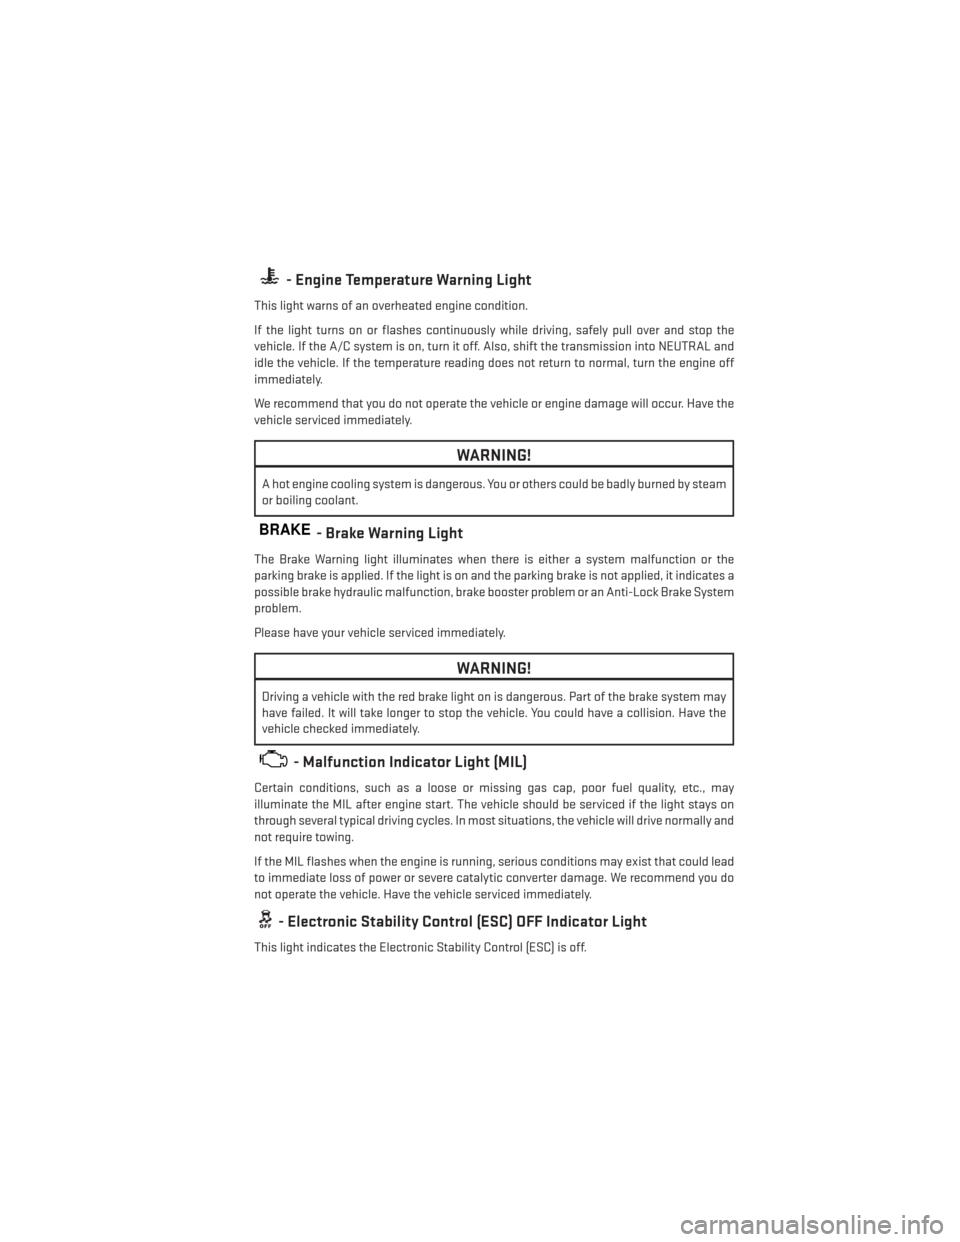
- Engine Temperature Warning Light
This light warns of an overheated engine condition.
If the light turns on or flashes continuously while driving, safely pull over and stop the
vehicle. If the A/C system is on, turn it off. Also, shift the transmission into NEUTRAL and
idle the vehicle. If the temperature reading does not return to normal, turn the engine off
immediately.
We recommend that you do not operate the vehicle or engine damage will occur. Have the
vehicle serviced immediately.
WARNING!
A hot engine cooling system is dangerous. You or others could be badly burned by steam
or boiling coolant.
BRAKE- Brake Warning Light
The Brake Warning light illuminates when there is either a system malfunction or the
parking brake is applied. If the light is on and the parking brake is not applied, it indicates a
possible brake hydraulic malfunction, brake booster problem or an Anti-Lock Brake System
problem.
Please have your vehicle serviced immediately.
WARNING!
Driving a vehicle with the red brake light on is dangerous. Part of the brake system may
have failed. It will take longer to stop the vehicle. You could have a collision. Have the
vehicle checked immediately.
- Malfunction Indicator Light (MIL)
Certain conditions, such as a loose or missing gas cap, poor fuel quality, etc., may
illuminate the MIL after engine start. The vehicle should be serviced if the light stays on
through several typical driving cycles. In most situations, the vehicle will drive normally and
not require towing.
If the MIL flashes when the engine is running, serious conditions may exist that could lead
to immediate loss of power or severe catalytic converter damage. We recommend you do
not operate the vehicle. Have the vehicle serviced immediately.
- Electronic Stability Control (ESC) OFF Indicator Light
This light indicates the Electronic Stability Control (ESC) is off.
WHAT TO DO IN EMERGENCIES
85