ECO mode DODGE DART 2014 PF / 1.G User Guide
[x] Cancel search | Manufacturer: DODGE, Model Year: 2014, Model line: DART, Model: DODGE DART 2014 PF / 1.GPages: 140, PDF Size: 4.57 MB
Page 11 of 140
Emergency Key
• Should the battery in the vehicle or the Key Fob transmitter go dead, there is anemergency key located in the Key Fob. To remove the emergency key, slide the button at
the back of the Key Fob sideways with your thumb and then pull the key out with your
other hand.
• The emergency key is also for locking the glove compartment.
WARNING!
• Never leave children alone in a vehicle, or with access to an unlocked vehicle. Allowing children to be in a vehicle unattended is dangerous for a number of reasons.
A child or others could be seriously or fatally injured. Children should be warned not
to touch the parking brake, brake pedal or the shift lever.
• Do not leave the Key Fob in or near the vehicle, or in a location accessible to children,
and do not leave the ignition of a vehicle equipped with Keyless Enter-N-Go™ in the
ACC or ON/RUN mode. A child could operate power windows, other controls, or move
the vehicle.
REMOTE START
• Press the REMOTE START buttonx2on the Key Fob twice within five seconds. Pressing
the REMOTE START button a third time shuts the engine off.
• To drive the vehicle, press the UNLOCK button and cycle the ignition to the ON/RUN position.
• With remote start, the engine will only run for 15 minutes (timeout) unless the ignition is cycled to the ON/RUN position.
• The vehicle must be cycled to the ON/RUN position after two consecutive timeouts.
WARNING!
• Do not start or run an engine in a closed garage or confined area. Exhaust gas contains Carbon Monoxide (CO) which is odorless and colorless. Carbon Monoxide is
poisonous and can cause you or others to be severely injured or killed when inhaled.
• Keep Key Fob transmitters away from children. Operation of the Remote Start
System, windows, door locks or other controls could cause you and others to be
severely injured or killed.
GETTING STARTED
9
Page 26 of 140
HEATED STEERING WHEEL
The steering wheel contains a heating element that heats the steering wheel to one
temperature setting.
The heated steering wheel control button is located within the climate or controls screen of
the touchscreen.
• Press the heated steering wheel button
once to turn the heating element On.
• Press the heated steering wheel button
a second time to turn the heating element
Off.
Once the heated steering wheel has been turned on, it will operate for up to 80 minutes
before automatically shutting off. The heated steering wheel can shut off early or may not
turn on when the steering wheel is already warm.
NOTE:
Vehicle Equipped With Remote Start
On models that are equipped with remote start, this feature can be programmed to come on
during a remote start through the Uconnect® system. Refer to “Uconnect® Settings” in
“Understanding Your Instrument Panel” in the Owner's Manual on the DVD.
WARNING!
• Persons who are unable to feel pain to the skin because of advanced age, chronic illness, diabetes, spinal cord injury, medication, alcohol use, exhaustion, or other
physical conditions must exercise care when using the steering wheel heater. It may
cause burns even at low temperatures, especially if used for long periods.
• Do not place anything on the steering wheel that insulates against heat, such as a
blanket or steering wheel covers of any type and material. This may cause the
steering wheel heater to overheat.
GETTING STARTED
24
Page 27 of 140
ENGINE BREAK-IN RECOMMENDATIONS
A long break-in period is not required for the engine and drivetrain (transmission and axle)
in your vehicle.
Drive moderately during the first 300 miles (500 km). After the initial 60 miles (100 km),
speeds up to 50 or 55 mph (80 or 90 km/h) are desirable.
While cruising, brief full-throttle acceleration within the limits of local traffic laws contrib-
utes to a good break-in. Wide-open throttle acceleration in low gear can be detrimental and
should be avoided.
The engine oil installed in the engine at the factory is a high-quality energy conserving type
lubricant. Oil changes should be consistent with anticipated climate conditions under
which vehicle operations will occur. For the recommended viscosity and quality grades,
refer to “Maintaining Your Vehicle.”
NOTE:
A new engine may consume some oil during its first few thousand miles (kilometers) of
operation. This should be considered a normal part of the break-in and not interpreted as an
indication of an engine problem or malfunction.
CAUTION!
Never use Non-Detergent Oil or Straight Mineral Oil in the engine or damage may result.
TURN SIGNAL/WIPER/WASHER/HIGH BEAM LEVER
Turn Signal/Lane Change Assist
• Tap the lever up or down once and the turn signal (right or left) will flash three times andautomatically turn off.
OPERATING YOUR VEHICLE
25
Page 35 of 140
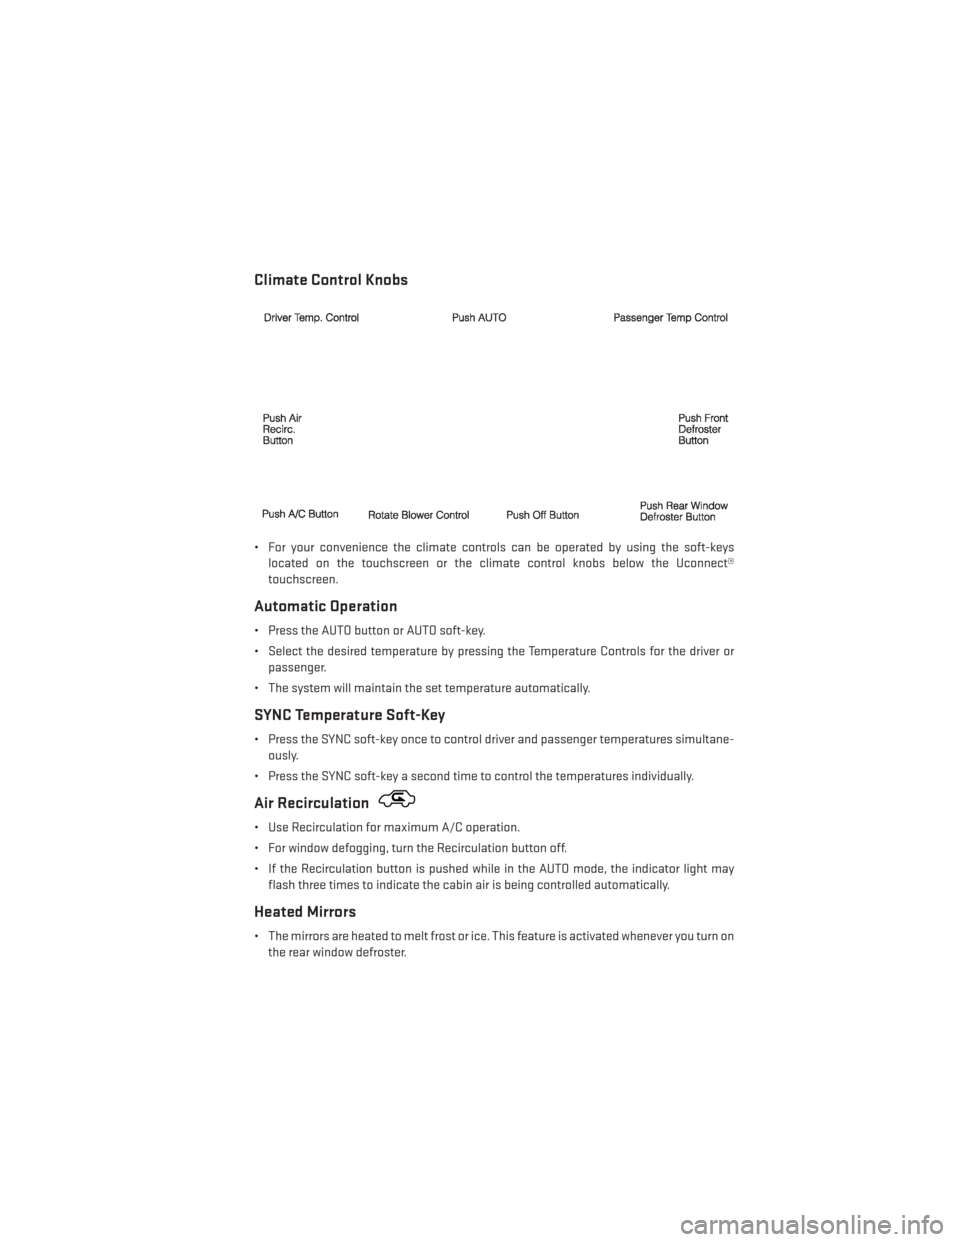
Climate Control Knobs
• For your convenience the climate controls can be operated by using the soft-keyslocated on the touchscreen or the climate control knobs below the Uconnect®
touchscreen.
Automatic Operation
• Press the AUTO button or AUTO soft-key.
• Select the desired temperature by pressing the Temperature Controls for the driver orpassenger.
• The system will maintain the set temperature automatically.
SYNC Temperature Soft-Key
• Press the SYNC soft-key once to control driver and passenger temperatures simultane- ously.
• Press the SYNC soft-key a second time to control the temperatures individually.
Air Recirculation
• Use Recirculation for maximum A/C operation.
• For window defogging, turn the Recirculation button off.
• If the Recirculation button is pushed while in the AUTO mode, the indicator light may flash three times to indicate the cabin air is being controlled automatically.
Heated Mirrors
• The mirrors are heated to melt frost or ice. This feature is activated whenever you turn onthe rear window defroster.
OPERATING YOUR VEHICLE
33
Page 37 of 140
WARNING!
• Do not let children play with the sunroof. Never leave children unattended in a vehicle,or with access to an unlocked vehicle. Do not leave the Key Fob in or near the vehicle,
and do not leave the ignition of a vehicle equipped with Keyless Enter-N-Go™ in the
ACC or ON/RUN mode. Occupants, particularly unattended children, can become
entrapped by the power sunroof while operating the power sunroof switch. Such
entrapment may result in serious injury or death.
• In a collision, there is a greater risk of being thrown from a vehicle with an open
sunroof. You could also be severely injured or killed. Always fasten your seat belt
properly and make sure all passengers are properly secured.
• Do not allow small children to operate the sunroof. Never allow your fingers, other
body parts, or any object to project through the sunroof opening. Injury may result.
WIND BUFFETING
Wind buffeting can be described as a helicopter-type percussion sound. If buffeting occurs
with the rear windows open, adjust the front and rear windows together.
If buffeting occurs with the sunroof open, adjust the sunroof opening, or adjust any window.
This will minimize buffeting.
SIX-SPEED AUTOMATIC TRANSMISSION
• This vehicle may be equipped with a fuel efficient Dual-Dry Clutch, Six Speed Automatic
Transmission. This transmission offers a sportier driving experience with faster
AutoStick® shifting.
• During low-speed driving conditions in first gear, vehicle momentum changes may feel exaggerated in response to changes in accelerator pedal position. This behavior is
normal and is similar to vehicles equipped with a manual transmission.
NOTE:
• Very aggressive driving may result in some clutch odor similar to a manual transmission. An active warning message will display in the Instrument Cluster if cool down actions are
needed.
• The first few shifts on a new vehicle may be somewhat abrupt. This is a normal condition, and precision shifts will develop within a few hundred miles (kilometers).
• At low speeds you may hear mechanical noises similar to a manual transmission as the transmission changes gears. These noises are normal and will not damage the trans-
mission.
• Before and after the engine is started, you may hear a hydraulic pump for a short period of time. This noise is normal and will not damage the transmission.
OPERATING YOUR VEHICLE
35
Page 38 of 140
Shifting The Transmission
• The transmission shift lever position (PRND) is displayed both on the shift lever and in theElectronic Vehicle Information Center (EVIC).
• To drive, depress the brake pedal, press the button on the front of the shift lever and move the shift lever from PARK or NEUTRAL to the DRIVE position.
• Manual shifts can also be made using the AutoStick® shift control.
• This transmission is programmed to prevent shifting from Reverse to Drive or Drive to Reverse, if vehicle speed is above 6 mph (10 km/h). This safety feature helps protect your
transmission from damage.
NOTE:
• When stopped on an incline, it is recommended that you always hold the vehicle in place using the brakes. On steep inclines, Hill Start Assist (HSA) will temporarily hold the car in
position when the brake pedal is released. If the accelerator pedal is not applied after a
short time, the car will roll back. Either reapply the brake (to hold the vehicle) or press the
accelerator to climb the hill.
• During acceleration, gear changes will feel smooth compared to a vehicle with a tradi- tional manual transmission. This is a benefit of the dual clutch design that avoids power
loss during up-shifts.
Instrument Cluster Messages
• Messages will be displayed in the instrument cluster (if equipped with an EVIC) to alertthe driver when certain conditions occur. These messages are described below.
MESSAGE DESCRIPTION
GEAR NOT AVAILABLE In AutoStick® mode, the gear selected by
the driver is not available due to a fault
condition. See your authorized dealer for diagnosis and service.
SHIFT NOT ALLOWED The gear position requested by the driver is
currently blocked. This occurs if NEUTRAL is requested while moving, if REVERSE is
requested while moving (at 6 mph [10 km/h]
or faster), if DRIVE is requested while moving
backwards (at 6 mph [10 km/h] or faster), or if 3rd gear or higher is requested at a stop.Make sure the vehicle is stopped before engaging DRIVE or REVERSE.
OPERATING YOUR VEHICLE
36
Page 43 of 140
NOTE:
Time format has the options of 12HR or 24HR. Selecting one of these options will change
the way the clock is displayed.
Equalizer, Balance And Fade
• To set the Bass, Mid Range, Treble, Balance or Fade settings press the AUDIO button toaccess the Audio sub-menu.
• The Audio sub-menu can also be reached by pressing the MENU button until AUDIO appears in the display. Press the ENTER/BROWSE button to select the AUDIO menu and
use the TUNE/SCROLL knob to highlight select Bass, Mid Range, Treble, Balance or Fade.
Once the desired selection is highlighted, press the ENTER/BROWSE button to select the
item and use the TUNE/SCROLL knob to adjust the setting.
Radio Operation
RADIO Button
• Press the button to select either AM, FM or SiriusXM mode.
Seek Up/Down Buttons
• Press to seek through radio stations in AM, FM, or SXM bands.
• Hold either button to bypass stations without stopping.
Buttons1-5
• These buttons tune the radio to the stations that you commit to pushbutton memory AM(A, B, C), FM (A, B, C) and SXM (A,B,C) — 15 AM, 15 FM and 15 SXM stations.
Store Radio Presets
• When you are receiving a station that you wish to commit to pushbutton memory, pressand hold the button (1–5) you wish to lock onto this station for three seconds.
• You may add a second or third station to each pushbutton by repeating the above procedure with this exception: Press the “A–B–C” button to select the A, B or C mode.
Each button can be set for up to three stations in both AM and FM. This allows a total of
15 AM, 15 FM and 15 SXM stations to be stored into push-button memory.
INFO Button
• Press the INFO button for an RDS station (one with call letters displayed). The radio willreturn a Radio Text message broadcast from an FM station (FM mode only).
Player Button
• Pressing the “Player” button will allow you to switch from AM/FM/SXM modes to Playermode (AUX/CD/Bluetooth® Steaming (BT)/USB).
ELECTRONICS
41
Page 45 of 140
•If you decide to continue your service at the end of your trial subscription, the plan
you choose will automatically renew and bill at then-current rates until you call
SiriusXM at 1-866-635-2349 to cancel. Canadian residents call 1-888-539-7474. See
SiriusXM Customer Agreement for complete terms at www.siriusxm.com. For Canadian
residents www.siriusxm.ca. All fees and programming subject to change. Our satellite
service is available only to those at least 18 and older in the 48 contiguous USA and D.C.
Our Sirius satellite service is also available in PR (with coverage limitations). Our Internet
radio service is available throughout our satellite service area and in AK and HI. © 2014
Sirius XM Radio Inc. Sirius, XM and all related marks and logos are trademarks of Sirius
XM Radio Inc.
CD/DISC Operation — If Equipped
• This radio is capable of playing compact discs (CD), recordable compact discs (CD-R), rewritable compact discs (CD-RW), compact discs with MP3 tracks and multisession
compact discs with CD, MP3 and WMA tracks.
Seek Up/Down Buttons
• Press to seek through CD tracks.
• Hold either button to bypass tracks without stopping.
Audio Jack Operation
• The Audio Jack allows a portable device,such as an MP3 player or an iPod® to be
plugged into the center console and uti-
lize the vehicle’s audio system, using a
3.5 mm audio cable, to amplify the source
and play through the vehicle speakers.
• Pressing the PLAYER button will change the mode to auxiliary device if the Audio
Jack is connected, allowing the music
from your portable device to play through
the vehicle's speakers.
• The functions of the portable device are controlled using the device buttons. The volume may be controlled using the radio or
portable device.
USB Port
• Connect your iPod®/MP3 or compatible device using a USB cable into the USB Port. USBMemory sticks with audio files can also be used. Then, audio from the device can be
played on the vehicles sound system while providing metadata (artist, track title, album,
etc.) information on the radio display.
• Pressing the PLAYER button will change the device mode between connected auxiliary devices.
ELECTRONICS
43
Page 48 of 140
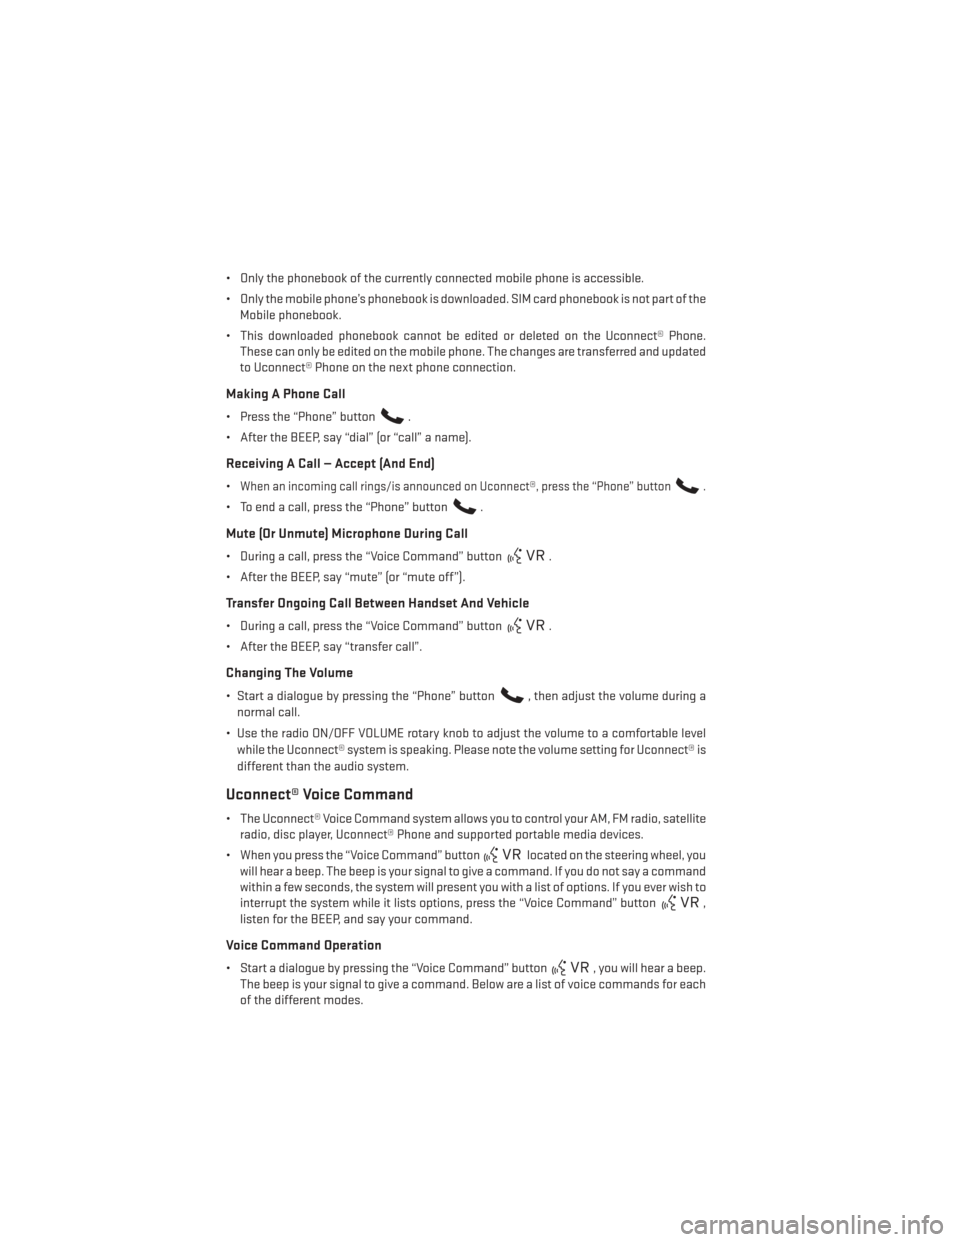
• Only the phonebook of the currently connected mobile phone is accessible.
• Only the mobile phone’s phonebook is downloaded. SIM card phonebook is not part of theMobile phonebook.
• This downloaded phonebook cannot be edited or deleted on the Uconnect® Phone. These can only be edited on the mobile phone. The changes are transferred and updated
to Uconnect® Phone on the next phone connection.
Making A Phone Call
• Press the “Phone” button.
• After the BEEP, say “dial” (or “call” a name).
Receiving A Call — Accept (And End)
•When an incoming call rings/is announced on Uconnect®, press the “Phone” button.
• To end a call, press the “Phone” button.
Mute (Or Unmute) Microphone During Call
• During a call, press the “Voice Command” button.
• After the BEEP, say “mute” (or “mute off”).
Transfer Ongoing Call Between Handset And Vehicle
• During a call, press the “Voice Command” button.
• After the BEEP, say “transfer call”.
Changing The Volume
• Start a dialogue by pressing the “Phone” button, then adjust the volume during a
normal call.
• Use the radio ON/OFF VOLUME rotary knob to adjust the volume to a comfortable level while the Uconnect® system is speaking. Please note the volume setting for Uconnect® is
different than the audio system.
Uconnect® Voice Command
• The Uconnect® Voice Command system allows you to control your AM, FM radio, satellite radio, disc player, Uconnect® Phone and supported portable media devices.
• When you press the “Voice Command” button
located on the steering wheel, you
will hear a beep. The beep is your signal to give a command. If you do not say a command
within a few seconds, the system will present you with a list of options. If you ever wish to
interrupt the system while it lists options, press the “Voice Command” button
,
listen for the BEEP, and say your command.
Voice Command Operation
• Start a dialogue by pressing the “Voice Command” button, you will hear a beep.
The beep is your signal to give a command. Below are a list of voice commands for each
of the different modes.
ELECTRONICS
46
Page 49 of 140
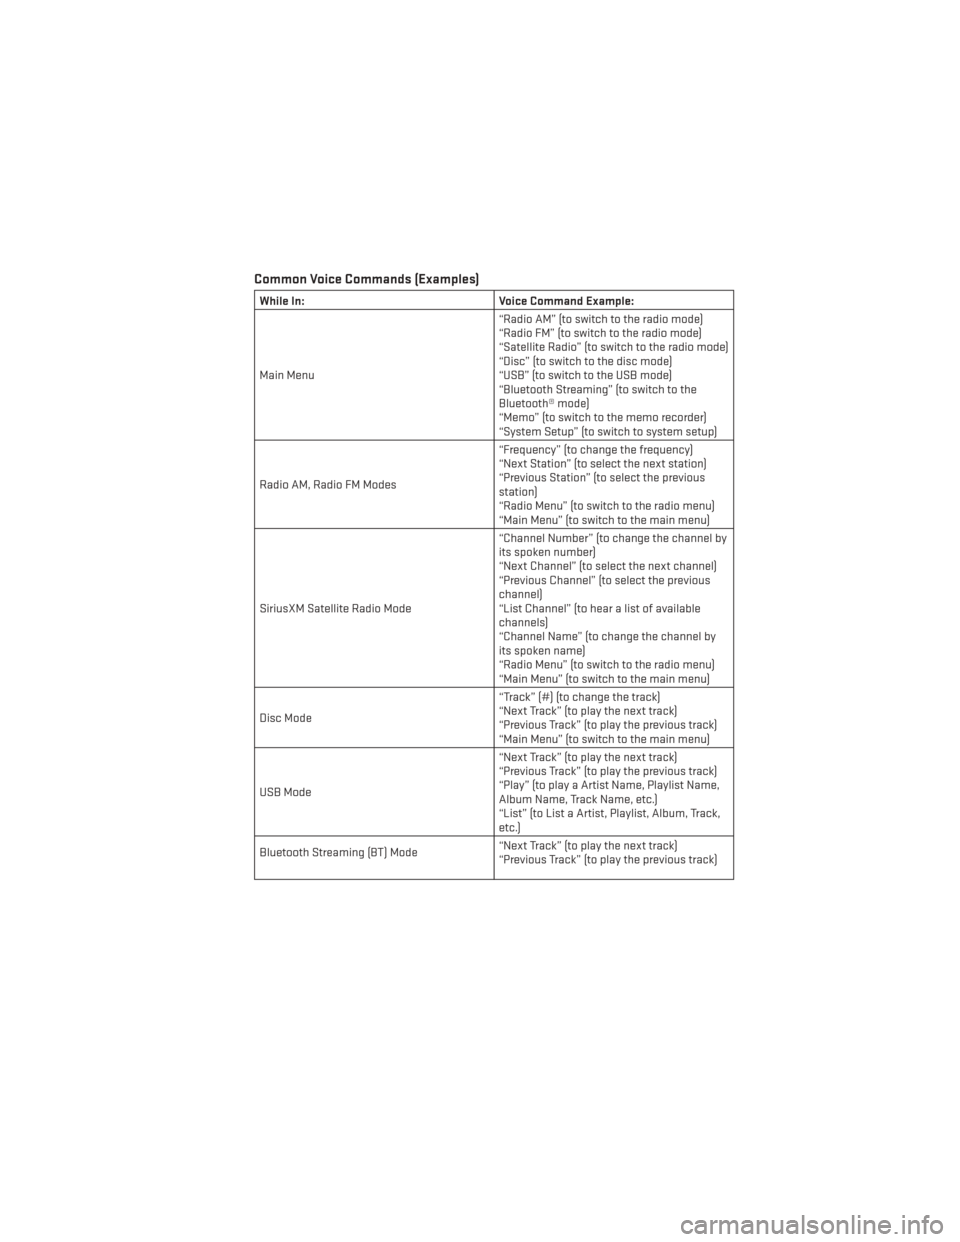
Common Voice Commands (Examples)
While In:Voice Command Example:
Main Menu “Radio AM” (to switch to the radio mode)
“Radio FM” (to switch to the radio mode)
“Satellite Radio” (to switch to the radio mode)
“Disc” (to switch to the disc mode)
“USB” (to switch to the USB mode)
“Bluetooth Streaming” (to switch to the
Bluetooth® mode)
“Memo” (to switch to the memo recorder)
“System Setup” (to switch to system setup)
Radio AM, Radio FM Modes “Frequency” (to change the frequency)
“Next Station” (to select the next station)
“Previous Station” (to select the previous
station)
“Radio Menu” (to switch to the radio menu)
“Main Menu” (to switch to the main menu)
SiriusXM Satellite Radio Mode “Channel Number” (to change the channel by
its spoken number)
“Next Channel” (to select the next channel)
“Previous Channel” (to select the previous
channel)
“List Channel” (to hear a list of available
channels)
“Channel Name” (to change the channel by
its spoken name)
“Radio Menu” (to switch to the radio menu)
“Main Menu” (to switch to the main menu)
Disc Mode “Track” (#) (to change the track)
“Next Track” (to play the next track)
“Previous Track” (to play the previous track)
“Main Menu” (to switch to the main menu)
USB Mode “Next Track” (to play the next track)
“Previous Track” (to play the previous track)
“Play” (to play a Artist Name, Playlist Name,
Album Name, Track Name, etc.)
“List” (to List a Artist, Playlist, Album, Track,
etc.)
Bluetooth Streaming (BT) Mode “Next Track” (to play the next track)
“Previous Track” (to play the previous track)
ELECTRONICS
47