service DODGE DART 2015 PF / 1.G Owner's Manual
[x] Cancel search | Manufacturer: DODGE, Model Year: 2015, Model line: DART, Model: DODGE DART 2015 PF / 1.GPages: 664, PDF Size: 16.96 MB
Page 190 of 664
Roadside Assistance/Towing Assistance
If you need roadside/towing assistance:
1. Push the Phonebutton to begin.
2. After the “Listening” prompt and the following beep,
say “Roadside Assistance” or say “Towing Assis-
tance.”
NOTE:The roadside/towing assistance number dialed is
based on the country where the vehicle is purchased
(1-800-521-2779 for the U.S./Canada, 55-14-3454 for
Mexico City and 1-800-712-3040 for outside Mexico City
in Mexico). Please refer to the Chrysler Group LLC
24-Hour “Roadside Assistance” coverage details in the
Warranty Information Booklet and in the Owner ’s Infor-
mation Manual on the DVD under “Other References.”
Voice Mail Calling
To learn how to access your voice mail, refer to “Working
with Automated Systems.”
Working With Automated Systems
This method is used in instances where one generally has
to push numbers on the mobile phone keypad while
navigating through an automated telephone system.
You can use your Uconnect® Phone to access a voice mail
system or an automated service, such as a paging service
or automated customer service line. Some services re-
quire immediate response selection. In some instances,
that may be too quick for use of the Uconnect® Phone.
When calling a number with your Uconnect® Phone that
normally requires you to enter in a touch-tone sequence
on your mobile phone keypad, you can utilize the
touchscreen or push the Voice Commandbutton
and say the word “Send” then the sequence you wish
to enter. For example, if required to enter your PIN
followed with a pound, (3746#),youcanpush the
Voice Commandbutton and say, “Send3746#.”
Saying “Send” followed by a number, or sequence of
188 UNDERSTANDING THE FEATURES OF YOUR VEHICLE
Page 191 of 664
numbers, is also to be used for navigating through an
automated customer service center menu structure,
and to leave a number on a pager.
You can also send stored mobile phonebook entries as
tones for fast and easy access to voice mail and pager
entries. For example, if you previously created a Phone-
book entry with First and/or Last Name as “Voicemail
Password”, then if you push the Voice Command
button and say “Send Voicemail Password” the
Uconnect® Phone will then send the corresponding
phone number associated with the phonebook entry,
as tones over the phone.
NOTE:
•The first number encountered for that contact will be
sent. All other numbers entered for that contact will be
ignored.
•You may not hear all of the tones due to mobile phone
network configurations. This is normal.
•Some paging and voice mail systems have system time
out settings that are too short and may not allow the
use of this feature.
•Pauses, wait or other characters that are supported by
some phones are not supported over Bluetooth®.
These additional symbols will be ignored in the dialing
a numbered sequence.
3
UNDERSTANDING THE FEATURES OF YOUR VEHICLE 189
Page 225 of 664
NOTE:
•You can also say “Find City,” “Find Favorite,” “Find
Play by Category,” “Find Play by Name,” “Find Re-
cently Found,” “Where to?” or “Go Home.”
•You can say “Find Nearest” then “Restaurant,” “Fuel,”
“Transit,” “Lodging,” “Shopping,” “Bank,” “Entertain-
ment,” “Recreation,” “Attractions,” “Community,”
“Auto Services,” “Hospitals,” “Parking,” “Airport,”
“Police Stations,” “Fire Stations,” or “Auto Dealers.”
NOTE:Available Voice Commands are shown in bold
face and shaded grey.
SEATS
Seats are a part of the Occupant Restraint System of the
vehicle.
WARNING!
•It is dangerous to ride in a cargo area, inside or
outside of a vehicle. In a collision, people riding in
these areas are more likely to be seriously injured
or killed.
•Do not allow people to ride in any area of your
vehicle that is not equipped with seats and seat
belts. In a collision, people riding in these areas are
more likely to be seriously injured or killed.
•Be sure everyone in your vehicle is in a seat and
using a seat belt properly.
3
UNDERSTANDING THE FEATURES OF YOUR VEHICLE 223
Page 233 of 664
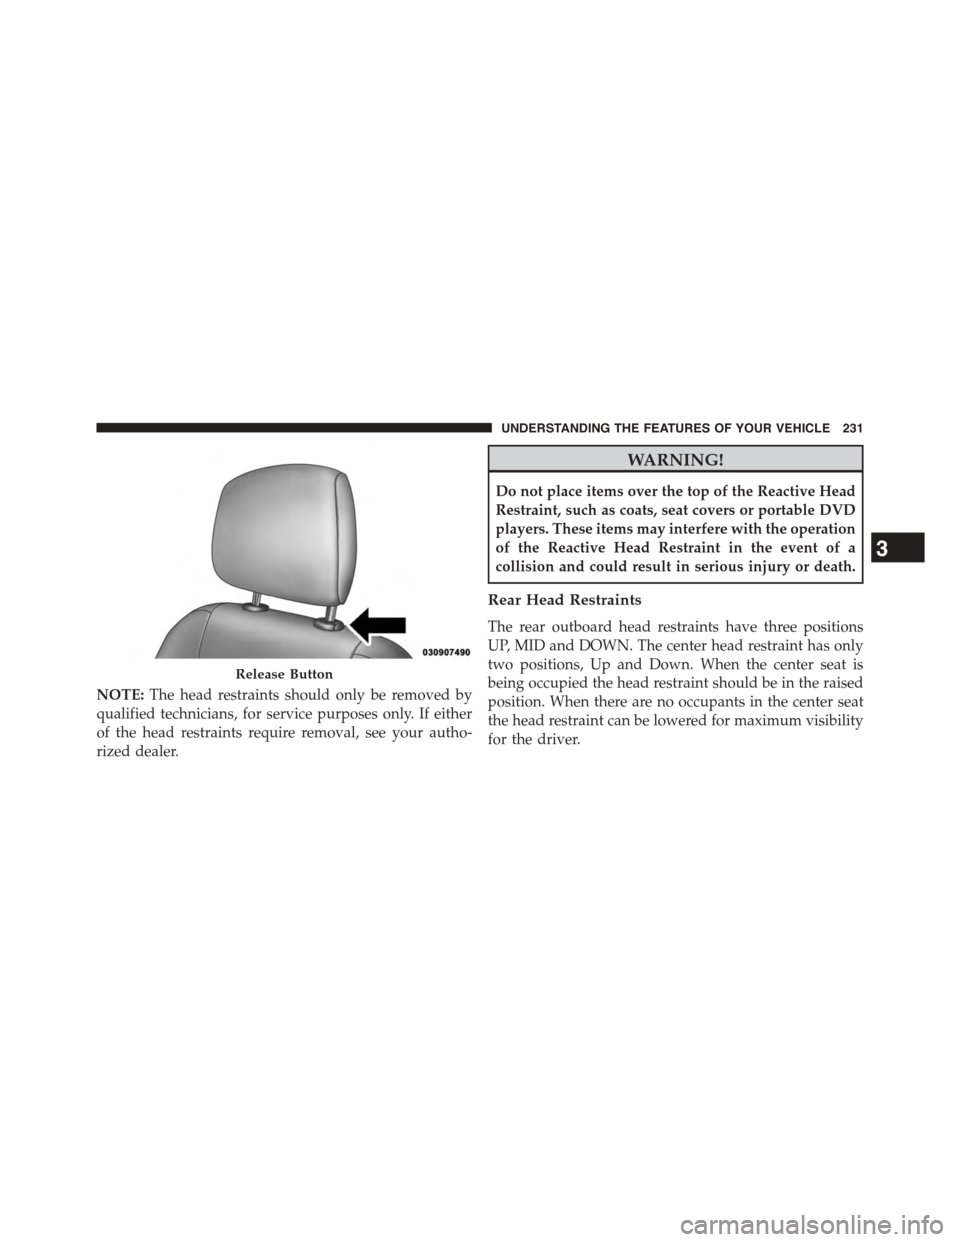
NOTE:The head restraints should only be removed by
qualified technicians, for service purposes only. If either
of the head restraints require removal, see your autho-
rized dealer.
WARNING!
Do not place items over the top of the Reactive Head
Restraint, such as coats, seat covers or portable DVD
players. These items may interfere with the operation
of the Reactive Head Restraint in the event of a
collision and could result in serious injury or death.
Rear Head Restraints
The rear outboard head restraints have three positions
UP, MID and DOWN. The center head restraint has only
two positions, Up and Down. When the center seat is
being occupied the head restraint should be in the raised
position. When there are no occupants in the center seat
the head restraint can be lowered for maximum visibility
for the driver.
Release Button
3
UNDERSTANDING THE FEATURES OF YOUR VEHICLE 231
Page 268 of 664
Enabling And Disabling ParkSense®
ParkSense® can be enabled and disabled using the
Uconnect® System. The available choices are: Off, Sound
Only, or Sound and Display. Refer to “Uconnect® Set-
tings” in “Understanding Your Instrument Panel” for
further information.
When the ParkSense® button is pushed to disable the
system, the Driver Information Display (DID) will dis-
play the “PARKSENSE OFF” message for approximately
five seconds. Refer to “Driver Information Display (DID)
” in “Understanding Your Instrument Panel” for further
information. When the shift lever is moved to REVERSE
and the system is disabled, the DID will display the
“PARKSENSE OFF” message for as long as the vehicle is
in REVERSE.
Service The ParkSense® Rear Park Assist
System
During vehicle start up, when the ParkSense® Rear Park
Assist System has detected a faulted condition, the
instrument cluster will actuate a single chime, once per
ignition cycle, and it will display the “PARKSENSE
UNAVAILABLE WIPE OFF REAR SENSORS” or the
“PARKSENSE UNAVAILABLE SERVICE REQUIRED”
message. Refer to “Driver Information Display (DID)” for
further information. When the shift lever/gear selector is
moved to REVERSE and the system has detected a
faulted condition, the DID will display the#PARKSENSE
UNAVAILABLE WIPE OFF REAR SENSORS#or
#PARKSENSE UNAVAILABLE SERVICE REQUIRED#
message for as long as the vehicle is in REVERSE. Under
this condition, ParkSense® will not operate.
If “PARKSENSE UNAVAILABLE WIPE OFF REAR SEN-
SORS” appears in the Driver Information Display (DID)
make sure the outer surface and the underside of the rear
266 UNDERSTANDING THE FEATURES OF YOUR VEHICLE
Page 269 of 664
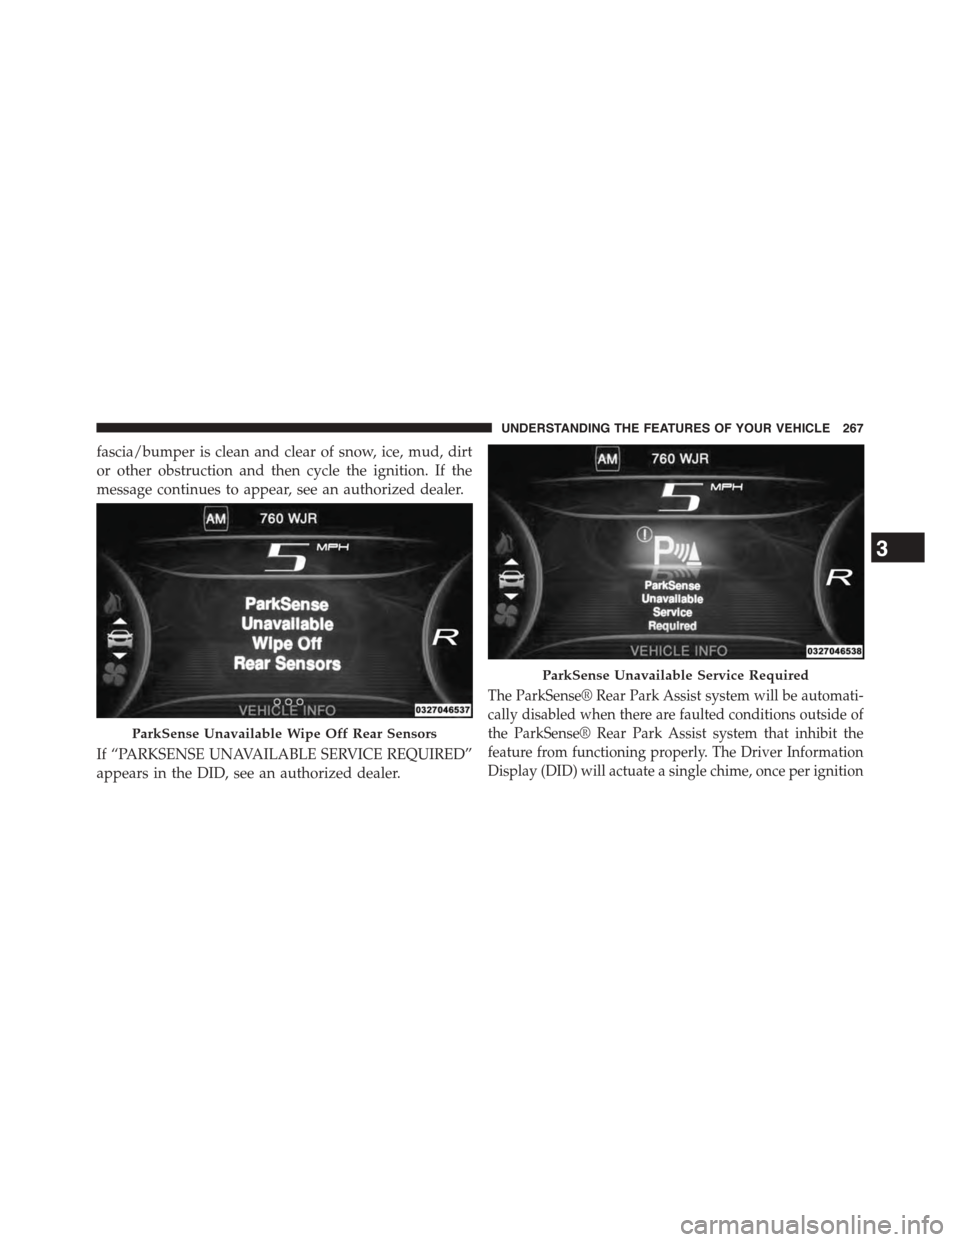
fascia/bumper is clean and clear of snow, ice, mud, dirt
or other obstruction and then cycle the ignition. If the
message continues to appear, see an authorized dealer.
If “PARKSENSE UNAVAILABLE SERVICE REQUIRED”
appears in the DID, see an authorized dealer.
The ParkSense® Rear Park Assist system will be automati-
cally disabled when there are faulted conditions outside of
the ParkSense® Rear Park Assist system that inhibit the
feature from functioning properly. The Driver Information
Display (DID) will actuate a single chime, once per ignition
ParkSense Unavailable Wipe Off Rear Sensors
ParkSense Unavailable Service Required
3
UNDERSTANDING THE FEATURES OF YOUR VEHICLE 267
Page 271 of 664
•When you move the shift lever to the REVERSE
position and ParkSense® is turned OFF, the DID will
display “PARKSENSE OFF” message for as long as the
vehicle is in REVERSE.
•Clean the ParkSense® sensors regularly, taking care not to
scratch or damage them. The sensors must not be covered
with ice, snow, slush, mud, dirt or debris. Failure to do so
can result in the system not working properly. The
ParkSense® system might not detect an obstacle behind
the fascia/bumper, or it could provide a false indication
that an obstacle is behind the fascia/bumper.
•Use the ParkSense® switch to turn the ParkSense®
system OFF if objects such as bicycle carriers, trailer
hitches, etc. are placed within 12 in (30 cm) from the rear
fascia/bumper. Failure to do so can result in the system
misinterpreting a close object as a sensor problem,
causing the “PARKSENSE UNAVAILABLE SERVICE
REQUIRED” message to be displayed in the DID.
CAUTION!
•ParkSense® is only a parking aid and it is unable to
recognize every obstacle, including small obstacles.
Parking curbs might be temporarily detected or not
detected at all. Obstacles located above or below
the sensors will not be detected when they are in
close proximity.
•The vehicle must be driven slowly when using
ParkSense® in order to be able to stop in time
when an obstacle is detected. It is recommended
that the driver looks over his/her shoulder when
using ParkSense®.
3
UNDERSTANDING THE FEATURES OF YOUR VEHICLE 269
Page 312 of 664
4. Temperature Gauge
The temperature gauge shows engine coolant tempera-
ture. Any reading within the normal range indicates that
the engine cooling system is operating satisfactorily.
The gauge pointer will likely indicate a higher tempera-
ture when driving in hot weather, up mountain grades,
or when towing a trailer. It should not be allowed to
exceed the upper limits of the normal operating range.
CAUTION!
Driving with a hot engine cooling system could
damage your vehicle. If the temperature gauge reads
“H” pull over and stop the vehicle. Idle the vehicle
with the air conditioner turned off until the pointer
drops back into the normal range. If the pointer
remains on the “H” and you hear continuous chimes,
turn the engine off immediately and call an autho-
rized dealer for service.
WARNING!
A hot engine cooling system is dangerous. You or
others could be badly burned by steam or boiling
coolant. You may want to call an authorized dealer
for service if your vehicle overheats. If you decide to
look under the hood yourself, see “Maintaining Your
Vehicle”. Follow the warnings under the Cooling
System Pressure Cap paragraph.
5. Electronic Stability Control (ESC) Activation/
Malfunction Indicator Light — If Equipped
The “ESC Activation/Malfunction Indicator
Light” in the instrument cluster will come on
when the ignition switch is in the ON/RUN
position. It should go out with the engine
running. If the “ESC Activation/Malfunction Indicator
Light” comes on continuously with the engine running, a
malfunction has been detected in the ESC system. If this
310 UNDERSTANDING YOUR INSTRUMENT PANEL
Page 313 of 664
light remains on after several ignition cycles, and the
vehicle has been driven several miles (kilometers) at
speeds greater than 30 mph (48 km/h), see your autho-
rized dealer as soon as possible to have the problem
diagnosed and corrected.
NOTE:
•The “ESC Off Indicator Light” and the “ESC
Activation/Malfunction Indicator Light” come on
momentarily each time the ignition switch is placed
in the ON/RUN.
•Each time the ignition is turned to ON/RUN, the
ESC system will be ON, even if it was turned off
previously.
•The ESC system will make buzzing or clicking
sounds when it is active. This is normal; the sounds
will stop when ESC becomes inactive following the
maneuver that caused the ESC activation.
6. Front Fog Light Indicator — If Equipped
This indicator will illuminate when the front
fog lights are on.
7. Engine Temperature Warning Light
This light warns of an overheated engine condi-
tion. If the engine coolant temperature is too high,
this indicator will illuminate and a single chime will
sound.
If the light turns on while driving, safely pull over and
stop the vehicle. If the A/C system is on, turn it off. Also,
shift the transmission into NEUTRAL and idle the ve-
hicle. If the temperature reading does not return to
normal, turn the engine off immediately and call for
service. Refer to “If Your Engine Overheats” in “What To
Do In Emergencies” for further information.
4
UNDERSTANDING YOUR INSTRUMENT PANEL 311
Page 315 of 664
and a brake pedal pulsation may be felt during each stop.
The dual brake system provides a reserve braking capac-
ity in the event of a failure to a portion of the hydraulic
system. A leak in either half of the dual brake system is
indicated by the Brake Warning Light, which will turn on
when the brake fluid level in the master cylinder has
dropped below a specified level.
The light will remain on until the cause is corrected.
NOTE:The light may flash momentarily during sharp
cornering maneuvers, which change fluid level condi-
tions. The vehicle should have service performed, and
the brake fluid level checked.
If brake failure is indicated, immediate repair is neces-
sary.
WARNING!
Driving a vehicle with the red brake light on is
dangerous. Part of the brake system may have failed.
It will take longer to stop the vehicle. You could have
a collision. Have the vehicle checked immediately.
Vehicles equipped with the Anti-Lock Brake System
(ABS), are also equipped with Electronic Brake Force
Distribution (EBD). In the event of an EBD failure, the
Brake Warning Light will turn on along with the ABS
Light. Immediate repair to the ABS system is required.
Operation of the Brake Warning Light can be checked by
turning the ignition switch from the OFF position to the
ON/RUN position. The light should illuminate for ap-
proximately two seconds. The light should then turn off
unless the parking brake is applied or a brake fault is
detected. If the light does not illuminate, have the light
inspected by an authorized dealer.
4
UNDERSTANDING YOUR INSTRUMENT PANEL 313