wheel DODGE DART 2015 PF / 1.G Manual Online
[x] Cancel search | Manufacturer: DODGE, Model Year: 2015, Model line: DART, Model: DODGE DART 2015 PF / 1.GPages: 664, PDF Size: 16.96 MB
Page 550 of 664
9. Lower the vehicle to the ground by turning the jack
handle counterclockwise.
10. Finish tightening the wheel bolts. Push down on the
wrench while at the end of the handle for increased
leverage. Tighten the wheel bolts in a star pattern
until each wheel bolt has been tightened twice. Refer
to “Torque Specifications” in this section for proper
lug bolt torque. If in doubt about the correct tight-
ness, have them checked with a torque wrench by
your authorized dealer or at a service station.
11. Lower the jack until it is free. Remove the wheel
blocks. Reassemble the lug wrench to the jack assem-
bly and stow it in the spare tire area. Secure the
assembly using the means provided. Release the
parking brake before driving the vehicle.
12. Stow the jack, tools and flat tire.
WARNING!
A loose tire or jack thrown forward in a collision or
hard stop could endanger the occupants of the ve-
hicle. Always stow the jack parts and the spare tire in
the places provided. Have the deflated (flat) tire
repaired or replaced immediately.
Road Tire Installation
Vehicles Equipped With Wheel Covers
1. Mount the road tire on the axle.
2. To ease the installation process for steel wheels with
wheel covers, install two wheel bolts on the wheel
which are on each side of the valve stem. Install the
wheel bolts with the threaded end of the bolt toward
the wheel. Lightly tighten the wheel bolts.
548 WHAT TO DO IN EMERGENCIES
Page 551 of 664
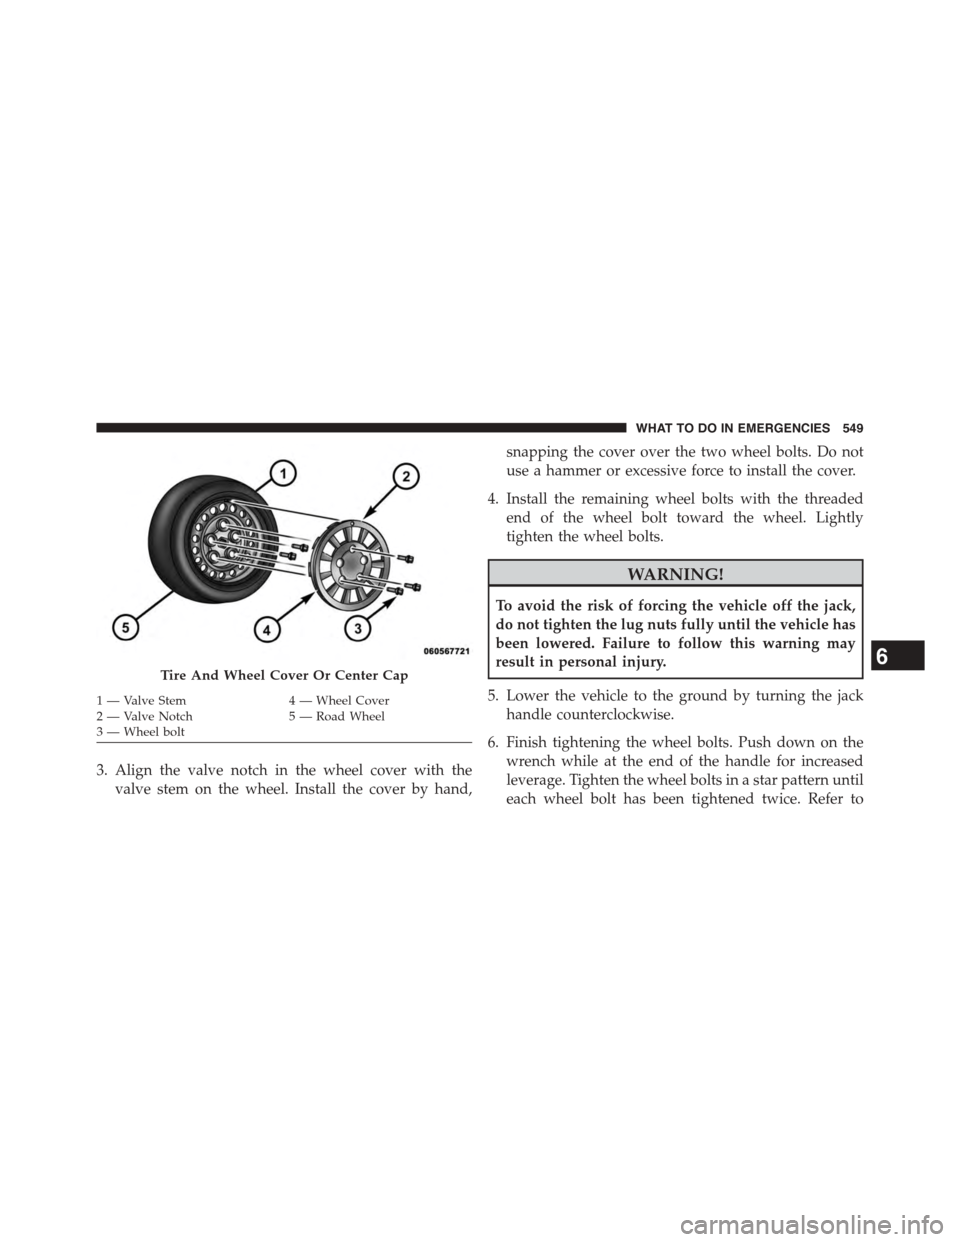
3. Align the valve notch in the wheel cover with the
valve stem on the wheel. Install the cover by hand,
snapping the cover over the two wheel bolts. Do not
use a hammer or excessive force to install the cover.
4. Install the remaining wheel bolts with the threaded
end of the wheel bolt toward the wheel. Lightly
tighten the wheel bolts.
WARNING!
To avoid the risk of forcing the vehicle off the jack,
do not tighten the lug nuts fully until the vehicle has
been lowered. Failure to follow this warning may
result in personal injury.
5. Lower the vehicle to the ground by turning the jack
handle counterclockwise.
6. Finish tightening the wheel bolts. Push down on the
wrench while at the end of the handle for increased
leverage. Tighten the wheel bolts in a star pattern until
each wheel bolt has been tightened twice. Refer to
Tire And Wheel Cover Or Center Cap
1 — Valve Stem4 — Wheel Cover2—ValveNotch5—RoadWheel3—Wheelbolt
6
WHAT TO DO IN EMERGENCIES 549
Page 552 of 664
“Torque Specifications” in this section for proper lug
bolt torque. If in doubt about the correct tightness,
have them checked with a torque wrench by your
authorized dealer or service station.
7. Lower the jack until it is free. Remove the wheel
blocks. Reassemble the lug wrench to the jack assem-
bly and stow it in the spare tire area. Secure the
assembly using the means provided. Release the park-
ing brake before driving the vehicle.
8. After 25 miles (40 km) check the wheel bolt torque
with a torque wrench to ensure that all wheel bolts are
properly seated against the wheel.
Road Tire Installation
1. Mount the road tire on the axle.
2. Install the remaining wheel bolts with the threaded
end of the wheel bolt toward the wheel. Lightly
tighten the wheel bolts.
WARNING!
To avoid the risk of forcing the vehicle off the jack,
do not tighten the lug nuts fully until the vehicle has
been lowered. Failure to follow this warning may
result in personal injury.
3. Lower the vehicle to the ground by turning the jack
handle counterclockwise.
4. Finish tightening the wheel bolts. Push down on the
wrench while at the end of the handle for increased
leverage. Tighten the wheel bolts in a star pattern until
each wheel bolt has been tightened twice. Refer to
“Torque Specifications” in this section for the proper
lug bolt torque. If in doubt about the correct tightness,
have them checked with a torque wrench by your
authorized dealer or service station.
550 WHAT TO DO IN EMERGENCIES
Page 553 of 664
5. Lower the jack until it is free. Remove the wheel
blocks. Reassemble the lug wrench to the jack assem-
bly and stow it in the spare tire area. Secure the
assembly using the means provided. Release the park-
ing brake before driving the vehicle.
6. After 25 miles (40 km) check the wheel bolt torque
with a torque wrench to ensure that all wheel bolts are
properly seated against the wheel.
JUMP-STARTING PROCEDURES
If your vehicle has a discharged battery it can be jump-
started using a set of jumper cables and a battery in
another vehicle or by using a portable battery booster
pack. Jump-starting can be dangerous if done improperly
so please follow the procedures in this section carefully.
NOTE:When using a portable battery booster pack
follow the manufacturer ’s operating instructions and
precautions.
CAUTION!
Do not use a portable battery booster pack or any
other booster source with a system voltage greater
than 12 Volts or damage to the battery, starter motor,
alternator or electrical system may occur.
WARNING!
Do not attempt jump-starting if the battery is frozen.
It could rupture or explode and cause personal injury.
Preparations For Jump-Start
The battery in your vehicle is located in the front of the
engine compartment, behind the left headlight assembly.
NOTE:The positive battery post is covered with a
protective cap. Lift up on the cap to gain access to the
positive battery post.
6
WHAT TO DO IN EMERGENCIES 551
Page 557 of 664
CAUTION!
Accessories plugged into the vehicle power outlets
draw power from the vehicle’s battery, even when not
in use (i.e., cellular phones, etc.). Eventually, if
plugged in long enough without engine operation,
the vehicle’s battery will discharge sufficiently to
degrade battery life and/or prevent the engine from
starting.
FREEING A STUCK VEHICLE
If your vehicle becomes stuck in mud, sand, or snow, it
can often be moved by a rocking motion. Turn your
steering wheel right and left to clear the area around the
front wheels. Then shift back and forth between DRIVE
and REVERSE (with automatic transmission) or 2nd Gear
and REVERSE (with manual transmission) while gently
pressing the accelerator. Use the least amount of accel-
erator pedal pressure that will maintain the rocking
motion, without spinning the wheels or racing the en-
gine.
NOTE:1.4L Turbo automatic transmission vehicles can-
not be rocked in this manner, because the transmission
will not allow shifts between DRIVE and REVERSE while
the wheels are turning.
CAUTION!
Racing the engine or spinning the wheels may lead to
transmission overheating and failure. Allow the en-
gine to idle with the transmission in NEUTRAL for at
least one minute after every five rocking-motion
cycles. This will minimize overheating and reduce
the risk of clutch or transmission failure during
prolonged efforts to free a stuck vehicle.
6
WHAT TO DO IN EMERGENCIES 555
Page 558 of 664
NOTE:Press the#ESC Off#switch, to place the Electronic
Stability Control (ESC) system in “partial off” mode,
before rocking the vehicle. Refer to “Electronic Brake
Control” in “Starting And Operating” for further infor-
mation. Once the vehicle has been freed, press the#ESC
Off#switch again to restore#ESC On#mode.
CAUTION!
•When “rocking” a stuck vehicle by shifting be-
tween DRIVE/2nd gear and REVERSE, do not spin
the wheels faster than 15 mph (24 km/h), or drive-
train damage may result.
•Revving the engine or spinning the wheels too fast
may lead to transmission overheating and failure.
It can also damage the tires. Do not spin the wheels
above 30 mph (48 km/h) while in gear (no trans-
mission shifting occurring).
WARNING!
Fast spinning tires can be dangerous. Forces gener-
ated by excessive wheel speeds may cause damage, or
even failure, of the axle and tires. A tire could
explode and injure someone. Do not spin your vehi-
cle’s wheels faster than 30 mph (48 km/h) or for
longer than 30 seconds continuously without stop-
ping when you are stuck and do not let anyone near
a spinning wheel, no matter what the speed.
SHIFT LEVER OVERRIDE
If a malfunction occurs and the shift lever cannot be
moved out of the PARK position, you can use the
following procedure to temporarily move the shift lever:
1. Turn the engine OFF.
2. Firmly apply the parking brake.
556 WHAT TO DO IN EMERGENCIES
Page 561 of 664
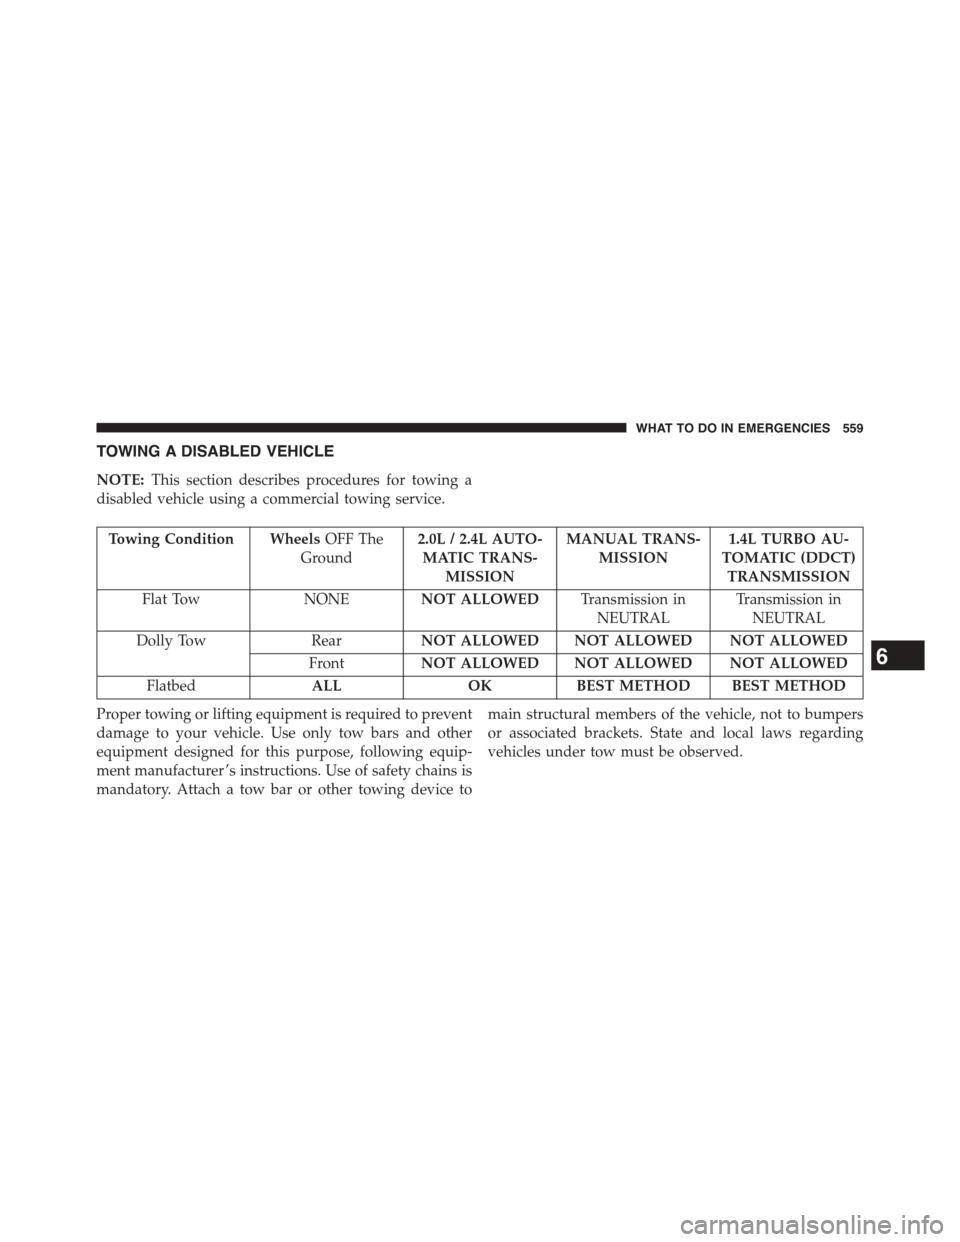
TOWING A DISABLED VEHICLE
NOTE:This section describes procedures for towing a
disabled vehicle using a commercial towing service.
Towing Condition WheelsOFF The
Ground
2.0L / 2.4L AUTO-
MATIC TRANS-
MISSION
MANUAL TRANS-
MISSION
1.4L TURBO AU-
TOMATIC (DDCT)
TRANSMISSION
Flat Tow NONENOT ALLOWEDTransmission in
NEUTRAL
Transmission in
NEUTRAL
Dolly TowRearNOT ALLOWED NOT ALLOWED NOT ALLOWED
FrontNOT ALLOWED NOT ALLOWED NOT ALLOWED
FlatbedALLOKBEST METHOD BEST METHOD
Proper towing or lifting equipment is required to prevent
damage to your vehicle. Use only tow bars and other
equipment designed for this purpose, following equip-
ment manufacturer ’s instructions. Use of safety chains is
mandatory. Attach a tow bar or other towing device to
main structural members of the vehicle, not to bumpers
or associated brackets. State and local laws regarding
vehicles under tow must be observed.
6
WHAT TO DO IN EMERGENCIES 559
Page 562 of 664
CAUTION!
•DO NOT use sling-type equipment when towing.
Vehicle damage may occur.
•When securing the vehicle to a flatbed truck, do not
attach to front or rear suspension components.
Damage to your vehicle may result from improper
towing.
•The manufacturer does not recommend towing this
vehicle using a tow dolly. Vehicle damage may
occur.
If you must use the accessories (wipers, defroster, etc.)
while being towed, the key must be in the ON/RUN
position, not the ACC position.
2.0L / 2.4L Automatic Transmission
This vehicle must be towed with all four wheels OFF
the ground using a flatbed.
CAUTION!
•DO NOT flat tow any 2.0L or 2.4L vehicle equipped
with an automatic transmission. Damage to the
drivetrain will result. If these vehicles require
towing, make sure all the wheels are OFF the
ground.
•Do not dolly tow this vehicle. Use of a towing dolly
can cause significant damage to your vehicle. Dam-
age from improper towing is not covered under the
New Vehicle Limited Warranty.
•Towing this vehicle in violation of the above re-
quirements can cause severe transmission damage.
Damage from improper towing is not covered un-
der the New Vehicle Limited Warranty.
560 WHAT TO DO IN EMERGENCIES
Page 563 of 664
If the key fob is unavailable, or the vehicle’s battery is
discharged, refer to “Shift Lever Override” in this section
for instructions on shifting the automatic transmission
out of PARK for loading onto a flatbed truck.
Manual Transmission Or 1.4L Turbo Automatic
(DDCT) Transmission
•The manufacturer recommends towing your vehicle
with all four wheelsOFFthe ground using a flatbed.
•Manual transmission and 1.4L turbo automatic (DDCT)
transmission vehicles can also be flat towed (all four
wheels on the ground) with the transmission in NEU-
TRAL. For vehicles with DDCT transmission (1.4L turbo
automatic), refer to#Shift Lever Override#in this section
for instructions on shifting the transmission into NEU-
TRAL when the ignition is OFF. If the ignition is left in
the ACC position, it may be helpful to disconnect the
negative battery cable (and secure it away from the
battery post), to avoid draining the battery.
CAUTION!
•DO NOT flat tow any disabled vehicle if condition
is related to the clutch, transmission or driveline.
Additional damage to the drivetrain could result.
•Towing this vehicle in violation of the above re-
quirements can cause severe engine, transmission,
or drivetrain damage. Damage from improper tow-
ing is not covered under the New Vehicle Limited
Warranty.6
WHAT TO DO IN EMERGENCIES 561
Page 599 of 664
CAUTION!
•Do not use abrasive or strong cleaning materials
such as steel wool or scouring powder that will
scratch metal and painted surfaces.
•Use of power washers exceeding 1,200 psi (8 274 kPa)
can result in damage or removal of paint and decals.
Special Care
•If you drive on salted or dusty roads or if you drive
near the ocean, hose off the undercarriage at least once
a month.
•It is important that the drain holes in the lower edges
of the doors, rocker panels, and trunk be kept clear and
open.
•If you detect any stone chips or scratches in the paint,
touch them up immediately. The cost of such repairs is
considered the responsibility of the owner.
•If your vehicle is damaged due to a collision or similar
cause that destroys the paint and protective coating,
have your vehicle repaired as soon as possible. The
cost of such repairs is considered the responsibility of
the owner.
•If you carry special cargo such as chemicals, fertilizers,
de-icer salt, etc., be sure that such materials are well
packaged and sealed.
•If a lot of driving is done on gravel roads, consider
mud or stone shields behind each wheel.
•Use MOPAR® Touch Up Paint on scratches as soon as
possible. Your authorized dealer has touch up paint to
match the color of your vehicle.
Wheel And Wheel Trim Care
•All wheels and wheel trim, especially aluminum and
chrome plated wheels, should be cleaned regularly
with a mild soap and water to prevent corrosion.
7
MAINTAINING YOUR VEHICLE 597