wheel DODGE DART 2015 PF / 1.G Repair Manual
[x] Cancel search | Manufacturer: DODGE, Model Year: 2015, Model line: DART, Model: DODGE DART 2015 PF / 1.GPages: 664, PDF Size: 16.96 MB
Page 501 of 664
NOTE:Your vehicle is equipped with a compact spare
wheel and tire assembly.
1. The compact spare tire does not have a tire pressure
monitoring sensor. Therefore, the TPMS will not moni-
tor the tire pressure in the compact spare tire.
2. If you install the compact spare tire in place of a road
tire that has a pressure below the low-pressure warn-
ing limit, upon the next ignition key cycle, a chime will
sound and the Tire Pressure Monitoring Telltale Light
will still turn ON due to the low tire. The “Inflate Tire
to XX” message and the graphic with the low tire
pressure in a different color will be displayed.
3. However, after driving the vehicle for up to 20 min-
utes above 15 mph (24 km/h), the Tire Pressure
Monitoring Telltale Light will flash on and off for 75
seconds and then remain on solid. In addition, the
EVIC/DID will display a “SERVICE TPM SYSTEM”
message for a minimum of five seconds and then
display dashes (- -) in place of the pressure values.
4. For each subsequent ignition key cycle, a chime will
sound and the Tire Pressure Monitoring Telltale Light
will flash on and off for 75 seconds and then remain on
solid, the EVIC/DID will display a “SERVICE TPM
SYSTEM” message for a minimum of five seconds and
then display dashes (- -) in place of the pressure
values.
5. Once you repair or replace the original road tire and
reinstall it on the vehicle in place of the compact spare
tire, the TPMS will update automatically and the Tire
Pressure Monitoring Telltale Light will turn OFF, as
long as no tire pressure is below the low-pressure
warning limit in any of the four active road tires. The
vehicle may need to be driven for up to 20 minutes
above 15 mph (24 km/h) in order for the TPMS to
receive this information.
5
STARTING AND OPERATING 499
Page 511 of 664
Rim Size
This is the rim size that is appropriate for the tire size listed.
Inflation Pressure
This is the cold tire inflation pressure for your vehicle for
all loading conditions up to full GAWR.
Curb Weight
The curb weight of a vehicle is defined as the total weight
of the vehicle with all fluids, including vehicle fuel, at full
capacity conditions, and with no occupants or cargo loaded
into the vehicle. The front and rear curb weight values are
determined by weighing your vehicle on a commercial
scale before any occupants or cargo are added.
Overloading
The load carrying components (springs, tires, wheels,
etc.) of your vehicle will provide satisfactory service as
long as you do not exceed the GVWR.
The best way to figure out the total weight of your
vehicle is to weigh it when it is fully loaded and ready for
operation. Weigh it on a commercial scale to ensure that
it is not over the GVWR.
Overloading can cause potential safety hazards and
shorten useful service life. Heavier suspension compo-
nents do not necessarily increase the vehicle’s GVWR.
Loading
To load your vehicle properly, first figure out its empty
weight. Store heavier items down low and be sure you
distribute their weight as evenly as possible. Stow all
loose items securely before driving. Improper weight
distribution can have an adverse effect on the way your
vehicle steers and handles, and the way the brakes
operate.
5
STARTING AND OPERATING 509
Page 517 of 664
Trailer And Tongue Weight
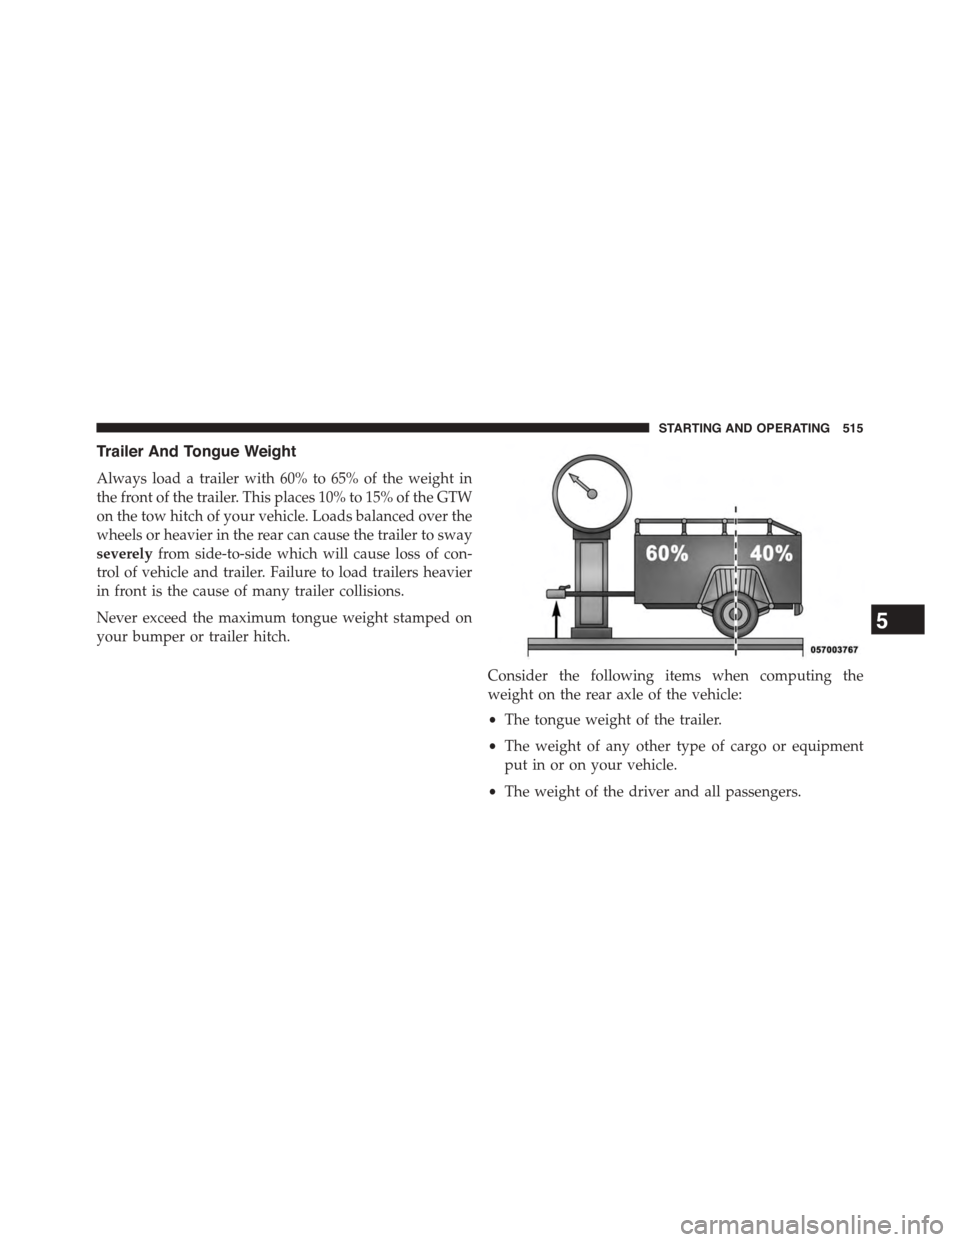
Always load a trailer with 60% to 65% of the weight in
the front of the trailer. This places 10% to 15% of the GTW
on the tow hitch of your vehicle. Loads balanced over the
wheels or heavier in the rear can cause the trailer to sway
severelyfrom side-to-side which will cause loss of con-
trol of vehicle and trailer. Failure to load trailers heavier
in front is the cause of many trailer collisions.
Never exceed the maximum tongue weight stamped on
your bumper or trailer hitch.
Consider the following items when computing the
weight on the rear axle of the vehicle:
•The tongue weight of the trailer.
•The weight of any other type of cargo or equipment
put in or on your vehicle.
•The weight of the driver and all passengers.
5
STARTING AND OPERATING 515
Page 519 of 664
WARNING!
Improper towing can lead to a collision. Follow these
guidelines to make your trailer towing as safe as
possible:
•Make certain that the load is secured in the trailer
and will not shift during travel. When trailering
cargo that is not fully secured, dynamic load shifts
can occur that may be difficult for the driver to
control. You could lose control of your vehicle and
have a collision.
•When hauling cargo or towing a trailer, do not
overload your vehicle or trailer. Overloading can
cause a loss of control, poor performance or dam-
age to the brakes, axle, engine, transmission, steer-
ing, suspension, chassis structure or tires.
(Continued)
WARNING!(Continued)
•Safety chains must always be used between your
vehicle and trailer. Always connect the chains to
the frame or hook retainers of the vehicle hitch.
Cross the chains under the trailer tongue and allow
enough slack for turning corners.
•Vehicles with trailers should not be parked on a
grade. When parking, apply the parking brake on
the tow vehicle. Put the tow vehicle automatic
transmission in PARK. With a manual transmis-
sion, shift the transmission into REVERSE. Always
block or%chock%the trailer wheels.
•GCWR must not be exceeded.
(Continued)
5
STARTING AND OPERATING 517
Page 525 of 664
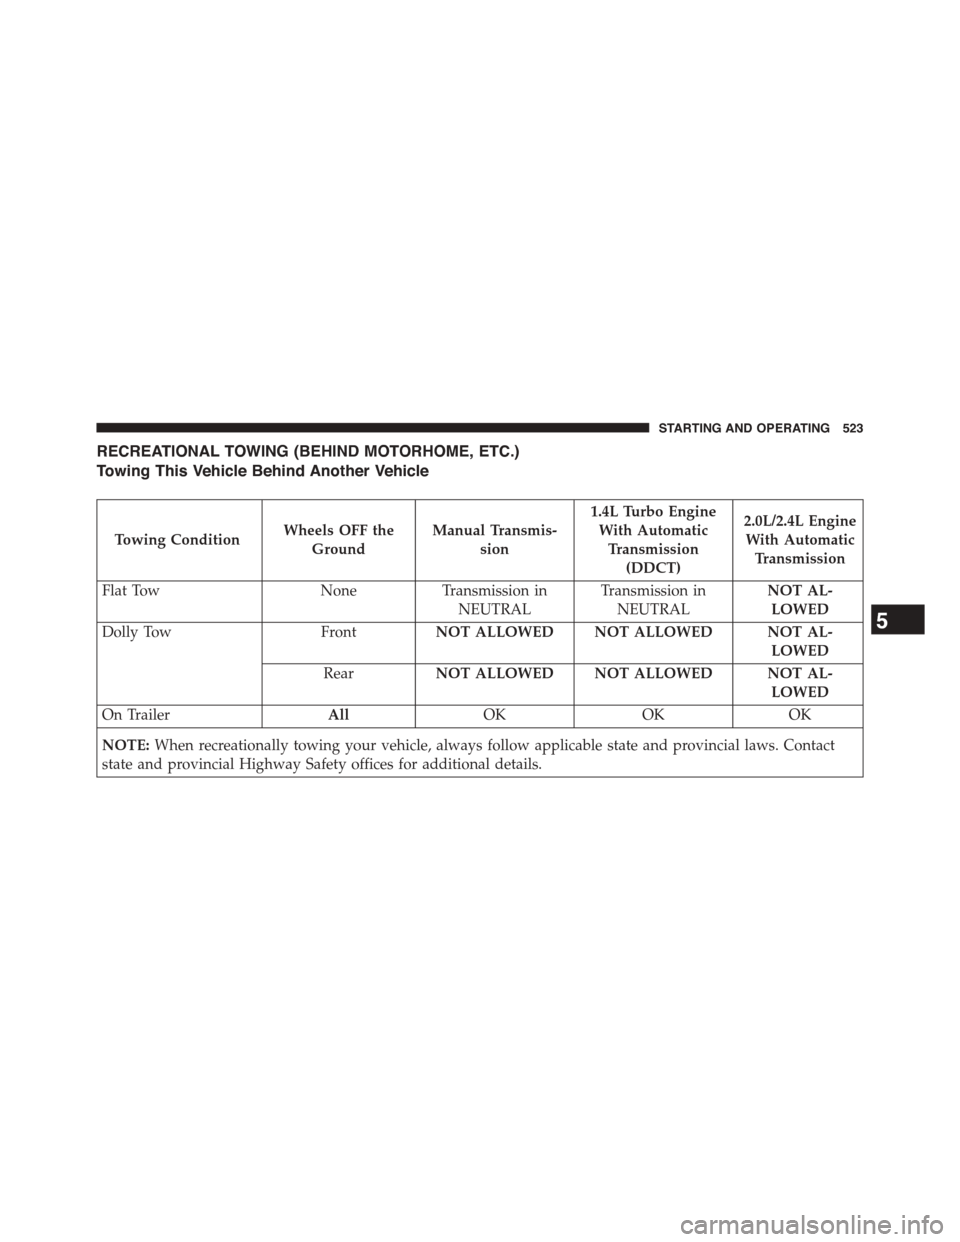
RECREATIONAL TOWING (BEHIND MOTORHOME, ETC.)
Towing This Vehicle Behind Another Vehicle
Towing ConditionWheels OFF the
Ground
Manual Transmis-
sion
1.4L Turbo Engine
With Automatic
Transmission
(DDCT)
2.0L/2.4L Engine
With Automatic
Transmission
Flat TowNoneTransmission in
NEUTRAL
Transmission in
NEUTRAL
NOT AL-
LOWED
Dolly TowFrontNOT ALLOWED NOT ALLOWED NOT AL-
LOWED
RearNOT ALLOWED NOT ALLOWED NOT AL-
LOWED
On TrailerAllOKOKOK
NOTE:When recreationally towing your vehicle, always follow applicable state and provincial laws. Contact
state and provincial Highway Safety offices for additional details.
5
STARTING AND OPERATING 523
Page 526 of 664
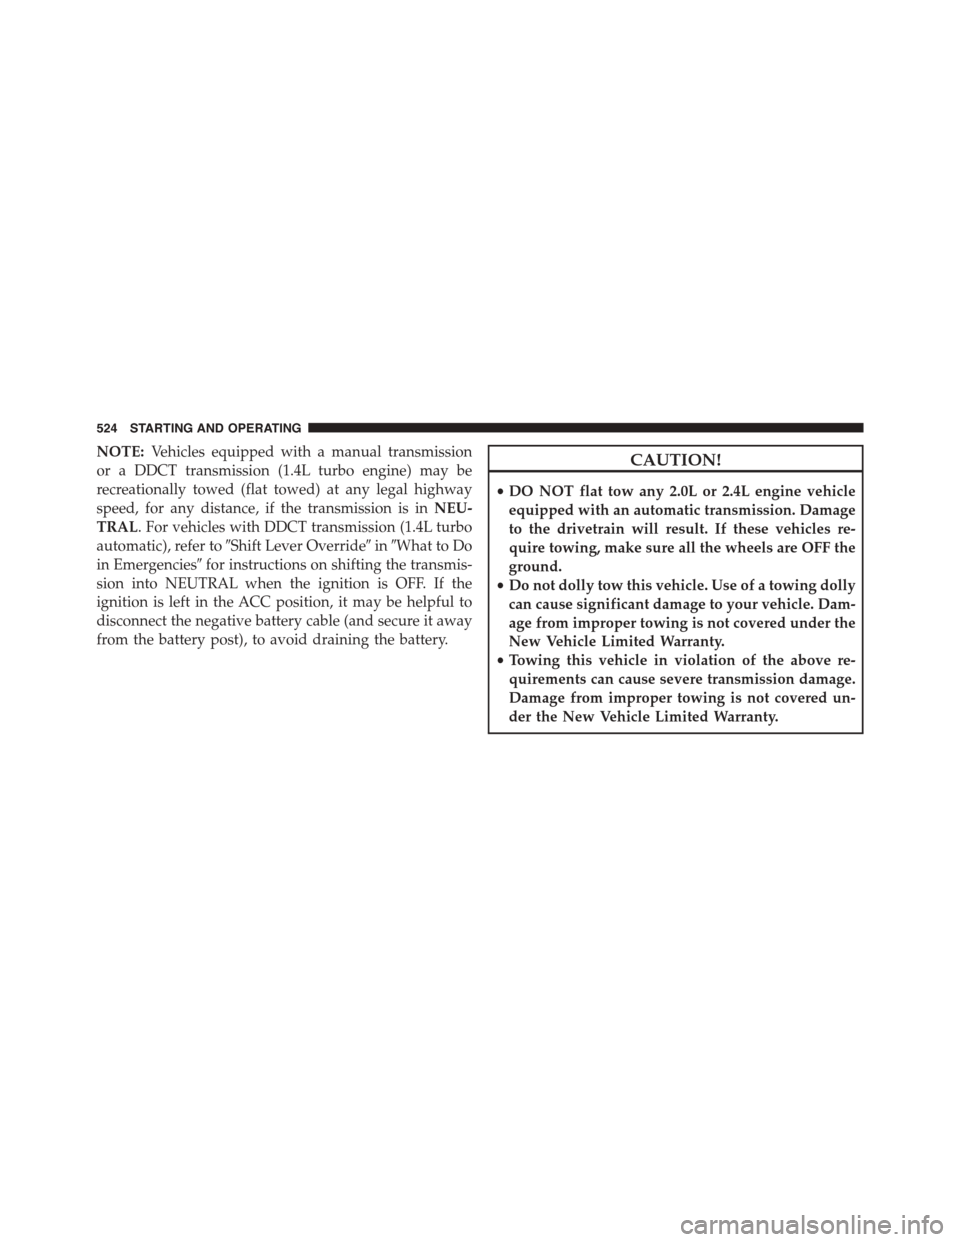
NOTE:Vehicles equipped with a manual transmission
or a DDCT transmission (1.4L turbo engine) may be
recreationally towed (flat towed) at any legal highway
speed, for any distance, if the transmission is inNEU-
TRAL. For vehicles with DDCT transmission (1.4L turbo
automatic), refer to#Shift Lever Override#in#What to Do
in Emergencies#for instructions on shifting the transmis-
sion into NEUTRAL when the ignition is OFF. If the
ignition is left in the ACC position, it may be helpful to
disconnect the negative battery cable (and secure it away
from the battery post), to avoid draining the battery.
CAUTION!
•DO NOT flat tow any 2.0L or 2.4L engine vehicle
equipped with an automatic transmission. Damage
to the drivetrain will result. If these vehicles re-
quire towing, make sure all the wheels are OFF the
ground.
•Do not dolly tow this vehicle. Use of a towing dolly
can cause significant damage to your vehicle. Dam-
age from improper towing is not covered under the
New Vehicle Limited Warranty.
•Towing this vehicle in violation of the above re-
quirements can cause severe transmission damage.
Damage from improper towing is not covered un-
der the New Vehicle Limited Warranty.
524 STARTING AND OPERATING
Page 527 of 664
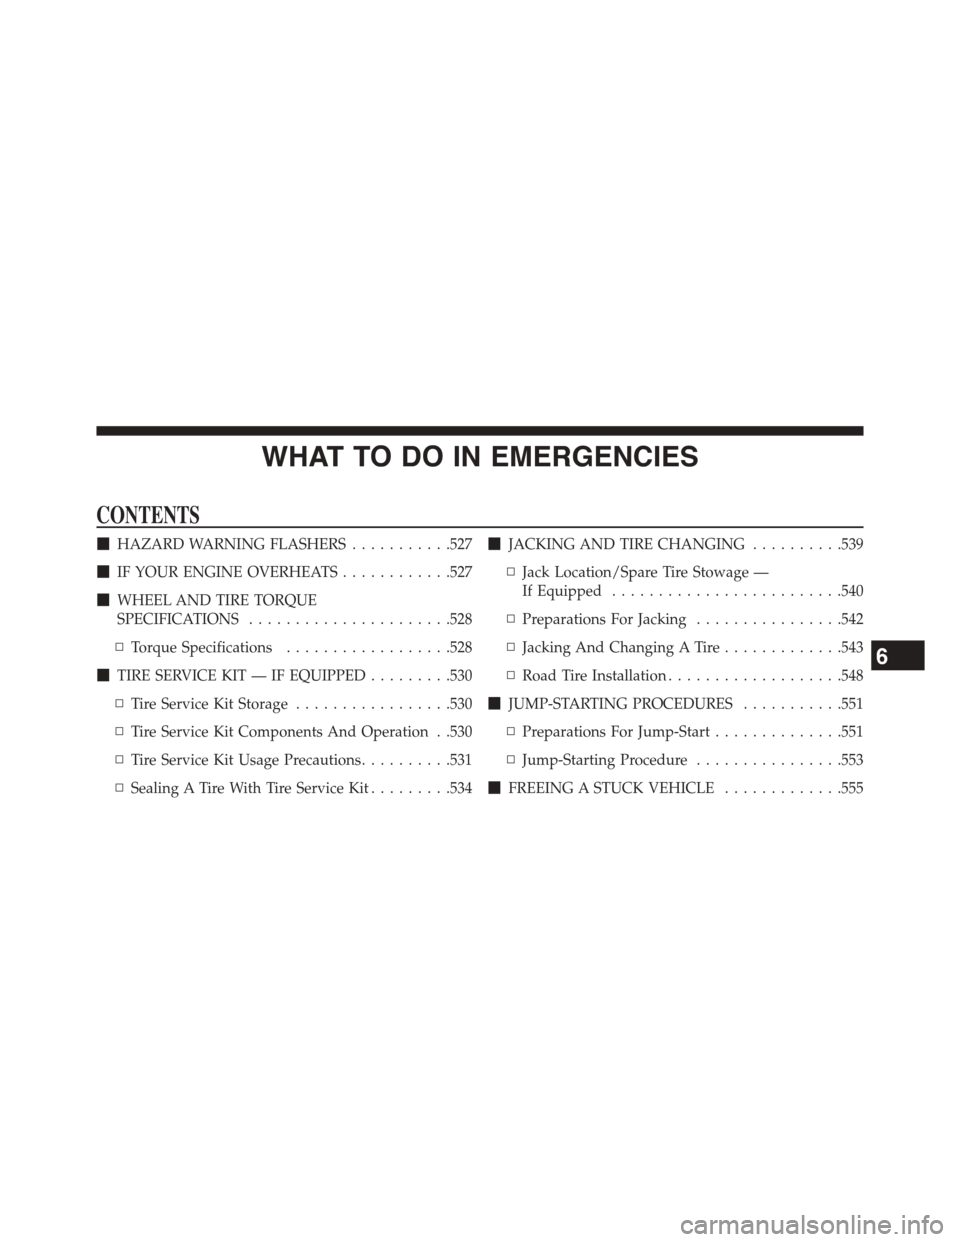
WHAT TO DO IN EMERGENCIES
CONTENTS
!HAZARD WARNING FLASHERS...........527
!IF YOUR ENGINE OVERHEATS............527
!WHEEL AND TIRE TORQUE
SPECIFICATIONS......................528
▫Torque Specifications..................528
!TIRE SERVICE KIT — IF EQUIPPED.........530
▫Tire Service Kit Storage.................530
▫Tire Service Kit Components And Operation . .530
▫Tire Service Kit Usage Precautions..........531
▫Sealing A Tire With Tire Service Kit.........534
!JACKING AND TIRE CHANGING..........539
▫Jack Location/Spare Tire Stowage —
If Equipped.........................540
▫Preparations For Jacking................542
▫Jacking And Changing A Tire.............543
▫Road Tire Installation...................548
!JUMP-STARTING PROCEDURES...........551
▫Preparations For Jump-Start..............551
▫Jump-Starting Procedure................553
!FREEING A STUCK VEHICLE.............555
6
Page 530 of 664
CAUTION!
Driving with a hot cooling system could damage
your vehicle. If the temperature gauge reads “H,”
pull over and stop the vehicle. Idle the vehicle with
the air conditioner turned off until the pointer drops
back into the normal range. If the pointer remains on
the “H,” turn the engine off immediately and call for
service.
WARNING!
You or others can be badly burned by hot engine
coolant (antifreeze) or steam from your radiator. If
you see or hear steam coming from under the hood,
do not open the hood until the radiator has had time
to cool. Never try to open a cooling system pressure
cap when the radiator or coolant bottle is hot.
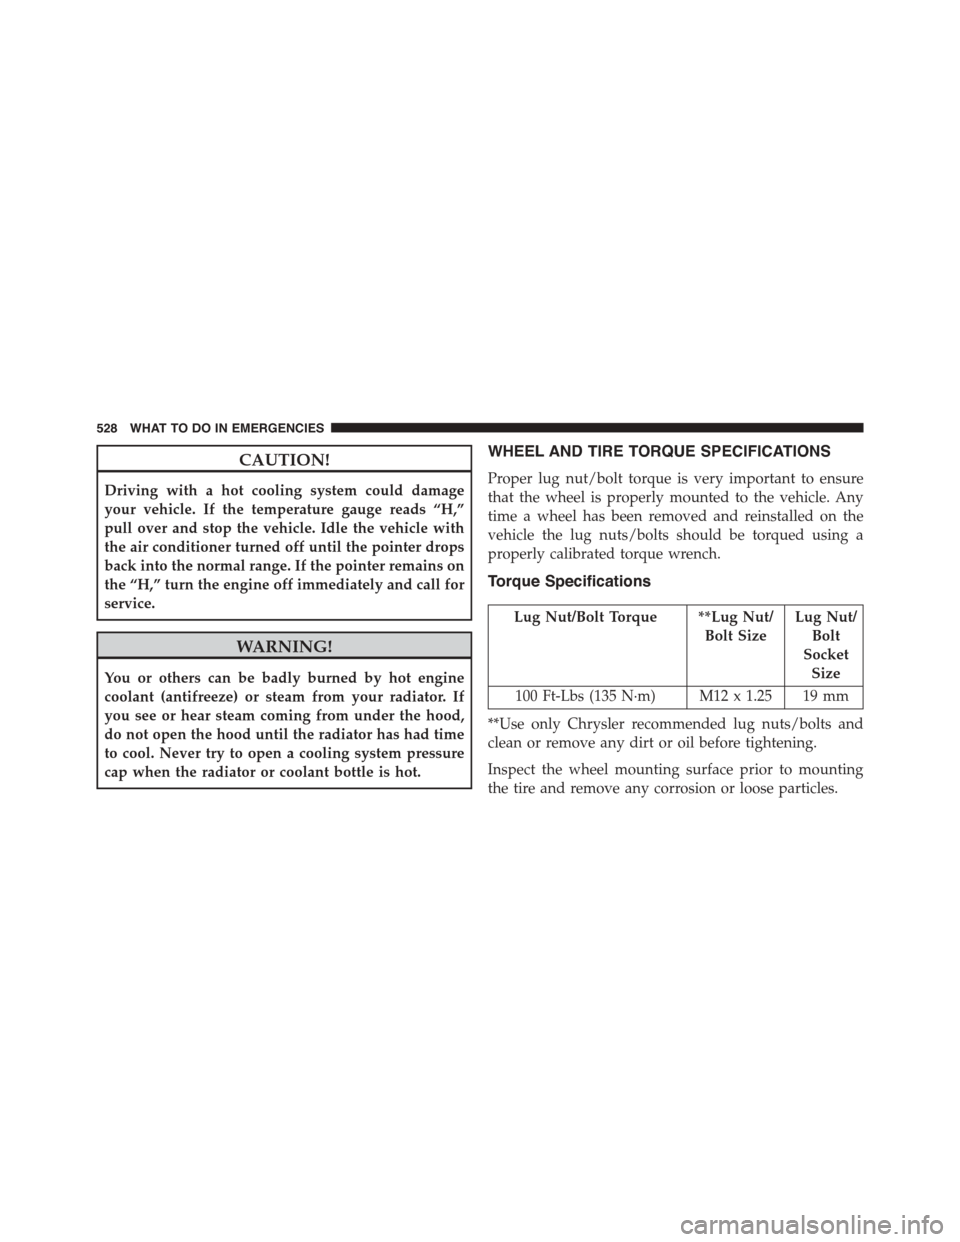
WHEEL AND TIRE TORQUE SPECIFICATIONS
Proper lug nut/bolt torque is very important to ensure
that the wheel is properly mounted to the vehicle. Any
time a wheel has been removed and reinstalled on the
vehicle the lug nuts/bolts should be torqued using a
properly calibrated torque wrench.
Torque Specifications
Lug Nut/Bolt Torque **Lug Nut/
Bolt Size
Lug Nut/
Bolt
Socket
Size
100 Ft-Lbs (135 N·m) M12 x 1.25 19 mm
**Use only Chrysler recommended lug nuts/bolts and
clean or remove any dirt or oil before tightening.
Inspect the wheel mounting surface prior to mounting
the tire and remove any corrosion or loose particles.
528 WHAT TO DO IN EMERGENCIES
Page 531 of 664
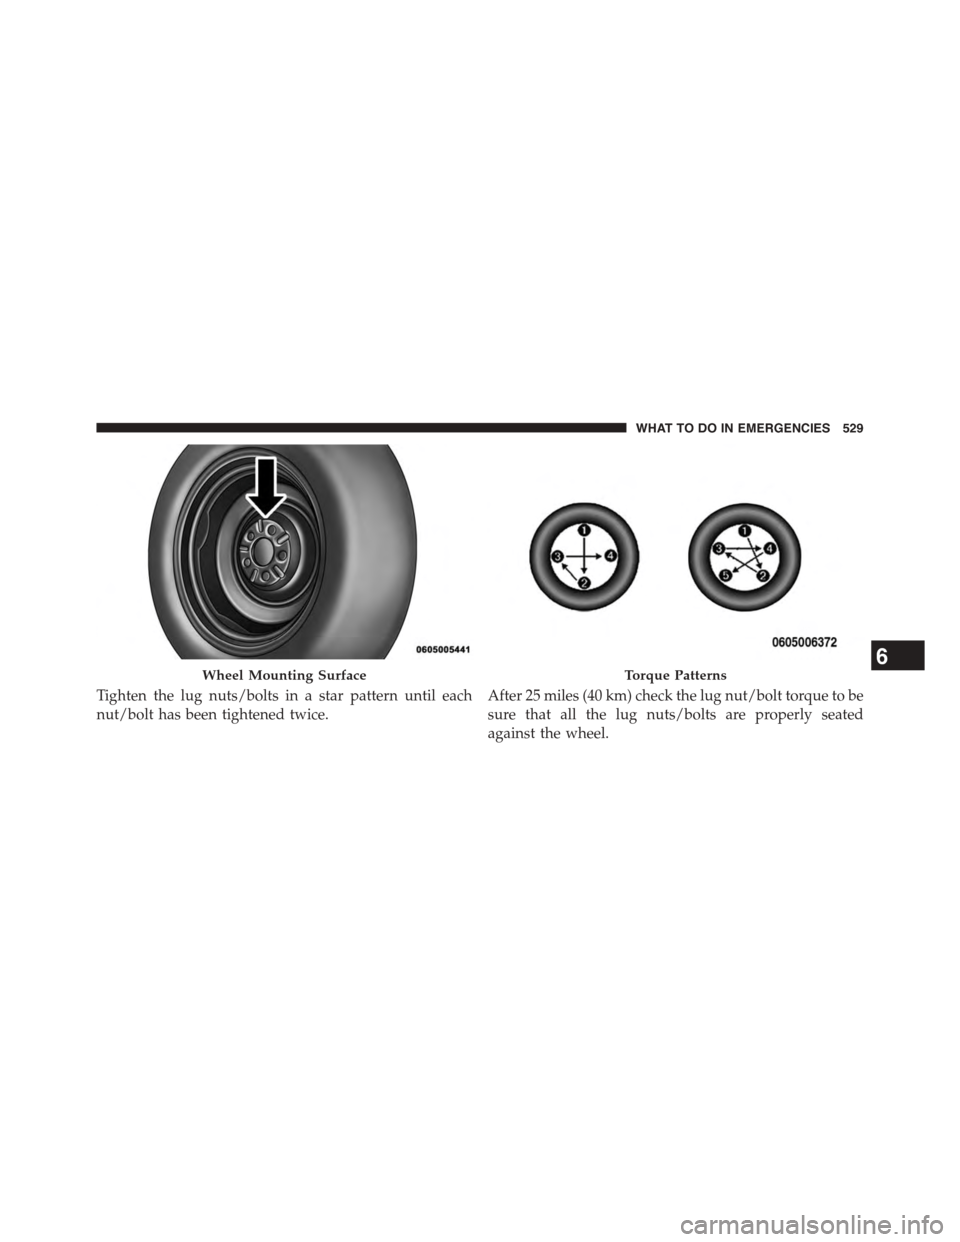
Tighten the lug nuts/bolts in a star pattern until each
nut/bolt has been tightened twice.
After 25 miles (40 km) check the lug nut/bolt torque to be
sure that all the lug nuts/bolts are properly seated
against the wheel.
Wheel Mounting SurfaceTorque Patterns6
WHAT TO DO IN EMERGENCIES 529
Page 534 of 664
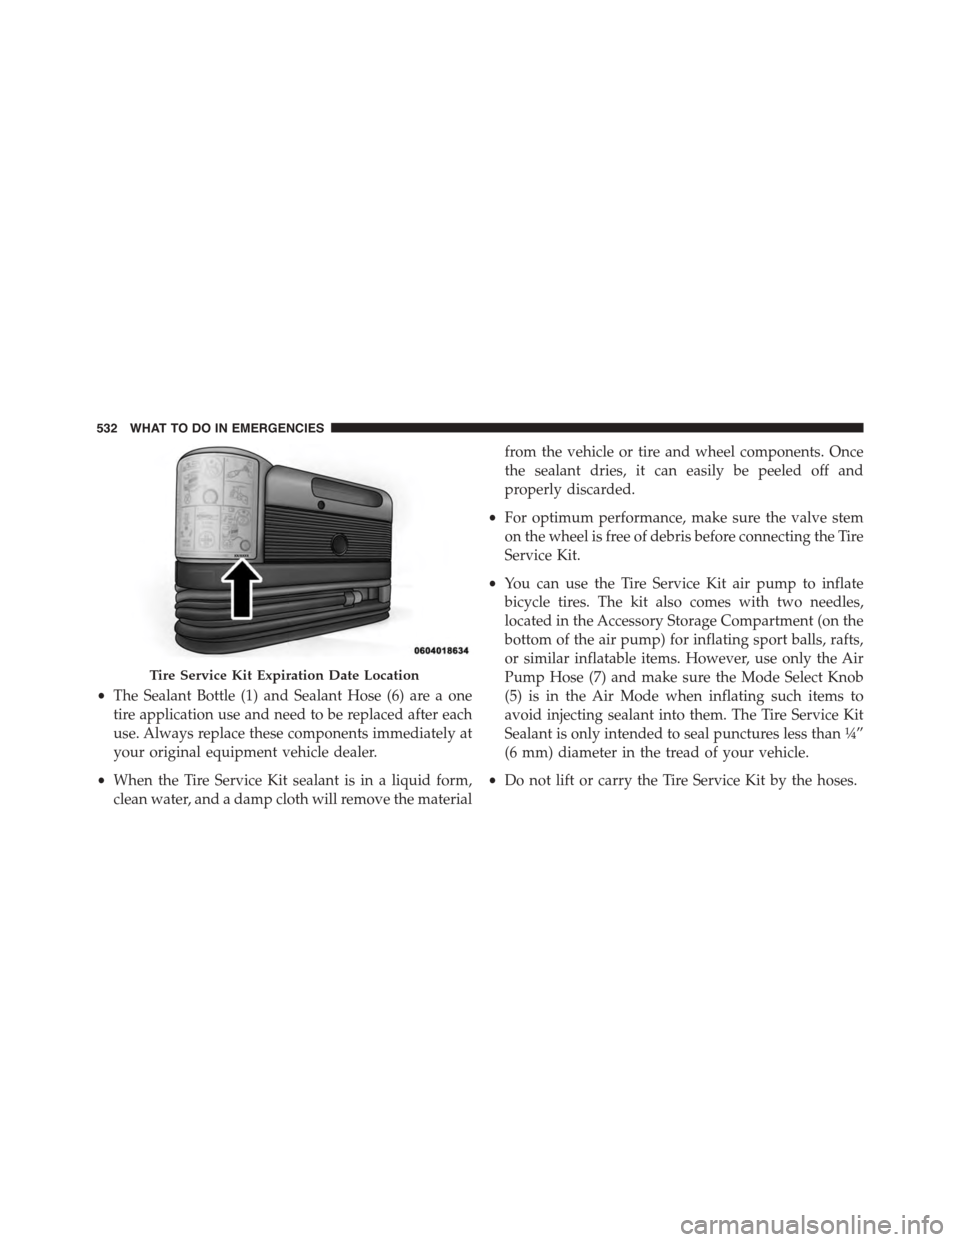
•The Sealant Bottle (1) and Sealant Hose (6) are a one
tire application use and need to be replaced after each
use. Always replace these components immediately at
your original equipment vehicle dealer.
•When the Tire Service Kit sealant is in a liquid form,
clean water, and a damp cloth will remove the material
from the vehicle or tire and wheel components. Once
the sealant dries, it can easily be peeled off and
properly discarded.
•For optimum performance, make sure the valve stem
on the wheel is free of debris before connecting the Tire
Service Kit.
•You can use the Tire Service Kit air pump to inflate
bicycle tires. The kit also comes with two needles,
located in the Accessory Storage Compartment (on the
bottom of the air pump) for inflating sport balls, rafts,
or similar inflatable items. However, use only the Air
Pump Hose (7) and make sure the Mode Select Knob
(5) is in the Air Mode when inflating such items to
avoid injecting sealant into them. The Tire Service Kit
Sealant is only intended to seal punctures less than¼”
(6 mm) diameter in the tread of your vehicle.
•Do not lift or carry the Tire Service Kit by the hoses.
Tire Service Kit Expiration Date Location
532 WHAT TO DO IN EMERGENCIES