buttons DODGE DART 2015 PF / 1.G Owner's Manual
[x] Cancel search | Manufacturer: DODGE, Model Year: 2015, Model line: DART, Model: DODGE DART 2015 PF / 1.GPages: 164, PDF Size: 25.19 MB
Page 57 of 164
•Audio—SelectingtheAudiosub-menuwillallowyoutoadjusttheBass,MidRange,
Tr e b l e , B a l a n c e o r F a d e , j u s t l i k e p u s h i n g t h e A U D I O h a r d c o n t r o l . I f t h e B A C K b u t t o n
is pushed the radio will return to the Main Menu.
•Clock—SelectingClockwillallowyoutosettheclock.Adjustthehoursbyturningthe
right-side TUNE/SCROLL control knob. After adjusting the hours, push the ENTER/
BROWSE button to set the minutes. The minutes will highlight. Adjust the minutes
using the right side TUNE/SCROLL control knob. Push the ENTER/BROWSE button to
save time change.
System Info
Selecting System Info will display the software version, serial number and SIRIUS ID.
SiriusXM Satellite Radio
SiriusXM Satellite Radio gives you over 130 channels, including 100% commercial-free
music from nearly every genre, plus all your favorite sports, news, talk and entertainment
channels–all with crystal clear, coast-to-coast coverage, all in one place and all at your
fingertips.
To a c c e s s S i r i u s X M S a t e l l i t e R a d i o , p u s h t h e R A D I O b u t t o n .
•If you decide to continue your service at the end of your trial subscription, the plan you
choose will automatically renew and bill at then-current rates until you call SiriusXM
at 1-866-635-2349 to cancel. Canadian residents call 1-888-539-7474.See
SiriusXM Customer Agreement for complete terms at www.siriusxm.com. For Canadian
residents www.siriusxm.ca. All fees and programming subject to change. Our satellite
service is available only to those at least 18 and older in the 48 contiguous USA and
D.C. Our Sirius satellite service is also available in PR (with coverage limitations). Our
Internet radio service is available throughout our satellite service area and in AK and HI.
©2014SiriusXMRadioInc.Sirius,XMandallrelatedmarksandlogosaretrademarks
of Sirius XM Radio Inc.
CD/DISC Operation — If Equipped
This radio is capable of playing compact discs (CD), recordable compact discs (CD-R),
rewritable compact discs (CD-RW), compact discs with MP3 tracks and multisession
compact discs with CD, MP3 and WMA tracks.
Seek Up/Down Buttons
•PushtoseekthroughCDtracks.
•Holdeitherbuttontobypasstrackswithoutstopping.
ELECTRONICS
55
Page 58 of 164
Audio Jack Operation
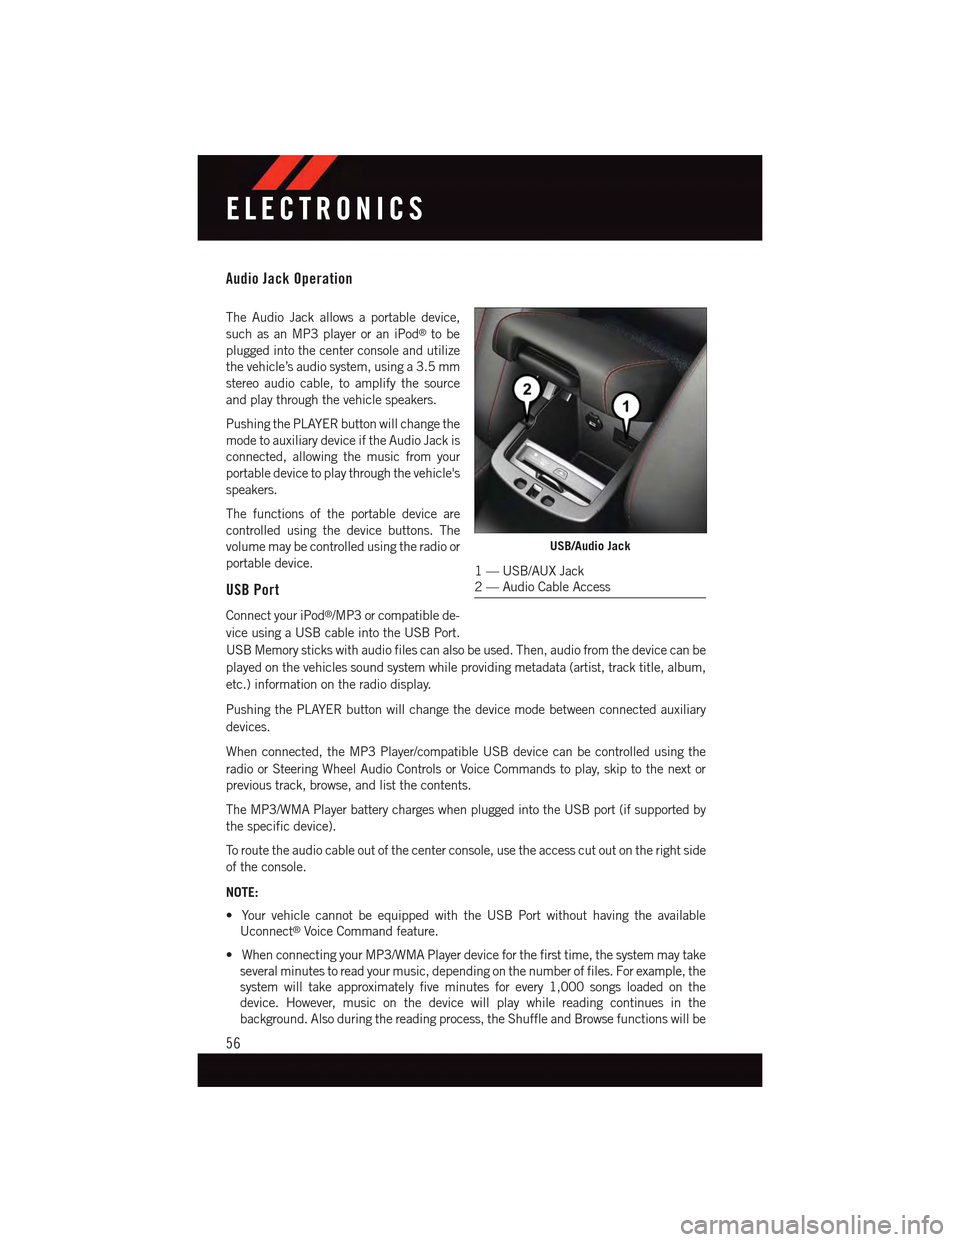
The Audio Jack allows a portable device,
such as an MP3 player or an iPod®to be
plugged into the center console and utilize
the vehicle’s audio system, using a 3.5 mm
stereo audio cable, to amplify the source
and play through the vehicle speakers.
Pushing the PLAYER button will change the
mode to auxiliary device if the Audio Jack is
connected, allowing the music from your
portable device to play through the vehicle's
speakers.
The functions of the portable device are
controlled using the device buttons. The
volume may be controlled using the radio or
portable device.
USB Port
Connect your iPod®/MP3 or compatible de-
vice using a USB cable into the USB Port.
USB Memory sticks with audio files can also be used. Then, audio from the device can be
played on the vehicles sound system while providing metadata (artist, track title, album,
etc.) information on the radio display.
Pushing the PLAYER button will change the device mode between connected auxiliary
devices.
When connected, the MP3 Player/compatible USB device can be controlled using the
radio or Steering Wheel Audio Controls or Voice Commands to play, skip to the next or
previous track, browse, and list the contents.
The MP3/WMA Player battery charges when plugged into the USB port (if supported by
the specific device).
To r o u t e t h e a u d i o c a b l e o u t o f t h e c e n t e r c o n s o l e , u s e t h e a c c e s s c u t o u t o n t h e r i g h t s i d e
of the console.
NOTE:
•YourvehiclecannotbeequippedwiththeUSBPortwithouthavingtheavailable
Uconnect®Voice Command feature.
•WhenconnectingyourMP3/WMAPlayerdeviceforthefirsttime,thesystemmaytake
several minutes to read your music, depending on the number of files. For example, the
system will take approximately five minutes for every 1,000 songs loaded on the
device. However, music on the device will play while reading continues in the
background. Also during the reading process, the Shuffle and Browse functions will be
USB/Audio Jack
1—USB/AUXJack2—AudioCableAccess
ELECTRONICS
56
Page 66 of 164
Setting The Time
Model 8.4N synchronizes time automatically via GPS, so should not require any time
adjustment. If you do need to set the time manually, follow the instructions below for
Model 8.4.
For Model 8.4, turn the unit on, then press the “Time Display” at the top of the screen.
Press “Yes.”
If the time is not displayed at the top of the screen, press the “More” button on the
touchscreen and then the “Settings” button on the touchscreen. In the Settings screen,
press the “Clock” button on the touchscreen, then check or uncheck this option.
Press “+” or “–” next to Set Time Hours and Set Time Minutes to adjust the time.
If these features are not available, uncheck the Sync with GPS box.
Press “X” to save your settings and exit out of the Clock Setting screen.
Audio Settings
Press the “Audio” button on the touchscreen to activate the Audio settings screen to
adjust Balance\Fade, Equalizer and Speed Adjusted Volume.
Yo u c a n r e t u r n t o t h e R a d i o s c r e e n b y t o u c h i n g t h e “ X ” l o c a t e d a t t h e t o p r i g h t .
Balance/Fade
Press the “Balance/Fade” button on the touchscreen to Balance audio between the front
speakers or fade the audio between the rear and front speakers.
To u c h i n g t h e “ F r o n t , ” “ R e a r, ” “ L e f t ” o r “ R i g h t ” b u t t o n s o n t h e t o u c h s c r e e n o r p r e s s a n d
drag the red Speaker Icon to adjust the Balance/Fade.
Equalizer
Press the “Equalizer” button on the touchscreen to activate the Equalizer screen.
Press the “+” or “–” buttons on the touchscreen, or by touching and dragging over the
level bar for each of the equalizer bands. The level value, which spans between ±9, is
displayed at the bottom of each of the Bands.
Speed Adjusted Volume
Press the “Speed Adjusted Volume” button on the touchscreen to activate the Speed
Adjusted Volume screen. The Speed Adjusted Volume is adjusted by touching the “+” and
“–” buttons or by touching and dragging over the level bar. This alters the automatic
adjustment of the audio volume with variation to vehicle speed.
ELECTRONICS
64
Page 68 of 164
Radio Operation
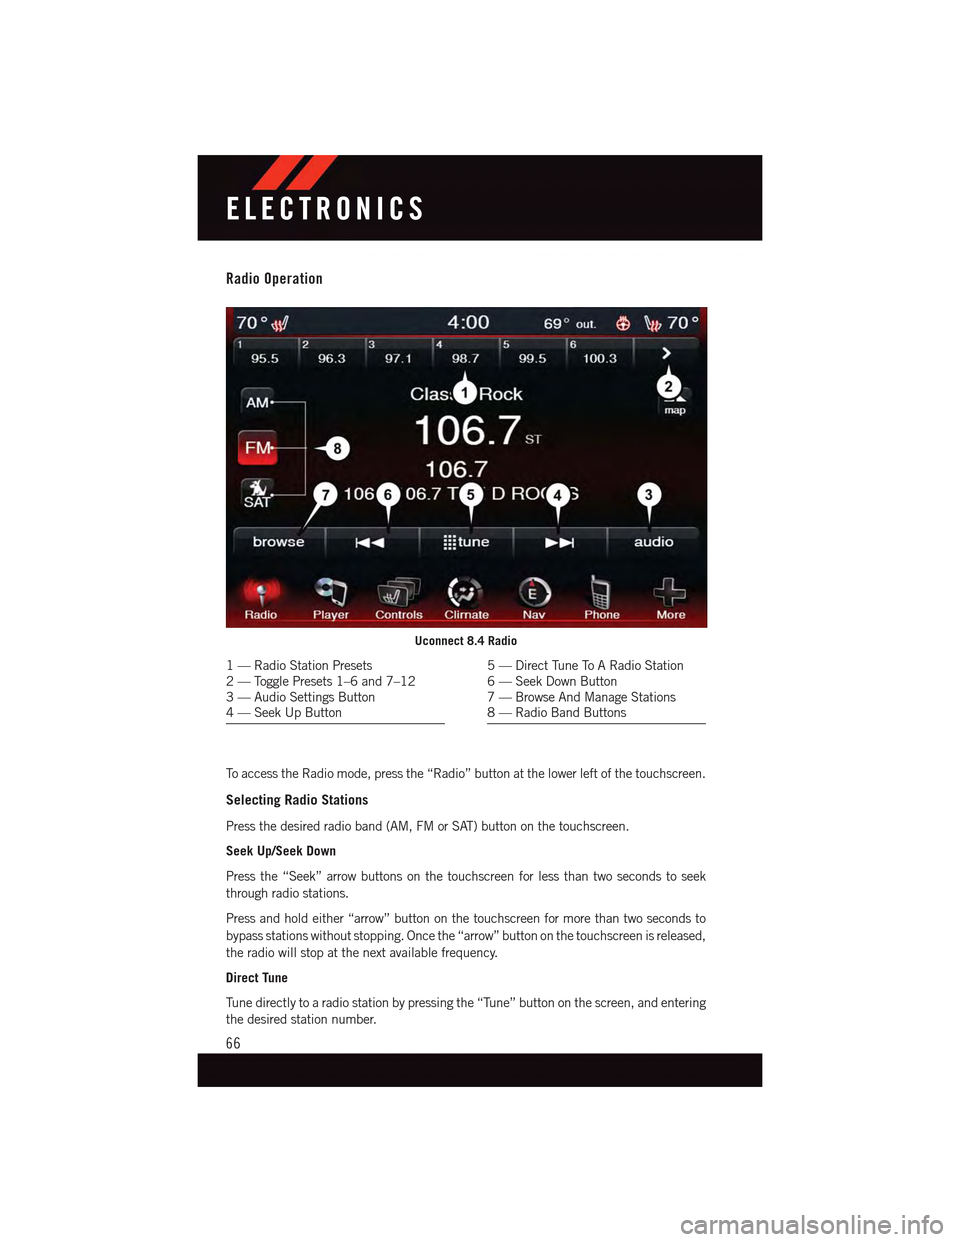
To a c c e s s t h e R a d i o m o d e , p r e s s t h e “ R a d i o ” b u t t o n a t t h e l o w e r l e f t o f t h e t o u c h s c r e e n .
Selecting Radio Stations
Press the desired radio band (AM, FM or SAT) button on the touchscreen.
Seek Up/Seek Down
Press the “Seek” arrow buttons on the touchscreen for less than two seconds to seek
through radio stations.
Press and hold either “arrow” button on the touchscreen for more than two seconds to
bypass stations without stopping. Once the “arrow” button on the touchscreen is released,
the radio will stop at the next available frequency.
Direct Tune
Tu n e d i r e c t l y t o a r a d i o s t a t i o n b y p r e s s i n g t h e “ Tu n e ” b u t t o n o n t h e s c r e e n , a n d e n t e r i n g
the desired station number.
Uconnect 8.4 Radio
1—RadioStationPresets2—TogglePresets1–6and7–123—AudioSettingsButton4—SeekUpButton
5—DirectTuneToARadioStation6—SeekDownButton7—BrowseAndManageStations8—RadioBandButtons
ELECTRONICS
66
Page 69 of 164
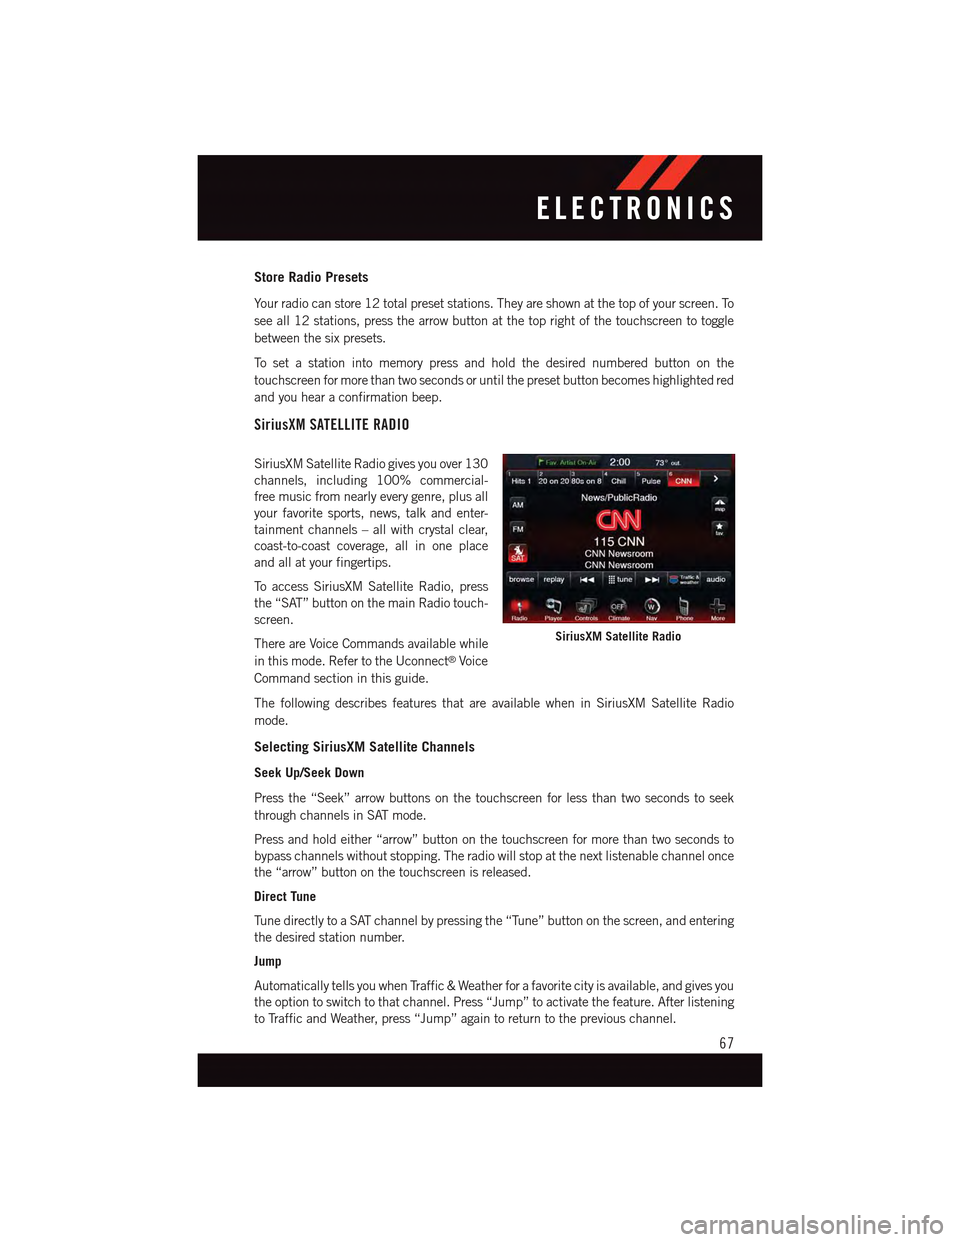
Store Radio Presets
Yo u r r a d i o c a n s t o r e 1 2 t o t a l p r e s e t s t a t i o n s . T h e y a r e s h o w n a t t h e t o p o f y o u r s c r e e n . To
see all 12 stations, press the arrow button at the top right of the touchscreen to toggle
between the six presets.
To s e t a s t a t i o n i n t o m e m o r y p r e s s a n d h o l d t h e d e s i r e d n u m b e r e d b u t t o n o n t h e
touchscreen for more than two seconds or until the preset button becomes highlighted red
and you hear a confirmation beep.
SiriusXM SATELLITE RADIO
SiriusXM Satellite Radio gives you over 130
channels, including 100% commercial-
free music from nearly every genre, plus all
your favorite sports, news, talk and enter-
tainment channels – all with crystal clear,
coast-to-coast coverage, all in one place
and all at your fingertips.
To a c c e s s S i r i u s X M S a t e l l i t e R a d i o , p r e s s
the “SAT” button on the main Radio touch-
screen.
There are Voice Commands available while
in this mode. Refer to the Uconnect®Voice
Command section in this guide.
The following describes features that are available when in SiriusXM Satellite Radio
mode.
Selecting SiriusXM Satellite Channels
Seek Up/Seek Down
Press the “Seek” arrow buttons on the touchscreen for less than two seconds to seek
through channels in SAT mode.
Press and hold either “arrow” button on the touchscreen for more than two seconds to
bypass channels without stopping. The radio will stop at the next listenable channel once
the “arrow” button on the touchscreen is released.
Direct Tune
Tu n e d i r e c t l y t o a S AT c h a n n e l b y p r e s s i n g t h e “ Tu n e ” b u t t o n o n t h e s c r e e n , a n d e n t e r i n g
the desired station number.
Jump
Automatically tells you when Traffic & Weather for a favorite city is available, and gives you
the option to switch to that channel. Press “Jump” to activate the feature. After listening
to Traffic and Weather, press “Jump” again to return to the previous channel.
SiriusXM Satellite Radio
ELECTRONICS
67
Page 82 of 164
Uconnect® Phone (Bluetooth® HANDS FREE CALLING)
If the Uconnect®PhoneButton exists on your steering wheel, then you have the
Uconnect®Phone features.
The Uconnect®Phone is a voice-activated, hands-free, in-vehicle communications
system with Voice Command Capability (see Voice Command section).
The Uconnect®Phone allows you to dial a phone number stored in your mobile phone by
using simple voice commands or using buttons on the touchscreen.
Refer to the “Understand The Features Of Your Vehicle” section of your vehicle's Owner's
Manual on the DVD for further details.
NOTE:
The Uconnect®Phone requires a mobile phone equipped with the Bluetooth®Hands-
Free Profile, Version 1.0 or higher. For Uconnect®customer support, call
1-877-855-8400 or visit UconnectPhone.com. Canadian Residents: call
1-800-465-2001 (English) or 1-800-387-9983 (French) or visit UconnectPhone.com.
Pairing A Phone
To u s e t h e U c o n n e c t®Phone feature, you must first pair your Bluetooth®phone with the
Uconnect®system.
NOTE:
For Voice Command enabled phone pairing, refer to your vehicles Owner's Manual for
details.
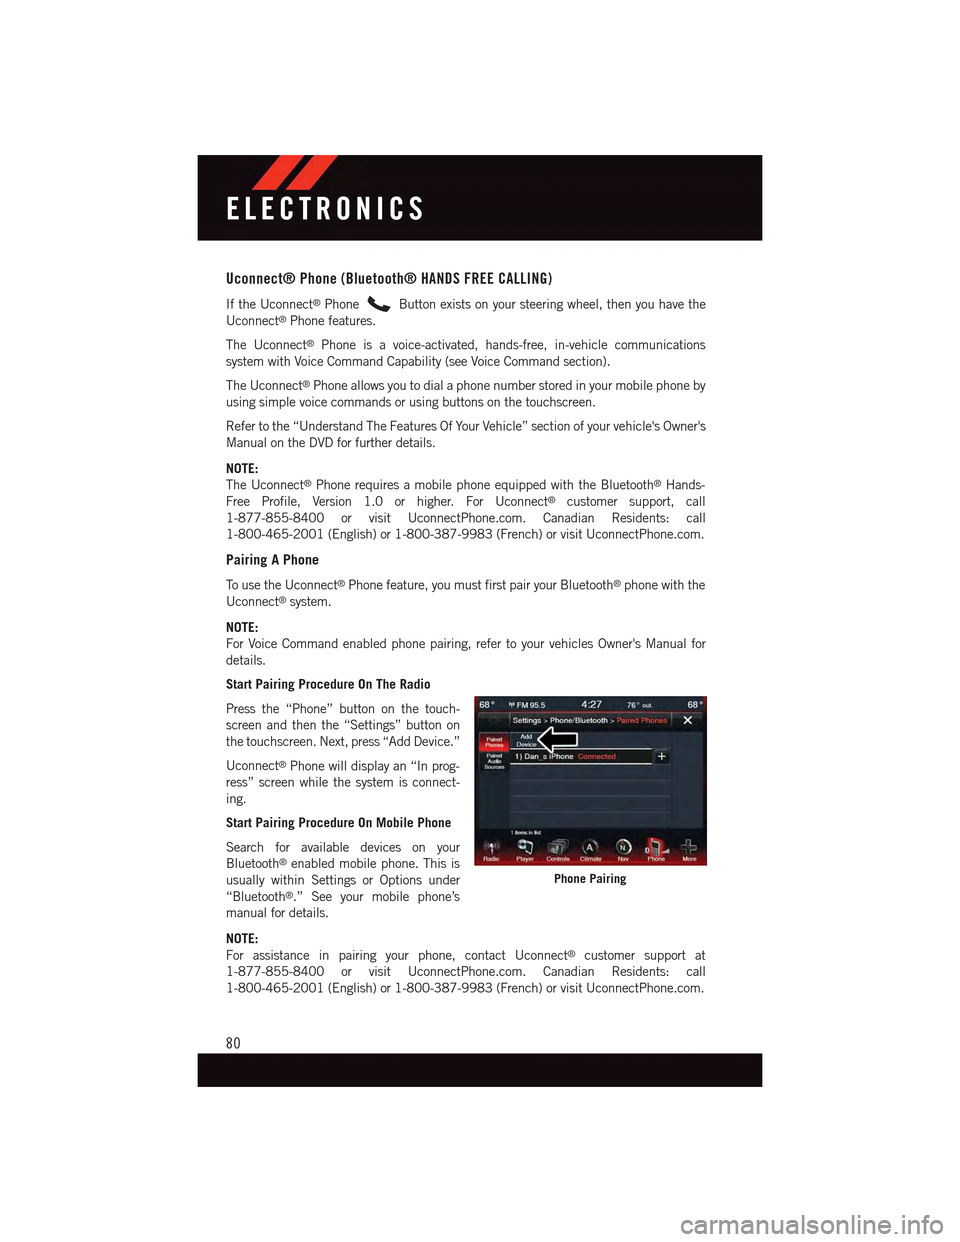
Start Pairing Procedure On The Radio
Press the “Phone” button on the touch-
screen and then the “Settings” button on
the touchscreen. Next, press “Add Device.”
Uconnect®Phone will display an “In prog-
ress” screen while the system is connect-
ing.
Start Pairing Procedure On Mobile Phone
Search for available devices on your
Bluetooth®enabled mobile phone. This is
usually within Settings or Options under
“Bluetooth®.” See your mobile phone’s
manual for details.
NOTE:
For assistance in pairing your phone, contact Uconnect®customer support at
1-877-855-8400 or visit UconnectPhone.com. Canadian Residents: call
1-800-465-2001 (English) or 1-800-387-9983 (French) or visit UconnectPhone.com.
Phone Pairing
ELECTRONICS
80
Page 87 of 164
Voice Text Reply
Uconnect®Phone can read or send new text messages on your mobile phone.
Yo u r m o b i l e p h o n e m u s t s u p p o r t Vo i c e Te x t R e p l y o v e r B l u e t o o t h®in order to use this
feature. If the Uconnect®Phone determines your phone is not compatible with Voice Text
Reply messaging over Bluetooth®the “Messaging” button will be greyed out and the
feature will not be available for use.
For mobile phone compatibility and pairing instructions, please visit
UconnectPhone.com.
Read Messages:
If you receive a new text message while your phone is connected to Uconnect®Phone, an
announcement will be made to notify you that you have a new text message. Once a
message is received and viewed or listened to, you will have the following options:
•SendaReply
•Forward
•Call
Send Messages Using Buttons On The Touchscreen:
With the vehicle in Park, you can send messages using Uconnect®Phone. To send a new
message:
1. Press the “Phone” button on the touchscreen.
2. Press the “Messaging” button on the touchscreen then “New Message.”
3. Press one of the 18 preset messages and the person you wish to send the message to.
4. If multiple numbers are available for the contact select which number you would like
to have the message sent.
5. Press “Send” or “Cancel.”
Send Messages Using Voice Commands:
1. Push the “Uconnect®Phone”button.
2. After the “Listening” prompt and the following beep, say “Send message to John
Smith mobile.”
3. After the system prompts you for what message you want to send, say the message you
wish to send or say “List.” There are 18 preset messages.
While the list of defined messages are being read, you can interrupt the system by pushing
thebutton and saying the message you want to send.
After the system confirms that you want to send your message to John Smith, your
message will be sent.
ELECTRONICS
85
Page 92 of 164
DRIVER INFORMATION DISPLAY (DID) — PREMIUM (4 BUTTON)
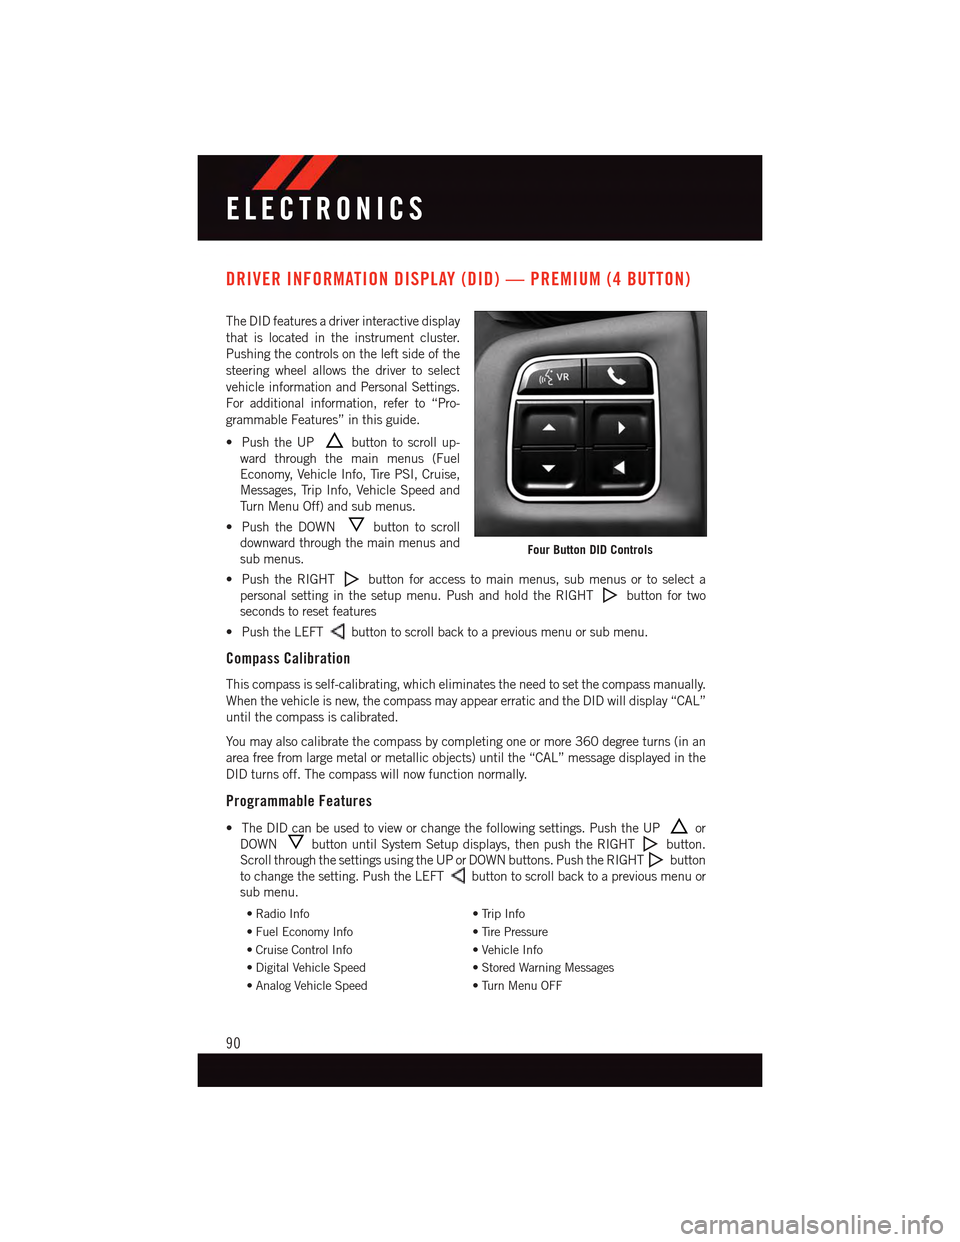
The DID features a driver interactive display
that is located in the instrument cluster.
Pushing the controls on the left side of the
steering wheel allows the driver to select
vehicle information and Personal Settings.
For additional information, refer to “Pro-
grammable Features” in this guide.
•PushtheUPbutton to scroll up-
ward through the main menus (Fuel
Economy, Vehicle Info, Tire PSI, Cruise,
Messages, Trip Info, Vehicle Speed and
Tu r n M e n u O f f ) a n d s u b m e n u s .
•PushtheDOWNbutton to scroll
downward through the main menus and
sub menus.
•PushtheRIGHTbutton for access to main menus, sub menus or to select a
personal setting in the setup menu. Push and hold the RIGHTbutton for two
seconds to reset features
•PushtheLEFTbutton to scroll back to a previous menu or sub menu.
Compass Calibration
This compass is self-calibrating, which eliminates the need to set the compass manually.
When the vehicle is new, the compass may appear erratic and the DID will display “CAL”
until the compass is calibrated.
Yo u m a y a l s o c a l i b r a t e t h e c o m p a s s b y c o m p l e t i n g o n e o r m o r e 3 6 0 d e g r e e t u r n s ( i n a n
area free from large metal or metallic objects) until the “CAL” message displayed in the
DID turns off. The compass will now function normally.
Programmable Features
•TheDIDcanbeusedtovieworchangethefollowingsettings.PushtheUPor
DOWNbutton until System Setup displays, then push the RIGHTbutton.
Scroll through the settings using the UP or DOWN buttons. Push the RIGHTbutton
to change the setting. Push the LEFTbutton to scroll back to a previous menu or
sub menu.
•RadioInfo•TripInfo
•FuelEconomyInfo•TirePressure
•CruiseControlInfo•VehicleInfo
•DigitalVehicleSpeed•StoredWarningMessages
•AnalogVehicleSpeed•TurnMenuOFF
Four Button DID Controls
ELECTRONICS
90
Page 94 of 164
Trip Info
Press the UPorDOWN button until the Trip Info icon is highlighted in the DID.
Press the RIGHTbutton to display the following three trip features in the next screen:
•TripA
•TripB
•ElapsedTime
Stored Message
Press the UPorDOWN button until the Messages display icon is highlighted in
the DID. This feature shows the number of stored warning messages. Pressing the RIGHT
button will allow you to see what the stored messages are. Press the LEFTbutton
to return to the Main Menu. The inner ring of the display will illuminate grey under normal
conditions, yellow for non critical warnings, red for critical warnings and white for on
demand information.
Screen Setup
•Screen Setup Display Analog Icon
•Screen Setup Display Digital Icon
Press the UPor DOWNbutton until the Screen Setup display icon is highlighted
in the DID. Press the RIGHTbutton to enter the Screen Setup submenu. The Screen
Setup feature allows you to change what information is displayed in the instrument cluster
as well as the location that information is displayed.
Press the UPor DOWNbutton until the Screen Setup display icon is highlighted
in the DID. Press the RIGHTbutton to enter the Screen Setup submenu. The Screen
Setup feature allows you to change the location that information is displayed within the
instrument cluster. Use the UP and DOWN buttons to highlight a screen setup location
(i.e., Upper Left, Upper Right, etc.) then press the RIGHT arrow button to select the
location and make changes. Press the UP and DOWN buttons to select the information
you would like to display in that location (i.e., Date, Time, Outside Temp, etc.) and press
the RIGHT arrow button to save the display setting. You can press the LEFT arrow button
at any time to back out of a submenu selection.
NOTE:
This option is only available when the vehicle is in the Park position.
ELECTRONICS
92
Page 96 of 164
Uconnect® 8.4 CUSTOMER PROGRAMMABLE FEATURES
The Uconnect®8.4 system allows you to access Customer Programmable feature settings
such as Display, Clock, Safety/Assistance, Lights, Doors & Locks, Heated Seats, Engine
Off Operation, Compass Settings, Audio, Phone/Bluetooth®and SiriusXM Setup through
buttons on the touchscreen.
Press the “More” button on the touchscreen on the bottom of the screen, then press the
“Settings” button on the touchscreen to access the Settings screen. When making a
selection, scroll up or down until the preferred setting is highlighted, then press and
release the preferred setting until a check-mark appears next to the setting, showing that
setting has been selected. The following feature settings are available:
•Display•Clock
•Safety/Assistance•Lights
•Doors&Locks•Auto-OnComfort&RemoteStart
•EngineOffOptions•CompassSettings
•Audio•Phone/Bluetooth®
•SiriusXMSetup
UNIVERSAL GARAGE DOOR OPENER (HomeLink®)
HomeLink®replaces up to three hand-held transmitters that operate devices such as
garage door openers, motorized gates, lighting or home security systems. The HomeLink®
unit is powered by your vehicles 12 Volt battery.
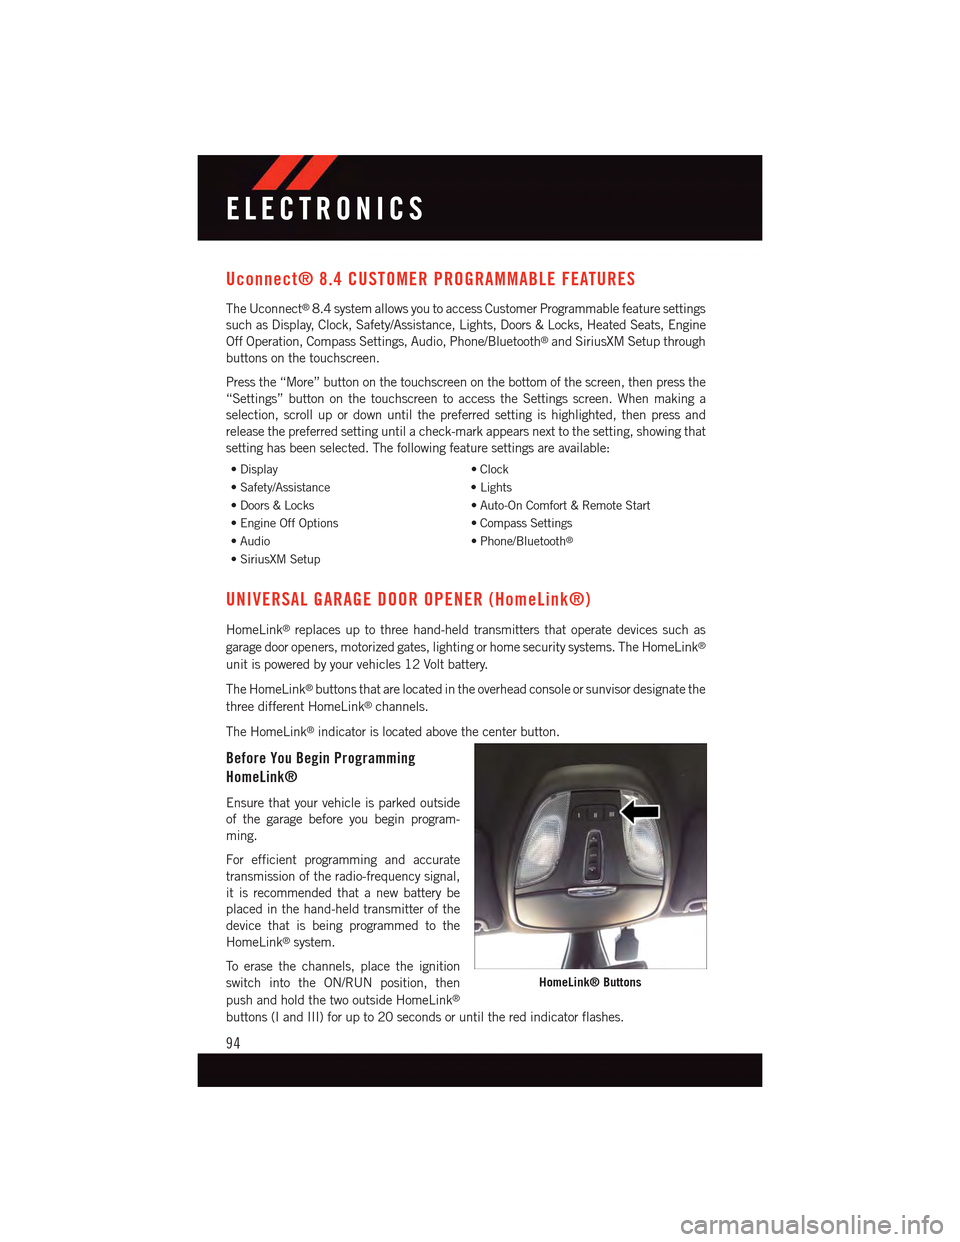
The HomeLink®buttons that are located in the overhead console or sunvisor designate the
three different HomeLink®channels.
The HomeLink®indicator is located above the center button.
Before You Begin Programming
HomeLink®
Ensure that your vehicle is parked outside
of the garage before you begin program-
ming.
For efficient programming and accurate
transmission of the radio-frequency signal,
it is recommended that a new battery be
placed in the hand-held transmitter of the
device that is being programmed to the
HomeLink®system.
To e r a s e t h e c h a n n e l s , p l a c e t h e i g n i t i o n
switch into the ON/RUN position, then
push and hold the two outside HomeLink®
buttons (I and III) for up to 20 seconds or until the red indicator flashes.
HomeLink® Buttons
ELECTRONICS
94