light DODGE DART 2015 PF / 1.G Owner's Manual
[x] Cancel search | Manufacturer: DODGE, Model Year: 2015, Model line: DART, Model: DODGE DART 2015 PF / 1.GPages: 164, PDF Size: 25.19 MB
Page 20 of 164
The OCS will NOT prevent deployment of the Passenger Advanced Front Air Bag. The OCS
may reduce the inflation rate of the Passenger Advanced Front Air Bag if the OCS
estimates that:
•Thefrontpassengerseatisunoccupiedorhasverylightobjectsonit;or
•Thefrontpassengerseatisoccupiedbyasmallpassenger,includingachild;or
•Thefrontpassengerseatisoccupiedbyarear-facingchildrestraint;or
•Thefrontpassengerisnotproperlyseatedorhisorherweightistakenoffoftheseat
for a period of time.
Front Passenger Seat Occupant Status Front Passenger Air Bag Output
Rear-facing child restraintReduced-power deployment
Child, including a child in a forward-facingchild restraint or booster seat*Full-power deployment OR reduced-power deployment
Properly seated adultFull-power deployment OR reduced-power deployment
Unoccupied seatReduced-power deployment
*Itispossibleforachildtobeclassifiedasanadult,allowingafull-powerPassenger
Advanced Front Air Bag deployment. Never allow children to ride in the front passenger
seat and never install a child restraint system, including a rear-facing child restraint, in the
front passenger seat.
The OCS determines the front passenger’s most probable classification.
The OCS estimates the seated weight on the front passenger seat and where that weight
is located. The OCS communicates the classification status to the ORC. The ORC uses the
classification to determine whether the Passenger Advanced Front Air Bag inflation rate
should be adjusted. In order for the OCS to operate as designed, it is important for the
front passenger to be seated properly and properly wearing the seat belt. Properly seated
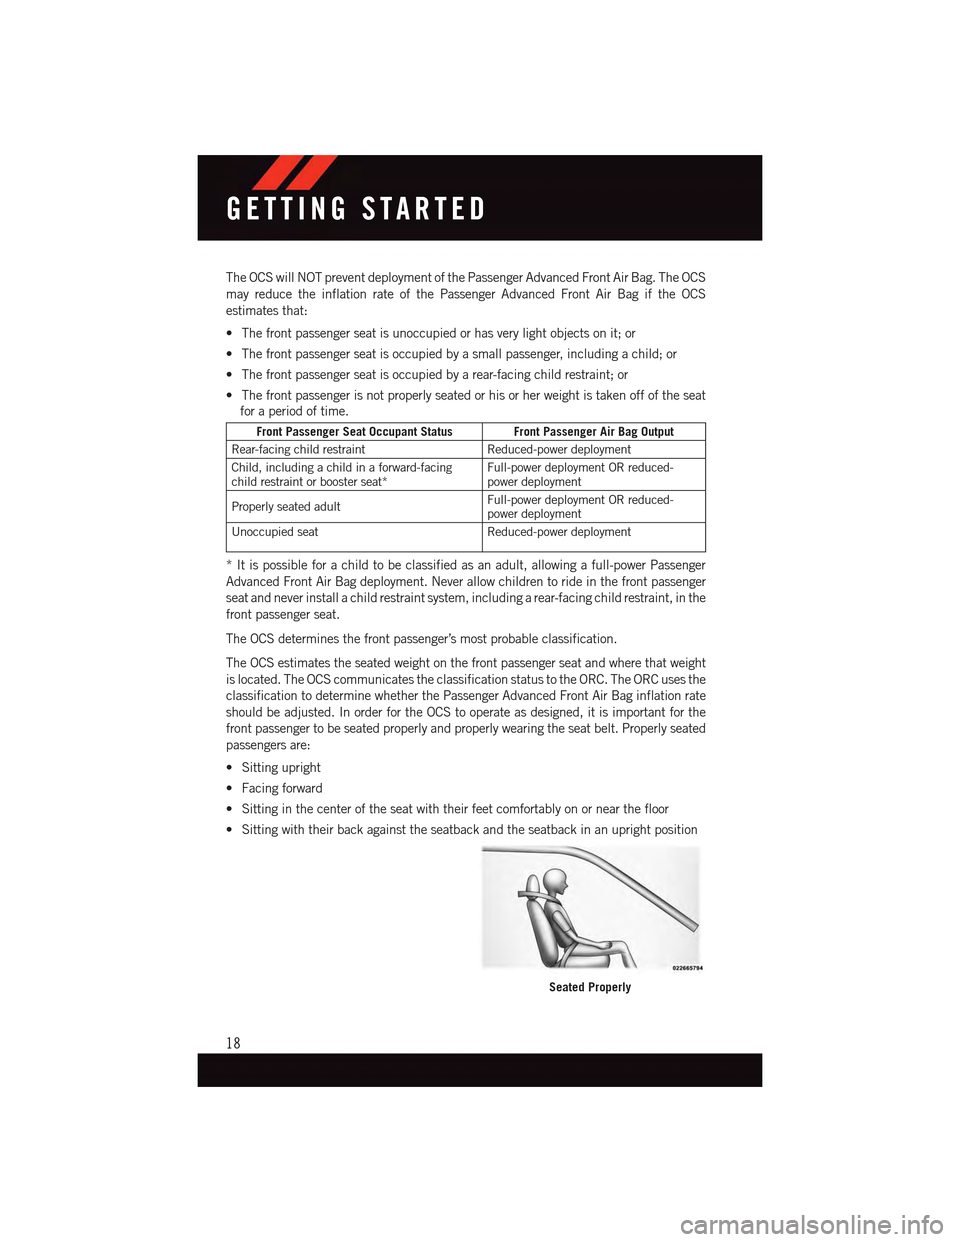
passengers are:
•Sittingupright
•Facingforward
•Sittinginthecenteroftheseatwiththeirfeetcomfortablyonornearthefloor
•Sittingwiththeirbackagainsttheseatbackandtheseatbackinanuprightposition
Seated Properly
GETTING STARTED
18
Page 21 of 164
Lighter Weight Passengers (Including Small Adults)
When a lighter weight passenger, including a small adult, occupies the front passenger
seat, the OCS may reduce the inflation rate of the Passenger Advanced Front Air Bag. This
does not mean that the OCS is working improperly.
Do not decrease OR increase the front passenger’s seated weight on the front passenger
seat
The front passenger’s seated weight must be properly positioned on the front passenger
seat. Failure to do so may result in serious injury or death. The OCS determines the most
probable classification of the occupant that it detects. The OCS will detect the front
passenger’s decreased or increased seated weight, which may result in an adjusted
inflation rate of the Passenger Advanced Front Air Bag in a collision. This does not mean
that the OCS is working improperly. Decreasing the front passenger’s seated weight on the
front passenger seat may result in a reduced-power deployment of the Passenger
Advanced Front Air Bag. Increasing the front passenger’s seated weight on the front
passenger seat may result in a full-power deployment of the Passenger Advanced Front Air
Bag. Examples of improper front passenger seating include:
•Thefrontpassenger’sweightistransferredtoanotherpartofthevehicle(likethedoor,
arm rest or instrument panel).
•Thefrontpassengerleansforward,sideways,orturnstofacetherearofthevehicle.
•Thefrontpassenger’sseatbackisnotinthefulluprightposition.
•Thefrontpassengercarriesorholdsanobjectwhileseated(e.g.,backpack,box,etc.).
•Objectsarelodgedunderthefrontpassengerseat.
•Objectsarelodgedbetweenthefrontpassengerseatandcenterconsole.
•Accessoriesthatmaychangetheseatedweightonthefrontpassengerseatare
attached to the front passenger seat.
•Anythingthatmaydecreaseorincreasethefrontpassenger’sseatedweight.
GETTING STARTED
19
Page 22 of 164
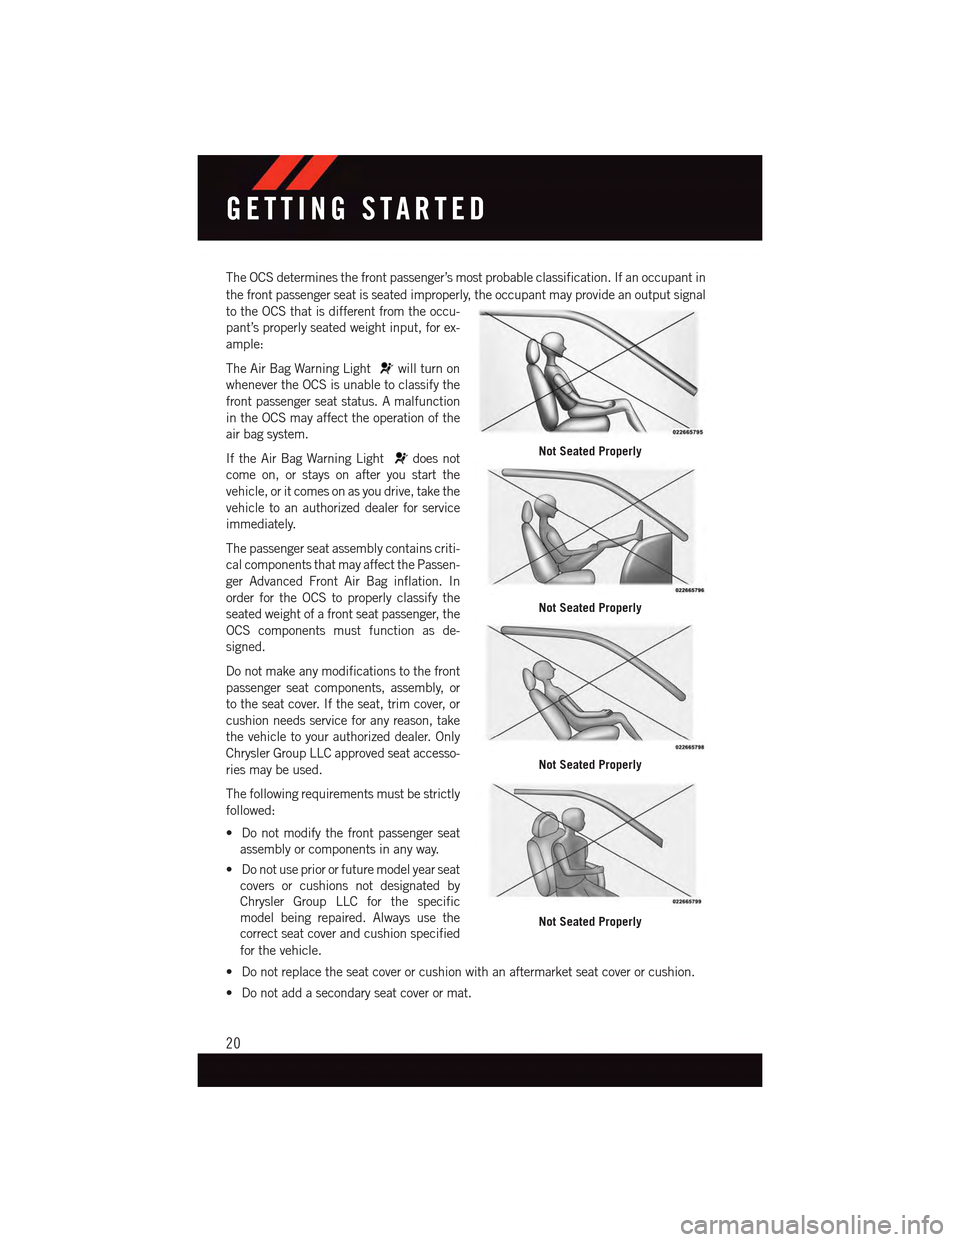
The OCS determines the front passenger’s most probable classification. If an occupant in
the front passenger seat is seated improperly, the occupant may provide an output signal
to the OCS that is different from the occu-
pant’s properly seated weight input, for ex-
ample:
The Air Bag Warning Lightwill turn on
whenever the OCS is unable to classify the
front passenger seat status. A malfunction
in the OCS may affect the operation of the
air bag system.
If the Air Bag Warning Lightdoes not
come on, or stays on after you start the
vehicle, or it comes on as you drive, take the
vehicle to an authorized dealer for service
immediately.
The passenger seat assembly contains criti-
cal components that may affect the Passen-
ger Advanced Front Air Bag inflation. In
order for the OCS to properly classify the
seated weight of a front seat passenger, the
OCS components must function as de-
signed.
Do not make any modifications to the front
passenger seat components, assembly, or
to the seat cover. If the seat, trim cover, or
cushion needs service for any reason, take
the vehicle to your authorized dealer. Only
Chrysler Group LLC approved seat accesso-
ries may be used.
The following requirements must be strictly
followed:
•Donotmodifythefrontpassengerseat
assembly or components in any way.
•Donotusepriororfuturemodelyearseat
covers or cushions not designated by
Chrysler Group LLC for the specific
model being repaired. Always use the
correct seat cover and cushion specified
for the vehicle.
•Donotreplacetheseatcoverorcushionwithanaftermarketseatcoverorcushion.
•Donotaddasecondaryseatcoverormat.
Not Seated Properly
Not Seated Properly
Not Seated Properly
Not Seated Properly
GETTING STARTED
20
Page 36 of 164
NOTE:
The mist feature does not activate the washer pump; therefore, no washer fluid will be
sprayed on the windshield. The wash function must be activated in order to spray the
windshield with washer fluid.
Washer Operation
Push the end of the lever inward and hold for as long as spray is desired.
Rain Sensing Wipers
This feature senses moisture on the vehicle's windshield and automatically activates the
wipers for the driver when the switch is in the intermittent position. Rotate the end of the
lever to one of four settings to activate this feature and adjust sensitivity.
Rain Sensing can be turned on and off using the Uconnect®System, refer to the Owner's
Manual on the DVD for further details.
High Beam Operation
Push the lever forward to activate the high beams. Pull the lever toward you for flash to
pass.
NOTE:
For safe driving, turn off the high beams when oncoming traffic is present to prevent
headlight glare and as a courtesy to other motorists.
OPERATING YOUR VEHICLE
34
Page 37 of 164
HEADLIGHT SWITCH
Automatic Headlights/Parking
Lights/Headlights
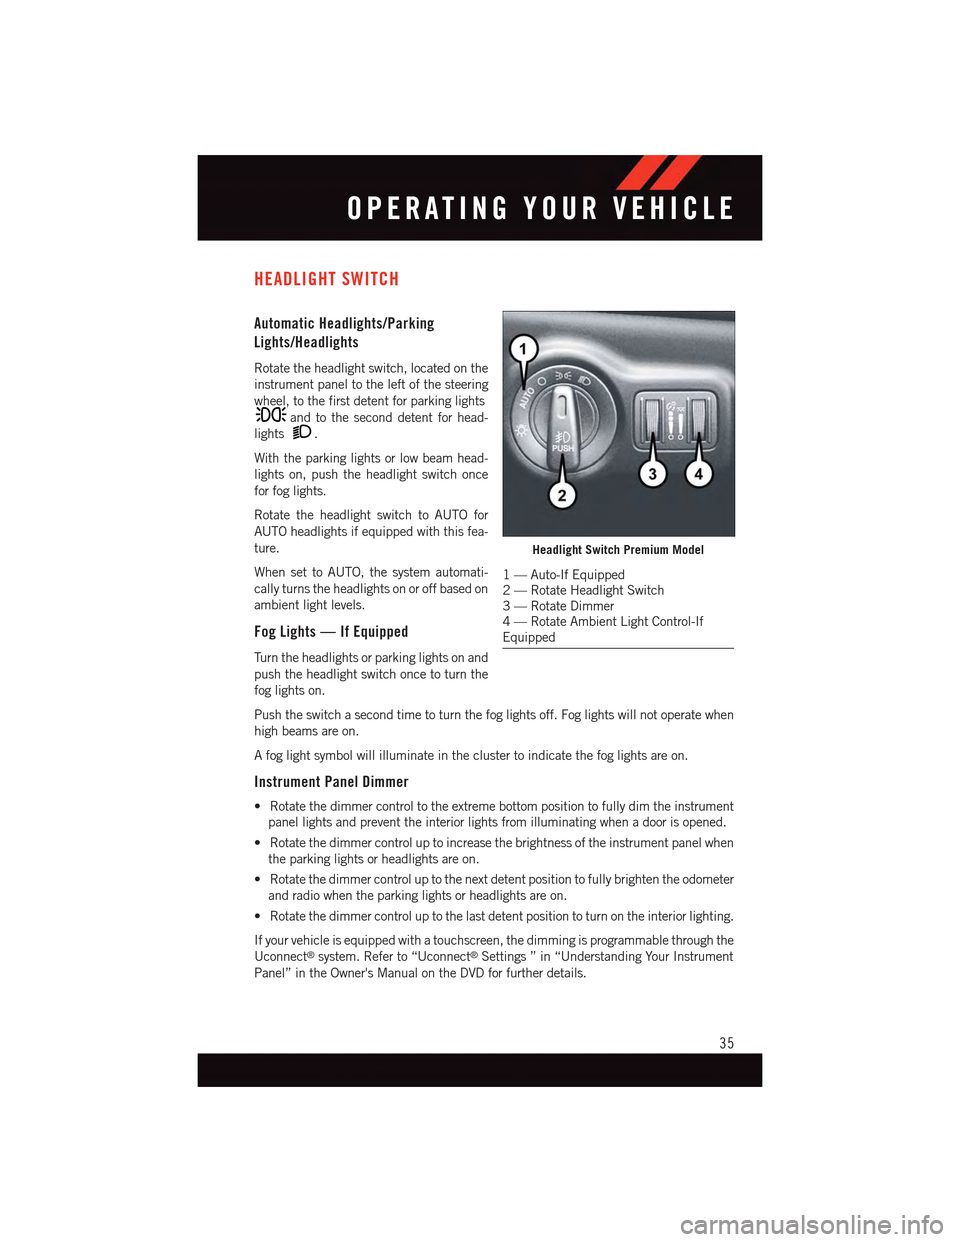
Rotate the headlight switch, located on the
instrument panel to the left of the steering
wheel, to the first detent for parking lights
and to the second detent for head-
lights.
With the parking lights or low beam head-
lights on, push the headlight switch once
for fog lights.
Rotate the headlight switch to AUTO for
AUTO headlights if equipped with this fea-
ture.
When set to AUTO, the system automati-
cally turns the headlights on or off based on
ambient light levels.
Fog Lights — If Equipped
Tu r n t h e h e a d l i g h t s o r p a r k i n g l i g h t s o n a n d
push the headlight switch once to turn the
fog lights on.
Push the switch a second time to turn the fog lights off. Fog lights will not operate when
high beams are on.
Afoglightsymbolwillilluminateintheclustertoindicatethefoglightsareon.
Instrument Panel Dimmer
•Rotatethedimmercontroltotheextremebottompositiontofullydimtheinstrument
panel lights and prevent the interior lights from illuminating when a door is opened.
•Rotatethedimmercontroluptoincreasethebrightnessoftheinstrumentpanelwhen
the parking lights or headlights are on.
•Rotatethedimmercontroluptothenextdetentpositiontofullybrightentheodometer
and radio when the parking lights or headlights are on.
•Rotatethedimmercontroluptothelastdetentpositiontoturnontheinteriorlighting.
If your vehicle is equipped with a touchscreen, the dimming is programmable through the
Uconnect®system. Refer to “Uconnect®Settings ” in “Understanding Your Instrument
Panel” in the Owner's Manual on the DVD for further details.
Headlight Switch Premium Model
1—Auto-IfEquipped2—RotateHeadlightSwitch3—RotateDimmer4—RotateAmbientLightControl-IfEquipped
OPERATING YOUR VEHICLE
35
Page 45 of 164
Automatic Operation — If Equipped
•PushtheAUTObuttonorpressthe“AUTO”buttononthetouchscreen.
•SelectthedesiredtemperaturebypressingtheTemperatureControlsforthedriveror
passenger.
The system will maintain the set temperature automatically.
SYNC Temperature Button — If Equipped
Press the SYNC button on the touchscreen once to control driver and passenger
temperatures simultaneously.
Press the SYNC button on the touchscreen a second time to control the temperatures
individually.
Air Recirculation
Use Recirculation for maximum A/C operation.
For window defogging, turn the Recirculation button off.
If the Recirculation button is pushed while in the AUTO mode, the indicator light may
flash three times to indicate the cabin air is being controlled automatically.
Heated Mirrors — If Equipped
The mirrors are heated to melt frost or ice. This feature is activated whenever you turn on
the rear window defroster.
OPERATING YOUR VEHICLE
43
Page 46 of 164
BLIND SPOT MONITORING
The Blind Spot Monitoring (BSM) system uses two radar-based sensors, located inside the
rear bumper fascia, to detect Highway licensable vehicles (automobiles, trucks, motor-
cycles etc.) that enter the blind spot zones from the rear/front/side of the vehicle.
The Blind Spot Monitoring (BSM) system warning light, located in the outside mirrors, will
illuminate if a vehicle moves into a blind spot zone.
The BSM system can also be configured to sound an audible (chime) alert and mute the
radio to notify you of objects that have entered the detection zones.
Refer to your Owner's Manual on the DVD for further details.
PARKVIEW® REAR BACK-UP CAMERA
Yo u c a n s e e a n o n - s c r e e n i m a g e o f t h e r e a r o f y o u r v e h i c l e w h e n e v e r t h e s h i f t l e v e r i s p u t
into REVERSE. The ParkView®Rear Back-Up Camera image will be displayed on the radio
display screen, located on the center stack of the instrument panel.
If the radio display screen appears foggy, clean the camera lens located on the rear of the
vehicle above the rear license plate.
Refer to your Owner's Manual on the DVD for further details.
WARNING!
Drivers must be careful when backing up; even when using the ParkView®Rear
Back-Up Camera. Always check carefully behind your vehicle, and be sure to check for
pedestrians, animals, other vehicles, obstructions, or blind spots before backing up.
Yo u m u s t c o n t i n u e t o p a y a t t e n t i o n w h i l e b a c k i n g u p . F a i l u r e t o d o s o c a n r e s u l t i n
serious injury or death.
WIND BUFFETING
Wind buffeting can be described as a helicopter-type percussion sound. If buffeting
occurs with the rear windows open, adjust the front and rear windows together.
If buffeting occurs with the sunroof open, adjust the sunroof opening, or adjust any
window. This will minimize buffeting.
OPERATING YOUR VEHICLE
44
Page 48 of 164
NOTE:
If three consecutive sunroof close attempts result in Pinch Protect reversals, the fourth
close attempt will be a Manual Close movement with Pinch Protect disabled.
WARNING!
•Donotletchildrenplaywiththesunroof.Neverleavechildrenunattendedina
vehicle, or with access to an unlocked vehicle. Do not leave the Key Fob in or near
the vehicle, and do not leave the ignition of a vehicle equipped with Keyless
Enter-N-Go™ in the ACC or ON/RUN mode. Occupants, particularly unattended
children, can become entrapped by the power sunroof while operating the power
sunroof switch. Such entrapment may result in serious injury or death.
•Inacollision,thereisagreaterriskofbeingthrownfromavehiclewithanopen
sunroof. You could also be severely injured or killed. Always fasten your seat belt
properly and make sure all passengers are properly secured.
•Donotallowsmallchildrentooperatethesunroof.Neverallowyourfingers,other
body parts, or any object to project through the sunroof opening. Injury may result.
MANUAL TRANSMISSION — IF EQUIPPED
Be sure the transmission is in first gear, not third, when starting from a standing position.
Damage to the clutch can result from starting in third gear.
Never drive with your foot resting on the clutch pedal, and never try to hold the vehicle on
ahillwiththeclutchpedalpartiallyengaged.Thiswillcauseabnormalwearontheclutch.
Shifting Into Reverse
To s h i f t i n t o R e v e r s e p u l l u p o n t h e l o c k o u t r i n g ( l o c a t e d u n d e r t h e s h i f t k n o b ) a n d s h i f t t h e
transmission into Reverse.
NOTE:
•NevershiftintoREVERSEuntilthevehiclehascometoacompletestop.
•Duringcoldweather,untilthetransmissionlubricantiswarm,youmayexperience
slightly higher shift efforts. This is normal and not harmful to the transmission.
OPERATING YOUR VEHICLE
46
Page 55 of 164
Anti-Theft Protection
This radio will not operate in any vehicle other than the vehicle in which it was delivered.
The radio display will prompt you to enter an anti-theft code and the radio will not
function, if this radio is transferred to another vehicle. You must contact your authorized
dealer to get the anti-theft code to unlock the radio.
Clock Setting
1. Push and hold the TIME button until the hours are highlighted.
2. Adjust the hours by turning the right side TUNE/SCROLL control knob.
3. After adjusting the hours, push the right side ENTER/BROWSE control knob to set the
minutes. The minutes will highlight.
4. Adjust the minutes using the right side TUNE/SCROLL control knob.
5. To exit, push the TIME button or push the BACK button to return to the previous menu.
NOTE:
Ti m e f o r m a t h a s t h e o p t i o n s o f 1 2 H R o r 2 4 H R . S e l e c t i n g o n e o f t h e s e o p t i o n s w i l l c h a n g e
the way the clock is displayed.
Equalizer, Balance And Fade
To s e t t h e B a s s , M i d R a n g e , Tr e b l e , B a l a n c e o r F a d e s e t t i n g s p u s h t h e A U D I O b u t t o n t o
access the Audio sub-menu.
The Audio sub-menu can also be reached by pushing the MENU button until AUDIO
appears in the display. Push the ENTER/BROWSE button to select the AUDIO menu and
use the TUNE/SCROLL knob to highlight select Bass, Mid Range, Treble, Balance or
Fade. Once the desired selection is highlighted, push the ENTER/BROWSE button to
select the item and use the TUNE/SCROLL knob to adjust the setting.
Radio Operation
RADIO Button
Push the button to select either AM, FM or SiriusXM mode.
Seek Up/Down Buttons
Push to seek through radio stations in AM, FM, or SXM bands.
Hold either button to bypass stations without stopping.
Buttons 1 - 5
These buttons tune the radio to the stations that you commit to pushbutton memory AM
(A, B, C), FM (A, B, C) and SXM (A,B,C) — 15 AM, 15 FM and 15 SXM stations.
ELECTRONICS
53
Page 56 of 164
Store Radio Presets
When you are receiving a station that you wish to commit to pushbutton memory, push and
hold the button (1–5) you wish to lock onto this station for three seconds.
Yo u m a y a d d a s e c o n d o r t h i r d s t a t i o n t o e a c h p u s h b u t t o n b y r e p e a t i n g t h e a b o v e
procedure with this exception: Push the “A–B–C” button to select the A, B or C mode.
Each button can be set for up to three stations in both AM and FM. This allows a total of
15 AM, 15 FM and 15 SXM stations to be stored into push-button memory.
INFO Button
Push the INFO button for an RDS station (one with call letters displayed). The radio will
return a Radio Text message broadcast from an FM station (FM mode only).
Player Button
Pushing the “Player” button will allow you to switch from AM/FM/SXM modes to Player
mode (AUX/CD/Bluetooth®Steaming (BT)/USB).
MENU Button
Pushing the MENU button allows you to scroll between the setting sub-menus. Once the
desired sub-menu setting is highlighted push the TUNE/SCROLL knob to select the
setting. The following items are selectable:
Radio Mode
•Audio—SelectingtheAudiosub-menuwillallowyoutoadjusttheBass,MidRange,
Tr e b l e , B a l a n c e o r F a d e , j u s t l i k e p u s h i n g t h e A U D I O h a r d c o n t r o l . I f t h e B A C K b u t t o n
is pushed the radio will return to the Main Menu.
•Clock—SelectingClockwillallowyoutosettheclock.Adjustthehoursbyturningthe
TUNE/SCROLL control knob. After adjusting the hours, push the ENTER/BROWSE
button to set the minutes. The minutes will highlight. Adjust the minutes using the
right side TUNE/SCROLL control knob. Press the ENTER/BROWSE button to save time
change.
Player Mode
•Player Browse—SelectingPlayerBrowsewillgototheappropriatebrowsemenu
depending on the device currently playing (will function the same as pushing the
browse button while in that mode). This will only appear in the menu if the device
currently playing can support these features.
•Shuffle (SHFL)—Thisfunctionshuffles(randomizestheorderofthefiles).Thiswill
only appear in the menu if the device currently playing can support these features.
•Repeat (RPT)—WhenRepeatisactivated,thecurrentlyplayingsongwillbeginagain
when it ends. It will continue to cycle through the same song until repeat is turned Off.
Repeat will be turned off once one for the following conditions are met: 1) The source
is ejected 2) A different track list within that source is initiated 3) The REPEAT button
is toggled OFF. This will only appear in the menu if the device currently playing can
support these features.
ELECTRONICS
54