lock DODGE DART 2015 PF / 1.G Owner's Manual
[x] Cancel search | Manufacturer: DODGE, Model Year: 2015, Model line: DART, Model: DODGE DART 2015 PF / 1.GPages: 164, PDF Size: 25.19 MB
Page 27 of 164
7. If the child restraint has a top tether strap and the seating position has a top tether
anchorage, connect the tether strap to the anchorage and tighten the tether strap. See
below for directions to attach a tether anchor.
8. Test that the child restraint is installed tightly by pulling back and forth on the child
seat at the belt path. It should not move more than 1 inch (25.4 mm) in any direction.
Installing The Top Tether Strap (With Either Lower Anchors Or Vehicle Seat
Belt):
When installing a forward-facing child restraint, always secure the top tether strap, up to
the tether anchor weight limit, whether the child restraint is installed with the lower
anchors or the vehicle seat belt.
Tether Anchorage Installation
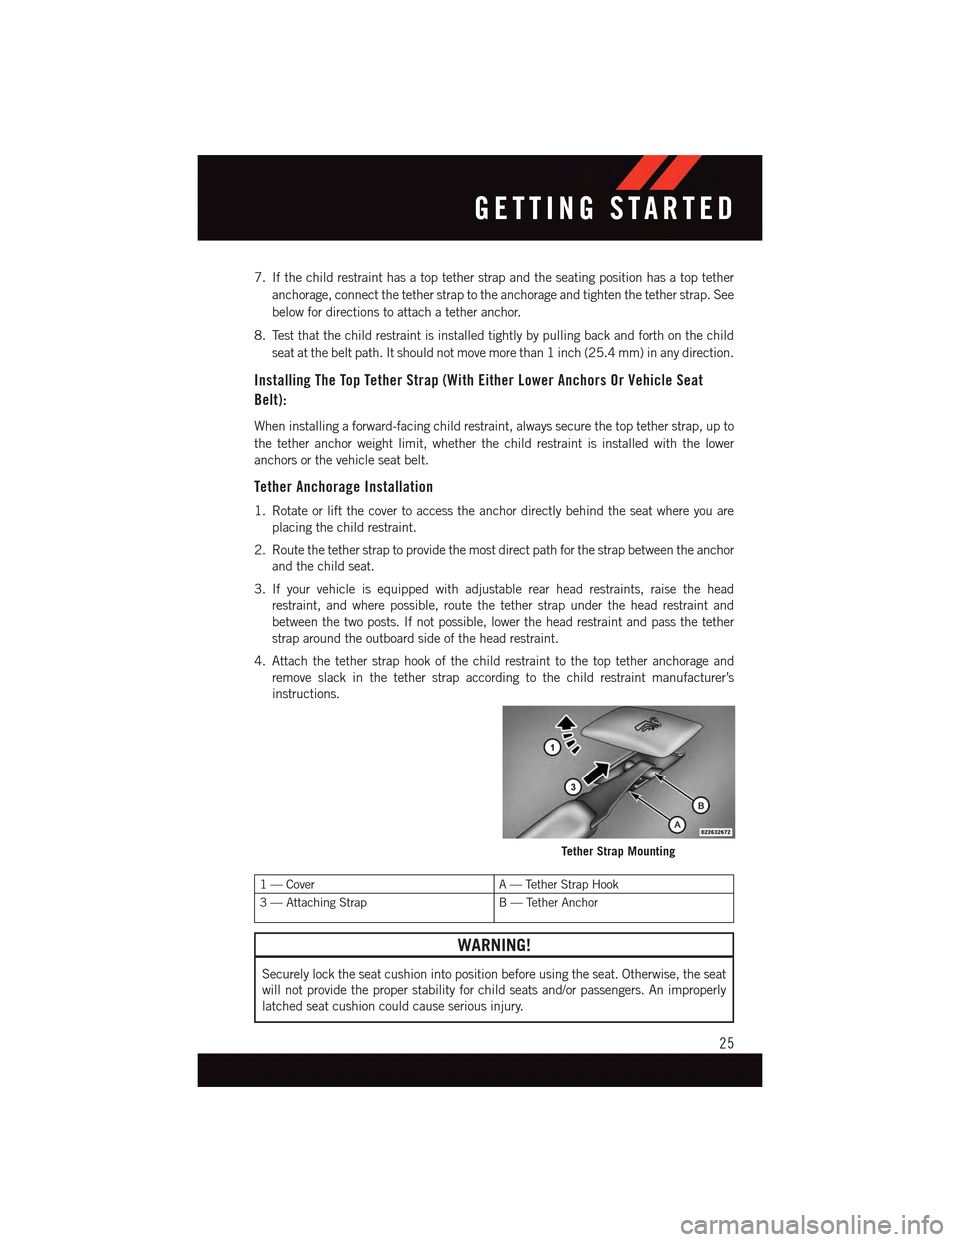
1. Rotate or lift the cover to access the anchor directly behind the seat where you are
placing the child restraint.
2. Route the tether strap to provide the most direct path for the strap between the anchor
and the child seat.
3. If your vehicle is equipped with adjustable rear head restraints, raise the head
restraint, and where possible, route the tether strap under the head restraint and
between the two posts. If not possible, lower the head restraint and pass the tether
strap around the outboard side of the head restraint.
4. Attach the tether strap hook of the child restraint to the top tether anchorage and
remove slack in the tether strap according to the child restraint manufacturer’s
instructions.
1—CoverA—TetherStrapHook
3—AttachingStrapB—TetherAnchor
WARNING!
Securely lock the seat cushion into position before using the seat. Otherwise, the seat
will not provide the proper stability for child seats and/or passengers. An improperly
latched seat cushion could cause serious injury.
Tether Strap Mounting
GETTING STARTED
25
Page 31 of 164
REAR SEAT
Folding Rear Seatback
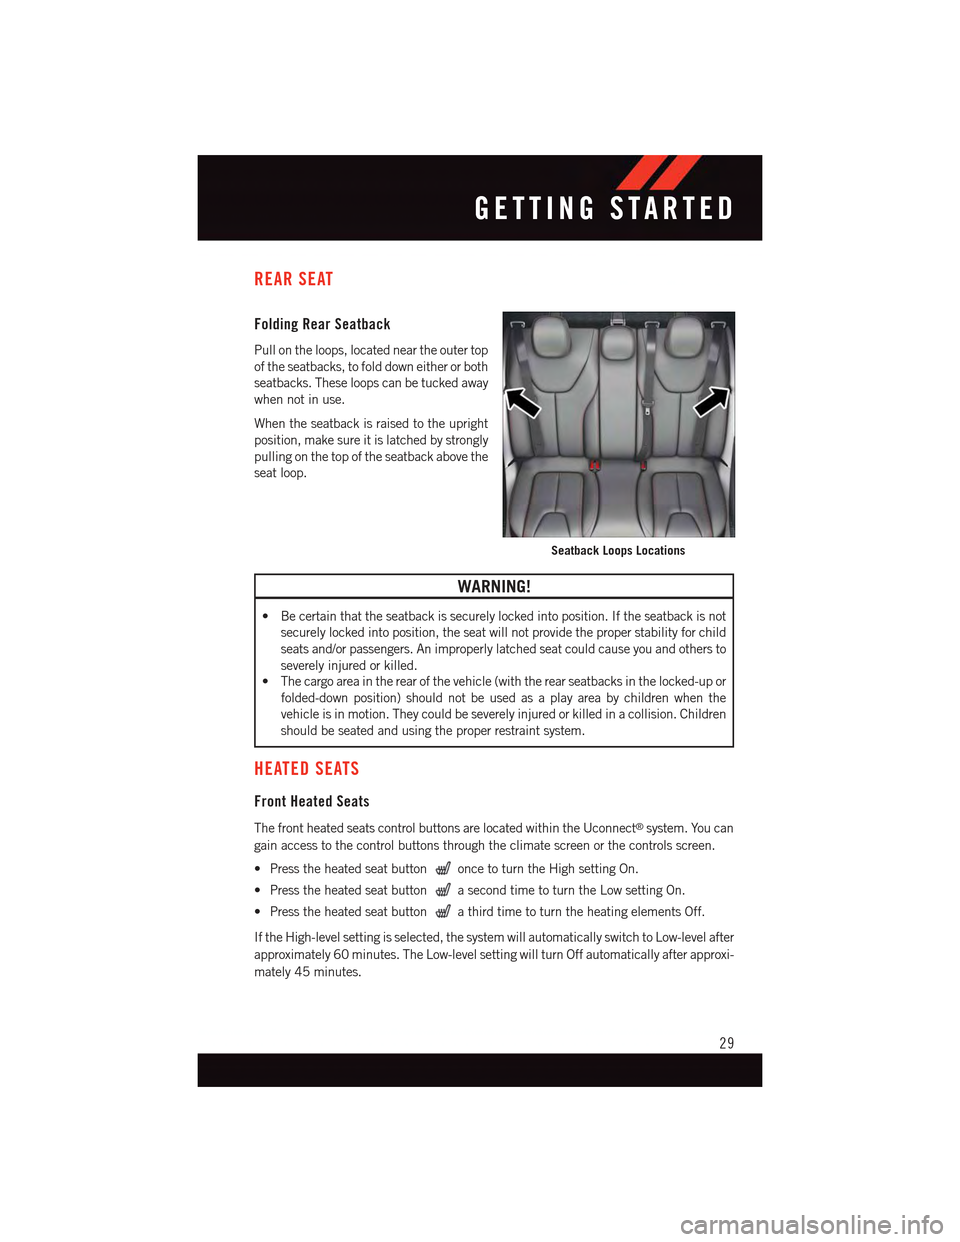
Pull on the loops, located near the outer top
of the seatbacks, to fold down either or both
seatbacks. These loops can be tucked away
when not in use.
When the seatback is raised to the upright
position, make sure it is latched by strongly
pulling on the top of the seatback above the
seat loop.
WARNING!
•Becertainthattheseatbackissecurelylockedintoposition.Iftheseatbackisnot
securely locked into position, the seat will not provide the proper stability for child
seats and/or passengers. An improperly latched seat could cause you and others to
severely injured or killed.
•Thecargoareaintherearofthevehicle(withtherearseatbacksinthelocked-upor
folded-down position) should not be used as a play area by children when the
vehicle is in motion. They could be severely injured or killed in a collision. Children
should be seated and using the proper restraint system.
HEATED SEATS
Front Heated Seats
The front heated seats control buttons are located within the Uconnect®system. You can
gain access to the control buttons through the climate screen or the controls screen.
•Presstheheatedseatbuttononce to turn the High setting On.
•PresstheheatedseatbuttonasecondtimetoturntheLowsettingOn.
•PresstheheatedseatbuttonathirdtimetoturntheheatingelementsOff.
If the High-level setting is selected, the system will automatically switch to Low-level after
approximately 60 minutes. The Low-level setting will turn Off automatically after approxi-
mately 45 minutes.
Seatback Loops Locations
GETTING STARTED
29
Page 33 of 164
TILT/TELESCOPING STEERING COLUMN
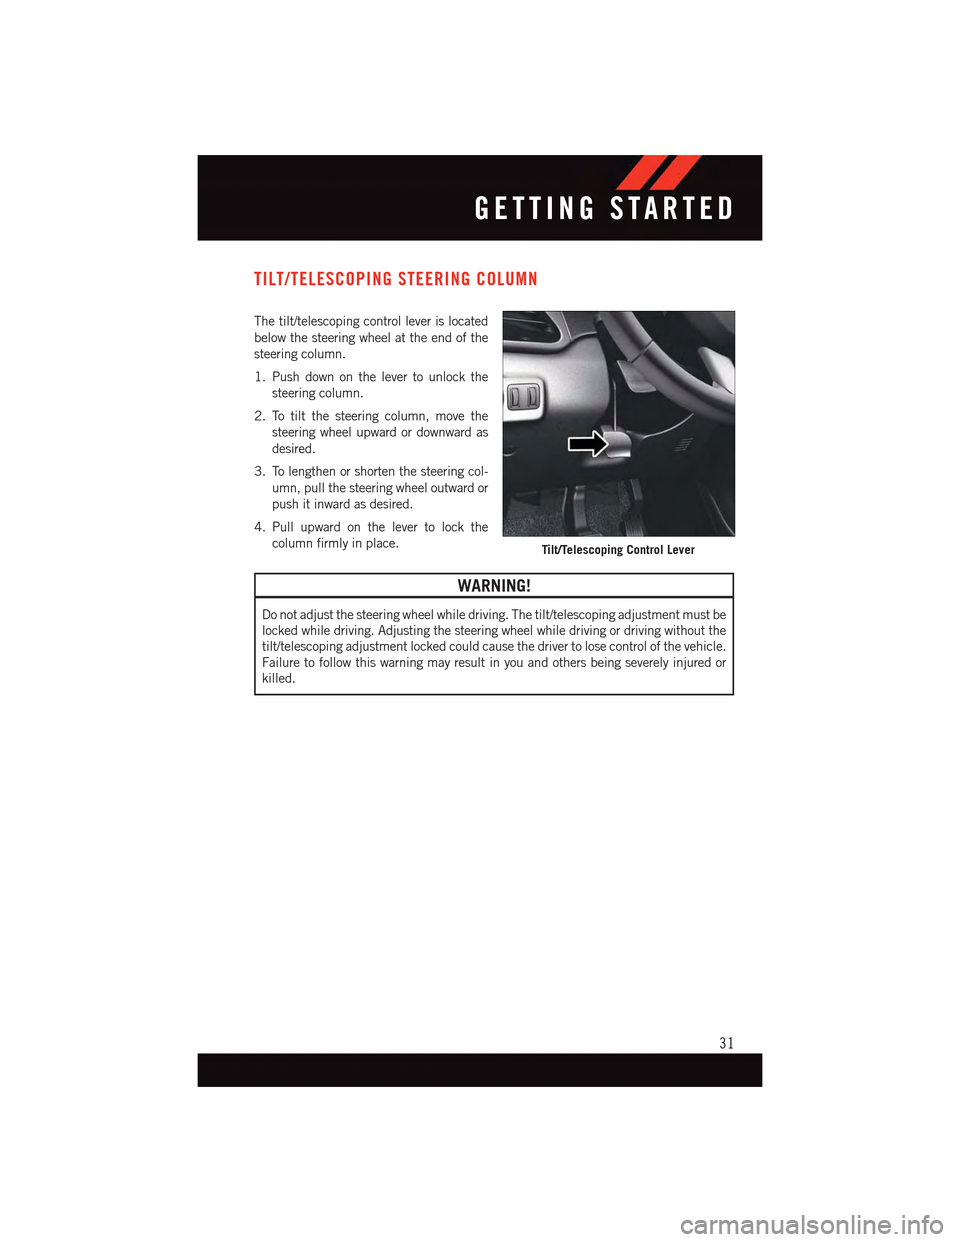
The tilt/telescoping control lever is located
below the steering wheel at the end of the
steering column.
1. Push down on the lever to unlock the
steering column.
2. To tilt the steering column, move the
steering wheel upward or downward as
desired.
3. To lengthen or shorten the steering col-
umn, pull the steering wheel outward or
push it inward as desired.
4. Pull upward on the lever to lock the
column firmly in place.
WARNING!
Do not adjust the steering wheel while driving. The tilt/telescoping adjustment must be
locked while driving. Adjusting the steering wheel while driving or driving without the
tilt/telescoping adjustment locked could cause the driver to lose control of the vehicle.
Failure to follow this warning may result in you and others being severely injured or
killed.
Tilt/Telescoping Control Lever
GETTING STARTED
31
Page 48 of 164
NOTE:
If three consecutive sunroof close attempts result in Pinch Protect reversals, the fourth
close attempt will be a Manual Close movement with Pinch Protect disabled.
WARNING!
•Donotletchildrenplaywiththesunroof.Neverleavechildrenunattendedina
vehicle, or with access to an unlocked vehicle. Do not leave the Key Fob in or near
the vehicle, and do not leave the ignition of a vehicle equipped with Keyless
Enter-N-Go™ in the ACC or ON/RUN mode. Occupants, particularly unattended
children, can become entrapped by the power sunroof while operating the power
sunroof switch. Such entrapment may result in serious injury or death.
•Inacollision,thereisagreaterriskofbeingthrownfromavehiclewithanopen
sunroof. You could also be severely injured or killed. Always fasten your seat belt
properly and make sure all passengers are properly secured.
•Donotallowsmallchildrentooperatethesunroof.Neverallowyourfingers,other
body parts, or any object to project through the sunroof opening. Injury may result.
MANUAL TRANSMISSION — IF EQUIPPED
Be sure the transmission is in first gear, not third, when starting from a standing position.
Damage to the clutch can result from starting in third gear.
Never drive with your foot resting on the clutch pedal, and never try to hold the vehicle on
ahillwiththeclutchpedalpartiallyengaged.Thiswillcauseabnormalwearontheclutch.
Shifting Into Reverse
To s h i f t i n t o R e v e r s e p u l l u p o n t h e l o c k o u t r i n g ( l o c a t e d u n d e r t h e s h i f t k n o b ) a n d s h i f t t h e
transmission into Reverse.
NOTE:
•NevershiftintoREVERSEuntilthevehiclehascometoacompletestop.
•Duringcoldweather,untilthetransmissionlubricantiswarm,youmayexperience
slightly higher shift efforts. This is normal and not harmful to the transmission.
OPERATING YOUR VEHICLE
46
Page 50 of 164
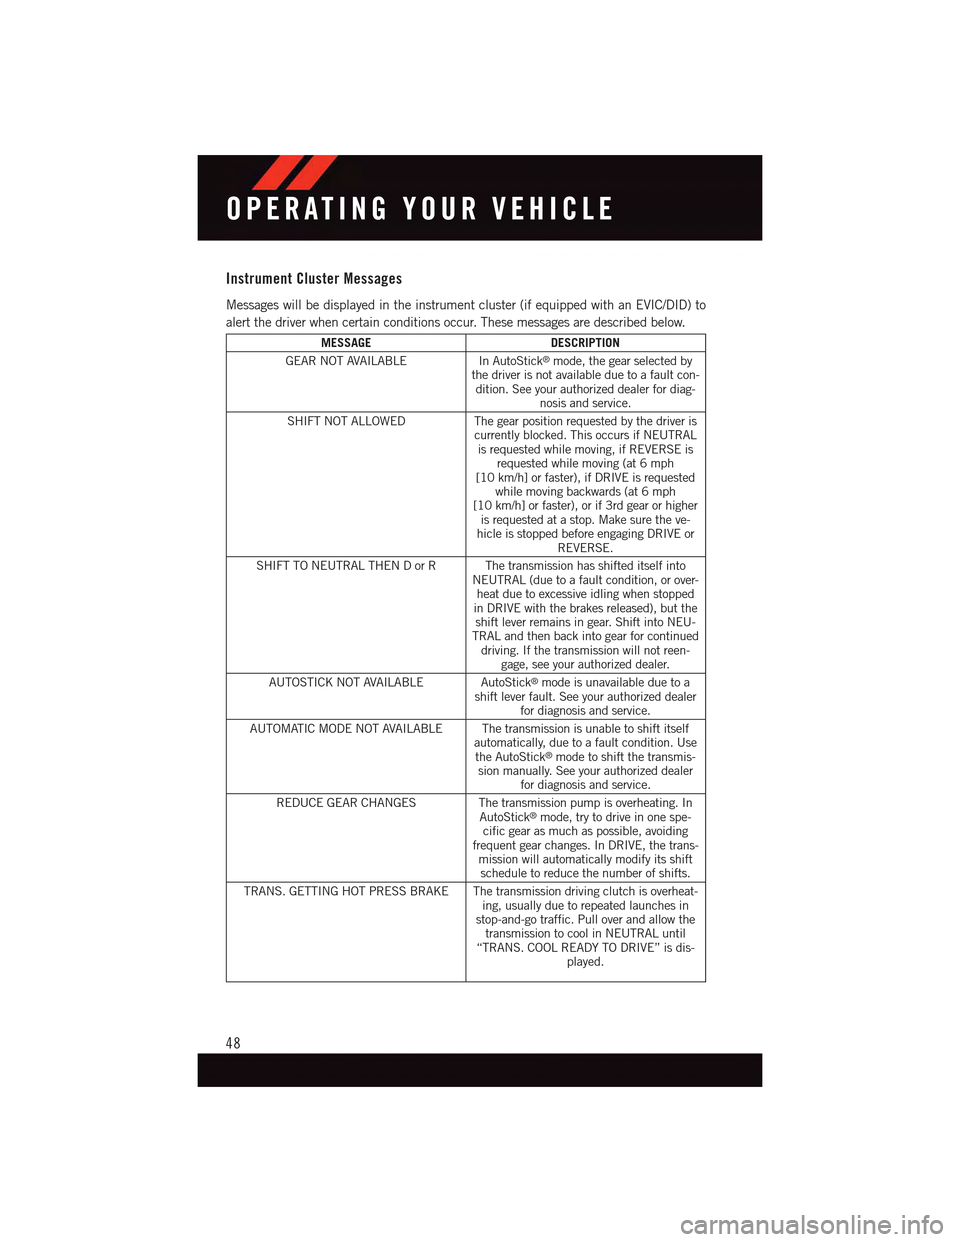
Instrument Cluster Messages
Messages will be displayed in the instrument cluster (if equipped with an EVIC/DID) to
alert the driver when certain conditions occur. These messages are described below.
MESSAGEDESCRIPTION
GEAR NOT AVAILABLEIn AutoStick®mode, the gear selected bythe driver is not available due to a fault con-dition. See your authorized dealer for diag-nosis and service.
SHIFT NOT ALLOWED The gear position requested by the driver iscurrently blocked. This occurs if NEUTRALis requested while moving, if REVERSE isrequested while moving (at 6 mph[10 km/h] or faster), if DRIVE is requestedwhile moving backwards (at 6 mph[10 km/h] or faster), or if 3rd gear or higheris requested at a stop. Make sure the ve-hicle is stopped before engaging DRIVE orREVERSE.
SHIFT TO NEUTRAL THEN D or R The transmission has shifted itself intoNEUTRAL (due to a fault condition, or over-heat due to excessive idling when stoppedin DRIVE with the brakes released), but theshift lever remains in gear. Shift into NEU-TRAL and then back into gear for continueddriving. If the transmission will not reen-gage, see your authorized dealer.
AUTOSTICK NOT AVAILABLE AutoStick®mode is unavailable due to ashift lever fault. See your authorized dealerfor diagnosis and service.
AUTOMATIC MODE NOT AVAILABLE The transmission is unable to shift itselfautomatically, due to a fault condition. Usethe AutoStick®mode to shift the transmis-sion manually. See your authorized dealerfor diagnosis and service.
REDUCE GEAR CHANGES The transmission pump is overheating. InAutoStick®mode, try to drive in one spe-cific gear as much as possible, avoidingfrequent gear changes. In DRIVE, the trans-mission will automatically modify its shiftschedule to reduce the number of shifts.
TRANS. GETTING HOT PRESS BRAKE The transmission driving clutch is overheat-ing, usually due to repeated launches instop-and-go traffic. Pull over and allow thetransmission to cool in NEUTRAL until“TRANS. COOL READY TO DRIVE” is dis-played.
OPERATING YOUR VEHICLE
48
Page 55 of 164
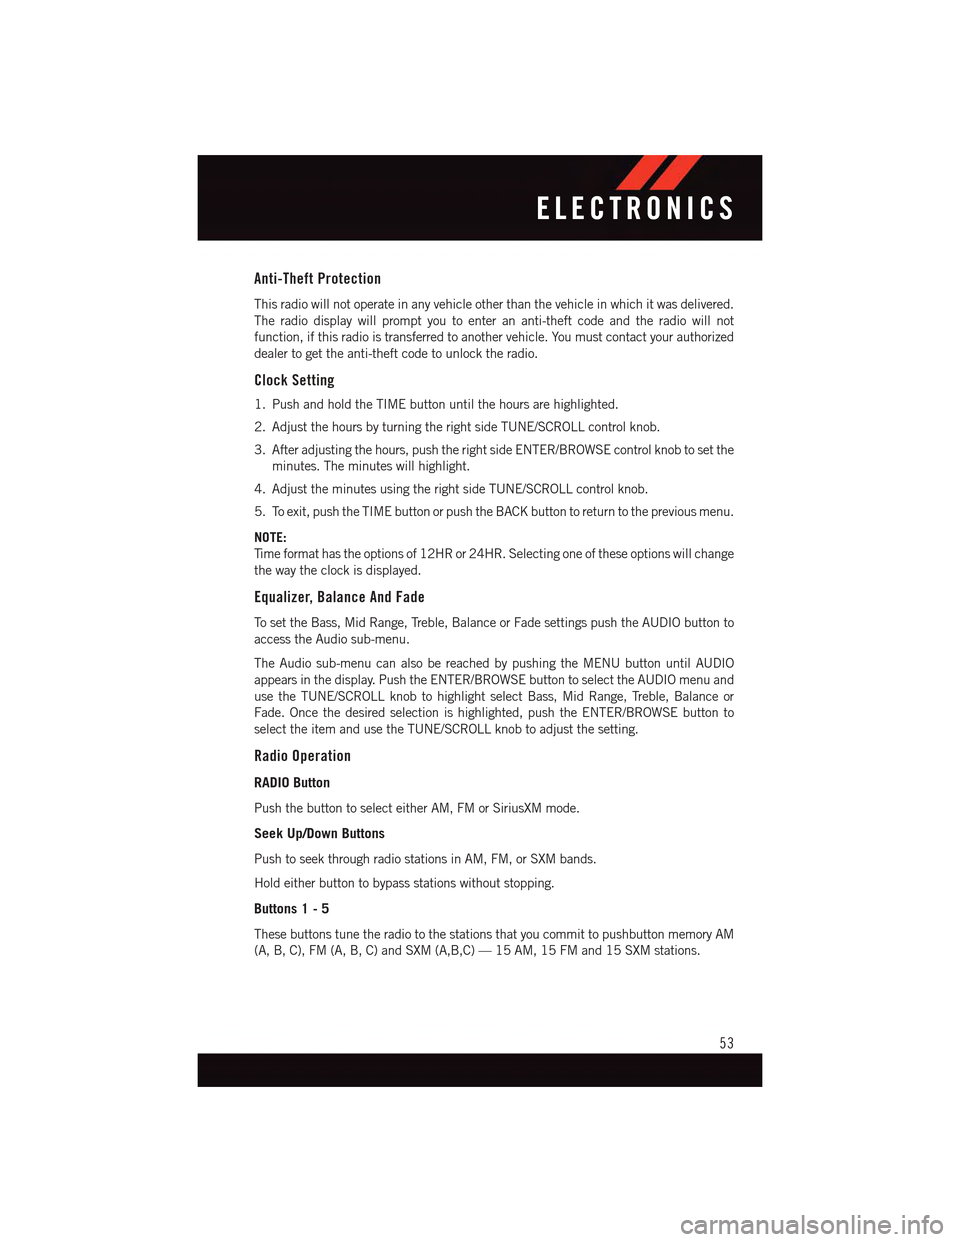
Anti-Theft Protection
This radio will not operate in any vehicle other than the vehicle in which it was delivered.
The radio display will prompt you to enter an anti-theft code and the radio will not
function, if this radio is transferred to another vehicle. You must contact your authorized
dealer to get the anti-theft code to unlock the radio.
Clock Setting
1. Push and hold the TIME button until the hours are highlighted.
2. Adjust the hours by turning the right side TUNE/SCROLL control knob.
3. After adjusting the hours, push the right side ENTER/BROWSE control knob to set the
minutes. The minutes will highlight.
4. Adjust the minutes using the right side TUNE/SCROLL control knob.
5. To exit, push the TIME button or push the BACK button to return to the previous menu.
NOTE:
Ti m e f o r m a t h a s t h e o p t i o n s o f 1 2 H R o r 2 4 H R . S e l e c t i n g o n e o f t h e s e o p t i o n s w i l l c h a n g e
the way the clock is displayed.
Equalizer, Balance And Fade
To s e t t h e B a s s , M i d R a n g e , Tr e b l e , B a l a n c e o r F a d e s e t t i n g s p u s h t h e A U D I O b u t t o n t o
access the Audio sub-menu.
The Audio sub-menu can also be reached by pushing the MENU button until AUDIO
appears in the display. Push the ENTER/BROWSE button to select the AUDIO menu and
use the TUNE/SCROLL knob to highlight select Bass, Mid Range, Treble, Balance or
Fade. Once the desired selection is highlighted, push the ENTER/BROWSE button to
select the item and use the TUNE/SCROLL knob to adjust the setting.
Radio Operation
RADIO Button
Push the button to select either AM, FM or SiriusXM mode.
Seek Up/Down Buttons
Push to seek through radio stations in AM, FM, or SXM bands.
Hold either button to bypass stations without stopping.
Buttons 1 - 5
These buttons tune the radio to the stations that you commit to pushbutton memory AM
(A, B, C), FM (A, B, C) and SXM (A,B,C) — 15 AM, 15 FM and 15 SXM stations.
ELECTRONICS
53
Page 56 of 164
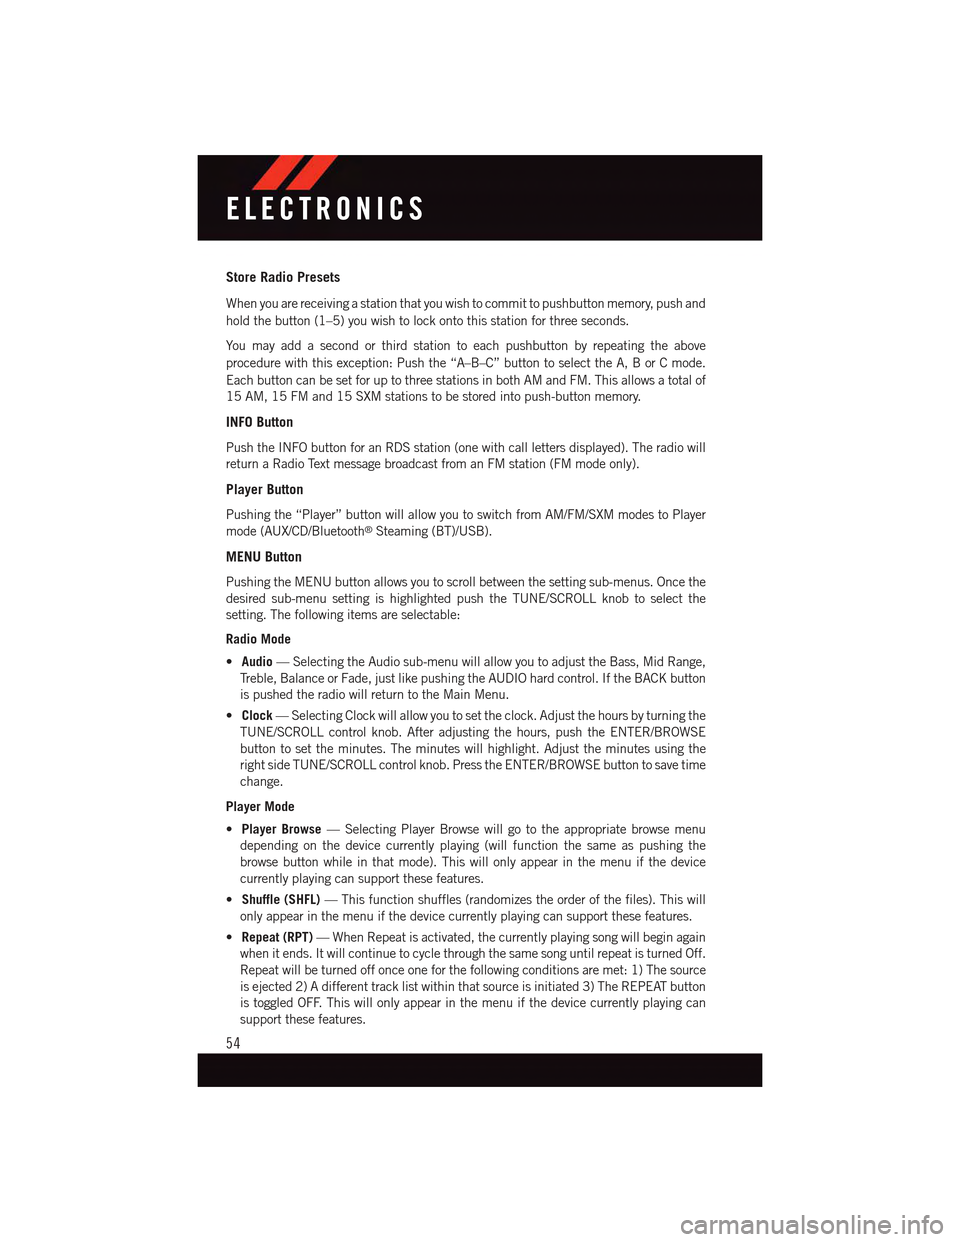
Store Radio Presets
When you are receiving a station that you wish to commit to pushbutton memory, push and
hold the button (1–5) you wish to lock onto this station for three seconds.
Yo u m a y a d d a s e c o n d o r t h i r d s t a t i o n t o e a c h p u s h b u t t o n b y r e p e a t i n g t h e a b o v e
procedure with this exception: Push the “A–B–C” button to select the A, B or C mode.
Each button can be set for up to three stations in both AM and FM. This allows a total of
15 AM, 15 FM and 15 SXM stations to be stored into push-button memory.
INFO Button
Push the INFO button for an RDS station (one with call letters displayed). The radio will
return a Radio Text message broadcast from an FM station (FM mode only).
Player Button
Pushing the “Player” button will allow you to switch from AM/FM/SXM modes to Player
mode (AUX/CD/Bluetooth®Steaming (BT)/USB).
MENU Button
Pushing the MENU button allows you to scroll between the setting sub-menus. Once the
desired sub-menu setting is highlighted push the TUNE/SCROLL knob to select the
setting. The following items are selectable:
Radio Mode
•Audio—SelectingtheAudiosub-menuwillallowyoutoadjusttheBass,MidRange,
Tr e b l e , B a l a n c e o r F a d e , j u s t l i k e p u s h i n g t h e A U D I O h a r d c o n t r o l . I f t h e B A C K b u t t o n
is pushed the radio will return to the Main Menu.
•Clock—SelectingClockwillallowyoutosettheclock.Adjustthehoursbyturningthe
TUNE/SCROLL control knob. After adjusting the hours, push the ENTER/BROWSE
button to set the minutes. The minutes will highlight. Adjust the minutes using the
right side TUNE/SCROLL control knob. Press the ENTER/BROWSE button to save time
change.
Player Mode
•Player Browse—SelectingPlayerBrowsewillgototheappropriatebrowsemenu
depending on the device currently playing (will function the same as pushing the
browse button while in that mode). This will only appear in the menu if the device
currently playing can support these features.
•Shuffle (SHFL)—Thisfunctionshuffles(randomizestheorderofthefiles).Thiswill
only appear in the menu if the device currently playing can support these features.
•Repeat (RPT)—WhenRepeatisactivated,thecurrentlyplayingsongwillbeginagain
when it ends. It will continue to cycle through the same song until repeat is turned Off.
Repeat will be turned off once one for the following conditions are met: 1) The source
is ejected 2) A different track list within that source is initiated 3) The REPEAT button
is toggled OFF. This will only appear in the menu if the device currently playing can
support these features.
ELECTRONICS
54
Page 57 of 164
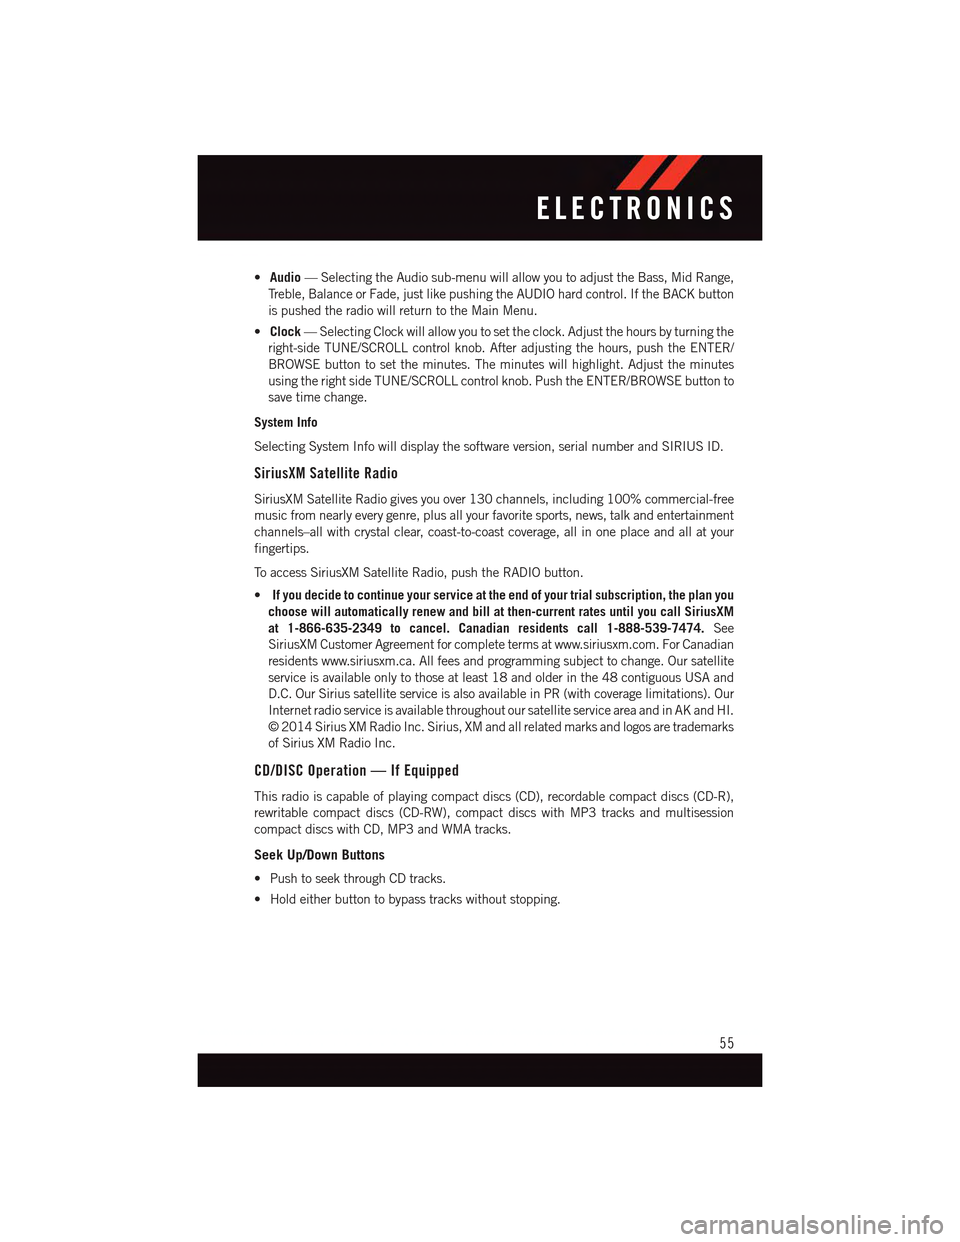
•Audio—SelectingtheAudiosub-menuwillallowyoutoadjusttheBass,MidRange,
Tr e b l e , B a l a n c e o r F a d e , j u s t l i k e p u s h i n g t h e A U D I O h a r d c o n t r o l . I f t h e B A C K b u t t o n
is pushed the radio will return to the Main Menu.
•Clock—SelectingClockwillallowyoutosettheclock.Adjustthehoursbyturningthe
right-side TUNE/SCROLL control knob. After adjusting the hours, push the ENTER/
BROWSE button to set the minutes. The minutes will highlight. Adjust the minutes
using the right side TUNE/SCROLL control knob. Push the ENTER/BROWSE button to
save time change.
System Info
Selecting System Info will display the software version, serial number and SIRIUS ID.
SiriusXM Satellite Radio
SiriusXM Satellite Radio gives you over 130 channels, including 100% commercial-free
music from nearly every genre, plus all your favorite sports, news, talk and entertainment
channels–all with crystal clear, coast-to-coast coverage, all in one place and all at your
fingertips.
To a c c e s s S i r i u s X M S a t e l l i t e R a d i o , p u s h t h e R A D I O b u t t o n .
•If you decide to continue your service at the end of your trial subscription, the plan you
choose will automatically renew and bill at then-current rates until you call SiriusXM
at 1-866-635-2349 to cancel. Canadian residents call 1-888-539-7474.See
SiriusXM Customer Agreement for complete terms at www.siriusxm.com. For Canadian
residents www.siriusxm.ca. All fees and programming subject to change. Our satellite
service is available only to those at least 18 and older in the 48 contiguous USA and
D.C. Our Sirius satellite service is also available in PR (with coverage limitations). Our
Internet radio service is available throughout our satellite service area and in AK and HI.
©2014SiriusXMRadioInc.Sirius,XMandallrelatedmarksandlogosaretrademarks
of Sirius XM Radio Inc.
CD/DISC Operation — If Equipped
This radio is capable of playing compact discs (CD), recordable compact discs (CD-R),
rewritable compact discs (CD-RW), compact discs with MP3 tracks and multisession
compact discs with CD, MP3 and WMA tracks.
Seek Up/Down Buttons
•PushtoseekthroughCDtracks.
•Holdeitherbuttontobypasstrackswithoutstopping.
ELECTRONICS
55
Page 65 of 164
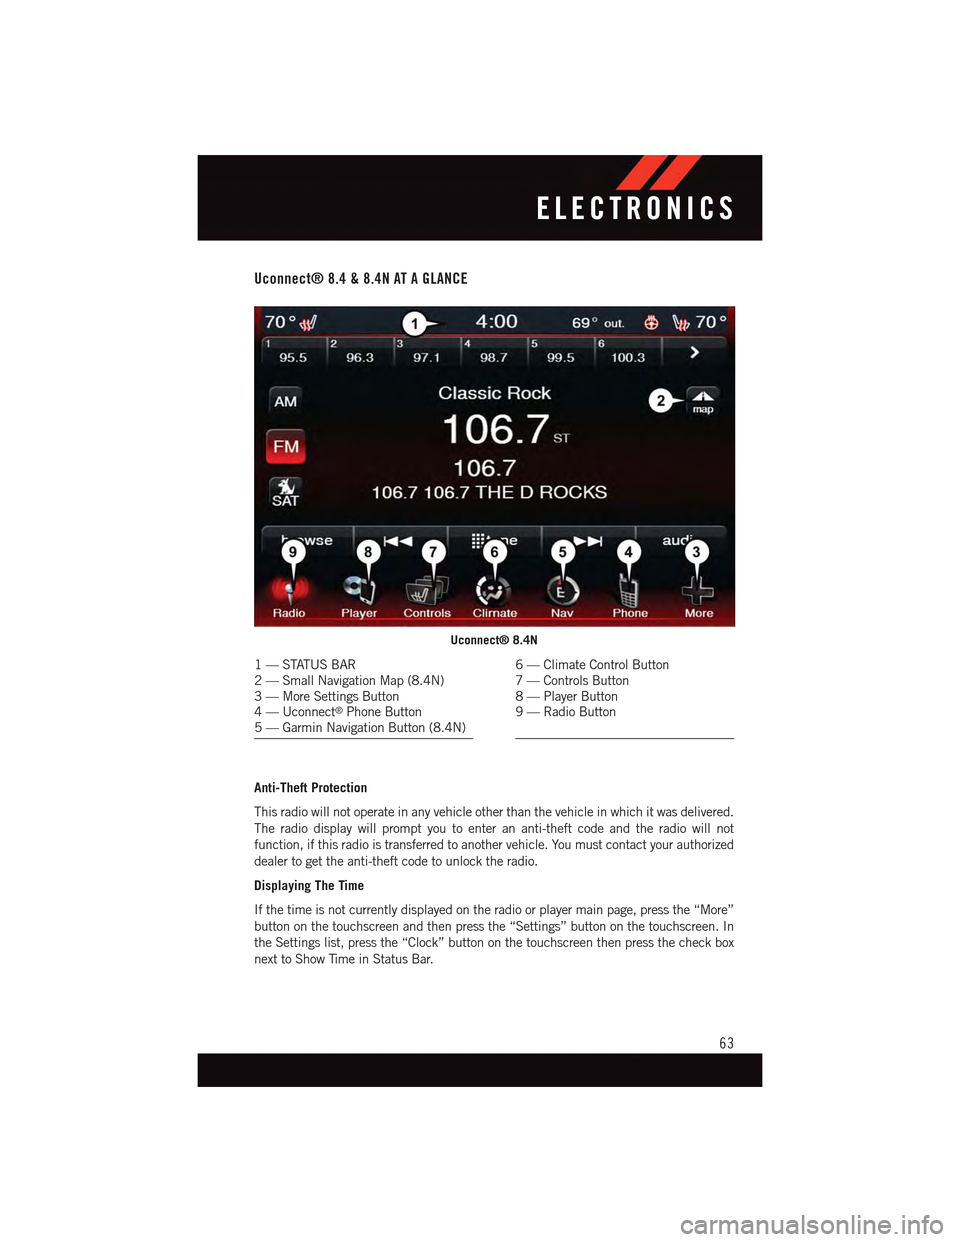
Uconnect® 8.4 & 8.4N AT A GLANCE
Anti-Theft Protection
This radio will not operate in any vehicle other than the vehicle in which it was delivered.
The radio display will prompt you to enter an anti-theft code and the radio will not
function, if this radio is transferred to another vehicle. You must contact your authorized
dealer to get the anti-theft code to unlock the radio.
Displaying The Time
If the time is not currently displayed on the radio or player main page, press the “More”
button on the touchscreen and then press the “Settings” button on the touchscreen. In
the Settings list, press the “Clock” button on the touchscreen then press the check box
next to Show Time in Status Bar.
Uconnect® 8.4N
1—STATUSBAR2—SmallNavigationMap(8.4N)3—MoreSettingsButton4—Uconnect®Phone Button5—GarminNavigationButton(8.4N)
6—ClimateControlButton7—ControlsButton8—PlayerButton9—RadioButton
ELECTRONICS
63
Page 66 of 164
Setting The Time
Model 8.4N synchronizes time automatically via GPS, so should not require any time
adjustment. If you do need to set the time manually, follow the instructions below for
Model 8.4.
For Model 8.4, turn the unit on, then press the “Time Display” at the top of the screen.
Press “Yes.”
If the time is not displayed at the top of the screen, press the “More” button on the
touchscreen and then the “Settings” button on the touchscreen. In the Settings screen,
press the “Clock” button on the touchscreen, then check or uncheck this option.
Press “+” or “–” next to Set Time Hours and Set Time Minutes to adjust the time.
If these features are not available, uncheck the Sync with GPS box.
Press “X” to save your settings and exit out of the Clock Setting screen.
Audio Settings
Press the “Audio” button on the touchscreen to activate the Audio settings screen to
adjust Balance\Fade, Equalizer and Speed Adjusted Volume.
Yo u c a n r e t u r n t o t h e R a d i o s c r e e n b y t o u c h i n g t h e “ X ” l o c a t e d a t t h e t o p r i g h t .
Balance/Fade
Press the “Balance/Fade” button on the touchscreen to Balance audio between the front
speakers or fade the audio between the rear and front speakers.
To u c h i n g t h e “ F r o n t , ” “ R e a r, ” “ L e f t ” o r “ R i g h t ” b u t t o n s o n t h e t o u c h s c r e e n o r p r e s s a n d
drag the red Speaker Icon to adjust the Balance/Fade.
Equalizer
Press the “Equalizer” button on the touchscreen to activate the Equalizer screen.
Press the “+” or “–” buttons on the touchscreen, or by touching and dragging over the
level bar for each of the equalizer bands. The level value, which spans between ±9, is
displayed at the bottom of each of the Bands.
Speed Adjusted Volume
Press the “Speed Adjusted Volume” button on the touchscreen to activate the Speed
Adjusted Volume screen. The Speed Adjusted Volume is adjusted by touching the “+” and
“–” buttons or by touching and dragging over the level bar. This alters the automatic
adjustment of the audio volume with variation to vehicle speed.
ELECTRONICS
64