service DODGE DART 2015 PF / 1.G User Guide
[x] Cancel search | Manufacturer: DODGE, Model Year: 2015, Model line: DART, Model: DODGE DART 2015 PF / 1.GPages: 164, PDF Size: 25.19 MB
Page 3 of 164
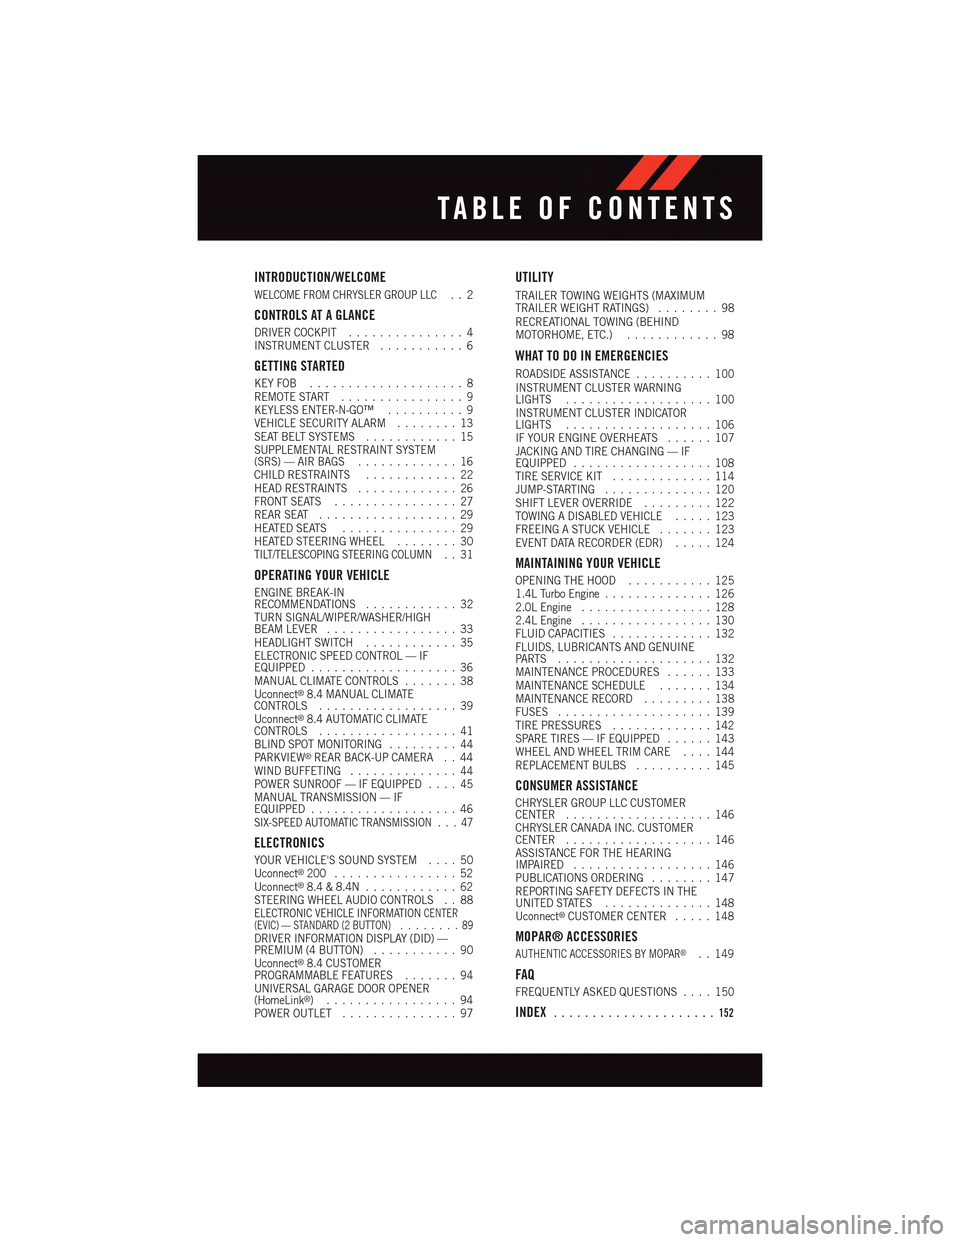
INTRODUCTION/WELCOME
WELCOME FROM CHRYSLER GROUP LLC..2
CONTROLS AT A GLANCE
DRIVER COCKPIT...............4INSTRUMENT CLUSTER...........6
GETTING STARTED
KEY FOB . . . . . . . . . . . . . . . . . . . . 8REMOTE START . . . . . . . . . . . . . . . . 9KEYLESS ENTER-N-GO™..........9VEHICLE SECURITY ALARM........13SEAT BELT SYSTEMS............15SUPPLEMENTAL RESTRAINT SYSTEM(SRS) — AIR BAGS.............16CHILD RESTRAINTS............22HEAD RESTRAINTS.............26FRONT SEATS................27REAR SEAT..................29HEATED SEATS . . . . . . . . . . . . . . . 29HEATED STEERING WHEEL........30TILT/TELESCOPING STEERING COLUMN..31
OPERATING YOUR VEHICLE
ENGINE BREAK-INRECOMMENDATIONS............32TURN SIGNAL/WIPER/WASHER/HIGHBEAM LEVER.................33HEADLIGHT SWITCH............35ELECTRONIC SPEED CONTROL — IFEQUIPPED...................36MANUAL CLIMATE CONTROLS.......38Uconnect®8.4 MANUAL CLIMATECONTROLS..................39Uconnect®8.4 AUTOMATIC CLIMATECONTROLS..................41BLIND SPOT MONITORING.........44PA R K V I E W®REAR BACK-UP CAMERA . . 44WIND BUFFETING..............44POWER SUNROOF — IF EQUIPPED....45MANUAL TRANSMISSION — IFEQUIPPED...................46SIX-SPEED AUTOMATIC TRANSMISSION . . . 47
ELECTRONICS
YOUR VEHICLE'S SOUND SYSTEM....50Uconnect®200 . . . . . . . . . . . . . . . . 52Uconnect®8.4 & 8.4N............62STEERING WHEEL AUDIO CONTROLS . . 88ELECTRONIC VEHICLE INFORMATIONCENTER(EVIC) — STANDARD (2 BUTTON) . . . . . . . . 89DRIVER INFORMATION DISPLAY (DID) —PREMIUM (4 BUTTON)...........90Uconnect®8.4 CUSTOMERPROGRAMMABLE FEATURES.......94UNIVERSAL GARAGE DOOR OPENER(HomeLink®).................94POWER OUTLET...............97
UTILITY
TRAILER TOWING WEIGHTS (MAXIMUMTRAILER WEIGHT RATINGS)........98RECREATIONAL TOWING (BEHINDMOTORHOME, ETC.)............98
WHAT TO DO IN EMERGENCIES
ROADSIDE ASSISTANCE..........100INSTRUMENT CLUSTER WARNINGLIGHTS...................100INSTRUMENT CLUSTER INDICATORLIGHTS...................106IF YOUR ENGINE OVERHEATS......107JACKING AND TIRE CHANGING — IFEQUIPPED..................108TIRE SERVICE KIT.............114JUMP-STARTING..............120SHIFT LEVER OVERRIDE.........122TOWING A DISABLED VEHICLE.....123FREEING A STUCK VEHICLE.......123EVENT DATA RECORDER (EDR).....124
MAINTAINING YOUR VEHICLE
OPENING THE HOOD...........1251.4L Turbo Engine..............1262.0L Engine.................1282.4L Engine.................130FLUID CAPACITIES.............132FLUIDS, LUBRICANTS AND GENUINEPA RT S . . . . . . . . . . . . . . . . . . . . 1 3 2MAINTENANCE PROCEDURES......133MAINTENANCE SCHEDULE.......134MAINTENANCE RECORD.........138FUSES....................139TIRE PRESSURES.............142SPARE TIRES — IF EQUIPPED......143WHEEL AND WHEEL TRIM CARE....144REPLACEMENT BULBS..........145
CONSUMER ASSISTANCE
CHRYSLER GROUP LLC CUSTOMERCENTER...................146CHRYSLER CANADA INC. CUSTOMERCENTER...................146ASSISTANCE FOR THE HEARINGIMPAIRED..................146PUBLICATIONS ORDERING........147REPORTING SAFETY DEFECTS IN THEUNITED STATES..............148Uconnect®CUSTOMER CENTER.....148
MOPAR® ACCESSORIES
AUTHENTIC ACCESSORIES BY MOPAR®..149
FAQ
FREQUENTLY ASKED QUESTIONS....150
INDEX.....................152
TABLE OF CONTENTS
Page 19 of 164
•TheORCturnsontheAirBagWarningLightintheinstrumentpanelforapproximately
four to eight seconds for a self-check when the ignition switch is first turned to the
ON/RUN position. After the self-check, the Air Bag Warning Light will turn off. If the
ORC detects a malfunction in any part of the system, it turns on the Air Bag Warning
Light, either momentarily or continuously. A single chime will sound to alert you if the
light comes on again after initial startup.
•TheORCmonitorsthereadinessoftheelectronicpartsoftheairbagsystemwhenever
the ignition switch is in the START or ON/RUN position. If the ignition switch is in the
OFF position or in the ACC position, the air bag system is not on and the air bags will
not inflate.
•IftheAirBagWarningLightintheinstrumentpanelisnotonduringthefourtoeight
seconds when the ignition switch is first turned to the ON/RUN position, stays on, or
turns on while driving, have the vehicle serviced by an authorized service center
immediately.
NOTE:
If the speedometer, tachometer, or any engine related gauges are not working, the
Occupant Restraint Controller (ORC) may also be disabled. In this condition the air bags
may not be ready to inflate for your protection. Have an authorized dealer service the air
bag system immediately.
•Afteranycollision,thevehicleshouldbetakentoanauthorizeddealerimmediately.
•Donotdriveyourvehicleaftertheairbagshavedeployed.Ifyouareinvolvedinanother
collision, the air bags will not be in place to protect you.
•Ifitisnecessarytomodifytheairbagsystemforpersonswithdisabilities,contactyour
authorized dealer.
•RefertotheOwner'sManualontheDVDforfurtherdetailsregardingtheSupplemental
Restraint System (SRS).
Occupant Classification System
This vehicle is equipped with a right front passenger Occupant Classification System
(“OCS”) that is designed to provide Passenger Advanced Front Air Bag output appropriate
to the occupant’s seated weight input, as determined by the OCS.
The Occupant Classification System (OCS) consists of the following:
•OccupantRestraintController(ORC)
•OccupantClassificationModule(OCM)andSensorlocatedinthefrontpassengerseat
•AirBagWarningLight
GETTING STARTED
17
Page 22 of 164
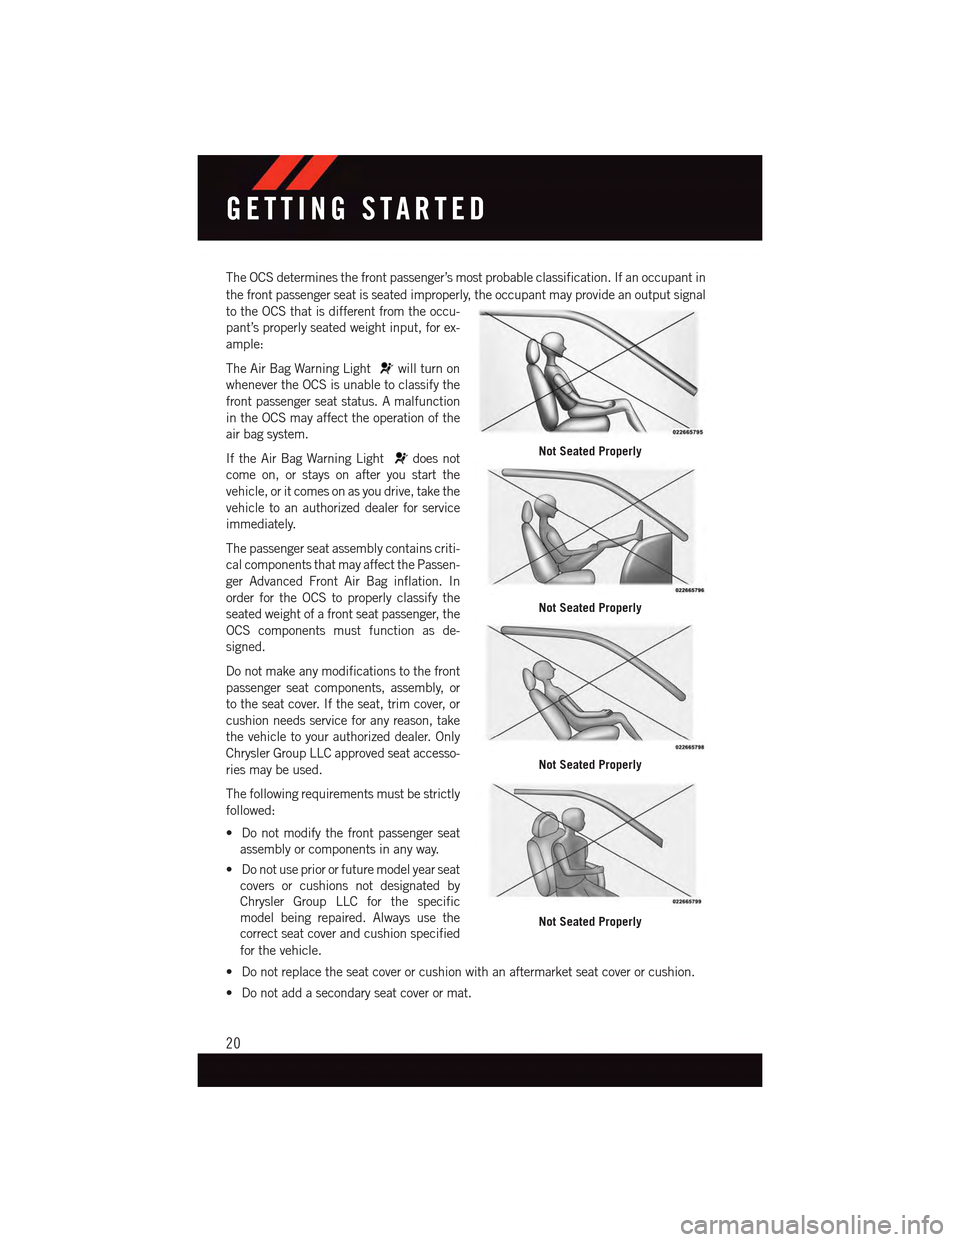
The OCS determines the front passenger’s most probable classification. If an occupant in
the front passenger seat is seated improperly, the occupant may provide an output signal
to the OCS that is different from the occu-
pant’s properly seated weight input, for ex-
ample:
The Air Bag Warning Lightwill turn on
whenever the OCS is unable to classify the
front passenger seat status. A malfunction
in the OCS may affect the operation of the
air bag system.
If the Air Bag Warning Lightdoes not
come on, or stays on after you start the
vehicle, or it comes on as you drive, take the
vehicle to an authorized dealer for service
immediately.
The passenger seat assembly contains criti-
cal components that may affect the Passen-
ger Advanced Front Air Bag inflation. In
order for the OCS to properly classify the
seated weight of a front seat passenger, the
OCS components must function as de-
signed.
Do not make any modifications to the front
passenger seat components, assembly, or
to the seat cover. If the seat, trim cover, or
cushion needs service for any reason, take
the vehicle to your authorized dealer. Only
Chrysler Group LLC approved seat accesso-
ries may be used.
The following requirements must be strictly
followed:
•Donotmodifythefrontpassengerseat
assembly or components in any way.
•Donotusepriororfuturemodelyearseat
covers or cushions not designated by
Chrysler Group LLC for the specific
model being repaired. Always use the
correct seat cover and cushion specified
for the vehicle.
•Donotreplacetheseatcoverorcushionwithanaftermarketseatcoverorcushion.
•Donotaddasecondaryseatcoverormat.
Not Seated Properly
Not Seated Properly
Not Seated Properly
Not Seated Properly
GETTING STARTED
20
Page 29 of 164
NOTE:
The head restraints should only be removed by qualified technicians, for service purposes
only. If either of the head restraints require removal, see your authorized dealer.
WARNING!
Do not place items over the top of the Reactive Head Restraint, such as coats, seat
covers or portable DVD players. These items may interfere with the operation of the
Reactive Head Restraint in the event of a collision and could result in serious injury or
death.
Rear Head Restraints
The rear outboard head restraints have three positions UP, MID and DOWN. The center
head restraint has only two positions, Up and Down. When the center seat is being
occupied the head restraint should be in the raised position. When there are no occupants
in the center seat the head restraint can be lowered for maximum visibility for the driver.
To r a i s e t h e h e a d r e s t r a i n t , p u l l u p w a r d o n t h e h e a d r e s t r a i n t . To l o w e r t h e h e a d r e s t r a i n t ,
press the push button, located at the base of the head restraint, and push downward on
the head restraint.
FRONT SEATS
Power Seats
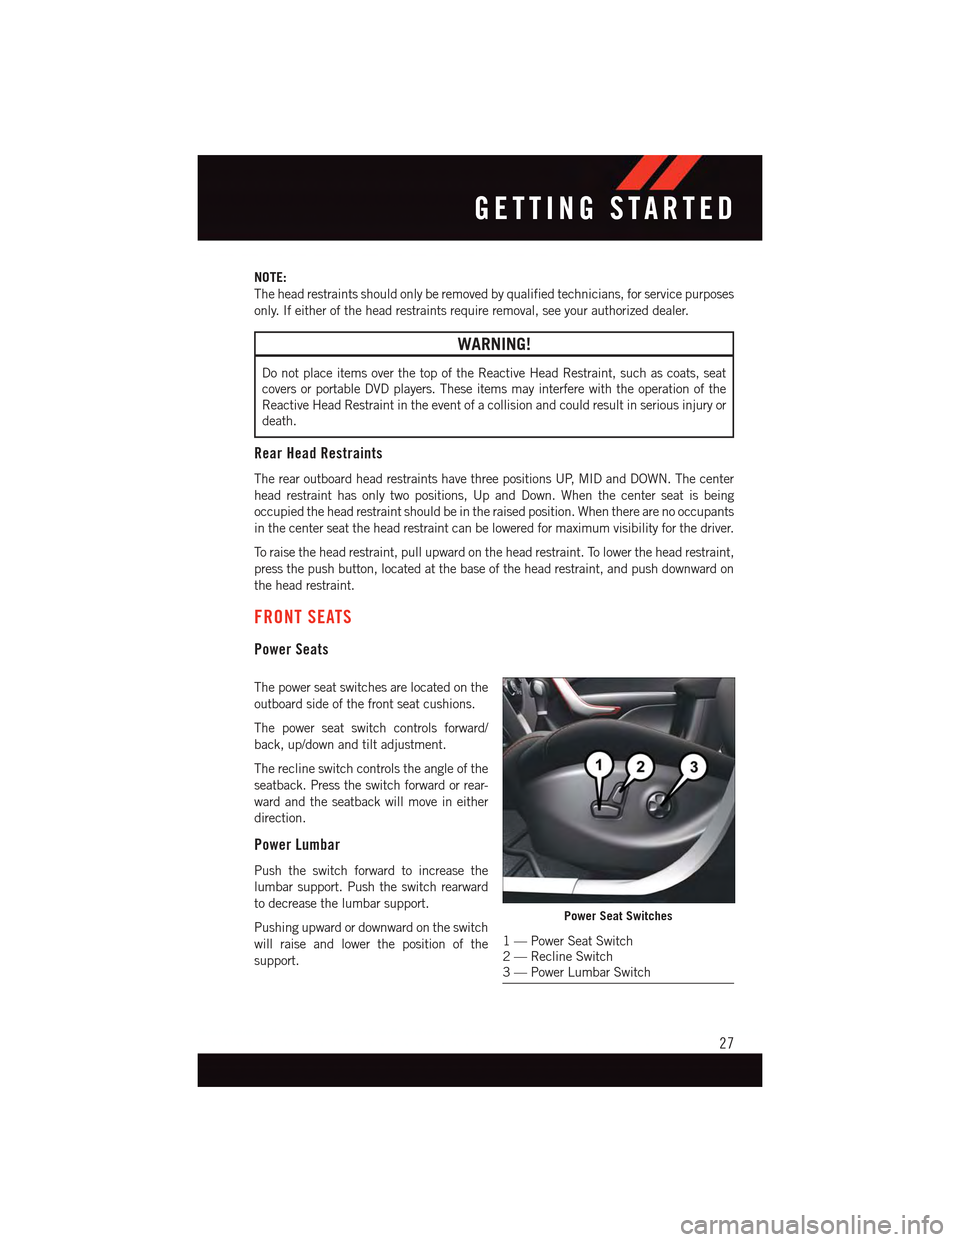
The power seat switches are located on the
outboard side of the front seat cushions.
The power seat switch controls forward/
back, up/down and tilt adjustment.
The recline switch controls the angle of the
seatback. Press the switch forward or rear-
ward and the seatback will move in either
direction.
Power Lumbar
Push the switch forward to increase the
lumbar support. Push the switch rearward
to decrease the lumbar support.
Pushing upward or downward on the switch
will raise and lower the position of the
support.
Power Seat Switches
1—PowerSeatSwitch2—ReclineSwitch3—PowerLumbarSwitch
GETTING STARTED
27
Page 50 of 164
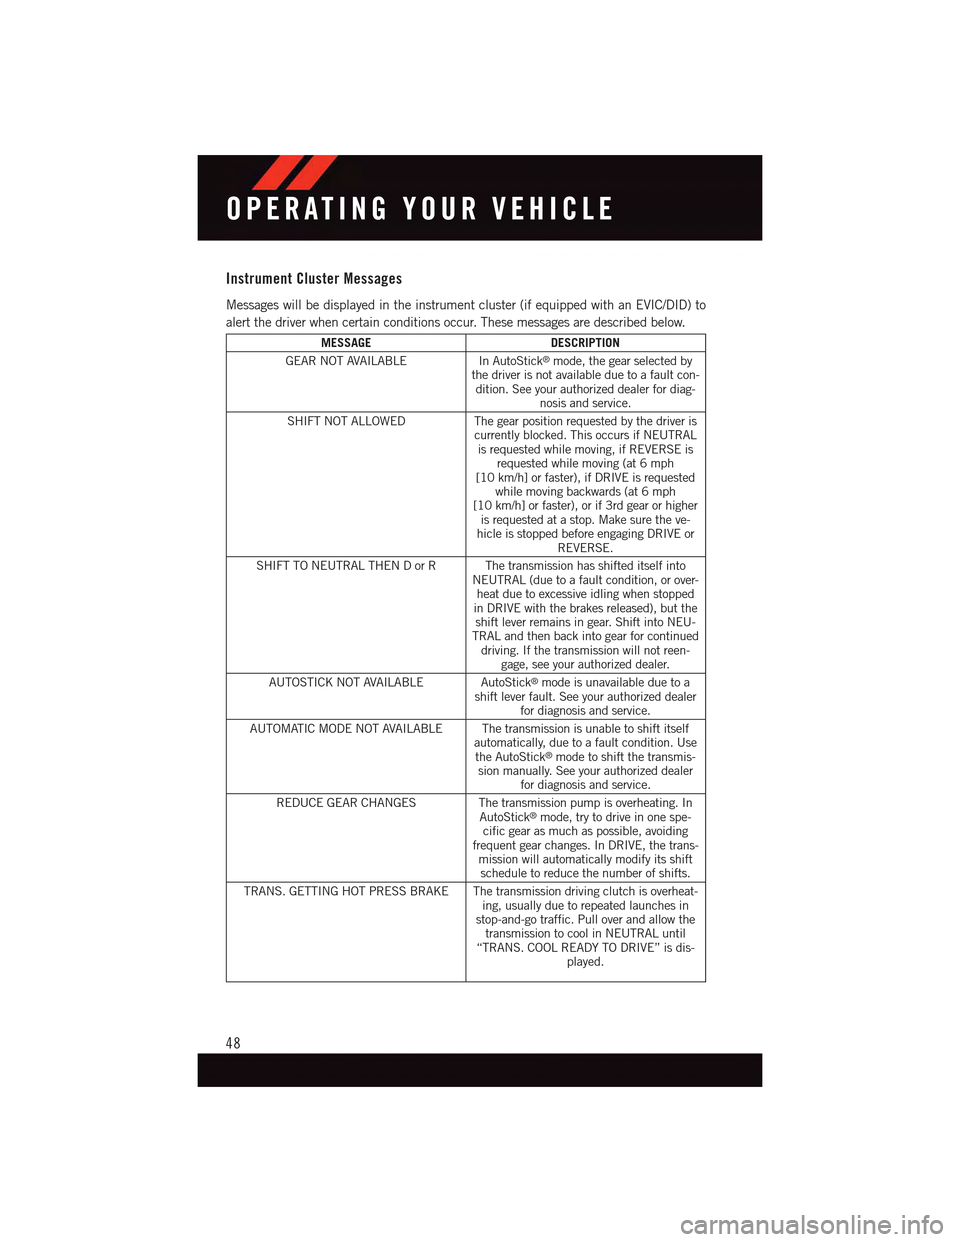
Instrument Cluster Messages
Messages will be displayed in the instrument cluster (if equipped with an EVIC/DID) to
alert the driver when certain conditions occur. These messages are described below.
MESSAGEDESCRIPTION
GEAR NOT AVAILABLEIn AutoStick®mode, the gear selected bythe driver is not available due to a fault con-dition. See your authorized dealer for diag-nosis and service.
SHIFT NOT ALLOWED The gear position requested by the driver iscurrently blocked. This occurs if NEUTRALis requested while moving, if REVERSE isrequested while moving (at 6 mph[10 km/h] or faster), if DRIVE is requestedwhile moving backwards (at 6 mph[10 km/h] or faster), or if 3rd gear or higheris requested at a stop. Make sure the ve-hicle is stopped before engaging DRIVE orREVERSE.
SHIFT TO NEUTRAL THEN D or R The transmission has shifted itself intoNEUTRAL (due to a fault condition, or over-heat due to excessive idling when stoppedin DRIVE with the brakes released), but theshift lever remains in gear. Shift into NEU-TRAL and then back into gear for continueddriving. If the transmission will not reen-gage, see your authorized dealer.
AUTOSTICK NOT AVAILABLE AutoStick®mode is unavailable due to ashift lever fault. See your authorized dealerfor diagnosis and service.
AUTOMATIC MODE NOT AVAILABLE The transmission is unable to shift itselfautomatically, due to a fault condition. Usethe AutoStick®mode to shift the transmis-sion manually. See your authorized dealerfor diagnosis and service.
REDUCE GEAR CHANGES The transmission pump is overheating. InAutoStick®mode, try to drive in one spe-cific gear as much as possible, avoidingfrequent gear changes. In DRIVE, the trans-mission will automatically modify its shiftschedule to reduce the number of shifts.
TRANS. GETTING HOT PRESS BRAKE The transmission driving clutch is overheat-ing, usually due to repeated launches instop-and-go traffic. Pull over and allow thetransmission to cool in NEUTRAL until“TRANS. COOL READY TO DRIVE” is dis-played.
OPERATING YOUR VEHICLE
48
Page 51 of 164
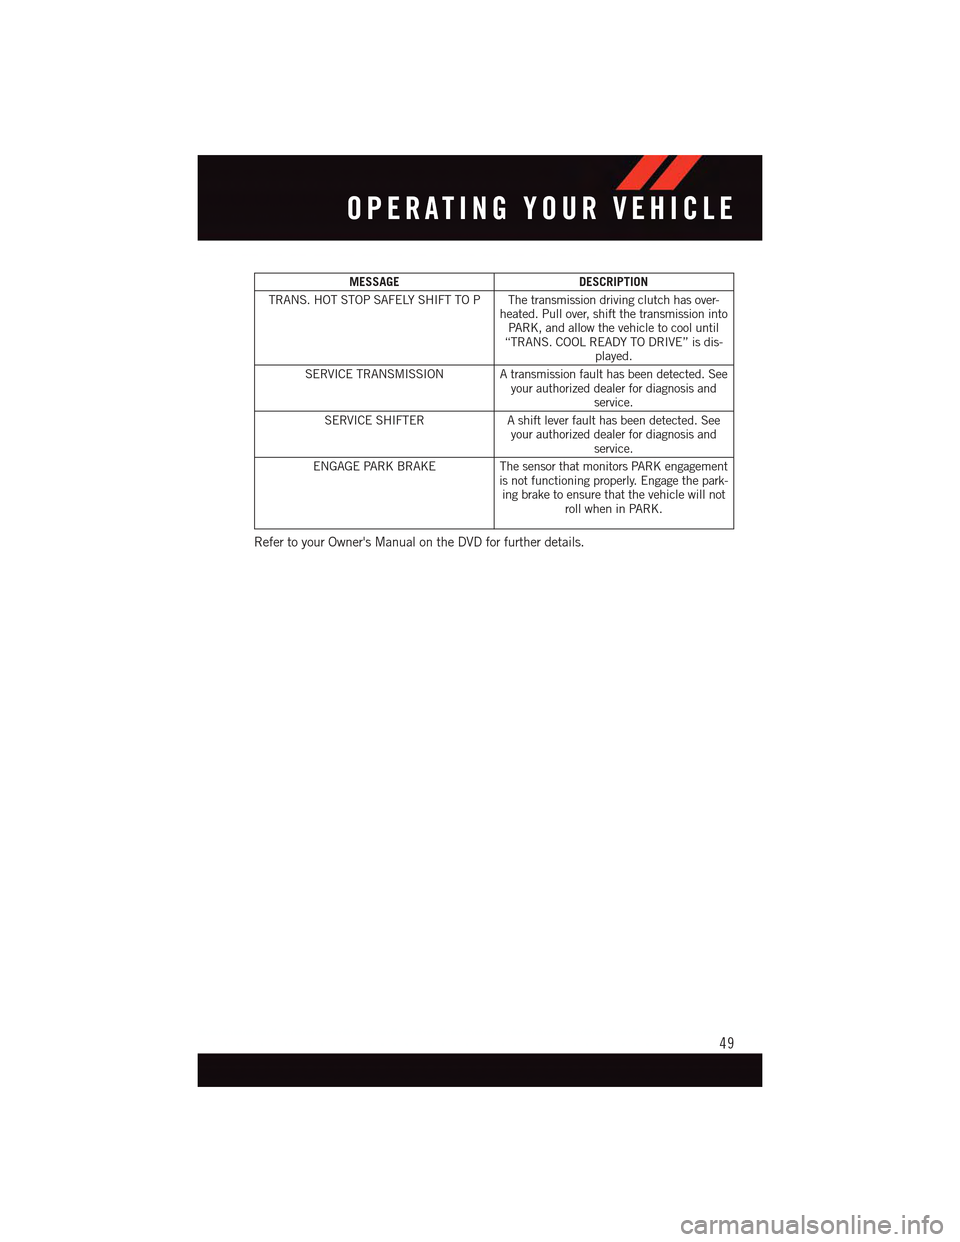
MESSAGEDESCRIPTION
TRANS. HOT STOP SAFELY SHIFT TO P The transmission driving clutch has over-heated. Pull over, shift the transmission intoPA R K , a n d a l l o w t h e v e h i c l e t o c o o l u n t i l“TRANS. COOL READY TO DRIVE” is dis-played.
SERVICE TRANSMISSION A transmission fault has been detected. Seeyour authorized dealer for diagnosis andservice.
SERVICE SHIFTERAshiftleverfaulthasbeendetected.Seeyour authorized dealer for diagnosis andservice.
ENGAGE PARK BRAKEThe sensor that monitors PARK engagementis not functioning properly. Engage the park-ing brake to ensure that the vehicle will notroll when in PARK.
Refer to your Owner's Manual on the DVD for further details.
OPERATING YOUR VEHICLE
49
Page 57 of 164
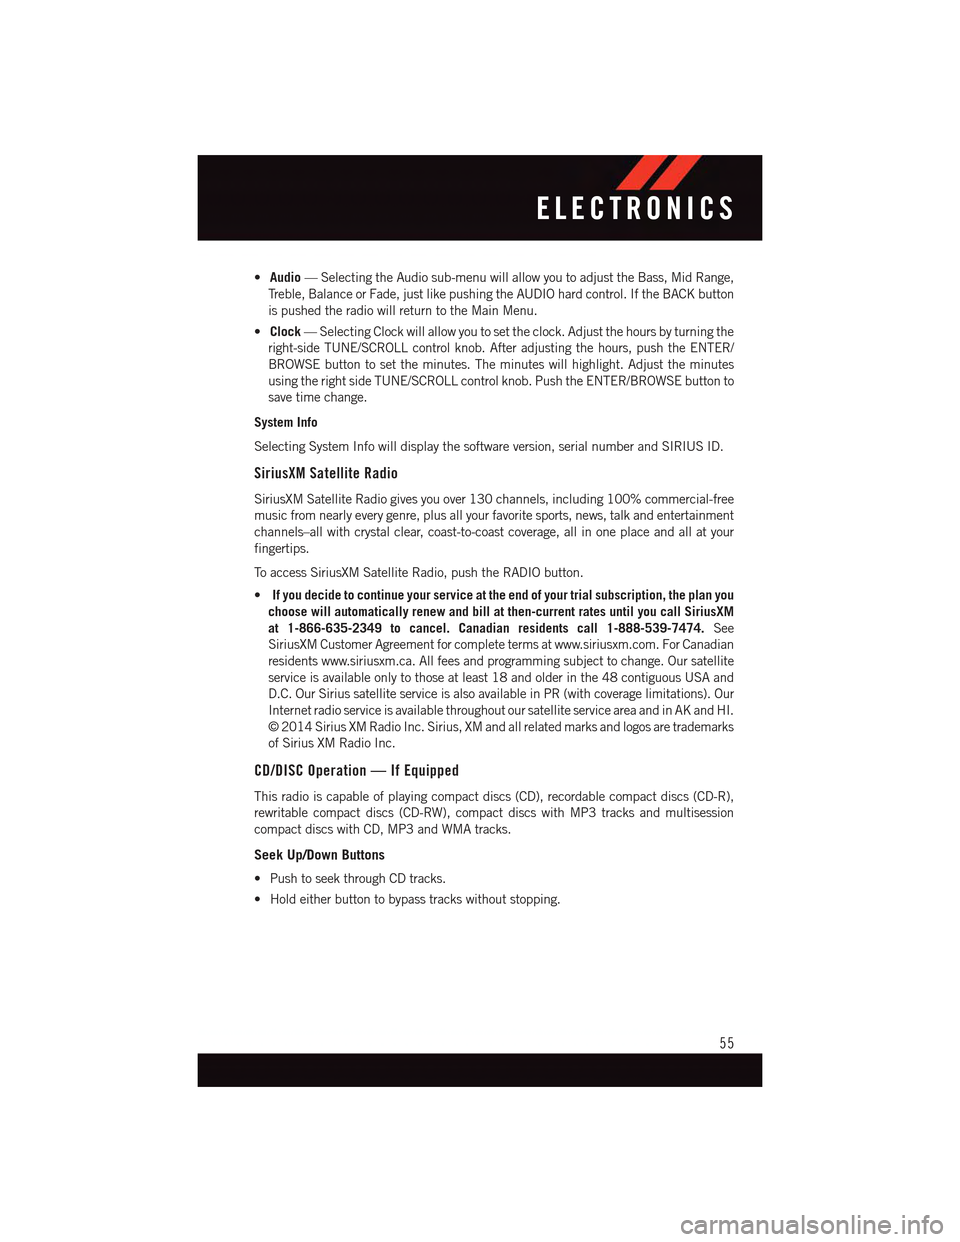
•Audio—SelectingtheAudiosub-menuwillallowyoutoadjusttheBass,MidRange,
Tr e b l e , B a l a n c e o r F a d e , j u s t l i k e p u s h i n g t h e A U D I O h a r d c o n t r o l . I f t h e B A C K b u t t o n
is pushed the radio will return to the Main Menu.
•Clock—SelectingClockwillallowyoutosettheclock.Adjustthehoursbyturningthe
right-side TUNE/SCROLL control knob. After adjusting the hours, push the ENTER/
BROWSE button to set the minutes. The minutes will highlight. Adjust the minutes
using the right side TUNE/SCROLL control knob. Push the ENTER/BROWSE button to
save time change.
System Info
Selecting System Info will display the software version, serial number and SIRIUS ID.
SiriusXM Satellite Radio
SiriusXM Satellite Radio gives you over 130 channels, including 100% commercial-free
music from nearly every genre, plus all your favorite sports, news, talk and entertainment
channels–all with crystal clear, coast-to-coast coverage, all in one place and all at your
fingertips.
To a c c e s s S i r i u s X M S a t e l l i t e R a d i o , p u s h t h e R A D I O b u t t o n .
•If you decide to continue your service at the end of your trial subscription, the plan you
choose will automatically renew and bill at then-current rates until you call SiriusXM
at 1-866-635-2349 to cancel. Canadian residents call 1-888-539-7474.See
SiriusXM Customer Agreement for complete terms at www.siriusxm.com. For Canadian
residents www.siriusxm.ca. All fees and programming subject to change. Our satellite
service is available only to those at least 18 and older in the 48 contiguous USA and
D.C. Our Sirius satellite service is also available in PR (with coverage limitations). Our
Internet radio service is available throughout our satellite service area and in AK and HI.
©2014SiriusXMRadioInc.Sirius,XMandallrelatedmarksandlogosaretrademarks
of Sirius XM Radio Inc.
CD/DISC Operation — If Equipped
This radio is capable of playing compact discs (CD), recordable compact discs (CD-R),
rewritable compact discs (CD-RW), compact discs with MP3 tracks and multisession
compact discs with CD, MP3 and WMA tracks.
Seek Up/Down Buttons
•PushtoseekthroughCDtracks.
•Holdeitherbuttontobypasstrackswithoutstopping.
ELECTRONICS
55
Page 90 of 164
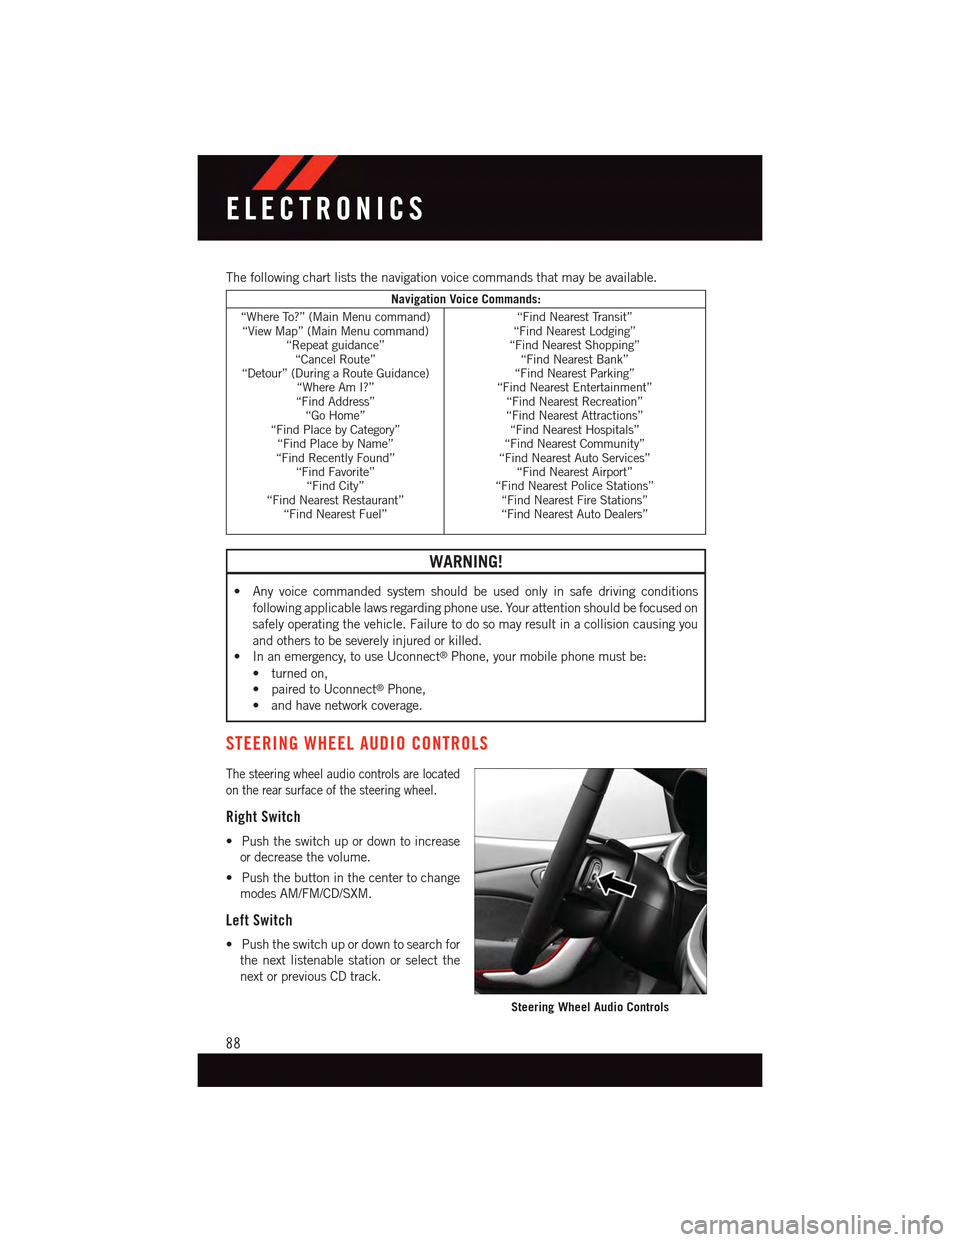
The following chart lists the navigation voice commands that may be available.
Navigation Voice Commands:
“Where To?” (Main Menu command)“View Map” (Main Menu command)“Repeat guidance”“Cancel Route”“Detour” (During a Route Guidance)“Where Am I?”“Find Address”“Go Home”“Find Place by Category”“Find Place by Name”“Find Recently Found”“Find Favorite”“Find City”“Find Nearest Restaurant”“Find Nearest Fuel”
“Find Nearest Transit”“Find Nearest Lodging”“Find Nearest Shopping”“Find Nearest Bank”“Find Nearest Parking”“Find Nearest Entertainment”“Find Nearest Recreation”“Find Nearest Attractions”“Find Nearest Hospitals”“Find Nearest Community”“Find Nearest Auto Services”“Find Nearest Airport”“Find Nearest Police Stations”“Find Nearest Fire Stations”“Find Nearest Auto Dealers”
WARNING!
•Anyvoicecommandedsystemshouldbeusedonlyinsafedrivingconditions
following applicable laws regarding phone use. Your attention should be focused on
safely operating the vehicle. Failure to do so may result in a collision causing you
and others to be severely injured or killed.
•Inanemergency,touseUconnect®Phone, your mobile phone must be:
•turnedon,
•pairedtoUconnect®Phone,
•andhavenetworkcoverage.
STEERING WHEEL AUDIO CONTROLS
The steering wheel audio controls are located
on the rear surface of the steering wheel.
Right Switch
•Pushtheswitchupordowntoincrease
or decrease the volume.
•Pushthebuttoninthecentertochange
modes AM/FM/CD/SXM.
Left Switch
•Pushtheswitchupordowntosearchfor
the next listenable station or select the
next or previous CD track.
Steering Wheel Audio Controls
ELECTRONICS
88
Page 102 of 164
ROADSIDE ASSISTANCE
Dial toll-free 1-800-521-2779 for U.S. Residents or 1-800-363-4869 for Canadian
Residents.
•Provideyourname,vehicleidentificationnumber,licenseplatenumber,andyour
location, including the telephone number from which you are calling.
•Brieflydescribethenatureoftheproblemandanswerafewsimplequestions.
•Youwillbegiventhenameoftheserviceproviderandanestimatedtimeofarrival.If
you feel you are in an “unsafe situation”, please let us know. With your consent, we will
contact local police or safety authorities.
INSTRUMENT CLUSTER WARNING LIGHTS
-ElectronicStabilityControl(ESC)Activation/MalfunctionIndicatorLight
The “ESC Activation/Malfunction Indicator Light” in the instrument cluster will come on
when the ignition switch is turned to the ON/RUN position. It should go out with the
engine running. If the “ESC Activation/Malfunction Indicator Light” comes on continu-
ously with the engine running, a malfunction has been detected in the ESC system.
If this light remains on after several ignition cycles, and the vehicle has been driven
several miles (kilometers) at speeds greater than 30 mph (48 km/h), we recommend you
drive to the nearest service center and have the vehicle serviced immediately.
-TirePressureMonitoringSystem(TPMS)Light
Each tire, including the spare (if provided), should be checked monthly when cold and
inflated to the inflation pressure recommended by the vehicle manufacturer on the
vehicle placard or tire inflation pressure label. (If your vehicle has tires of a different size
than the size indicated on the vehicle placard or tire inflation pressure label, you should
determine the proper tire inflation pressure for those tires.)
As an added safety feature, your vehicle has been equipped with a tire pressure
monitoring system (TPMS) that illuminates a low tire pressure telltale when one or more
of your tires is significantly under-inflated. Accordingly, when the low tire pressure telltale
illuminates, you should stop and check your tires as soon as possible, and inflate them to
the proper pressure. Driving on a significantly under-inflated tire causes the tire to
overheat and can lead to tire failure. Under-inflation also reduces fuel efficiency and tire
tread life, and may affect the vehicle’s handling and stopping ability.
IF THE LIGHT STARTS FLASHING INDICATING A LOW TIRE PRESSURE, ADJUST THE AIR
PRESSURE IN THE LOW TIRE TO THE AIR PRESSURE SHOWN ON THE VEHICLE PLACARD OR
TIRE INFLATION PRESSURE LABEL LOCATED ON THE DRIVER'S DOOR.
WHAT TO DO IN EMERGENCIES
100
Page 104 of 164
-EngineTemperatureWarningLight
This light warns of an overheated engine condition.
If the light turns on or flashes continuously while driving, safely pull over and stop the
vehicle. If the A/C system is on, turn it off. Also, shift the transmission into NEUTRAL and
idle the vehicle. If the temperature reading does not return to normal, turn the engine off
immediately.
We recommend that you do not operate the vehicle or engine damage will occur. Have the
vehicle serviced immediately.
WARNING!
Ahotenginecoolingsystemisdangerous.Youorotherscouldbebadlyburnedby
steam or boiling coolant.
-BrakeWarningLight
This light monitors various brake functions, including brake fluid level and parking brake
application. If the brake light turns on it may indicate that the parking brake is applied,
that the brake fluid level is low, or that there is a problem with the anti-lock brake system
reservoir.
If the light remains on when the parking brake has been disengaged, and the fluid level is
at the full mark on the master cylinder reservoir, it indicates a possible brake hydraulic
system malfunction or that a problem with the Brake Booster has been detected by the
Anti-Lock Brake System (ABS)/Electronic Stability Control (ESC) system. In this case, the
light will remain on until the condition has been corrected. If the problem is related to the
brake booster, the ABS pump will run when applying the brake and a brake pedal
pulsation may be felt during each stop.
The dual brake system provides a reserve braking capacity in the event of a failure to a
portion of the hydraulic system. A leak in either half of the dual brake system is indicated
by the Brake Warning Light, which will turn on when the brake fluid level in the master
cylinder has dropped below a specified level. The light will remain on until the cause is
corrected.
Vehicles equipped with the Anti-Lock Brake System (ABS), are also equipped with
Electronic Brake Force Distribution (EBD). In the event of an EBD failure, the Brake
Warning Light will turn on along with the ABS Light. Immediate repair to the ABS system
is required.
Operation of the Brake Warning Light can be checked by turning the ignition switch from
the OFF position to the ON/RUN position. The light should illuminate for approximately
two seconds. The light should then turn off unless the parking brake is applied or a brake
fault is detected. If the light does not illuminate, have the light inspected by an authorized
dealer.
WHAT TO DO IN EMERGENCIES
102