instrument cluster DODGE DART 2015 PF / 1.G User Guide
[x] Cancel search | Manufacturer: DODGE, Model Year: 2015, Model line: DART, Model: DODGE DART 2015 PF / 1.GPages: 164, PDF Size: 25.19 MB
Page 3 of 164
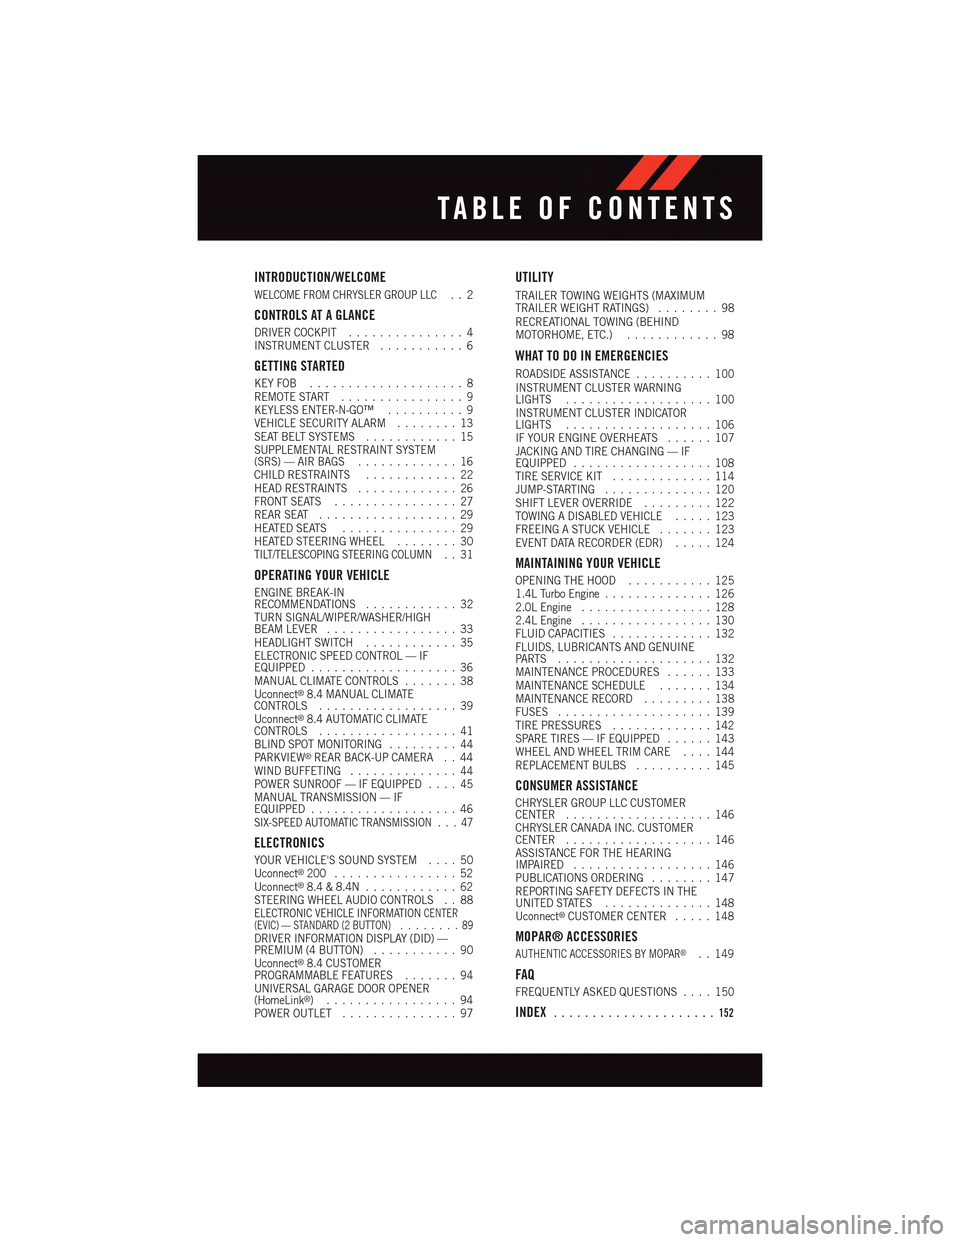
INTRODUCTION/WELCOME
WELCOME FROM CHRYSLER GROUP LLC..2
CONTROLS AT A GLANCE
DRIVER COCKPIT...............4INSTRUMENT CLUSTER...........6
GETTING STARTED
KEY FOB . . . . . . . . . . . . . . . . . . . . 8REMOTE START . . . . . . . . . . . . . . . . 9KEYLESS ENTER-N-GO™..........9VEHICLE SECURITY ALARM........13SEAT BELT SYSTEMS............15SUPPLEMENTAL RESTRAINT SYSTEM(SRS) — AIR BAGS.............16CHILD RESTRAINTS............22HEAD RESTRAINTS.............26FRONT SEATS................27REAR SEAT..................29HEATED SEATS . . . . . . . . . . . . . . . 29HEATED STEERING WHEEL........30TILT/TELESCOPING STEERING COLUMN..31
OPERATING YOUR VEHICLE
ENGINE BREAK-INRECOMMENDATIONS............32TURN SIGNAL/WIPER/WASHER/HIGHBEAM LEVER.................33HEADLIGHT SWITCH............35ELECTRONIC SPEED CONTROL — IFEQUIPPED...................36MANUAL CLIMATE CONTROLS.......38Uconnect®8.4 MANUAL CLIMATECONTROLS..................39Uconnect®8.4 AUTOMATIC CLIMATECONTROLS..................41BLIND SPOT MONITORING.........44PA R K V I E W®REAR BACK-UP CAMERA . . 44WIND BUFFETING..............44POWER SUNROOF — IF EQUIPPED....45MANUAL TRANSMISSION — IFEQUIPPED...................46SIX-SPEED AUTOMATIC TRANSMISSION . . . 47
ELECTRONICS
YOUR VEHICLE'S SOUND SYSTEM....50Uconnect®200 . . . . . . . . . . . . . . . . 52Uconnect®8.4 & 8.4N............62STEERING WHEEL AUDIO CONTROLS . . 88ELECTRONIC VEHICLE INFORMATIONCENTER(EVIC) — STANDARD (2 BUTTON) . . . . . . . . 89DRIVER INFORMATION DISPLAY (DID) —PREMIUM (4 BUTTON)...........90Uconnect®8.4 CUSTOMERPROGRAMMABLE FEATURES.......94UNIVERSAL GARAGE DOOR OPENER(HomeLink®).................94POWER OUTLET...............97
UTILITY
TRAILER TOWING WEIGHTS (MAXIMUMTRAILER WEIGHT RATINGS)........98RECREATIONAL TOWING (BEHINDMOTORHOME, ETC.)............98
WHAT TO DO IN EMERGENCIES
ROADSIDE ASSISTANCE..........100INSTRUMENT CLUSTER WARNINGLIGHTS...................100INSTRUMENT CLUSTER INDICATORLIGHTS...................106IF YOUR ENGINE OVERHEATS......107JACKING AND TIRE CHANGING — IFEQUIPPED..................108TIRE SERVICE KIT.............114JUMP-STARTING..............120SHIFT LEVER OVERRIDE.........122TOWING A DISABLED VEHICLE.....123FREEING A STUCK VEHICLE.......123EVENT DATA RECORDER (EDR).....124
MAINTAINING YOUR VEHICLE
OPENING THE HOOD...........1251.4L Turbo Engine..............1262.0L Engine.................1282.4L Engine.................130FLUID CAPACITIES.............132FLUIDS, LUBRICANTS AND GENUINEPA RT S . . . . . . . . . . . . . . . . . . . . 1 3 2MAINTENANCE PROCEDURES......133MAINTENANCE SCHEDULE.......134MAINTENANCE RECORD.........138FUSES....................139TIRE PRESSURES.............142SPARE TIRES — IF EQUIPPED......143WHEEL AND WHEEL TRIM CARE....144REPLACEMENT BULBS..........145
CONSUMER ASSISTANCE
CHRYSLER GROUP LLC CUSTOMERCENTER...................146CHRYSLER CANADA INC. CUSTOMERCENTER...................146ASSISTANCE FOR THE HEARINGIMPAIRED..................146PUBLICATIONS ORDERING........147REPORTING SAFETY DEFECTS IN THEUNITED STATES..............148Uconnect®CUSTOMER CENTER.....148
MOPAR® ACCESSORIES
AUTHENTIC ACCESSORIES BY MOPAR®..149
FAQ
FREQUENTLY ASKED QUESTIONS....150
INDEX.....................152
TABLE OF CONTENTS
Page 6 of 164
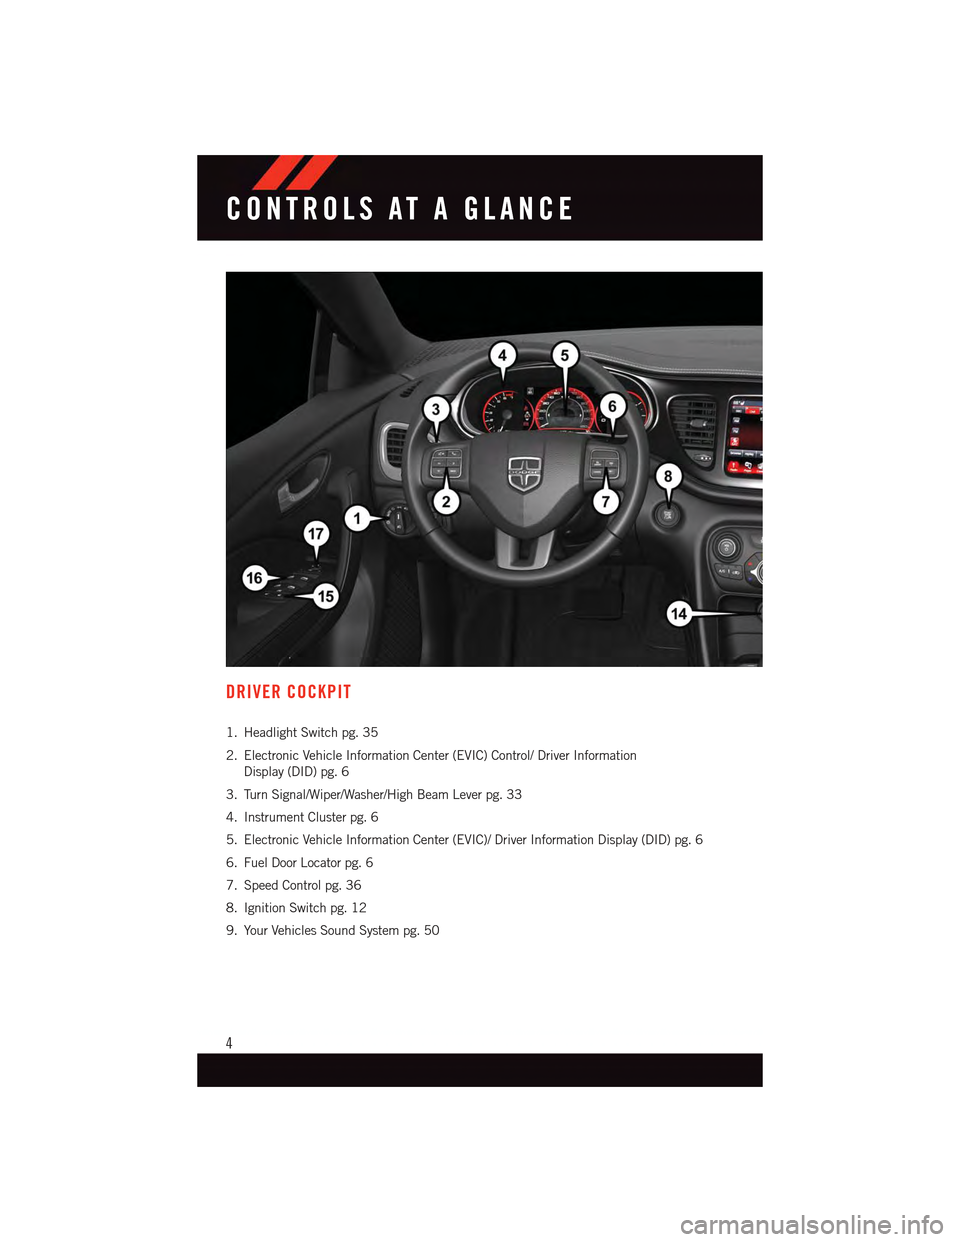
DRIVER COCKPIT
1. Headlight Switch pg. 35
2. Electronic Vehicle Information Center (EVIC) Control/ Driver Information
Display (DID) pg. 6
3. Turn Signal/Wiper/Washer/High Beam Lever pg. 33
4. Instrument Cluster pg. 6
5. Electronic Vehicle Information Center (EVIC)/ Driver Information Display (DID) pg. 6
6. Fuel Door Locator pg. 6
7. Speed Control pg. 36
8. Ignition Switch pg. 12
9. Your Vehicles Sound System pg. 50
CONTROLS AT A GLANCE
4
Page 8 of 164
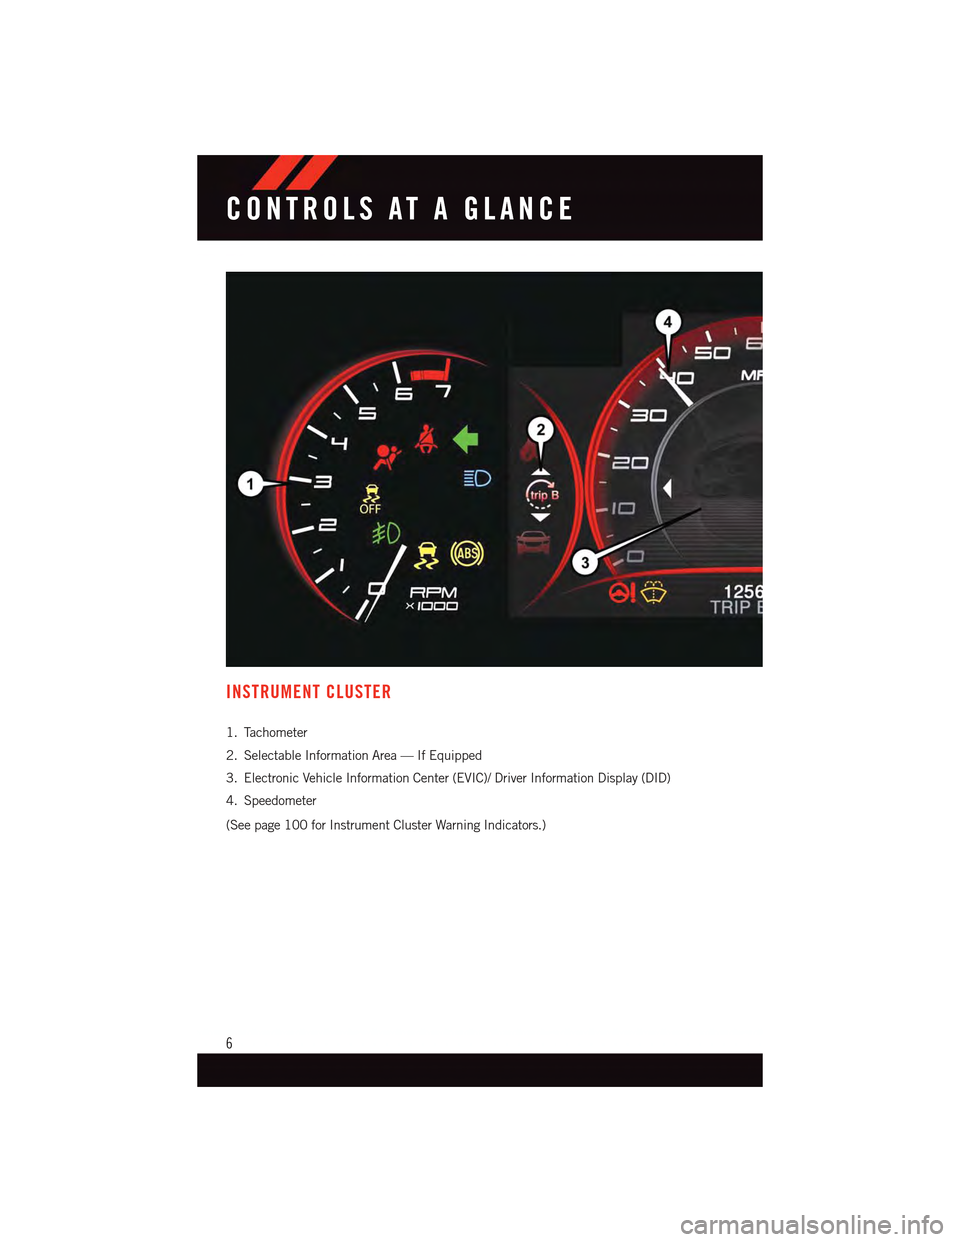
INSTRUMENT CLUSTER
1. Tachometer
2. Selectable Information Area — If Equipped
3. Electronic Vehicle Information Center (EVIC)/ Driver Information Display (DID)
4. Speedometer
(See page 100 for Instrument Cluster Warning Indicators.)
CONTROLS AT A GLANCE
6
Page 9 of 164
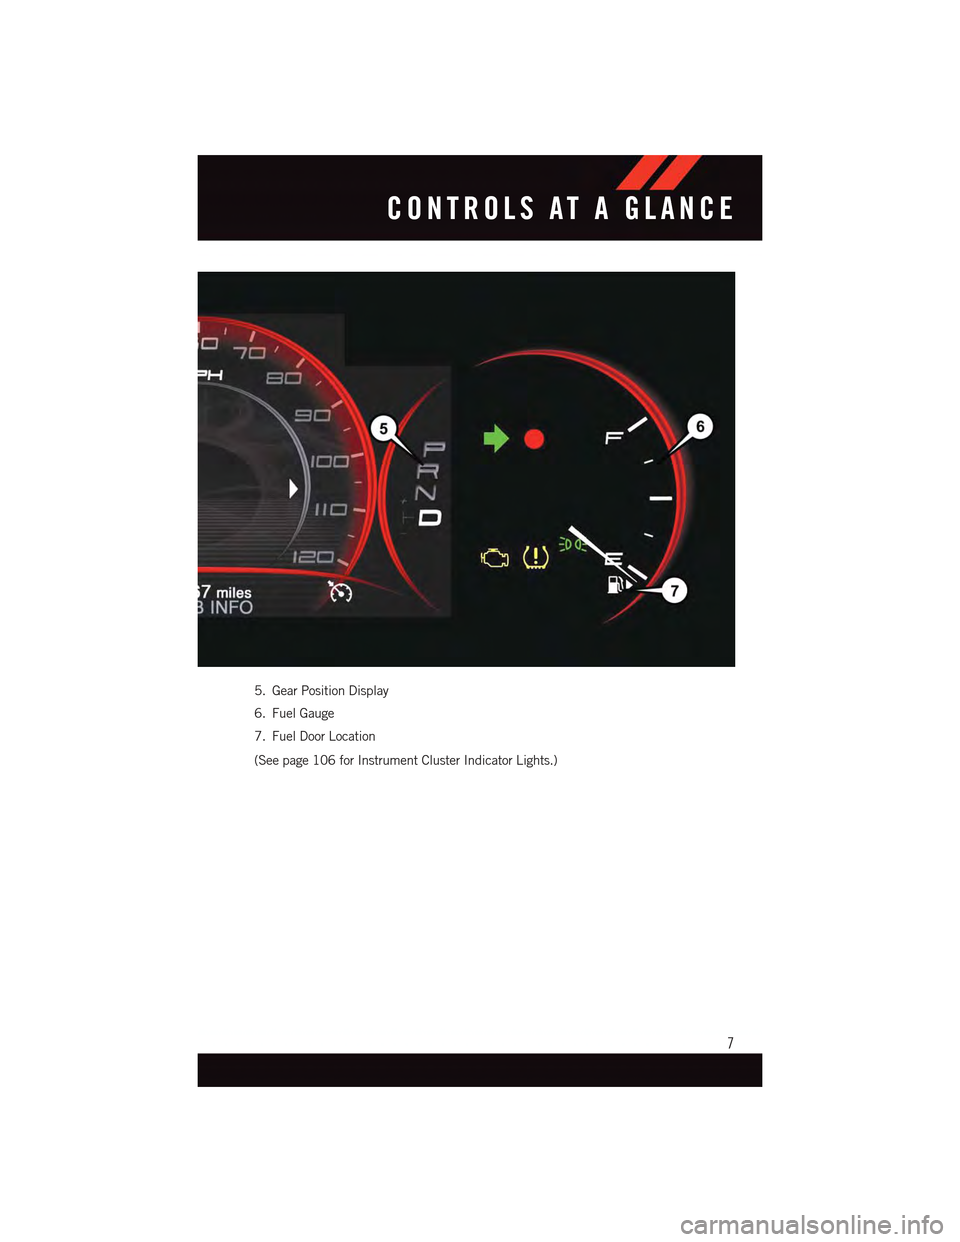
5. Gear Position Display
6. Fuel Gauge
7. Fuel Door Location
(See page 106 for Instrument Cluster Indicator Lights.)
CONTROLS AT A GLANCE
7
Page 15 of 164
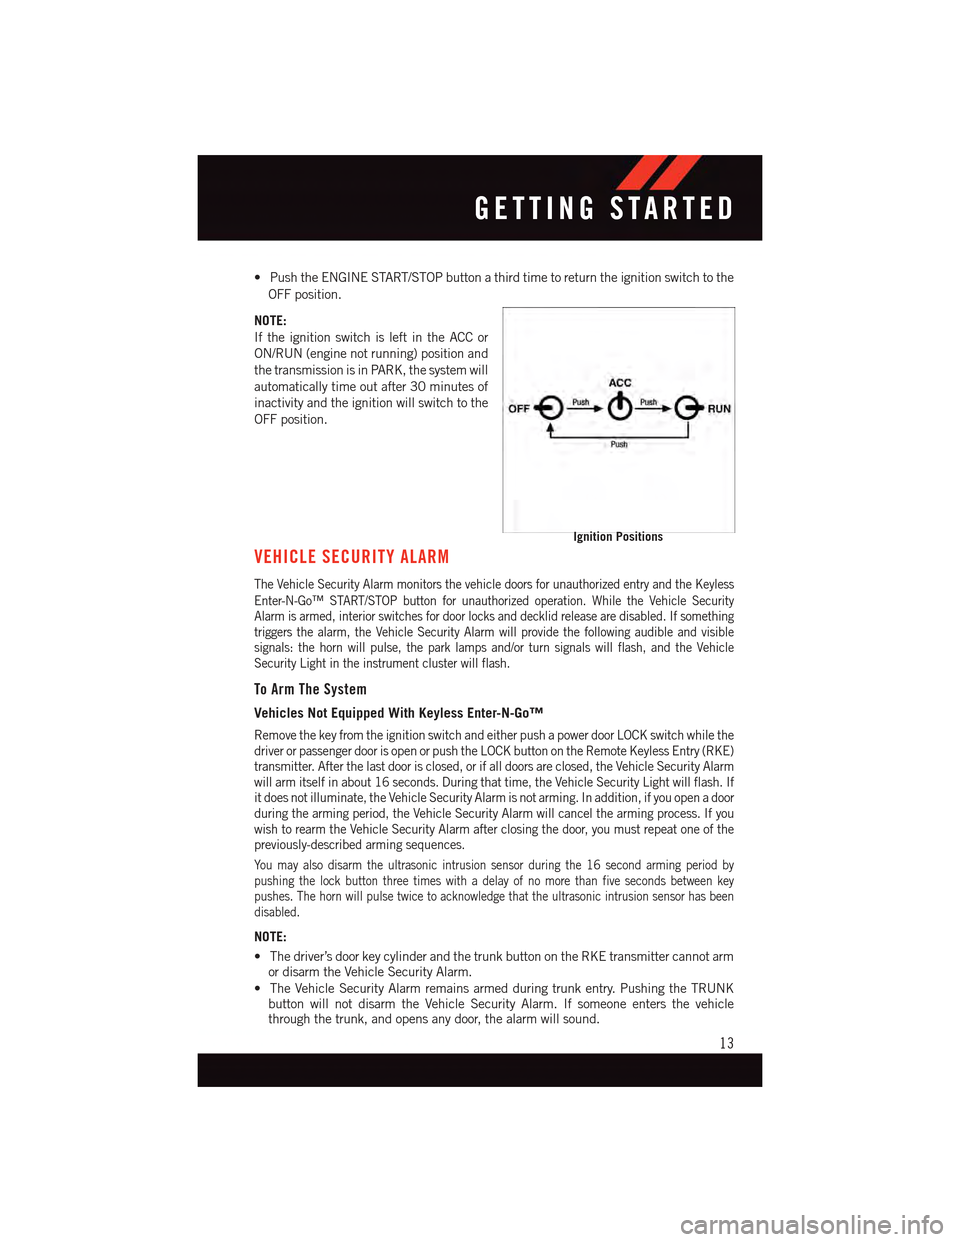
•PushtheENGINESTART/STOPbuttonathirdtimetoreturntheignitionswitchtothe
OFF position.
NOTE:
If the ignition switch is left in the ACC or
ON/RUN (engine not running) position and
the transmission is in PARK, the system will
automatically time out after 30 minutes of
inactivity and the ignition will switch to the
OFF position.
VEHICLE SECURITY ALARM
The Vehicle Security Alarm monitors the vehicle doors for unauthorized entry and the Keyless
Enter-N-Go™ START/STOP button for unauthorized operation. While the Vehicle SecurityAlarm is armed, interior switches for door locks and decklid release are disabled. If somethingtriggers the alarm, the Vehicle Security Alarm will provide the following audible and visiblesignals: the horn will pulse, the park lamps and/or turn signals will flash, and the VehicleSecurity Light in the instrument cluster will flash.
To Arm The System
Vehicles Not Equipped With Keyless Enter-N-Go™
Remove the key from the ignition switch and either push a power door LOCK switch while thedriver or passenger door is open or push the LOCK button on the Remote Keyless Entry (RKE)transmitter. After the last door is closed, or if all doors are closed, the Vehicle Security Alarmwill arm itself in about 16 seconds. During that time, the Vehicle Security Light will flash. Ifit does not illuminate, the Vehicle Security Alarm is not arming. In addition, if you open a doorduring the arming period, the Vehicle Security Alarm will cancel the arming process. If youwish to rearm the Vehicle Security Alarm after closing the door, you must repeat one of thepreviously-described arming sequences.
Yo u m a y a l s o d i s a r m t h e u l t r a s o n i c i n t r u s i o n s e n s o r d u r i n g t h e 1 6 s e c o n d a r m i n g p e r i o d b ypushing the lock button three times with a delay of no more than five seconds between keypushes. The horn will pulse twice to acknowledge that the ultrasonic intrusion sensor has beendisabled.
NOTE:
•Thedriver’sdoorkeycylinderandthetrunkbuttonontheRKEtransmittercannotarmor disarm the Vehicle Security Alarm.
•TheVehicleSecurityAlarmremainsarmedduringtrunkentry.PushingtheTRUNKbutton will not disarm the Vehicle Security Alarm. If someone enters the vehiclethrough the trunk, and opens any door, the alarm will sound.
Ignition Positions
GETTING STARTED
13
Page 37 of 164
HEADLIGHT SWITCH
Automatic Headlights/Parking
Lights/Headlights
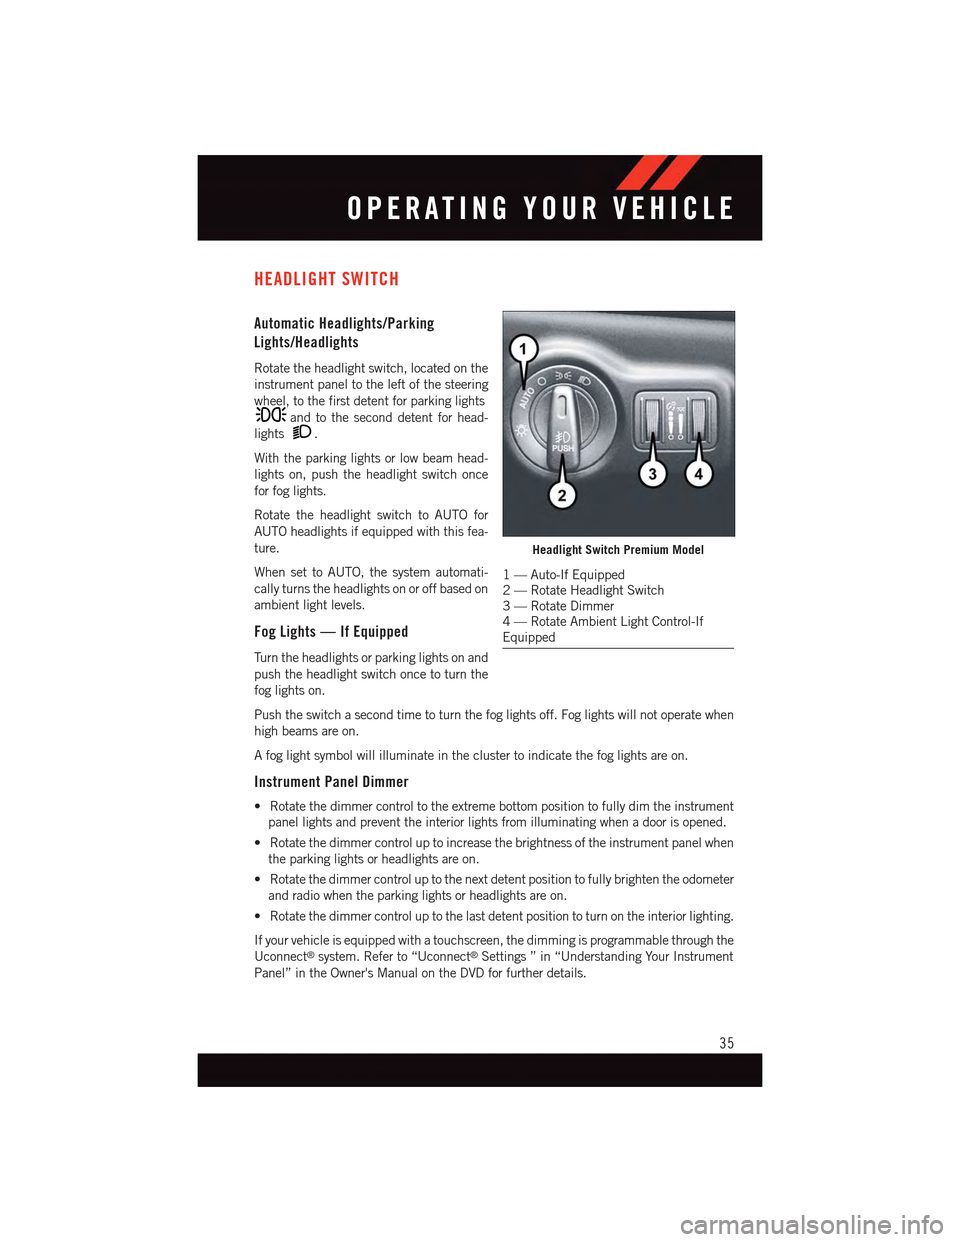
Rotate the headlight switch, located on the
instrument panel to the left of the steering
wheel, to the first detent for parking lights
and to the second detent for head-
lights.
With the parking lights or low beam head-
lights on, push the headlight switch once
for fog lights.
Rotate the headlight switch to AUTO for
AUTO headlights if equipped with this fea-
ture.
When set to AUTO, the system automati-
cally turns the headlights on or off based on
ambient light levels.
Fog Lights — If Equipped
Tu r n t h e h e a d l i g h t s o r p a r k i n g l i g h t s o n a n d
push the headlight switch once to turn the
fog lights on.
Push the switch a second time to turn the fog lights off. Fog lights will not operate when
high beams are on.
Afoglightsymbolwillilluminateintheclustertoindicatethefoglightsareon.
Instrument Panel Dimmer
•Rotatethedimmercontroltotheextremebottompositiontofullydimtheinstrument
panel lights and prevent the interior lights from illuminating when a door is opened.
•Rotatethedimmercontroluptoincreasethebrightnessoftheinstrumentpanelwhen
the parking lights or headlights are on.
•Rotatethedimmercontroluptothenextdetentpositiontofullybrightentheodometer
and radio when the parking lights or headlights are on.
•Rotatethedimmercontroluptothelastdetentpositiontoturnontheinteriorlighting.
If your vehicle is equipped with a touchscreen, the dimming is programmable through the
Uconnect®system. Refer to “Uconnect®Settings ” in “Understanding Your Instrument
Panel” in the Owner's Manual on the DVD for further details.
Headlight Switch Premium Model
1—Auto-IfEquipped2—RotateHeadlightSwitch3—RotateDimmer4—RotateAmbientLightControl-IfEquipped
OPERATING YOUR VEHICLE
35
Page 38 of 164
ELECTRONIC SPEED CONTROL — IF EQUIPPED
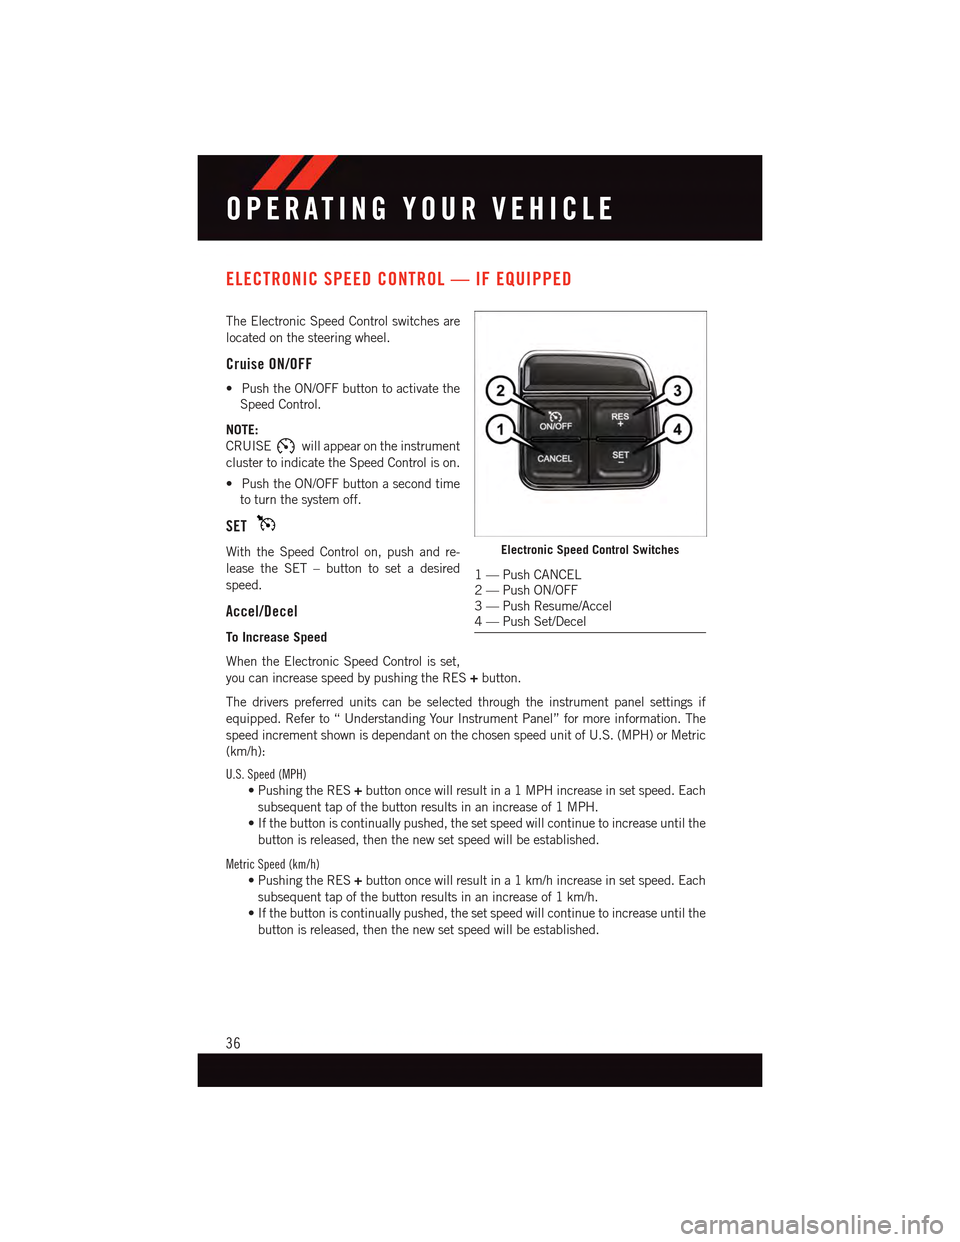
The Electronic Speed Control switches are
located on the steering wheel.
Cruise ON/OFF
•PushtheON/OFFbuttontoactivatethe
Speed Control.
NOTE:
CRUISEwill appear on the instrument
cluster to indicate the Speed Control is on.
•PushtheON/OFFbuttonasecondtime
to turn the system off.
SET
With the Speed Control on, push and re-
lease the SET – button to set a desired
speed.
Accel/Decel
To Increase Speed
When the Electronic Speed Control is set,
you can increase speed by pushing the RES+button.
The drivers preferred units can be selected through the instrument panel settings if
equipped. Refer to “ Understanding Your Instrument Panel” for more information. The
speed increment shown is dependant on the chosen speed unit of U.S. (MPH) or Metric
(km/h):
U.S. Speed (MPH)
•PushingtheRES+button once will result in a 1 MPH increase in set speed. Each
subsequent tap of the button results in an increase of 1 MPH.
•Ifthebuttoniscontinuallypushed,thesetspeedwillcontinuetoincreaseuntilthe
button is released, then the new set speed will be established.
Metric Speed (km/h)
•PushingtheRES+button once will result in a 1 km/h increase in set speed. Each
subsequent tap of the button results in an increase of 1 km/h.
•Ifthebuttoniscontinuallypushed,thesetspeedwillcontinuetoincreaseuntilthe
button is released, then the new set speed will be established.
Electronic Speed Control Switches
1—PushCANCEL2—PushON/OFF3—PushResume/Accel4—PushSet/Decel
OPERATING YOUR VEHICLE
36
Page 49 of 164
SIX-SPEED AUTOMATIC TRANSMISSION
This vehicle may be equipped with a fuel efficient Dual-Dry Clutch, Six Speed Automatic
Tr a n s m i s s i o n . T h i s t r a n s m i s s i o n o f f e r s a s p o r t i e r d r i v i n g e x p e r i e n c e w i t h f a s t e r A u t o S t i c k®
shifting.
During low-speed driving conditions in first gear, vehicle momentum changes may feel
exaggerated in response to changes in accelerator pedal position. This behavior is normal
and is similar to vehicles equipped with a manual transmission.
NOTE:
•Veryaggressivedrivingmayresultinsomeclutchodorsimilartoamanualtransmis-
sion. An active warning message will display in the Instrument Cluster if cool down
actions are needed.
•Thefirstfewshiftsonanewvehiclemaybesomewhatabrupt.Thisisanormal
condition, and precision shifts will develop within a few hundred miles (kilometers).
•Atlowspeedsyoumayhearmechanicalnoisessimilartoamanualtransmissionasthe
transmission changes gears. These noises are normal and will not damage the
transmission.
•Beforeandaftertheengineisstarted,youmayhearahydraulicpumpforashortperiod
of time. This noise is normal and will not damage the transmission.
Shifting The Transmission
The transmission shift lever position (PRND) is displayed both on the shift lever and in the
Electronic Vehicle Information Center (EVIC).
To d r i v e , d e p r e s s t h e b r a k e p e d a l , p r e s s t h e b u t t o n o n t h e f r o n t o f t h e s h i f t l e v e r a n d m o v e
the shift lever from PARK or NEUTRAL to the DRIVE position.
Manual shifts can also be made using the AutoStick®shift control.
This transmission is programmed to prevent shifting from Reverse to Drive or Drive to
Reverse, if vehicle speed is above 6 mph (10 km/h). This safety feature helps protect your
transmission from damage.
NOTE:
•Whenstoppedonanincline,itisrecommendedthatyoualwaysholdthevehiclein
place using the brakes. On steep inclines, Hill Start Assist (HSA) will temporarily hold
the car in position when the brake pedal is released. If the accelerator pedal is not
applied after a short time, the car will roll back. Either reapply the brake (to hold the
vehicle) or press the accelerator to climb the hill.
•Duringacceleration,gearchangeswillfeelsmoothcomparedtoavehiclewitha
traditional manual transmission. This is a benefit of the dual clutch design that avoids
power loss during up-shifts.
OPERATING YOUR VEHICLE
47
Page 50 of 164
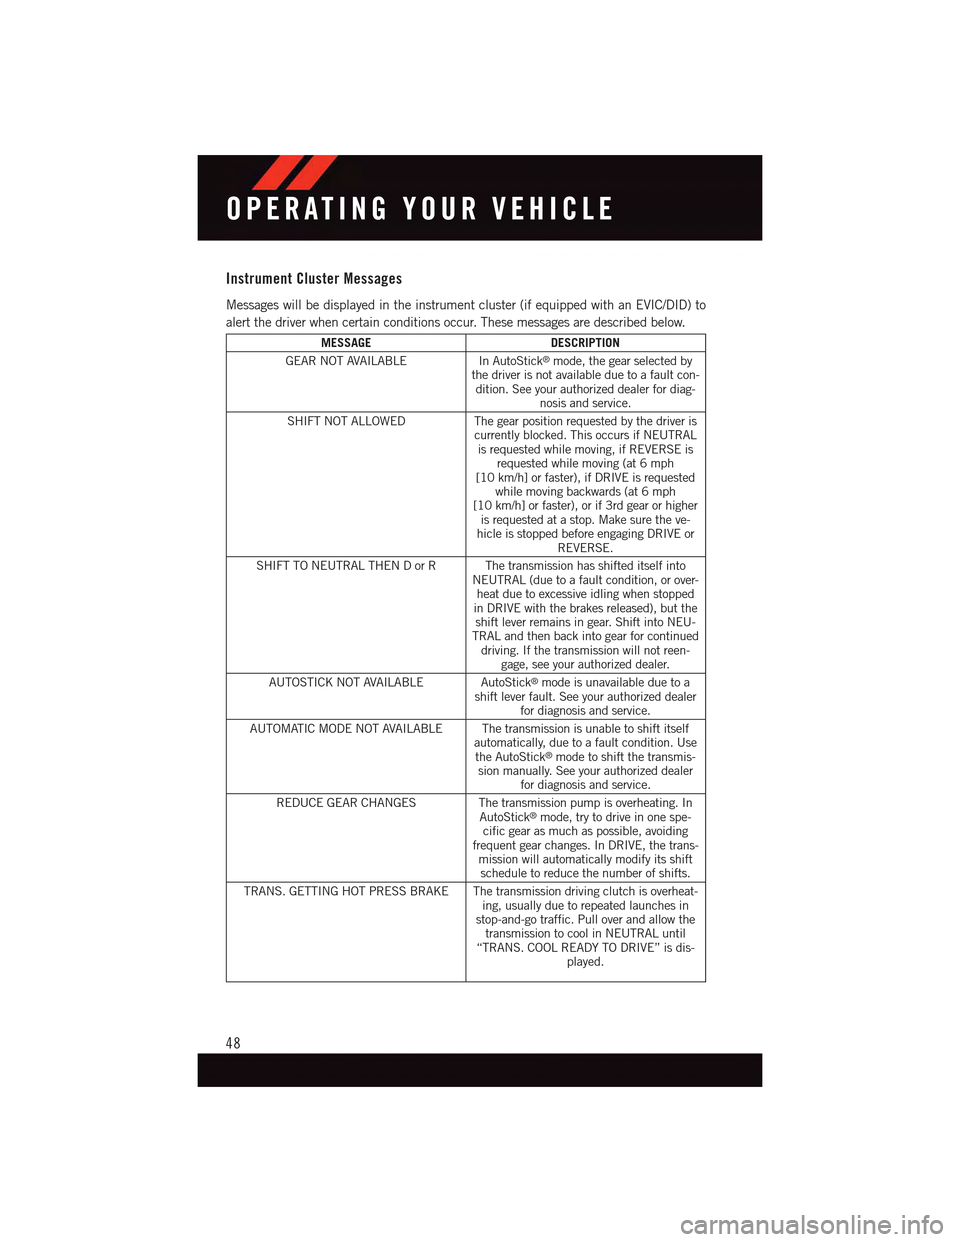
Instrument Cluster Messages
Messages will be displayed in the instrument cluster (if equipped with an EVIC/DID) to
alert the driver when certain conditions occur. These messages are described below.
MESSAGEDESCRIPTION
GEAR NOT AVAILABLEIn AutoStick®mode, the gear selected bythe driver is not available due to a fault con-dition. See your authorized dealer for diag-nosis and service.
SHIFT NOT ALLOWED The gear position requested by the driver iscurrently blocked. This occurs if NEUTRALis requested while moving, if REVERSE isrequested while moving (at 6 mph[10 km/h] or faster), if DRIVE is requestedwhile moving backwards (at 6 mph[10 km/h] or faster), or if 3rd gear or higheris requested at a stop. Make sure the ve-hicle is stopped before engaging DRIVE orREVERSE.
SHIFT TO NEUTRAL THEN D or R The transmission has shifted itself intoNEUTRAL (due to a fault condition, or over-heat due to excessive idling when stoppedin DRIVE with the brakes released), but theshift lever remains in gear. Shift into NEU-TRAL and then back into gear for continueddriving. If the transmission will not reen-gage, see your authorized dealer.
AUTOSTICK NOT AVAILABLE AutoStick®mode is unavailable due to ashift lever fault. See your authorized dealerfor diagnosis and service.
AUTOMATIC MODE NOT AVAILABLE The transmission is unable to shift itselfautomatically, due to a fault condition. Usethe AutoStick®mode to shift the transmis-sion manually. See your authorized dealerfor diagnosis and service.
REDUCE GEAR CHANGES The transmission pump is overheating. InAutoStick®mode, try to drive in one spe-cific gear as much as possible, avoidingfrequent gear changes. In DRIVE, the trans-mission will automatically modify its shiftschedule to reduce the number of shifts.
TRANS. GETTING HOT PRESS BRAKE The transmission driving clutch is overheat-ing, usually due to repeated launches instop-and-go traffic. Pull over and allow thetransmission to cool in NEUTRAL until“TRANS. COOL READY TO DRIVE” is dis-played.
OPERATING YOUR VEHICLE
48
Page 92 of 164
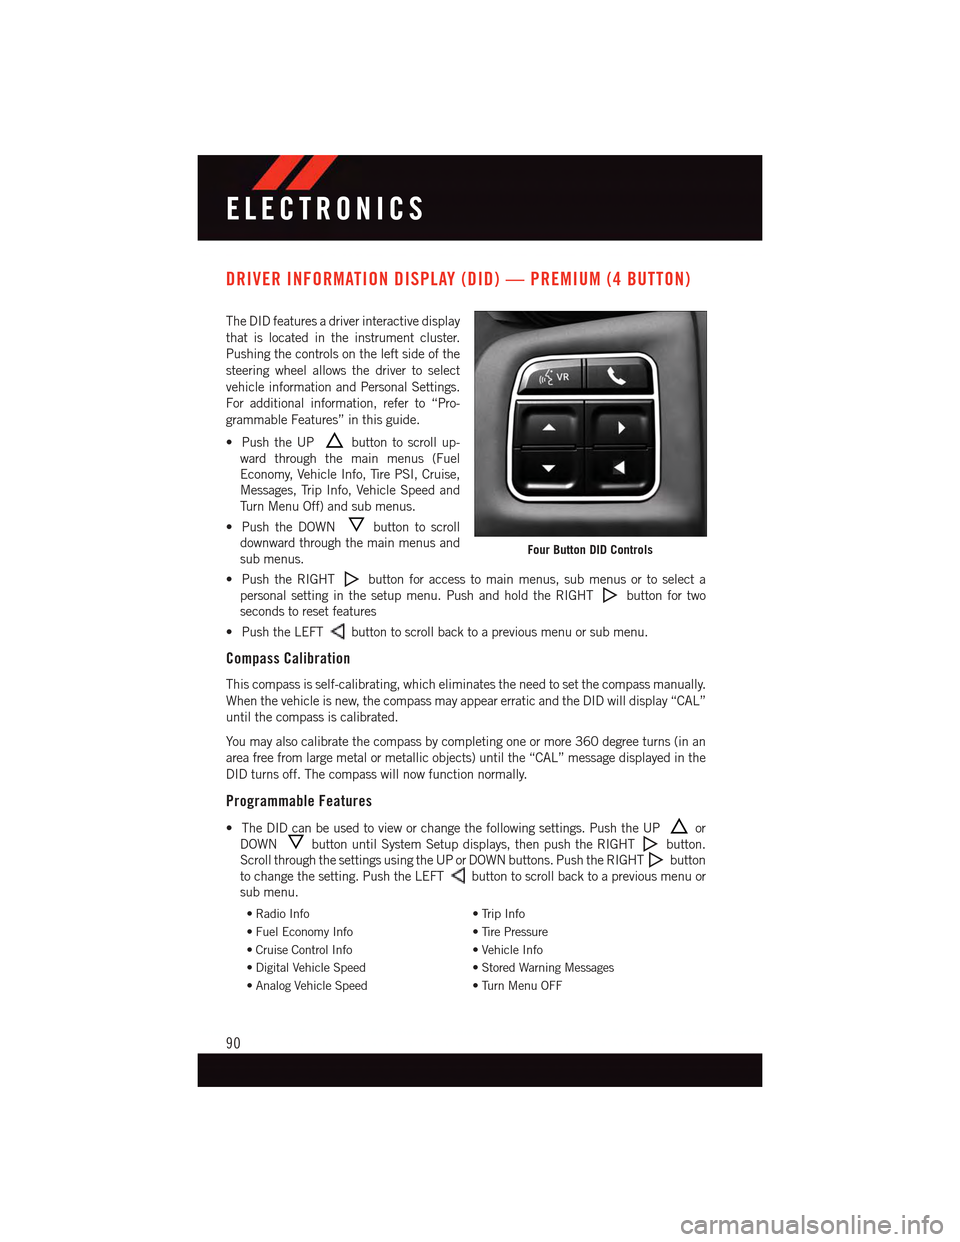
DRIVER INFORMATION DISPLAY (DID) — PREMIUM (4 BUTTON)
The DID features a driver interactive display
that is located in the instrument cluster.
Pushing the controls on the left side of the
steering wheel allows the driver to select
vehicle information and Personal Settings.
For additional information, refer to “Pro-
grammable Features” in this guide.
•PushtheUPbutton to scroll up-
ward through the main menus (Fuel
Economy, Vehicle Info, Tire PSI, Cruise,
Messages, Trip Info, Vehicle Speed and
Tu r n M e n u O f f ) a n d s u b m e n u s .
•PushtheDOWNbutton to scroll
downward through the main menus and
sub menus.
•PushtheRIGHTbutton for access to main menus, sub menus or to select a
personal setting in the setup menu. Push and hold the RIGHTbutton for two
seconds to reset features
•PushtheLEFTbutton to scroll back to a previous menu or sub menu.
Compass Calibration
This compass is self-calibrating, which eliminates the need to set the compass manually.
When the vehicle is new, the compass may appear erratic and the DID will display “CAL”
until the compass is calibrated.
Yo u m a y a l s o c a l i b r a t e t h e c o m p a s s b y c o m p l e t i n g o n e o r m o r e 3 6 0 d e g r e e t u r n s ( i n a n
area free from large metal or metallic objects) until the “CAL” message displayed in the
DID turns off. The compass will now function normally.
Programmable Features
•TheDIDcanbeusedtovieworchangethefollowingsettings.PushtheUPor
DOWNbutton until System Setup displays, then push the RIGHTbutton.
Scroll through the settings using the UP or DOWN buttons. Push the RIGHTbutton
to change the setting. Push the LEFTbutton to scroll back to a previous menu or
sub menu.
•RadioInfo•TripInfo
•FuelEconomyInfo•TirePressure
•CruiseControlInfo•VehicleInfo
•DigitalVehicleSpeed•StoredWarningMessages
•AnalogVehicleSpeed•TurnMenuOFF
Four Button DID Controls
ELECTRONICS
90