seats DODGE DART 2015 PF / 1.G User Guide
[x] Cancel search | Manufacturer: DODGE, Model Year: 2015, Model line: DART, Model: DODGE DART 2015 PF / 1.GPages: 164, PDF Size: 25.19 MB
Page 3 of 164
INTRODUCTION/WELCOME
WELCOME FROM CHRYSLER GROUP LLC..2
CONTROLS AT A GLANCE
DRIVER COCKPIT...............4INSTRUMENT CLUSTER...........6
GETTING STARTED
KEY FOB . . . . . . . . . . . . . . . . . . . . 8REMOTE START . . . . . . . . . . . . . . . . 9KEYLESS ENTER-N-GO™..........9VEHICLE SECURITY ALARM........13SEAT BELT SYSTEMS............15SUPPLEMENTAL RESTRAINT SYSTEM(SRS) — AIR BAGS.............16CHILD RESTRAINTS............22HEAD RESTRAINTS.............26FRONT SEATS................27REAR SEAT..................29HEATED SEATS . . . . . . . . . . . . . . . 29HEATED STEERING WHEEL........30TILT/TELESCOPING STEERING COLUMN..31
OPERATING YOUR VEHICLE
ENGINE BREAK-INRECOMMENDATIONS............32TURN SIGNAL/WIPER/WASHER/HIGHBEAM LEVER.................33HEADLIGHT SWITCH............35ELECTRONIC SPEED CONTROL — IFEQUIPPED...................36MANUAL CLIMATE CONTROLS.......38Uconnect®8.4 MANUAL CLIMATECONTROLS..................39Uconnect®8.4 AUTOMATIC CLIMATECONTROLS..................41BLIND SPOT MONITORING.........44PA R K V I E W®REAR BACK-UP CAMERA . . 44WIND BUFFETING..............44POWER SUNROOF — IF EQUIPPED....45MANUAL TRANSMISSION — IFEQUIPPED...................46SIX-SPEED AUTOMATIC TRANSMISSION . . . 47
ELECTRONICS
YOUR VEHICLE'S SOUND SYSTEM....50Uconnect®200 . . . . . . . . . . . . . . . . 52Uconnect®8.4 & 8.4N............62STEERING WHEEL AUDIO CONTROLS . . 88ELECTRONIC VEHICLE INFORMATIONCENTER(EVIC) — STANDARD (2 BUTTON) . . . . . . . . 89DRIVER INFORMATION DISPLAY (DID) —PREMIUM (4 BUTTON)...........90Uconnect®8.4 CUSTOMERPROGRAMMABLE FEATURES.......94UNIVERSAL GARAGE DOOR OPENER(HomeLink®).................94POWER OUTLET...............97
UTILITY
TRAILER TOWING WEIGHTS (MAXIMUMTRAILER WEIGHT RATINGS)........98RECREATIONAL TOWING (BEHINDMOTORHOME, ETC.)............98
WHAT TO DO IN EMERGENCIES
ROADSIDE ASSISTANCE..........100INSTRUMENT CLUSTER WARNINGLIGHTS...................100INSTRUMENT CLUSTER INDICATORLIGHTS...................106IF YOUR ENGINE OVERHEATS......107JACKING AND TIRE CHANGING — IFEQUIPPED..................108TIRE SERVICE KIT.............114JUMP-STARTING..............120SHIFT LEVER OVERRIDE.........122TOWING A DISABLED VEHICLE.....123FREEING A STUCK VEHICLE.......123EVENT DATA RECORDER (EDR).....124
MAINTAINING YOUR VEHICLE
OPENING THE HOOD...........1251.4L Turbo Engine..............1262.0L Engine.................1282.4L Engine.................130FLUID CAPACITIES.............132FLUIDS, LUBRICANTS AND GENUINEPA RT S . . . . . . . . . . . . . . . . . . . . 1 3 2MAINTENANCE PROCEDURES......133MAINTENANCE SCHEDULE.......134MAINTENANCE RECORD.........138FUSES....................139TIRE PRESSURES.............142SPARE TIRES — IF EQUIPPED......143WHEEL AND WHEEL TRIM CARE....144REPLACEMENT BULBS..........145
CONSUMER ASSISTANCE
CHRYSLER GROUP LLC CUSTOMERCENTER...................146CHRYSLER CANADA INC. CUSTOMERCENTER...................146ASSISTANCE FOR THE HEARINGIMPAIRED..................146PUBLICATIONS ORDERING........147REPORTING SAFETY DEFECTS IN THEUNITED STATES..............148Uconnect®CUSTOMER CENTER.....148
MOPAR® ACCESSORIES
AUTHENTIC ACCESSORIES BY MOPAR®..149
FAQ
FREQUENTLY ASKED QUESTIONS....150
INDEX.....................152
TABLE OF CONTENTS
Page 23 of 164
•AtnotimeshouldanySupplementalRestraintSystem(SRS)componentorSRS
related component or fastener be modified or replaced with any part except those which
are approved by Chrysler Group LLC.
Supplemental Knee Air Bags
This vehicle is equipped with a Supplemental Driver Knee Air Bag mounted in the
instrument panel below the steering column and a Supplemental Passenger Knee Air Bag
mounted in the instrument panel below the glove compartment. The Supplemental Knee
Air Bags provide enhanced protection during a frontal impact by working together with the
seat belts, pretensioners, and Advanced Front Air Bags.
WARNING!
•Relyingontheairbagsalonecouldleadtomoresevereinjuriesinacollision.The
air bags work with your seat belt to restrain you properly. In some collisions, the air
bags won't deploy at all. Always wear your seat belts even though you have air bags.
•BeingtooclosetothesteeringwheelorinstrumentpanelduringAdvancedFrontAir
Bag deployment could cause serious injury, including death. Air bags need room to
inflate. Sit back, comfortably extending your arms to reach the steering wheel or
instrument panel.
•Noobjectsshouldbeplacedoverorneartheairbagontheinstrumentpanelor
steering wheel because any such objects could cause harm if the vehicle is in a
collision severe enough to cause the air bag to inflate.
Supplemental Side Air Bags
•ThisvehicleisequippedwithSupplementalSeat-MountedSideAirBags(SABs)
located in the outboard side of the front and rear (in vehicles equipped with outboard
rear seat SABs) seats. The SABs are marked with a SRS AIRBAG label sewn into the
outboard side of the seats.
•ThisvehicleisequippedwithSupplementalSideAirBagInflatableCurtains(SABICs)
located above the side windows. The trim covering the SABICs is labeled SRS AIRBAG.
The SABICs may help reduce the risk of partial or complete ejection of vehicle
occupants through side windows in certain side impact events.
•TheSABICsandSABs(“SideAirBags”)aredesignedtoactivateincertainside
impacts. The Occupant Restraint Controller (“ORC”) determines whether the deploy-
ment of the Side Air Bags in a particular impact event is appropriate, based on the
severity and type of collision. Vehicle damage by itself is not a good indicator of whether
or not Side Air Bags should have deployed.
GETTING STARTED
21
Page 24 of 164
WARNING!
•SideAirBagsneedroomtoinflate.Donotleanagainstthedoororwindow.Sit
upright in the center of the seat.
•BeingtooclosetotheSideAirBagsduringdeploymentcouldcauseyoutobe
severely injured or killed.
•RelyingontheSideAirBagsalonecouldleadtomoresevereinjuriesinacollision.
The Side Air Bags work with your seat belt to restrain you properly. In some
collisions, Side Air Bags won’t deploy at all. Always wear your seat belt even though
you have Side Air Bags.
•ThisvehicleisequippedwithleftandrightSupplementalSideAirBagInflatable
Curtains (SABICs). Do not stack luggage or other cargo up high enough to block the
deployment of the SABICs. The trim covering above the side windows where the
SABIC and its deployment path are located should remain free from any obstruc-
tions.
•ThisvehicleisequippedwithSABICs.InorderfortheSABICstoworkasintended,
do not install any accessory items in your vehicle which could alter the roof. Do not
add an aftermarket sunroof to your vehicle. Do not add roof racks that require
permanent attachments (bolts or screws) for installation on the vehicle roof. Do not
drill into the roof of the vehicle for any reason.
•DonotuseaccessoryseatcoversorplaceobjectsbetweenyouandtheSideAir
Bags; the performance could be adversely affected and/or objects could be pushed
into you, causing serious injury.
CHILD RESTRAINTS
Children 12 years or younger should ride properly buckled up in a rear seat, if available.
According to crash statistics, children are safer when properly restrained in the rear seats
rather than in the front.
Every state in the United States and all Canadian provinces require that small children
ride in proper restraint systems. This is the law, and you can be prosecuted for ignoring it.
NOTE:
•Foradditionalinformation,refertowww.Seatcheck.orgorcall1-866-SEATCHECK.
•CanadianresidentsshouldrefertoTransportCanada’swebsiteforadditionalinforma-
tion: http://www.tc.gc.ca/eng/motorvehiclesafety/safedrivers-childsafety-index-53.htm
GETTING STARTED
22
Page 27 of 164
7. If the child restraint has a top tether strap and the seating position has a top tether
anchorage, connect the tether strap to the anchorage and tighten the tether strap. See
below for directions to attach a tether anchor.
8. Test that the child restraint is installed tightly by pulling back and forth on the child
seat at the belt path. It should not move more than 1 inch (25.4 mm) in any direction.
Installing The Top Tether Strap (With Either Lower Anchors Or Vehicle Seat
Belt):
When installing a forward-facing child restraint, always secure the top tether strap, up to
the tether anchor weight limit, whether the child restraint is installed with the lower
anchors or the vehicle seat belt.
Tether Anchorage Installation
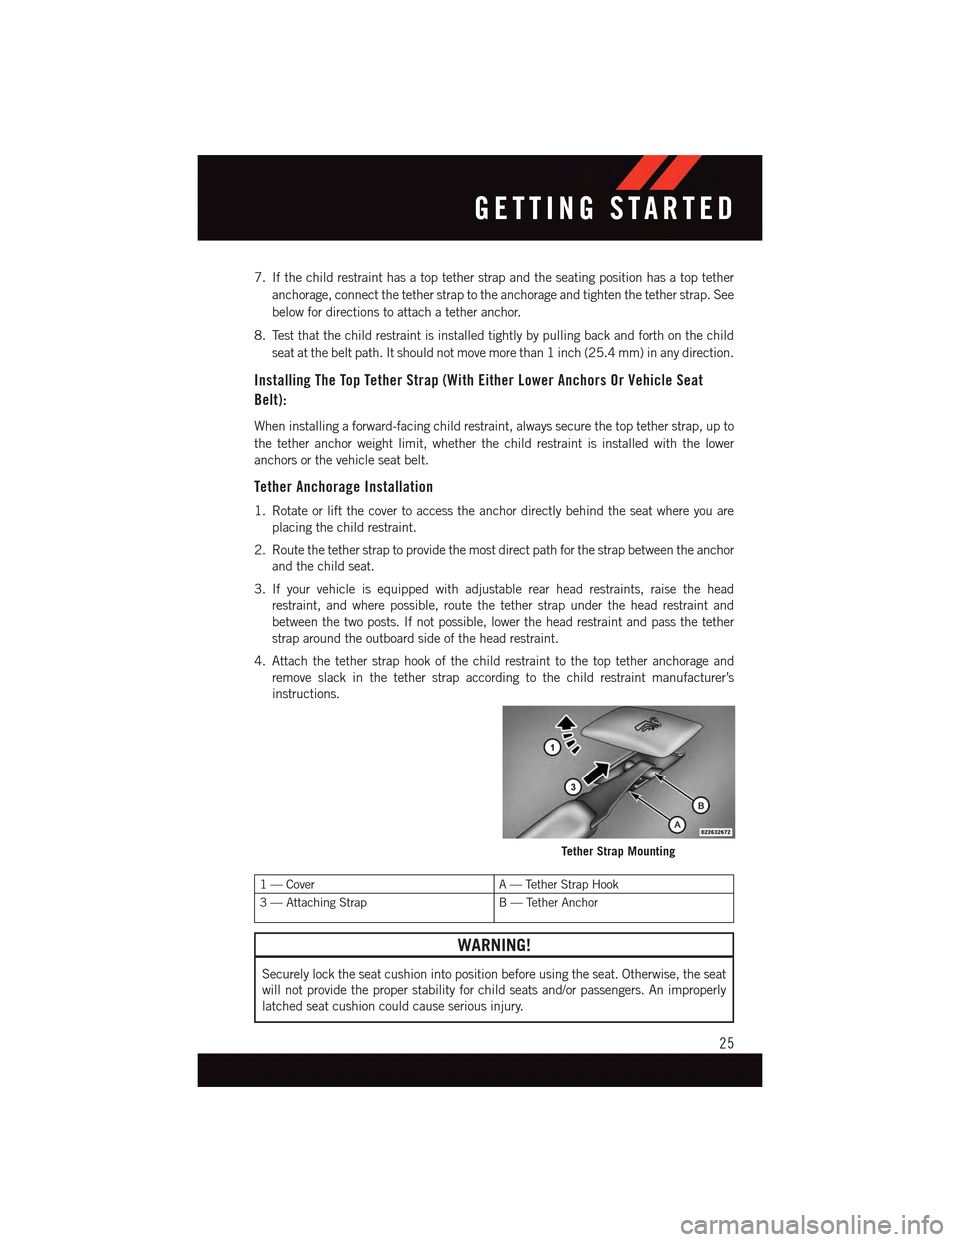
1. Rotate or lift the cover to access the anchor directly behind the seat where you are
placing the child restraint.
2. Route the tether strap to provide the most direct path for the strap between the anchor
and the child seat.
3. If your vehicle is equipped with adjustable rear head restraints, raise the head
restraint, and where possible, route the tether strap under the head restraint and
between the two posts. If not possible, lower the head restraint and pass the tether
strap around the outboard side of the head restraint.
4. Attach the tether strap hook of the child restraint to the top tether anchorage and
remove slack in the tether strap according to the child restraint manufacturer’s
instructions.
1—CoverA—TetherStrapHook
3—AttachingStrapB—TetherAnchor
WARNING!
Securely lock the seat cushion into position before using the seat. Otherwise, the seat
will not provide the proper stability for child seats and/or passengers. An improperly
latched seat cushion could cause serious injury.
Tether Strap Mounting
GETTING STARTED
25
Page 28 of 164
WARNING!
•Inacollision,anunrestrainedchild,evenatinybaby,canbecomeaprojectile
inside the vehicle. The force required to hold even an infant on your lap could
become so great that you could not hold the child, no matter how strong you are.
The child and others could be severely injured or killed. Any child riding in your
vehicle should be in a proper restraint for the child's size.
•Rearward-facingchildseatsmustneverbeusedinthefrontseatofavehiclewith
afrontpassengerairbag.Anairbagdeploymentcouldcausesevereinjuryordeath
to infants in this position.
•Onlyusearearward-facingchildrestraintinavehiclewitharearseat.
•ImproperinstallationofachildrestrainttotheLATCHanchoragescanleadto
failure of an infant or child restraint. The child could be severely injured or killed.
Follow the manufacturer’s directions exactly when installing an infant or child
restraint.
•Anincorrectlyanchoredtetherstrapcouldleadtoincreasedheadmotionand
possible injury to the child. Use only the anchor positions directly behind the child
seat to secure a child restraint top tether strap.
•Ifyourvehicleisequippedwithasplitrearseat,makesurethetetherstrapdoesnot
slip into the opening between the seatbacks as you remove slack in the strap.
HEAD RESTRAINTS
Head restraints are designed to reduce the risk of injury by restricting head movement in
the event of a rear impact. Head restraints should be adjusted so that the top of the head
restraint is located above the top of your ear.
WARNING!
The head restraints for all occupants must be properly installed and adjusted prior to
operating the vehicle or occupying a seat. Head restraints should never be adjusted
while the vehicle is in motion. Driving a vehicle with the head restraints improperly
adjusted or removed could cause serious injury or death in the event of a collision.
Reactive Head Restraints — Front Seats
The front driver and passenger seats are equipped with Reactive Head Restraints (RHR).
In the event of a rear impact the RHRs will automatically extend forward minimizing the
gap between the back of the occupants head and the RHR.
The RHRs will automatically return to their normal position following a rear impact. If the
RHRs do not return to their normal position see your authorized dealer immediately.
To r a i s e t h e h e a d r e s t r a i n t , p u l l u p w a r d o n t h e h e a d r e s t r a i n t . To l o w e r t h e h e a d r e s t r a i n t ,
press the release button, located at the base of the head restraint, and push downward on
the head restraint.
GETTING STARTED
26
Page 29 of 164
NOTE:
The head restraints should only be removed by qualified technicians, for service purposes
only. If either of the head restraints require removal, see your authorized dealer.
WARNING!
Do not place items over the top of the Reactive Head Restraint, such as coats, seat
covers or portable DVD players. These items may interfere with the operation of the
Reactive Head Restraint in the event of a collision and could result in serious injury or
death.
Rear Head Restraints
The rear outboard head restraints have three positions UP, MID and DOWN. The center
head restraint has only two positions, Up and Down. When the center seat is being
occupied the head restraint should be in the raised position. When there are no occupants
in the center seat the head restraint can be lowered for maximum visibility for the driver.
To r a i s e t h e h e a d r e s t r a i n t , p u l l u p w a r d o n t h e h e a d r e s t r a i n t . To l o w e r t h e h e a d r e s t r a i n t ,
press the push button, located at the base of the head restraint, and push downward on
the head restraint.
FRONT SEATS
Power Seats
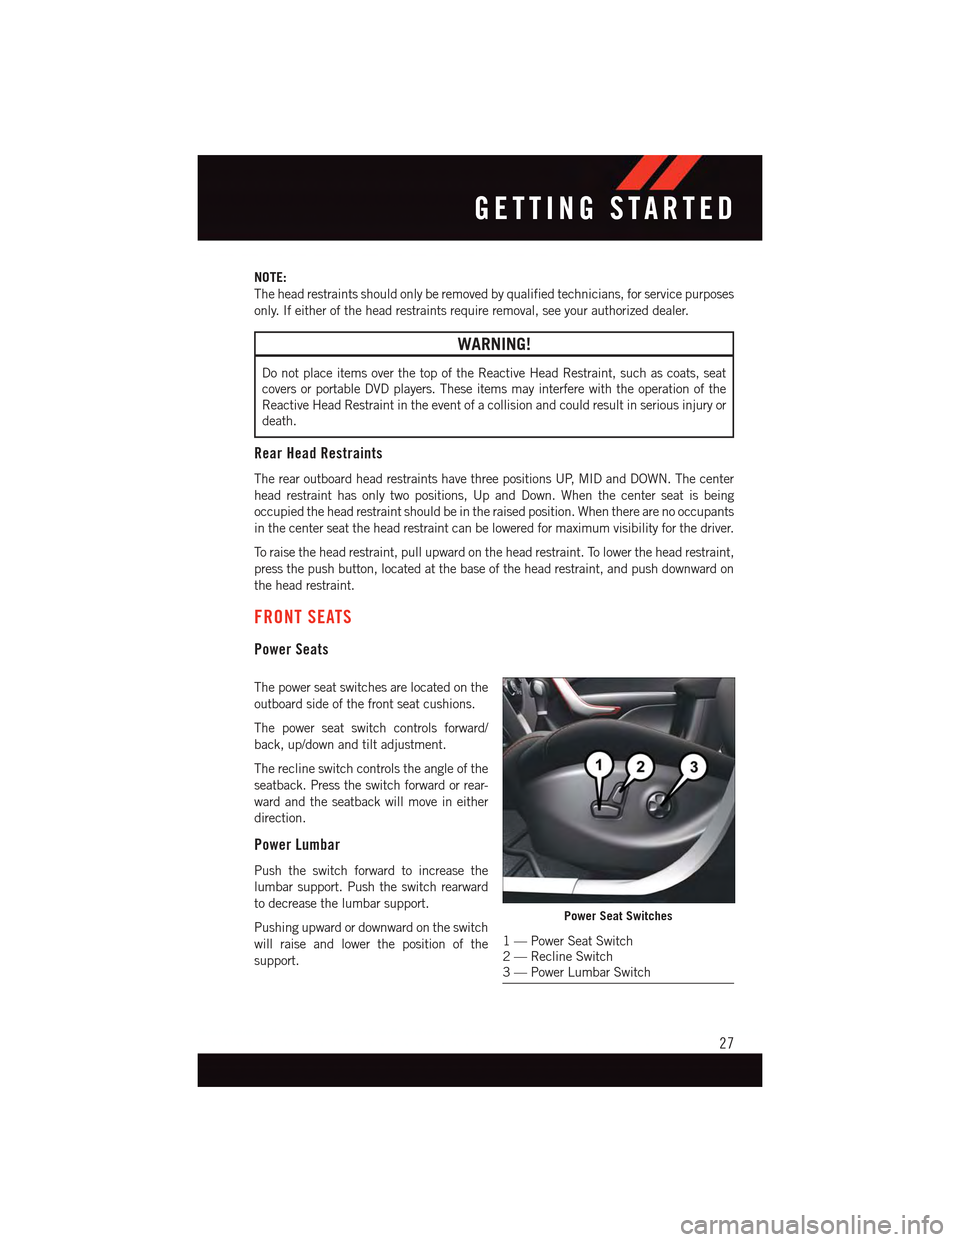
The power seat switches are located on the
outboard side of the front seat cushions.
The power seat switch controls forward/
back, up/down and tilt adjustment.
The recline switch controls the angle of the
seatback. Press the switch forward or rear-
ward and the seatback will move in either
direction.
Power Lumbar
Push the switch forward to increase the
lumbar support. Push the switch rearward
to decrease the lumbar support.
Pushing upward or downward on the switch
will raise and lower the position of the
support.
Power Seat Switches
1—PowerSeatSwitch2—ReclineSwitch3—PowerLumbarSwitch
GETTING STARTED
27
Page 31 of 164
REAR SEAT
Folding Rear Seatback
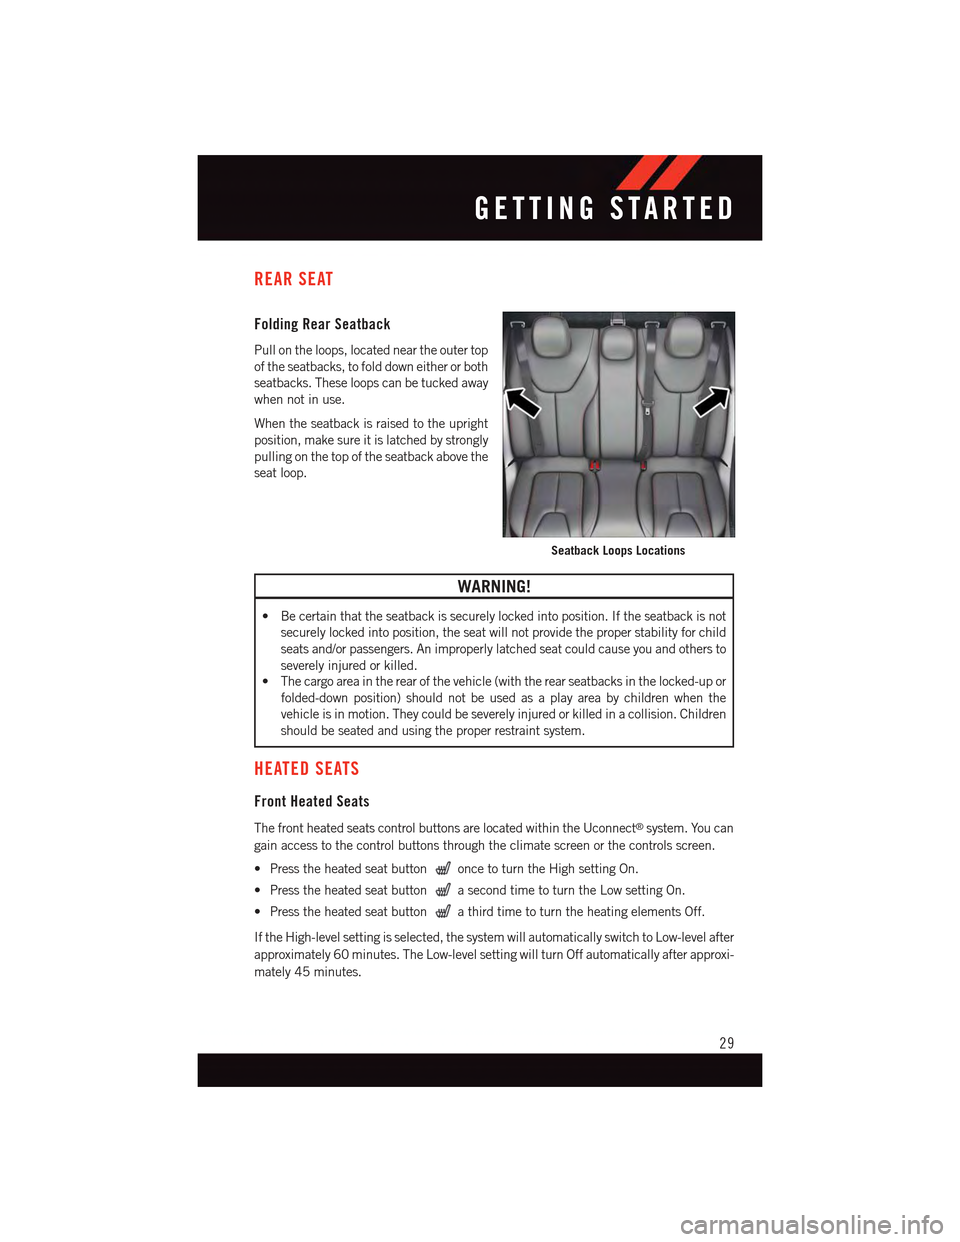
Pull on the loops, located near the outer top
of the seatbacks, to fold down either or both
seatbacks. These loops can be tucked away
when not in use.
When the seatback is raised to the upright
position, make sure it is latched by strongly
pulling on the top of the seatback above the
seat loop.
WARNING!
•Becertainthattheseatbackissecurelylockedintoposition.Iftheseatbackisnot
securely locked into position, the seat will not provide the proper stability for child
seats and/or passengers. An improperly latched seat could cause you and others to
severely injured or killed.
•Thecargoareaintherearofthevehicle(withtherearseatbacksinthelocked-upor
folded-down position) should not be used as a play area by children when the
vehicle is in motion. They could be severely injured or killed in a collision. Children
should be seated and using the proper restraint system.
HEATED SEATS
Front Heated Seats
The front heated seats control buttons are located within the Uconnect®system. You can
gain access to the control buttons through the climate screen or the controls screen.
•Presstheheatedseatbuttononce to turn the High setting On.
•PresstheheatedseatbuttonasecondtimetoturntheLowsettingOn.
•PresstheheatedseatbuttonathirdtimetoturntheheatingelementsOff.
If the High-level setting is selected, the system will automatically switch to Low-level after
approximately 60 minutes. The Low-level setting will turn Off automatically after approxi-
mately 45 minutes.
Seatback Loops Locations
GETTING STARTED
29
Page 96 of 164
Uconnect® 8.4 CUSTOMER PROGRAMMABLE FEATURES
The Uconnect®8.4 system allows you to access Customer Programmable feature settings
such as Display, Clock, Safety/Assistance, Lights, Doors & Locks, Heated Seats, Engine
Off Operation, Compass Settings, Audio, Phone/Bluetooth®and SiriusXM Setup through
buttons on the touchscreen.
Press the “More” button on the touchscreen on the bottom of the screen, then press the
“Settings” button on the touchscreen to access the Settings screen. When making a
selection, scroll up or down until the preferred setting is highlighted, then press and
release the preferred setting until a check-mark appears next to the setting, showing that
setting has been selected. The following feature settings are available:
•Display•Clock
•Safety/Assistance•Lights
•Doors&Locks•Auto-OnComfort&RemoteStart
•EngineOffOptions•CompassSettings
•Audio•Phone/Bluetooth®
•SiriusXMSetup
UNIVERSAL GARAGE DOOR OPENER (HomeLink®)
HomeLink®replaces up to three hand-held transmitters that operate devices such as
garage door openers, motorized gates, lighting or home security systems. The HomeLink®
unit is powered by your vehicles 12 Volt battery.
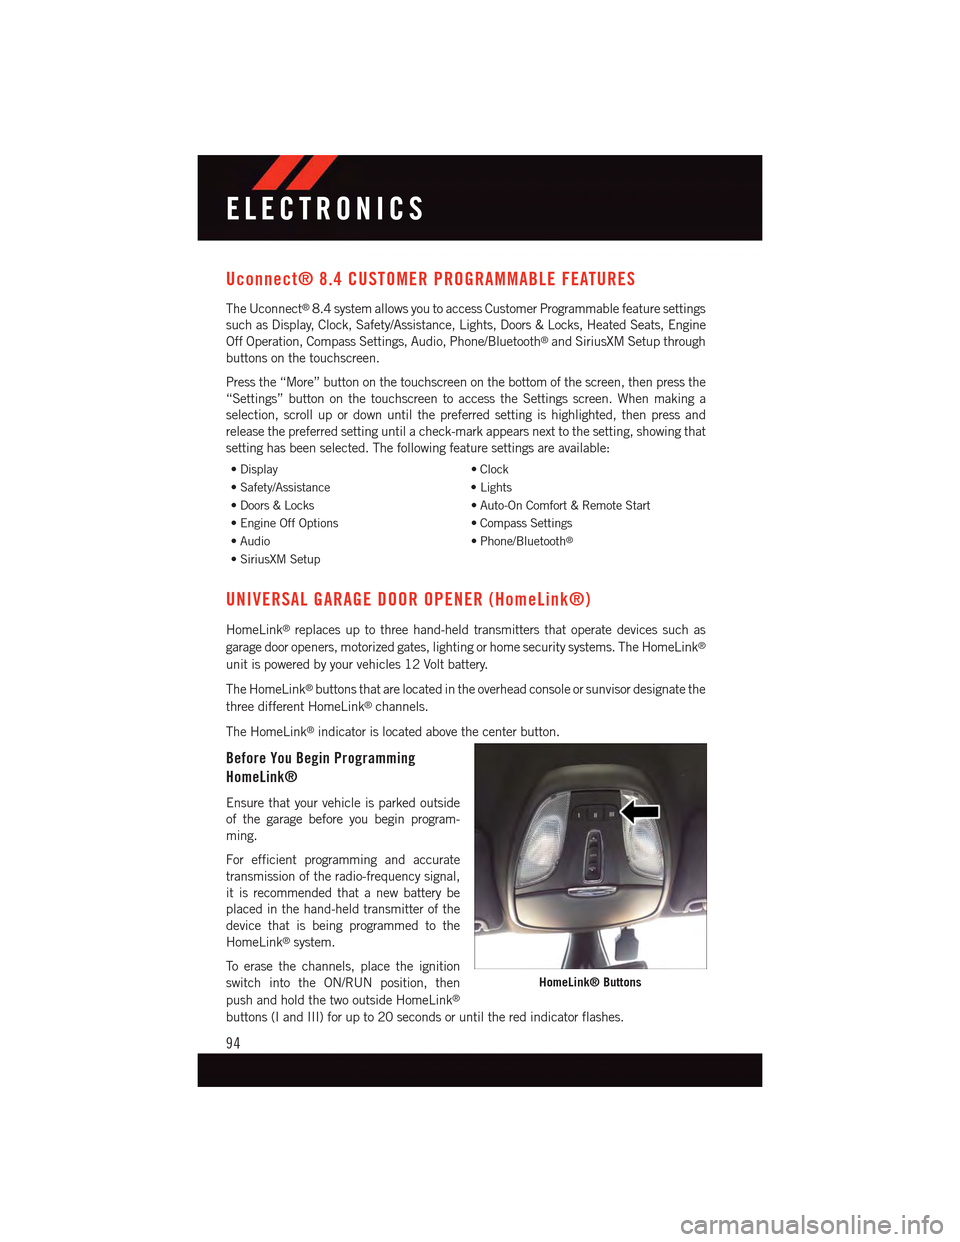
The HomeLink®buttons that are located in the overhead console or sunvisor designate the
three different HomeLink®channels.
The HomeLink®indicator is located above the center button.
Before You Begin Programming
HomeLink®
Ensure that your vehicle is parked outside
of the garage before you begin program-
ming.
For efficient programming and accurate
transmission of the radio-frequency signal,
it is recommended that a new battery be
placed in the hand-held transmitter of the
device that is being programmed to the
HomeLink®system.
To e r a s e t h e c h a n n e l s , p l a c e t h e i g n i t i o n
switch into the ON/RUN position, then
push and hold the two outside HomeLink®
buttons (I and III) for up to 20 seconds or until the red indicator flashes.
HomeLink® Buttons
ELECTRONICS
94
Page 141 of 164
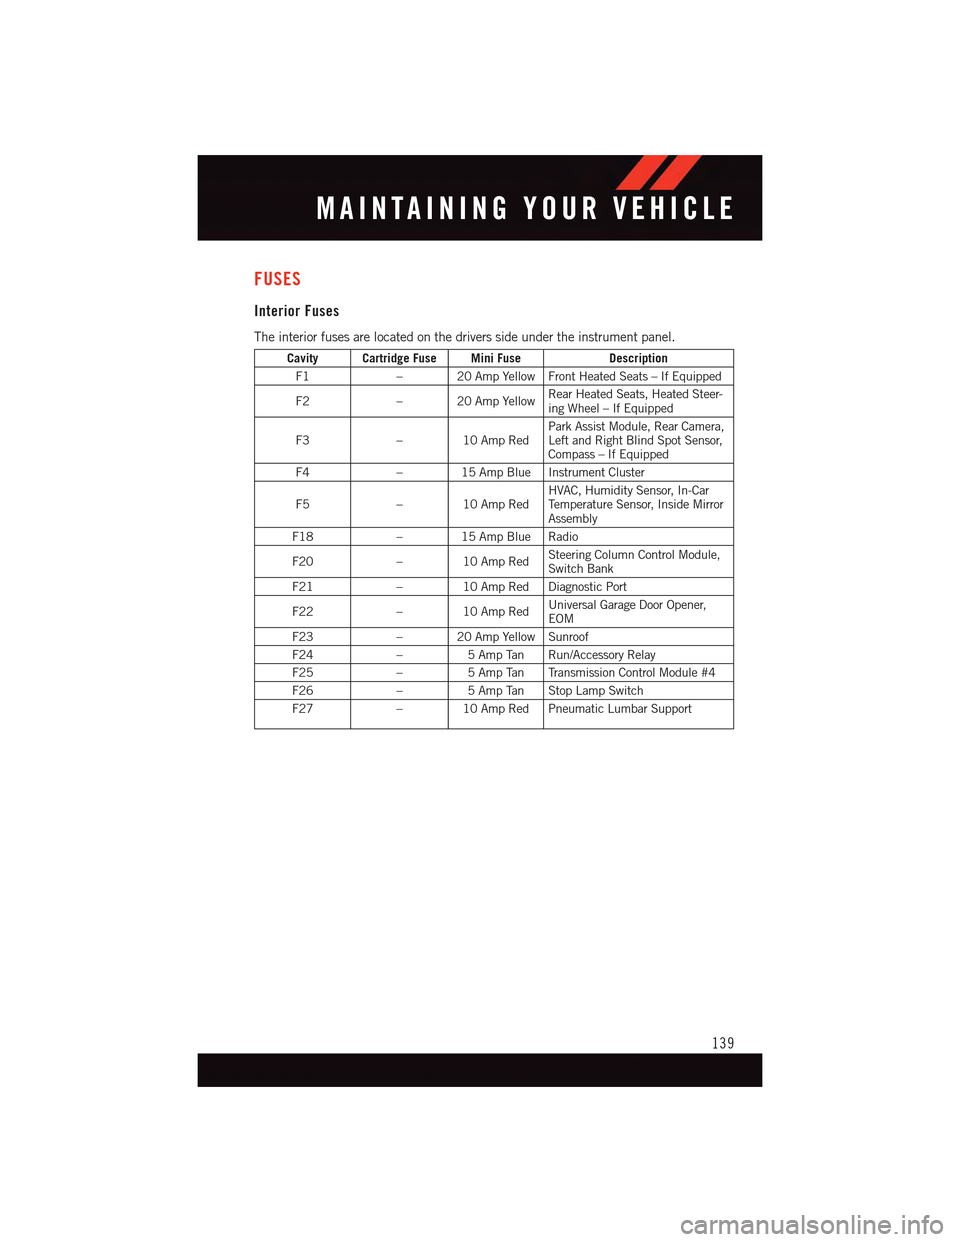
FUSES
Interior Fuses
The interior fuses are located on the drivers side under the instrument panel.
Cavity Cartridge Fuse Mini FuseDescription
F1–20AmpYellowFrontHeatedSeats–IfEquipped
F2–20AmpYellowRear Heated Seats, Heated Steer-ing Wheel – If Equipped
F3–10AmpRedPark Assist Module, Rear Camera,Left and Right Blind Spot Sensor,Compass – If Equipped
F4–15AmpBlueInstrumentCluster
F5–10AmpRedHVAC, Humidity Sensor, In-CarTe m p e r a t u r e S e n s o r, I n s i d e M i r r o rAssembly
F18–15AmpBlueRadio
F20–10AmpRedSteering Column Control Module,Switch Bank
F21–10AmpRedDiagnosticPort
F22–10AmpRedUniversal Garage Door Opener,EOM
F23–20AmpYellowSunroof
F24–5AmpTan Run/AccessoryRelay
F25–5AmpTan TransmissionControlModule#4
F26–5AmpTan StopLampSwitch
F27–10AmpRedPneumaticLumbarSupport
MAINTAINING YOUR VEHICLE
139
Page 142 of 164
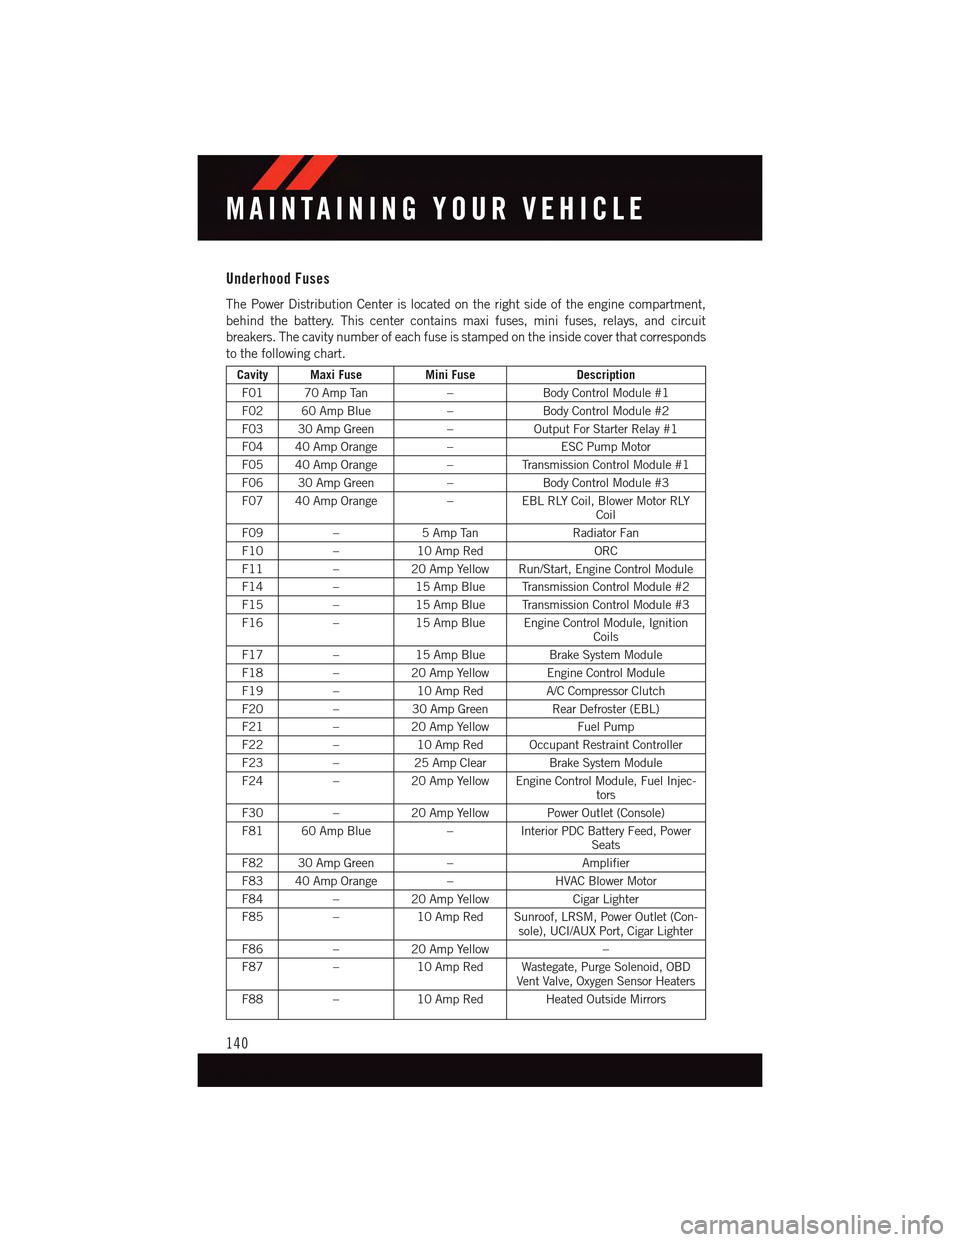
Underhood Fuses
The Power Distribution Center is located on the right side of the engine compartment,
behind the battery. This center contains maxi fuses, mini fuses, relays, and circuit
breakers. The cavity number of each fuse is stamped on the inside cover that corresponds
to the following chart.
Cavity Maxi FuseMini FuseDescription
F01 70 Amp Tan–Body Control Module #1
F02 60 Amp Blue–Body Control Module #2
F03 30 Amp Green–Output For Starter Relay #1
F04 40 Amp Orange–ESC Pump Motor
F05 40 Amp Orange–Tr a n s m i s s i o n C o n t r o l M o d u l e # 1
F06 30 Amp Green–Body Control Module #3
F07 40 Amp Orange–EBL RLY Coil, Blower Motor RLYCoil
F09–5AmpTanRadiator Fan
F10–10 Amp RedORC
F11–20 Amp Yellow Run/Start, Engine Control Module
F14–15 Amp Blue Transmission Control Module #2
F15–15 Amp Blue Transmission Control Module #3
F16–15 Amp Blue Engine Control Module, IgnitionCoils
F17–15 Amp BlueBrake System Module
F18–20 Amp Yellow Engine Control Module
F19–10 Amp RedA/C Compressor Clutch
F20–30 Amp GreenRear Defroster (EBL)
F21–20 Amp YellowFuel Pump
F22–10 Amp Red Occupant Restraint Controller
F23–25 Amp ClearBrake System Module
F24–20 Amp Yellow Engine Control Module, Fuel Injec-tors
F30–20 Amp Yellow Power Outlet (Console)
F81 60 Amp Blue–Interior PDC Battery Feed, PowerSeats
F82 30 Amp Green–Amplifier
F83 40 Amp Orange–HVAC Blower Motor
F84–20 Amp YellowCigar Lighter
F85–10 Amp Red Sunroof, LRSM, Power Outlet (Con-sole), UCI/AUX Port, Cigar Lighter
F86–20 Amp Yellow–
F87–10 Amp Red Wastegate, Purge Solenoid, OBDVent Valve, Oxygen Sensor Heaters
F88–10 Amp Red Heated Outside Mirrors
MAINTAINING YOUR VEHICLE
140