check engine light DODGE DART 2016 PF / 1.G User Guide
[x] Cancel search | Manufacturer: DODGE, Model Year: 2016, Model line: DART, Model: DODGE DART 2016 PF / 1.GPages: 671, PDF Size: 4.75 MB
Page 365 of 671
•Auto Dim High Beams — If Equipped
When this feature is selected, the high beam headlights
will deactivate automatically under certain conditions. To
make your selection, press the Auto High Beams button
on the touchscreen, until a check-mark appears next to
setting, showing that setting has been selected. Press the
back arrow button on the touchscreen to return to the
previous menu. Refer to “Lights/Automatic High Beam
Headlamp Control — If Equipped” in “Understanding
The Features Of Your Vehicle” for further information.
• Daytime Running Lights
When this feature is selected, the headlights will turn on
whenever the engine is running. To make your selection,
press the Daytime Running Lights button on the touch-
screen, until a check-mark appears next to setting, showing
that setting has been selected. Press the back arrow button
on the touchscreen to return to the previous menu.
•Flash Lights With Lock
When this feature is selected, the exterior lights will flash
when the doors are locked or unlocked with the Remote
Keyless Entry (RKE) transmitter. This feature may be
selected with or without the sound horn on lock feature
selected. To make your selection, press the Flash Lamps
with Lock button on the touchscreen, until a check-mark
appears next to setting, showing that setting has been
selected. Press the back arrow button on the touchscreen
to return to the previous menu.
Doors & Locks
After pressing the Doors & Locks button on the touch-
screen the following settings will be available.
• Auto Lock
When this feature is selected, all doors will lock auto-
matically when the vehicle reaches a speed of 15 mph
(24 km/h). To make your selection, press the “Auto
4
UNDERSTANDING YOUR INSTRUMENT PANEL 363
Page 398 of 671
•Recirculated air is not allowed in Defrost modes. If
the Recirculation button is pushed while in this
mode, the LED indicator will flash several times then
go out. Recirculation will be disabled automatically
is this mode is selected.
• The A/C can be deselected manually without dis-
turbing the mode control selection.
• When the ignition switch is turned to the LOCK
position, the recirculation feature will be cancelled.
3. Temperature Control
Rotate this control to regulate the temperature of the air
inside the passenger compartment. Rotating the dial left
into the blue area of the scale indicates cooler tempera-
tures, while rotating right into the red area indicates
warmer temperatures. NOTE:
If your air conditioning performance seems lower
than expected, check the front of the A/C condenser
located in front of the radiator for an accumulation of dirt
or insects. Clean with a gentle water spray from behind
the radiator and through the condenser. Fabric front
fascia protectors may reduce airflow to the condenser,
reducing air conditioning performance.
4. Air Conditioning Control
Push this button to engage the Air Conditioning. A light
will illuminate when the Air Conditioning system is
engaged. Rotating the dial left into the blue area of the
scale indicates cooler temperatures, while rotating right
into the red area indicates warmer temperatures.
NOTE: The air conditioning compressor will not engage
until the engine has been running for about 10 seconds.
•MAX A/C
For maximum cooling use the A/C and recirculation
buttons at the same time.
396 UNDERSTANDING YOUR INSTRUMENT PANEL
Page 452 of 671
WARNING!
•Driving through standing water limits your vehi-
cle’s traction capabilities. Do not exceed 5 mph
(8 km/h) when driving through standing water.
• Driving through standing water limits your vehi-
cle’s braking capabilities, which increases stopping
distances. Therefore, after driving through stand-
ing water, drive slowly and lightly press on the
brake pedal several times to dry the brakes.
• Failure to follow these warnings may result in
injuries that are serious or fatal to you, your pas-
sengers, and others around you.
CAUTION!
• Always check the depth of the standing water
before driving through it. Never drive through
standing water that is deeper than the bottom of
the tire rims mounted on the vehicle.
• Determine the condition of the road or the path
that is under water and if there are any obstacles in
the way before driving through the standing water.
•
Do not exceed 5 mph (8 km/h) when driving through
standing water. This will minimize wave effects.
• Driving through standing water may cause damage
to your vehicle’s drivetrain components. Always
inspect your vehicle’s fluids (i.e., engine oil, trans-
mission, axle, etc.) for signs of contamination (i.e.,
fluid that is milky or foamy in appearance) after
driving through standing water. Do not continue to
(Continued)
450 STARTING AND OPERATING
Page 456 of 671
BRAKE SYSTEM
Your vehicle is equipped with dual hydraulic
brake systems. If either of the two hydraulic
systems loses normal capability, the remaining
system will still function. However, there will
be some loss of overall braking effectiveness. This will be
evident by increased pedal travel during application and
greater pedal force required to slow or stop the vehicle. In
addition, if the malfunction is caused by a leak in the
hydraulic system, the “Brake Warning Light” will turn on
as the brake fluid level drops in the master cylinder.
In the event power assist is lost for any reason (i.e.,
repeated brake applications with the engine OFF) the
brakes will still function. However, the effort required to
brake the vehicle will be much greater than that required
with the power system operating.
WARNING!
• Riding the brakes can lead to brake failure and
possibly a collision. Driving with your foot resting
or riding on the brake pedal can result in abnor-
mally high brake temperatures, excessive lining
wear, and possible brake damage. You would not
have your full braking capacity in an emergency.
• Driving a vehicle with the “Brake Warning Light”
on is dangerous. A significant decrease in braking
performance or vehicle stability during braking
may occur. It will take you longer to stop the
vehicle or will make your vehicle harder to control.
You could have a collision. Have the vehicle
checked immediately.
454 STARTING AND OPERATING
Page 577 of 671
persists, the message will appear the next time the
vehicle is started. This might indicate a damaged cap. If
the problem is detected twice in a row, the system will
turn on the MIL. Resolving the problem will turn the MIL
light off.
EMISSIONS INSPECTION AND MAINTENANCE
PROGRAMS
In some localities, it may be a legal requirement to pass
an inspection of your vehicle’s emissions control system.
Failure to pass could prevent vehicle registration.For states that require an Inspection and Mainte-
nance (I/M), this check verifies the “Malfunction
Indicator Light (MIL)” is functioning and is not
on when the engine is running, and that the OBD II
system is ready for testing. Normally, the OBD II system will be ready. The OBD II
system may
notbe ready if your vehicle was recently
serviced, recently had a dead battery or a battery replace-
ment. If the OBD II system should be determined not
ready for the I/M test, your vehicle may fail the test.
Your vehicle has a simple ignition actuated test, which
you can use prior to going to the test station. To check if
your vehicle’s OBD II system is ready, you must do the
following:
1. Cycle the ignition switch to the ON position, but do not crank or start the engine.
NOTE: If you crank or start the engine, you will have to
start this test over.
2. As soon as you cycle the ignition switch to the ON position, you will see the Malfunction Indicator Light
(MIL) symbol come on as part of a normal bulb check.
7
MAINTAINING YOUR VEHICLE 575
Page 599 of 671
•Keep the front of the radiator clean. If your vehicle is
equipped with air conditioning, keep the front of the
condenser clean.
• Do not change the thermostat for Summer or Winter
operation. If replacement is ever necessary, install
ONLY the correct type thermostat. Other designs may
result in unsatisfactory engine coolant (antifreeze)
performance, poor gas mileage, and increased emis-
sions.
Brake System
In order to assure brake system performance, all brake
system components should be inspected periodically.
Refer to the “Maintenance Schedule” for the proper
maintenance intervals.
WARNING!
Riding the brakes can lead to brake failure and
possibly a collision. Driving with your foot resting or
riding on the brake pedal can result in abnormally
high brake temperatures, excessive lining wear, and
possible brake damage. You would not have your full
braking capacity in an emergency.
Brake Master Cylinder
The fluid level in the master cylinder should be checked
when performing under hood services, or immediately if
the brake system warning light is on.
Be sure to clean the top of the master cylinder area before
removing the cap. If necessary, add fluid to bring the
fluid level up to the requirements described on the brake
fluid reservoir. Fluid level can be expected to fall as the
brake pads wear. The brake fluid level should be checked7
MAINTAINING YOUR VEHICLE 597
Page 631 of 671
Once A Month Or Before A Long Trip:
•Check engine oil level.
• Check windshield washer fluid level.
• Check the tire inflation pressures and look for unusual
wear or damage.
• Check the fluid levels of the coolant reservoir, and
brake master cylinder as needed.
• Check function of all interior and exterior lights.
Required Maintenance
Refer to the Maintenance Schedules on the following
pages for required maintenance.
At Every Oil Change Interval As Indicated By Oil
Change Indicator System:
•Change engine oil and filter.
• Rotate the tires. Rotate at the first sign of irregu-
lar wear, even if it occurs before the oil indicator
system turns on.
• Inspect battery and clean and tighten terminals as
required.
• Inspect brake pads, shoes, rotors, drums, hoses
and park brake.
• Inspect engine cooling system protection and
hoses.
• Inspect exhaust system.
• Inspect engine air cleaner if using in dusty or
off-road conditions. 8
MAINTENANCE SCHEDULES 629
Page 649 of 671
Tamper Alert...........................22
Vehicle Security Alarm ....................20
Alarm, Panic .......................... .22, 26
Alarm (Security Alarm) ..................20, 310
Alarm System (Security Alarm) ................20
Alterations/Modifications, Vehicle ...............7
Antifreeze (Engine Coolant) ...........592, 622, 623
Capacities ........................... .622
Disposal ............................. .595
Anti-Lock Brake System (ABS) ................456
Anti-Lock Warning Light ....................322
Appearance Care ........................ .602
Assistance Towing ........................ .149
Assist, Hill Start ......................... .459
Auto Down Power Windows ..................44
Automatic Dimming Mirror ..................121
Automatic Door Locks ....................35, 36
Automatic Headlights ..................... .235
Automatic High Beams .....................236 Automatic Temperature Control (ATC)
..........406
Automatic Transmission .................425, 599
Adding Fluid ......................... .600
Fluid And Filter Changes ..................601
Fluid Level Check ...................... .600
Fluid Type ........................ .599, 625
Gear Ranges ...................... .430, 440
Special Additives ...................... .600
Autostick .............................. .446
Auto Unlock, Doors ........................36
Auto Up Power Windows ....................45
Battery ............................ .312, 583
Charging System Light ...................312
Keyless Transmitter Replacement (RKE) ........27
Belts, Seat ...............................110
Bluetooth Connecting To A Particular Mobile Phone Or Audio
Device After Pairing .....................174
10
INDEX 647
Page 650 of 671
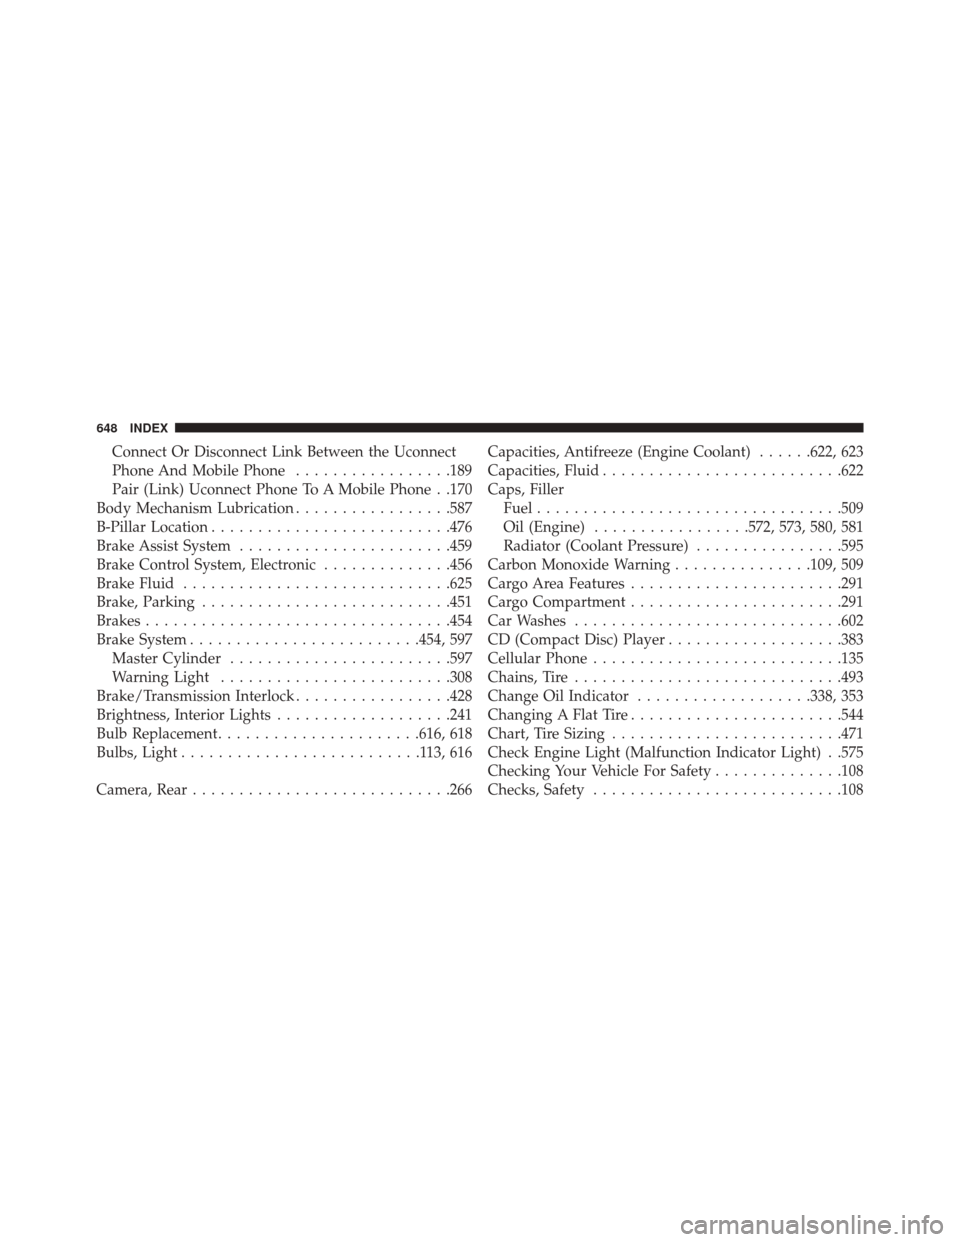
Connect Or Disconnect Link Between the Uconnect
Phone And Mobile Phone.................189
Pair (Link) Uconnect Phone To A Mobile Phone . .170
Body Mechanism Lubrication .................587
B-Pillar Location ......................... .476
Brake Assist System ...................... .459
Brake Control System, Electronic ..............456
Brake Fluid ............................ .625
Brake, Parking .......................... .451
Brakes ................................ .454
Brake System ........................ .454, 597
Master Cylinder ....................... .597
Warning Light ........................ .308
Brake/Transmission Interlock .................428
Brightness, Interior Lights ...................241
Bulb Replacement ..................... .616, 618
Bulbs, Light ..........................113,616
Camera, Rear ........................... .266Capacities, Antifreeze (Engine Coolant)
......622, 623
Capacities, Fluid ......................... .622
Caps, Filler Fuel ................................ .509
Oil (Engine) .................572, 573, 580, 581
Radiator (Coolant Pressure) ................595
Carbon Monoxide Warning ...............109, 509
Cargo Area Features ...................... .291
Cargo Compartment ...................... .291
Car Washes ............................ .602
CD (Compact Disc) Player ...................383
Cellular Phone .......................... .135
Chains, Tire ............................ .493
Change Oil Indicator ...................338, 353
Changing A Flat Tire ...................... .544
Chart, Tire Sizing ........................ .471
Check Engine Light (Malfunction Indicator Light) . .575
Checking Your Vehicle For Safety ..............108
Checks, Safety .......................... .108
648 INDEX
Page 653 of 671
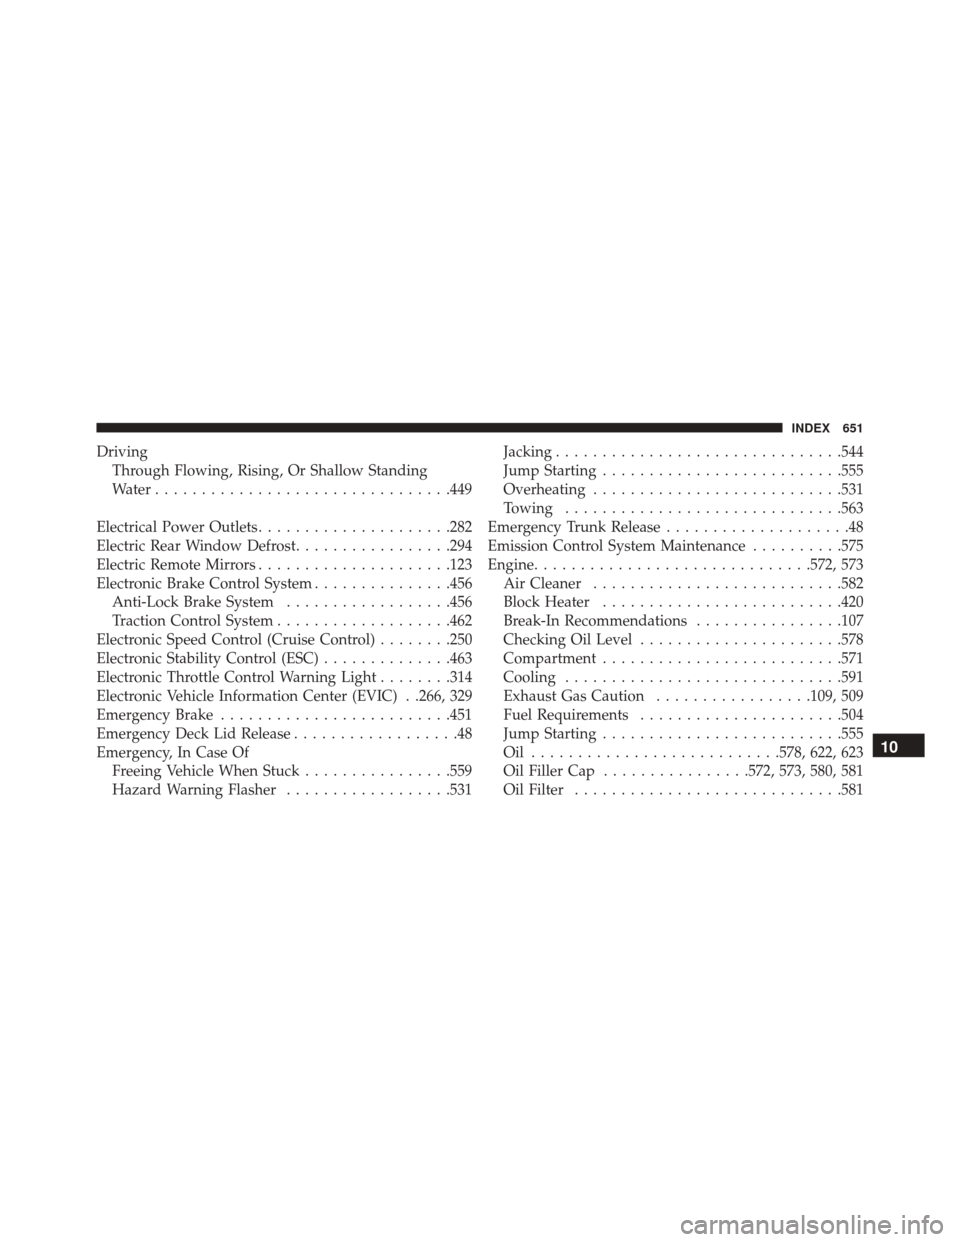
DrivingThrough Flowing, Rising, Or Shallow Standing
Water ............................... .449
Electrical Power Outlets .....................282
Electric Rear Window Defrost .................294
Electric Remote Mirrors .....................123
Electronic Brake Control System ...............456
Anti-Lock Brake System ..................456
Traction Control System ...................462
Electronic Speed Control (Cruise Control) ........250
Electronic Stability Control (ESC) ..............463
Electronic Throttle Control Warning Light ........314
Electronic Vehicle Information Center (EVIC) . .266, 329
Emergency Brake ........................ .451
Emergency Deck Lid Release ..................48
Emergency, In Case Of Freeing Vehicle When Stuck ................559
Hazard Warning Flasher ..................531 Jacking
.............................. .544
Jump Starting ......................... .555
Overheating .......................... .531
Towing ............................. .563
Emergency Trunk Release ....................48
Emission Control System Maintenance ..........575
Engine ............................. .572, 573
Air Cleaner .......................... .582
Block Heater ......................... .420
Break-In Recommendations ................107
Checking Oil Level ..................... .578
Compartment ......................... .571
Cooling ............................. .591
Exhaust Gas Caution .................109, 509
Fuel Requirements ..................... .504
Jump Starting ......................... .555
Oil .......................... .578, 622, 623
Oil Filler Cap ................572, 573, 580, 581
Oil Filter ............................ .581
10
INDEX 651