check engine DODGE DURANGO 2006 2.G Owner's Manual
[x] Cancel search | Manufacturer: DODGE, Model Year: 2006, Model line: DURANGO, Model: DODGE DURANGO 2006 2.GPages: 440, PDF Size: 6.63 MB
Page 354 of 440
WARNING!
Exhaust gases can injure or kill. They contain carbon
monoxide (CO) which is colorless and odorless.
Breathing it can make you unconscious and can
eventually poison you. To avoid breathing CO, fol-
low the preceding safety tips.
Cooling System
Inspection
Check engine coolant (antifreeze) protection every 12
months (before the onset of freezing weather, where
applicable). If coolant is dirty or rusty in appearance, the
system should be drained, flushed and refilled with fresh
coolant. Check face of radiator for any accumulation of
bugs, leaves, etc. If dirty, clean the radiator core by gently
spraying water from a garden hose at the back of the core.Check the coolant bottle tubing for condition and tight-
ness of connection at coolant bottle and radiator. Inspect
the entire system for leaks.
With the engine at normal operating temperature (but
not running), check the coolant pressure cap for proper
vacuum sealing by draining a small amount of coolant
from the radiator drain cock. If the cap is sealing prop-
erly, the coolant will begin to drain from the coolant
bottle. Do not remove the pressure cap when the cooling
system is hot.
354 MAINTAINING YOUR VEHICLE
Page 355 of 440
WARNING!
You or others can be badly burned by hot coolant or
steam from your radiator. If you see or hear steam
coming from under the hood don’t open the hood
until the radiator has had time to cool. If you open
the hood and see steam or hot coolant escaping from
the radiator, don’t touch anything. Get away quickly.
Never try to open a pressure cap when the radiator is
hot.
Cooling System Maintenance
At the intervals shown in the Maintenance Schedules
section of this manual, the system should be drained,
flushed and refilled. See your authorized dealer for
proper cooling system maintenance.
Cooling System — Drain, Flush And Refill
If the solution is dirty and contains a considerable
amount of sediment, it should be cleaned and flushed.
See your authorized dealer for proper draining, flushing
and refilling of your vehicle’s cooling system.
Disposal of Used Engine Coolant
Used ethylene glycol based engine coolant is a regulated
substance requiring proper disposal. Check with your
local authorities to determine the disposal rules for your
community. Do not store ethylene glycol based engine
coolant in open containers or allow it to remain in
puddles on the ground. Prevent ingestion by animals and
children. If ingested by a child contact a physician
immediately. Clean up any ground spills immediately.
MAINTAINING YOUR VEHICLE 355
7
Page 358 of 440
WARNING!
The warning words “DO NOT OPEN HOT” on the
coolant pressure cap are a safety precaution. Heat
causes pressure to build up in the cooling system. To
prevent scalding or injury, do not remove the pres-
sure cap when the system is hot or under pressure.
Coolant Level
The coolant bottle system provides a quick visual method
for determining that the coolant level is adequate. With
the engine idling, and warmed to normal operating
temperature, remove the cap from the bottle, remove the
dipstick and wipe the excess coolant from it. Reinsert the
dipstick and remove. Observe the dipstick checking the
holes along the stem for coolant. Check the coolant level
whenever the hood is raised.The radiator normally remains completely full, so there is
no need to remove the pressure cap except checking
coolant freeze point or replacement with new antifreeze
coolant. Your service attendant should be advised of this.
When additional coolant is needed to maintain the
proper level, it should be added to the coolant bottle. Do
not overfill.
Points To Remember
A. Do not overfill the coolant bottle.
B. Check coolant freeze point in the radiator and in the
coolant bottle. If antifreeze needs to be added, contents of
coolant bottle also must be protected against freezing.
C. If frequent coolant additions are required, or if the
level in the coolant bottle does not drop when the engine
cools, the cooling system should be pressure tested for
leaks.
358 MAINTAINING YOUR VEHICLE
Page 359 of 440
D. Maintain coolant concentration at 50% HOAT ethyl-
ene glycol engine coolant (minimum) and distilled water
for proper corrosion protection of your engine.
E. Make sure that the radiator and coolant bottle over-
flow hoses are not kinked or obstructed.
F. Keep the front of the radiator clean. If your vehicle is
equipped with air conditioning, keep the front of the
condenser clean also.
G. The thermostat should not be changed for summer or
winter operation. If replacement is ever necessary, install
ONLY the correct type thermostat. Other designs may
result in unsatisfactory cooling performance.
Emission Related Components
Fuel System Hoses And Vapor/Vacuum Harnesses
When the vehicle is serviced for scheduled maintenance,
inspect surface of hoses and nylon tubing for evidence of
heat and mechanical damage. Hard and brittle rubber,cracking, checking, tears, cuts, abrasions, and excessive
swelling suggest deterioration of the rubber. Particular
attention should be given to examining hose surfaces
nearest to high heat sources, such as the exhaust mani-
fold.
Insure nylon tubing in these areas has not melted or
collapsed.
Inspect all hose clamps and couplings to make sure they
are secure and no leaks are present.
NOTE:Fluids such as oil, power steering fluid, and
brake fluid are used during assembly plant operations to
ease the assembly of hoses to couplings. Therefore, oil
wetness at the hose-coupling area is not necessarily an
indication of leakage. Actual dripping of hot fluid when
systems are under pressure (during vehicle operation),
should be noted before hose is replaced based on leakage.
MAINTAINING YOUR VEHICLE 359
7
Page 362 of 440
WARNING!
Worn brake hoses can burst and cause brake failure.
You could have an accident. If you see any sign of
cracking, scuffing, or worn spots, have the brake
hoses replaced immediately.
Automatic Transmission
Fluid Level Check
Check the fluid level while the transmission is at normal
operating temperature 180°F (82°C). This occurs after at
least 15 miles (24 km) of driving. At normal operating
temperature the fluid cannot be held comfortably be-
tween the fingertips.
To check the automatic transmission fluid level properly,
the following procedure must be used:1. Operate the engine at idle speed and normal operating
temperature.
2. The vehicle must be on level ground.
3. Fully apply the parking brake and press the brake
pedal.
4. Place the gear selector momentarily in each gear
position ending with the lever in P (Park).
5. Remove the dipstick, wipe it clean and reinsert it until
seated.
6. Remove the dipstick again and note the fluid level on
both sides. The fluid level should be between the “HOT”
(upper) reference holes on the dipstick at normal operat-
ing temperature. Verify that solid coating of oil is seen on
both sides of the dipstick. If the fluid is low, add as
required into the dipstick tube.Do not overfill.After
adding any quantity of oil through the oil fill tube, wait
362 MAINTAINING YOUR VEHICLE
Page 392 of 440
Use the schedule that best describes your driving condi-
tions. Where time and mileage are listed, follow the
interval that occurs first.
NOTE:Under no circumstances should oil change in-
tervals exceed 6000 miles (10 000 km) or 6 months
whichever comes first.
CAUTION!
Failure to perform the required maintenance items
may result in damage to the vehicle.
At Each Stop for Fuel
•Check the engine oil level about 5 minutes after a fully
warmed engine is shut off. Checking the oil level while
the vehicle is on level ground will improve the accu-
racy of the oil level reading. Add oil only when the
level is at or below the ADD or MIN mark.
•Check the windshield washer solvent and add if
required.
392 MAINTENANCE SCHEDULES
8
M
A
I
N
T
E
N
A
N
C
E
S
C
H
E
D
U
L
E
S
Page 393 of 440
Once a Month
•Check tire pressure and look for unusual wear or
damage.
•Inspect the battery and clean and tighten the terminals
as required.
•Check the fluid levels of coolant reservoir, brake
master cylinder, and transmission and add as needed.
•Check all lights and all other electrical items for correct
operation.At Each Oil Change
•Change the engine oil filter.
•Inspect the exhaust system.
•Inspect the brake hoses.
•Inspect the CV joints (if equipped) and front suspen-
sion components.
•Check the automatic transmission fluid level.
•Check the coolant level, hoses, and clamps.
MAINTENANCE SCHEDULES 393
8
M
A
I
N
T
E
N
A
N
C
E
S
C
H
E
D
U
L
E
S
Page 395 of 440
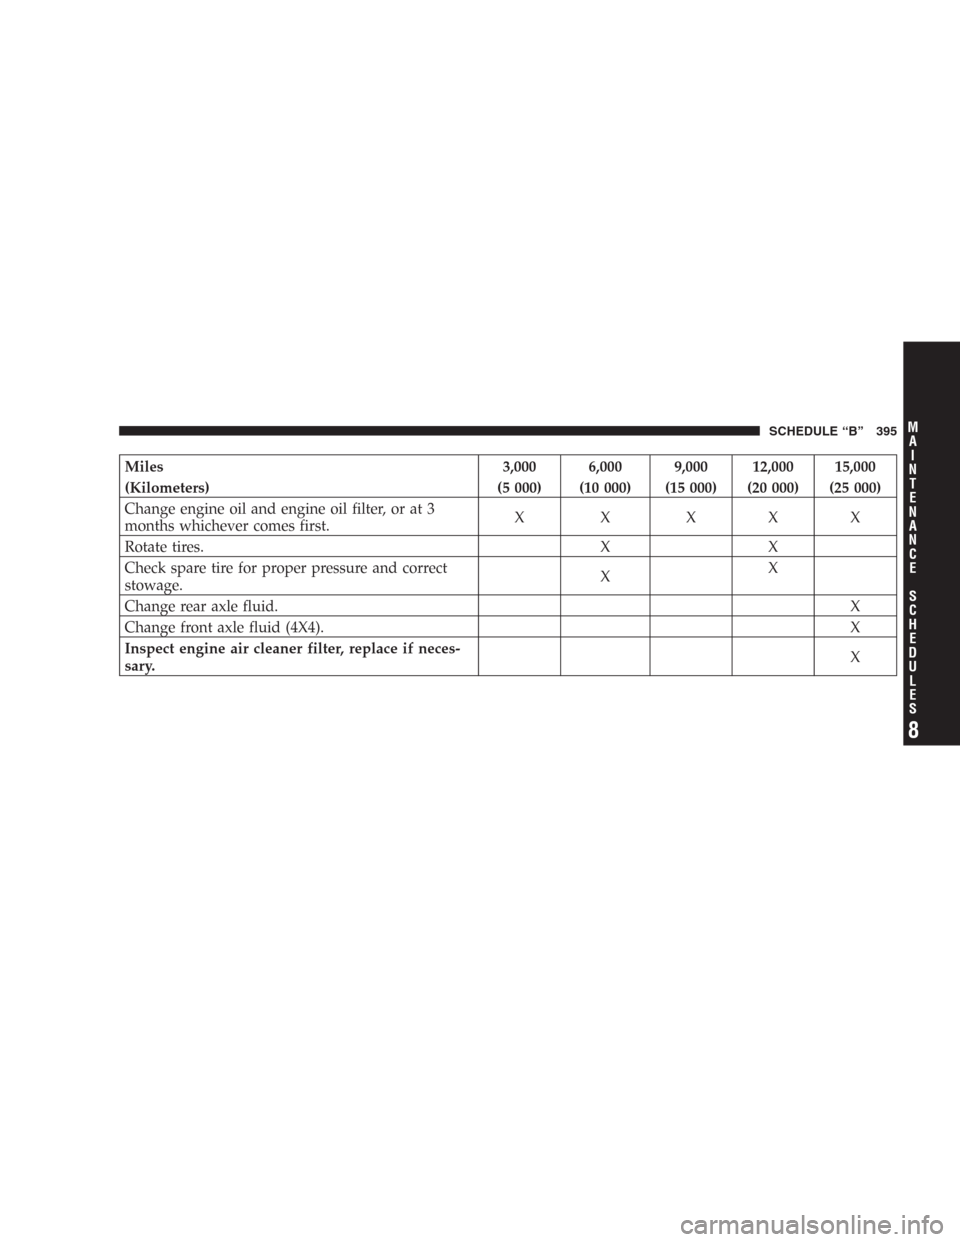
Miles 3,000 6,000 9,000 12,000 15,000
(Kilometers) (5 000) (10 000) (15 000) (20 000) (25 000)
Change engine oil and engine oil filter, or at 3
months whichever comes first.X X XXX
Rotate tires. X X
Check spare tire for proper pressure and correct
stowage.XX
Change rear axle fluid.X
Change front axle fluid (4X4).X
Inspect engine air cleaner filter, replace if neces-
sary.X
SCHEDULE “B” 395
8
M
A
I
N
T
E
N
A
N
C
E
S
C
H
E
D
U
L
E
S
Page 396 of 440
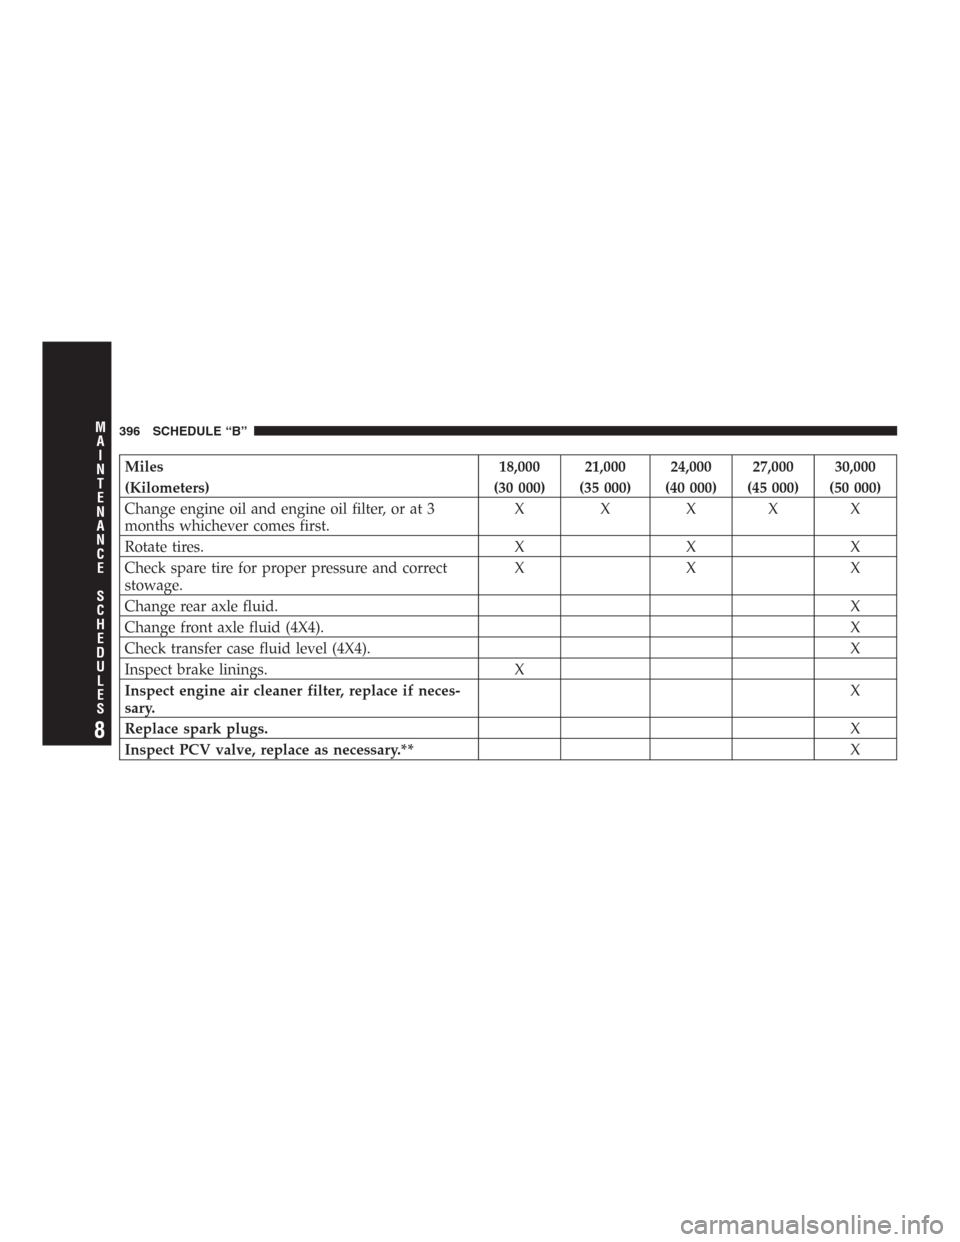
Miles 18,000 21,000 24,000 27,000 30,000
(Kilometers) (30 000) (35 000) (40 000) (45 000) (50 000)
Change engine oil and engine oil filter, or at 3
months whichever comes first.X X XXX
Rotate tires. X X X
Check spare tire for proper pressure and correct
stowage.XXX
Change rear axle fluid.X
Change front axle fluid (4X4).X
Check transfer case fluid level (4X4).X
Inspect brake linings. X
Inspect engine air cleaner filter, replace if neces-
sary.X
Replace spark plugs.X
Inspect PCV valve, replace as necessary.**X
396 SCHEDULE “B”
8
M
A
I
N
T
E
N
A
N
C
E
S
C
H
E
D
U
L
E
S
Page 397 of 440
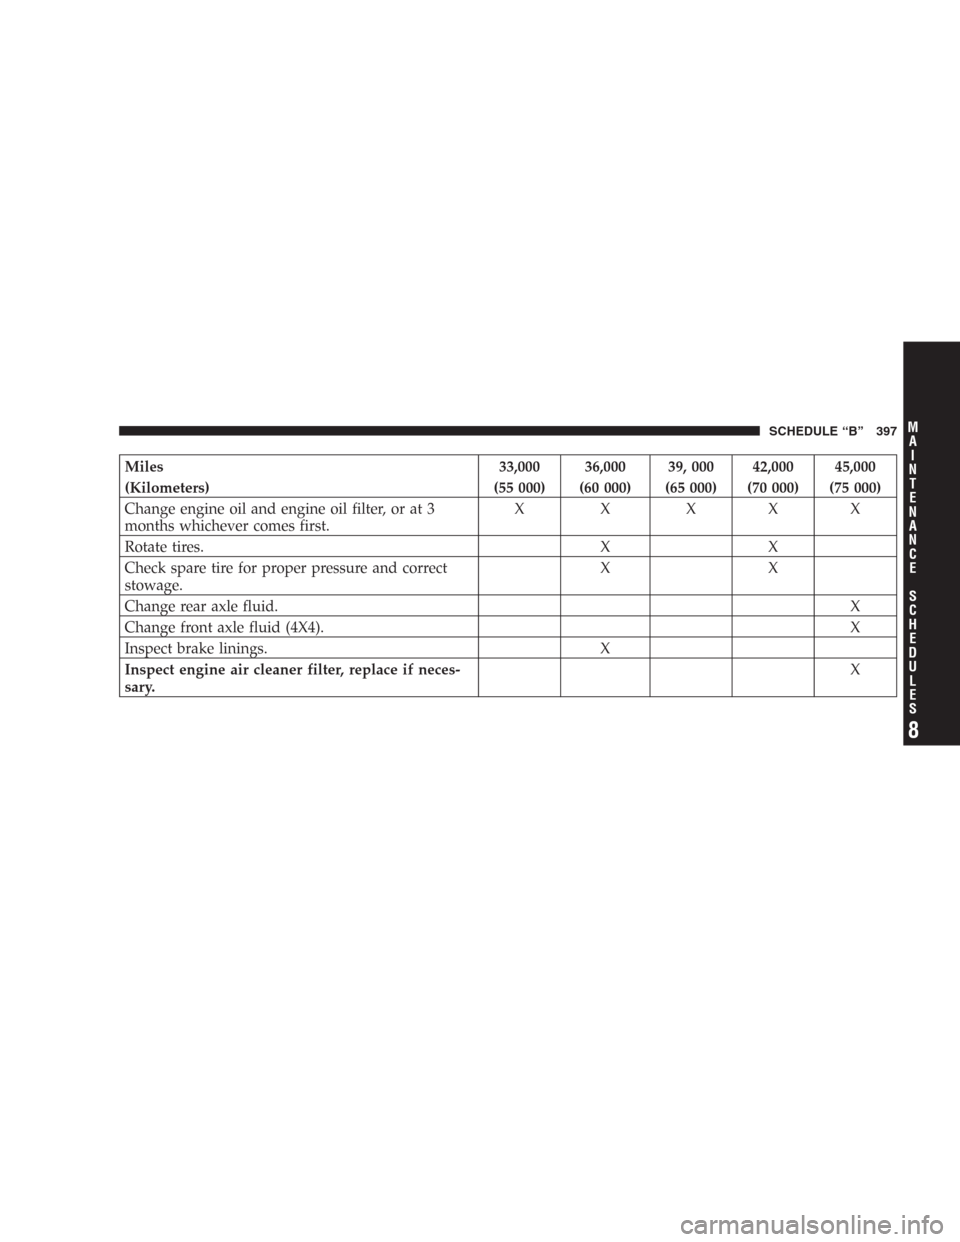
Miles 33,000 36,000 39, 000 42,000 45,000
(Kilometers) (55 000) (60 000) (65 000) (70 000) (75 000)
Change engine oil and engine oil filter, or at 3
months whichever comes first.X X XXX
Rotate tires. X X
Check spare tire for proper pressure and correct
stowage.XX
Change rear axle fluid.X
Change front axle fluid (4X4).X
Inspect brake linings. X
Inspect engine air cleaner filter, replace if neces-
sary.X
SCHEDULE “B” 397
8
M
A
I
N
T
E
N
A
N
C
E
S
C
H
E
D
U
L
E
S