key battery DODGE DURANGO 2008 2.G Owners Manual
[x] Cancel search | Manufacturer: DODGE, Model Year: 2008, Model line: DURANGO, Model: DODGE DURANGO 2008 2.GPages: 481, PDF Size: 7.75 MB
Page 20 of 481

UNLOCK button or by inserting a programmed Sentry
Key into the ignition and turning the key to the ON
position.
ILLUMINATED ENTRY
Vehicles Equipped With Power Door Locks
All interior lights will illuminate in the vehicle when the
doors are unlocked using the key fob.
The interior lights will remain on for 30 seconds after the
last door is closed, or until all doors are closed and either
the ignition is turned to the ON position or a key fob
LOCK button is pressed.
There is also a battery saver feature that will turn the
interior lights off after 8 minutes if the ignition is OFF
and a door is left open or the dimmer control is in the
interior lights ON position.
REMOTE KEYLESS ENTRY
NOTE:For the remote starting feature (if equipped),
refer to the ªRemote Starting Systemº section.
NOTE:For the power liftgate feature (if equipped), refer
to the ªPower Liftgateº section.
Five Button Transmitter
20 THINGS TO KNOW BEFORE STARTING YOUR VEHICLE
Page 26 of 481

12. Repeat steps 8 through 10 to program up to six
additional fobs.
13. Turn the ignition to the OFF position.
14. Your vehicle will remain in program mode up to 60
seconds from when the original chime was heard. After
60 seconds, all programmed fobs function normally.
NOTE:If you do not have a programmed transmitter,
contact your dealer for details.
Battery Replacement
The recommended replacement battery is CR2032.
NOTE:
Perchlorate Material ± special handling may
apply, See www.dtsc.ca.gov/hazardouswaste/perchlorate
1.If the key fob is equipped with a screw, remove the
screw. With the transmitter buttons facing down, use a flat
blade to pry the two halves of the transmitter apart. Make
sure not to damage the elastomer seal during removal.
2. Remove and replace the battery. When replacing the
battery, match the + sign on battery to the + sign on the
inside of the battery clip, located on back cover. Avoid
touching the new battery with your fingers. Skin oils may
cause battery deterioration. If you touch a battery, clean it
with rubbing alcohol. Avoid touching the new battery
Transmitter Battery Replacement
26 THINGS TO KNOW BEFORE STARTING YOUR VEHICLE
Page 27 of 481

with your fingers. Skin oils may cause battery deteriora-
tion. If you touch a battery, clean it with rubbing alcohol.
3. To reassemble the transmitter case, snap the two
halves of the case together. Make sure there is an even
ªgapº between the two halves. If equipped, install and
tighten the screw until snug. Test transmitter operation.
REMOTE STARTING SYSTEM Ð IF EQUIPPED
Your vehicle may be equipped with a remote starting
system, which will allow the vehicle to be started from
distances up to approximately 300 feet away from the
vehicle using the remote keyless entry key fob which is
part of your ignition key.
In order to remote start your vehicle, the hood, liftgate,
and all the doors must be closed.
To remote start your vehicle, press the REMOTE START
button on the key fob twice within three seconds. Toindicate that the vehicle is about to start, the parking
lights will flash and the horn will sound briefly.
Once the vehicle has started, the engine will run for 15
minutes. To cancel remote start, press the REMOTE
START button once.
Remote Start Transmitter
THINGS TO KNOW BEFORE STARTING YOUR VEHICLE 27
2
Page 99 of 481

Call Continuation
Call continuation is progression of a phone call on
UConnectŸ system after the vehicle ignition key has
been switched to off. Call continuation functionality
available on the vehicle can be any one of three types:
²After ignition key is switched off, a call can continue
on the UConnectŸ system either until the call ends or
until the vehicle battery condition dictates cessation of
the call on the UConnectŸ system and transfer of the
call to the mobile phone.
²After ignition key is switched to off, a call can continue
on the UConnectŸ system for certain duration, after
which the call is automatically transferred from the
UConnectŸ system to the mobile phone.
²An active call is automatically transferred to the
mobile phone after ignition key is switched to off.
UConnectŸ System Features
Language Selection
To change the language that the UConnectŸ system is
using,
²Press the ªPhoneº button to begin.
²After the9Ready9prompt and the following beep, say
the name of the language you wish to switch to
(English, Espanol, or Francais, if so equipped).
²Continue to follow the system prompts to complete
language selection.
After selecting one of the languages, all prompts and
voice commands will be in that language.
NOTE:After every UConnectŸ language change op-
eration, only the language specific 32-name phone book
is usable. The paired phone name is not language specific
and usable across all languages.
UNDERSTANDING THE FEATURES OF YOUR VEHICLE 99
3
Page 103 of 481

notification to inform you of your phone and network
status when you are attempting to make a phone call
using UConnectŸ. The status is given for roaming,
network signal strength, phone battery strength, etc.
Dialing Using the Cellular Phone Keypad
You can dial a phone number with your cellular phone
keypad and still use the UConnectŸ system (while
dialing via the cell phone keypad, the user must exercise
caution and take precautionary safety measures). By
dialing a number with your paired BluetoothŸ cellular
phone, the audio will be played through your vehicle's
audio system. The UConnectŸ system will work the
same as if you dial the number using voice recognition.
NOTE:Certain brands of mobile phones do not send the
dial ring to the UConnectŸ system to play it on the
vehicle audio system, so you will not hear it. Under this
situation, after successfully dialing a number, the usermay feel that the call did not go through even though the
call is in progress. Once your call is answered, you will
hear the audio.
Mute/Un-Mute (Mute Off)
When you mute the UConnectŸ system, you will still be
able to hear the conversation coming from the other
party, but the other party will not be able to hear you. In
order to mute the UConnectŸ system:
²Press the ªVoice Recognitionº button.
²Following the beep, say9Mute.9
In order to un-mute the UConnectŸ system:
²Press the ªVoice Recognitionº button.
²Following the beep, say9Mute-off.9
UNDERSTANDING THE FEATURES OF YOUR VEHICLE 103
3
Page 138 of 481

Interior Lights
Courtesy and dome lights are turned on when the front
doors are opened, when the dimmer control (rotating
wheel on the right side of the switch) is rotated to thesecond upward detent position, or when the UNLOCK
button is pressed on the key fob. When a door is open
and the interior lights are on, rotating the dimmer control
all the way down to the OFF detent will cause all the
interior lights to go out. This allows the doors to stay
open for extended periods of time without discharging
the vehicle's battery.
The brightness of the instrument panel lighting can be
regulated by rotating the dimmer control up (brighter) or
down (dimmer). When the headlights are ON you can
supplement the brightness of the odometer, trip odom-
eter, radio and overhead console by rotating the control
up until you hear a click. This feature is termed the
9Parade9mode and is useful when headlights are re-
quired during the day.
Dimmer Control
138 UNDERSTANDING THE FEATURES OF YOUR VEHICLE
Page 275 of 481

WARNING!
Do not attempt to push or tow your vehicle to get it
started. Vehicles equipped with an automatic trans-
mission cannot be started this way. Unburned fuel
could enter the catalytic converter and once the
engine has started, ignite and damage the converter
and vehicle. If the vehicle has a discharged battery,
booster cables may be used to obtain a start from a
booster battery or the battery in another vehicle. This
type of start can be dangerous if done improperly.
See section 6 of this manual for the proper jump
starting procedures and follow them carefully.If the engine has been flooded, it may start to run, but not
have enough power to continue running when the key is
released. If this occurs, continue cranking with the accel-
erator pedal pushed all the way to the floor. Release the
accelerator pedal and the key once the engine is running
smoothly.
If the engine shows no sign of starting after two 15
second periods of cranking with the accelerator pedal
held to the floor, the Normal Starting procedure should
be repeated.
After Starting
The idle speed is automatically controlled on fuel injected
engines and will decrease as the engine warms up.
STARTING AND OPERATING 275
5
Page 389 of 481

Your vehicle has a simple ignition key actuated test
which you can use prior to going to the test station. To
check if your vehicle's OBD system is ready, you must do
the following:
1. Insert your ignition key into the ignition switch.
2. Turn the ignition to the ON position, but do not crank
or start the engine. If you crank or start the engine, you
will have to start this test over.
3. As soon as you turn your key to the ON position, you
will see your MIL symbol come on as part of a normal
bulb check.
4. Approximately 15 seconds later, one of two things will
happen:
a. The MIL light will blink for approximately 5 sec-
onds and then remain on until the first engine crank orthe key is turned off. This means that your vehicle's
OBD system isnot readyand you shouldnotproceed
to the I/M station.
b. The MIL light will remain fully illuminated until the
first engine crank or the key is turned off. This means
that your vehicle's OBD system isreadyand you can
proceed to the I/M station.
If your OBD system isnot readyyou should see your
dealer or repair facility. If your vehicle was recently
serviced or had a battery failure or replacement, you may
need to do nothing more than drive your vehicle as you
normally would in order for your OBD system to update.
A recheck with the above test routine may then indicate
that the system is now ready.
Regardless of whether your vehicle's OBD system is
ready or not ready, if the MIL symbol is illuminated
during normal vehicle operation, you should have your
MAINTAINING YOUR VEHICLE 389
7
Page 423 of 481

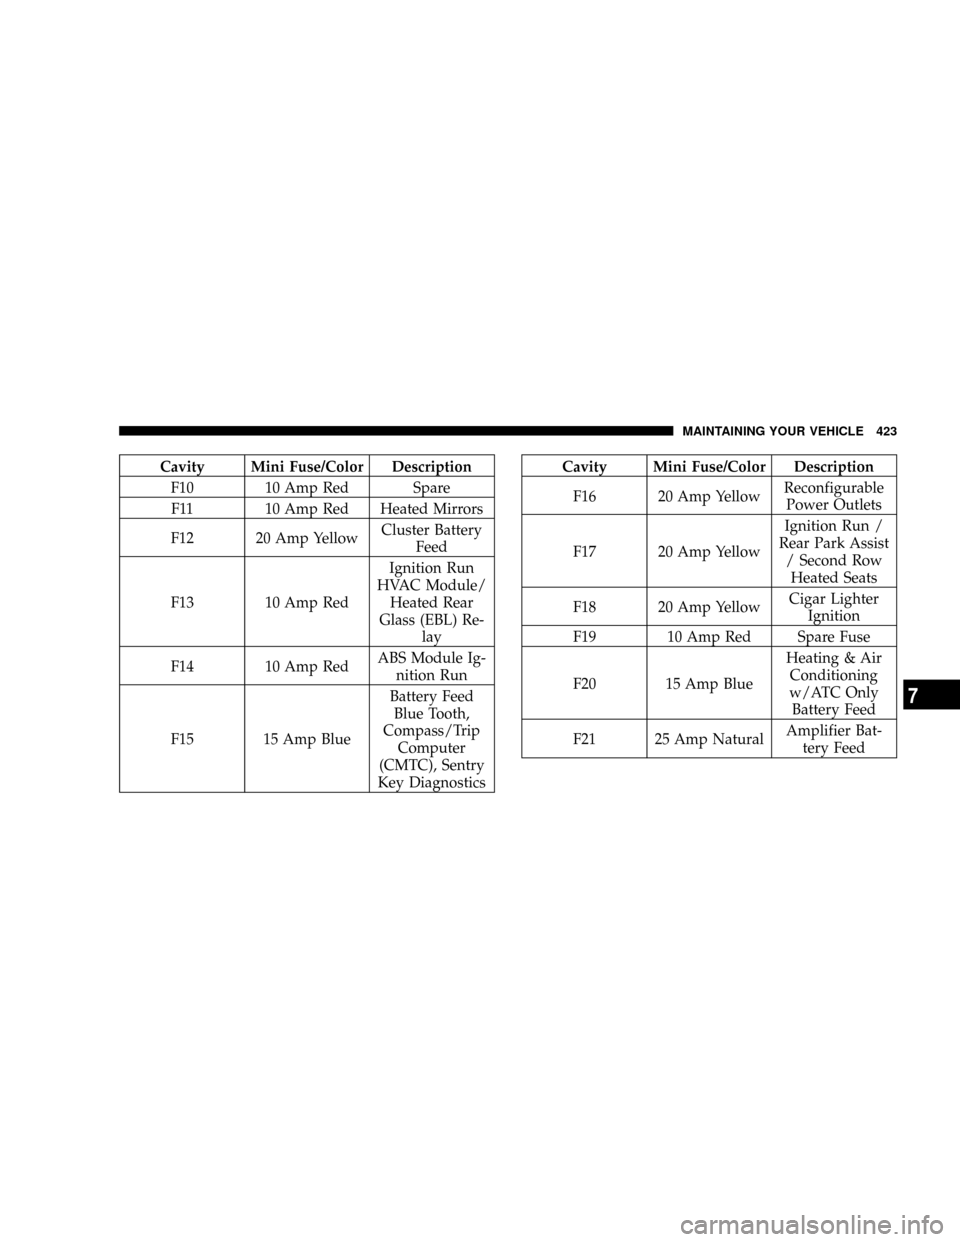
Cavity Mini Fuse/Color Description
F10 10 Amp Red Spare
F11 10 Amp Red Heated Mirrors
F12 20 Amp YellowCluster Battery
Feed
F13 10 Amp RedIgnition Run
HVAC Module/
Heated Rear
Glass (EBL) Re-
lay
F14 10 Amp RedABS Module Ig-
nition Run
F15 15 Amp BlueBattery Feed
Blue Tooth,
Compass/Trip
Computer
(CMTC), Sentry
Key DiagnosticsCavity Mini Fuse/Color Description
F16 20 Amp YellowReconfigurable
Power Outlets
F17 20 Amp YellowIgnition Run /
Rear Park Assist
/ Second Row
Heated Seats
F18 20 Amp YellowCigar Lighter
Ignition
F19 10 Amp Red Spare Fuse
F20 15 Amp BlueHeating & Air
Conditioning
w/ATC Only
Battery Feed
F21 25 Amp NaturalAmplifier Bat-
tery Feed
MAINTAINING YOUR VEHICLE 423
7
Page 463 of 481

Special Additives...................... 413
Torque Converter...................... 280
Axle Fluid............................. 441
Axle Lubrication (Axle Fluid)............... 414
Ball Joints............................. 400
Battery.......................384,385,386,397
Charging............................ 375
Emergency Starting..................... 375
Gas Caution.......................... 375
Keyless Transmitter Replacement (RKE)....... 26
Saving Feature (Protection)............... 139
Belts, Drive............................ 394
Belts, Seat.............................. 40
Body Mechanism Lubrication............... 401
B-Pillar Location........................ 309
Brake Assist System...................... 296
Brake Control System, Electronic............. 295
Brake Fluid............................ 441Brake System........................291,410
Anti-Lock (ABS)....................291,295
Disc Brakes.......................... 410
Fluid Check.......................... 410
Hoses.............................. 411
Master Cylinder....................... 410
Parking............................. 290
Warning Light.....................195,199
Brakes............................... 291
Brake/Transmission Interlock............... 276
Break-In Recommendations, New Vehicle........ 74
Bulb Replacement....................... 430
Bulbs, Light............................ 430
Calibration, Compass..................... 166
Camera, Rear........................... 156
Capacities, Fluid........................ 439
Caps, Filler
Fuel................................ 336
INDEX 463
10