radio DODGE DURANGO 2011 3.G User Guide
[x] Cancel search | Manufacturer: DODGE, Model Year: 2011, Model line: DURANGO, Model: DODGE DURANGO 2011 3.GPages: 108, PDF Size: 5.96 MB
Page 2 of 108
The driver
distracted can result in loss of vehicle control, resulting in a collisi\
on and personal injury
Chrysler Group LLC strongly recommends that the driver use extreme cauti\
on when using
any device or feature that may take their attention off the road. Use of\
any electrical
devices such as cell phones, computers, portable radios, vehicle navigat\
ion or other
devices by the driver while the vehicle is moving is dangerous and could\
lead to a serious
collision. T
vehicle is moving. If you \037nd yourself unable to devote your full att\
ention to vehicle
operation, pull off the road to a safe location and stop your vehicle. S\
ome States or
Provinces prohibit the use of cellular telephones or texting w
driver
IMPORT This User Guide is intended to familiarize you with the important featu\
res of
your vehicle. The DVD enclosed contains your Owner
Manuals, W
purchased in the U.S.\) or Roadside Assistance \(new vehicles purchased \
in Canada\) in
electronic format. W
visiting www
If you are the \037rst registered owner of your vehicle,
you may obtain a complimentary printed copy of the
Owner
W
1-800-387-1143 \(Canada\) or by contacting your dealer
Page 3 of 108
INTRODUCTION/WELCOMEWelcome From Chrysler Group LLC....2
CONTROLS AT A GLANCEDriver Cockpit...............4
Instrument Cluster.............6
GETTING STARTEDKeyFOB ..................8
Remote Start................9
Keyless Enter-N-Go............10
Theft Alarm................12
Seat Belt.................13
Supplemental Restraint System (SRS) —
Airbags..................13
Child Restraints.............14
Front Seats................16
Rear Seats................19
Power Folding Third Row Head
Restraints.................20
Heated/Ventilated Seats.........21
Heated Steering Wheel..........22
Tilt/Telescoping Steering Column....22
OPERATING YOUR VEHICLEHeadlight Switch.............24
Turn Signal/Wiper/Washer/High Beam
Lever...................25
Auto Dimming Mirrors..........26
Speed Control..............26
Electronic Range Selection (ERS)....29
Automatic Temperature Controls (ATC) . 30
Parksense
®Rear Park Assist.......31
Parkview®Rear Back-Up Camera....32
Blind Spot Monitoring..........32
Power Sunroof..............33
Wind Buffeting..............35
ELECTRONICSYour Vehicle's Sound System......36
Non-Touch-Screen Radios........38
Touch-Screen Radios...........40
Steering Wheel Audio Controls......46
Uconnect™ Phone............47
Uconnect™ Voice Command.......49
iPod
®/USB/MP3 Control.........50
Video Entertainment System (VES)™ . . 51
Electronic Vehicle Information Center
(EVIC)...................53
Programmable Features.........54Universal Garage Door Opener
(HomeLink
®) ...............54
Power Inverter..............56
Power Outlet...............57
OFF-ROAD CAPABILITIES
All-Wheel Drive Operation........58
UTILITY
Roof Luggage Rack............60
Trailer Towing Weights
(Maximum Trailer Weight Ratings)....61
Tow/Haul Mode..............62
Recreational Towing
(Behind Motorhome, Etc.)........62
WHAT TO DO IN EMERGENCIES
24-Hour Towing Assistance.......64
Instrument Cluster Warning Lights . . . 64
If Your Engine Overheats.........67
Jacking And Tire Changing........69
Jump-Starting..............72
Emergency Tow Hooks..........75
Shift Lever Override...........75
Towing A Disabled Vehicle........76
Event Data Recorder (EDR).......77
MAINTAINING YOUR VEHICLEOpening The Hood............78
Fuel Door Release............78
Engine Compartment...........80
Fluids And Capacities..........82
Maintenance Chart............84
Fuses...................87
Tire Pressures...............90
Wheel And Wheel Trim Care.......91
Exterior Bulbs..............91
CONSUMER ASSISTANCEChrysler Group LLC Customer Center . . 92
Chrysler Canada Inc. Customer Center . 92
Assistance For The Hearing Impaired . . 92
Publications Ordering..........92
Reporting Safety Defects In The 50
United States And Washington, D.C. . . 93
MOPAR ACCESSORIESAuthentic Accessories By MOPAR®...94
INDEX..................95
TABLE OF CONTENTS
Page 4 of 108
WELCOME FROM CHRYSLER GROUP LLC
Congratulations on selecting your new Chrysler Group LLC vehicle. Be assured that it
represents precision workmanship, distinctive styling, and high quality - all essentials
that are traditional to our vehicles.
Your new Chrysler Group LLC vehicle has characteristics to enhance the driver's control
under some driving conditions. These are to assist the driver and are never a substitute
for attentive driving. They can never take the driver's place. Always drive carefully.
Your new vehicle has many features for the comfort and convenience of you and your
passengers. Some of these should not be used when driving because they take your
eyes from the road or your attention from driving. Never text while driving or take your
eyes more than momentarily off the road.
This guide illustrates and describes the operation of features and equipment that are
either standard or optional on this vehicle. This guide may also include a description of
features and equipment that are no longer available or were not ordered on this vehicle.
Please disregard any features and equipment described in this guide that are not
available on this vehicle. Chrysler Group LLC reserves the right to make changes in
design and specifications and/or make additions to or improvements to its products
without imposing any obligation upon itself to install them on products previously
manufactured.
This User Guide has been prepared to help you quickly become acquainted with the
important features of your vehicle. It contains most things you will need to operate and
maintain the vehicle, including emergency information.
The DVD includes a computer application containing detailed owner's information
which can be viewed on a personal computer or MAC computer. The multimedia DVD
also includes videos which can be played on any standard DVD player (including the
Media Center Touch-Screen Radios). Additional DVD operational information is located
on the back of the DVD sleeve.
For complete owner information, refer to your Owner's Manual on the DVD in the
owner’s kit provided at the time of new vehicle purchase. For your convenience, the
information contained on the DVD may also be printed and saved for future reference.
Chrysler Group LLC is committed to protecting our environment and natural resources.
By converting from paper to electronic delivery for the majority of the user information
for your vehicle, together we greatly reduce the demand for tree-based products and
lessen the stress on our environment.
Vehicles Sold In Canada
With respect to any vehicles sold in Canada, the name Chrysler Group LLC shall be
deemed to be deleted and the name Chrysler Canada Inc. used in substitution
therefore.
INTRODUCTION/WELCOME
2
Page 19 of 108
Power Lumbar
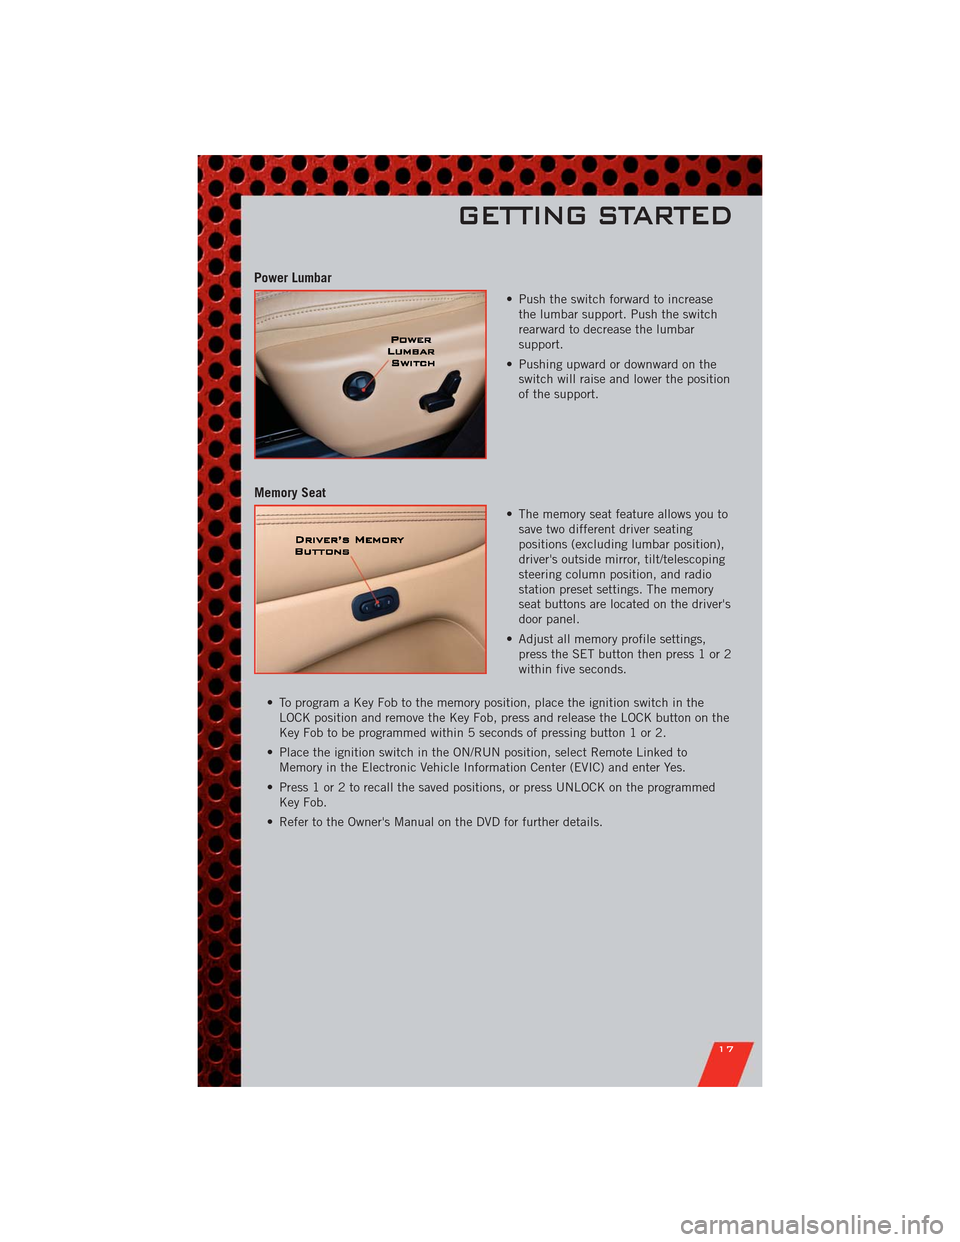
• Push the switch forward to increase
the lumbar support. Push the switch
rearward to decrease the lumbar
support.
• Pushing upward or downward on the
switch will raise and lower the position
of the support.
Memory Seat
• The memory seat feature allows you to
save two different driver seating
positions (excluding lumbar position),
driver's outside mirror, tilt/telescoping
steering column position, and radio
station preset settings. The memory
seat buttons are located on the driver's
door panel.
• Adjust all memory profile settings,
press the SET button then press 1 or 2
within five seconds.
• To program a Key Fob to the memory position, place the ignition switch in the
LOCK position and remove the Key Fob, press and release the LOCK button on the
Key Fob to be programmed within 5 seconds of pressing button 1 or 2.
• Place the ignition switch in the ON/RUN position, select Remote Linked to
Memory in the Electronic Vehicle Information Center (EVIC) and enter Yes.
• Press 1 or 2 to recall the saved positions, or press UNLOCK on the programmed
Key Fob.
• Refer to the Owner's Manual on the DVD for further details.
GETTING STARTED
17
Page 26 of 108
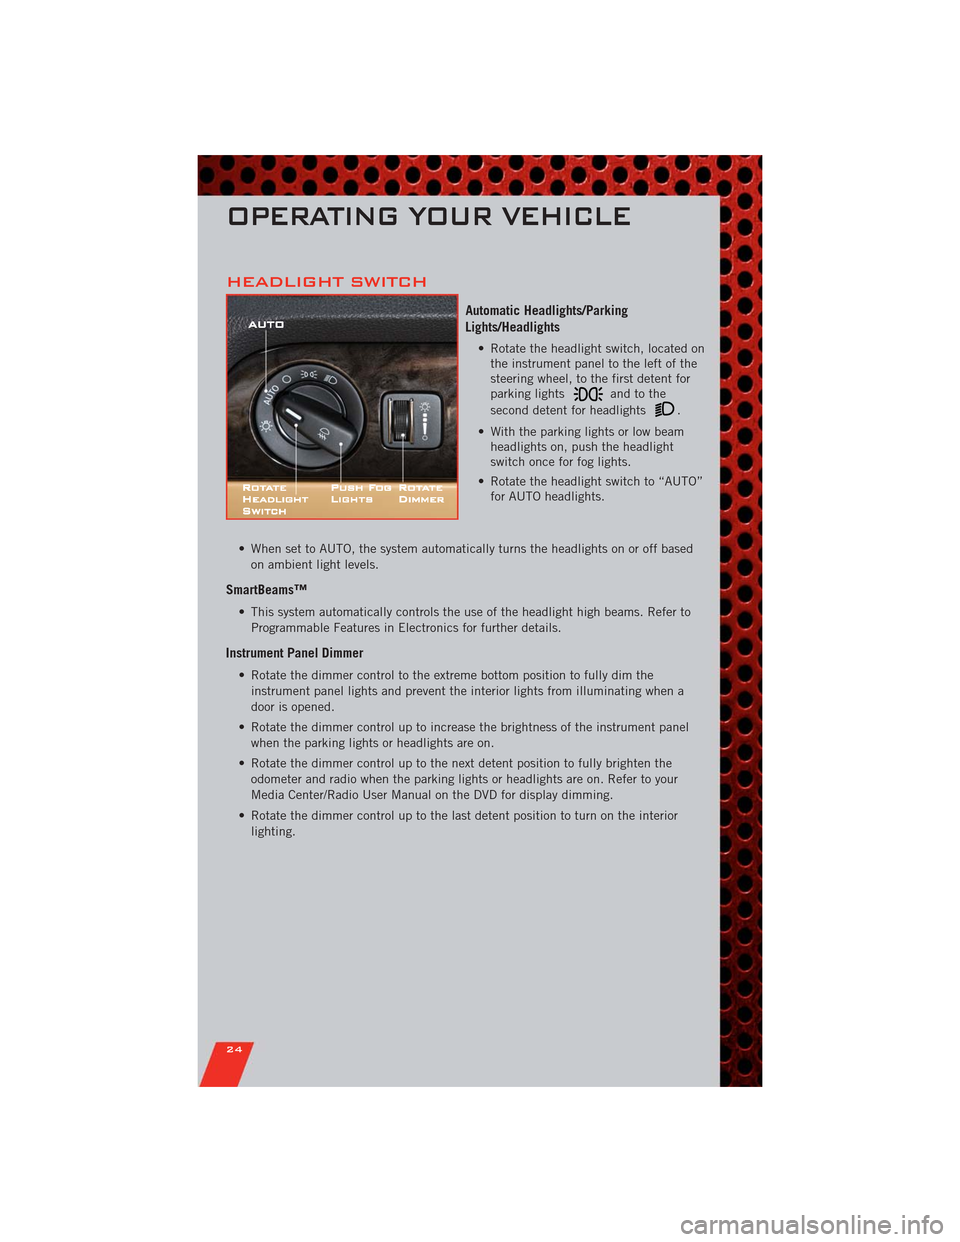
HEADLIGHT SWITCH
Automatic Headlights/Parking
Lights/Headlights
• Rotate the headlight switch, located on
the instrument panel to the left of the
steering wheel, to the first detent for
parking lights
andtothe
second detent for headlights
.
• With the parking lights or low beam
headlights on, push the headlight
switch once for fog lights.
• Rotate the headlight switch to “AUTO”
for AUTO headlights.
• When set to AUTO, the system automatically turns the headlights on or off based
on ambient light levels.
SmartBeams™
• This system automatically controls the use of the headlight high beams. Refer to
Programmable Features in Electronics for further details.
Instrument Panel Dimmer
• Rotate the dimmer control to the extreme bottom position to fully dim the
instrument panel lights and prevent the interior lights from illuminating when a
door is opened.
• Rotate the dimmer control up to increase the brightness of the instrument panel
when the parking lights or headlights are on.
• Rotate the dimmer control up to the next detent position to fully brighten the
odometer and radio when the parking lights or headlights are on. Refer to your
Media Center/Radio User Manual on the DVD for display dimming.
• Rotate the dimmer control up to the last detent position to turn on the interior
lighting.
OPERATING YOUR VEHICLE
24
Page 34 of 108
PARKVIEW®REAR BACK-UP CAMERA
• You can see an on-screen image of the rear of your vehicle whenever the shift lever
is put into REVERSE. The ParkView®Rear Back-Up Camera image will be
displayed on the radio display screen, located on the center stack of the
instrument panel.
• If the radio display screen appears foggy, clean the camera lens located on the
liftgate.
WARNING!
Drivers must be careful when backing up even when using the ParkView®Rear
Back-Up Camera. Always check carefully behind your vehicle, and be sure to
check for pedestrians, animals, other vehicles, obstructions, or blind spots
before backing up. You must continue to pay attention while backing up.
Failure to do so can result in serious injury or death.
BLIND SPOT MONITORING
• The Blind Spot Monitoring (BSM) system uses two radar-based sensors, located
inside the rear bumper fascia, to detect Highway licensable vehicles (automobiles,
trucks, motorcycles etc.) that enter the blind spot zones from the rear/front/side of
the vehicle.
• The Blind Spot Monitoring (BSM) system warning light, located in the outside
mirrors, will illuminate if a vehicle moves into a blind spot zone.
• The BSM system can also be configured to sound an audible (chime) alert and
mute the radio to notify you of objects that have entered the detection zones.
• Refer to your owner's manual on the DVD for further details.
OPERATING YOUR VEHICLE
32
Page 40 of 108
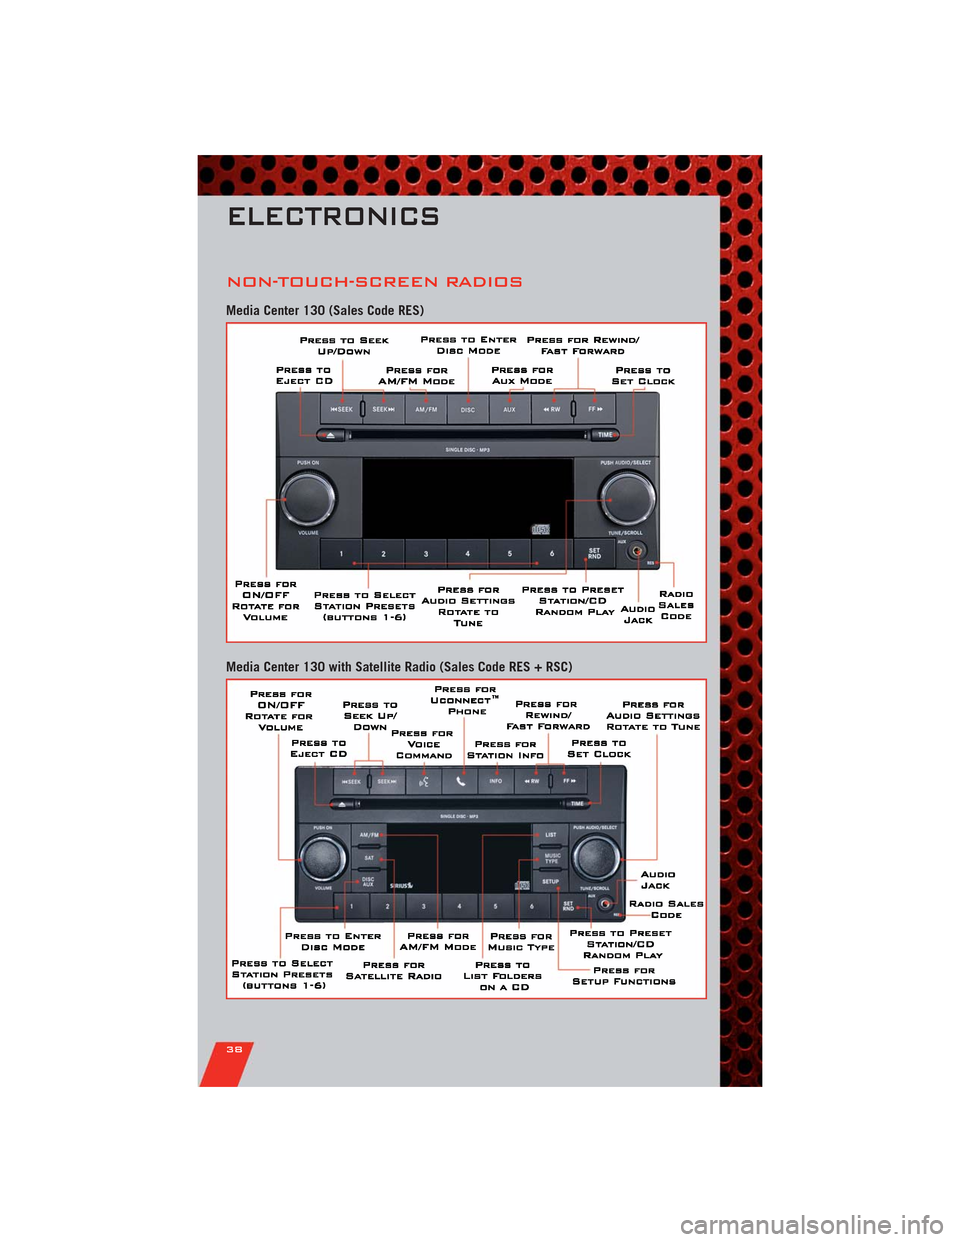
NON-TOUCH-SCREEN RADIOS
Media Center 130 (Sales Code RES)
Media Center 130 with Satellite Radio (Sales Code RES + RSC)
ELECTRONICS
38
Page 41 of 108
NOTE:Your radio may not be equipped with the Uconnect™ Voice Command and
Uconnect™ Phone features. To determine if your radio has these features, press the
Voice Command button on the radio. You will hear a voice prompt if you have the
feature, or see a message on the radio stating “Uconnect Phone not available” if you do
not.
• Your radio has many features that add to the comfort and convenience of you and
your passengers. Some of these radio features should not be used when driving
because they take your eyes from the road or your attention from driving.
• The radio sales code is located on the lower right side of the radio faceplate.
Seek Up/Down Buttons
• Press to seek through radio stations in AM, FM, or SAT bands. Seek through tracks
in CD, iPod®, or USB modes.
• Hold either button to bypass stations without stopping.
Audio Settings
• Press the TUNE/SCROLL control knob and BASS, MID, TREBLE, BALANCE and
FADE will display. Rotate the TUNE/SCROLL control knob to select the desired
setting.
Audio Jack
• The Audio Jack allows a portable device, such as an MP3 player or a cassette
player, to be plugged into the radio and utilize the vehicle’s audio system, using a
3.5 mm audio cable, to amplify the source and play through the vehicle speakers.
• Pressing the AUX button will change the mode to auxiliary device if the Audio Jack
is connected, allowing the music from your portable device to be heard through the
vehicle's speakers.
• The functions of the portable device are controlled using the device buttons. The
volume may be controlled using the radio or portable device.
Clock Setting
• Press and hold the TIME button until the hours blink; turn the TUNE/SCROLL
control knob to set the hours.
• Press the TUNE/SCROLL control knob until the minutes begin to blink; turn the
TUNE/SCROLL control knob to set the minutes.
• Press the TUNE/SCROLL control knob to save the time change.
• To exit, press any button/knob or wait five seconds.
Store Radio Presets
• Press the SET/RND button once and SET 1 will show in the display. Then select
the button (1–6).
• A second station may be added to each push button. Press the SET/RND button
twice and SET 2 will show in the display, then select button (1–6).
ELECTRONICS
39
Page 42 of 108
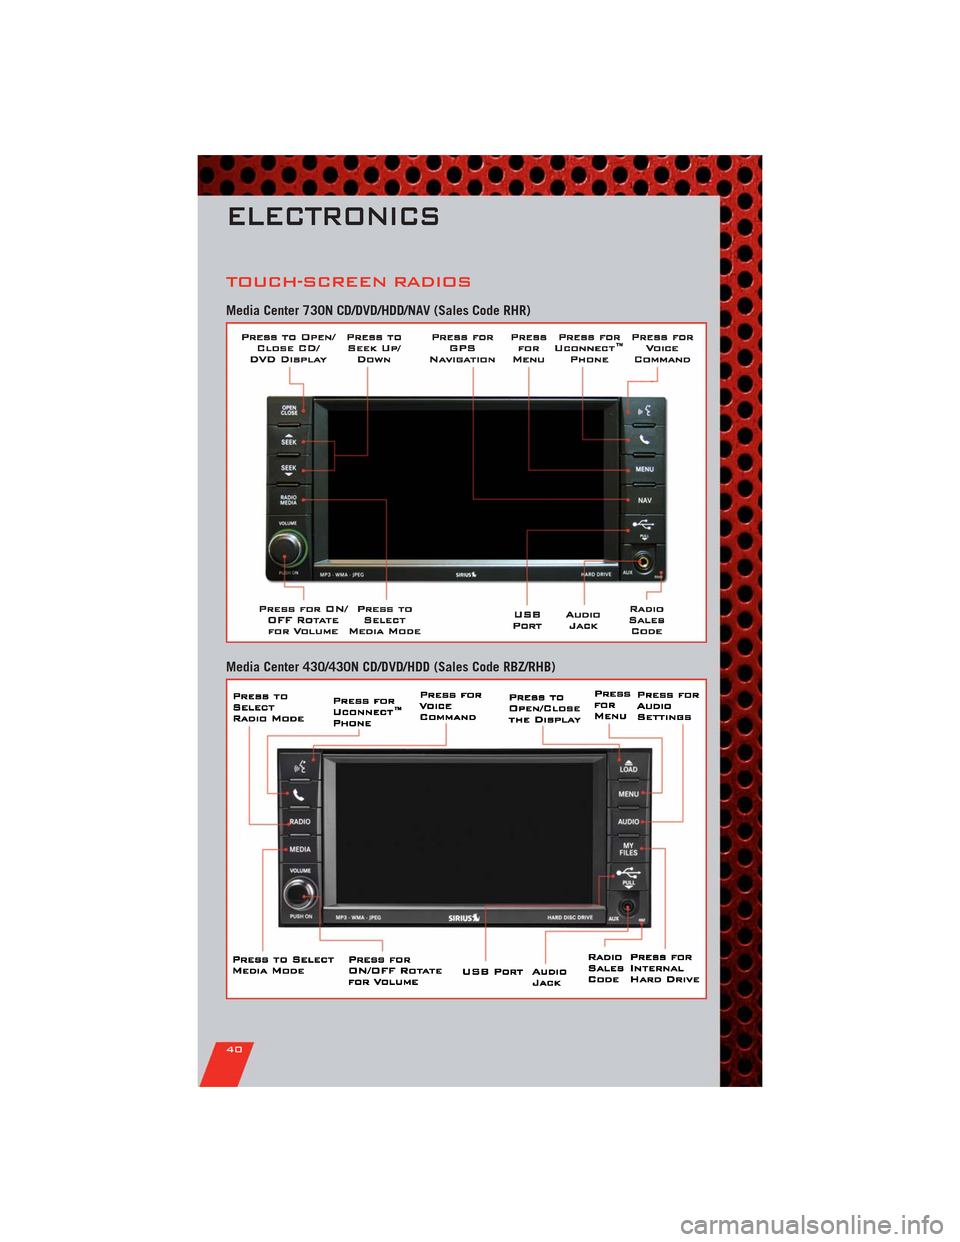
TOUCH-SCREEN RADIOS
Media Center 730N CD/DVD/HDD/NAV (Sales Code RHR)
Media Center 430/430N CD/DVD/HDD (Sales Code RBZ/RHB)
ELECTRONICS
40
Page 43 of 108
NOTE:Your radio may not be equipped with the Uconnect™ Voice Command and
Uconnect™ Phone features. To determine if your radio has these features, press the
Voice Command button on the radio. You will hear a voice prompt if you have the
feature, or see a message on the radio stating “Uconnect Phone not available” if you do
not.
• Your radio has many features that add to the comfort and convenience of you and
your passengers. Some of these radio features should not be used when driving
because they take your eyes from the road or your attention from driving.
• The radio sales code is located on the lower right side of the radio faceplate.
Seek Up/Down
• Media Center 730N: Press the SEEK hard-key to seek through radio stations in
AM, FM, or SAT bands. Seek through tracks in CD or iPod®modes or through
songs in the HDD playlist.
• Media Center 430/430N: Press the SEEK up/down arrow soft-keys to change the
currently playing station in AM, FM or SAT bands. Seek through tracks in CD or
iPod
®modes or through songs in the HDD playlist.
Audio Jack
• The Audio Jack allows a portable device, such as an MP3 player or a cassette
player, to be plugged into the radio and utilize the vehicle’s audio system, using a
3.5 mm audio cable, to amplify the source and play through the vehicle speakers.
• Pressing the AUX button will change the mode to auxiliary device if the Audio Jack
is connected, allowing the music from your portable device to be heard through the
vehicle's speakers.
• The functions of the portable device are controlled using the device buttons. The
volume may be controlled using the radio or portable device.
Clock Setting
• Turn the radio on, then touch the screen where the time is displayed.
• Touch the USER CLOCK soft-key (Navigation radio only).
• To adjust the hours, touch either the HOUR FORWARD or HOUR BACKWARD
soft-key.
• To adjust the minutes, touch either the MINUTE FORWARD or MINUTE
BACKWARD soft-key.
• To save the new time setting, touch the screen where the word “Save” is displayed.
Store Radio Presets
• Media Center 730N: Press the RADIO/MEDIA hard-key until AM FM SAT is
displayed in the upper left corner of the screen.
• Media Center 430/430N: Press the RADIO hard-key to display AM FM SAT in the
upper left corner of the screen.
• Select the radio band by touching either the AM, FM, or SAT soft-key.
• Find the station to store by either pressing the SEEK UP/DOWN hard-keys (Media
Center 730N), touching the right and left arrow soft-keys (Media Center
430/430N), touching the SCAN soft-key, or by using the DIRECT TUNE soft-key.
ELECTRONICS
41