sensor DODGE DURANGO 2011 3.G User Guide
[x] Cancel search | Manufacturer: DODGE, Model Year: 2011, Model line: DURANGO, Model: DODGE DURANGO 2011 3.GPages: 108, PDF Size: 5.96 MB
Page 29 of 108
Accel/Decel
• Once a speed is set, pushing the RES + button once or the SET – button once will
increase or decrease the set speed approximately 1 mph (2 km/h).
Resume
• To resume a previously selected set speed in memory, push the RES + button and
release.
Cancel
• Push the CANCEL button, or apply the brakes to cancel the set speed and
maintain the set speed memory.
• Push the ON/OFF button to turn the system off and erase the set speed memory.
Adaptive Cruise Control (ACC)
• If your vehicle is equipped with adaptive cruise control the controls operate exactly
the same as the standard cruise control with one difference. You can set a
specified distance you would like to maintain between you and the vehicle in front
of you.
• If the ACC sensor detects a vehicle ahead, ACC will apply limited braking or
acceleration automatically to maintain a preset following distance, while matching
the speed of the vehicle ahead.
• If the sensor does not detect a vehicle directly ahead of you, it functions like a
standard cruise control system, maintaining the speed you set.
Accel/Decel (ACC Only)
• Once a speed is set, pushing the RES + button once or the SET – button once will
increase or decrease the set speed approximately 1 mph (1 km/h).
• Push and hold the RES + button to accelerate in 5mph (10 km/h) increments or
push and hold the SET – button to decelerate in 5mph (10 km/h) increments;
release the button to save the new set speed.
Distance Setting (ACC Only)
• To set or change the distance setting, press the Distance button and release. Each
time the button is pressed, the distance setting adjusts between long (3), medium
(2), and short (1). The distance setting will default to the last set mode the next
time the vehicle is restarted and the ACC system is turned on.
• The specified following distance for ACC can be set by varying the distance setting
between 3 (long), 2 (medium), and 1 (short). Using this distance setting and the
vehicle speed, ACC calculates and sets the distance to the vehicle ahead. This
distance setting displays in the EVIC.
Mode (ACC Only)
• If desired, the Adaptive Cruise Control mode can be turned off and the system can
be operated as a standard (fixed speed) Cruise Control. When in the standard
(fixed speed) Cruise Control mode the distance setting feature will be disabled and
the system will maintain the speed you set.
OPERATING YOUR VEHICLE
27
Page 33 of 108
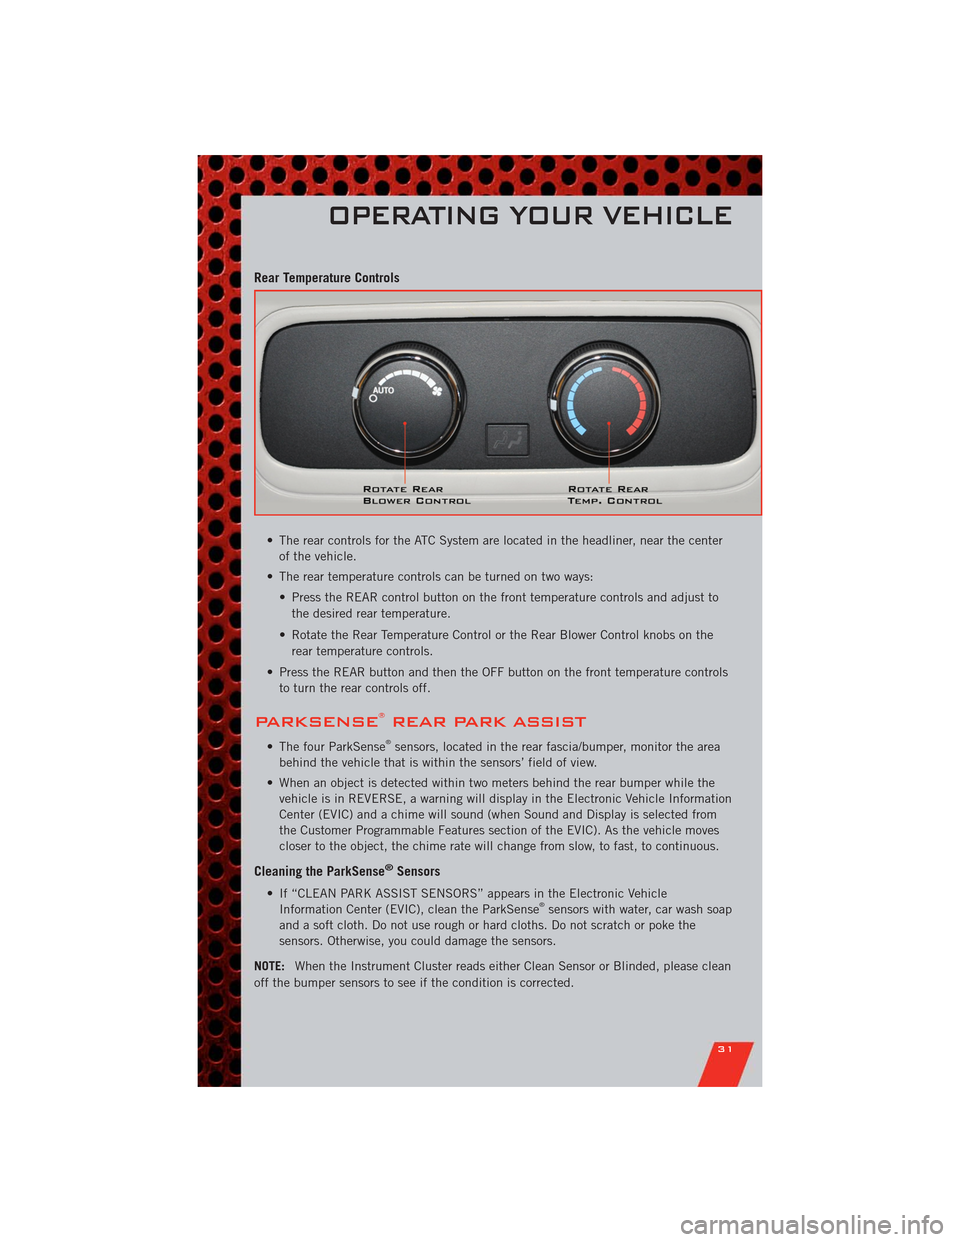
Rear Temperature Controls
• The rear controls for the ATC System are located in the headliner, near the center
of the vehicle.
• The rear temperature controls can be turned on two ways:
• Press the REAR control button on the front temperature controls and adjust to
the desired rear temperature.
• Rotate the Rear Temperature Control or the Rear Blower Control knobs on the
rear temperature controls.
• Press the REAR button and then the OFF button on the front temperature controls
to turn the rear controls off.
PARKSENSE®REAR PARK ASSIST
• The four ParkSense®sensors, located in the rear fascia/bumper, monitor the area
behind the vehicle that is within the sensors’ field of view.
• When an object is detected within two meters behind the rear bumper while the
vehicle is in REVERSE, a warning will display in the Electronic Vehicle Information
Center (EVIC) and a chime will sound (when Sound and Display is selected from
the Customer Programmable Features section of the EVIC). As the vehicle moves
closer to the object, the chime rate will change from slow, to fast, to continuous.
Cleaning the ParkSense®Sensors
• If “CLEAN PARK ASSIST SENSORS” appears in the Electronic Vehicle
Information Center (EVIC), clean the ParkSense®sensors with water, car wash soap
and a soft cloth. Do not use rough or hard cloths. Do not scratch or poke the
sensors. Otherwise, you could damage the sensors.
NOTE:When the Instrument Cluster reads either Clean Sensor or Blinded, please clean
off the bumper sensors to see if the condition is corrected.
OPERATING YOUR VEHICLE
31
Page 34 of 108
PARKVIEW®REAR BACK-UP CAMERA
• You can see an on-screen image of the rear of your vehicle whenever the shift lever
is put into REVERSE. The ParkView®Rear Back-Up Camera image will be
displayed on the radio display screen, located on the center stack of the
instrument panel.
• If the radio display screen appears foggy, clean the camera lens located on the
liftgate.
WARNING!
Drivers must be careful when backing up even when using the ParkView®Rear
Back-Up Camera. Always check carefully behind your vehicle, and be sure to
check for pedestrians, animals, other vehicles, obstructions, or blind spots
before backing up. You must continue to pay attention while backing up.
Failure to do so can result in serious injury or death.
BLIND SPOT MONITORING
• The Blind Spot Monitoring (BSM) system uses two radar-based sensors, located
inside the rear bumper fascia, to detect Highway licensable vehicles (automobiles,
trucks, motorcycles etc.) that enter the blind spot zones from the rear/front/side of
the vehicle.
• The Blind Spot Monitoring (BSM) system warning light, located in the outside
mirrors, will illuminate if a vehicle moves into a blind spot zone.
• The BSM system can also be configured to sound an audible (chime) alert and
mute the radio to notify you of objects that have entered the detection zones.
• Refer to your owner's manual on the DVD for further details.
OPERATING YOUR VEHICLE
32
Page 67 of 108
• When the malfunction indicator is illuminated, the system may not be able to
detect or signal low tire pressure as intended. TPMS malfunctions may occur for a
variety of reasons, including the installation of replacement or alternate tires or
wheels on the vehicle that prevent the TPMS from functioning properly. Always
check the TPMS malfunction telltale after replacing one or more tires or wheels on
your vehicle, to ensure that the replacement or alternate tires and wheels allow the
TPMS to continue to function properly.
CAUTION!
The TPMS has been optimized for the original equipment tires and wheels.
TPMS pressures and warning have been established for the tire size equipped
on your vehicle. Undesirable system operation or sensor damage may result
when using replacement equipment that is not of the same size, type, and/or
style. Aftermarket wheels can cause sensor damage. Do not use tire sealant
from a can, or balance beads if your vehicle is equipped with a TPMS, as
damage to the sensors may result.
BRAKE- Brake Warning Light
• The Brake Warning light illuminates when there is either a system malfunction or
the parking brake is applied. If the light is on and the parking brake is not applied,
it indicates a possible brake hydraulic malfunction, brake booster problem or an
Anti-Lock Brake System problem.
• We recommend you drive to the nearest service center and have the vehicle
serviced immediately.
WARNING!
Driving a vehicle with the red brake light on is dangerous. Part of the brake
system may have failed. It will take longer to stop the vehicle. You could have a
collision. Have the vehicle checked immediately.
- Malfunction Indicator Light (MIL)
• Certain conditions, such as a loose or missing gas cap, poor fuel quality, etc., may
illuminate the MIL after engine start. The vehicle should be serviced if the light
stays on through several typical driving cycles. In most situations, the vehicle will
drive normally and not require towing.
• If the MIL flashes when the engine is running, serious conditions may exist that
could lead to immediate loss of power or severe catalytic converter damage. We
recommend you do not operate the vehicle. Have the vehicle serviced immediately.
WHAT TO DO IN EMERGENCIES
65
Page 90 of 108
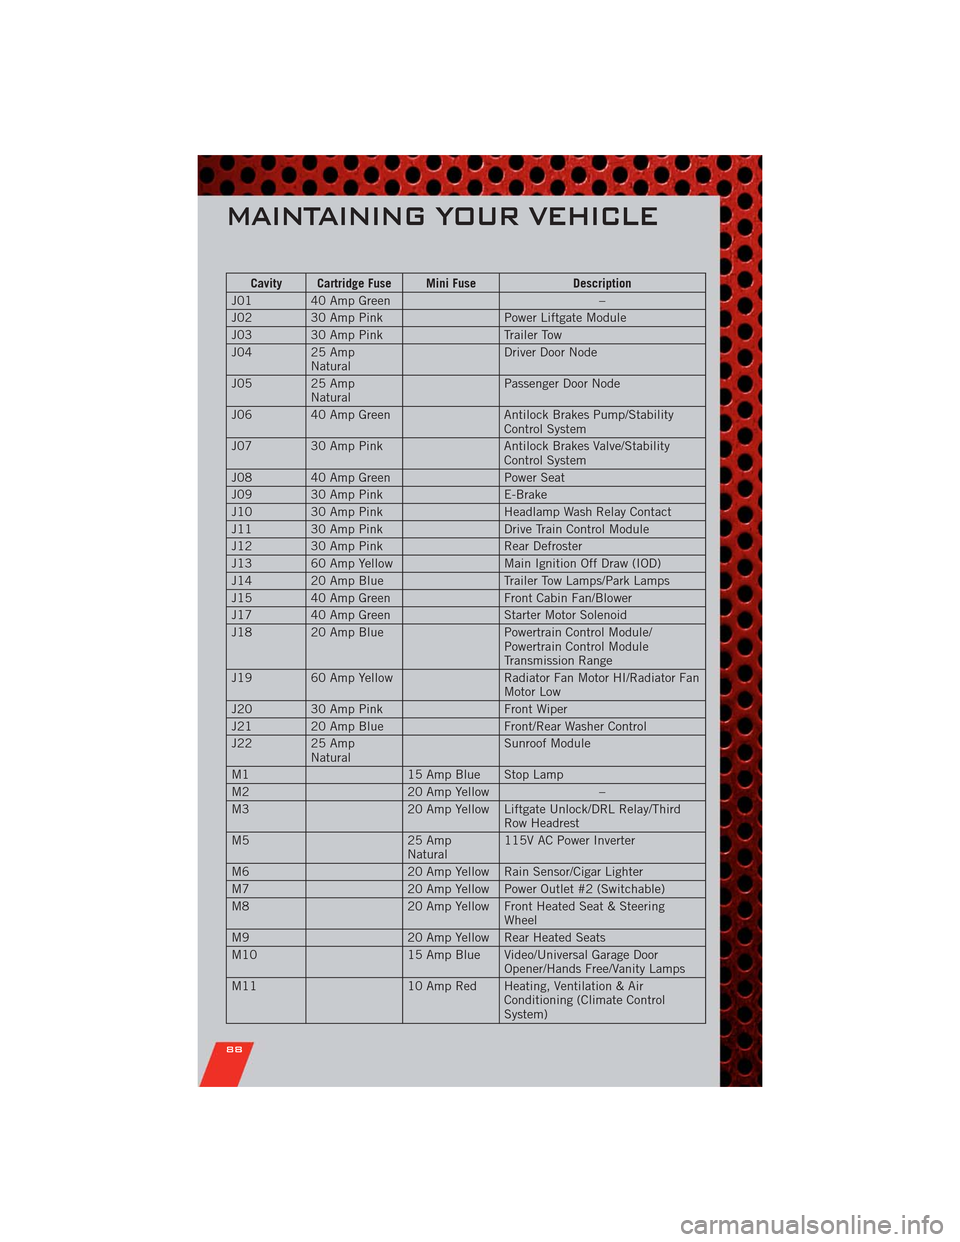
Cavity Cartridge Fuse Mini Fuse Description
J01 40 Amp Green –
J02 30 Amp Pink Power Liftgate Module
J03 30 Amp Pink Trailer Tow
J04 25 Amp
NaturalDriver Door Node
J05 25 Amp
NaturalPassenger Door Node
J06 40 Amp Green Antilock Brakes Pump/Stability
Control System
J07 30 Amp Pink Antilock Brakes Valve/Stability
Control System
J08 40 Amp Green Power Seat
J09 30 Amp Pink E-Brake
J10 30 Amp Pink Headlamp Wash Relay Contact
J11 30 Amp Pink Drive Train Control Module
J12 30 Amp Pink Rear Defroster
J13 60 Amp Yellow Main Ignition Off Draw (IOD)
J14 20 Amp Blue Trailer Tow Lamps/Park Lamps
J15 40 Amp Green Front Cabin Fan/Blower
J17 40 Amp Green Starter Motor Solenoid
J18 20 Amp Blue Powertrain Control Module/
Powertrain Control Module
Transmission Range
J19 60 Amp Yellow Radiator Fan Motor HI/Radiator Fan
Motor Low
J20 30 Amp Pink Front Wiper
J21 20 Amp Blue Front/Rear Washer Control
J22 25 Amp
NaturalSunroof Module
M1 15 Amp Blue Stop Lamp
M2 20 Amp Yellow –
M3 20 Amp Yellow Liftgate Unlock/DRL Relay/Third
Row Headrest
M5 25 Amp
Natural115V AC Power Inverter
M6 20 Amp Yellow Rain Sensor/Cigar Lighter
M7 20 Amp Yellow Power Outlet #2 (Switchable)
M8 20 Amp Yellow Front Heated Seat & Steering
Wheel
M9 20 Amp Yellow Rear Heated Seats
M10 15 Amp Blue Video/Universal Garage Door
Opener/Hands Free/Vanity Lamps
M11 10 Amp Red Heating, Ventilation & Air
Conditioning (Climate Control
System)
MAINTAINING YOUR VEHICLE
88
Page 91 of 108
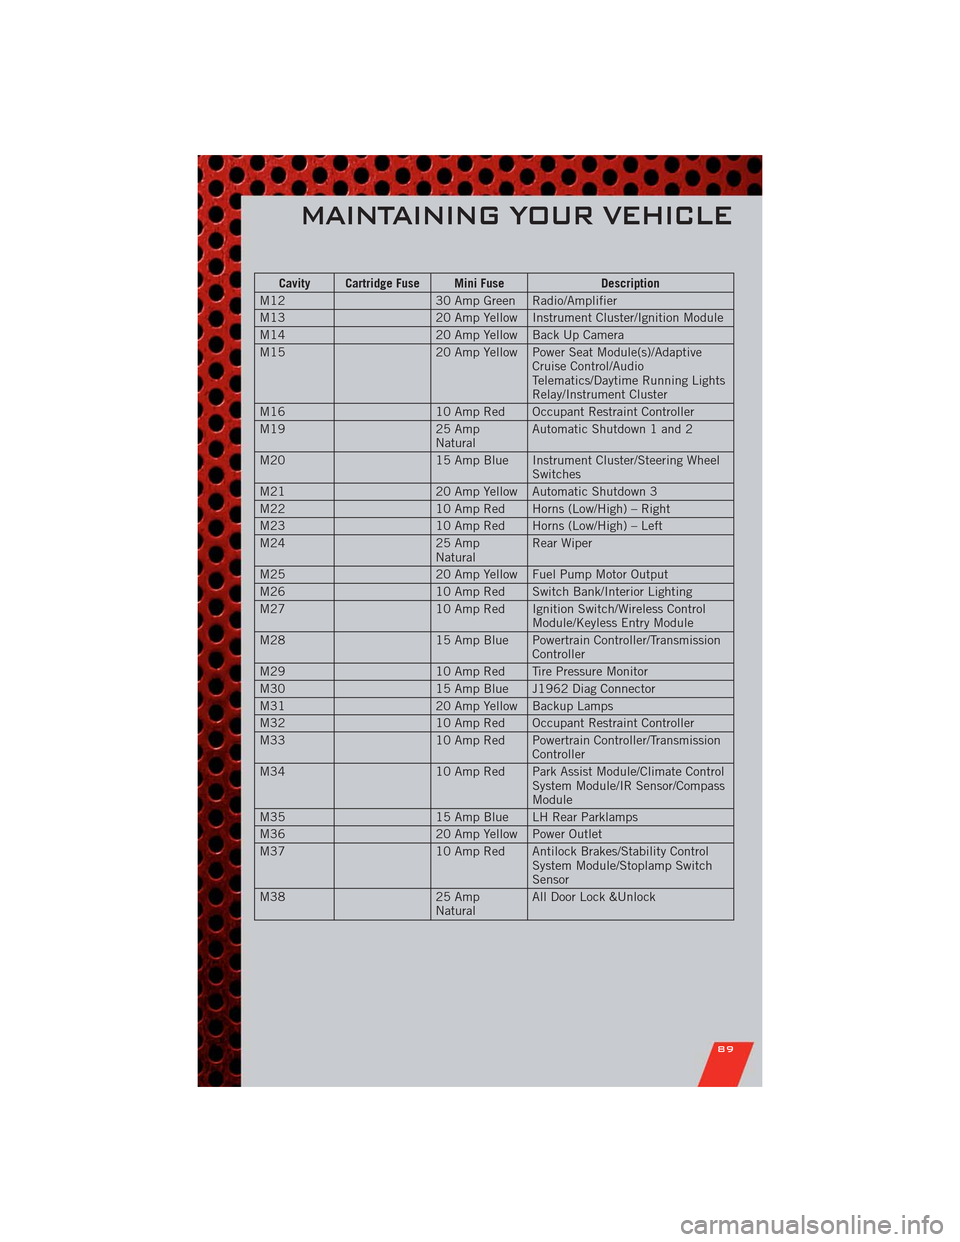
Cavity Cartridge Fuse Mini Fuse Description
M12 30 Amp Green Radio/Amplifier
M13 20 Amp Yellow Instrument Cluster/Ignition Module
M14 20 Amp Yellow Back Up Camera
M15 20 Amp Yellow Power Seat Module(s)/Adaptive
Cruise Control/Audio
Telematics/Daytime Running Lights
Relay/Instrument Cluster
M16 10 Amp Red Occupant Restraint Controller
M19 25 Amp
NaturalAutomatic Shutdown 1 and 2
M20 15 Amp Blue Instrument Cluster/Steering Wheel
Switches
M21 20 Amp Yellow Automatic Shutdown 3
M22 10 Amp Red Horns (Low/High) – Right
M23 10 Amp Red Horns (Low/High) – Left
M24 25 Amp
NaturalRear Wiper
M25 20 Amp Yellow Fuel Pump Motor Output
M26 10 Amp Red Switch Bank/Interior Lighting
M27 10 Amp Red Ignition Switch/Wireless Control
Module/Keyless Entry Module
M28 15 Amp Blue Powertrain Controller/Transmission
Controller
M29 10 Amp Red Tire Pressure Monitor
M30 15 Amp Blue J1962 Diag Connector
M31 20 Amp Yellow Backup Lamps
M32 10 Amp Red Occupant Restraint Controller
M33 10 Amp Red Powertrain Controller/Transmission
Controller
M34 10 Amp Red Park Assist Module/Climate Control
System Module/IR Sensor/Compass
Module
M35 15 Amp Blue LH Rear Parklamps
M36 20 Amp Yellow Power Outlet
M37 10 Amp Red Antilock Brakes/Stability Control
System Module/Stoplamp Switch
Sensor
M38 25 Amp
NaturalAll Door Lock &Unlock
MAINTAINING YOUR VEHICLE
89
Page 96 of 108
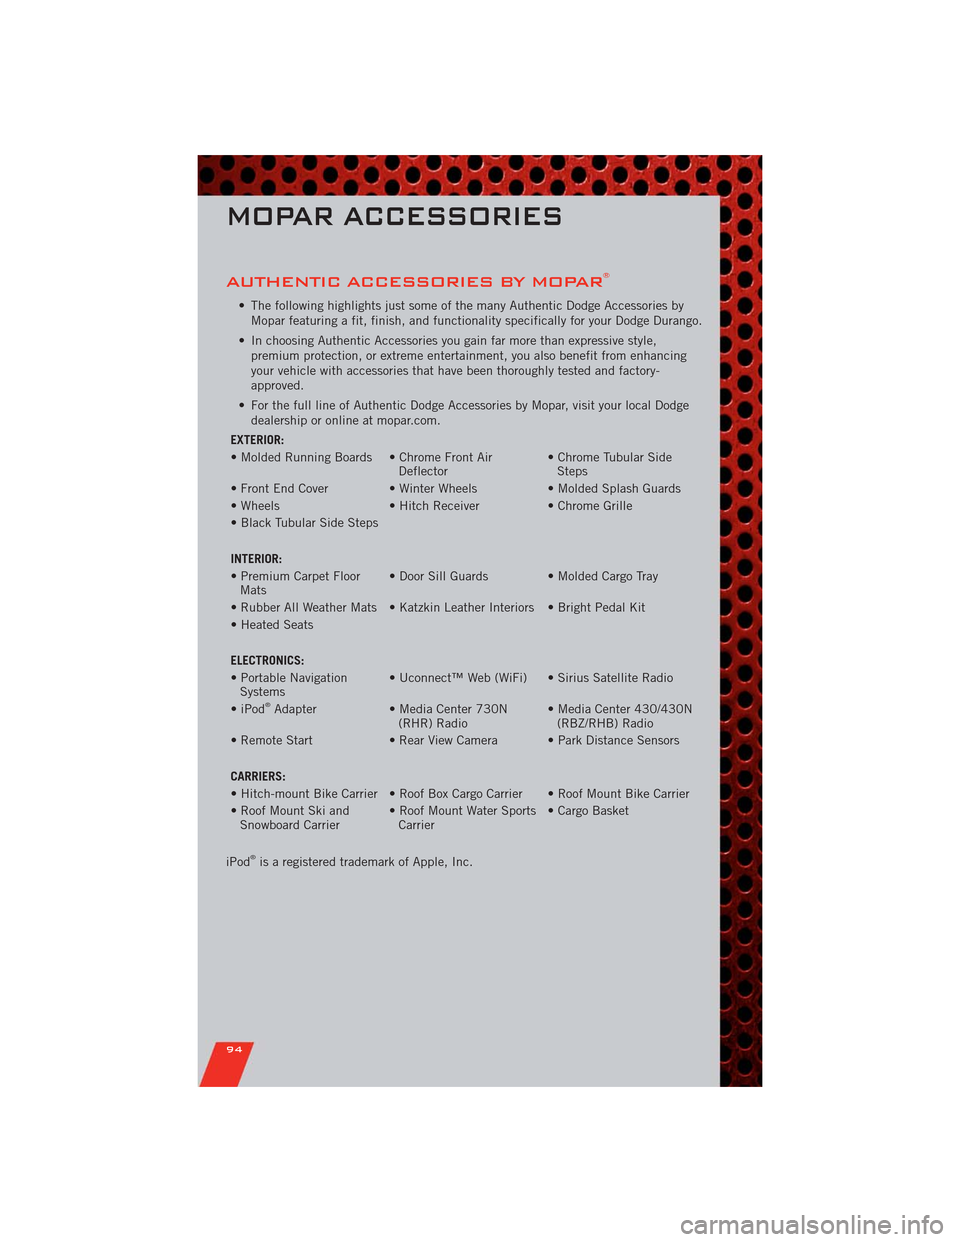
AUTHENTIC ACCESSORIES BY MOPAR®
• The following highlights just some of the many Authentic Dodge Accessories by
Mopar featuring a fit, finish, and functionality specifically for your Dodge Durango.
• In choosing Authentic Accessories you gain far more than expressive style,
premium protection, or extreme entertainment, you also benefit from enhancing
your vehicle with accessories that have been thoroughly tested and factory-
approved.
• For the full line of Authentic Dodge Accessories by Mopar, visit your local Dodge
dealership or online at mopar.com.
EXTERIOR:
• Molded Running Boards • Chrome Front Air
Deflector• Chrome Tubular Side
Steps
• Front End Cover • Winter Wheels • Molded Splash Guards
• Wheels • Hitch Receiver • Chrome Grille
• Black Tubular Side Steps
INTERIOR:
• Premium Carpet Floor
Mats• Door Sill Guards • Molded Cargo Tray
• Rubber All Weather Mats • Katzkin Leather Interiors • Bright Pedal Kit
• Heated Seats
ELECTRONICS:
• Portable Navigation
Systems• Uconnect™ Web (WiFi) • Sirius Satellite Radio
• iPod
®Adapter • Media Center 730N
(RHR) Radio• Media Center 430/430N
(RBZ/RHB) Radio
• Remote Start • Rear View Camera • Park Distance Sensors
CARRIERS:
• Hitch-mount Bike Carrier • Roof Box Cargo Carrier • Roof Mount Bike Carrier
• Roof Mount Ski and
Snowboard Carrier• Roof Mount Water Sports
Carrier• Cargo Basket
iPod
®is a registered trademark of Apple, Inc.
MOPAR ACCESSORIES
94
Page 98 of 108
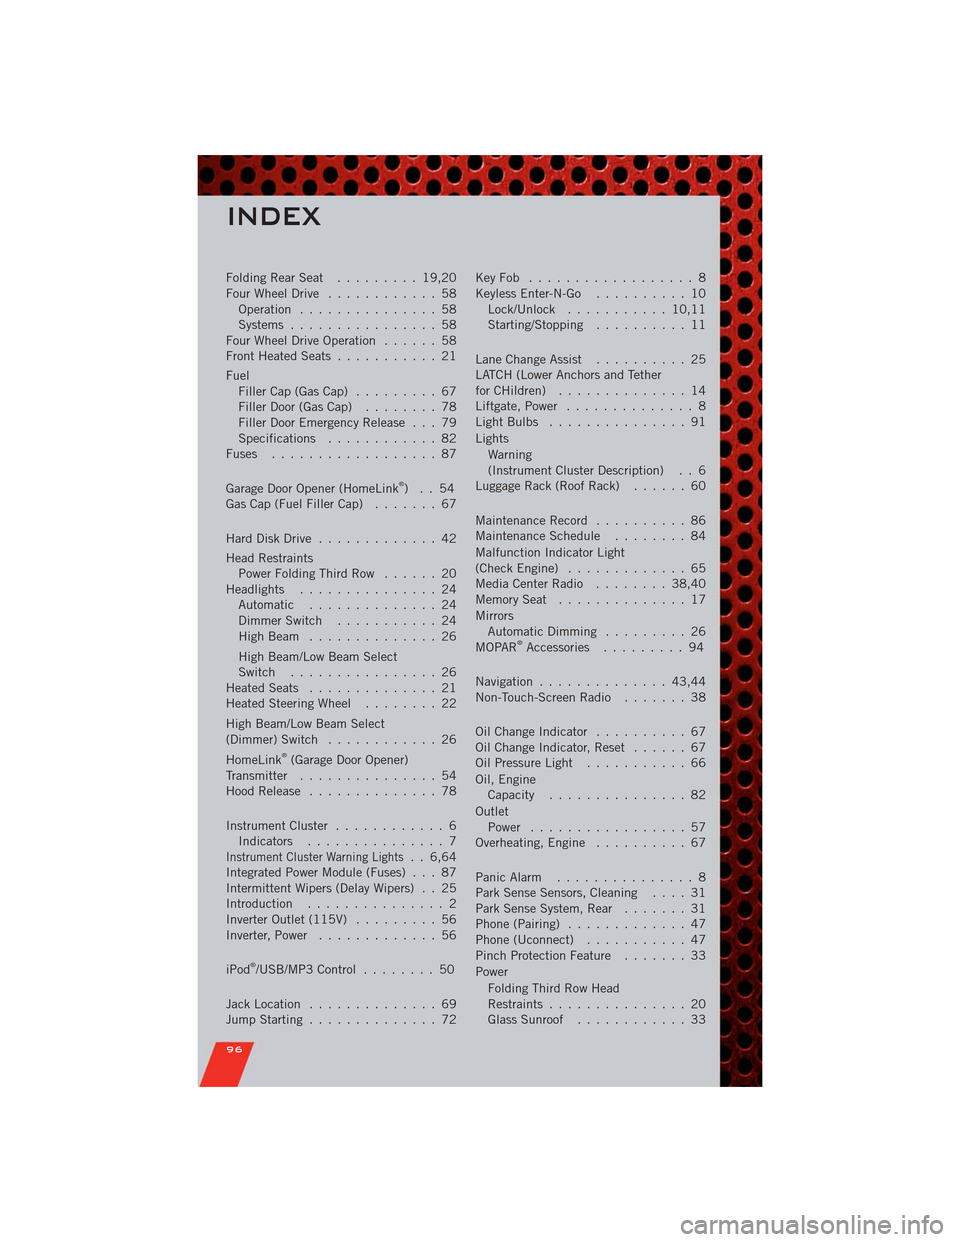
FoldingRearSeat ......... 19,20
Four Wheel Drive............ 58
Operation............... 58
Systems................ 58
Four Wheel Drive Operation...... 58
Front Heated Seats........... 21
Fuel
Filler Cap (Gas Cap)......... 67
Filler Door (Gas Cap)........ 78
Filler Door Emergency Release . . . 79
Specifications............ 82
Fuses .................. 87
Garage Door Opener (HomeLink
®)..54
Gas Cap (Fuel Filler Cap)....... 67
Hard Disk Drive............. 42
Head Restraints
Power Folding Third Row...... 20
Headlights............... 24
Automatic .............. 24
Dimmer Switch........... 24
HighBeam .............. 26
High Beam/Low Beam Select
Switch ................ 26
Heated Seats.............. 21
Heated Steering Wheel........ 22
High Beam/Low Beam Select
(Dimmer) Switch............ 26
HomeLink
®(Garage Door Opener)
Transmitter............... 54
Hood Release.............. 78
Instrument Cluster............ 6
Indicators............... 7
Instrument Cluster Warning Lights. . 6,64
Integrated Power Module (Fuses) . . . 87
Intermittent Wipers (Delay Wipers) . . 25
Introduction............... 2
Inverter Outlet (115V)......... 56
Inverter, Power............. 56
iPod
®/USB/MP3 Control........ 50
Jack Location.............. 69
Jump Starting.............. 72KeyFob .................. 8
Keyless Enter-N-Go.......... 10
Lock/Unlock........... 10,11
Starting/Stopping.......... 11
Lane Change Assist.......... 25
LATCH (Lower Anchors and Tether
forCHildren) .............. 14
Liftgate, Power.............. 8
LightBulbs ............... 91
Lights
Warning
(Instrument Cluster Description) . . 6
Luggage Rack (Roof Rack)...... 60
Maintenance Record.......... 86
MaintenanceSchedule ........ 84
Malfunction Indicator Light
(CheckEngine) ............. 65
MediaCenterRadio ........ 38,40
MemorySeat .............. 17
Mirrors
Automatic Dimming......... 26
MOPAR
®Accessories......... 94
Navigation.............. 43,44
Non-Touch-Screen Radio....... 38
Oil Change Indicator.......... 67
Oil Change Indicator, Reset...... 67
Oil Pressure Light........... 66
Oil, Engine
Capacity............... 82
Outlet
Power ................. 57
Overheating, Engine.......... 67
Panic Alarm............... 8
Park Sense Sensors, Cleaning.... 31
Park Sense System, Rear....... 31
Phone (Pairing)............. 47
Phone (Uconnect)........... 47
Pinch Protection Feature....... 33
Power
Folding Third Row Head
Restraints............... 20
Glass Sunroof............ 33
INDEX
96