check engine DODGE DURANGO 2012 3.G User Guide
[x] Cancel search | Manufacturer: DODGE, Model Year: 2012, Model line: DURANGO, Model: DODGE DURANGO 2012 3.GPages: 140, PDF Size: 4.3 MB
Page 14 of 140
• If a Key Fob is detected in the vehicle when locking the vehicle using the power doorlock switch, the doors and liftgate will unlock and the horn will chirp three times. On
the third attempt, your Key Fob can be locked inside the vehicle.
• After pressing the Keyless Enter-N-Go™ LOCK button, you must wait 2 seconds before you can lock or unlock the vehicle using the door handle. This is done to allow
you to check if the vehicle is locked by pulling the door handle, without the vehicle
reacting and unlocking.
• If a Keyless Enter-N-Go™ door handle has not been used for 72 hours, the Keyless Enter-N-Go™ feature for that handle may time out. Pulling the deactivated front door
handle will reactivate the door handle's Keyless Enter-N-Go™ feature.
Lock or Unlock the Liftgate:
• With a valid Keyless Enter-N-Go™ KeyFob within 3 ft (1.0 m) of the liftgate,
press the button located to the right of
the liftgate handle to unlock the
liftgate. Press the button a second
time to lock the liftgate.
NOTE:
• Refer to your Owner's Manual on the DVD for further information.
Installing And Removing The ENGINE START/STOP Button
Installing The Button
• Remove the Key Fob from the ignition switch.
• Insert the ENGINE START/STOP button into the ignition switch with the lettering facing up and readable.
• Press firmly on the center of the button to secure it into position.
Removing The Button • The ENGINE START/STOP button can be removed from the ignition switch for Key Fob use.
• Insert the metal part of the emergency key under the chrome bezel at the 6 o’clock position and gently pry the button
loose.
NOTE:
• The ENGINE START/STOP button should only be removed or inserted with the
ignition in the LOCK position (OFF
position for Keyless Enter-N-Go™).
GETTING STARTED
12
Page 92 of 140
• When the malfunction indicator is illuminated, the system may not be able todetect or signal low tire pressure as intended. TPMS malfunctions may occur for a
variety of reasons, including the installation of replacement or alternate tires or
wheels on the vehicle that prevent the TPMS from functioning properly. Always
check the TPMS malfunction telltale after replacing one or more tires or wheels on
your vehicle, to ensure that the replacement or alternate tires and wheels allow the
TPMS to continue to function properly.
NOTE: Tire pressures change by approximately 1 psi (7 kPa) per 12° F (7° C) of air
temperature change. Keep this in mind when checking tire pressure inside a garage,
especially in the Winter. Example: If garage temperature is 68°F (20°C) and the outside
temperature is 32°F (0°C), then the cold tire inflation pressure should be increased by
3 psi (21 kPa), which equals 1 psi (7 kPa) for every 12°F (7°C) for this outside
temperature condition.
CAUTION!
The TPMS has been optimized for the original equipment tires and wheels.
TPMS pressures and warning have been established for the tire size equipped
on your vehicle. Undesirable system operation or sensor damage may result
when using replacement equipment that is not of the same size, type, and/or
style. Aftermarket wheels can cause sensor damage. Do not use tire sealant
from a can, or balance beads if your vehicle is equipped with a TPMS, as
damage to the sensors may result.
BRAKE- Brake Warning Light
• The Brake Warning light illuminates when there is either a system malfunction or the parking brake is applied. If the light is on and the parking brake is not applied,
it indicates a possible brake hydraulic malfunction, brake booster problem or an
Anti-Lock Brake System problem.
• Please have your vehicle serviced immediately.
WARNING!
Driving a vehicle with the red brake light on is dangerous. Part of the brake
system may have failed. It will take longer to stop the vehicle. You could have a
collision. Have the vehicle checked immediately.
- Malfunction Indicator Light (MIL)
• Certain conditions, such as a loose or missing gas cap, poor fuel quality, etc., may illuminate the MIL after engine start. The vehicle should be serviced if the light
stays on through several typical driving cycles. In most situations, the vehicle will
drive normally and not require towing.
• If the MIL flashes when the engine is running, serious conditions may exist that could lead to immediate loss of power or severe catalytic converter damage. We
recommend you do not operate the vehicle. Have the vehicle serviced immediately.
WHAT TO DO IN EMERGENCIES
90
Page 94 of 140
- Air Bag Warning Light
• If the light is not on during starting, stays on, or turns on while driving, have thevehicle serviced by an authorized service center immediately.
Fuel Cap/Loose Gas Cap Message
• If a “gas cap” message (shown as Check Gascap) appears, tighten the gas capuntil a “clicking” sound is heard.
• If the message continues to appear for more than three days after tightening the gas cap, have the vehicle serviced by an authorized service center immediately.
Oil Change Indicator
Message
• If an “oil change” message (shown as Oil Change Due) appears and a single chime sounds, it is time for your next required oil change.
Resetting The Light After Servicing
Vehicles Equipped With Keyless Enter-N-Go™ • Without pressing the brake pedal, push the ENGINE START/STOP button and cycle the ignition to the ON/RUN position (Do not start the engine.)
• Fully depress the accelerator pedal, slowly, three times within 10 seconds.
• Without pressing the brake pedal, push the ENGINE START/STOP button once to return the ignition to the OFF/LOCK position.
Vehicles Not Equipped With Keyless Enter-N-Go™
• Turn the ignition switch to the ON/RUN position (Do not start the engine.)
• Fully depress the accelerator pedal, slowly, three times within 10 seconds.
• Turn the ignition switch to the OFF/LOCK position.
IF YOUR ENGINE OVERHEATS
• In any of the following situations, you can reduce the potential for overheating by taking the appropriate action.
• On the highways — slow down.
• In city traffic — while stopped, place the transmission in NEUTRAL, but do not increase engine idle speed.
NOTE: There are steps that you can take to slow down an impending overheat
condition:
• If your air conditioner (A/C) is on, turn it off. The A/C system adds heat to the engine cooling system and turning the A/C off can help remove this heat.
• You can also turn the temperature control to maximum heat, the mode control to floor and the blower control to high. This allows the heater core to act as a
supplement to the radiator and aids in removing heat from the engine cooling
system.
WHAT TO DO IN EMERGENCIES
92
Page 128 of 140
Adaptive Cruise Control (ACC) (Cruise
Control)................. 30
Air Conditioning ............ 35
Airbag .................. 15
AirbagLight ............... 92
Alarm, Panic ............... 8
All Wheel Drive (AWD) ......... 83
Anti-Lock Brake System (ABS) .... 91
Arming Theft System
(Security Alarm) ............ 14
Audio Settings . . . 42,43,44,46,49,58
Automatic Dimming Mirror ...... 29
Automatic Headlights ......... 27
Automatic Temperature
Control (ATC) .............. 35
Air Recirculation ........... 35
Automatic Operation ........ 35
Rear Temperature Control ...... 35
SYNC Temperature Button ..... 36
Automatic Transmission FluidType .............. 113
Auxiliary Audio/Video Input Jacks . . 75
AxleFluid ............ 113,114
Back-UpCamera ............ 37
Battery Charging System Light ....... 91
Belts, Seat ............... 14
Blind Spot Monitoring ......... 37
BrakeFluid ........... 113,114
Brake System WarningLight ............ 90
Break-In Recommendations,
New Vehicle ............... 27
Bulb Replacement .......... 122
Button, Start/Stop Removal ..... 8,12
Calibration, Compass ......... 76
Cargo Compartment Luggage Carrier ........... 85
Change Oil Indicator .......... 92
Changing A Flat Tire .......... 94
Charging System Light ......... 91
Check Engine Light (Malfunction
Indicator Light) ............. 90
Child Restraint ............. 16
Child Restraint Tether Anchors .... 16
ClimateControl ............. 35 Clock Setting
........ 42,44,47,55
Compass Calibration .......... 76
Cooling System Coolant Capacity .......... 113
Cruise Control (Speed Control) .... 30
CruiseLight ............... 30
Customer Assistance ......... 123
Defects, Reporting .......... 124
Dimmer Control ............. 28
Dimmer Switch, Headlight ...... 28
Disarming, Theft System ....... 14
E-85Fuel ............... 114
ECO ................... 76
Electronic Range Select (ERS) .... 34
Electronic Speed Control
(CruiseControl) ............. 30
Electronic Stability Control (ESC) . . 91
Electronic Throttle Control
WarningLight .............. 91
Electronic Vehicle Information Center
(EVIC) ................ 76,77
Electronically Shifted Transfer
Case ................... 83
Electronics Your Vehicle's Sound System .... 40
Emergency Key .............. 8
Emergency, In Case of Jacking ................ 94
Overheating ............. 92
Engine Break-In Recommendations .... 27
Compartment ............
111
Coolant (Antifreeze) ........ 113
Malfunction Indicator
(CheckEngine) ............ 90
Oil .................. 113
Oil Filter .............. 113
Oil Selection ............ 113
Overheating ............. 92
Starting ................ 13
Stopping ............... 13
EventDataRecorder ......... 108
Exterior Lights ............ 122
Flexible Fuel Vehicles ........ 114
INDEX
126
Page 129 of 140
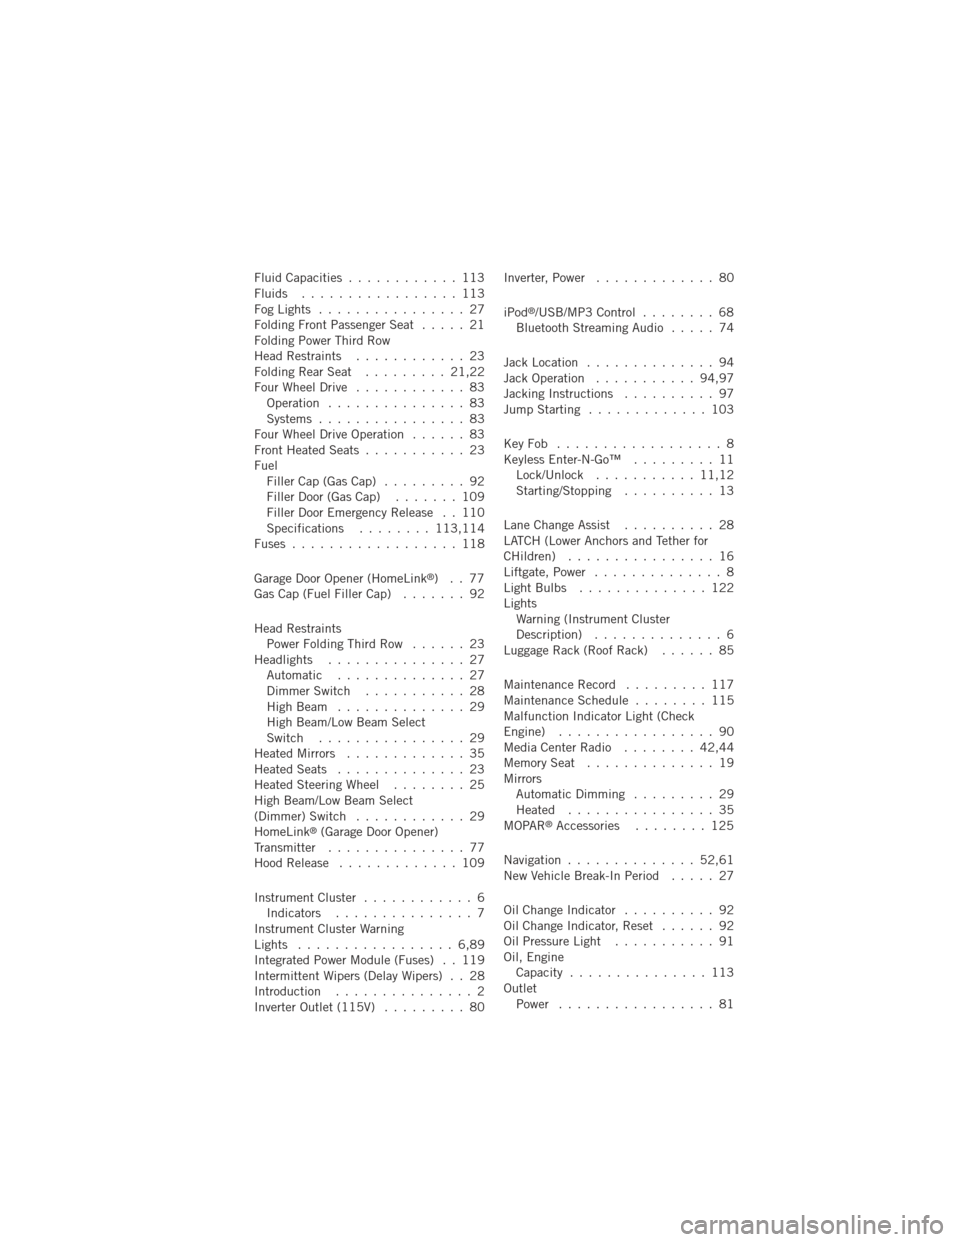
Fluid Capacities............ 113
Fluids ................. 113
FogLights ................ 27
Folding Front Passenger Seat ..... 21
Folding Power Third Row
Head Restraints ............ 23
FoldingRearSeat ......... 21,22
Four Wheel Drive ............ 83
Operation ............... 83
Systems ................ 83
Four Wheel Drive Operation ...... 83
Front Heated Seats ........... 23
Fuel Filler Cap (Gas Cap) ......... 92
Filler Door (Gas Cap) ....... 109
Filler Door Emergency Release . . 110
Specifications ........113,114
Fuses .................. 118
Garage Door Opener (HomeLink
®)..77
Gas Cap (Fuel Filler Cap) ....... 92
Head Restraints Power Folding Third Row ...... 23
Headlights ............... 27 Automatic .............. 27
Dimmer Switch ........... 28
HighBeam .............. 29
High Beam/Low Beam Select
Switch ................ 29
Heated Mirrors ............. 35
Heated Seats .............. 23
Heated Steering Wheel ........ 25
High Beam/Low Beam Select
(Dimmer) Switch ............ 29
HomeLink
®(Garage Door Opener)
Transmitter ............... 77
Hood Release ............. 109
Instrument Cluster ............ 6
Indicators ............... 7
Instrument Cluster Warning
Lights ................. 6,89
Integrated Power Module (Fuses) . . 119
Intermittent Wipers (Delay Wipers) . . 28
Introduction ............... 2
Inverter Outlet (115V) ......... 80Inverter, Power
............. 80
iPod
®/USB/MP3 Control ........ 68
Bluetooth Streaming Audio ..... 74
Jack Location .............. 94
Jack Operation ........... 94,97
Jacking Instructions .......... 97
Jump Starting ............. 103
KeyFob .................. 8
Keyless Enter-N-Go™ ......... 11
Lock/Unlock ........... 11,12
Starting/Stopping .......... 13
Lane Change Assist .......... 28
LATCH (Lower Anchors and Tether for
CHildren) ................ 16
Liftgate, Power .............. 8
LightBulbs .............. 122
Lights Warning (Instrument Cluster
Description) .............. 6
Luggage Rack (Roof Rack) ...... 85
Maintenance Record ......... 117
MaintenanceSchedule ........ 115
Malfunction Indicator Light (Check
Engine) ................. 90
MediaCenterRadio ........ 42,44
MemorySeat .............. 19
Mirrors Automatic Dimming ......... 29
Heated ................ 35
MOPAR
®Accessories ........ 125
Navigation .............. 52,61
New Vehicle Break-In Period ..... 27
Oil Change Indicator .......... 92
Oil Change Indicator, Reset ...... 92
Oil Pressure Light ........... 91
Oil, Engine Capacity ............... 113
Outlet Power ................. 81
INDEX
127