brake DODGE DURANGO 2013 3.G Owner's Manual
[x] Cancel search | Manufacturer: DODGE, Model Year: 2013, Model line: DURANGO, Model: DODGE DURANGO 2013 3.GPages: 140, PDF Size: 4.38 MB
Page 94 of 140
Shifting Into NEUTRAL
Use the following procedure to prepare your vehicle for recreational towing.
• Bring the vehicle to a complete stop and shift the transmission to PARK.
• Turn the engine off.
• For vehicles with Keyless Enter-N-Go, remove the Keyless Enter-N-Go button and use theKey Fob to complete this procedure.
• Turn the ignition switch to the ON/RUN position, but do not start the engine.
• Press and hold the brake pedal and shift the transmission into NEUTRAL.
• Press and hold the transfer case N (Neutral) button for four seconds, until the light next to the N symbol starts to blink, indicating shift in progress. The light will stop blinking
(stay on solid) when the shift to N (Neutral) is complete.
• Start the engine and shift the transmission into REVERSE.
• Release the brake pedal for five seconds and ensure that there is no vehicle movement.
• Turn the engine off and firmly apply the parking brake.
• Shift the transmission into PARK and remove the Key Fob.
• Attach the vehicle to the tow vehicle using a suitable tow bar and release the parking brake.
CAUTION!
•Towing with the rear wheels on the ground will cause severe transmission damage.
Damage from improper towing is not covered under the New Vehicle Limited Warranty.
• Front or rear wheel lifts should not be used. Internal damage to the transmission or
transfer case will occur if a front or rear wheel lift is used when recreational towing.
• It is necessary to follow these steps to be certain that the transfer case is fully in NEUTRAL before recreational towing to prevent damage to internal parts.
WARNING!
You or others could be injured if you leave the vehicle unattended with the transfer case
in the NEUTRAL position without first fully engaging the parking brake. The transfer case
NEUTRAL position disengages both the front and rear driveshafts from the powertrain
and will allow the vehicle to move even if the transmission is in PARK. The parking brake
should always be applied when the driver is not in the vehicle.
UTILITY
92
Page 96 of 140
•When the malfunction indicator is illuminated, the system may not be able to detect or signal
low tire pressure as intended. TPMS malfunctions may occur for a variety of reasons, including
the installation of replacement or alternate tires or wheels on the vehicle that prevent the
TPMS from functioning properly. Always check the TPMS malfunction telltale after replacing
one or more tires or wheels on your vehicle, to ensure that the replacement or alternate tires
and wheels allow the TPMS to continue to function properly.
NOTE:
Tire pressures change by approximately 1 psi (7 kPa) per 12° F (7° C) of air temperature
change. Keep this in mind when checking tire pressure inside a garage, especially in the
Winter. Example: If garage temperature is 68°F (20°C) and the outside temperature is 32°F
(0°C), then the cold tire inflation pressure should be increased by 3 psi (21 kPa), which equals
1 psi (7 kPa) for every 12°F (7°C) for this outside temperature condition.
CAUTION!
The TPMS has been optimized for the original equipment tires and wheels. TPMS
pressures and warning have been established for the tire size equipped on your vehicle.
Undesirable system operation or sensor damage may result when using replacement
equipment that is not of the same size, type, and/or style. Aftermarket wheels can cause
sensor damage. Do not use tire sealant from a can, or balance beads if your vehicle is
equipped with a TPMS, as damage to the sensors may result.
BRAKE- Brake Warning Light
• The Brake Warning light illuminates when there is either a system malfunction or the parking brake is applied. If the light is on and the parking brake is not applied, it indicates
a possible brake hydraulic malfunction, brake booster problem or an Anti-Lock Brake
System problem.
• Please have your vehicle serviced immediately.
WARNING!
Driving a vehicle with the red brake light on is dangerous. Part of the brake system may
have failed. It will take longer to stop the vehicle. You could have a collision. Have the
vehicle checked immediately.
- Malfunction Indicator Light (MIL)
• Certain conditions, such as a loose or missing gas cap, poor fuel quality, etc., may illuminate the MIL after engine start. The vehicle should be serviced if the light stays on
through several typical driving cycles. In most situations, the vehicle will drive normally
and not require towing.
• If the MIL flashes when the engine is running, serious conditions may exist that could lead to immediate loss of power or severe catalytic converter damage. We recommend
you do not operate the vehicle. Have the vehicle serviced immediately.
WHAT TO DO IN EMERGENCIES
94
Page 97 of 140
- Electronic Stability Control (ESC) Activation/Malfunction Indicator Light
• If the “ESC Activation/Malfunction Indicator Light” comes on continuously with the engine running, a malfunction has been detected in the ESC system. If this light remains
on after several ignition cycles, and the vehicle has been driven several miles (kilome-
ters) at speeds greater than 30 mph (48 km/h), we recommend you drive to the nearest
service center and have the vehicle serviced immediately.
•
The “ESC Activation/Malfunction Indicator Light” starts to flash as soon as the tires lose
traction and the ESC system becomes active. If the light begins to flash during acceleration,
ease up on the accelerator and apply as little throttle as possible. Be sure to adapt your
speed and driving to the prevailing road conditions. The light also flashes when TCS is
active. To improve the vehicle's traction when starting off in deep snow, sand or gravel, it
may be desirable to switch the ESC system to Partial Off mode by momentarily pressing the
ESC Off
switch located below the climate controls, on the switch panel.
- Charging System Light
•
This light shows the status of the electrical charging system. If the charging system light
remains on, it means that the vehicle is experiencing a problem with the charging system.
• We recommend you do not continue driving if the charging system light is on. Have the vehicle serviced immediately.
- Oil Pressure Warning Light
• This light indicates low engine oil pressure. If the light turns on while driving, stop the vehicle and shut off the engine as soon as possible. A chime will sound for four minutes
when this light turns on.
• We recommend you do not operate the vehicle or engine damage will occur. Have the vehicle serviced immediately.
- Anti-Lock Brake (ABS) Light
• This light monitors the Anti-Lock Brake System (ABS).
• If the light is not on during starting, stays on, or turns on while driving, we recommend you drive to the nearest service center and have the vehicle serviced immediately.
- Electronic Throttle Control (ETC) Light
• This light informs you of a problem with the Electronic Throttle Control (ETC) system.
• If a problem is detected, the light will come on while the engine is running. Cycle the ignition key when the vehicle has completely stopped and the shift lever is placed in the
PARK position; the light should turn off.
• If the light remains lit with the engine running, your vehicle will usually be drivable; however, see an authorized service center immediately. If the light is flashing when the
engine is running, immediate service is required and you may experience reduced
performance, an elevated/rough idle or engine stall and your vehicle may require towing.
- Air Bag Warning Light
• If the light is not on during starting, stays on, or turns on while driving, have the vehicle serviced by an authorized service center immediately.
WHAT TO DO IN EMERGENCIES
95
Page 98 of 140
Fuel Cap/Loose Gas Cap Message
• If a “gas cap” message (shown as Check Gascap) appears, tighten the gas cap until a“clicking” sound is heard.
• If the message continues to appear for more than three days after tightening the gas cap, have the vehicle serviced by an authorized service center immediately.
Oil Change Indicator
• Your vehicle is equipped with an engine oil change indicator system. The “Oil Change Due” message will flash in the EVIC display for approximately 10 seconds after a single
chime has sounded, to indicate the next scheduled oil change interval. The engine oil
change indicator system is duty cycle based, which means the engine oil change interval
may fluctuate, dependent upon your personal driving style
• Unless reset, this message will continue to display each time you turn the ignition switch to the ON/RUN position or cycle the ignition to the ON/RUN position if equipped with
Keyless Enter-N-Go™. To turn off the message temporarily, press and release the MENU
button. To reset the oil change indicator system (after performing the scheduled main-
tenance) refer to the following procedure.
Vehicles Equipped With Keyless Enter-N-Go™
1. Without pressing the brake pedal, cycle the ignition to the ON/RUN position (Do not start the engine).
2. Fully depress the accelerator pedal, slowly, three times within 10 seconds.
3. Cycle the ignition to the OFF/LOCK position.
Vehicles Not Equipped With Keyless Enter-N-Go™
1. Turn the ignition switch to the ON/RUN position (Do not start the engine).
2. Fully depress the accelerator pedal, slowly, three times within 10 seconds.
3. Turn the ignition switch to the OFF/LOCK position.
NOTE:
If the indicator message illuminates when you start the vehicle, the oil change indicator
system did not reset. If necessary, repeat this procedure.
Resetting The Light After Servicing
Vehicles Equipped With Keyless Enter-N-Go™
• Without pressing the brake pedal, push the ENGINE START/STOP button and cycle the ignition to the ON/RUN position (Do not start the engine.)
• Fully depress the accelerator pedal, slowly, three times within 10 seconds.
• Without pressing the brake pedal, push the ENGINE START/STOP button once to return the ignition to the OFF/LOCK position.
WHAT TO DO IN EMERGENCIES
96
Page 103 of 140
7. Pinch the three short and two long tubes to remove the protective plate from the steelspare wheel.
Preparations For Jacking
1. Park the vehicle on a firm level surface, away from traffic for your safety.
2. Turn the engine off, place the transmission in PARK, fully depress the pedal to the floor to set the parking brake, and activate the Hazard Warning flashers.
3. Block both the front and rear of the wheel diagonally opposite of the jacking position.
NOTE:
Passengers should not remain in the vehicle
when the vehicle is being jacked.
Jacking Instructions
1. Loosen the lug nuts on the road wheel one turn while still on the ground, but do not
remove.
WHAT TO DO IN EMERGENCIES
101
Page 108 of 140
WARNING!
• Do not attempt to change a tire on the side of the vehicle close to moving traffic. Pullfar enough off the road to avoid the danger of being hit when operating the jack or
changing the wheel.
• Being under a jacked-up vehicle is dangerous. The vehicle could slip off the jack and
fall on you. You could be crushed. Never put any part of your body under a vehicle that
is on a jack. If you need to get under a raised vehicle, take it to a service center where
it can be raised on a lift.
• The jack is designed to be used as a tool for changing tires only. The jack should not
be used to lift the vehicle for service purposes. The vehicle should be jacked on a firm
level surface only. Avoid ice or slippery areas.
• Always park on a firm, level surface as far from the edge of the roadway as possible
before raising the vehicle.
• Turn on the Hazard Warning flasher.
• Block the wheel diagonally opposite the wheel to be raised.
• Set the parking brake firmly and set the automatic transmission in PARK.
• Never start or run the engine with the vehicle on a jack.
• Do not let anyone sit in the vehicle when it is on a jack.
• Do not get under the vehicle when it is on a jack.
• Only use the jack in the positions indicated and for lifting this vehicle during a tire
change.
• If working on or near a roadway, be extremely careful of motor traffic.
• To assure that spare tires, flat or inflated, are securely stowed, spares must be
stowed with the valve stem facing the ground. Carefully follow these tire changing
warnings to help prevent personal injury or damage to your vehicle:
• Raising the vehicle higher than necessary can make the vehicle less stable.It could slip off the jack and hurt someone near it. Raise the vehicle only
enough to remove the tire.
• To avoid the risk of forcing the vehicle off the jack, do not fully tighten the
wheel nuts until the vehicle has been lowered. Failure to follow this warning
may result in personal injury.
• Do not use power tools to winch the tire up or down. Impact-type tools may
damage the winch mechanism.
• A loose tire or jack, thrown forward in a collision or hard stop could endanger
the occupants of the vehicle. Always stow the jack parts and the spare tire in
the places provided.
• To avoid the risk of forcing the vehicle off the jack, do not tighten the lug nuts
fully until the vehicle is lowered to the ground.
WHAT TO DO IN EMERGENCIES
106
Page 109 of 140
BATTERY LOCATION
• The battery in your vehicle is located under the passenger's front seat. Remote batteryposts are located on the right side of the engine compartment for jump-starting.
JUMP-STARTING
• If your vehicle has a discharged battery it can be jump-started using a set of jumpercables and a battery in another vehicle or by using a portable battery booster pack.
• Jump-starting can be dangerous if done improperly so please follow the procedures in this section carefully.
NOTE:
When using a portable battery booster pack follow the manufacturer’s operating instruc-
tions and precautions.
Preparations for Jump-Start
•
The battery in your vehicle is located under
the passengers front seat. There are re-
mote locations under the hood to assist in
jump starting.
•Set the parking brake, shift the automatic
transmission into PARK and turn the ignition
to OFF.
•Turn off the heater, radio, and all unneces-
sary electrical accessories.
•Remove the protective cover over the remote
positive (+) battery post. Pull upward on the
cover to remove it.
• If using another vehicle to jump-start the
battery, park the vehicle within the jumper
cables reach, set the parking brake and make sure the ignition is OFF.
WHAT TO DO IN EMERGENCIES
107
Page 112 of 140
SHIFT LEVER OVERRIDE
•If a malfunction occurs and the shift lever
cannot be moved out of the PARK position,
you can use the following procedure to
temporarily move the shift lever:
• To access the shift lever override, re-
move the rubber cupholder liner to the
right of the shift lever.
• Firmly set the parking brake.
• Turn the ignition switch to the ACC or ON position without starting the engine.
• Press and maintain firm pressure on the brake pedal.
• Using a screwdriver or similar tool, press and hold the override tab through
the access port on the center console.
• Move the shift lever into the NEUTRAL position.
• The vehicle may then be started in NEUTRAL.
• Reinstall the override cover.
WHAT TO DO IN EMERGENCIES
110
Page 115 of 140
EVENT DATA RECORDER (EDR)
• This vehicle is equipped with an Event Data Recorder (EDR). The main purpose of an EDRis to record, in certain crash or near crash-like situations, such as an air bag deployment
or hitting a road obstacle, data that will assist in understanding how a vehicle’s systems
performed. The EDR is designed to record data related to vehicle dynamics and safety
systems for a short period of time, typically 30 seconds or less. The EDR in this vehicle is
designed to record such data as:• How various systems in your vehicle were operating.
• Whether or not the driver and passenger safety belts were buckled/fastened.
• How far (if at all) the driver was depressing the accelerator and/or brake pedal.
• How fast the vehicle was traveling.
• These data can help provide a better understanding of the circumstances in which crashes and injuries occur.
NOTE:
EDR data are recorded by your vehicle only if a non-trivial crash situation occurs; no data are
recorded by the EDR under normal driving conditions and no personal data (e.g. name,
gender, age, and crash location) are recorded. However, other parties, such as law enforce-
ment, could combine the EDR data with the type of personally identifying data routinely
acquired during a crash investigation.
• To read data recorded by an EDR, special equipment is required, and access to the vehicle or the EDR is needed. In addition to the vehicle manufacturer, other parties such
as law enforcement, that have the special equipment, can read the information if they
have access to the vehicle or the EDR.
WHAT TO DO IN EMERGENCIES
113
Page 120 of 140
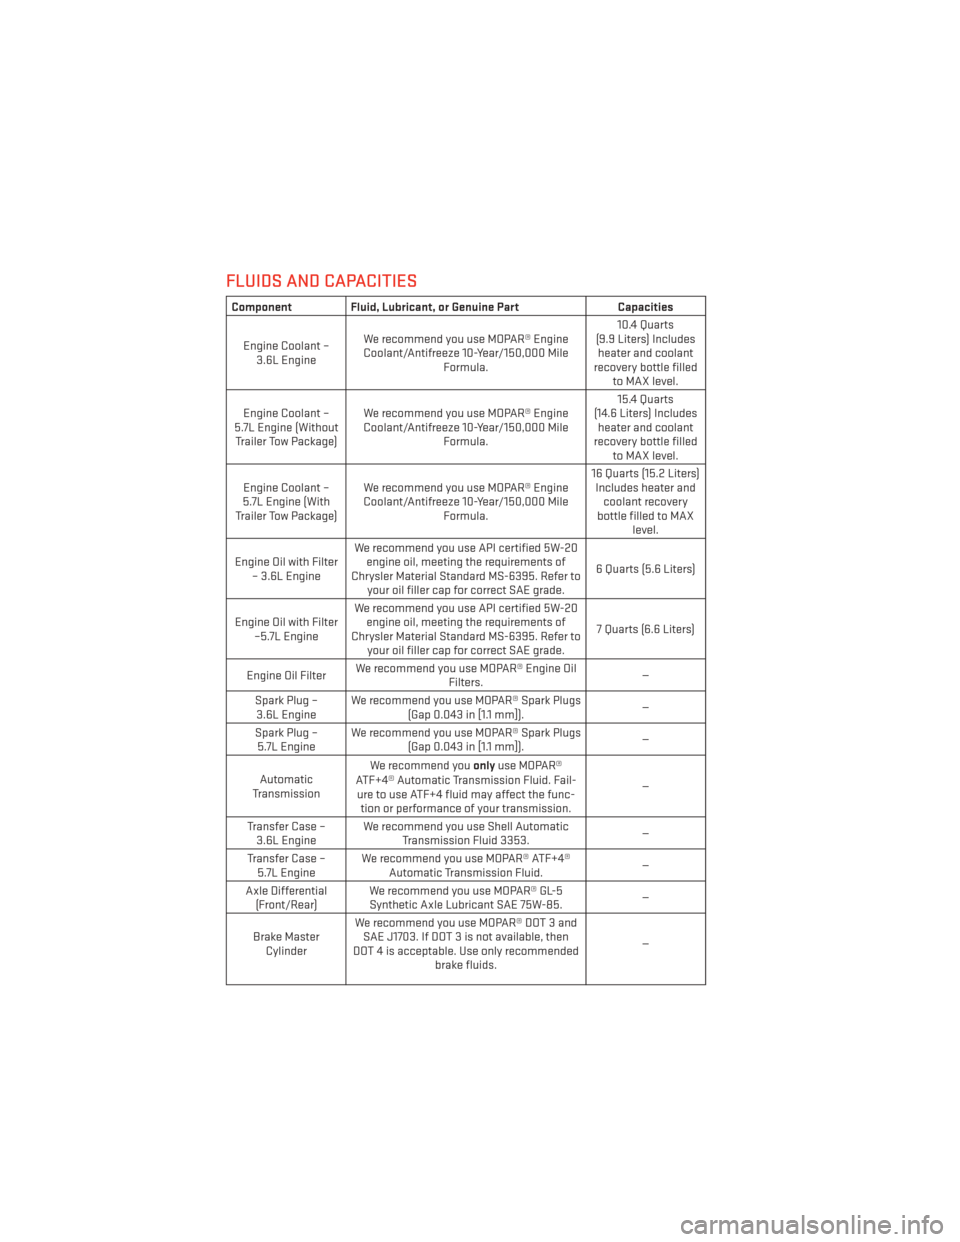
FLUIDS AND CAPACITIES
Component Fluid, Lubricant, or Genuine PartCapacities
Engine Coolant – 3.6L Engine We recommend you use MOPAR® Engine
Coolant/Antifreeze 10-Year/150,000 Mile Formula. 10.4 Quarts
(9.9 Liters) Includes heater and coolant
recovery bottle filled to MAX level.
Engine Coolant –
5.7L Engine (Without Trailer Tow Package) We recommend you use MOPAR® Engine
Coolant/Antifreeze 10-Year/150,000 Mile Formula. 15.4 Quarts
(14.6 Liters) Includes heater and coolant
recovery bottle filled to MAX level.
Engine Coolant –
5.7L Engine (With
Trailer Tow Package) We recommend you use MOPAR® Engine
Coolant/Antifreeze 10-Year/150,000 Mile Formula. 16 Quarts (15.2 Liters)
Includes heater and coolant recovery
bottle filled to MAX level.
Engine Oil with Filter – 3.6L Engine We recommend you use API certified 5W-20
engine oil, meeting the requirements of
Chrysler Material Standard MS-6395. Refer to your oil filler cap for correct SAE grade. 6 Quarts (5.6 Liters)
Engine Oil with Filter –5.7L Engine We recommend you use API certified 5W-20
engine oil, meeting the requirements of
Chrysler Material Standard MS-6395. Refer to your oil filler cap for correct SAE grade. 7 Quarts (6.6 Liters)
Engine Oil Filter We recommend you use MOPAR® Engine Oil
Filters. —
Spark Plug – 3.6L Engine We recommend you use MOPAR® Spark Plugs
(Gap 0.043 in [1.1 mm]). —
Spark Plug – 5.7L Engine We recommend you use MOPAR® Spark Plugs
(Gap 0.043 in [1.1 mm]). —
Automatic
Transmission We recommend you
onlyuse MOPAR®
ATF+4® Automatic Transmission Fluid. Fail- ure to use ATF+4 fluid may affect the func- tion or performance of your transmission. —
Transfer Case – 3.6L Engine We recommend you use Shell Automatic
Transmission Fluid 3353. —
Transfer Case – 5.7L Engine We recommend you use MOPAR® ATF+4®
Automatic Transmission Fluid. —
Axle Differential (Front/Rear) We recommend you use MOPAR® GL-5
Synthetic Axle Lubricant SAE 75W-85. —
Brake Master Cylinder We recommend you use MOPAR® DOT 3 and
SAE J1703. If DOT 3 is not available, then
DOT 4 is acceptable. Use only recommended brake fluids. —
MAINTAINING YOUR VEHICLE
118