lock DODGE DURANGO 2013 3.G Owner's Manual
[x] Cancel search | Manufacturer: DODGE, Model Year: 2013, Model line: DURANGO, Model: DODGE DURANGO 2013 3.GPages: 140, PDF Size: 4.38 MB
Page 29 of 140
WARNING!
• Persons who are unable to feel pain to the skin because of advanced age, chronicillness, diabetes, spinal cord injury, medication, alcohol use, exhaustion or other
physical conditions must exercise care when using the seat heater. It may cause
burns even at low temperatures, especially if used for long periods of time.
• Do not place anything on the seat that insulates against heat, such as a blanket or
cushion. This may cause the seat heater to overheat. Sitting in a seat that has been
overheated could cause serious burns due to the increased surface temperature of
the seat.
HEATED STEERING WHEEL
• The steering wheel contains a heating el-ement that heats the steering wheel to
one temperature setting.
• The heated steering wheel switch is lo- cated on the center instrument panel be-
low the climate controls.
• Press the switch once to turn the heating element On. Press the switch a second
time to turn the heating element Off.
• Once the heated steering wheel has been turned on, it will operate for approxi-
mately 58 to 70 minutes before automatically shutting off. The heated steering wheel
can shut off early or may not turn on when the steering wheel is already warm.
TILT/TELESCOPING STEERING COLUMN
Manual - Tilt/Telescoping Steering Column
• The tilt/telescoping control handle is lo-cated below the steering wheel at the end
of the steering column.
• Push the handle down to unlock the steer- ing column.
• To tilt the steering column, move the steering wheel upward or downward as
desired. To lengthen or shorten the steer-
ing column, pull the steering wheel out-
ward or push it inward as desired.
• Pull up on the handle to lock the column firmly in place.
GETTING STARTED
27
Page 30 of 140
Power - Tilt/Telescoping Steering Column
• The power tilt/telescoping steering con-trol is located below the turn signal/
wiper/washer/high beam lever on the
steering column.
•
To tilt the steering column, move the power
tilt/telescoping control up or down as de-
sired. To lengthen or shorten the steering
column, pull the control toward you or push
the control away from you as desired.
WARNING!
• Do not adjust the steering wheel while driving. The tilt/telescoping adjustment must
be locked while driving. Adjusting the steering wheel while driving or driving without
the tilt/telescoping adjustment locked could cause the driver to lose control of the
vehicle. Failure to follow this warning may result in you and others being severely
injured or killed.
• Moving the steering column while the vehicle is moving is dangerous. Without a
stable steering column, you could lose control of the vehicle and have a collision.
Adjust the column only while the vehicle is stopped.
GETTING STARTED
28
Page 46 of 140
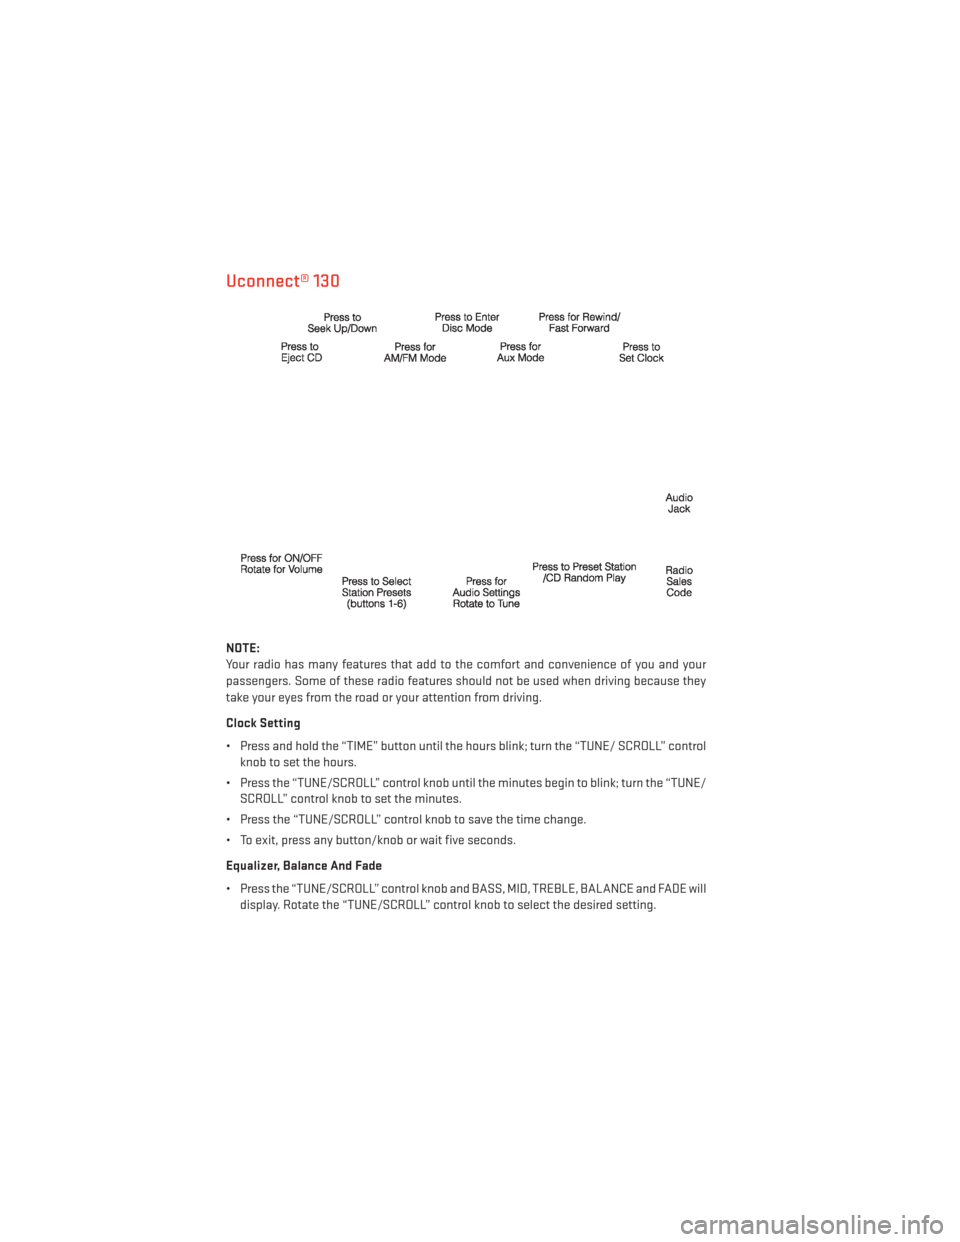
Uconnect® 130
NOTE:
Your radio has many features that add to the comfort and convenience of you and your
passengers. Some of these radio features should not be used when driving because they
take your eyes from the road or your attention from driving.
Clock Setting
• Press and hold the “TIME” button until the hours blink; turn the “TUNE/ SCROLL” controlknob to set the hours.
• Press the “TUNE/SCROLL” control knob until the minutes begin to blink; turn the “TUNE/ SCROLL” control knob to set the minutes.
• Press the “TUNE/SCROLL” control knob to save the time change.
• To exit, press any button/knob or wait five seconds.
Equalizer, Balance And Fade
• Press the “TUNE/SCROLL” control knob and BASS, MID, TREBLE, BALANCE and FADE will display. Rotate the “TUNE/SCROLL” control knob to select the desired setting.
ELECTRONICS
44
Page 48 of 140
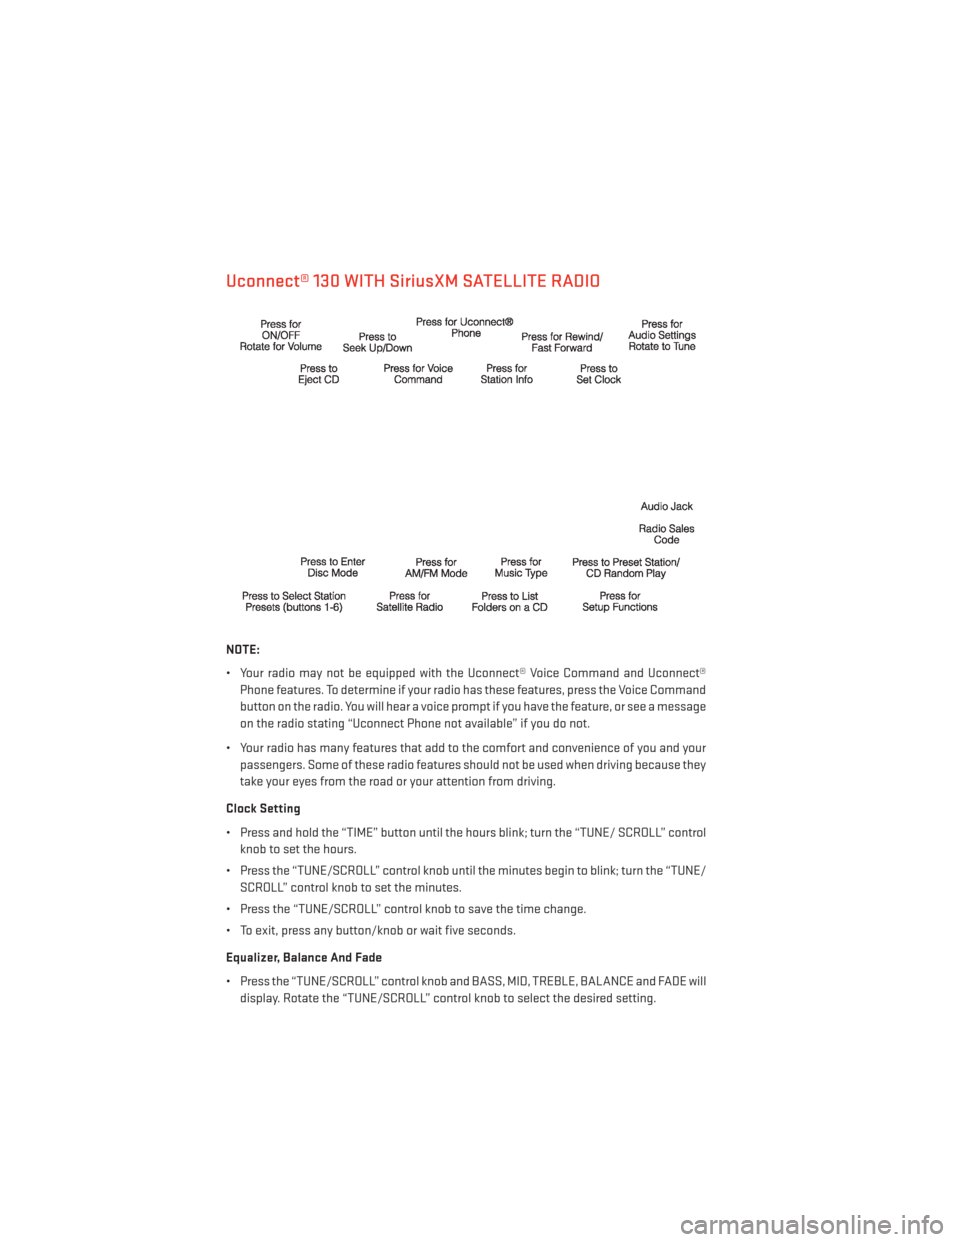
Uconnect® 130 WITH SiriusXM SATELLITE RADIO
NOTE:
• Your radio may not be equipped with the Uconnect® Voice Command and Uconnect®Phone features. To determine if your radio has these features, press the Voice Command
button on the radio. You will hear a voice prompt if you have the feature, or see a message
on the radio stating “Uconnect Phone not available” if you do not.
• Your radio has many features that add to the comfort and convenience of you and your passengers. Some of these radio features should not be used when driving because they
take your eyes from the road or your attention from driving.
Clock Setting
• Press and hold the “TIME” button until the hours blink; turn the “TUNE/ SCROLL” control knob to set the hours.
• Press the “TUNE/SCROLL” control knob until the minutes begin to blink; turn the “TUNE/ SCROLL” control knob to set the minutes.
• Press the “TUNE/SCROLL” control knob to save the time change.
• To exit, press any button/knob or wait five seconds.
Equalizer, Balance And Fade
• Press the “TUNE/SCROLL” control knob and BASS, MID, TREBLE, BALANCE and FADE will display. Rotate the “TUNE/SCROLL” control knob to select the desired setting.
ELECTRONICS
46
Page 51 of 140
Clock Setting
• Turn the radio on, then touch the screen where the time is displayed.
• Touch the “USER CLOCK” soft-key (Navigation radio only).
• To adjust the hours, touch either the “HOUR FORWARD” or “HOUR BACKWARD” soft-key.
• To adjust the minutes, touch either the “MINUTE FORWARD” or “MINUTE BACKWARD”soft-key.
• To save the new time setting, touch the screen where the word “Save” is displayed.
Menu
• Press the “MENU” hard-key to access the System Setup menu and the My Files menu.
• Press the “MENU” hard-key in an active mode (SAT, CD, AUX, etc.) to change mode specific settings.
Equalizer, Balance And Fade
Audio Control Menu
• Press the “AUDIO” hard-key on the right side of the radio.
•
Use either the arrow soft-keys or the cross-
hair on the screen to change Balance and
Fade. The “CENTER” soft-key resets the set-
tings.
• Touch the “Equalizer” soft-key and use either the arrow soft-keys or the sliders on
the screen to adjust BASS, MID, and/or
TREBLE.
Display Settings
• Press the “MENU” hard-key and touch the “Display Settings” soft-key to access the
Display Settings menu.
• Select the “Daytime Colors” soft-key to switch to manual daytime mode and to
adjust the brightness of the display using
daytime colors.
• Select the “Nighttime Colors” soft-key to switch to manual nighttime mode and to
adjust the brightness of the display using nighttime colors.
• Select the “Auto Color Mode” soft-key to switch to automatic daytime/nighttime mode and to control the brightness of the display using the dimmer switch of the vehicle.
• Touch the “EXIT” soft-key to save your settings.
ELECTRONICS
49
Page 60 of 140
Acquiring Satellites
• The GPS Satellite strength bars indicate the strength of your satellite reception.
• Acquiring satellite signals can take a few minutes. When at least one of the bars is green,your device has acquired satellite signals.
• You may experience delays receiving satellite signals when in areas with an obstructed view to the sky, such as garages, tunnels, or large cities with tall buildings.
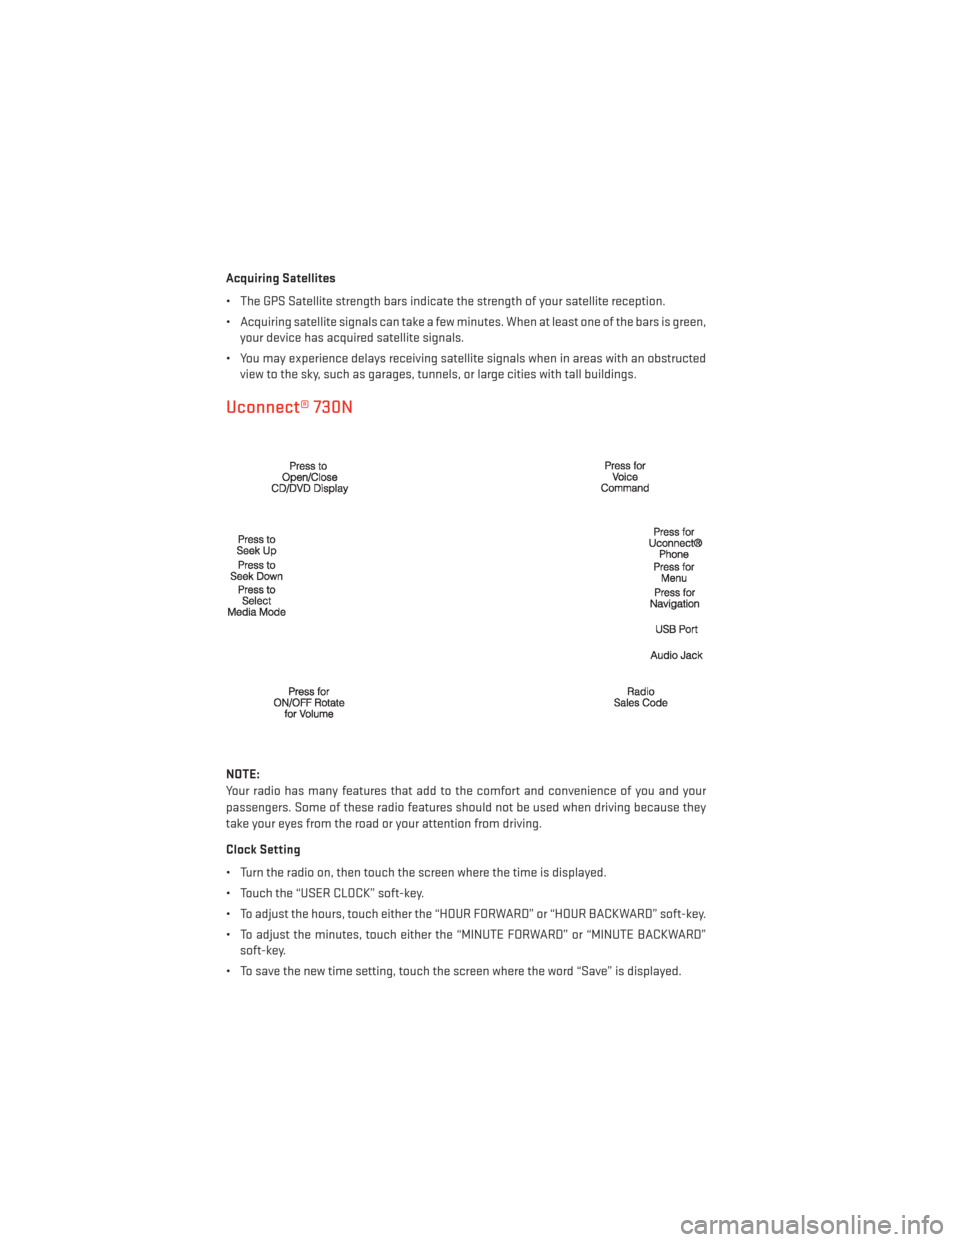
Uconnect® 730N
NOTE:
Your radio has many features that add to the comfort and convenience of you and your
passengers. Some of these radio features should not be used when driving because they
take your eyes from the road or your attention from driving.
Clock Setting
• Turn the radio on, then touch the screen where the time is displayed.
• Touch the “USER CLOCK” soft-key.
• To adjust the hours, touch either the “HOUR FORWARD” or “HOUR BACKWARD” soft-key.
• To adjust the minutes, touch either the “MINUTE FORWARD” or “MINUTE BACKWARD”soft-key.
• To save the new time setting, touch the screen where the word “Save” is displayed.
ELECTRONICS
58
Page 71 of 140
SiriusXM SATELLITE RADIO/TRAVEL LINK
• SiriusXM Travel Link requires a subscription, sold separately after the 1 year trial sub-scription included with your vehicle purchase.
• SiriusXM Travel Link is only available in the United States.
•
The following describes features that are available when in SiriusXM Satellite Radio mode.
• To access SiriusXM Satellite Radio, press the “RADIO/MEDIA” or “RADIO” and then touch the “SAT” soft-key tab.
Info
• Touch the “i” soft-key to view detailed information about the current Sirius XM Satellite channel.
SiriusXM Parental Controls
• SiriusXM offers the option to permanently block selected channels. Call 1-888-539-7474 and request the Family Package.
• Uconnect® 430/430N and 730N: Press the “MENU” hard-key while in SiriusXM Satellite Radio Mode, then touch the “Channel Lock” to enable and/or disable desired channels.
The SEEK and SCAN function will then only display channels without Channel lock.
Search/Browse
• Touch the “magnifying glass” soft-key to search/browse the SiriusXM channel listing by Favorites and Categories such as Song, Artist and Channel Name. The Search/Browse
also allows you manage your Favorites.
SiriusXM Satellite Radio Favorites (SAT Favorites)
• You can save 50 favorite songs and 50 favorite artists.
•
Touch the “Add Favorite” soft-key to add
either the song or the artist of the currently
playing program to the SAT Favorites list.
The favorite star will appear in the upper
right corner, below the “SAT” soft-key.
ELECTRONICS
69
Page 83 of 140
Compass Calibration
• This compass is self-calibrating, which eliminates the need to set the compass manu-ally. When the vehicle is new, the compass may appear erratic and the EVIC will display
“CAL” until the compass is calibrated.
• You may also calibrate the compass by completing one or more 360 degree turns (in an area free from large metal or metallic objects) until the “CAL” message displayed in the
EVIC turns off. The compass will now function normally.
ECO
• The ECO message will appear in your EVIC display whenever you are driving in a fuel efficient manner.
• This feature allows you to monitor when you are driving in a fuel efficient manner, and it can be used to modify driving habits in order to increase fuel economy.
PROGRAMMABLE FEATURES
Electronic Vehicle Information Center (EVIC)
• The EVIC can be used to program the following Personal Settings. Press the UP
or
DOWN
button until System Setup displays, then press the SELECTbutton. Scroll
through the settings using the UP or DOWN buttons. Press the SELECT
button to
change the setting. Press the BACK button to scroll back to a previous menu or sub menu.
• Select Language • Illuminated Approach
• Nav – Turn By Turn • Hill Start Assist (HSA)
• Auto Unlock Doors • Display ECO Symbol
• Remote Unlock Sequence • Keyless Enter-N-Go™
• RKE Linked To Memory • Gauge Glow Rings
• Remote Start Comfort Sys. • Auto High Beams
• Horn with Remote Lock • Intermittent Wiper
• Horn With Remote Start • Blind Spot Alert
• Flash Lamps With Lock • Forward Collision Warning
• Headlamp Off Delay • Park Assist System
• Headlamps with Wipers • Display Units of Measure In
• Easy Entry/Exit Seat • Liftgate Chime
• Tilt Mirror in Reverse • Calibrate Compass
• Key-Off Power Delay • Compass Variance
ELECTRONICS
81
Page 86 of 140
Using HomeLink®
•T
o operate, press and release the programmed HomeLink® button. Activation will now occur
for the programmed device (i.e., garage door opener, gate operator, security system, entry door
lock, home/office lighting, etc.,). The hand-held transmitter of the device may also be used at
any time.
WARNING!
• Your motorized door or gate will open and close while you are programming the
universal transceiver. Do not program the transceiver if people or pets are in the path
of the door or gate.
• Do not run your vehicle in a closed garage or confined area while programming the transceiver. Exhaust gas from your vehicle contains Carbon Monoxide (CO) which is
odorless and colorless. Carbon Monoxide is poisonous when inhaled and can cause
you and others to be severely injured or killed.
POWER INVERTER
• There is a 115 Volt, 150 Watt power inverteroutlet located on the back of the center
console. This outlet can power cellular
phones, electronics and other low power
devices requiring power up to 150 Watts.
• Press the switch located in the switch bank on the lower instrument panel to
turn the power inverter on. The indicator
light will turn on to indicate the inverter is
producing AC power.
•
Press the switch again to turn the power
inverter off. The indicator light will turn off.
NOTE:
The power inverter is designed with built-in
overload protection. If the power rating of
150 Watts is exceeded, the power inverter will
automatically shut down. Once the electrical device has been removed from the outlet, the
inverter should automatically reset. If the power rating exceeds approximately 170 Watts, the
power inverter may have to be reset manually. To reset the inverter manually, unplug the device
and plug it in again. To avoid overloading the circuit, check the power ratings on electrical devices
prior to using the inverter.
ELECTRONICS
84
Page 89 of 140
ALL-WHEEL DRIVE OPERATION
Single-Speed Operating Instructions/Precautions
•
This system contains a single-speed (HI range only) transfer case, which provides conve-
nient full-time all-wheel drive. No driver interaction is required. The Brake Traction Control
(BTC) System, which combines standard ABS and Traction Control, provides resistance to
any wheel that is slipping to allow additional torque transfer to wheels with traction.
NOTE:
This system is not appropriate for conditions where AWD LOW range is recommended. Refer to
“Off-Road Driving Tips” in “Starting and Operating” on the DVD for further information.
Electronically Shifted Transfer Case (Three-Position Switch)
•
This is an electronic shift transfer case and
is operated by the AWD Control Switch
(Transfer Case Switch), which is located on
the center console.
• This electronically shifted transfer case provides three mode positions:• All-wheel drive automatic range
(AWD AUTO)
• All-wheel drive low range (LOW RANGE)
• Neutral (NEUTRAL)
•
When additional traction is required, the
LOW RANGE position can be used to lock
the front and rear driveshafts together
forcing the front and rear wheels to rotate
at the same speed. The LOW RANGE posi-
tion are designed for loose, slippery road surfaces only. Driving in the LOW RANGE positions
on dry hard surfaced roads may cause increased tire wear and damage to the driveline
components.
• When operating your vehicle in LOW RANGE, the engine speed is approximately three times that of the AWD HI position at a given road speed. Take care not to overspeed the
engine and do not exceed 25 mph (40 km/h).
NOTE:
The “SERV AWD Warning Light” monitors the electronic shift all-wheel drive system. If this
light remains on after engine start up or illuminates during driving, it means that the
all-wheel drive system is not functioning properly and that service is required.
OFF-ROAD CAPABILITIES
87