service DODGE DURANGO 2014 3.G Owner's Manual
[x] Cancel search | Manufacturer: DODGE, Model Year: 2014, Model line: DURANGO, Model: DODGE DURANGO 2014 3.GPages: 188, PDF Size: 3.8 MB
Page 139 of 188
IF YOUR ENGINE OVERHEATS
In any of the following situations, you can reduce the potential for overheating by taking the
appropriate action:
• On the highways — slow down.
• In city traffic — while stopped, shift the transmission to NEUTRAL, but do not increaseengine idle speed.
NOTE:
There are steps that you can take to slow down an impending overheat condition:
• If your air conditioner (A/C) is on, turn it off. The A/C system adds heat to the engine cooling system and turning the A/C off can help remove this heat.
• You can also turn the temperature control to maximum heat, the mode control to floor and the blower control to high. This allows the heater core to act as a supplement to the
radiator and aids in removing heat from the engine cooling system.
CAUTION!
Driving with a hot cooling system could damage your vehicle. If the temperature gauge
reads HOT (H), pull over and stop the vehicle. Idle the vehicle with the air conditioner
turned off until the pointer drops back into the normal range. If the pointer remains on
HOT (H), and you hear continuous chimes, turn the engine off immediately, and call for
service.
WARNING!
You or others can be badly burned by hot engine coolant (antifreeze) or steam from your
radiator. If you see or hear steam coming from under the hood, do not open the hood until
the radiator has had time to cool. Never try to open a cooling system pressure cap when
the radiator or coolant bottle is hot.
WHAT TO DO IN EMERGENCIES
137
Page 145 of 188
3. For the front axle, place the jack on thebody flange just behind the front tire as
indicated by the triangular lift point sym-
bol on the sill molding. Do not raise the
vehicle until you are sure the jack is fully
engaged.
4. For a rear tire, place the jack in the slot on the rear tie-down bracket, just forward of
the rear tire (as indicated by the triangu-
lar lift point symbol on the sill molding).
Do not raise the vehicle until you are
sure the jack is fully engaged.
5. Raise the vehicle by turning the jack screw clockwise. Raise the vehicle just
enough to remove the flat tire.
6. Remove the lug nuts and wheel.
7.
Install the temporary spare wheel/tire and
lightly tighten the lug nuts prior to lowering
to prevent the vehicle from moving on the
jack.
8.Lower the vehicle by turning the jack screw
counterclockwise, and remove the jack.
9. Finish tightening the lug nuts. Push down on the wrench while at the end of the
handle for increased leverage. Tighten
the lug nuts in a star pattern until each
nut has been tightened twice. The correct
wheel nut tightness is 130 ft lbs (176 N·m). If in doubt about the correct tightness, have
them checked with a torque wrench by your authorized dealer or at a service station.
WHAT TO DO IN EMERGENCIES
143
Page 147 of 188
15. Reinstall the plastic plug into the floor of the cargo area. Roll up and store the Jack, ToolKit and Tire Changing Instructions. Reinstall the cover for the jack in the rear storage
bin.
NOTE:
The plastic thumb screw being on the right and the position of the lug wrench before the
Velcro® straps go around the fully closed jack.
16.
Remove the blocks/rocks from the opposite tire.
17. Have the aluminum road wheel and tire repaired as soon as possible and properly secure the spare tire, jack and tool kit.
Road Tire Installation
1. Mount the road tire on the axle.
2. Install the remaining lug nuts with the cone shaped end of the nut toward the wheel.Lightly tighten the lug nuts.
3. Lower the vehicle to the ground by turning the jack handle counterclockwise.
4. Finish tightening the lug nuts. Push down on the wrench while at the end of the handle for increased leverage. Tighten the lug nuts in a star pattern until each nut has been
tightened twice. The correct tightness of each lug nut is 130 ft/lbs (176 N·m). If in doubt
about the correct tightness, have them checked with a torque wrench by your authorized
dealer or service station.
5. After 25 miles (40 km) check the lug nut torque with a torque wrench to ensure that all lug nuts are properly seated against the wheel.
CAUTION!
• Do not use power tools to winch the tire up or down. Impact type tools can damage the winch mechanism.
• Do not attempt to raise the vehicle by jacking on locations other than those indicated
in the Jacking Instructions for this vehicle.
• Be sure to mount the spare tire with the valve stem facing outward. The vehicle could
be damaged if the spare tire is mounted incorrectly.
WHAT TO DO IN EMERGENCIES
145
Page 148 of 188

WARNING!
• Do not attempt to change a tire on the side of the vehicle close to moving traffic. Pullfar enough off the road to avoid the danger of being hit when operating the jack or
changing the wheel.
• Being under a jacked-up vehicle is dangerous. The vehicle could slip off the jack and
fall on you. You could be crushed. Never put any part of your body under a vehicle that
is on a jack. If you need to get under a raised vehicle, take it to a service center where
it can be raised on a lift.
• The jack is designed to be used as a tool for changing tires only. The jack should not
be used to lift the vehicle for service purposes. The vehicle should be jacked on a firm
level surface only. Avoid ice or slippery areas.
• Always park on a firm, level surface as far from the edge of the roadway as possible
before raising the vehicle.
• Turn on the Hazard Warning flasher.
• Block the wheel diagonally opposite the wheel to be raised.
• Set the parking brake firmly and set the automatic transmission in PARK.
• Never start or run the engine with the vehicle on a jack.
• Do not let anyone sit in the vehicle when it is on a jack.
• Do not get under the vehicle when it is on a jack.
• Only use the jack in the positions indicated and for lifting this vehicle during a tire
change.
• If working on or near a roadway, be extremely careful of motor traffic.
• To assure that spare tires, flat or inflated, are securely stowed, spares must be
stowed with the valve stem facing the ground. Carefully follow these tire changing
warnings to help prevent personal injury or damage to your vehicle:
• Raising the vehicle higher than necessary can make the vehicle less stable. Itcould slip off the jack and hurt someone near it. Raise the vehicle only enough
to remove the tire.
• To avoid the risk of forcing the vehicle off the jack, do not fully tighten the
wheel nuts until the vehicle has been lowered. Failure to follow this warning
may result in personal injury.
• Do not use power tools to winch the tire up or down. Impact-type tools may
damage the winch mechanism.
• A loose tire or jack, thrown forward in a collision or hard stop could endanger
the occupants of the vehicle. Always stow the jack parts and the spare tire in
the places provided.
• To avoid the risk of forcing the vehicle off the jack, do not tighten the lug nuts
fully until the vehicle is lowered to the ground.
WHAT TO DO IN EMERGENCIES
146
Page 163 of 188
MAINTENANCE SCHEDULE — GASOLINE ENGINE
Your vehicle is equipped with an automatic oil change indicator system. The oil change indicator
system will remind you that it is time to take your vehicle in for scheduled maintenance.
Based on engine operation conditions, the oil change indicator message will illuminate. This
means that service is required for your vehicle. Operating conditions such as frequent short-
trips, trailer tow, extremely hot or cold ambient temperatures, and E85 fuel usage will influence
when the “Oil Change Required” message is displayed. Severe Operating Conditions can cause
the change oil message to illuminate as early as 3,500 miles (5,600 km) since last reset. Have
your vehicle serviced as soon as possible, within the next 500 miles (805 km).
Your authorized dealer will reset the oil change indicator message after completing the
scheduled oil change. If a scheduled oil change is performed by someone other than your
authorized dealer, the message can be reset by referring to the steps described under “Instru-
ment Cluster Warning Lights” in “What To Do In Emergencies” in this guide or “Electronic
Vehicle Information Center (EVIC)” in “Understanding Your Instrument Panel” in your Owners
Manual on the DVD for further information.
NOTE:
Under no circumstances should oil change intervals exceed 10,000 miles (16,000 km) or
twelve months, whichever comes first.
Severe Duty All Models
Change Engine Oil at 4000 miles (6,500 km) if the vehicle is operated in a dusty and off road
environment. This type of vehicle use is considered Severe Duty.
Once A Month Or Before A Long Trip:
• Check engine oil level
• Check windshield washer fluid level
• Check the tire inflation pressures and look for unusual wear or damage
• Check the fluid levels of the coolant reservoir, brake master cylinder, power steering andtransmission as needed
• Check function of all interior and exterior lights
Required Maintenance
Refer to the Maintenance Schedules on the following pages for required maintenance.
At Every Oil Change Interval As Indicated By Oil Change Indicator System:
• Change oil and filter.
• Rotate the tires. Rotate at the first sign of irregular wear, even if it occurs before the oil
indicator system turns on.
• Inspect battery and clean and tighten terminals as required.
• Inspect automatic transmission fluid if equipped with dipstick.
• Inspect brake pads, shoes, rotors, drums, hoses and park brake.
• Inspect engine cooling system protection and hoses.
• Inspect exhaust system.
• Inspect engine air cleaner if using in dusty or off-road conditions.
MAINTAINING YOUR VEHICLE
161
Page 165 of 188
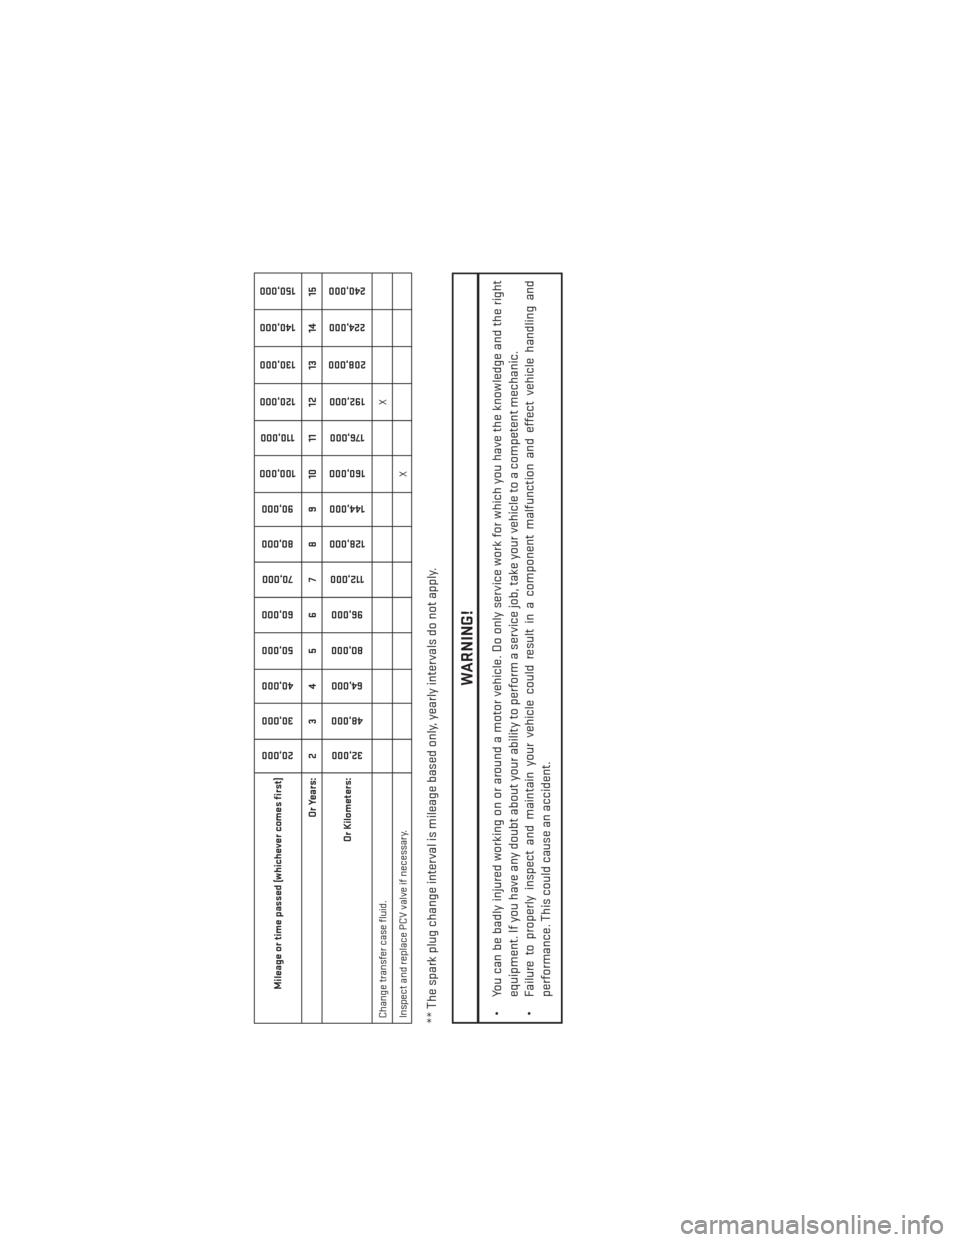
Mileage or time passed (whichever comes first)
20,00030,000
40,000
50,000
60,000 70,000
80,000 90,000
100,000
110,000
120,000
130,000
140,000
150,000
Or Years: 2 3 4 5 6 7 8 9 10 11 12 13 14 15
Or Kilometers:
32,000
48,000
64,000
80,000
96,000
112,000
128,000 144,000
160,000
176,000
192,000
208,000 224,000
240,000
Change transfer case fluid. X
Inspect and replace PCV valve if necessary. X** The spark plug change interval is mileage based only, yearly intervals do not apply.
WARNING!
• You can be badly injured working on or around a motor vehicle. Do only service work for which you have the knowledge and the right
equipment. If you have any doubt about your ability to perform a service job, take your vehicle to a competent mechanic.
• Failure to properly inspect and maintain your vehicle could result in a component malfunction and effect vehicle handling and
performance. This could cause an accident.
MAINTAINING YOUR VEHICLE
163
Page 166 of 188
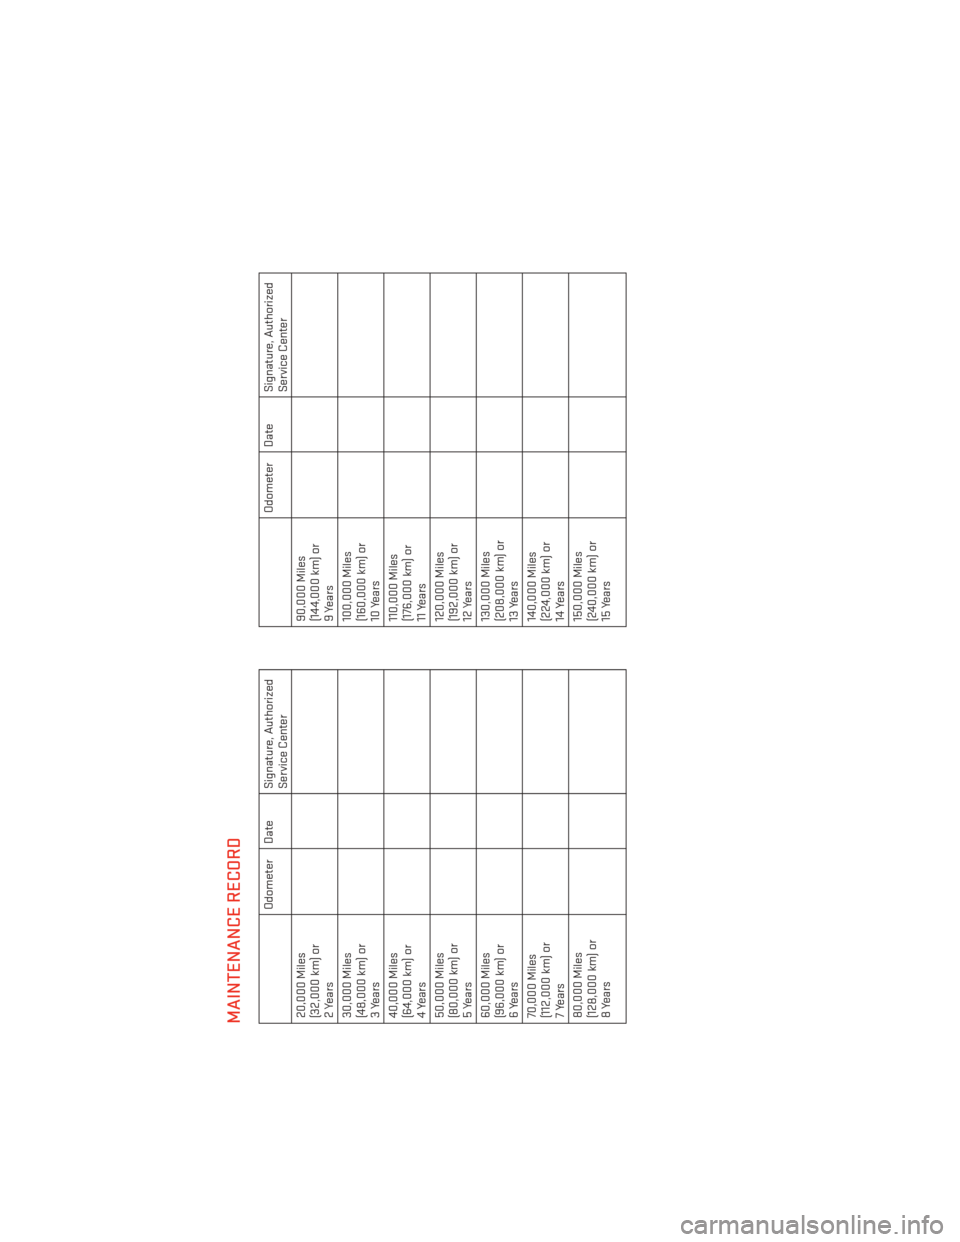
MAINTENANCE RECORD
Odometer Date Signature, AuthorizedService Center
20,000 Miles
(32,000 km) or
2Years
30,000 Miles
(48,000 km) or
3Years
40,000 Miles
(64,000 km) or
4 Years
50,000 Miles
(80,000 km) or
5Years
60,000 Miles
(96,000 km) or
6 Years
70,000 Miles
(112,000 km) or
7 Years
80,000 Miles
(128,000 km) or
8Years
Odometer Date Signature, Authorized Service Center
90,000 Miles
(144,000 km) or
9 Years
100,000 Miles
(160,000 km) or
10 Years
110,000 Miles
(176,000 km) or
11 Years
120,000 Miles
(192,000 km) or
12 Years
130,000 Miles
(208,000 km) or
13 Years
140,000 Miles
(224,000 km) or
14 Years
150,000 Miles
(240,000 km) or
15 Years
MAINTAINING YOUR VEHICLE
164
Page 171 of 188
WHEEL AND WHEEL TRIM CARE
All wheels and wheel trim, especially aluminum and chrome plated wheels, should be
cleaned regularly with a mild soap and water to prevent corrosion.
To remove heavy soil and/or excessive brake dust, use MOPAR® Wheel Cleaner or equiva-
lent or select a non-abrasive, non-acidic cleaner.
CAUTION!
Do not use scouring pads, steel wool, a bristle brush, or metal polishes. Do not use oven
cleaner. These products may damage the wheel's protective finish. Avoid automatic car
washes that use acidic solutions or harsh brushes that may damage the wheel's protec-
tive finish. Only MOPAR® Wheel Cleaner or equivalent is recommended.
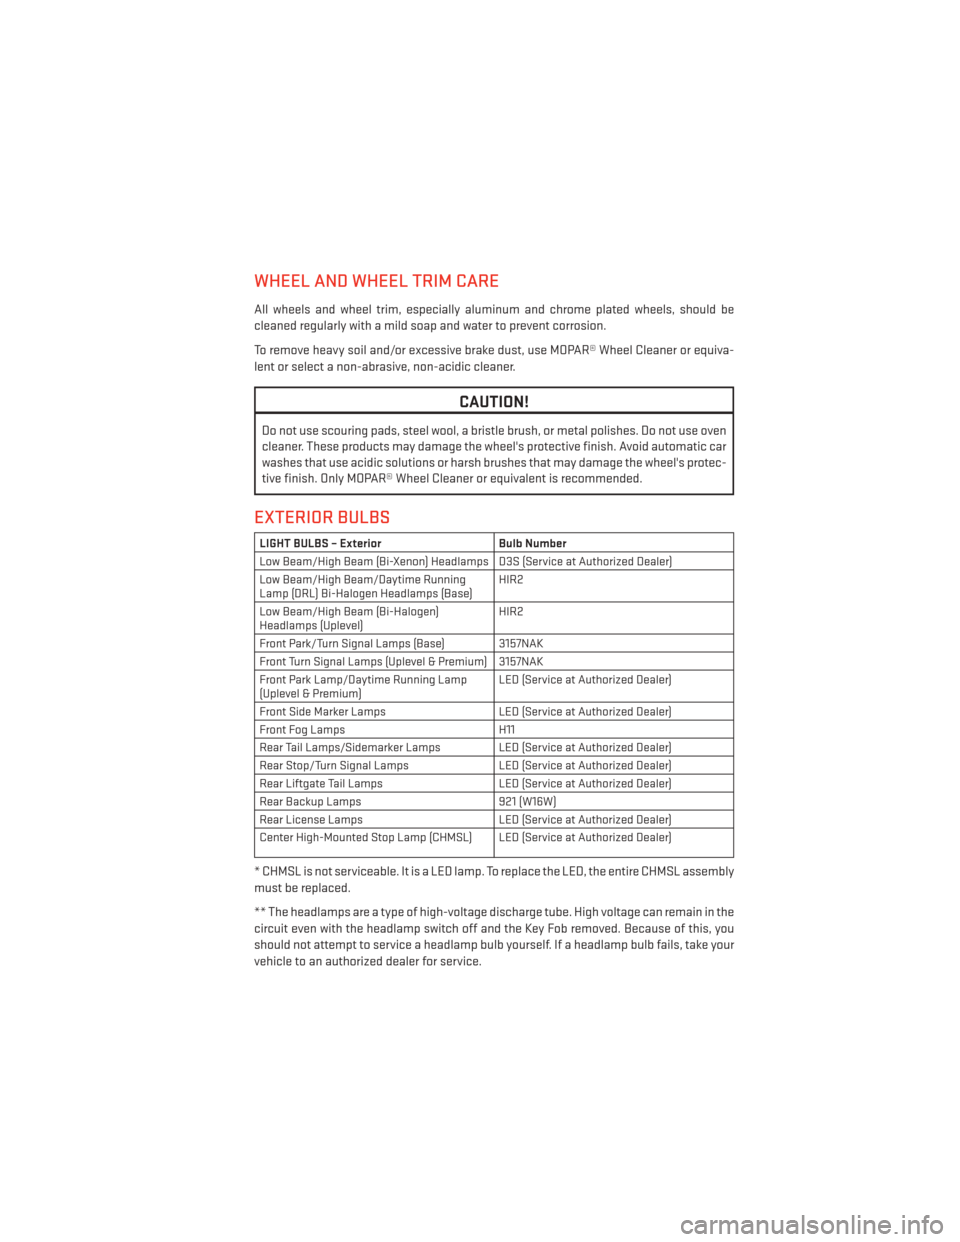
EXTERIOR BULBS
LIGHT BULBS – ExteriorBulb Number
Low Beam/High Beam (Bi-Xenon) Headlamps D3S (Service at Authorized Dealer)
Low Beam/High Beam/Daytime Running
Lamp (DRL) Bi-Halogen Headlamps (Base) HIR2
Low Beam/High Beam (Bi-Halogen)
Headlamps (Uplevel) HIR2
Front Park/Turn Signal Lamps (Base) 3157NAK
Front Turn Signal Lamps (Uplevel & Premium) 3157NAK
Front Park Lamp/Daytime Running Lamp
(Uplevel & Premium) LED (Service at Authorized Dealer)
Front Side Marker Lamps LED (Service at Authorized Dealer)
Front Fog Lamps H11
Rear Tail Lamps/Sidemarker Lamps LED (Service at Authorized Dealer)
Rear Stop/Turn Signal Lamps LED (Service at Authorized Dealer)
Rear Liftgate Tail Lamps LED (Service at Authorized Dealer)
Rear Backup Lamps 921 (W16W)
Rear License Lamps LED (Service at Authorized Dealer)
Center High-Mounted Stop Lamp (CHMSL) LED (Service at Authorized Dealer)
* CHMSL is not serviceable. It is a LED lamp. To replace the LED, the entire CHMSL assembly
must be replaced.
** The headlamps are a type of high-voltage discharge tube. High voltage can remain in the
circuit even with the headlamp switch off and the Key Fob removed. Because of this, you
should not attempt to service a headlamp bulb yourself. If a headlamp bulb fails, take your
vehicle to an authorized dealer for service.
MAINTAINING YOUR VEHICLE
169
Page 172 of 188
CHRYSLER GROUP LLC CUSTOMER CENTER
P.O. Box 21–8004 Auburn Hills, MI 48321–8004 Phone: 1–800–423–6343
CHRYSLER CANADA INC. CUSTOMER CENTER
P.O. Box 1621 Windsor, Ontario N9A 4H6 Phone: 1–800–465–2001 (English)
Phone: 1–800–387–9983 (French)
ASSISTANCE FOR THE HEARING IMPAIRED
To assist customers who have hearing difficulties, the manufacturer has installed special
TDD (Telecommunication Devices for the Deaf) equipment at its customer center. Any
hearing or speech impaired customer, who has access to a TDD or a conventional teletype-
writer (TTY) in the United States, can communicate with the manufacturer by dialing
1–800–380–CHRY. Canadian residents with hearing difficulties that require assistance can
use the special needs relay service offered by Bell Canada. For TTY teletypewriter users, dial
711 and for Voice callers, dial 1–800–855–0511 to connect with a Bell Relay Service operator.
WARNING!
Engine exhaust, some of its constituents, and certain vehicle components contain, or
emit, chemicals known to the State of California to cause cancer and birth defects, or
other reproductive harm. In addition, certain fluids contained in vehicles and certain
products of component wear contain, or emit, chemicals known to the State of California
to cause cancer and birth defects, or other reproductive harm.
PUBLICATIONS ORDERING
•If you are the first registered retail owner of your vehicle, you may obtain one free
printed copy of the Owner's Manual, Warranty Booklet or Radio Manuals on your DVD by
calling 1–800–423–6343 (U.S.) or 1–800–387–1143 (Canada) or by contacting your dealer.
•
Replacement User Guide kits or DVDs or, if you prefer, additional printed copies of the
Owner's Manual, Warranty Booklet or Radio Manuals may be purchased by visiting
www.techauthority.com or by calling 1–800–890–4038 (U.S.) or 1–800–387–1143 (Canada).
Visa, Master Card, American Express and Discover orders are accepted. If you prefer mailing
your order, please call the above numbers for an order form.
NOTE:
• A street address is required when ordering manuals (no P.O. Boxes).
• The Owner's Manual and User Guide electronic files are also available on the Chrysler,
Jeep, Ram Truck, Dodge and SRT websites.
• Click on the “For Owners” tab, select “Owner/Service Manuals”, then select your desired model year and vehicle from the drop down lists.
CUSTOMER ASSISTANCE
170
Page 173 of 188
REPORTING SAFETY DEFECTS IN THE UNITED STATES
If you believe that your vehicle has a defect that could cause a collision or cause injury or
death, you should immediately inform the National Highway Traffic Safety Administration
(NHTSA) in addition to notifying the manufacturer.
If NHTSA receives similar complaints, it may open an investigation, and if it finds that a
safety defect exists in a group of vehicles, it may order a recall and remedy campaign.
However, NHTSA cannot become involved in individual problems between you, your autho-
rized dealer and the manufacturer.
To contact NHTSA, you may either call the Auto Safety Hotline toll free at 1–888–327–4236
(TTY: 1–800–424–9153), or go to http://www.safercar.gov; or write to: Administrator, NHTSA,
1200 New Jersey Avenue, SE., West Building, Washington, D.C. 20590. You can also obtain
other information about motor vehicle safety from http://www.safercar.gov.
In Canada
If you believe that your vehicle has a safety defect, you should contact the Customer Service
Department immediately. Canadian customers who wish to report a safety defect to the
Canadian government should contact Transport Canada, Motor Vehicle Defect Investigations
and Recalls at 1-800-333-0510 or go to http://www.tc.gc.ca/eng/roadsafety/safedrivers-
childsafety-index-53.htm
French Canadian customers who wish to report a safety defect to the Canadian government
should contact Transport Canada, Motor Vehicle Defect Investigations and Recalls at
1-800-333-0510 or go to http://www.tc.gc.ca/securiteroutiere/
CUSTOMER ASSISTANCE
171