DODGE DURANGO 2015 3.G Owner's Manual
Manufacturer: DODGE, Model Year: 2015, Model line: DURANGO, Model: DODGE DURANGO 2015 3.GPages: 236, PDF Size: 35.01 MB
Page 11 of 236
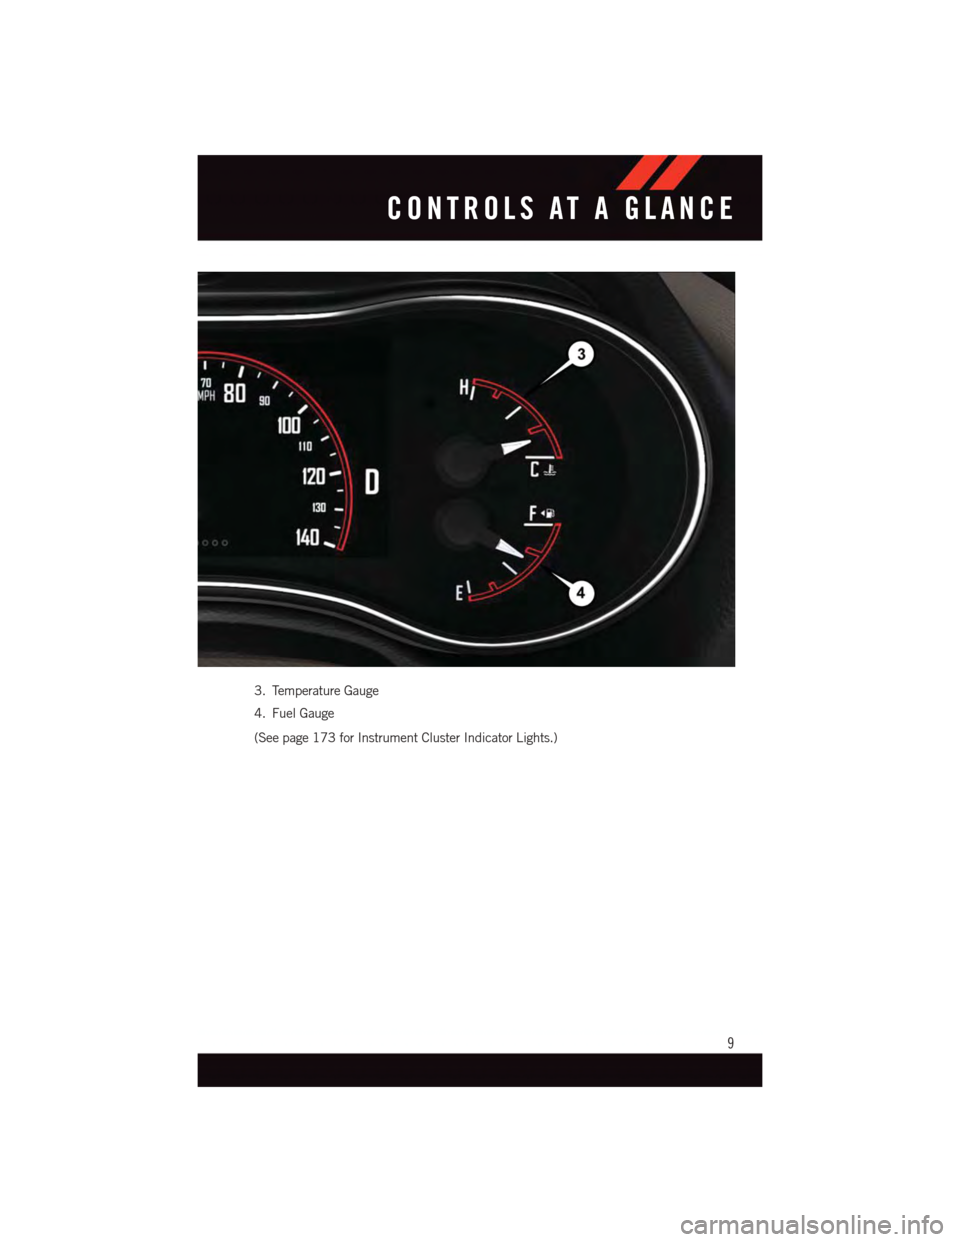
3. Temperature Gauge
4. Fuel Gauge
(See page 173 for Instrument Cluster Indicator Lights.)
CONTROLS AT A GLANCE
9
Page 12 of 236
KEY FOB
Locking And Unlocking The Doors And
Liftgate
Lock The Doors And Liftgate
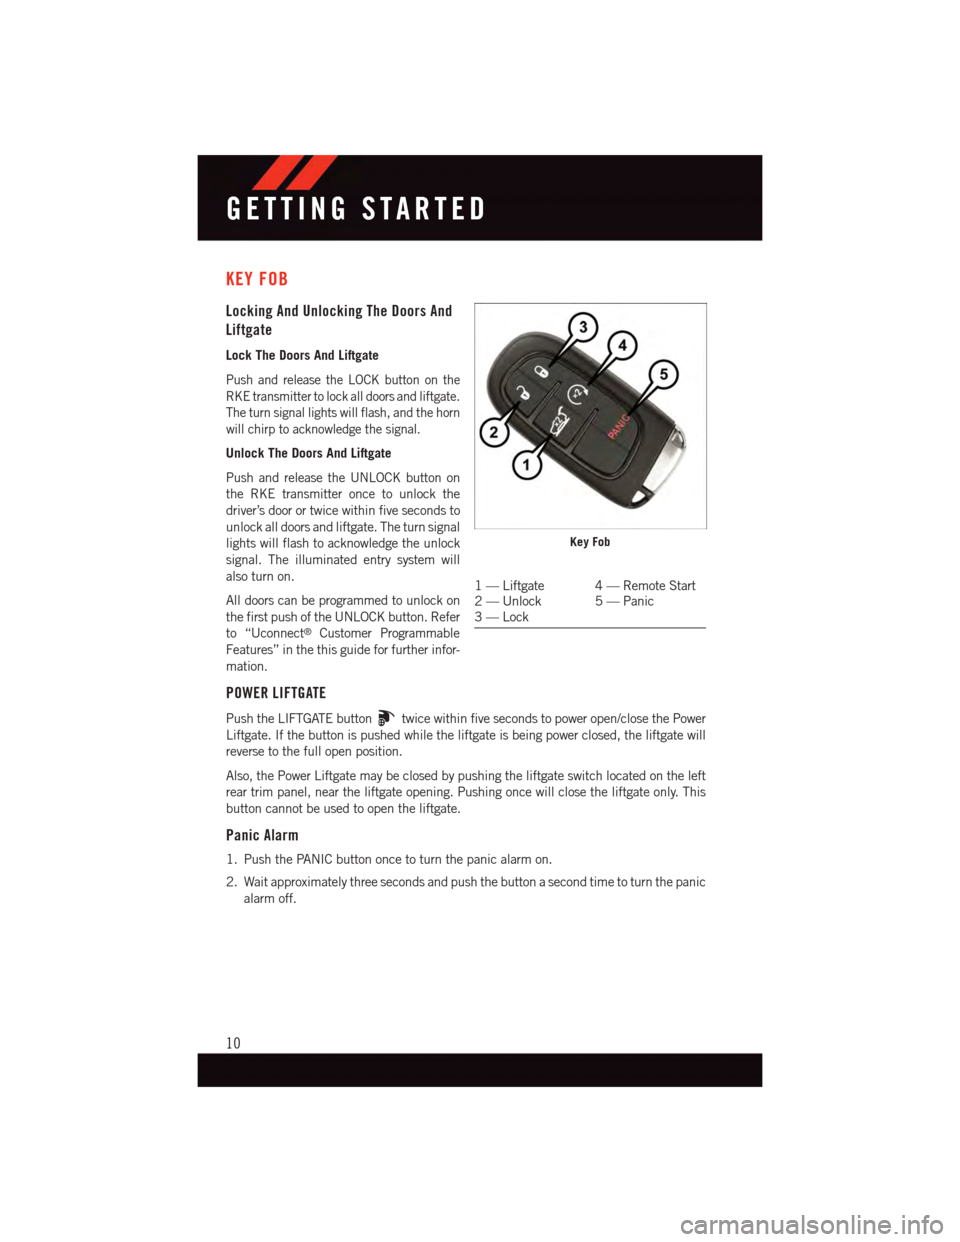
Push and release the LOCK button on the
RKE transmitter to lock all doors and liftgate.
The turn signal lights will flash, and the horn
will chirp to acknowledge the signal.
Unlock The Doors And Liftgate
Push and release the UNLOCK button on
the RKE transmitter once to unlock the
driver’s door or twice within five seconds to
unlock all doors and liftgate. The turn signal
lights will flash to acknowledge the unlock
signal. The illuminated entry system will
also turn on.
All doors can be programmed to unlock on
the first push of the UNLOCK button. Refer
to “Uconnect®Customer Programmable
Features” in the this guide for further infor-
mation.
POWER LIFTGATE
Push the LIFTGATE buttontwice within five seconds to power open/close the Power
Liftgate. If the button is pushed while the liftgate is being power closed, the liftgate will
reverse to the full open position.
Also, the Power Liftgate may be closed by pushing the liftgate switch located on the left
rear trim panel, near the liftgate opening. Pushing once will close the liftgate only. This
button cannot be used to open the liftgate.
Panic Alarm
1. Push the PANIC button once to turn the panic alarm on.
2. Wait approximately three seconds and push the button a second time to turn the panic
alarm off.
Key Fob
1—Liftgate 4—RemoteStart2—Unlock 5—Panic3—Lock
GETTING STARTED
10
Page 13 of 236
REMOTE START
•PushtheREMOTESTARTbuttonx2on the Key Fob twice within five seconds.
Pushing the REMOTE START button a third time shuts the engine off.
•Todrivethevehicle,withavalidKeylessEnter-N-Go™KeyFobwithin5ft(1.5m)of
the driver's side of the vehicle, grab the front driver door handle to unlock the driver's
door automatically and then push the Start/Stop switch, or push the UNLOCK button,
insert the Key Fob in the ignition and turn to the ON/RUN position.
•Withremotestart,theenginewillonlyrunfor15minutes(timeout)unlesstheignition
is placed in the ON/RUN position.
•ThevehiclemustbestartedwiththeKeyFobaftertwoconsecutivetimeouts.
WARNING!
•Do not start or run an engine in a closed garage or confined area. Exhaust gas contains
Carbon Monoxide (CO) which is odorless and colorless. Carbon Monoxide is poisonous
and can cause you or others to be severely injured or killed when inhaled.
•KeepKeyFobtransmittersawayfromchildren.OperationoftheRemoteStart
System, windows, door locks or other controls could cause you and others to be
severely injured or killed.
GETTING STARTED
11
Page 14 of 236
KEYLESS ENTER-N-GO™
The Keyless Enter-N-Go™ system is an enhancement to the vehicle's Key Fob. This
feature allows you to lock and unlock the vehicle's door(s) and liftgate without having to
push the Key Fob lock or unlock buttons as well as starting and stopping the vehicle with
the push of a button.
To Unlock From The Driver Or Passenger Side
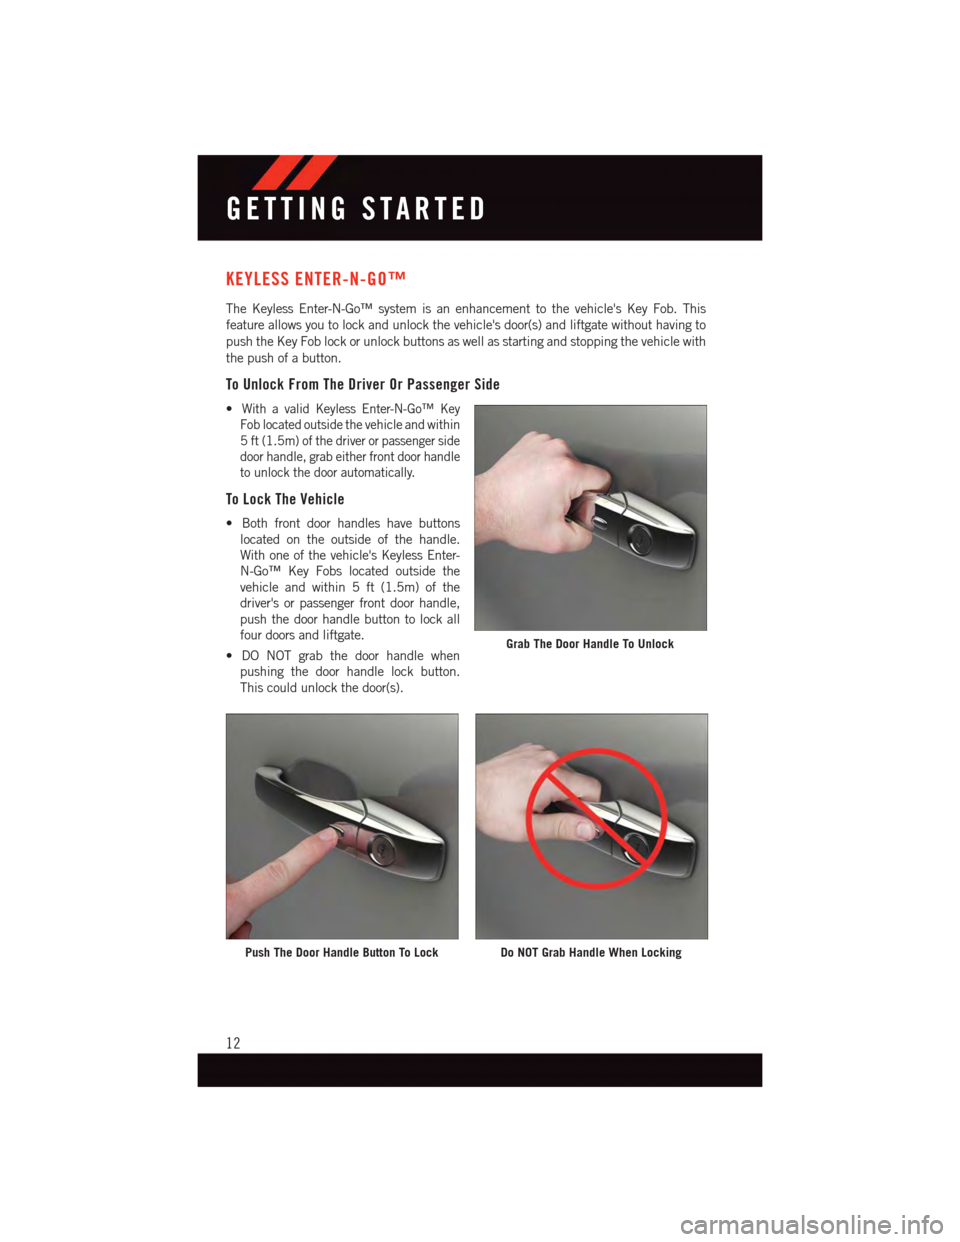
•With a valid Keyless Enter-N-Go™ Key
Fob located outside the vehicle and within
5ft(1.5m)ofthedriverorpassengerside
door handle, grab either front door handle
to unlock the door automatically.
To Lock The Vehicle
•Bothfrontdoorhandleshavebuttons
located on the outside of the handle.
With one of the vehicle's Keyless Enter-
N-Go™ Key Fobs located outside the
vehicle and within 5 ft (1.5m) of the
driver's or passenger front door handle,
push the door handle button to lock all
four doors and liftgate.
•DONOTgrabthedoorhandlewhen
pushing the door handle lock button.
This could unlock the door(s).
Grab The Door Handle To Unlock
Push The Door Handle Button To LockDo NOT Grab Handle When Locking
GETTING STARTED
12
Page 15 of 236
NOTE:
•“1stPressofKeyFobUnlocks”hastwooptionsavailable.“DriverDoor”and“All
Doors” will unlock when you grab hold of the front driver's door handle. To select
between “Driver Door” and “All Doors,” Refer to page 150 for “Uconnect®Customer
Programmable Features ” in the this guide, or the Owner's Manual on the DVD.
•IfaKeyFobisdetectedinthevehiclewhenlockingthevehicleusingthepowerdoor
lock switch, the doors and liftgate will unlock, and the horn will chirp three times.
On the third attempt, your Key Fob can be locked inside the vehicle.
•AfterpushingtheKeylessEnter-N-Go™LOCKbutton,youmustwaittwoseconds
before you can lock or unlock the vehicle using the door handle. This is done to allow
you to check if the vehicle is locked by pulling the door handle, without the vehicle
reacting and unlocking.
•IfaKeylessEnter-N-Go™doorhandlehasnotbeenusedfor72hours,theKeyless
Enter-N-Go™ feature for that handle may time out. Pulling the deactivated front door
handle will reactivate the door handle's Keyless Enter-N-Go™ feature.
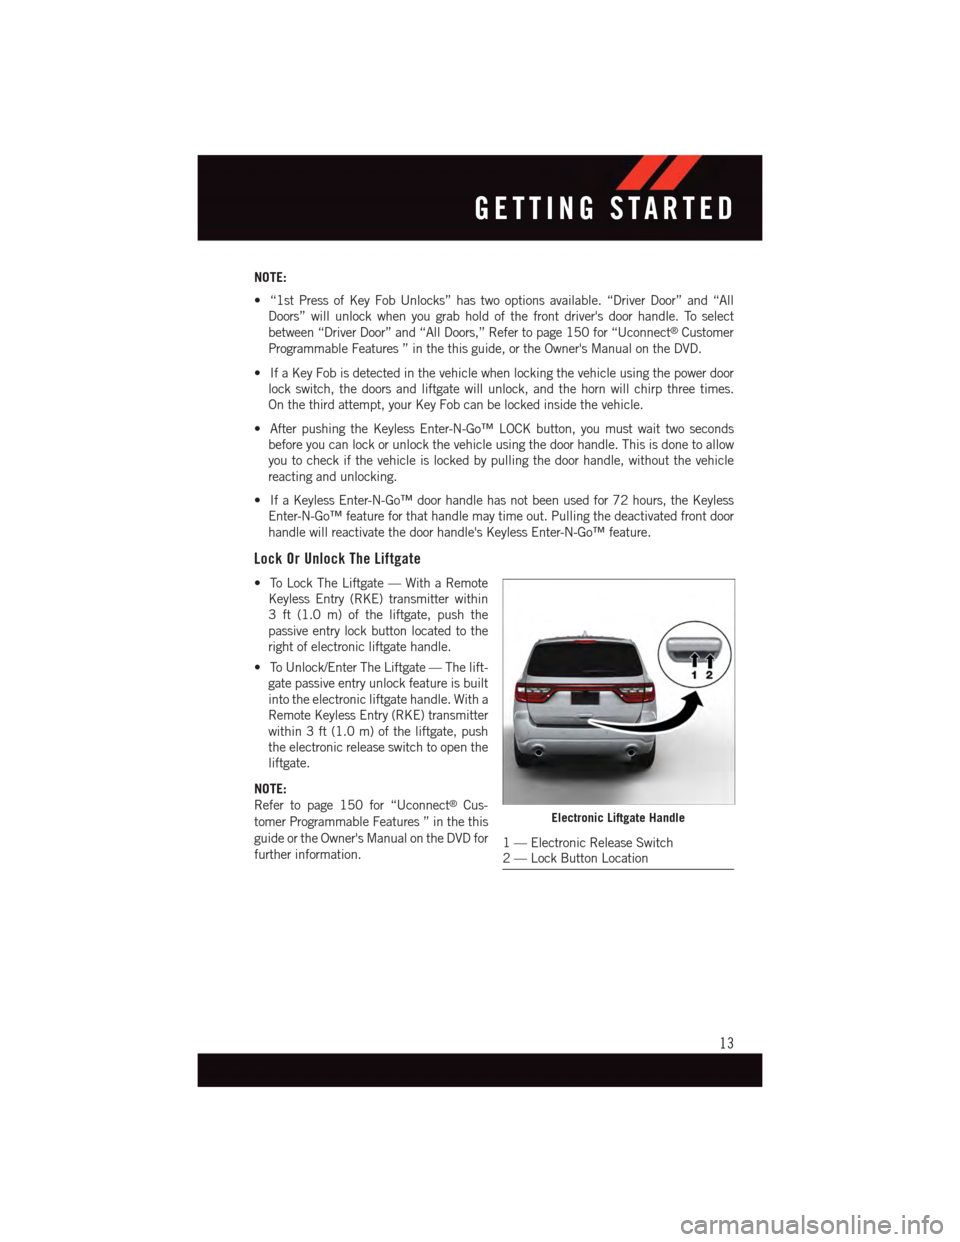
Lock Or Unlock The Liftgate
•ToLockTheLiftgate—WithaRemote
Keyless Entry (RKE) transmitter within
3ft(1.0m)oftheliftgate,pushthe
passive entry lock button located to the
right of electronic liftgate handle.
•ToUnlock/EnterTheLiftgate—Thelift-
gate passive entry unlock feature is built
into the electronic liftgate handle. With a
Remote Keyless Entry (RKE) transmitter
within 3 ft (1.0 m) of the liftgate, push
the electronic release switch to open the
liftgate.
NOTE:
Refer to page 150 for “Uconnect®Cus-
tomer Programmable Features ” in the this
guide or the Owner's Manual on the DVD for
further information.
Electronic Liftgate Handle
1—ElectronicReleaseSwitch2—LockButtonLocation
GETTING STARTED
13
Page 16 of 236
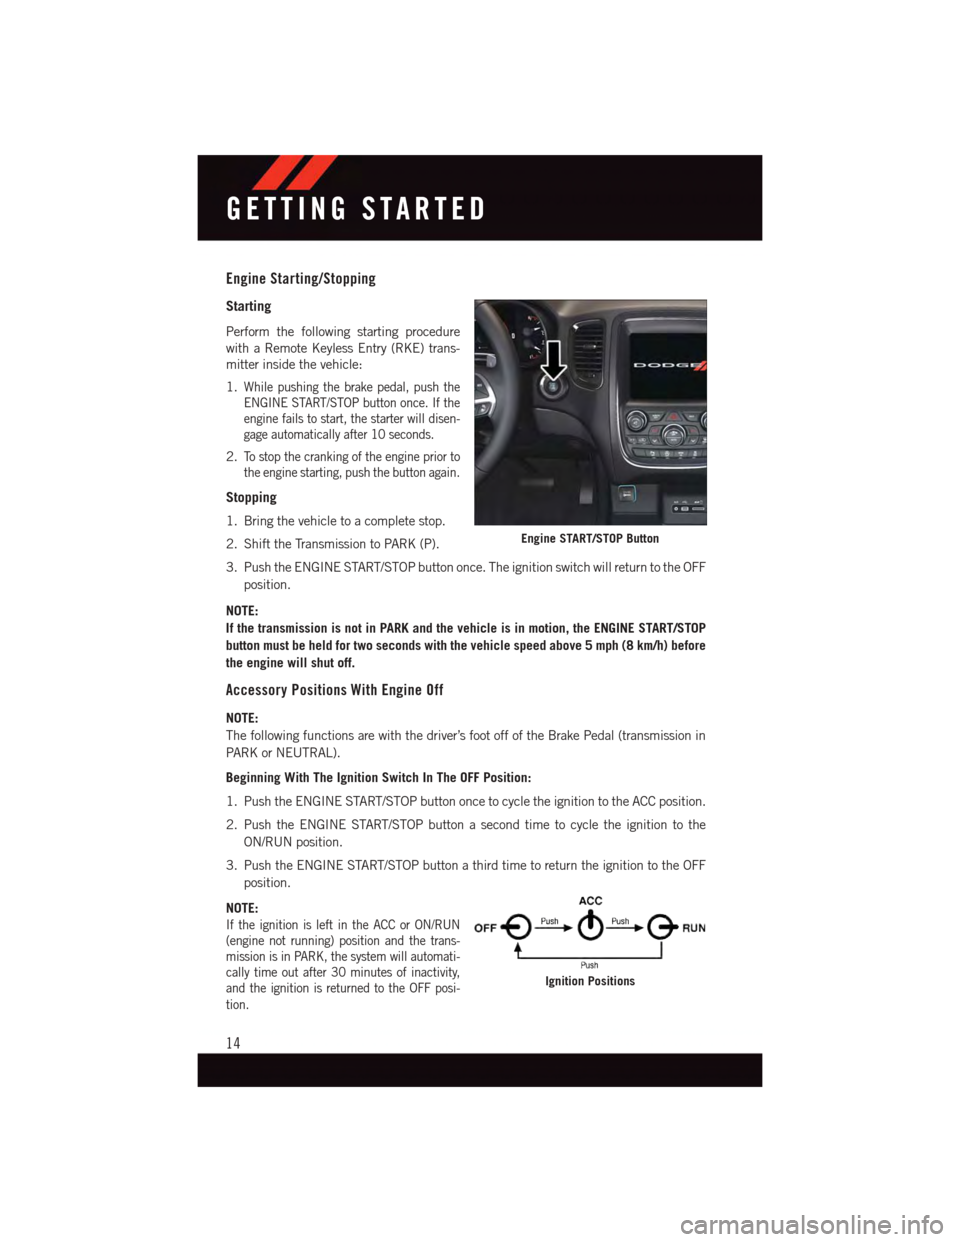
Engine Starting/Stopping
Starting
Perform the following starting procedure
with a Remote Keyless Entry (RKE) trans-
mitter inside the vehicle:
1.While pushing the brake pedal, push the
ENGINE START/STOP button once. If the
engine fails to start, the starter will disen-
gage automatically after 10 seconds.
2.To s t o p t h e c r a n k i n g o f t h e e n g i n e p r i o r t o
the engine starting, push the button again.
Stopping
1. Bring the vehicle to a complete stop.
2. Shift the Transmission to PARK (P).
3. Push the ENGINE START/STOP button once. The ignition switch will return to the OFF
position.
NOTE:
If the transmission is not in PARK and the vehicle is in motion, the ENGINE START/STOP
button must be held for two seconds with the vehicle speed above 5 mph (8 km/h) before
the engine will shut off.
Accessory Positions With Engine Off
NOTE:
The following functions are with the driver’s foot off of the Brake Pedal (transmission in
PA R K o r N E U T R A L ) .
Beginning With The Ignition Switch In The OFF Position:
1. Push the ENGINE START/STOP button once to cycle the ignition to the ACC position.
2. Push the ENGINE START/STOP button a second time to cycle the ignition to the
ON/RUN position.
3. Push the ENGINE START/STOP button a third time to return the ignition to the OFF
position.
NOTE:
If the ignition is left in the ACC or ON/RUN
(engine not running) position and the trans-
mission is in PARK, the system will automati-
cally time out after 30 minutes of inactivity,
and the ignition is returned to the OFF posi-
tion.
Engine START/STOP Button
Ignition Positions
GETTING STARTED
14
Page 17 of 236
VEHICLE SECURITY ALARM
The Vehicle Security Alarm monitors the vehicle doors for unauthorized entry and the
Keyless Enter-N-Go™ START/STOP button for unauthorized operation. While the Vehicle
Security Alarm is armed, interior switches for door locks and decklid release are disabled.
If something triggers the alarm, the Vehicle Security Alarm will provide the following
audible and visible signals: the horn will pulse, the park lamps and/or turn signals will
flash, and the Vehicle Security Light in the instrument cluster will flash.
To Arm
Cycle the Keyless Enter-N-Go™ START/STOP button until the button display indicates
that the vehicle ignition is “OFF.” Push the power door lock switch while the door is open,
push the Key Fob LOCK button, or with one of the Key Fobs located outside the vehicle
and within 5 ft (1.5 m) of the driver's and passenger front door handles, push the Keyless
Enter-N-Go™ LOCK button located on the door handle.
NOTE:
After pushing the Keyless Enter-N-Go™ LOCK button, you must wait two seconds before
you can lock or unlock the vehicle via the door handle.
To Disarm
Push the Key Fob UNLOCK button or with one of the Key Fobs located outside the vehicle
and within 5 ft (1.5 m) of the driver's and passenger front door handles. Grab the Keyless
Enter-N-Go™ door handle and enter the vehicle, then push the Keyless Enter-N-Go™
START/STOP button (requires at least one valid Key Fob in the vehicle).
SEAT BELT SYSTEMS
Lap/Shoulder Belts
•Allseatingpositionsinyourvehicleareequippedwithlap/shoulderbelts.
•Besureeveryoneinyourvehicleisinaseatandusingaseatbeltproperly.
•Positionthelapbeltsothatitissnugandlieslowacrossyourhips,belowyour
abdomen. To remove slack in the lap belt portion, pull up on the shoulder belt. To loosen
the lap belt if it is too tight, tilt the latch plate and pull on the lap belt. A snug seat belt
reduces the risk of sliding under the seat belt in a collision.
•Positiontheshoulderbeltacrosstheshoulderandchestwithminimal,ifanyslackso
that it is comfortable and not resting on your neck. The retractor will withdraw any slack
in the shoulder belt.
Seat Belt Pretensioner
•Thefrontseatbeltsystemisequippedwithpretensioningdevicesthataredesignedto
remove slack from the seat belt in the event of a collision.
•Adeployedpretensioneroradeployedairbagmustbereplacedimmediately.
GETTING STARTED
15
Page 18 of 236
WARNING!
•Inacollision,youandyourpassengerscansuffermuchgreaterinjuriesifyouare
not properly buckled up. You can strike the interior of your vehicle or other
passengers, or you can be thrown out of the vehicle. Always be sure you and others
in your vehicle are buckled up properly.
•Ashoulderbeltplacedbehindyouwillnotprotectyoufrominjuryduringacollision.
Yo u a r e m o r e l i k e l y t o h i t y o u r h e a d i n a c o l l i s i o n i f y o u d o n o t w e a r y o u r s h o u l d e r
belt. The lap and shoulder belt are meant to be used together.
•Aseatbeltthatistooloosewillnotprotectyouproperly.Inasuddenstop,youcould
move too far forward, increasing the possibility of injury. Wear your seat belt snugly.
•Afrayedortornseatbeltcouldripapartinacollisionandleaveyouwithno
protection. Inspect the seat belt system periodically, checking for cuts, frays, or
loose parts. Damaged parts must be replaced immediately. Do not disassemble or
modify the system. Seat belt assemblies must be replaced after a collision.
SUPPLEMENTAL RESTRAINT SYSTEM (SRS) — AIR BAGS
Air Bag System Components
Yo u r v e h i c l e m a y b e e q u i p p e d w i t h t h e f o l l o w i n g a i r b a g s y s t e m c o m p o n e n t s :
•OccupantRestraintController(ORC)
•AirBagWarningLight
•SteeringWheelandColumn
•InstrumentPanel
•KneeImpactBolsters
•AdvancedFrontAirBags
•SupplementalSideAirBags
•SupplementalKneeAirBags
•FrontandSideImpactSensors
•SeatBeltPretentioners
•SeatBeltBuckleSwitch
•SeatTrackPositionSensors
Advanced Front Air Bags
•ThisvehiclehasAdvancedFrontAirBagsforboththedriverandfrontpassengerasa
supplement to the seat belt restraint systems. The Advanced Front Air Bags will not
deploy in every type of collision.
•AdvancedFrontAirBagsaredesignedtoprovideadditionalprotectionbysupplement-
ing the seat belts. Advanced Front Air Bags are not expected to reduce the risk of injury
in rear, side, or rollover collisions.
GETTING STARTED
16
Page 19 of 236
•TheAdvancedFrontAirBagswillnotdeployinallfrontalcollisions,includingsome
that may produce substantial vehicle damage — for example, some pole collisions,
truck underrides, and angle offset collisions.
•Ontheotherhand,dependingonthetypeandlocationofimpact,AdvancedFrontAir
Bags may deploy in crashes with little vehicle front-end damage but that produce a
severe initial deceleration.
•Becauseairbagsensorsmeasurevehicledecelerationovertime,vehiclespeedand
damage by themselves are not good indicators of whether or not an air bag should have
deployed.
•Seatbeltsarenecessaryforyourprotectioninallcollisions,andalsoareneededtohelp
keep you in position, away from an inflating air bag.
•Theairbagsmustbereadytoinflateforyourprotectioninacollision.TheOccupant
Restraint Controller (ORC) monitors the internal circuits and interconnecting wiring
associated with air bag system electrical components.
•TheORCturnsontheAirBagWarningLightintheinstrumentpanelforapproximately
four to eight seconds for a self-check when the ignition switch is first turned to the
ON/RUN position. After the self-check, the Air Bag Warning Light will turn off. If the
ORC detects a malfunction in any part of the system, it turns on the Air Bag Warning
Light, either momentarily or continuously. A single chime will sound to alert you if the
light comes on again after initial startup.
•TheORCmonitorsthereadinessoftheelectronicpartsoftheairbagsystemwhenever
the ignition switch is in the START or ON/RUN position. If the ignition switch is in the
OFF position or in the ACC position, the air bag system is not on and the air bags will
not inflate.
•IftheAirBagWarningLightintheinstrumentpanelisnotonduringthefourtoeight
seconds when the ignition switch is first turned to the ON/RUN position, stays on, or
turns on while driving, have the vehicle serviced by an authorized service center
immediately.
NOTE:
If the speedometer, tachometer, or any engine related gauges are not working, the
Occupant Restraint Controller (ORC) may also be disabled. In this condition the air bags
may not be ready to inflate for your protection. Have an authorized dealer service the air
bag system immediately.
•Afteranycollision,thevehicleshouldbetakentoanauthorizeddealerimmediately.
•Donotdriveyourvehicleaftertheairbagshavedeployed.Ifyouareinvolvedinanother
collision, the air bags will not be in place to protect you.
•Ifitisnecessarytomodifytheairbagsystemforpersonswithdisabilities,contactyour
authorized dealer.
•RefertotheOwner'sManualontheDVDregardingtheSupplementalRestraintSystem
(SRS) for further information.
GETTING STARTED
17
Page 20 of 236
Supplemental Knee Air Bags
This vehicle is equipped with a Supplemental Driver Knee Air Bag mounted in the
instrument panel below the steering column. The Supplemental Driver Knee Air Bag
provides enhanced protection during a frontal impact by working together with the seat
belts, pretensioners, and Advanced Front Air Bags.
WARNING!
•Relyingontheairbagsalonecouldleadtomoresevereinjuriesinacollision.The
air bags work with your seat belt to restrain you properly. In some collisions, the air
bags won't deploy at all. Always wear your seat belts even though you have air bags.
•BeingtooclosetothesteeringwheelorinstrumentpanelduringAdvancedFrontAir
Bag deployment could cause serious injury, including death. Air bags need room to
inflate. Sit back, comfortably extending your arms to reach the steering wheel or
instrument panel.
•Noobjectsshouldbeplacedoverorneartheairbagontheinstrumentpanelor
steering wheel because any such objects could cause harm if the vehicle is in a
collision severe enough to cause the air bag to inflate.
Supplemental Side Air Bags
•ThisvehicleisequippedwithSupplementalSeat-MountedSideAirBags(SABs)
located in the outboard side of the front seats. The SABs are marked with a SRS
AIRBAG or AIRBAG label sewn into the outboard side of the seats.
•ThisvehicleisequippedwithSupplementalSideAirBagInflatableCurtains(SABICs)
located above the side windows. The trim covering the SABICs is labeled SRS AIRBAG
or AIRBAG. The SABICs may help reduce the risk of partial or complete ejection of
vehicle occupants through side windows in certain side impact events.
•TheSABICsandSABs(“SideAirBags”)aredesignedtoactivateincertainside
impacts and certain rollover events. The Occupant Restraint Controller (“ORC”)
determines whether the deployment of the Side Air Bags in a particular side impact or
rollover event is appropriate, based on the severity and type of collision. Vehicle damage
by itself is not a good indicator of whether or not Side Air Bags should have deployed.
GETTING STARTED
18