DODGE DURANGO 2015 3.G Workshop Manual
Manufacturer: DODGE, Model Year: 2015, Model line: DURANGO, Model: DODGE DURANGO 2015 3.GPages: 236, PDF Size: 35.01 MB
Page 51 of 236
FORWARD COLLISION WARNING (FCW) WITH MITIGATION
The Forward Collision Warning (FCW) system with mitigation provides the driver with
audible warnings, visual warnings within the DID, and may apply a brake jerk to warn the
driver when it detects a potential frontal collision. The warnings and limited braking are
intended to provide the driver with enough time to react, avoid or mitigate the potential
collision.
•FCWmonitorstheinformationfromtheforwardlookingsensorsaswellasthe
Electronic Brake Controller (EBC), to calculate the probability of a forward collision.
When the system determines that a forward collision is probable, the driver will be
provided with audible and visual warnings and may provide a brake jerk warning.
•Ifthedriverdoesnottakeactionbasedupontheseprogressivewarnings,thenthe
system will provide a limited level of active braking to help slow the vehicle and mitigate
the potential forward collision. If the driver reacts to the warnings by braking and the
system determines that the driver intends to avoid the collision by braking but has not
applied sufficient brake force, the system will compensate and provide additional brake
force as required.
Turning FCW ON Or OFF
NOTE:
The default status of FCW is “On,” this allows the system to warn you of a possible
collision with the vehicle in front of you when you are farther away and it applies limited
braking. This gives you the most reaction time to avoid a possible collision.
The forward collision button is on the switch panel that is located in the center of the
instrument panel.
•ToturntheFCWsystemOFF,pushtheforwardcollisionbuttononce(LEDturnson).
•To t u r n t h e F C W s y s t e m b a c k O N , p u s h t h e f o r w a r d c o l l i s i o n b u t t o n a g a i n ( L E D t u r n s o f f ) .
Changing FCW Status
The FCW feature has two settings and can be changed within the Uconnect®System
Screen:
•Far
•Near
NOTE:
The FCW and active braking settings can only be changed when the vehicle is in PARK.
Far
The default status of FCW is the “Far” setting.
The far setting provides warnings for potential collisions more distant in front of the
vehicle, allowing the driver to have the most reaction time to avoid a collision.
OPERATING YOUR VEHICLE
49
Page 52 of 236
This setting is designed to provide early warnings per NHTSA (National Highway Traffic
Safety Administration) recommendations.
More cautious drivers that do not mind frequent warnings may prefer this setting.
NOTE:
This setting gives you the most reaction time.
Near
Changing the FCW status to the “Near” setting, allows the system to warn you of a
potential frontal collision when you are much closer.
This setting provides less reaction time than the “Far” setting, which allows for a more
dynamic driving experience.
More dynamic or aggressive drivers that want to avoid frequent warnings may prefer this
setting.
Off
Changing the FCW status to “Off” prevents the system from warning you of a possible
collision with the vehicle in front of you.
Turning Active Braking ON Or OFF
The Active Braking feature has two settings and can be changed within the Uconnect®
System Screen:
•On
•Off
Changing the Active Braking status to “Off” prevents the system from providing limited
autonomous braking, or additional brake support if the driver is not braking adequately in
the event of a potential frontal collision.
NOTE:
If FCW is set to “Off,” “FCW OFF” will be displayed in the DID.
Refer to the Owner's Manual on the DVD for further details.
WARNING!
Forward Collision Warning (FCW) is not intended to avoid a collision on its own, nor can
FCW detect every type of potential collision. The driver has the responsibility to avoid
acollisionbycontrollingthevehicleviabrakingandsteering.Failuretofollowthis
warning could lead to serious injury or death.
OPERATING YOUR VEHICLE
50
Page 53 of 236
AUTOMATIC DIMMING MIRRORS
The rearview and driver side exterior mirror automatically adjusts for headlight glare from
vehicles behind you.
Yo u c a n t u r n t h e f e a t u r e o n o r o f f w h e n t h e A u t o m a t i c D i m m i n g M i r r o r f e a t u r e i s s e l e c t e d
through the programmable features in the Uconnect®system. Refer to “Uconnect®
Settings” in “Understanding Your Instrument Panel” in the Owner's Manual on the DVD
for further details.
ELECTRONIC SHIFTER
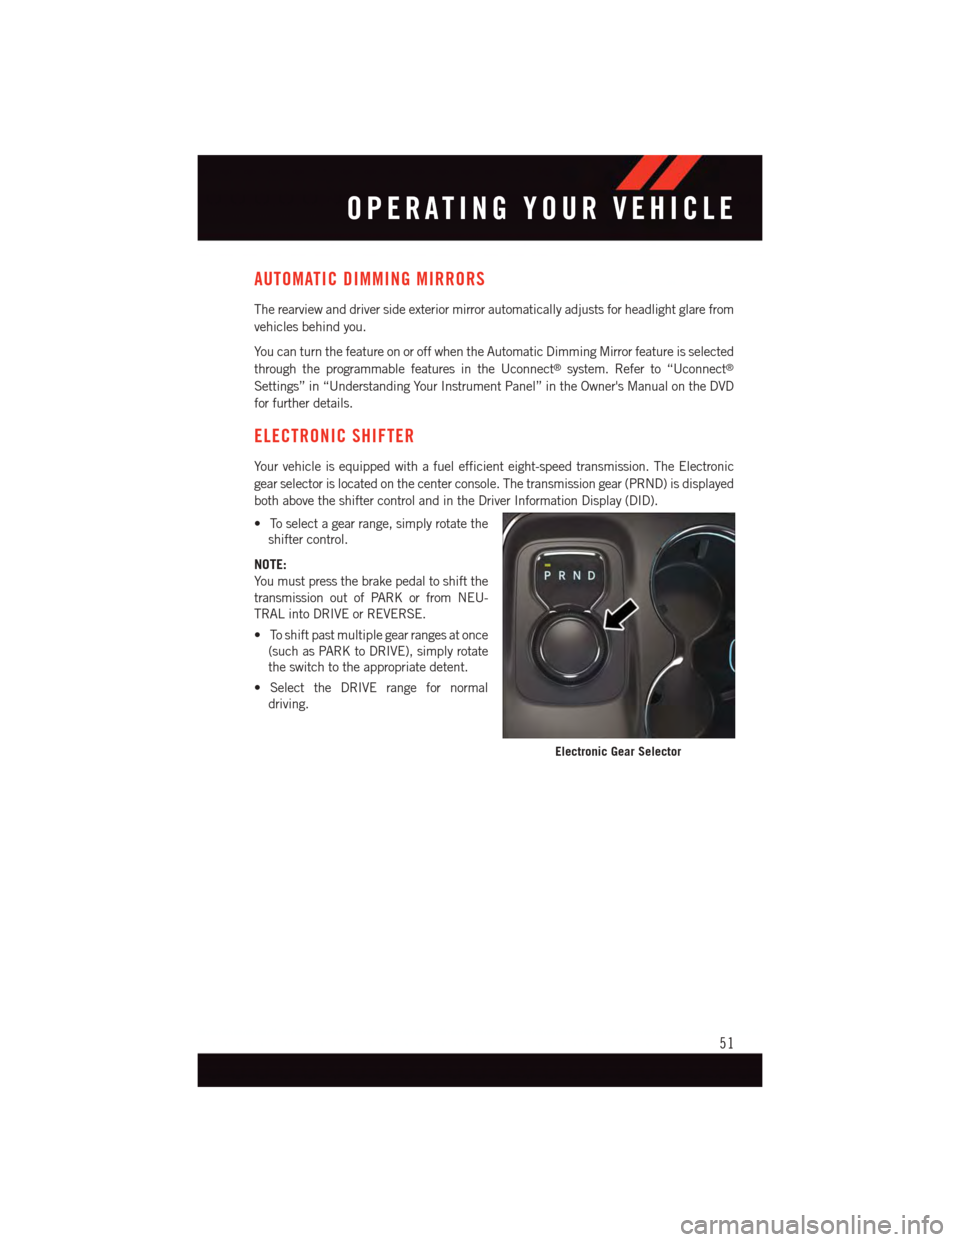
Yo u r v e h i c l e i s e q u i p p e d w i t h a f u e l e f f i c i e n t e i g h t - s p e e d t r a n s m i s s i o n . T h e E l e c t r o n i c
gear selector is located on the center console. The transmission gear (PRND) is displayed
both above the shifter control and in the Driver Information Display (DID).
•Toselectagearrange,simplyrotatethe
shifter control.
NOTE:
Yo u m u s t p r e s s t h e b r a k e p e d a l t o s h i f t t h e
transmission out of PARK or from NEU-
TRAL into DRIVE or REVERSE.
•Toshiftpastmultiplegearrangesatonce
(such as PARK to DRIVE), simply rotate
the switch to the appropriate detent.
•SelecttheDRIVErangefornormal
driving.
Electronic Gear Selector
OPERATING YOUR VEHICLE
51
Page 54 of 236
WARNING!
•NeverusethePARKpositionasasubstitutefortheparkingbrake.Alwaysapplythe
parking brake fully when parked to guard against vehicle movement and possible
injury or damage.
•YourvehiclecouldmoveandinjureyouandothersifitisnotinPARK.Makesure
the transmission is in PARK before leaving the vehicle.
•ItisdangeroustoshiftoutofPARKorNEUTRALiftheenginespeedishigherthan
idle speed. If your foot is not firmly pressing the brake pedal, the vehicle could
accelerate quickly forward or in reverse. You could lose control of the vehicle and hit
someone or something. Only shift into gear when the engine is idling normally and
your foot is firmly pressing the brake pedal.
•Unintendedmovementofavehiclecouldinjurethoseinornearthevehicle.Aswith
all vehicles, you should never exit a vehicle while the engine is running. Before
exiting a vehicle, always apply the parking brake, shift the transmission into PARK,
turn the engine OFF, and remove the key fob. When the ignition is in the OFF
position, the transmission is locked in PARK, securing the vehicle against un-
wanted movement.
•Whenleavingthevehicle,alwaysmakesuretheignitionisintheOFFposition,
remove the key fob from the vehicle, and lock the vehicle.
•Neverleavechildrenaloneinavehicle,orwithaccesstoanunlockedvehicle.
Allowing children to be in a vehicle unattended is dangerous for a number of
reasons. A child or others could be seriously or fatally injured. Children should be
warned not to touch the parking brake, brake pedal or the transmission gear
selector.
•Donotleavethekeyfobinornearthevehicle(orinalocationaccessibleto
children), and do not leave the ignition in the ACC or ON/RUN position. A child
could operate power windows, other controls, or move the vehicle.
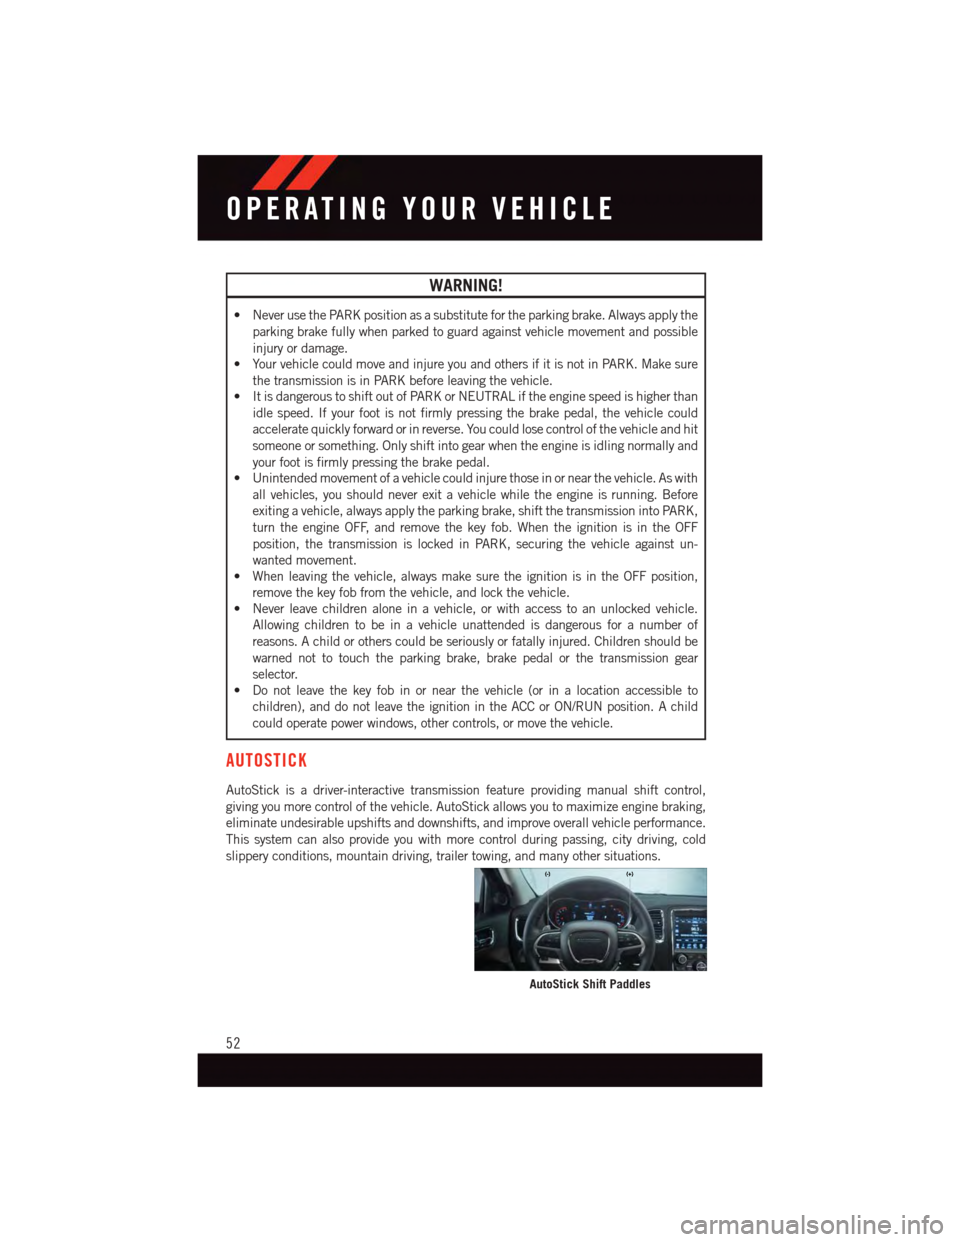
AUTOSTICK
AutoStick is a driver-interactive transmission feature providing manual shift control,
giving you more control of the vehicle. AutoStick allows you to maximize engine braking,
eliminate undesirable upshifts and downshifts, and improve overall vehicle performance.
This system can also provide you with more control during passing, city driving, cold
slippery conditions, mountain driving, trailer towing, and many other situations.
AutoStick Shift Paddles
OPERATING YOUR VEHICLE
52
Page 55 of 236
Operation
When the transmission is in DRIVE, it will operate automatically, shifting between the
eight available gears. To engage AutoStick, simply tap one of the steering wheel-mounted
shift paddles (+/-). Tapping (-) to enter AutoStick mode will downshift the transmission to
the next lower gear, while using (+) to enter AutoStick mode will retain the current gear.
When AutoStick is active, the current transmission gear is displayed in the instrument
cluster.
In AutoStick mode, the transmission will shift up or down when (+/-) is manually selected
by the driver, unless an engine lugging or overspeed condition would result. It will remain
in the selected gear until another upshift or downshift is chosen, except as described
below.
•Thetransmissionwillautomaticallydownshiftasthevehicleslows(topreventengine
lugging) and will display the current gear.
•Thetransmissionwillautomaticallydownshifttofirstgearwhencomingtoastop.After
astop,thedrivershouldmanuallyupshift(+)thetransmissionasthevehicleis
accelerated.
•Youcanstartout,fromastop,infirstorsecondgear.Tapping(+)atastopwillallow
starting in second gear. Starting out in second gear can be helpful in snowy or icy
conditions.
•Ifarequesteddownshiftwouldcausetheenginetoover-speed,thatshiftwillnotoccur.
•Thesystemwillignoreattemptstoupshiftattoolowofavehiclespeed.
•Holdingthe(-)paddledepressedwilldownshiftthetransmissiontothelowestgear
possible at the current speed.
•TransmissionshiftingwillbemorenoticeablewhenAutoStickisengaged.
•Thesystemmayreverttoautomaticshiftmodeifafaultoroverheatconditionis
detected.
To d i s e n g a g e A u t o S t i c k m o d e , p r e s s a n d h o l d t h e ( + ) s h i f t p a d d l e u n t i l " D " i s o n c e a g a i n
indicated in the instrument cluster. You can shift in or out of AutoStick mode at any time
without taking your foot off the accelerator pedal.
WARNING!
Do not downshift for additional engine braking on a slippery surface. The drive wheels
could lose their grip and the vehicle could skid, causing a collision or personal injury.
OPERATING YOUR VEHICLE
53
Page 56 of 236
FUEL ECONOMY (ECO) MODE
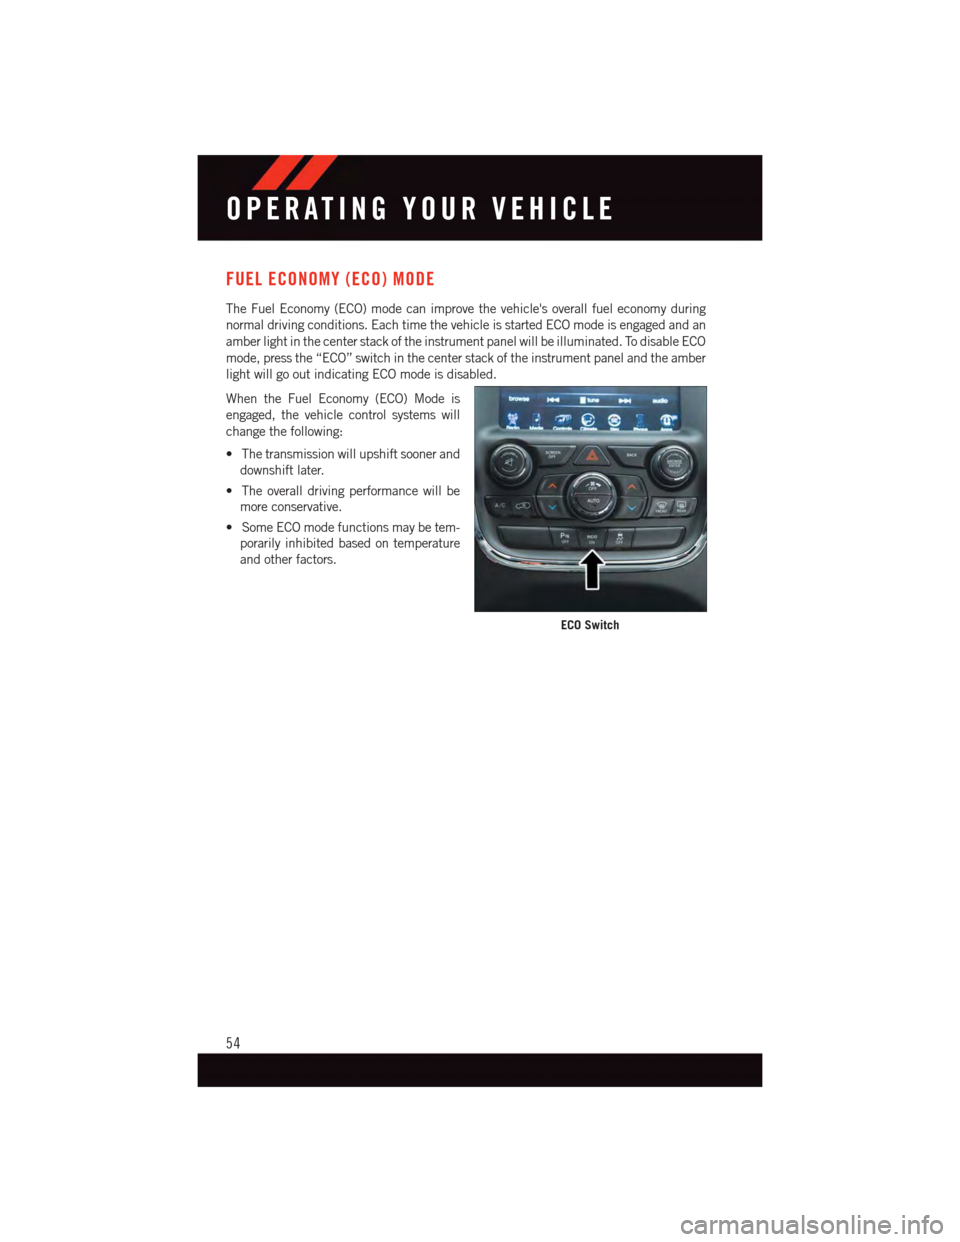
The Fuel Economy (ECO) mode can improve the vehicle's overall fuel economy during
normal driving conditions. Each time the vehicle is started ECO mode is engaged and an
amber light in the center stack of the instrument panel will be illuminated. To disable ECO
mode, press the “ECO” switch in the center stack of the instrument panel and the amber
light will go out indicating ECO mode is disabled.
When the Fuel Economy (ECO) Mode is
engaged, the vehicle control systems will
change the following:
•Thetransmissionwillupshiftsoonerand
downshift later.
•Theoveralldrivingperformancewillbe
more conservative.
•SomeECOmodefunctionsmaybetem-
porarily inhibited based on temperature
and other factors.
ECO Switch
OPERATING YOUR VEHICLE
54
Page 57 of 236
AUTOMATIC CLIMATE CONTROLS
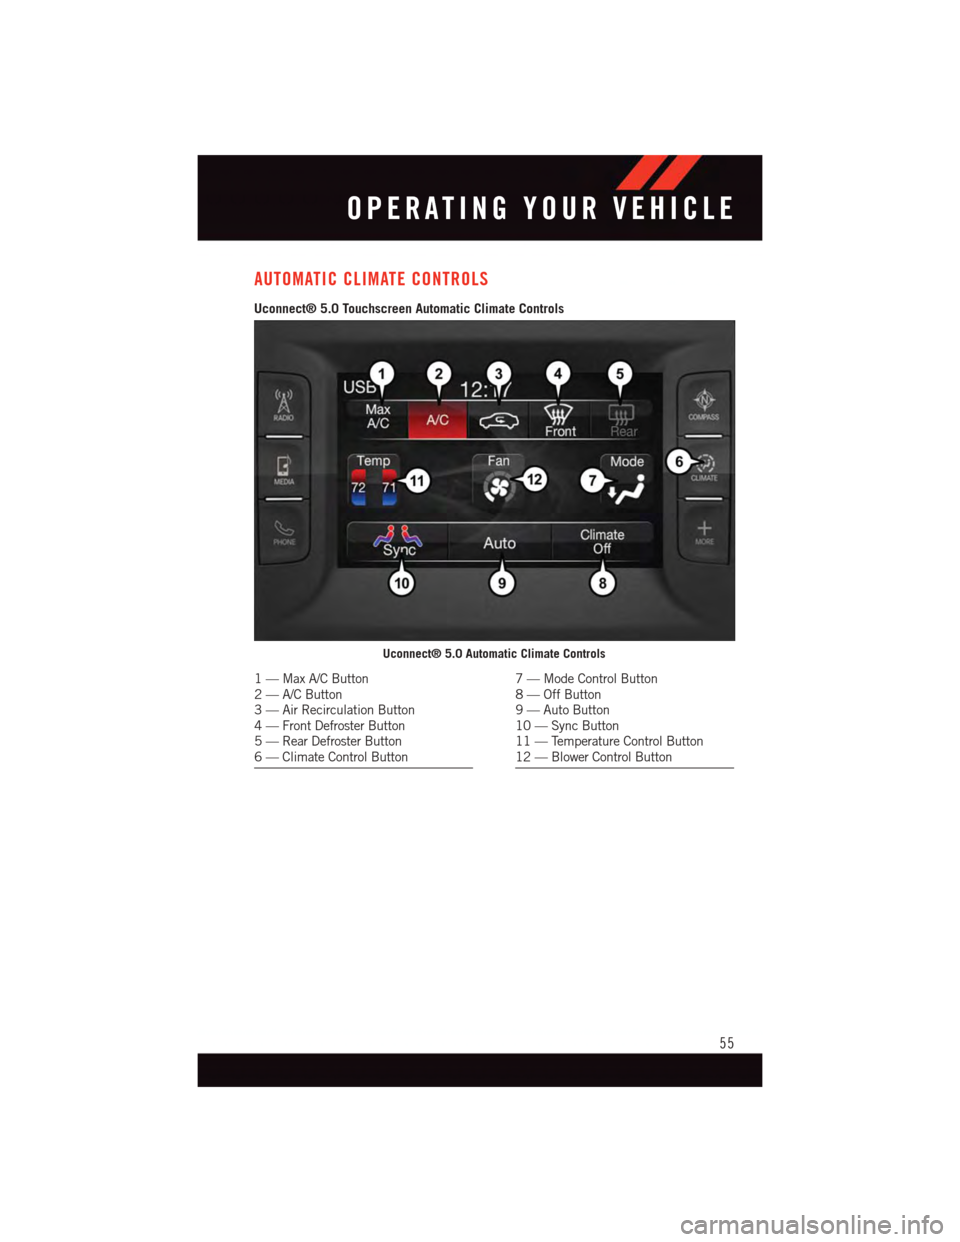
Uconnect® 5.0 Touchscreen Automatic Climate Controls
Uconnect® 5.0 Automatic Climate Controls
1—MaxA/CButton2—A/CButton3—AirRecirculationButton4—FrontDefrosterButton5—RearDefrosterButton6—ClimateControlButton
7—ModeControlButton8—OffButton9—AutoButton10 — Sync Button11 — Temperature Control Button12 — Blower Control Button
OPERATING YOUR VEHICLE
55
Page 58 of 236
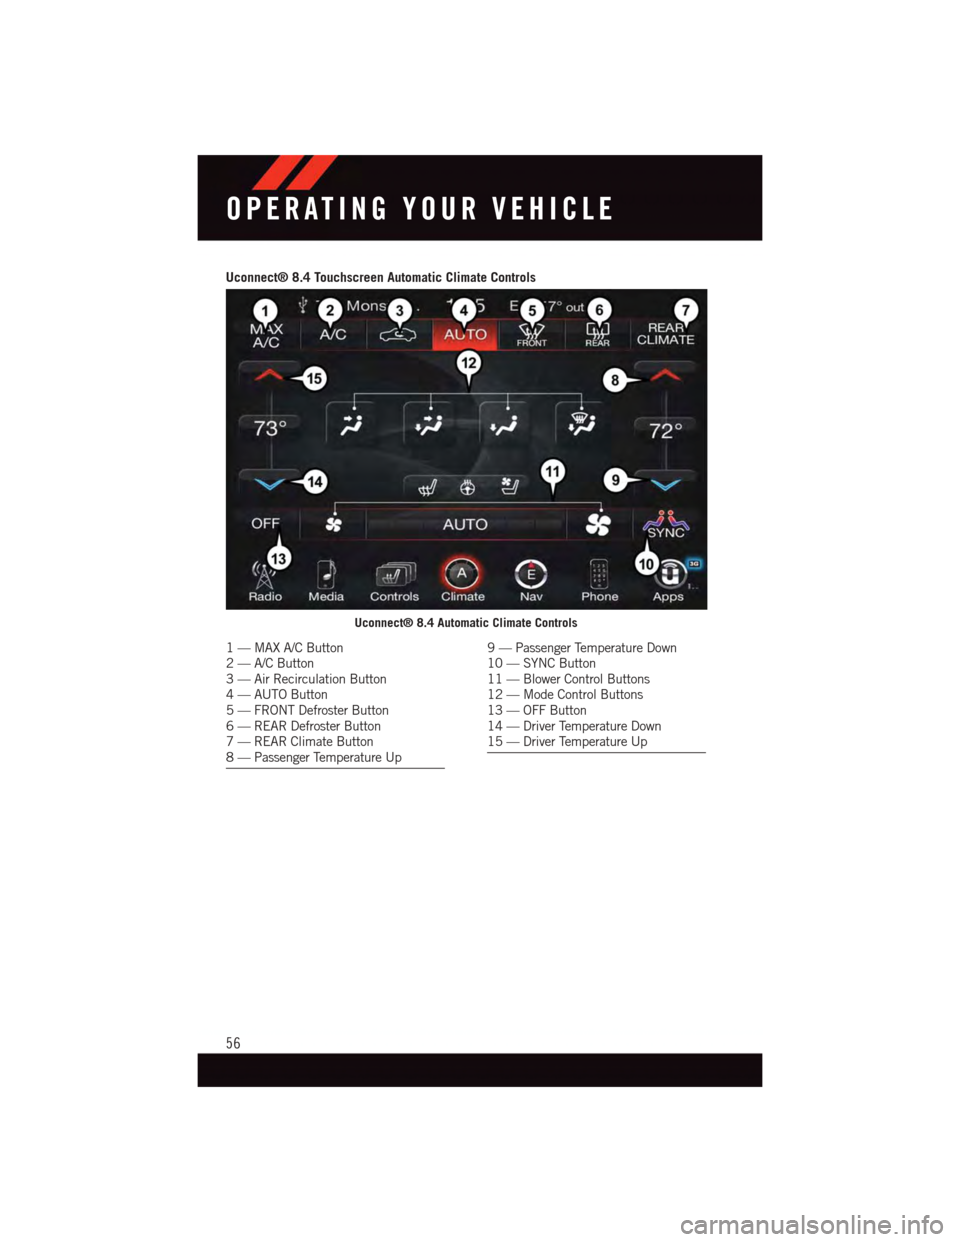
Uconnect® 8.4 Touchscreen Automatic Climate Controls
Uconnect® 8.4 Automatic Climate Controls
1—MAXA/CButton2—A/CButton3—AirRecirculationButton4—AUTOButton5—FRONTDefrosterButton6—REARDefrosterButton7—REARClimateButton8—PassengerTemperatureUp
9—PassengerTemperatureDown10 — SYNC Button11 — Blower Control Buttons12 — Mode Control Buttons13 — OFF Button14 — Driver Temperature Down15 — Driver Temperature Up
OPERATING YOUR VEHICLE
56
Page 59 of 236
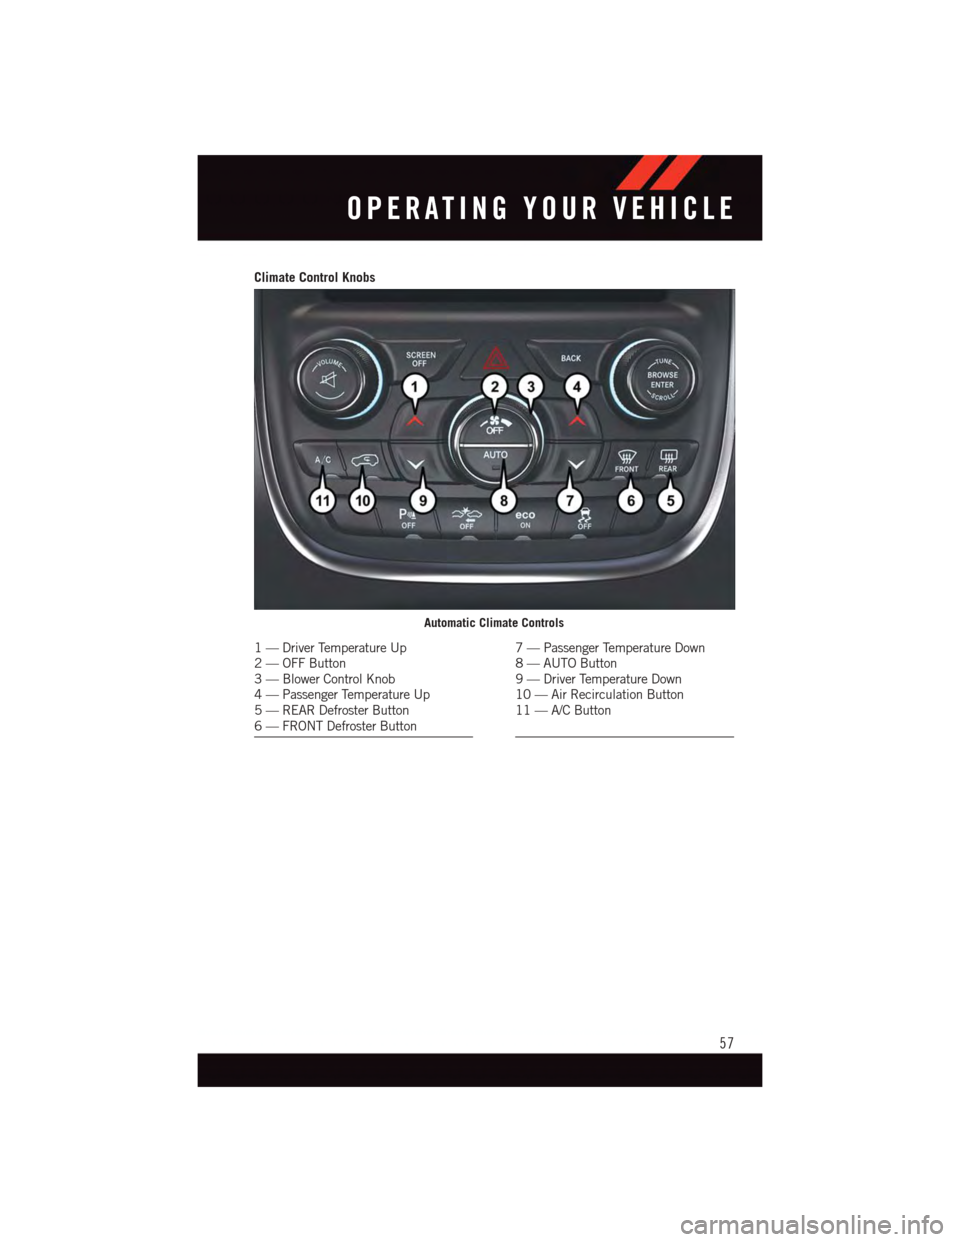
Climate Control Knobs
Automatic Climate Controls
1—DriverTemperatureUp2—OFFButton3—BlowerControlKnob4—PassengerTemperatureUp5—REARDefrosterButton6—FRONTDefrosterButton
7—PassengerTemperatureDown8—AUTOButton9—DriverTemperatureDown10 — Air Recirculation Button11 — A/C Button
OPERATING YOUR VEHICLE
57
Page 60 of 236
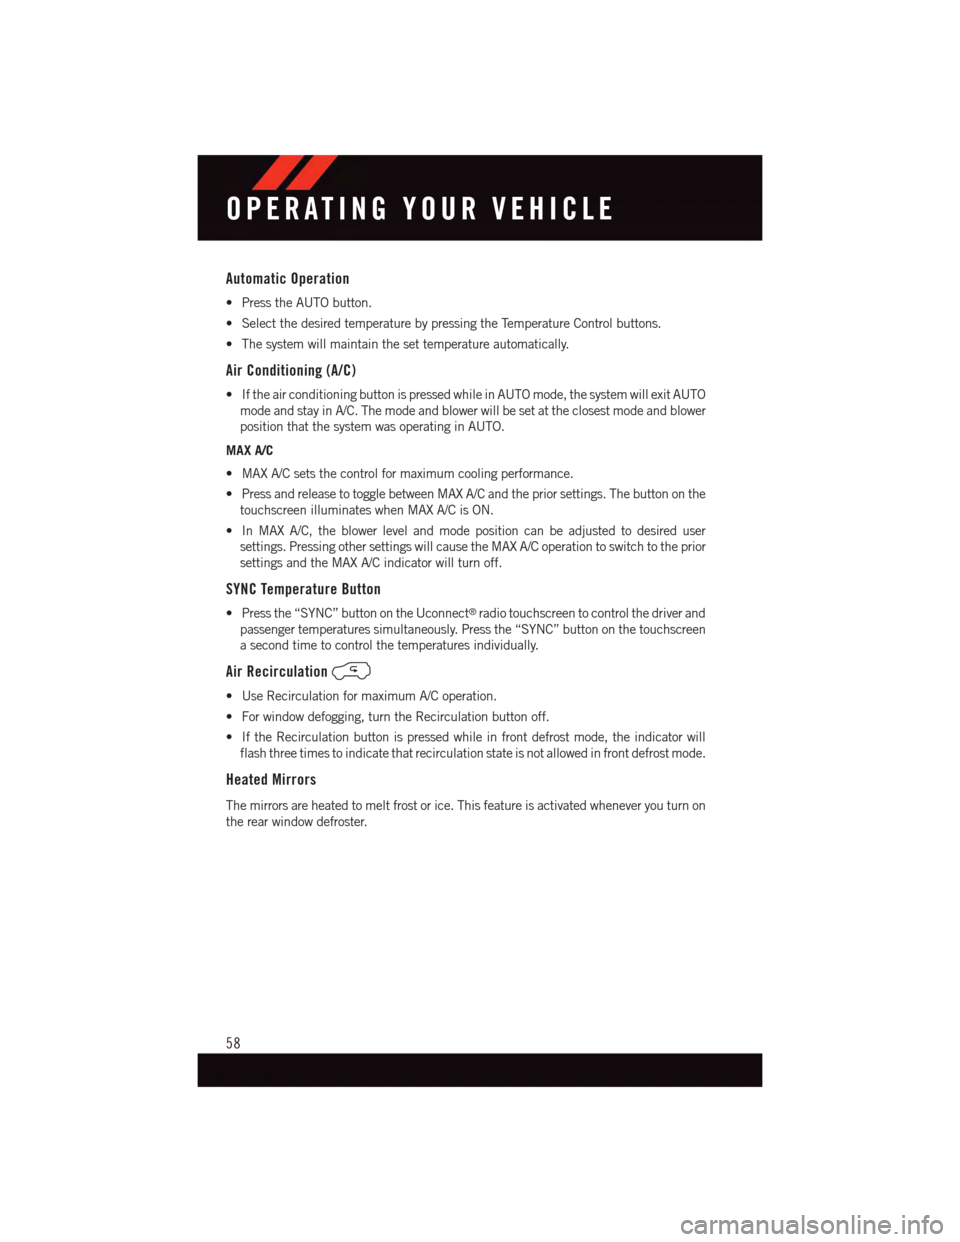
Automatic Operation
•PresstheAUTObutton.
•SelectthedesiredtemperaturebypressingtheTemperatureControlbuttons.
•Thesystemwillmaintainthesettemperatureautomatically.
Air Conditioning (A/C)
•IftheairconditioningbuttonispressedwhileinAUTOmode,thesystemwillexitAUTO
mode and stay in A/C. The mode and blower will be set at the closest mode and blower
position that the system was operating in AUTO.
MAX A/C
•MAXA/Csetsthecontrolformaximumcoolingperformance.
•PressandreleasetotogglebetweenMAXA/Candthepriorsettings.Thebuttononthe
touchscreen illuminates when MAX A/C is ON.
•InMAXA/C,theblowerlevelandmodepositioncanbeadjustedtodesireduser
settings. Pressing other settings will cause the MAX A/C operation to switch to the prior
settings and the MAX A/C indicator will turn off.
SYNC Temperature Button
•Pressthe“SYNC”buttonontheUconnect®radio touchscreen to control the driver and
passenger temperatures simultaneously. Press the “SYNC” button on the touchscreen
asecondtimetocontrolthetemperaturesindividually.
Air Recirculation
•UseRecirculationformaximumA/Coperation.
•Forwindowdefogging,turntheRecirculationbuttonoff.
•IftheRecirculationbuttonispressedwhileinfrontdefrostmode,theindicatorwill
flash three times to indicate that recirculation state is not allowed in front defrost mode.
Heated Mirrors
The mirrors are heated to melt frost or ice. This feature is activated whenever you turn on
the rear window defroster.
OPERATING YOUR VEHICLE
58