steering wheel DODGE DURANGO 2015 3.G Owner's Manual
[x] Cancel search | Manufacturer: DODGE, Model Year: 2015, Model line: DURANGO, Model: DODGE DURANGO 2015 3.GPages: 236, PDF Size: 35.01 MB
Page 133 of 236
MEDIA HUB — iPod®/USB/MP3/SD Card
There are many ways to play music from iPod®/MP3 players, SD card, or USB devices
through your vehicle's sound system.
•Pressyour“Media”buttononthetouchscreentobegin.
USB Port
Connect your iPod®or compatible device using a USB cable into the USB Port. USB
Memory sticks with audio files can also be used. Audio from the device can be played on
the vehicle's sound system while providing metadata (artist, track title, album, etc.)
information on the radio display.
When connected, the iPod®/compatible USB device can be controlled using the radio or
Steering Wheel Audio Controls to play, skip to the next or previous track, browse, and list
the contents.
The iPod®battery charges when plugged into the USB port (if supported by the specific
device.)
To r o u t e t h e U S B / i P o d®cable out of the center console, use the access cut out.
NOTE:
•WhenconnectingyouriPod®device for the first time, the system may take several
minutes to read your music, depending on the number of files. For example, the system
will take approximately five minutes for every 1,000 songs loaded on the device. Also
during the reading process, the Shuffle and Browse functions will be disabled. This
process is needed to ensure the full use of your iPod®features and only happens the
first time it is connected. After the first time, the reading process of your iPod®will take
considerably less time unless changes are made or new songs are added to the playlist.
•TheUSBportsupportscertainMini,Classic,Nano,Touch,andiPhone®devices. The
USB port also supports playing music from compatible external USB Mass Storage
Class memory devices. Some iPod®software versions may not fully support the USB
port features. Please visit Apple’s website for iPod®software updates.
Audio Jack (AUX)
The AUX allows a portable device, such as an MP3 player or an iPod®,tobepluggedinto
the radio and utilize the vehicle’s sound system, using a 3.5 mm audio cable, to amplify
the source and play through the vehicle speakers.
•Pressingthe“AUX”buttononthetouchscreenwillchangethemodetoauxiliarydevice
if the audio jack is connected, allowing the music from your portable device to be heard
through the vehicle's speakers. In order to activate the AUX, plug in the audio jack.
•Thefunctionsoftheportabledevicearecontrolledusingthedevicebuttons.The
volume may be controlled using the radio or portable device.
•Toroutetheaudiocableoutofthecenterconsole,usetheaccesscutoutinthefront
of the console.
ELECTRONICS
131
Page 140 of 236
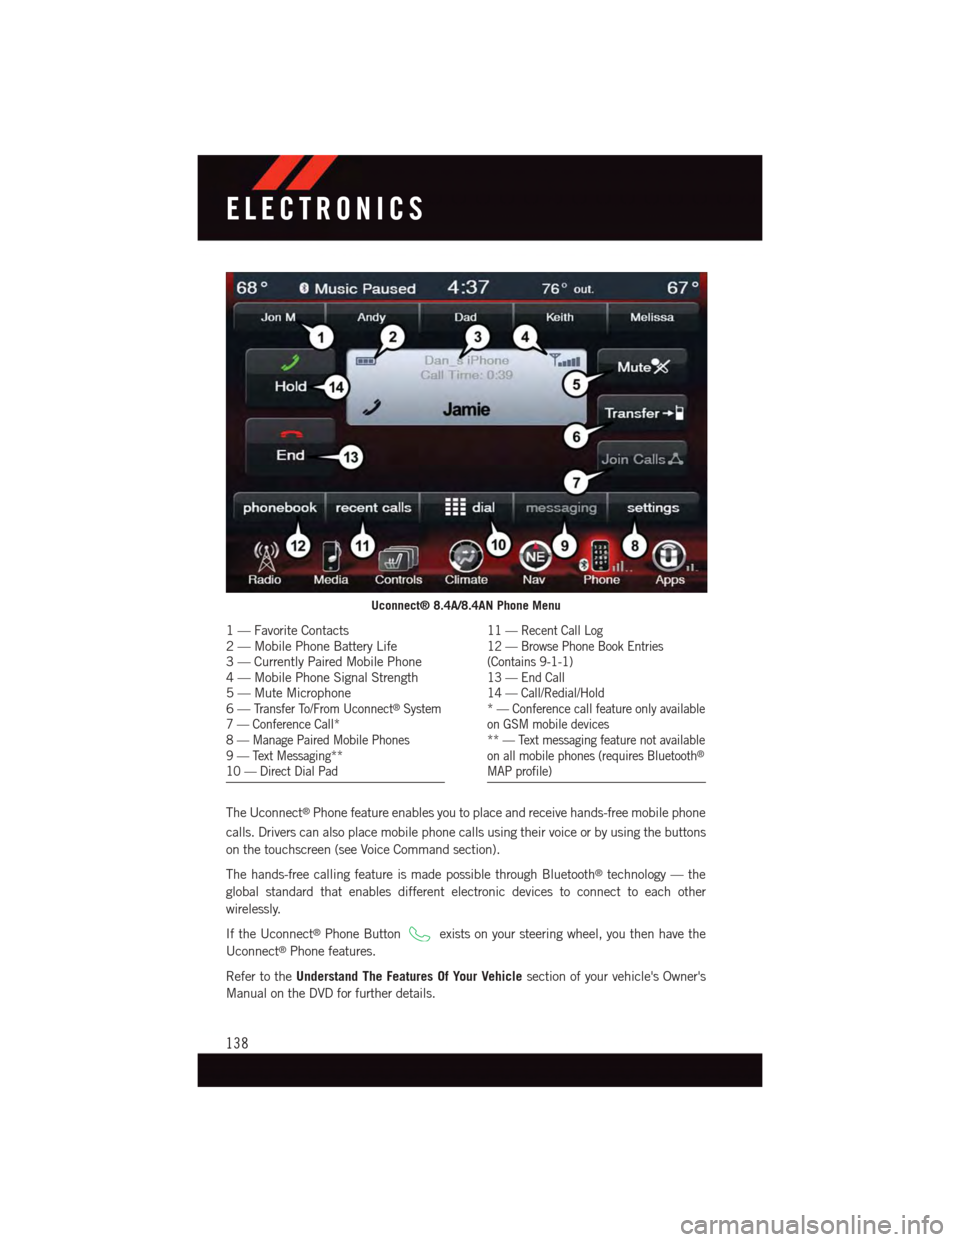
The Uconnect®Phone feature enables you to place and receive hands-free mobile phone
calls. Drivers can also place mobile phone calls using their voice or by using the buttons
on the touchscreen (see Voice Command section).
The hands-free calling feature is made possible through Bluetooth®technology — the
global standard that enables different electronic devices to connect to each other
wirelessly.
If the Uconnect®Phone Buttonexists on your steering wheel, you then have the
Uconnect®Phone features.
Refer to theUnderstand The Features Of Your Vehiclesection of your vehicle's Owner's
Manual on the DVD for further details.
Uconnect® 8.4A/8.4AN Phone Menu
1—FavoriteContacts2—MobilePhoneBatteryLife3—CurrentlyPairedMobilePhone4—MobilePhoneSignalStrength5—MuteMicrophone6—Tr a n s f e r To / F r o m U c o n n e c t®System7—ConferenceCall*8—ManagePairedMobilePhones9—TextMessaging**10 — Direct Dial Pad
11 — Recent Call Log12 — Browse Phone Book Entries(Contains 9-1-1)13 — End Call14 — Call/Redial/Hold*—Conferencecallfeatureonlyavailableon GSM mobile devices** — Text messaging feature not availableon all mobile phones (requires Bluetooth®
MAP profile)
ELECTRONICS
138
Page 144 of 236
Select The Android Mobile Phone's Priority Level
When the pairing process has successfully completed, the system will prompt you to
choose whether or not this is your favorite mobile phone. Selecting “Yes” will make this
mobile phone the highest priority. This mobile phone will take precedence over other
paired mobile phones within range and will connect to the Uconnect®system automati-
cally when entering the vehicle. Only one mobile phone and/or one Bluetooth audio device
can be connected to the Uconnect®system at a time. If “No” is selected, simply select
“Uconnect” from the mobile phone/audio device Bluetooth screen, and the Uconnect®
system will reconnect to the Bluetooth device.
Yo u a r e n o w r e a d y t o m a k e h a n d s - f r e e c a l l s . P r e s s t h e U c o n n e c t®“Phone” button
on your steering wheel to begin.
NOTE:
Refer to UconnectPhone.com website for additional information on mobile phone pairing
and for a list of compatible phones.
Making A Phone Call
•PushtheUconnect®Phone button.
•Say“dial”thenthenumber(or“call”thenthenameaslistedinyourphone;see
Phonebook) after the BEEP.
NOTE:
Yo u c a n a l s o i n i t i a t e a c a l l b y u s i n g t h e t o u c h s c r e e n o n t h e U c o n n e c t®Phone main
screen.
Common Phone Commands (Examples)
•“CallJohnSmith”
•“CallJohnSmithmobile”
•“Dial12485551212”
•“Redial”
Receiving A Call – Accept (And End)
•Whenanincomingcallrings/isannouncedonUconnect®,pushthePhonebutton
.
•Toendacall,pushtheHangUporPhonebutton.
Mute (Or Unmute) Microphone During Call
•Duringacall,pressthe“Mute”buttononthePhonemainscreentomuteandunmute
the call.
Transfer Ongoing Call Between Handset And Vehicle
•Duringanon-goingcall,pressthe“Transfer”buttononthePhonemainscreento
transfer an on-going call between handset and vehicle.
ELECTRONICS
142
Page 145 of 236
Phonebook
The Uconnect®system will automatically sync your phonebook from your paired phone, if
this feature is supported by your phone. Phonebook contacts are updated each time that
the phone is connected. If your phone book entries do not appear, check the settings on
your phone. Some phones require you to enable this feature manually.
•YourphonebookcanbebrowsedontheUconnect®system touchscreen, but editing
can only be done on your phone. To browse, press the “Phone” button on the
touchscreen, then the “Phonebook” button on the touchscreen.
Favorite phonebook entries can be saved as Favorites for quicker access. Favorites are
shown at the top of the main phone screen.
Voice Command Tips
•Speakingcompletenames(i.e;CallJohnDoevs.CallJohn)willresultingreatersystem
accuracy.
•Youcan“link”commandstogetherforfasterresults.Say“CallJohnDoe,mobile,”for
example.
•Ifyouarelisteningtoavailablevoicecommandoptions,youdonothavetolistentothe
entire list. When you hear the command that you need, push thebutton on the
steering wheel, wait for the beep and say your command.
Changing The Volume
•StartadialoguebypushingthePhonebutton,thensayacommandforexample
-"Help".
•UsetheradioVOLUME/MUTErotaryknobtoadjustthevolumetoacomfortablelevel
while the Uconnect®system is speaking. Please note the volume setting for Uconnect®
is different than the audio system.
NOTE:
To a c c e s s h e l p , p u s h t h e U c o n n e c t®Phonebutton on the steering wheel and say
"help." Press the display or press either the Phoneor VRbutton and say
"cancel" to cancel the help session.
Incoming Text Messages
After pairing your Uconnect®system with a Bluetooth®enabled mobile device with the
Message Access Profile (MAP), the Uconnect®system can announce a new incoming text
message and read it to you over the vehicle’s audio system.
ELECTRONICS
143
Page 149 of 236
•Verifyyouareselecting“Uconnect”inthediscoveredBluetooth®devices on your
mobile phone.
•Ifyourvehiclesystemgeneratesapincodethedefaultis0000.
Mobile Phonebook didn’t download:
•Check“Donotaskagain,”thenacceptthe“phonebookdownload”requestonyour
mobile phone.
•Upto5,000contactnameswithfournumberspercontactwilltransfertothe
Uconnect®8.4A/8.4AN system phonebook.
•Upto2,000contactnameswithsixnumberspercontactwilltransfertothe
Uconnect®5.0 system phonebook.
Te x t m e s s a g i n g w o n ’ t w o r k :
•Check“Donotaskagain,”thenacceptthe“connecttoyourmessages”requestonyour
mobile phone.
•VerifythatyourmobilephonehastheBluetooth®feature (Message Access Profile).
Can’t make a conference call:
•CDMA(Code-DivisionMultipleAccess)carriersdonotsupportconferencecalling.
Refer to your mobile phone user’s manual for further information.
Making calls while connected to AUX:
•Plugging in your mobile phone to AUX while connected to Bluetooth®will disable Hands-
Free Calling. Do not make calls while your mobile phone is plugged into the AUX jack.
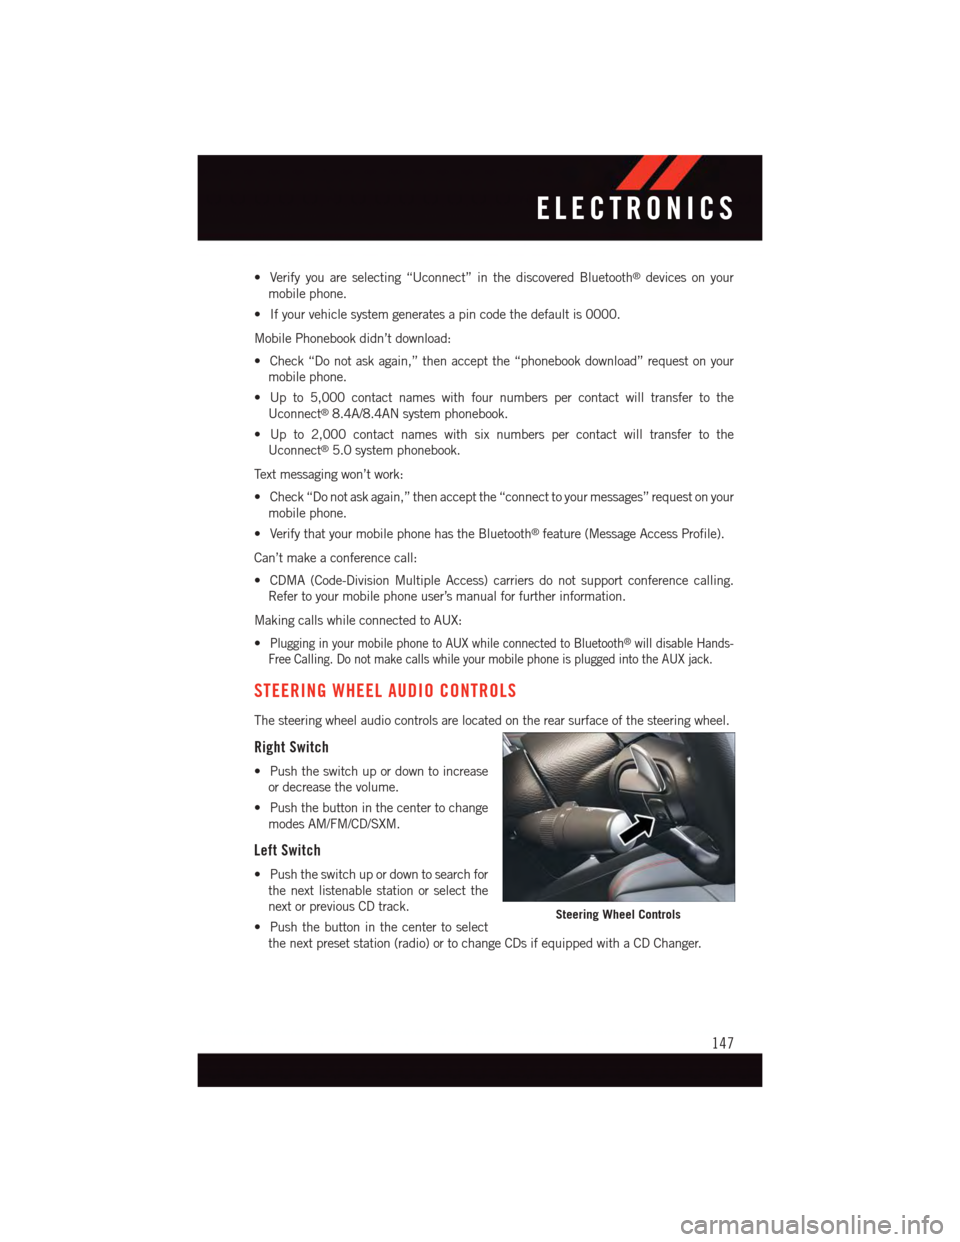
STEERING WHEEL AUDIO CONTROLS
The steering wheel audio controls are located on the rear surface of the steering wheel.
Right Switch
•Pushtheswitchupordowntoincrease
or decrease the volume.
•Pushthebuttoninthecentertochange
modes AM/FM/CD/SXM.
Left Switch
•Pushtheswitchupordowntosearchfor
the next listenable station or select the
next or previous CD track.
•Pushthebuttoninthecentertoselect
the next preset station (radio) or to change CDs if equipped with a CD Changer.
Steering Wheel Controls
ELECTRONICS
147
Page 150 of 236
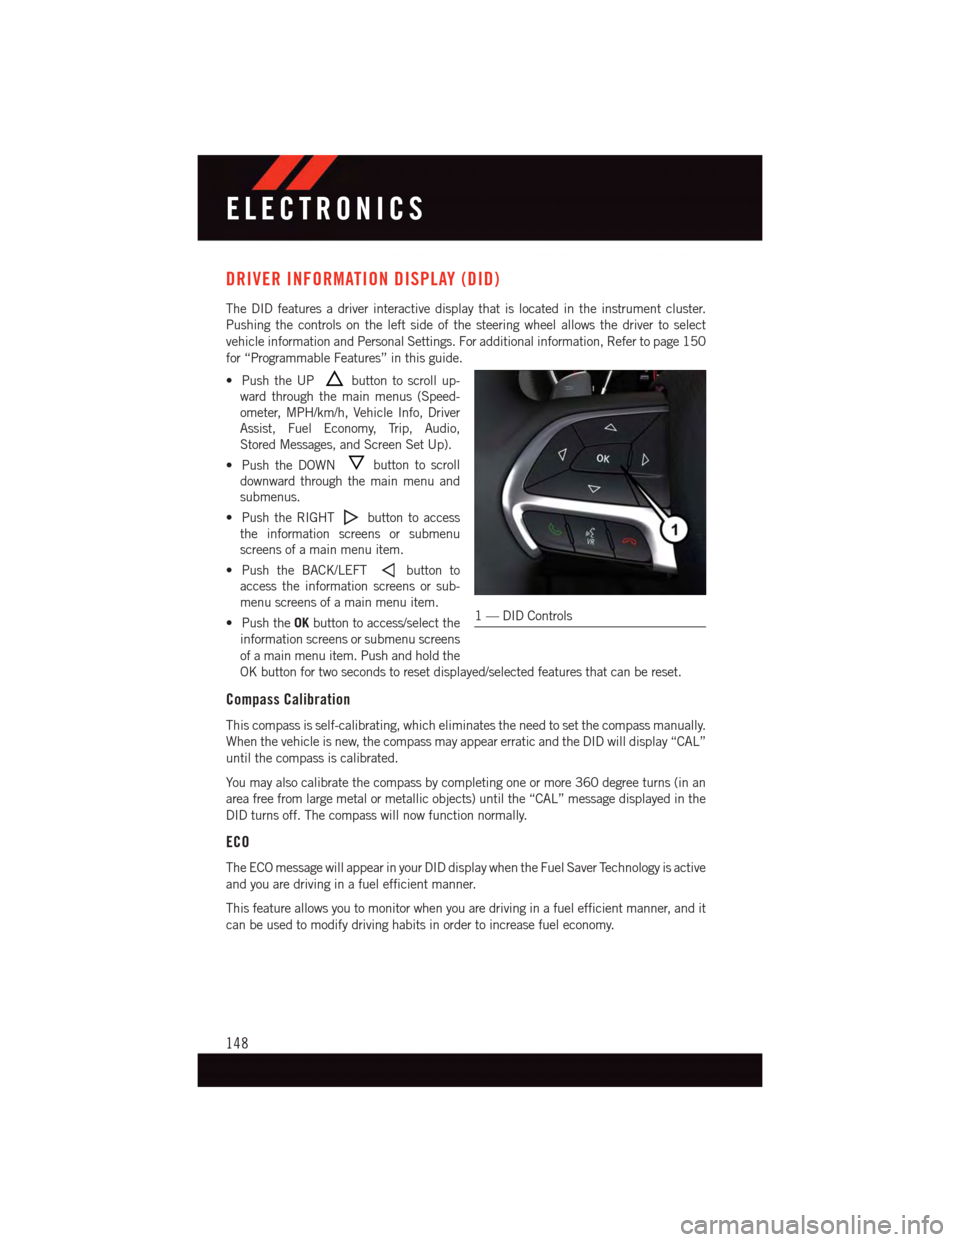
DRIVER INFORMATION DISPLAY (DID)
The DID features a driver interactive display that is located in the instrument cluster.
Pushing the controls on the left side of the steering wheel allows the driver to select
vehicle information and Personal Settings. For additional information, Refer to page 150
for “Programmable Features” in this guide.
•PushtheUPbutton to scroll up-
ward through the main menus (Speed-
ometer, MPH/km/h, Vehicle Info, Driver
Assist, Fuel Economy, Trip, Audio,
Stored Messages, and Screen Set Up).
•PushtheDOWNbutton to scroll
downward through the main menu and
submenus.
•PushtheRIGHTbutton to access
the information screens or submenu
screens of a main menu item.
•PushtheBACK/LEFTbutton to
access the information screens or sub-
menu screens of a main menu item.
•PushtheOKbutton to access/select the
information screens or submenu screens
of a main menu item. Push and hold the
OK button for two seconds to reset displayed/selected features that can be reset.
Compass Calibration
This compass is self-calibrating, which eliminates the need to set the compass manually.
When the vehicle is new, the compass may appear erratic and the DID will display “CAL”
until the compass is calibrated.
Yo u m a y a l s o c a l i b r a t e t h e c o m p a s s b y c o m p l e t i n g o n e o r m o r e 3 6 0 d e g r e e t u r n s ( i n a n
area free from large metal or metallic objects) until the “CAL” message displayed in the
DID turns off. The compass will now function normally.
ECO
The ECO message will appear in your DID display when the Fuel Saver Technology is active
and you are driving in a fuel efficient manner.
This feature allows you to monitor when you are driving in a fuel efficient manner, and it
can be used to modify driving habits in order to increase fuel economy.
1—DIDControls
ELECTRONICS
148
Page 193 of 236
FREEING A STUCK VEHICLE
•Ifyourvehiclebecomesstuckinmud,sandorsnow,itcanoftenbemovedbyarocking
motion. Turn your steering wheel right and left to clear the area around the front wheels.
Then shift back and forth between DRIVE and REVERSE while gently pushing the
accelerator. Use the least amount of accelerator pedal pressure that will maintain the
rocking motion without spinning the wheels or racing the engine.
•AllowtheenginetoidlewiththetransmissioninNEUTRALforatleastoneminuteafter
every five rocking-motion cycles. This minimizes overheating and reduce the risk of
transmission failure during prolonged efforts to free a stuck vehicle.
NOTE:
•ShiftsbetweenDRIVEandREVERSEcanonlybeachievedatwheelspeedsof5mph
(8 km/h) or less. Whenever the transmission remains in NEUTRAL for more than
2seconds,youmustpushthebrakepedaltoengageDRIVEorREVERSE.
•IfyourvehicleisequippedwithElectronicStabilityControl(ESC)thenpushthe"ESC
Off" switch, to place the Electronic Stability Control (ESC) system in "Partial Off" mode,
before rocking the vehicle.
CAUTION!
Revving the engine or spinning the wheels too fast may lead to transmission overheat-
ing and failure. It can also damage the tires. Do not spin the wheels above 30 mph
(48 km/h) while in gear (no transmission shifting occurring).
WARNING!
Fast spinning tires can be dangerous. Forces generated by excessive wheel speeds may
cause tire damage or failure. A tire could explode and injure someone. Do not spin your
vehicle's wheels faster than 30 mph (48 km/h) when you are stuck. Do not let anyone
near a spinning wheel, no matter what the speed.
WHAT TO DO IN EMERGENCIES
191
Page 195 of 236
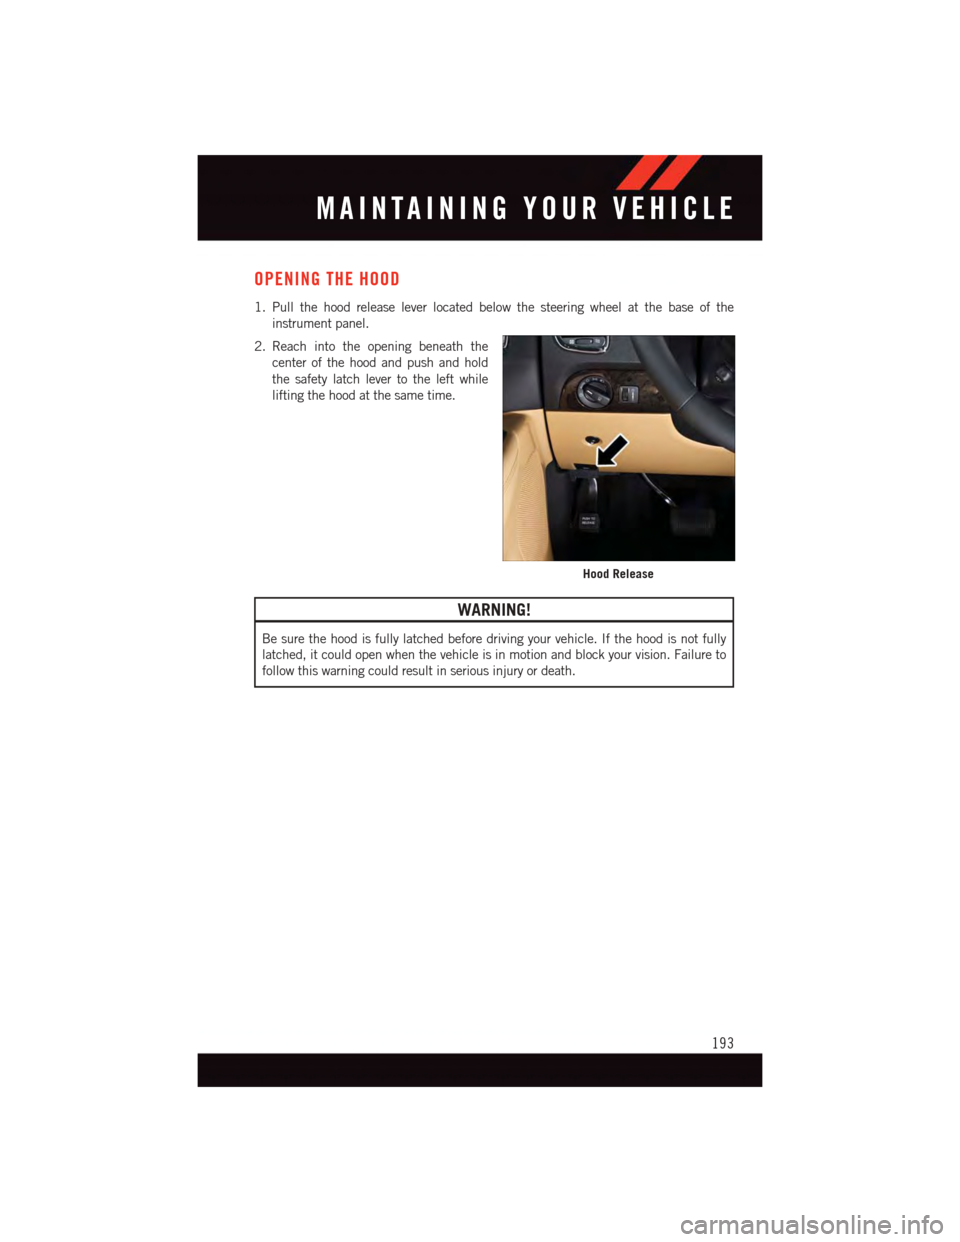
OPENING THE HOOD
1. Pull the hood release lever located below the steering wheel at the base of the
instrument panel.
2. Reach into the opening beneath the
center of the hood and push and hold
the safety latch lever to the left while
lifting the hood at the same time.
WARNING!
Be sure the hood is fully latched before driving your vehicle. If the hood is not fully
latched, it could open when the vehicle is in motion and block your vision. Failure to
follow this warning could result in serious injury or death.
Hood Release
MAINTAINING YOUR VEHICLE
193
Page 210 of 236
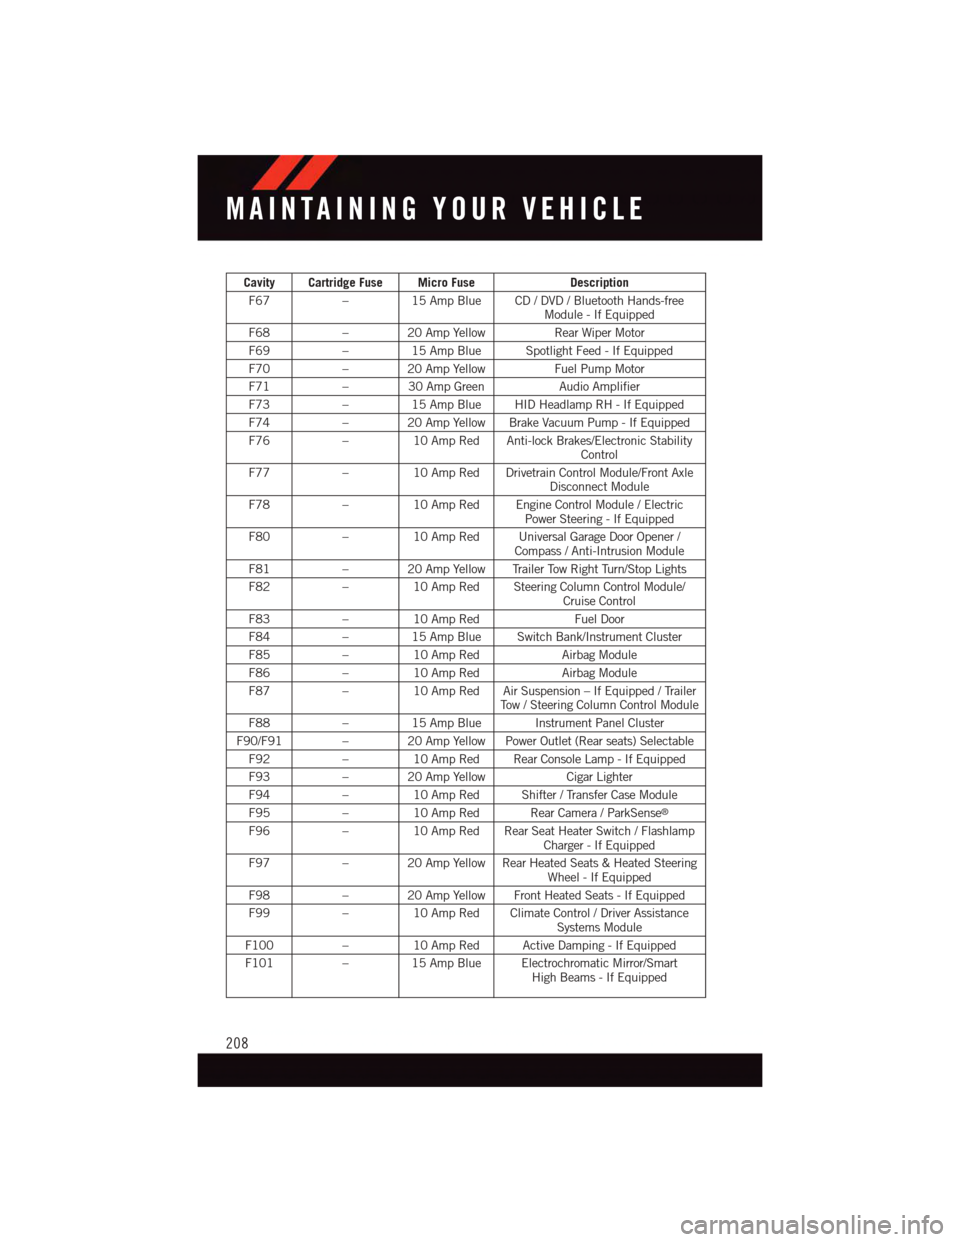
Cavity Cartridge Fuse Micro FuseDescription
F67–15 Amp Blue CD / DVD / Bluetooth Hands-freeModule - If Equipped
F68–20AmpYellowRear Wiper Motor
F69–15 Amp Blue Spotlight Feed - If Equipped
F70–20AmpYellowFuel Pump Motor
F71–30AmpGreenAudio Amplifier
F73–15 Amp Blue HID Headlamp RH - If Equipped
F74–20AmpYellowBrakeVacuumPump-IfEquipped
F76–10 Amp Red Anti-lock Brakes/Electronic StabilityControl
F77–10 Amp Red Drivetrain Control Module/Front AxleDisconnect Module
F78–10 Amp Red Engine Control Module / ElectricPower Steering - If Equipped
F80–10 Amp Red Universal Garage Door Opener /Compass / Anti-Intrusion Module
F81–20AmpYellowTrailerTowRightTurn/StopLights
F82–10 Amp Red Steering Column Control Module/Cruise Control
F83–10 Amp RedFuel Door
F84–15 Amp Blue Switch Bank/Instrument Cluster
F85–10 Amp RedAirbag Module
F86–10 Amp RedAirbag Module
F87–10 Amp Red Air Suspension – If Equipped / TrailerTo w / S t e e r i n g C o l u m n C o n t r o l M o d u l e
F88–15 Amp Blue Instrument Panel Cluster
F90/F91 – 20 Amp Yellow Power Outlet (Rear seats) Selectable
F92–10 Amp Red Rear Console Lamp - If Equipped
F93–20AmpYellowCigar Lighter
F94–10 Amp Red Shifter / Transfer Case Module
F95–10 Amp Red Rear Camera / ParkSense®
F96–10 Amp Red Rear Seat Heater Switch / FlashlampCharger - If Equipped
F97–20AmpYellowRearHeatedSeats&HeatedSteeringWheel - If Equipped
F98–20AmpYellowFrontHeatedSeats-IfEquipped
F99–10 Amp Red Climate Control / Driver AssistanceSystems Module
F100–10 Amp Red Active Damping - If Equipped
F101–15 Amp Blue Electrochromatic Mirror/SmartHigh Beams - If Equipped
MAINTAINING YOUR VEHICLE
208
Page 224 of 236
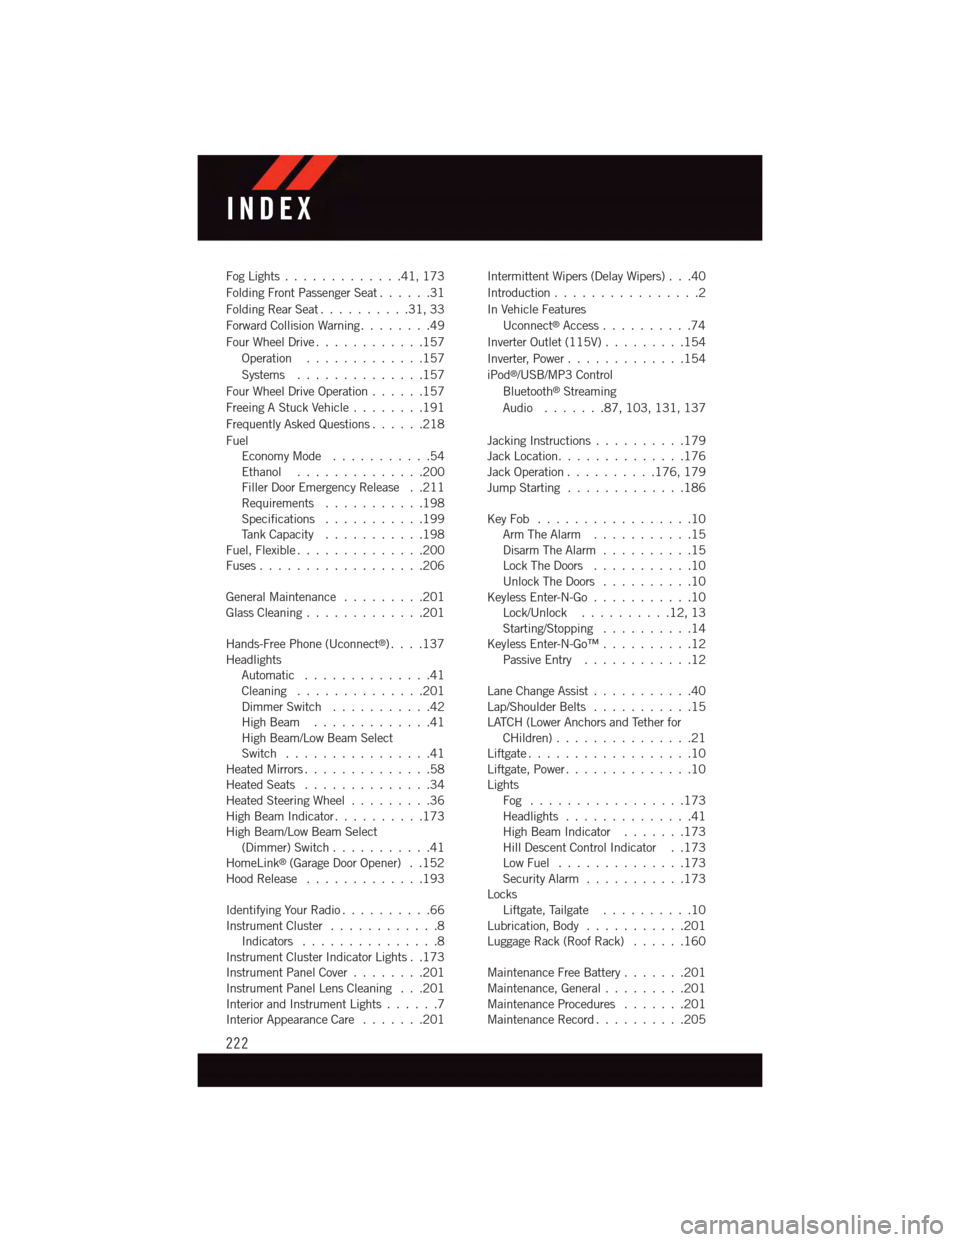
Fog Lights . . . . . . . . . . . . .41, 173
Folding Front Passenger Seat......31
Folding Rear Seat..........31,33
Forward Collision Warning........49
Four Wheel Drive............157
Operation.............157
Systems . . . . . . . . . . . . . .157
Four Wheel Drive Operation......157
Freeing A Stuck Vehicle . . . . . . . .191
Frequently Asked Questions......218
FuelEconomy Mode...........54Ethanol..............200Filler Door Emergency Release . .211Requirements...........198Specifications...........199Ta n k C a p a c i t y...........198Fuel, Flexible..............200Fuses . . . . . . . . . . . . . . . . . .206
General Maintenance.........201Glass Cleaning . . . . . . . . . . . . .201
Hands-Free Phone (Uconnect®). . . .137HeadlightsAutomatic . . . . . . . . . . . . . .41Cleaning..............201Dimmer Switch...........42High Beam . . . . . . . . . . . . .41High Beam/Low Beam SelectSwitch . . . . . . . . . . . . . . . .41Heated Mirrors..............58Heated Seats..............34Heated Steering Wheel.........36High Beam Indicator..........173High Beam/Low Beam Select(Dimmer) Switch...........41HomeLink®(Garage Door Opener) . .152Hood Release . . . . . . . . . . . . .193
Identifying Your Radio..........66Instrument Cluster............8Indicators . . . . . . . . . . . . . . .8Instrument Cluster Indicator Lights . .173Instrument Panel Cover........201Instrument Panel Lens Cleaning . . .201Interior and Instrument Lights......7Interior Appearance Care.......201
Intermittent Wipers (Delay Wipers) . . .40
Introduction................2
In Vehicle Features
Uconnect®Access..........74
Inverter Outlet (115V).........154
Inverter, Power.............154
iPod®/USB/MP3 Control
Bluetooth®Streaming
Audio.......87,103, 131, 137
Jacking Instructions..........179Jack Location..............176Jack Operation..........176, 179Jump Starting.............186
Key Fob . . . . . . . . . . . . . . . . .10Arm The Alarm . . . . . . . . . . .15Disarm The Alarm . . . . . . . . . .15Lock The Doors...........10Unlock The Doors..........10Keyless Enter-N-Go...........10Lock/Unlock..........12,13Starting/Stopping..........14Keyless Enter-N-Go™..........12Passive Entry............12
Lane Change Assist...........40Lap/Shoulder Belts...........15LATCH (Lower Anchors and Tether forCHildren) . . . . . . . . . . . . . . .21Liftgate . . . . . . . . . . . . . . . . . .10Liftgate, Power..............10LightsFog . . . . . . . . . . . . . . . . .173Headlights..............41High Beam Indicator.......173Hill Descent Control Indicator . .173Low Fuel..............173Security Alarm...........173LocksLiftgate, Tailgate . . . . . . . . . .10Lubrication, Body...........201Luggage Rack (Roof Rack)......160
Maintenance Free Battery.......201Maintenance, General.........201Maintenance Procedures.......201Maintenance Record..........205
INDEX
222