tire type DODGE DURANGO 2015 3.G User Guide
[x] Cancel search | Manufacturer: DODGE, Model Year: 2015, Model line: DURANGO, Model: DODGE DURANGO 2015 3.GPages: 236, PDF Size: 35.01 MB
Page 171 of 236
When the malfunction indicator is illuminated, the system may not be able to detect or signal
low tire pressure as intended. TPMS malfunctions may occur for a variety of reasons,
including the installation of replacement or alternate tires or wheels on the vehicle that
prevent the TPMS from functioning properly. Always check the TPMS malfunction telltale
after replacing one or more tires or wheels on your vehicle, to ensure that the replacement or
alternate tires and wheels allow the TPMS to continue to function properly.
NOTE:
Ti r e p r e s s u r e s c h a n g e b y a p p r o x i m a t e l y 1 p s i ( 7 k P a ) p e r 1 2 ° F ( 7 ° C ) o f a i r t e m p e r a t u r e
change. Keep this in mind when checking tire pressure inside a garage, especially in the
Winter. Example: If garage temperature is 68°F (20°C) and the outside temperature is
32°F (0°C), then the cold tire inflation pressure should be increased by 3 psi (21 kPa),
which equals 1 psi (7 kPa) for every 12°F (7°C) for this outside temperature condition.
CAUTION!
The TPMS has been optimized for the original equipment tires and wheels. TPMS
pressures and warning have been established for the tire size equipped on your vehicle.
Undesirable system operation or sensor damage may result when using replacement
equipment that is not of the same size, type, and/or style. Aftermarket wheels can
cause sensor damage. Do not use tire sealant from a can, or balance beads if your
vehicle is equipped with a TPMS, as damage to the sensors may result.
Brake Warning Light
This light monitors various brake functions, including brake fluid level and parking brake
application. If the brake light turns on, it may indicate that the parking brake is applied,
that the brake fluid level is low, or that there is a problem with the anti-lock brake system
reservoir.
If the light remains on when the parking brake has been disengaged, and the fluid level is
at the full mark on the master cylinder reservoir, it indicates a possible brake hydraulic
system malfunction or that a problem with the Brake Booster has been detected by the
Anti-Lock Brake System (ABS)/Electronic Stability Control (ESC) system. In this case, the
light will remain on until the condition has been corrected. If the problem is related to the
brake booster, the ABS pump will run when applying the brake, and a brake pedal
pulsation may be felt during each stop.
The dual brake system provides a reserve braking capacity in the event of a failure to a
portion of the hydraulic system. A leak in either half of the dual brake system is indicated
by the Brake Warning Light, which will turn on when the brake fluid level in the master
cylinder has dropped below a specified level. The light will remain on until the cause is
corrected.
WHAT TO DO IN EMERGENCIES
169
Page 178 of 236
JACKING AND TIRE CHANGING
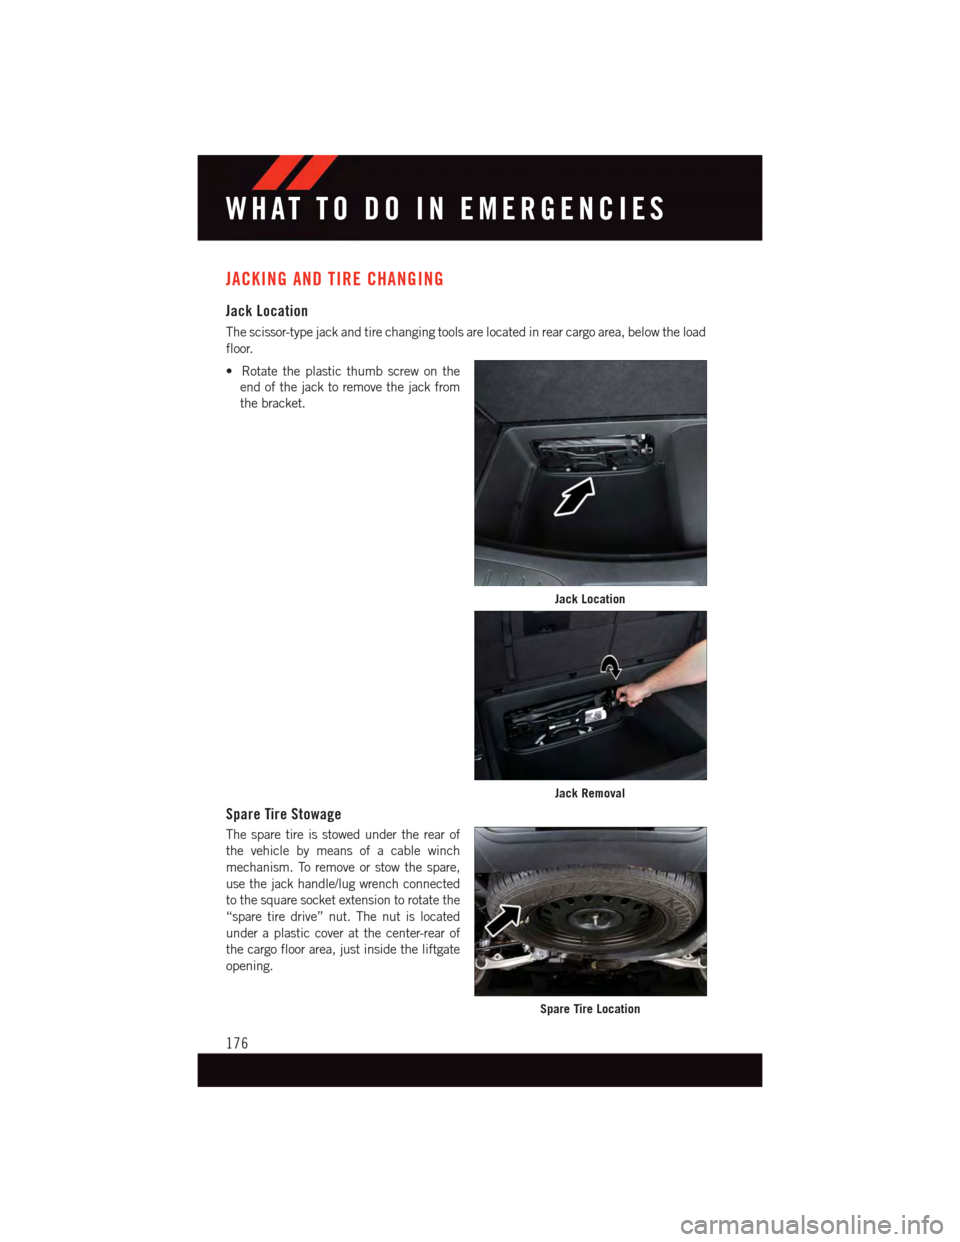
Jack Location
The scissor-type jack and tire changing tools are located in rear cargo area, below the load
floor.
•Rotatetheplasticthumbscrewonthe
end of the jack to remove the jack from
the bracket.
Spare Tire Stowage
The spare tire is stowed under the rear of
the vehicle by means of a cable winch
mechanism. To remove or stow the spare,
use the jack handle/lug wrench connected
to the square socket extension to rotate the
“spare tire drive” nut. The nut is located
under a plastic cover at the center-rear of
the cargo floor area, just inside the liftgate
opening.
Jack Location
Jack Removal
Spare Tire Location
WHAT TO DO IN EMERGENCIES
176
Page 186 of 236
Road Tire Installation
1. Mount the road tire on the axle.
2. Install the remaining lug nuts with the cone shaped end of the nut toward the wheel.
Lightly tighten the lug nuts.
3. Lower the vehicle to the ground by turning the jack handle counterclockwise.
4. Finish tightening the lug nuts. Push down on the wrench while at the end of the handle
for increased leverage. Tighten the lug nuts in a star pattern until each nut has been
tightened twice. The correct tightness of each lug nut is 130 ft/lbs (176 N·m). If in
doubt about the correct tightness, have them checked with a torque wrench by your
authorized dealer or service station.
5. After 25 miles (40 km) check the lug nut torque with a torque wrench to ensure that
all lug nuts are properly seated against the wheel.
CAUTION!
•Donotusepowertoolstowinchthetireupordown.Impacttypetoolscandamage
the winch mechanism.
•Donotattempttoraisethevehiclebyjackingonlocationsotherthanthose
indicated in the Jacking Instructions for this vehicle.
•Besuretomountthesparetirewiththevalvestemfacingoutward.Thevehicle
could be damaged if the spare tire is mounted incorrectly.
WHAT TO DO IN EMERGENCIES
184
Page 187 of 236
WARNING!
•Donotattempttochangeatireonthesideofthevehicleclosetomovingtraffic.
Pull far enough off the road to avoid the danger of being hit when operating the jack
or changing the wheel.
•Beingunderajacked-upvehicleisdangerous.Thevehiclecouldslipoffthejack
and fall on you. You could be crushed. Never put any part of your body under a
vehicle that is on a jack. If you need to get under a raised vehicle, take it to a service
center where it can be raised on a lift.
•Thejackisdesignedtobeusedasatoolforchangingtiresonly.Thejackshouldnot
be used to lift the vehicle for service purposes. The vehicle should be jacked on a
firm level surface only. Avoid ice or slippery areas.
•Alwaysparkonafirm,levelsurfaceasfarfromtheedgeoftheroadwayaspossible
before raising the vehicle.
•TurnontheHazardWarningflasher.
•Blockthewheeldiagonallyoppositethewheeltoberaised.
•SettheparkingbrakefirmlyandsettheautomatictransmissioninPARK.
•Neverstartorruntheenginewiththevehicleonajack.
•Donotletanyonesitinthevehiclewhenitisonajack.
•Donotgetunderthevehiclewhenitisonajack.
•Onlyusethejackinthepositionsindicatedandforliftingthisvehicleduringatire
change.
•Ifworkingonorneararoadway,beextremelycarefulofmotortraffic.
•Toassurethatsparetires,flatorinflated,aresecurelystowed,sparesmustbe
stowed with the valve stem facing the ground. Carefully follow these tire changing
warnings to help prevent personal injury or damage to your vehicle:
•Raisingthevehiclehigherthannecessarycanmakethevehiclelessstable.
It could slip off the jack and hurt someone near it. Raise the vehicle only
enough to remove the tire.
•Toavoidtheriskofforcingthevehicleoffthejack,donotfullytightenthe
wheel nuts until the vehicle has been lowered. Failure to follow this warning
may result in personal injury.
•Donotusepowertoolstowinchthetireupordown.Impact-typetoolsmay
damage the winch mechanism.
•Aloosetireorjack,thrownforwardinacollisionorhardstopcouldendanger
the occupants of the vehicle. Always stow the jack parts and the spare tire in
the places provided.
•Toavoidtheriskofforcingthevehicleoffthejack,donottightenthelug
nuts fully until the vehicle is lowered to the ground.
WHAT TO DO IN EMERGENCIES
185
Page 203 of 236
MAINTENANCE PROCEDURES
For information on the maintenance procedures for your vehicle, please refer to “Main-
tenance Procedures” in “Maintaining Your Vehicle” in your Owner’s Manual or applicable
supplement on the DVD for further details.
MAINTENANCE SCHEDULE
Yo u r v e h i c l e i s e q u i p p e d w i t h a n a u t o m a t i c o i l c h a n g e i n d i c a t o r s y s t e m . T h e o i l c h a n g e
indicator system will remind you that it is time to take your vehicle in for scheduled
maintenance.
Based on engine operation conditions, the oil change indicator message will illuminate.
This means that service is required for your vehicle. Operating conditions such as frequent
short-trips, trailer tow, extremely hot or cold ambient temperatures, and E85 fuel usage
will influence when the “Oil Change Required” message is displayed. Severe Operating
Conditions can cause the change oil message to illuminate as early as 3,500 miles
(5,600 km) since last reset. Have your vehicle serviced as soon as possible, within the
next 500 miles (805 km).
Yo u r a u t h o r i z e d d e a l e r w i l l r e s e t t h e o i l c h a n g e i n d i c a t o r m e s s a g e a f t e r c o m p l e t i n g t h e
scheduled oil change.
NOTE:
Under no circumstances should oil change intervals exceed 10,000 miles (16,000 km)
or twelve months, whichever comes first.
Severe Duty All Models
•ChangeEngineOilat4000miles(6,500km)ifthevehicleisoperatedinadustyand
off road environment. This type of vehicle use is considered Severe Duty.
Once A Month Or Before A Long Trip:
•Checkengineoillevel
•Checkwindshieldwasherfluidlevel
•Checkthetireinflationpressuresandlookforunusualwearordamage
•Check the fluid levels of the coolant reservoir, brake master cylinder and power steering,
and fill as needed.
•Checkfunctionofallinteriorandexteriorlights
MAINTAINING YOUR VEHICLE
201
Page 221 of 236
WHAT TO DO IN EMERGENCIES
What do I do if my TPMS warning light is blinking? pg. 168
How do I change a flat tire? pg. 176
How do I Jump-Start my vehicle? pg. 186
MAINTAINING YOUR VEHICLE
Where is my Fuse Block located? pg. 206
What type of oil do I use? pg. 198
How often should I change my engine’s oil? pg. 201
What should my tire pressure be set at? pg. 209
FREQUENTLY ASKED QUESTIONS
219
Page 222 of 236
Access
Uconnect®..............67
Access, Uconnect®...........67
Adaptive Cruise Control (ACC)
(Cruise Control) . . . . . . . . . . . .44
Adding Engine Coolant (Antifreeze)..201
Adding Fuel..............210
Adding Washer Fluid..........201
Air Bag
Advanced Front Air Bag.......16
Advance Front Air Bag.......16Air Bags . . . . . . . . . . . . . . .16Air Bag Warning Light . . . . .16, 172Driver Knee Air Bag.........18Front Air Bag . . . . . . . . . . . .16Passenger Knee Air Bag.......18Rollover . . . . . . . . . . . . . . .16Side Air Bags............18Side Impact Curtains........18Side Impacts.............16Air Bag, Side . . . . . . . . . . . . . . .16Air Cleaner, Engine(Engine Air Cleaner Filter).....201Air Conditioner Maintenance.....201Air Conditioning...........55,58Air Conditioning Refrigerant......201Air Conditioning System........201AlarmArm The System...........15Disarm The System.........15Vehicle Security Alarm.......15Alarm (Security Alarm)......15,173All Wheel Drive (AWD).........157Antifreeze (Engine Coolant) . . .198, 201Disposal . . . . . . . . . . . . . .201Anti-Lock Brake System (ABS)....172APPUconnect®Access..........70Appearance Care............201Arming System (Security Alarm)....15Assistance Towing...........168Automatic Dimming Mirror.......51Automatic Headlights..........41Automatic High Beams.........41Automatic Temperature Control (ATC)...55SYNC Temperature Button.....59Automatic TransmissionFluid Type . . . . . . . . . . . . .200
Axle Fluid . . . . . . . . . . . . . . . .200
Back-Up Camera............61Battery . . . . . . . . . . . . . .186, 201Charging System Light......171Blind Spot Monitoring..........61Body Mechanism Lubrication.....201Brake Fluid . . . . . . . . . . . . . . .200Brakes.................201Brake System.............201Master Cylinder..........201Warning Light . . . . . . . . . . .169Break-In Recommendations,New Vehicle . . . . . . . . . . . . .39Bulb Replacement...........214
Calibration, Compass.........148Capacities, Fluid............198Caps, FillerFuel................192Oil (Engine)............201Cargo CompartmentLuggage Carrier..........160Car Washes . . . . . . . . . . . . . . .201Change Oil Indicator..........174Changing A Flat Tire..........176Charging System Light.........171Check Engine Light(Malfunction Indicator Light). . . .170Child Restraint...........19,20Arm Rest Tether . . . . . . . . . . .22Child RestraintsCenter Seat LATCH.........21Child Restraints...........20Child Tether Anchorage Locations...22Locating The LATCH Anchorages...20Lower Anchors And TethersFor Children . . . . . . . . . .19, 20CleaningWheels...............201Windshield Wiper Blades.....201Climate Control . . . . . . . . . . . . .55Clock . . . . . . . . . . . . . . . . . . .84Clock Setting...............84Cluster Warning/Indicator LightsAir Bag Warning Light . . . . . . .172Brake Warning Light . . . . . . . .169
INDEX
220