USB DODGE DURANGO 2015 3.G User Guide
[x] Cancel search | Manufacturer: DODGE, Model Year: 2015, Model line: DURANGO, Model: DODGE DURANGO 2015 3.GPages: 236, PDF Size: 35.01 MB
Page 67 of 236
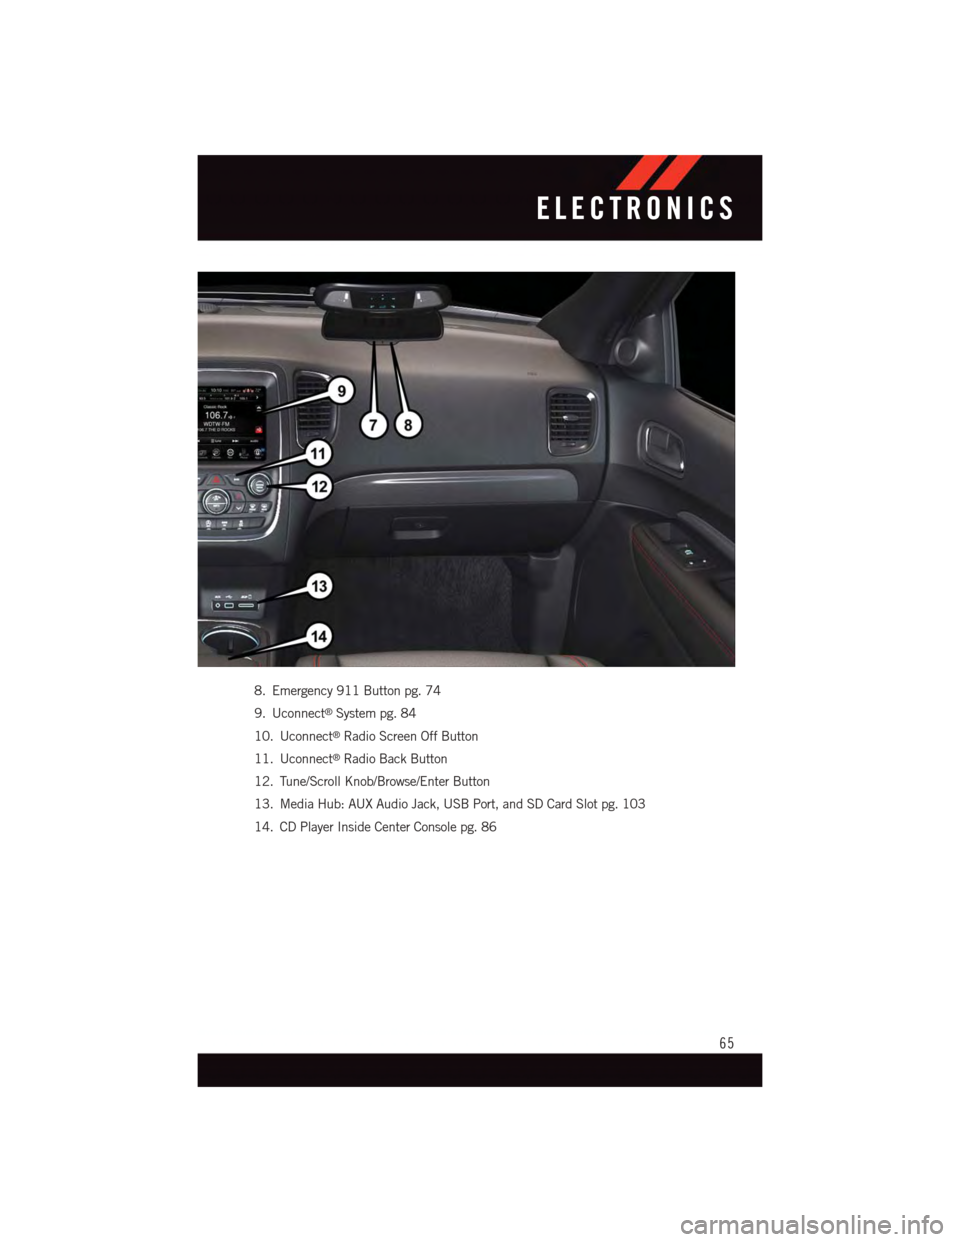
8. Emergency 911 Button pg. 74
9. Uconnect®System pg. 84
10. Uconnect®Radio Screen Off Button
11. Uconnect®Radio Back Button
12. Tune/Scroll Knob/Browse/Enter Button
13. Media Hub: AUX Audio Jack, USB Port, and SD Card Slot pg. 103
14. CD Player Inside Center Console pg. 86
ELECTRONICS
65
Page 81 of 236
Sample Commands For Voice Text Reply And Voice Texting
Example CommandAction
“Text John Smith”Send a message to specific contactin address book
“Text 123 456 7890”Send 123 456 7890 a message fromyour phonebook
“Show messages”See recent text messages listed by numberon Uconnect®screen
“Listen to/view (message number four,for example)”Hear messages or read it onUconnect®screen
“Reply”Send a voice text reply to a current message
“Forward text/message to “John Smith”Forward current text to specificcontact in address book
“Forward text/message to “123 456 7890”Forward current text to specific phonenumber
Uconnect® Access Via Mobile — If Equipped (Available On Uconnect®
8.4A/8.4AN)
Via Mobile uses the Uconnect®Access app and your smartphone's data plan to access
your personal Pandora®,iHeartRadio,Aha™byHARMANandSlackerRadioaccounts
from the vehicle and control them using the vehicle touchscreen. Customer’s data plan
charges will apply.
To g e t s t a r t e d u s i n g V i a M o b i l e a p p s , f i r s t r e g i s t e r y o u r U c o n n e c t®Access system where
you'll be guided through the setup of your Via Mobile (requires a compatible Android or
iPhone®smartphone). Please refer to “Uconnect®Access Registration” for more infor-
mation.
The Uconnect®Access app is compatible with select iPhone®and Android smartphones.
Visit UconnectPhone.com to confirm that your smartphone is compatible with
Uconnect®.Onceyou’veconfirmedyoursmartphoneiscompatible,pairittothevehicle
touchscreen via Bluetooth®to use Via Mobile apps. If using an iPhone®,aUSBcableis
also supported for the data connection.
ELECTRONICS
79
Page 89 of 236
Browse
•Pressthe“Browse”buttononthetouchscreentoscrollthroughandselectadesired
track on the Disc. Press the “Exit” button on the touchscreen if you wish to cancel the
browse function.
MEDIA HUB — iPod®/USB/MP3/SD Card
USB/iPod®
•USB/iPod®Mode is entered by either inserting a USB Jump Drive or iPod®cable into
the USB port or by pushing the MEDIA button located left of the display. Once in Media
Mode, press the “source” button on the touchscreen and select “USB/iPod.”
•PushtheMEDIAbuttononthefaceplatethenpressthe“source”buttononthe
touchscreen. Select “USB/iPod” to change the mode to the USB device if the device is
connected, allowing the music from your portable device to play through the vehicle's
speakers.
Audio Jack (AUX)
The AUX allows a portable device, such as an MP3 player or an iPod®,tobepluggedinto
the radio and utilize the vehicle’s audio system, using a 3.5 mm stereo audio cable, to
amplify the source and play through the vehicle speakers.
•PushtheMEDIAbuttononthefaceplate,thenpressthe“source”buttononthe
touchscreen and select “AUX” to change the mode to auxiliary device if the audio jack
is connected, allowing the music from your portable device to play through the vehicle's
speakers.
The functions of the portable device are controlled using the device buttons, not the
buttons on the radio. The volume may be controlled using the radio or portable device.
Bluetooth®
If using a Bluetooth®-equippeddevice,youmayalsobeabletostreammusictoyour
vehicle's sound system.
•PushtheMEDIAbuttononthefaceplate,thenpressthe“source”buttononthe
touchscreen. Select “Bluetooth” to change the mode to Bluetooth®if the device is
paired, allowing the music from your portable device to play through the vehicle's
speakers.
SD Card
SD Card Mode allows you to play music that has been saved to your SD Card through your
vehicle’s sound system.
•YoucanenterSDCardModebyeitherinsertingaSDCardintotheSDCardslotorby
pushing the “SD Card” button on the left side of the display while in media mode.
For further information refer to your Radio Supplement.
ELECTRONICS
87
Page 95 of 236
Media
Uconnect®offers connections via USB, SD, Bluetooth®and auxiliary ports (If Equipped).
Voice operation is only available for connected USB and iPod®devices. (Remote CD
player optional and not available on all vehicles.)
Push the VR button.Afterthebeep,sayoneofthefollowingcommandsand
follow the prompts to switch your media source or choose an artist.
•Change sourceto Bluetooth®
•Change sourceto iPod®
•Change sourceto USB
•Play artistBeethoven;Play albumGreatest Hits;Play songMoonlight Sonata;Play
genreClassical
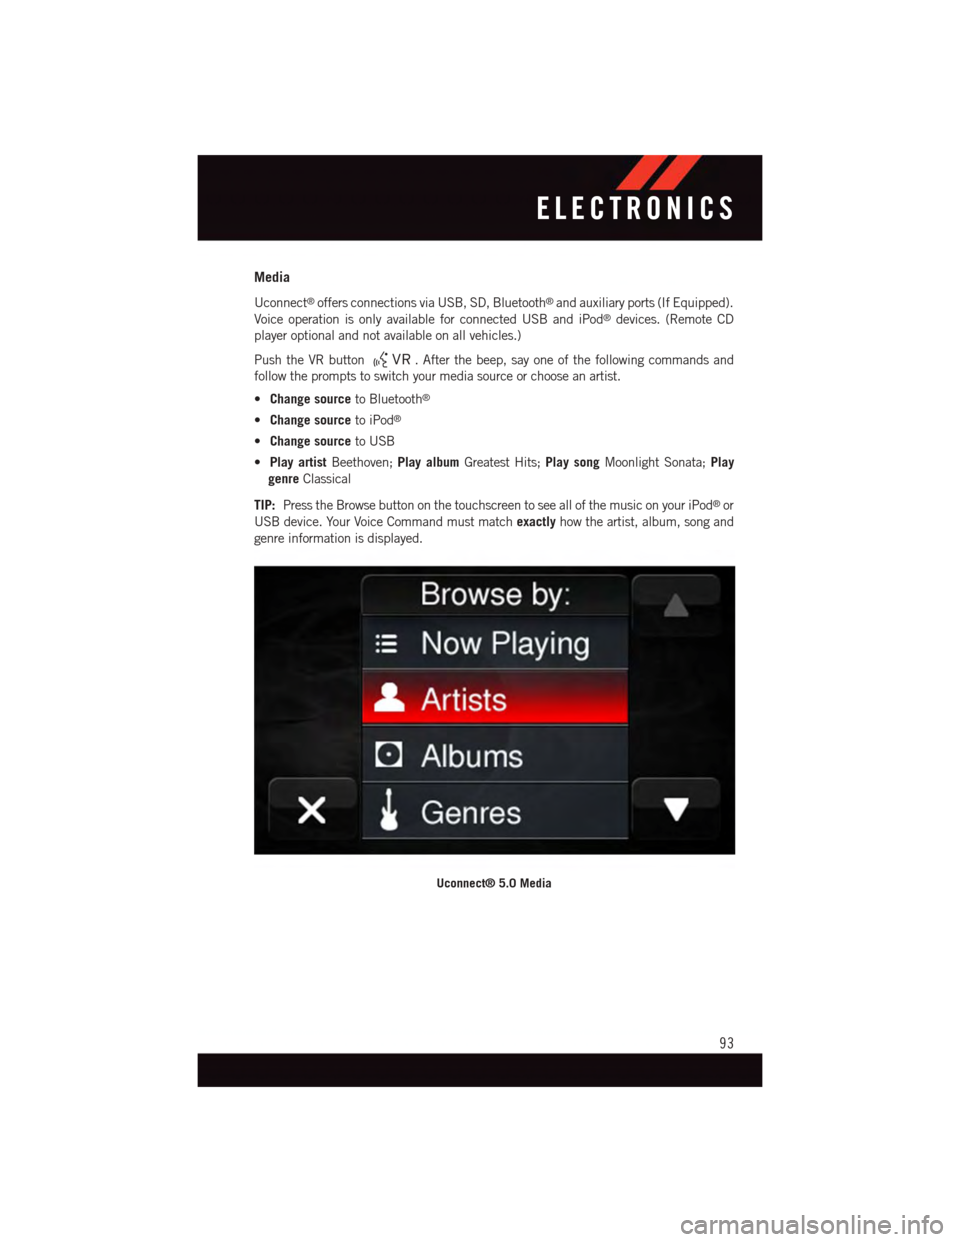
TIP:Press the Browse button on the touchscreen to see all of the music on your iPod®or
USB device. Your Voice Command must matchexactlyhow the artist, album, song and
genre information is displayed.
Uconnect® 5.0 Media
ELECTRONICS
93
Page 98 of 236
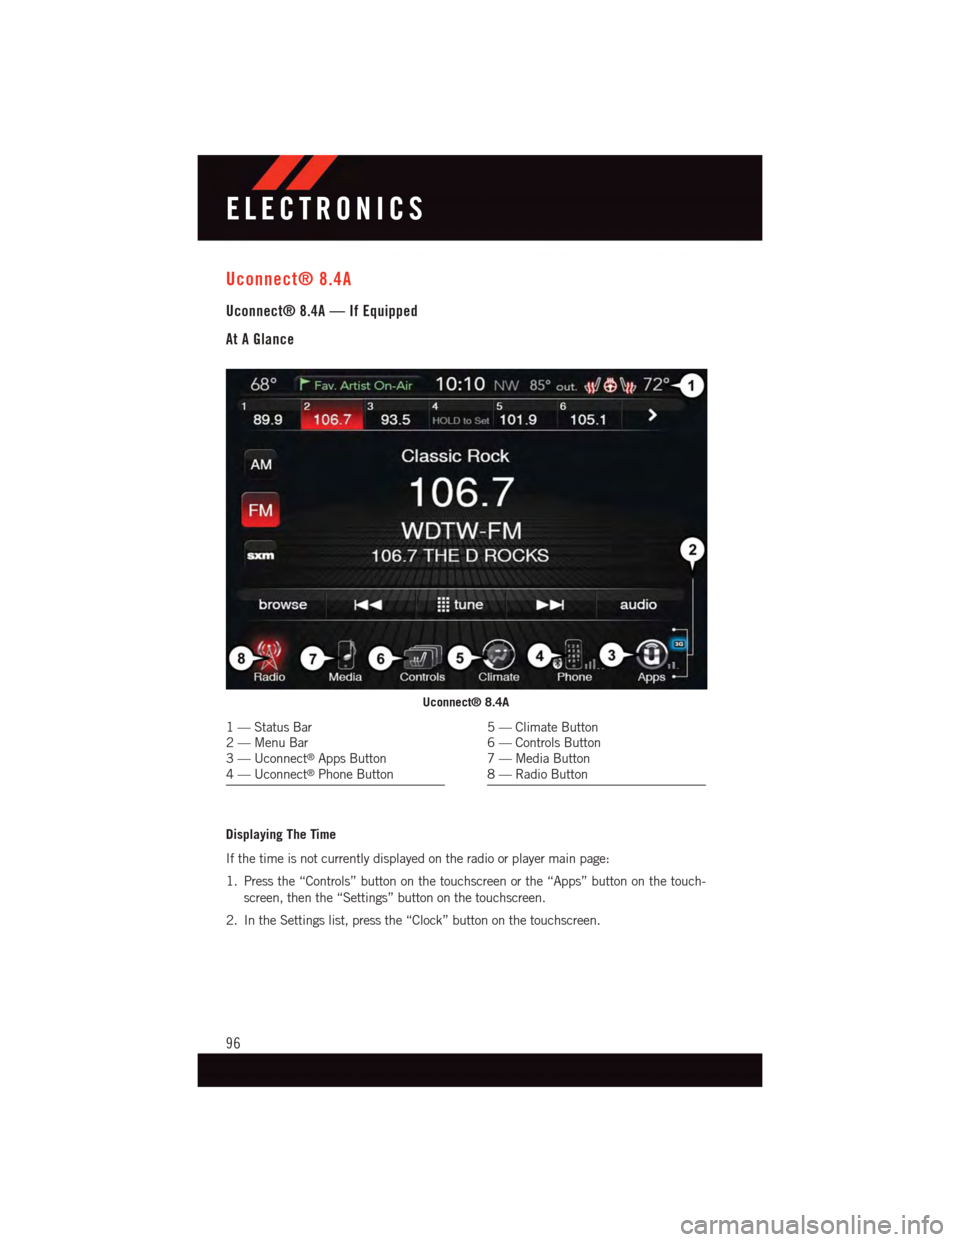
Uconnect® 8.4A
Uconnect® 8.4A — If Equipped
At A Glance
Displaying The Time
If the time is not currently displayed on the radio or player main page:
1. Press the “Controls” button on the touchscreen or the “Apps” button on the touch-
screen, then the “Settings” button on the touchscreen.
2. In the Settings list, press the “Clock” button on the touchscreen.
Uconnect® 8.4A
1—StatusBar2—MenuBar3—Uconnect®Apps Button4—Uconnect®Phone Button
5—ClimateButton6—ControlsButton7—MediaButton8—RadioButton
ELECTRONICS
96
Page 105 of 236
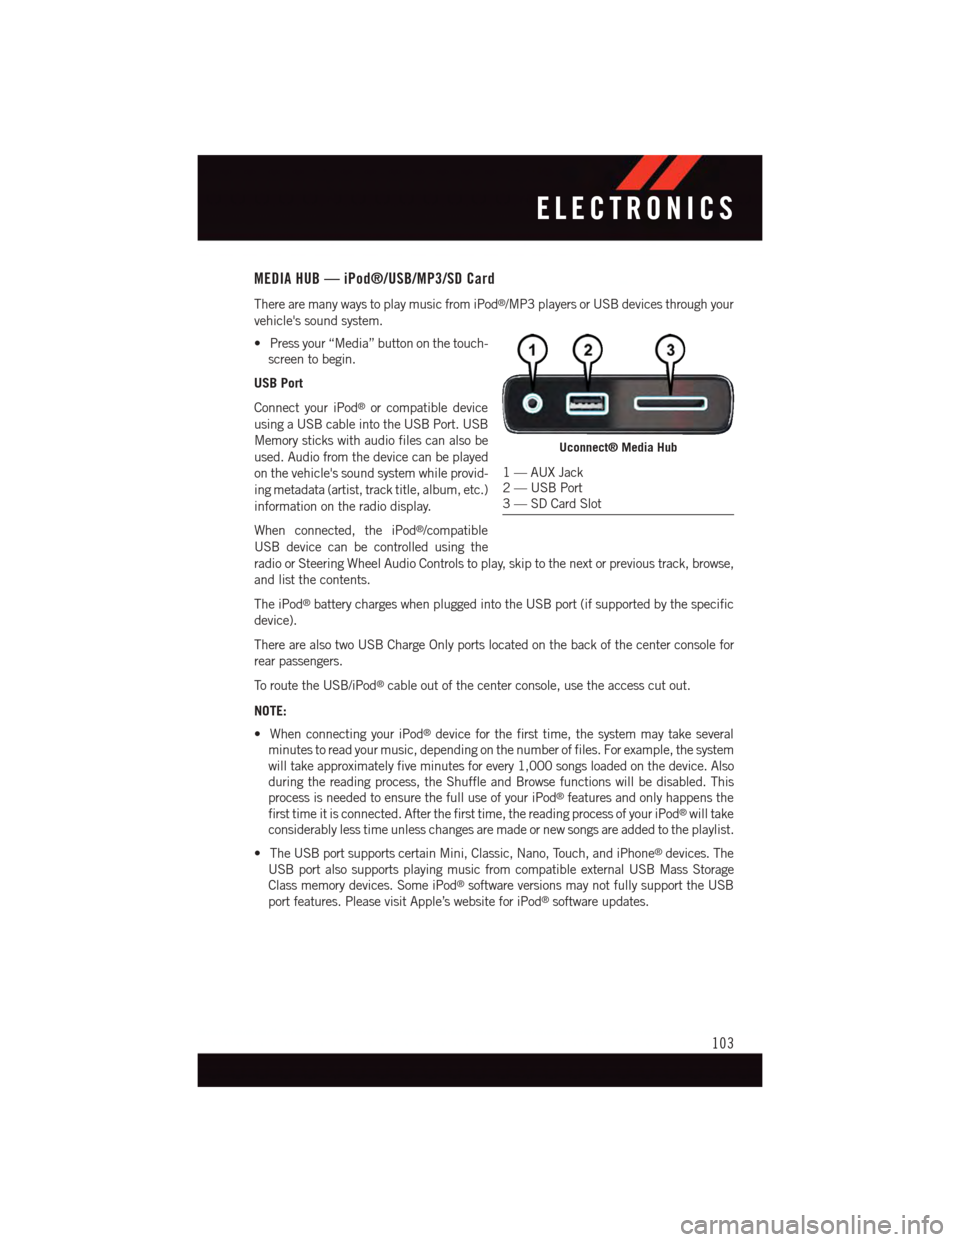
MEDIA HUB — iPod®/USB/MP3/SD Card
There are many ways to play music from iPod®/MP3 players or USB devices through your
vehicle's sound system.
•Pressyour“Media”buttononthetouch-
screen to begin.
USB Port
Connect your iPod®or compatible device
using a USB cable into the USB Port. USB
Memory sticks with audio files can also be
used. Audio from the device can be played
on the vehicle's sound system while provid-
ing metadata (artist, track title, album, etc.)
information on the radio display.
When connected, the iPod®/compatible
USB device can be controlled using the
radio or Steering Wheel Audio Controls to play, skip to the next or previous track, browse,
and list the contents.
The iPod®battery charges when plugged into the USB port (if supported by the specific
device).
There are also two USB Charge Only ports located on the back of the center console for
rear passengers.
To r o u t e t h e U S B / i P o d®cable out of the center console, use the access cut out.
NOTE:
•WhenconnectingyouriPod®device for the first time, the system may take several
minutes to read your music, depending on the number of files. For example, the system
will take approximately five minutes for every 1,000 songs loaded on the device. Also
during the reading process, the Shuffle and Browse functions will be disabled. This
process is needed to ensure the full use of your iPod®features and only happens the
first time it is connected. After the first time, the reading process of your iPod®will take
considerably less time unless changes are made or new songs are added to the playlist.
•TheUSBportsupportscertainMini,Classic,Nano,Touch,andiPhone®devices. The
USB port also supports playing music from compatible external USB Mass Storage
Class memory devices. Some iPod®software versions may not fully support the USB
port features. Please visit Apple’s website for iPod®software updates.
Uconnect® Media Hub
1—AUXJack2—USBPort3—SDCardSlot
ELECTRONICS
103
Page 115 of 236
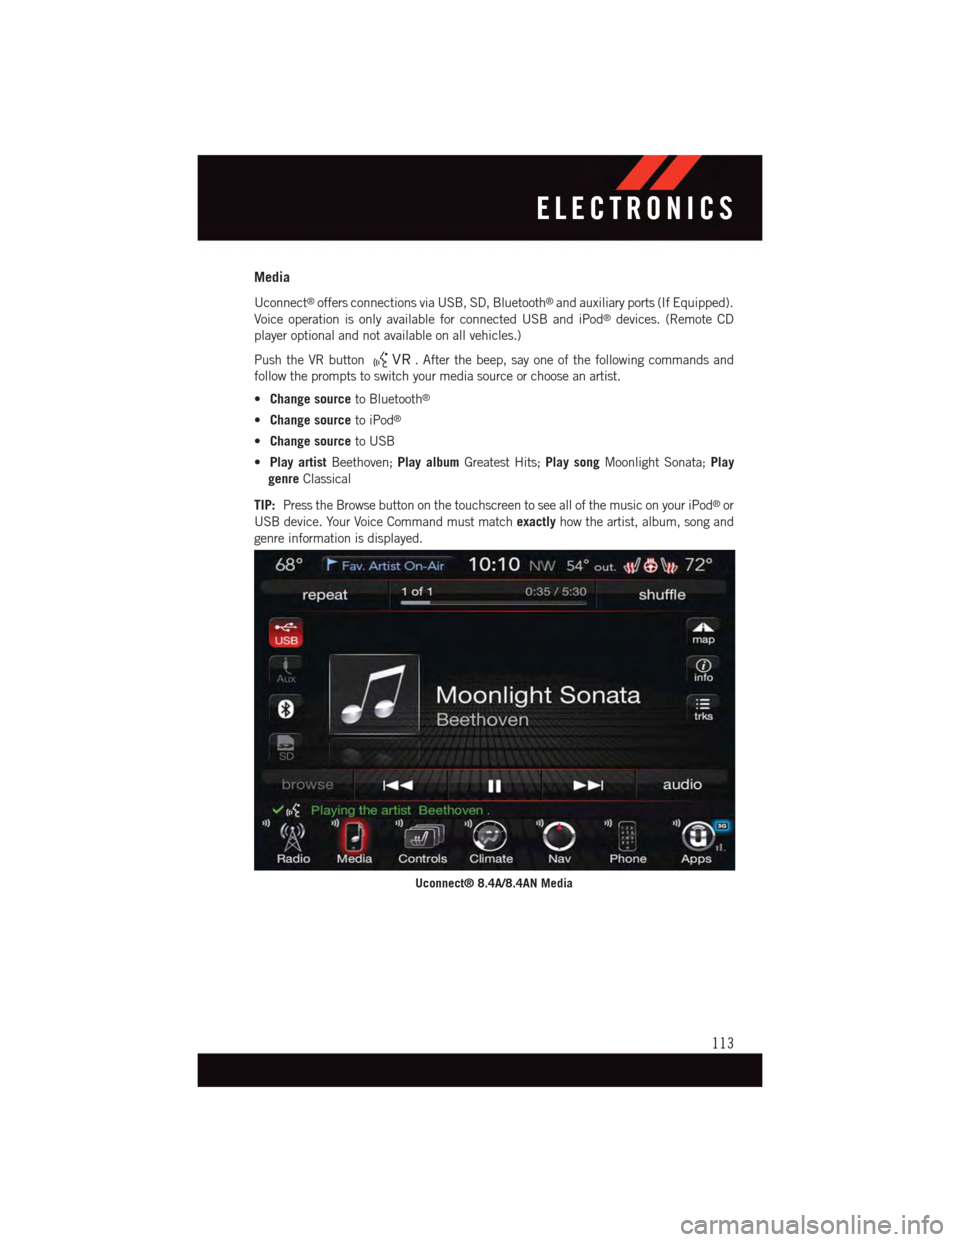
Media
Uconnect®offers connections via USB, SD, Bluetooth®and auxiliary ports (If Equipped).
Voice operation is only available for connected USB and iPod®devices. (Remote CD
player optional and not available on all vehicles.)
Push the VR button.Afterthebeep,sayoneofthefollowingcommandsand
follow the prompts to switch your media source or choose an artist.
•Change sourceto Bluetooth®
•Change sourceto iPod®
•Change sourceto USB
•Play artistBeethoven;Play albumGreatest Hits;Play songMoonlight Sonata;Play
genreClassical
TIP:Press the Browse button on the touchscreen to see all of the music on your iPod®or
USB device. Your Voice Command must matchexactlyhow the artist, album, song and
genre information is displayed.
Uconnect® 8.4A/8.4AN Media
ELECTRONICS
113
Page 126 of 236
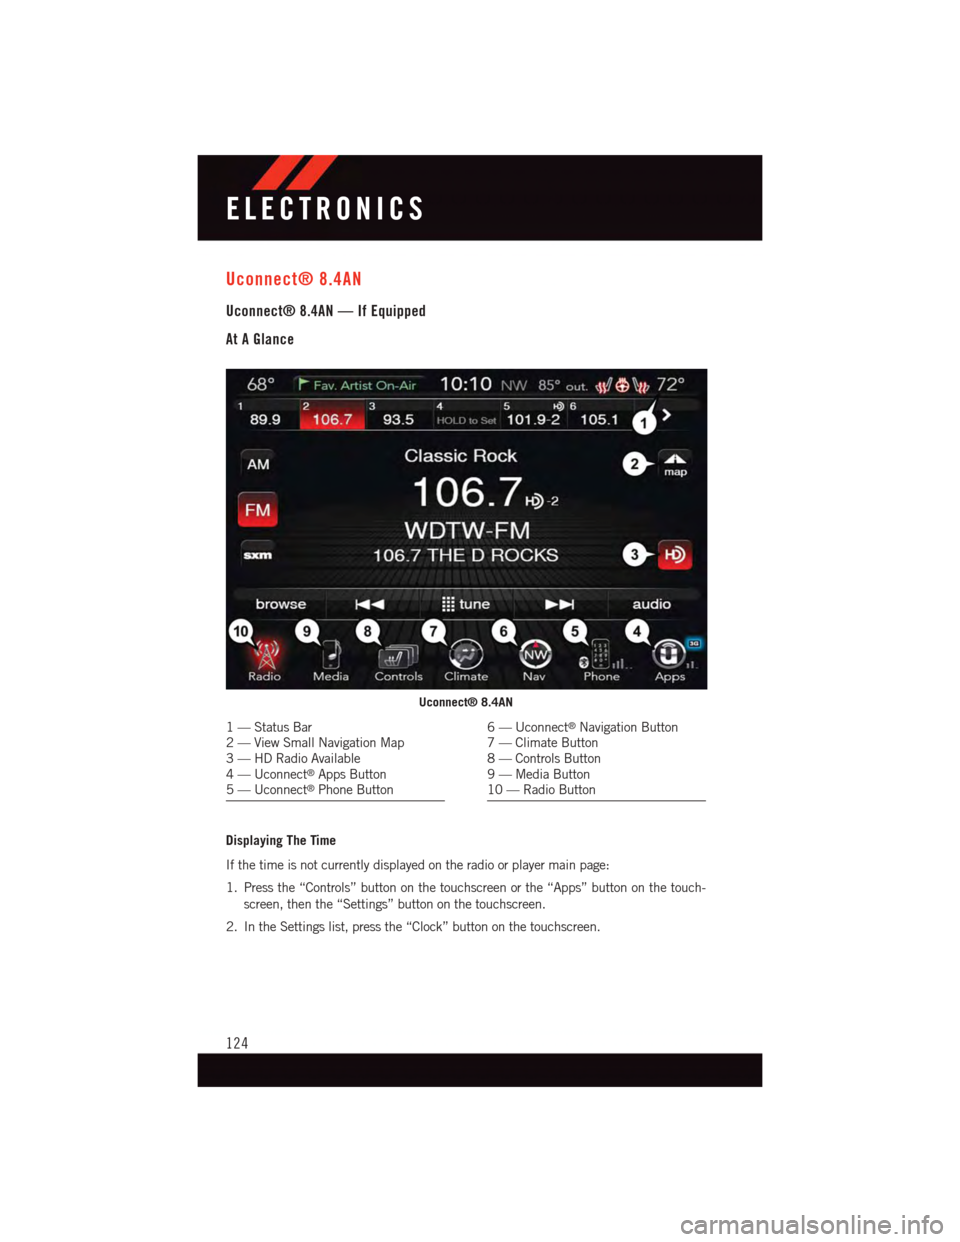
Uconnect® 8.4AN
Uconnect® 8.4AN — If Equipped
At A Glance
Displaying The Time
If the time is not currently displayed on the radio or player main page:
1. Press the “Controls” button on the touchscreen or the “Apps” button on the touch-
screen, then the “Settings” button on the touchscreen.
2. In the Settings list, press the “Clock” button on the touchscreen.
Uconnect® 8.4AN
1—StatusBar2—ViewSmallNavigationMap3—HDRadioAvailable4—Uconnect®Apps Button5—Uconnect®Phone Button
6—Uconnect®Navigation Button7—ClimateButton8—ControlsButton9—MediaButton10 — Radio Button
ELECTRONICS
124
Page 133 of 236
MEDIA HUB — iPod®/USB/MP3/SD Card
There are many ways to play music from iPod®/MP3 players, SD card, or USB devices
through your vehicle's sound system.
•Pressyour“Media”buttononthetouchscreentobegin.
USB Port
Connect your iPod®or compatible device using a USB cable into the USB Port. USB
Memory sticks with audio files can also be used. Audio from the device can be played on
the vehicle's sound system while providing metadata (artist, track title, album, etc.)
information on the radio display.
When connected, the iPod®/compatible USB device can be controlled using the radio or
Steering Wheel Audio Controls to play, skip to the next or previous track, browse, and list
the contents.
The iPod®battery charges when plugged into the USB port (if supported by the specific
device.)
To r o u t e t h e U S B / i P o d®cable out of the center console, use the access cut out.
NOTE:
•WhenconnectingyouriPod®device for the first time, the system may take several
minutes to read your music, depending on the number of files. For example, the system
will take approximately five minutes for every 1,000 songs loaded on the device. Also
during the reading process, the Shuffle and Browse functions will be disabled. This
process is needed to ensure the full use of your iPod®features and only happens the
first time it is connected. After the first time, the reading process of your iPod®will take
considerably less time unless changes are made or new songs are added to the playlist.
•TheUSBportsupportscertainMini,Classic,Nano,Touch,andiPhone®devices. The
USB port also supports playing music from compatible external USB Mass Storage
Class memory devices. Some iPod®software versions may not fully support the USB
port features. Please visit Apple’s website for iPod®software updates.
Audio Jack (AUX)
The AUX allows a portable device, such as an MP3 player or an iPod®,tobepluggedinto
the radio and utilize the vehicle’s sound system, using a 3.5 mm audio cable, to amplify
the source and play through the vehicle speakers.
•Pressingthe“AUX”buttononthetouchscreenwillchangethemodetoauxiliarydevice
if the audio jack is connected, allowing the music from your portable device to be heard
through the vehicle's speakers. In order to activate the AUX, plug in the audio jack.
•Thefunctionsoftheportabledevicearecontrolledusingthedevicebuttons.The
volume may be controlled using the radio or portable device.
•Toroutetheaudiocableoutofthecenterconsole,usetheaccesscutoutinthefront
of the console.
ELECTRONICS
131
Page 156 of 236
Using HomeLink®
To o p e r a t e , p u s h a n d r e l e a s e t h e p r o g r a m m e d H o m e L i n k®button. Activation will now
occur for the programmed device (e.g., garage door opener, gate operator, security system,
entry door lock, home/office lighting, etc.). The hand-held transmitter of the device may
also be used at any time.
WARNING!
•Yourmotorizeddoororgatewillopenandclosewhileyouareprogrammingthe
universal transceiver. Do not program the transceiver if people or pets are in the
path of the door or gate.
•Donotrunyourvehicleinaclosedgarageorconfinedareawhileprogrammingthe
transceiver. Exhaust gas from your vehicle contains Carbon Monoxide (CO) which is
odorless and colorless. Carbon Monoxide is poisonous when inhaled and can cause
you and others to be severely injured or killed.
POWER INVERTER
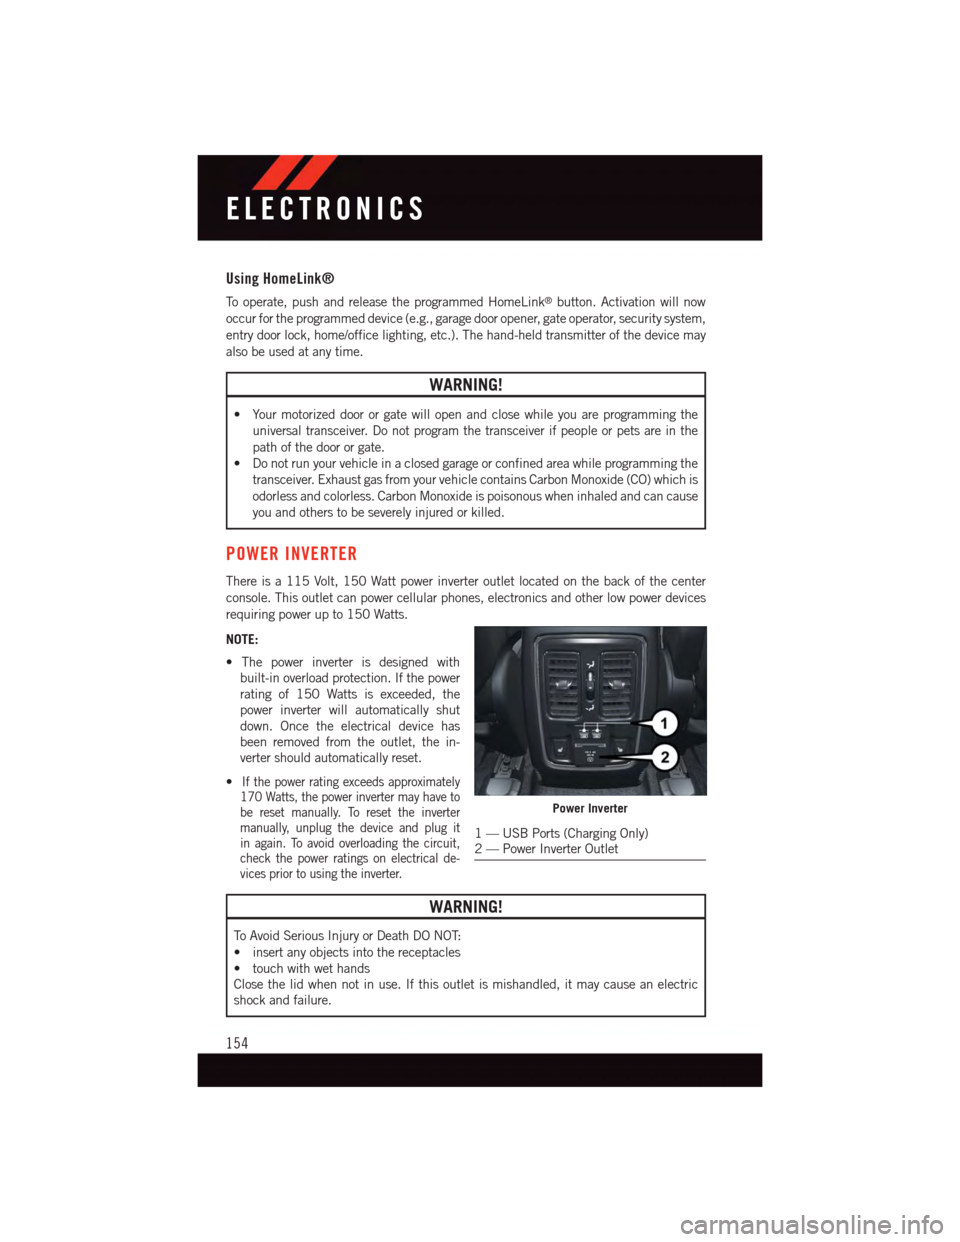
There is a 115 Volt, 150 Watt power inverter outlet located on the back of the center
console. This outlet can power cellular phones, electronics and other low power devices
requiring power up to 150 Watts.
NOTE:
•Thepowerinverterisdesignedwith
built-in overload protection. If the power
rating of 150 Watts is exceeded, the
power inverter will automatically shut
down. Once the electrical device has
been removed from the outlet, the in-
verter should automatically reset.
•If the power rating exceeds approximately170 Watts, the power inverter may have tobe reset manually. To reset the invertermanually, unplug the device and plug itin again. To avoid overloading the circuit,check the power ratings on electrical de-vices prior to using the inverter.
WARNING!
To A v o i d S e r i o u s I n j u r y o r D e a t h D O N O T:
•insertanyobjectsintothereceptacles
•touchwithwethands
Close the lid when not in use. If this outlet is mishandled, it may cause an electric
shock and failure.
Power Inverter
1—USBPorts(ChargingOnly)2—PowerInverterOutlet
ELECTRONICS
154