jacking DODGE DURANGO 2015 3.G User Guide
[x] Cancel search | Manufacturer: DODGE, Model Year: 2015, Model line: DURANGO, Model: DODGE DURANGO 2015 3.GPages: 236, PDF Size: 35.01 MB
Page 3 of 236
INTRODUCTION/WELCOME
WELCOME FROM FCA US LLC.......2
CONTROLS AT A GLANCE
DRIVER COCKPIT...............6INSTRUMENT CLUSTER...........8
GETTING STARTED
KEY FOB . . . . . . . . . . . . . . . . . . . 10REMOTE START . . . . . . . . . . . . . . . . 11KEYLESS ENTER-N-GO™.........12VEHICLE SECURITY ALARM........15SEAT BELT SYSTEMS............15SUPPLEMENTAL RESTRAINT SYSTEM(SRS) — AIR BAGS.............16CHILD RESTRAINTS............19HEAD RESTRAINTS.............25FRONT SEATS.................28REAR SEATS.................31HEATED/VENTILATED SEATS........34HEATED STEERING WHEEL........36TILT/TELESCOPING STEERINGCOLUMN...................37
OPERATING YOUR VEHICLE
ENGINE BREAK-INRECOMMENDATIONS............39TURN SIGNAL/WIPER/WASHER/HIGHBEAM LEVER.................40HEADLIGHT SWITCH............41ELECTRONIC SPEED CONTROL......42ADAPTIVE CRUISE CONTROL (ACC)....44FORWARD COLLISION WARNING (FCW)WITH MITIGATION..............49AUTOMATIC DIMMING MIRRORS.....51ELECTRONIC SHIFTER...........51AUTOSTICK..................52FUEL ECONOMY (ECO) MODE.......54AUTOMATIC CLIMATE CONTROLS.....55PA R K S E N S E®REAR PARK ASSIST.....60PA R K V I E W®REAR BACK-UP CAMERA...61BLIND SPOT MONITORING.........61POWER SUNROOF..............62WIND BUFFETING..............63
ELECTRONICSYOUR VEHICLE'S SOUND SYSTEM....64IDENTIFYING YOUR RADIO.........66Uconnect®ACCESS.............67Uconnect®5.0 . . . . . . . . . . . . . . . . 84Uconnect®8.4A...............96Uconnect®8.4AN.............124Uconnect®PHONE.............137STEERING WHEEL AUDIO CONTROLS...147DRIVER INFORMATION DISPLAY (DID)...148PROGRAMMABLE FEATURES.......150UNIVERSAL GARAGE DOOR OPENER(HomeLink®).................152
POWER INVERTER.............154POWER OUTLET..............155
OFF-ROAD CAPABILITIESALL-WHEEL DRIVE OPERATION.....157
UTILITYROOF LUGGAGE RACK..........160TRAILER TOWING WEIGHTS (MAXIMUMTRAILER WEIGHT RATINGS).......161RECREATIONAL TOWING (BEHINDMOTORHOME, ETC.)............163
WHAT TO DO IN EMERGENCIESROADSIDE ASSISTANCE..........168INSTRUMENT CLUSTER WARNINGLIGHTS....................168INSTRUMENT CLUSTER INDICATORLIGHTS...................173IF YOUR ENGINE OVERHEATS......175JACKING AND TIRE CHANGING.....176BATTERY LOCATION............186JUMP-STARTING..............186MANUAL PARK RELEASE.........189TOWING A DISABLED VEHICLE.....190FREEING A STUCK VEHICLE.......191EVENT DATA RECORDER (EDR).....192CAP-LESS FUEL FILL FUNNEL......192
MAINTAINING YOUR VEHICLE
OPENING THE HOOD...........193ENGINE COMPARTMENT.........194FLUID CAPACITIES.............198FLUIDS, LUBRICANTS AND GENUINEPA RT S....................199MAINTENANCE PROCEDURES......201MAINTENANCE SCHEDULE.......201MAINTENANCE RECORD.........205FUSES....................206TIRE PRESSURES.............209ADDING FUEL................210SPARE TIRES — IF EQUIPPED......211WHEEL AND WHEEL TRIM CARE....213REPLACEMENT BULBS..........214
CUSTOMER ASSISTANCE
FCA US LLC CUSTOMER CENTER....215CHRYSLER CANADA INC. CUSTOMERCENTER...................215ASSISTANCE FOR THE HEARINGIMPAIRED..................215PUBLICATIONS ORDERING........216REPORTING SAFETY DEFECTS IN THEUNITED STATES..............216
MOPAR® ACCESSORIESAUTHENTIC ACCESSORIES BY MOPAR®...217
FREQUENTLY ASKED QUESTIONS
FREQUENTLY ASKED QUESTIONS....218
INDEX.....................220
TABLE OF CONTENTS
Page 178 of 236
JACKING AND TIRE CHANGING
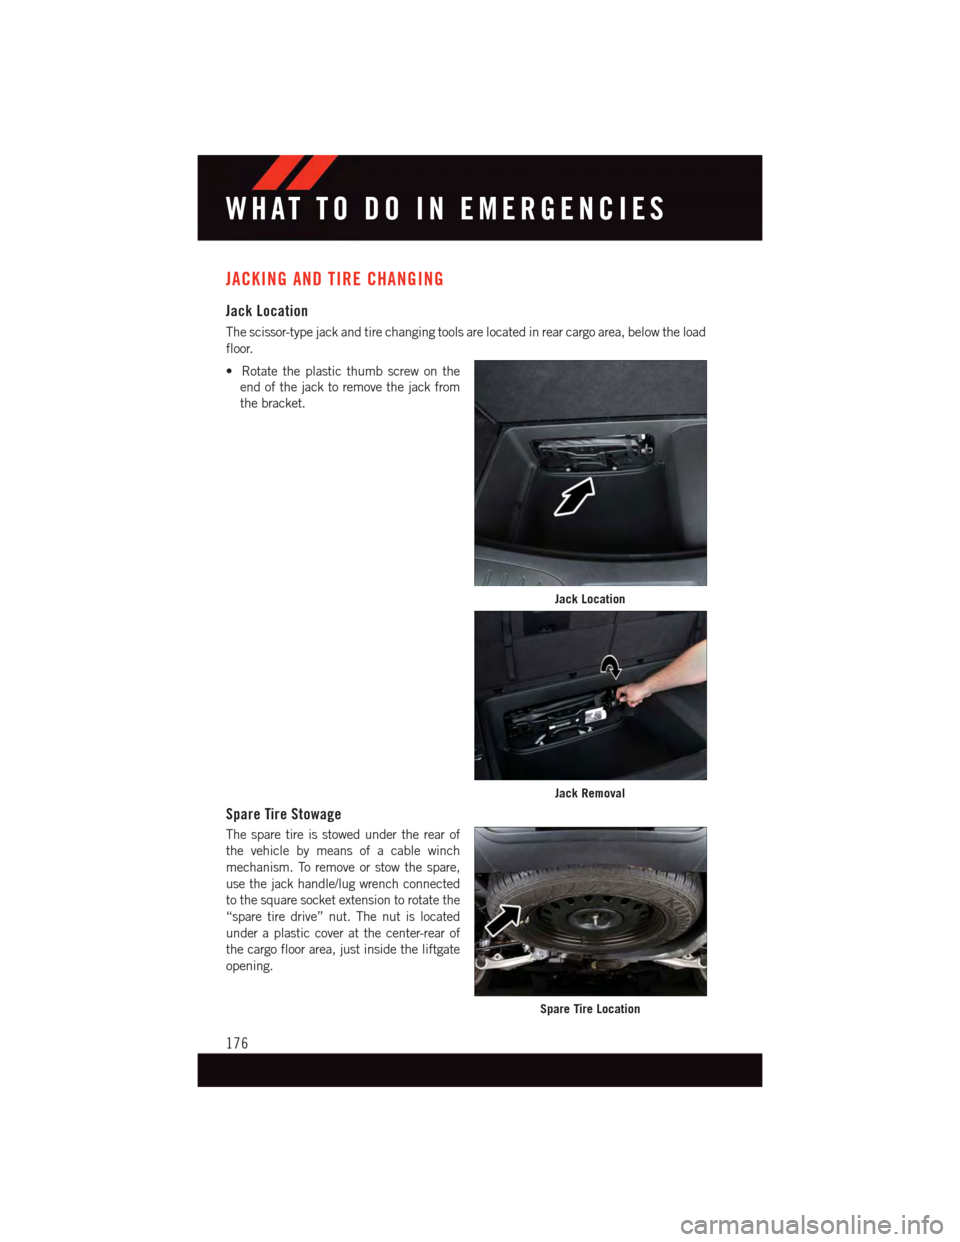
Jack Location
The scissor-type jack and tire changing tools are located in rear cargo area, below the load
floor.
•Rotatetheplasticthumbscrewonthe
end of the jack to remove the jack from
the bracket.
Spare Tire Stowage
The spare tire is stowed under the rear of
the vehicle by means of a cable winch
mechanism. To remove or stow the spare,
use the jack handle/lug wrench connected
to the square socket extension to rotate the
“spare tire drive” nut. The nut is located
under a plastic cover at the center-rear of
the cargo floor area, just inside the liftgate
opening.
Jack Location
Jack Removal
Spare Tire Location
WHAT TO DO IN EMERGENCIES
176
Page 181 of 236
Preparations For Jacking
1. Park the vehicle on a firm level surface, away from traffic for your safety.
2. Turn the engine off, place the transmission in PARK, fully depress the pedal to the floor
to set the parking brake, and activate the Hazard Warning flashers.
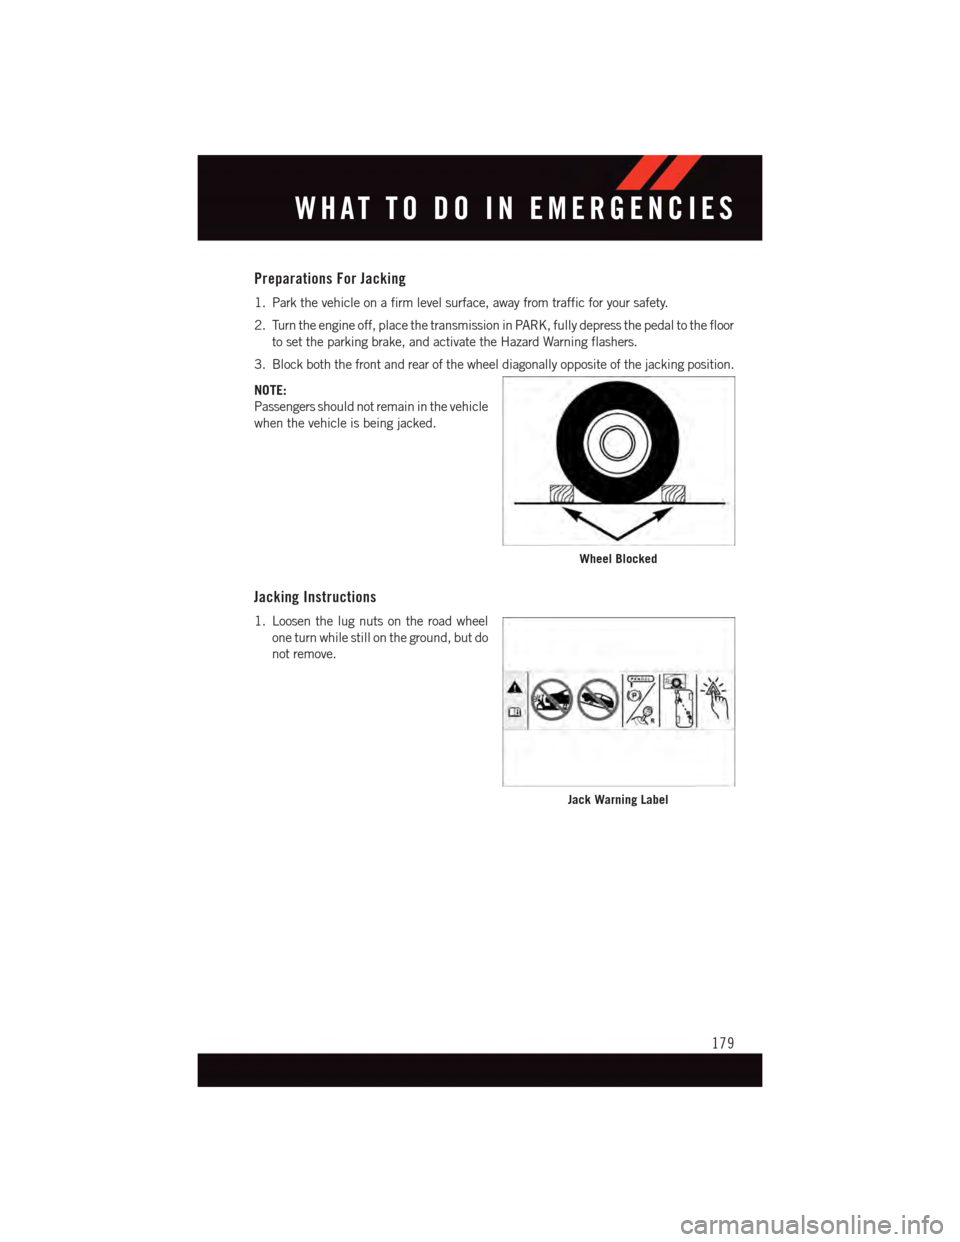
3. Block both the front and rear of the wheel diagonally opposite of the jacking position.
NOTE:
Passengers should not remain in the vehicle
when the vehicle is being jacked.
Jacking Instructions
1. Loosen the lug nuts on the road wheel
one turn while still on the ground, but do
not remove.
Wheel Blocked
Jack Warning Label
WHAT TO DO IN EMERGENCIES
179
Page 182 of 236
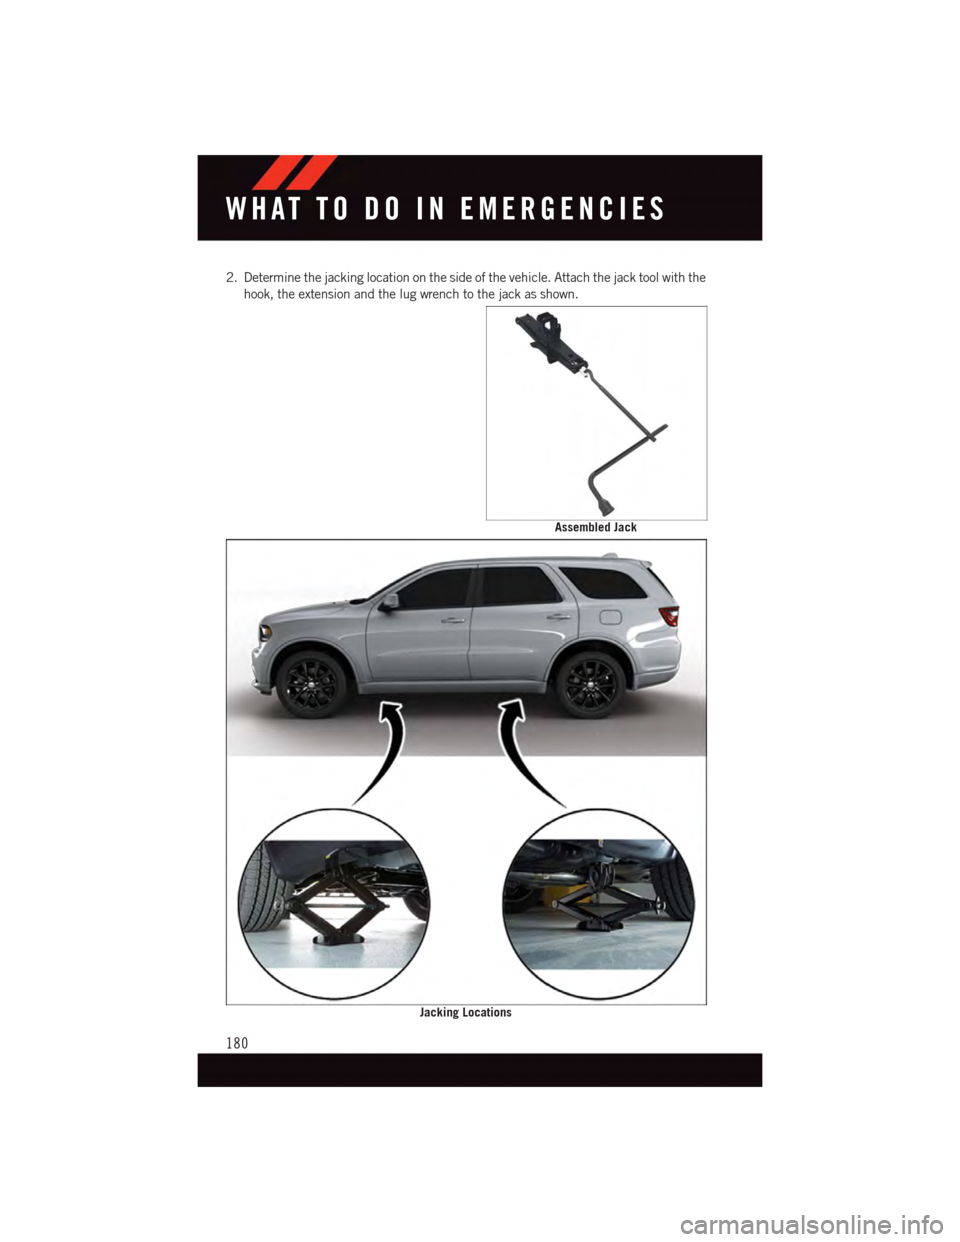
2. Determine the jacking location on the side of the vehicle. Attach the jack tool with the
hook, the extension and the lug wrench to the jack as shown.
Assembled Jack
Jacking Locations
WHAT TO DO IN EMERGENCIES
180
Page 183 of 236
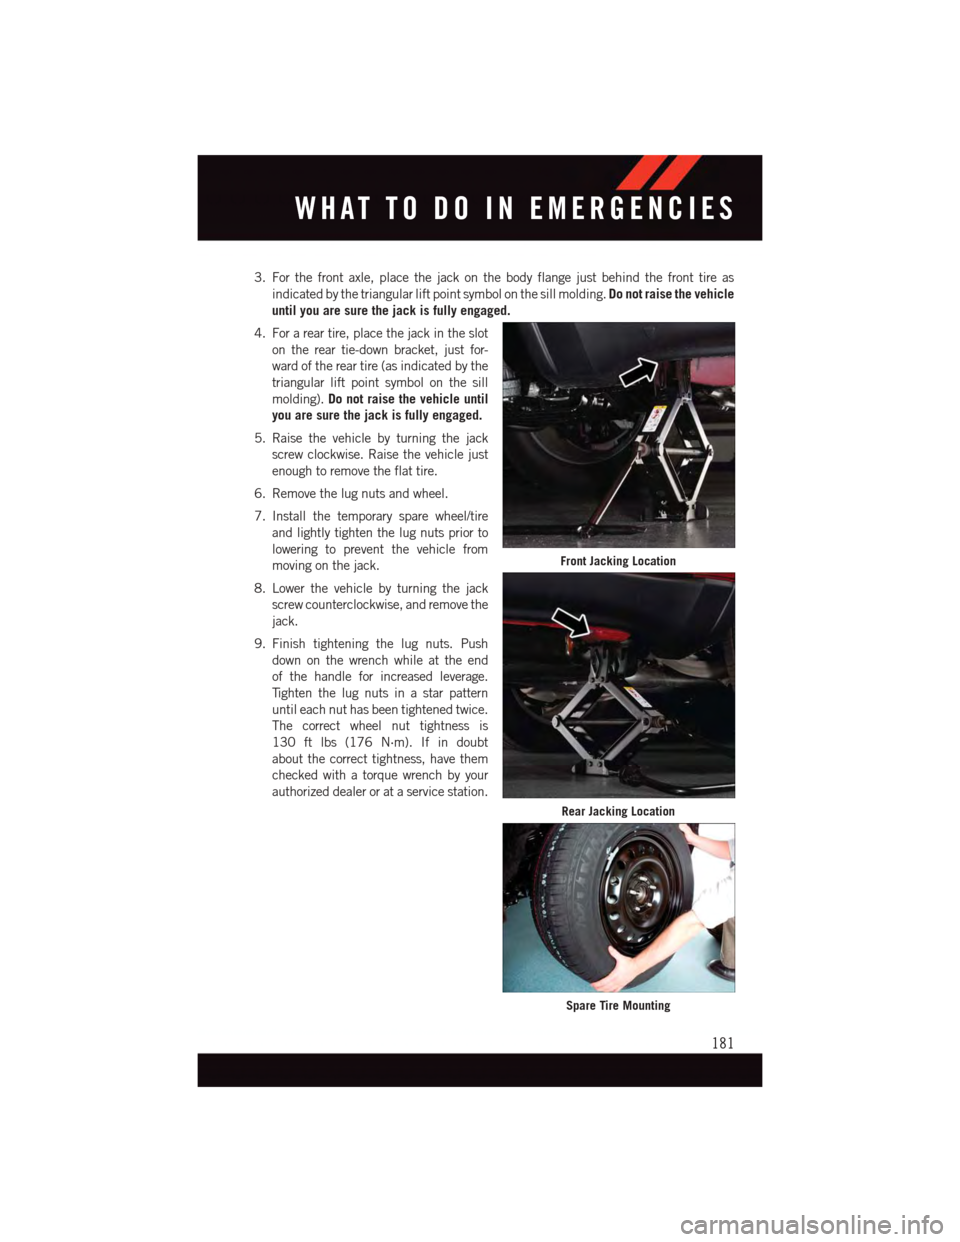
3. For the front axle, place the jack on the body flange just behind the front tire as
indicated by the triangular lift point symbol on the sill molding.Do not raise the vehicle
until you are sure the jack is fully engaged.
4. For a rear tire, place the jack in the slot
on the rear tie-down bracket, just for-
ward of the rear tire (as indicated by the
triangular lift point symbol on the sill
molding).Do not raise the vehicle until
you are sure the jack is fully engaged.
5. Raise the vehicle by turning the jack
screw clockwise. Raise the vehicle just
enough to remove the flat tire.
6. Remove the lug nuts and wheel.
7. Install the temporary spare wheel/tire
and lightly tighten the lug nuts prior to
lowering to prevent the vehicle from
moving on the jack.
8. Lower the vehicle by turning the jack
screw counterclockwise, and remove the
jack.
9. Finish tightening the lug nuts. Push
down on the wrench while at the end
of the handle for increased leverage.
Ti g h t e n t h e l u g n u t s i n a s t a r p a t t e r n
until each nut has been tightened twice.
The correct wheel nut tightness is
130 ft lbs (176 N·m). If in doubt
about the correct tightness, have them
checked with a torque wrench by your
authorized dealer or at a service station.
Front Jacking Location
Rear Jacking Location
Spare Tire Mounting
WHAT TO DO IN EMERGENCIES
181
Page 186 of 236
Road Tire Installation
1. Mount the road tire on the axle.
2. Install the remaining lug nuts with the cone shaped end of the nut toward the wheel.
Lightly tighten the lug nuts.
3. Lower the vehicle to the ground by turning the jack handle counterclockwise.
4. Finish tightening the lug nuts. Push down on the wrench while at the end of the handle
for increased leverage. Tighten the lug nuts in a star pattern until each nut has been
tightened twice. The correct tightness of each lug nut is 130 ft/lbs (176 N·m). If in
doubt about the correct tightness, have them checked with a torque wrench by your
authorized dealer or service station.
5. After 25 miles (40 km) check the lug nut torque with a torque wrench to ensure that
all lug nuts are properly seated against the wheel.
CAUTION!
•Donotusepowertoolstowinchthetireupordown.Impacttypetoolscandamage
the winch mechanism.
•Donotattempttoraisethevehiclebyjackingonlocationsotherthanthose
indicated in the Jacking Instructions for this vehicle.
•Besuretomountthesparetirewiththevalvestemfacingoutward.Thevehicle
could be damaged if the spare tire is mounted incorrectly.
WHAT TO DO IN EMERGENCIES
184
Page 194 of 236
EVENT DATA RECORDER (EDR)
This vehicle is equipped with an Event Data Recorder (EDR). The main purpose of an EDR
is to record, in certain crash or near crash-like situations, such as an air bag deployment
or hitting a road obstacle, data that will assist in understanding how a vehicle’s systems
performed. The EDR is designed to record data related to vehicle dynamics and safety
systems for a short period of time, typically 30 seconds or less. The EDR in this vehicle is
designed to record such data as:
•Howvarioussystemsinyourvehiclewereoperating.
•Whetherornotthedriverandpassengersafetybeltswerebuckled/fastened.
•Howfar(ifatall)thedriverwasdepressingtheacceleratorand/orbrakepedal.
•Howfastthevehiclewastraveling.
These data can help provide a better understanding of the circumstances in which crashes
and injuries occur.
NOTE:
EDR data is recorded by your vehicle only if a non-trivial crash situation occurs; no data is
recorded by the EDR under normal driving conditions and no personal data (e.g. name,
gender, age, and crash location) is recorded. However, other parties, such as law
enforcement, could combine the EDR data with the type of personally identifying data
routinely acquired during a crash investigation.
To r e a d d a t a r e c o r d e d b y a n E D R , s p e c i a l e q u i p m e n t i s r e q u i r e d , a n d a c c e s s t o t h e v e h i c l e
or the EDR is needed. In addition to the vehicle manufacturer, other parties such as law
enforcement, that have the special equipment, can read the information if they have
access to the vehicle or the EDR.
CAP-LESS FUEL FILL FUNNEL
The funnel for the Cap-Less Fuel System is located on the jacking tool kit. If your vehicle
is out of fuel and an auxiliary fuel can is needed, insert the funnel into the filler neck and
proceed to fill the vehicle.
WHAT TO DO IN EMERGENCIES
192
Page 223 of 236
Electronic Speed Control ON
Indicator . . . . . . . . . . . . . .173
Electronic Speed Control SET
Indicator . . . . . . . . . . . . . .173
Electronic Stability Control (ESC)
OFF Indicator Light . . . . . . . .173
Front Fog Light Indicator . . . . .173
High Beam Indicator.......173
Park/Headlight ON Indicator . . .173
Tu r n S i g n a l I n d i c a t o r.......173Vehicle Security Light.......173Clutch . . . . . . . . . . . . . . . . .201Clutch Fluid . . . . . . . . . . . . . .201Compact Spare Tire..........212Compass Calibration..........148Cooling System.............201Adding Coolant (Antifreeze)....201Coolant Capacity.........198Coolant Level...........201Disposal of Used Coolant.....201Drain, Flush, and Refill......201Inspection . . . . . . . . . . . . .201Points to Remember.......201Pressure Cap . . . . . . . . . . .201Selection of Coolant(Antifreeze)......198, 199, 201Corrosion Protection..........201Cruise Control (Speed Control).....42Cruise Light . . . . . . . . . . . . . . .42Customer Assistance.......215, 216Customer Programmable Features . .150
Defects, Reporting...........216Dimmer Control.............42Dimmer Switch, Headlight.......42Disabled Vehicle Towing . . . . . . . .168Disarming, Security System.......15Discharged Battery...........186DisposalAntifreeze (Engine Coolant)....201Driver Cockpit...............7Driver Information DisplayProgrammable Features......149Driver Information Display (DID)Display . . . . . . . . . . . . . . .148
Driver Information Display (DID)..150Selectable Menu Items......150
E-85 Fuel................200
ECO . . . . . . . . . . . . . . . . . . .148
Economy (Fuel) Mode..........54
Electronically Shifted Transfer Case . .157
Electronics
Yo u r Ve h i c l e ' s S o u n d S y s t e m....64
Electronic Speed Control (Cruise
Control) . . . . . . . . . . . . . . . .42
Electronic Stability Control (ESC) . . .171
Electronic Stability Control (ESC)OFF Indicator . . . . . . . . . . . .173Electronic Throttle Control WarningLight . . . . . . . . . . . . . . . . .172Emergency, In Case ofJacking..............176Overheating............175To w i n g . . . . . . . . . . . . . . . 1 6 8EngineAir Cleaner . . . . . . . . . . . . .201Break-In Recommendations....39Checking Oil Level.........201Compartment............194Cooling . . . . . . . . . . . . . . .201Fuel Requirements.........198Malfunction Indicator(Check Engine)..........170Oil . . . . . . . . . . . . . .198, 201Oil Filler Cap...........201Oil Selection . . . . .198, 199, 201Overheating............175Starting...............14Stopping..............14Ethanol.................200Event Data Recorder..........192Exhaust System............201Exterior Lights . . . . . . . . . . . . .214
FA Q . . . . . . . . . . . . . . . . . . . 2 1 8FiltersAir Cleaner . . . . . . . . . . . . .201Engine Oil.............201Engine Oil Disposal........201FlashersTu r n S i g n a l............173Flexible Fuel Vehicles.........200Fluid Capacities............198Fluids . . . . . . . . . . . . . . . . . .200
Fluids, Lubricants and Genuine Parts..199
INDEX
221
Page 224 of 236
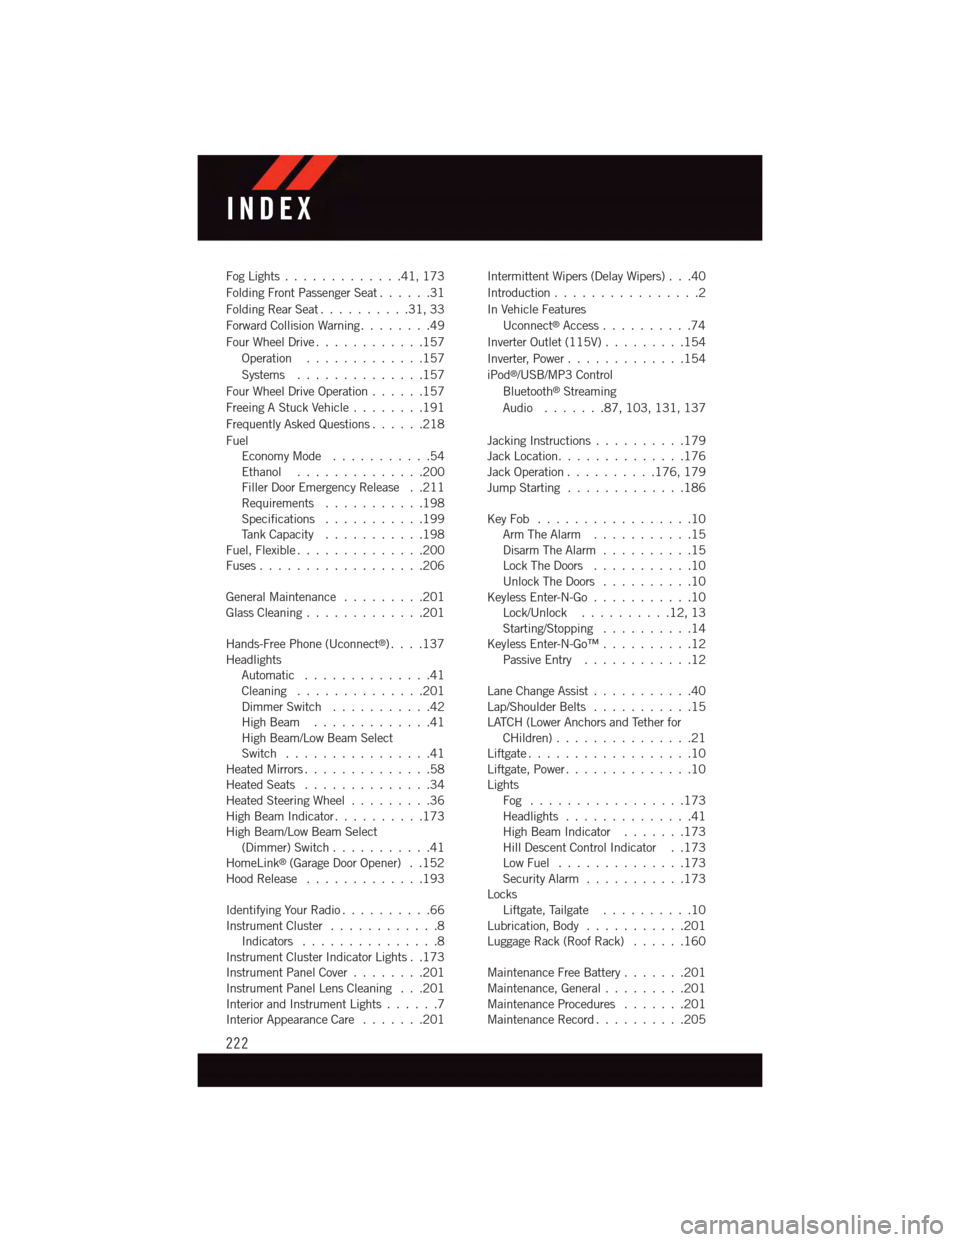
Fog Lights . . . . . . . . . . . . .41, 173
Folding Front Passenger Seat......31
Folding Rear Seat..........31,33
Forward Collision Warning........49
Four Wheel Drive............157
Operation.............157
Systems . . . . . . . . . . . . . .157
Four Wheel Drive Operation......157
Freeing A Stuck Vehicle . . . . . . . .191
Frequently Asked Questions......218
FuelEconomy Mode...........54Ethanol..............200Filler Door Emergency Release . .211Requirements...........198Specifications...........199Ta n k C a p a c i t y...........198Fuel, Flexible..............200Fuses . . . . . . . . . . . . . . . . . .206
General Maintenance.........201Glass Cleaning . . . . . . . . . . . . .201
Hands-Free Phone (Uconnect®). . . .137HeadlightsAutomatic . . . . . . . . . . . . . .41Cleaning..............201Dimmer Switch...........42High Beam . . . . . . . . . . . . .41High Beam/Low Beam SelectSwitch . . . . . . . . . . . . . . . .41Heated Mirrors..............58Heated Seats..............34Heated Steering Wheel.........36High Beam Indicator..........173High Beam/Low Beam Select(Dimmer) Switch...........41HomeLink®(Garage Door Opener) . .152Hood Release . . . . . . . . . . . . .193
Identifying Your Radio..........66Instrument Cluster............8Indicators . . . . . . . . . . . . . . .8Instrument Cluster Indicator Lights . .173Instrument Panel Cover........201Instrument Panel Lens Cleaning . . .201Interior and Instrument Lights......7Interior Appearance Care.......201
Intermittent Wipers (Delay Wipers) . . .40
Introduction................2
In Vehicle Features
Uconnect®Access..........74
Inverter Outlet (115V).........154
Inverter, Power.............154
iPod®/USB/MP3 Control
Bluetooth®Streaming
Audio.......87,103, 131, 137
Jacking Instructions..........179Jack Location..............176Jack Operation..........176, 179Jump Starting.............186
Key Fob . . . . . . . . . . . . . . . . .10Arm The Alarm . . . . . . . . . . .15Disarm The Alarm . . . . . . . . . .15Lock The Doors...........10Unlock The Doors..........10Keyless Enter-N-Go...........10Lock/Unlock..........12,13Starting/Stopping..........14Keyless Enter-N-Go™..........12Passive Entry............12
Lane Change Assist...........40Lap/Shoulder Belts...........15LATCH (Lower Anchors and Tether forCHildren) . . . . . . . . . . . . . . .21Liftgate . . . . . . . . . . . . . . . . . .10Liftgate, Power..............10LightsFog . . . . . . . . . . . . . . . . .173Headlights..............41High Beam Indicator.......173Hill Descent Control Indicator . .173Low Fuel..............173Security Alarm...........173LocksLiftgate, Tailgate . . . . . . . . . .10Lubrication, Body...........201Luggage Rack (Roof Rack)......160
Maintenance Free Battery.......201Maintenance, General.........201Maintenance Procedures.......201Maintenance Record..........205
INDEX
222
Page 225 of 236
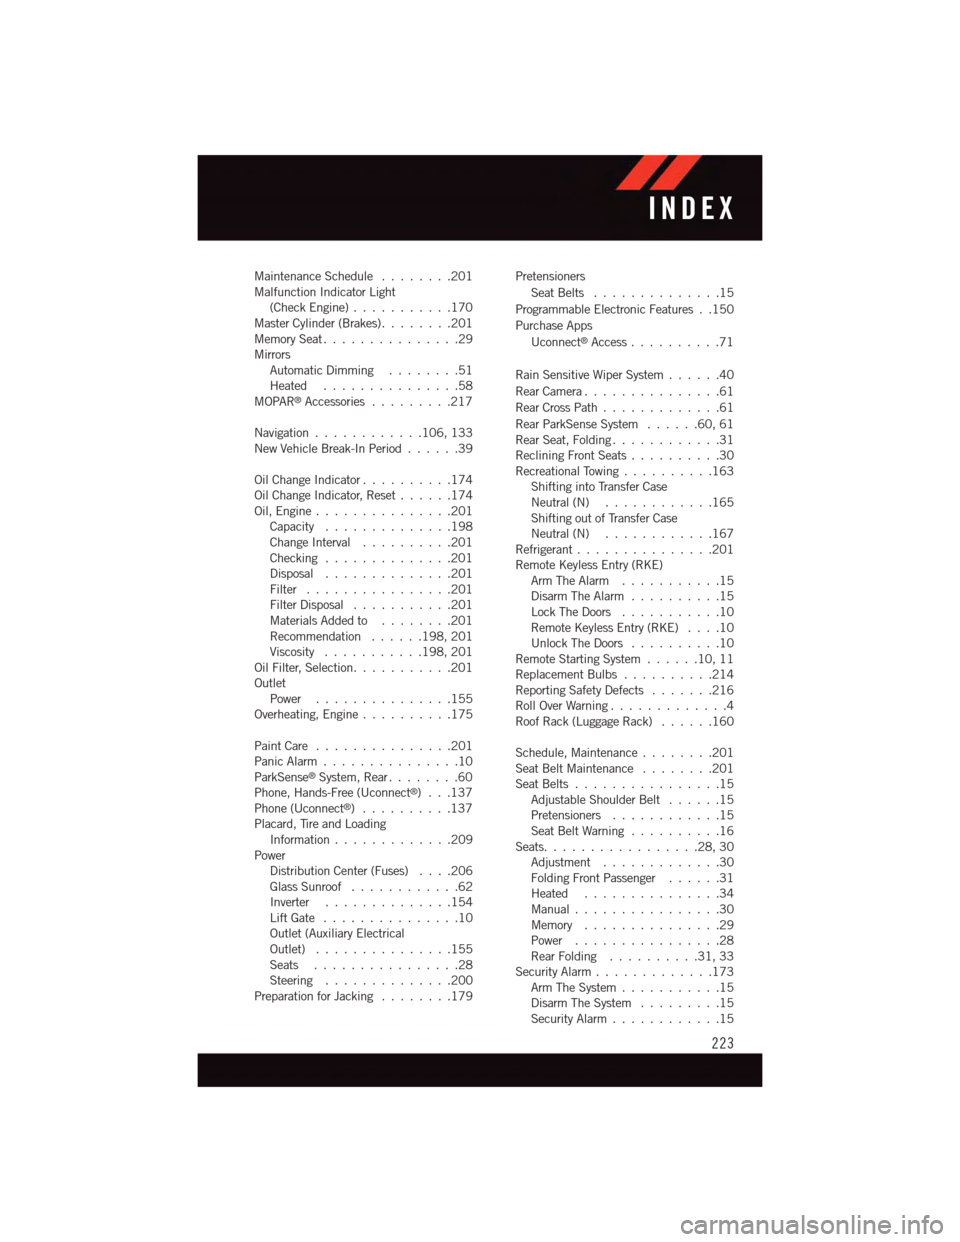
Maintenance Schedule........201Malfunction Indicator Light(Check Engine)...........170Master Cylinder (Brakes)........201Memory Seat...............29MirrorsAutomatic Dimming . . . . . . . .51Heated . . . . . . . . . . . . . . .58MOPAR®Accessories.........217
Navigation . . . . . . . . . . . .106, 133New Vehicle Break-In Period . . . . . .39
Oil Change Indicator..........174Oil Change Indicator, Reset......174Oil, Engine...............201Capacity..............198Change Interval..........201Checking..............201Disposal . . . . . . . . . . . . . .201Filter................201Filter Disposal...........201Materials Added to........201Recommendation......198, 201Viscosity...........198, 201Oil Filter, Selection...........201OutletPower...............155Overheating, Engine..........175
Paint Care . . . . . . . . . . . . . . .201Panic Alarm . . . . . . . . . . . . . . .10ParkSense®System, Rear........60Phone, Hands-Free (Uconnect®)...137Phone (Uconnect®)..........137Placard, Tire and LoadingInformation . . . . . . . . . . . . .209PowerDistribution Center (Fuses)....206Glass Sunroof............62Inverter . . . . . . . . . . . . . .154Lift Gate . . . . . . . . . . . . . . .10Outlet (Auxiliary ElectricalOutlet) . . . . . . . . . . . . . . .155Seats................28Steering . . . . . . . . . . . . . .200Preparation for Jacking........179
Pretensioners
Seat Belts..............15
Programmable Electronic Features . .150
Purchase Apps
Uconnect®Access..........71
Rain Sensitive Wiper System......40
Rear Camera...............61
Rear Cross Path.............61
Rear ParkSense System......60,61Rear Seat, Folding............31Reclining Front Seats..........30Recreational Towing..........163Shifting into Transfer CaseNeutral (N) . . . . . . . . . . . .165Shifting out of Transfer CaseNeutral (N) . . . . . . . . . . . .167Refrigerant . . . . . . . . . . . . . . .201Remote Keyless Entry (RKE)Arm The Alarm . . . . . . . . . . .15Disarm The Alarm..........15Lock The Doors...........10Remote Keyless Entry (RKE)....10Unlock The Doors..........10Remote Starting System......10,11Replacement Bulbs..........214Reporting Safety Defects.......216Roll Over Warning . . . . . . . . . . . . .4Roof Rack (Luggage Rack)......160
Schedule, Maintenance........201Seat Belt Maintenance........201Seat Belts................15Adjustable Shoulder Belt . . . . . .15Pretensioners............15Seat Belt Warning..........16Seats.................28,30Adjustment.............30Folding Front Passenger......31Heated...............34Manual................30Memory...............29Power................28Rear Folding..........31,33Security Alarm.............173Arm The System...........15Disarm The System.........15Security Alarm............15
INDEX
223