buttons DODGE DURANGO 2015 3.G User Guide
[x] Cancel search | Manufacturer: DODGE, Model Year: 2015, Model line: DURANGO, Model: DODGE DURANGO 2015 3.GPages: 236, PDF Size: 35.01 MB
Page 14 of 236
KEYLESS ENTER-N-GO™
The Keyless Enter-N-Go™ system is an enhancement to the vehicle's Key Fob. This
feature allows you to lock and unlock the vehicle's door(s) and liftgate without having to
push the Key Fob lock or unlock buttons as well as starting and stopping the vehicle with
the push of a button.
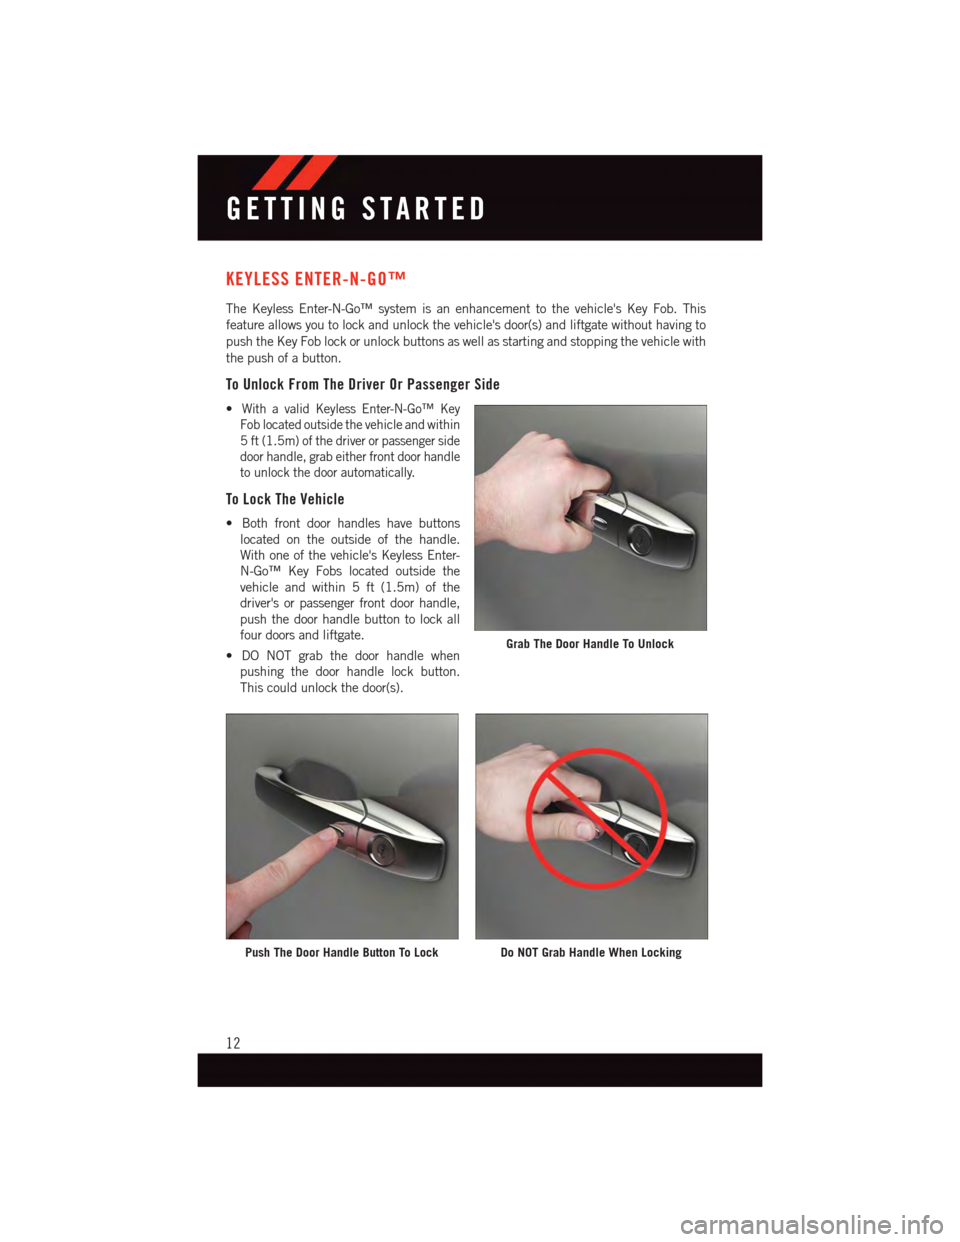
To Unlock From The Driver Or Passenger Side
•With a valid Keyless Enter-N-Go™ Key
Fob located outside the vehicle and within
5ft(1.5m)ofthedriverorpassengerside
door handle, grab either front door handle
to unlock the door automatically.
To Lock The Vehicle
•Bothfrontdoorhandleshavebuttons
located on the outside of the handle.
With one of the vehicle's Keyless Enter-
N-Go™ Key Fobs located outside the
vehicle and within 5 ft (1.5m) of the
driver's or passenger front door handle,
push the door handle button to lock all
four doors and liftgate.
•DONOTgrabthedoorhandlewhen
pushing the door handle lock button.
This could unlock the door(s).
Grab The Door Handle To Unlock
Push The Door Handle Button To LockDo NOT Grab Handle When Locking
GETTING STARTED
12
Page 31 of 236
Memory Seat
The memory seat feature allows you to set two different driver seating positions (excluding
lumbar position), outside mirrors, radio station preset settings and tilt/telescoping steer-
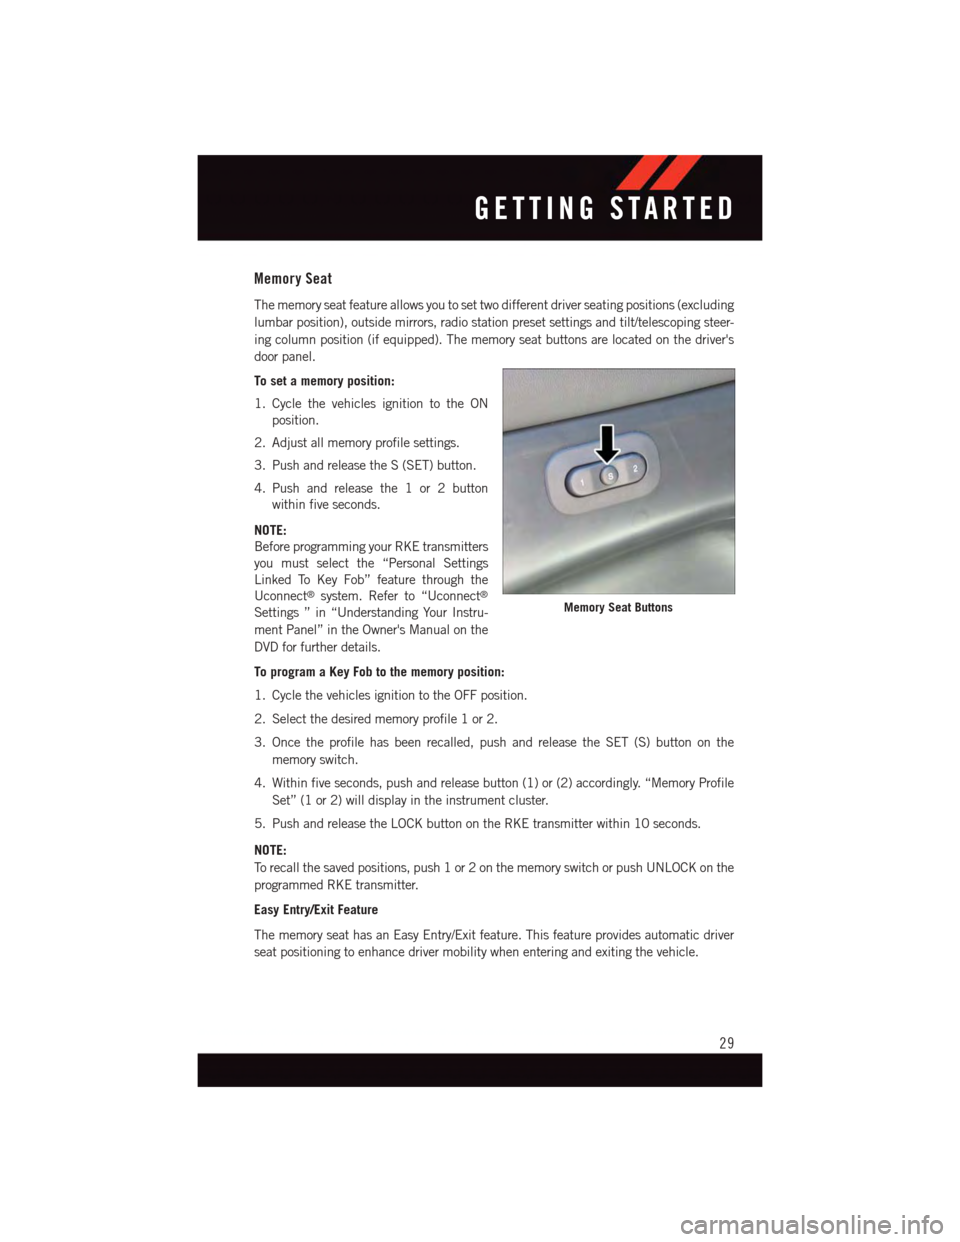
ing column position (if equipped). The memory seat buttons are located on the driver's
door panel.
To set a memory position:
1. Cycle the vehicles ignition to the ON
position.
2. Adjust all memory profile settings.
3. Push and release the S (SET) button.
4. Push and release the 1 or 2 button
within five seconds.
NOTE:
Before programming your RKE transmitters
you must select the “Personal Settings
Linked To Key Fob” feature through the
Uconnect®system. Refer to “Uconnect®
Settings ” in “Understanding Your Instru-
ment Panel” in the Owner's Manual on the
DVD for further details.
To program a Key Fob to the memory position:
1. Cycle the vehicles ignition to the OFF position.
2. Select the desired memory profile 1 or 2.
3. Once the profile has been recalled, push and release the SET (S) button on the
memory switch.
4. Within five seconds, push and release button (1) or (2) accordingly. “Memory Profile
Set” (1 or 2) will display in the instrument cluster.
5. Push and release the LOCK button on the RKE transmitter within 10 seconds.
NOTE:
To r e c a l l t h e s a v e d p o s i t i o n s , p u s h 1 o r 2 o n t h e m e m o r y s w i t c h o r p u s h U N L O C K o n t h e
programmed RKE transmitter.
Easy Entry/Exit Feature
The memory seat has an Easy Entry/Exit feature. This feature provides automatic driver
seat positioning to enhance driver mobility when entering and exiting the vehicle.
Memory Seat Buttons
GETTING STARTED
29
Page 36 of 236
HEATED/VENTILATED SEATS
Heated Seats
On some models, the front and rear seats may be equipped with heaters in both the seat
cushions and seatbacks.
The front driver and passenger heated seats are operated using the Uconnect®System.
WARNING!
•Personswhoareunabletofeelpaintotheskinbecauseofadvancedage,chronic
illness, diabetes, spinal cord injury, medication, alcohol use, exhaustion or other
physical condition must exercise care when using the seat heater. It may cause
burns even at low temperatures, especially if used for long periods of time.
•Donotplaceanythingontheseatorseatbackthatinsulatesagainstheat,suchas
ablanketorcushion.Thismaycausetheseatheatertooverheat.Sittinginaseat
that has been overheated could cause serious burns due to the increased surface
temperature of the seat.
Front Heated Seats
The front heated seats control buttons are located within the climate or controls screen of
the touchscreen.
Yo u c a n c h o o s e f r o m H I , L O o r O F F h e a t s e t t i n g s . T h e i n d i c a t o r l i g h t s i n e a c h s w i t c h
indicate the level of heat in use. Two indicator lights will illuminate for HI, one for LO and
none for OFF.
•Presstheheatedseatbuttononce to turn the HI setting ON.
•PresstheheatedseatbuttonasecondtimetoturntheLOsettingON.
•PresstheheatedseatbuttonathirdtimetoturntheheatingelementsOFF.
If the HI-level setting is selected, the system will automatically switch to LO-level after
approximately 60 minutes of continuous operation. At that time, the display will change
from HI to LO, indicating the change. The LO-level setting will turn OFF automatically
after approximately 45 minutes.
NOTE:
•Onceaheatsettingisselected,heatwillbefeltwithintwotofiveminutes.
•Theenginemustberunningfortheheatedseatstooperate.
Vehicles Equipped With Remote Start
On models that are equipped with remote start, the heated seats can be programed to
come on during a remote start.
This feature can be programmed through the Uconnect®system. Refer to “Uconnect®
Settings” in “Understanding Your Instrument Panel” in the Owner's Manual on the DVD.
GETTING STARTED
34
Page 37 of 236
Rear Heated Seats
On some models, the two outboard seats are equipped with heated seats. The heated seat
switches for these seats are located on the rear of the center console. There are two heated
seat switchesthat allow the rear passengers to operate the seats independently.
Yo u c a n c h o o s e f r o m H I , L O o r O F F h e a t s e t t i n g s . T h e i n d i c a t o r l i g h t s i n e a c h s w i t c h
indicate the level of heat in use. Two indicator lights will illuminate for HI, one for LO and
none for OFF.
•Pushtheheatedseatbuttononce to select HI-level heating.
•PushtheheatedseatbuttonasecondtimetoselectLO-levelheating.
•PushtheheatedseatbuttonathirdtimetoturntheheatingelementsOFF.
NOTE:
•Onceaheatsettingisselected,heatwillbefeltwithintwotofiveminutes.
•Theenginemustberunningfortheheatedseatstooperate.
When the HI-level setting is selected, the heater will provide a boosted heat level during
the first four minutes of operation. Then, the heat output will drop to the normal HI-level.
If the HI-level setting is selected, the system will automatically switch to LO-level after
approximately 60 minutes of continuous operation. At that time, the number of illumi-
nated LEDs changes from two to one, indicating the change. The LO-level setting will turn
OFF automatically after approximately 45 minutes.
Front Ventilated Seats
Located in the seat cushion and seat back are small fans that draw the air from the
passenger compartment and move air through fine perforations in the seat cover to help
keep the driver and front passenger cooler in higher ambient temperatures. The fans
operate at two speeds, HI and LO.
The front ventilated seats control buttons are located within the Uconnect®system. You
can gain access to the control buttons through the climate screen or the controls screen.
•Presstheventilatedseatbuttononce to choose HI.
•PresstheventilatedseatbuttonasecondtimetochooseLO.
•PresstheventilatedseatbuttonathirdtimetoturntheventilatedseatOFF.
NOTE:
The engine must be running for the ventilated seats to operate.
Vehicles Equipped With Remote Start
On models that are equipped with remote start, the ventilated seats can be programed to
come on during a remote start.
This feature can be programmed through the Uconnect®system. Refer to “Uconnect®
Settings” in “Understanding Your Instrument Panel” in the Owner's Manual on the DVD.
GETTING STARTED
35
Page 38 of 236
HEATED STEERING WHEEL
The steering wheel contains a heating element that heats the steering wheel to one
temperature setting.
The heated steering wheel control button is located within the Uconnect®system. You can
gain access to the control buttons through the climate screen or the controls screen.
•Presstheheatedsteeringwheelbuttononce to turn the heating element ON.
•Presstheheatedsteeringwheelbuttonasecondtimetoturntheheatingelement
OFF.
Once the heated steering wheel has been turned on, it will operate for up to 80 minutes
before automatically shutting off. The heated steering wheel can shut off early or may not
turn on when the steering wheel is already warm.
NOTE:
On models that are equipped with Remote Start, this feature can be programmed to come
on during a Remote Start through the Uconnect®system. Refer to “Uconnect®Settings”
in “Understanding Your Instrument Panel” in the Owner's Manual on the DVD.
WARNING!
•Personswhoareunabletofeelpaintotheskinbecauseofadvancedage,chronic
illness, diabetes, spinal cord injury, medication, alcohol use, exhaustion, or other
physical conditions must exercise care when using the steering wheel heater. It may
cause burns even at low temperatures, especially if used for long periods.
•Donotplaceanythingonthesteeringwheelthatinsulatesagainstheat,suchasa
blanket or steering wheel covers of any type and material. This may cause the
steering wheel heater to overheat.
GETTING STARTED
36
Page 48 of 236
NOTE:
•WhenyouoverrideandpushtheSET+button or SET-buttons, the new Set Speed will
be the current speed of the vehicle.
•WhenyouusetheSET-button to decelerate, if the engine’s braking power does not
slow the vehicle sufficiently to reach the set speed, the brake system will automatically
slow the vehicle.
•TheACCsystemappliesthebrakedowntoafullstopwhenfollowingatargetvehicle.
If an ACC host vehicle follows a target vehicle to a standstill, the host vehicle will release
the vehicle brakes two seconds after coming to a full stop.
•TheACCsystemmaintainssetspeedwhendrivinguphillanddownhill.However,a
slight speed change on moderate hills is normal. In addition, downshifting may occur
while climbing uphill or descending downhill. This is normal operation and necessary
to maintain set speed. When driving up hill and down hill, the ACC system will cancel
if the braking temperature exceeds normal range (overheated).
Distance Setting (ACC Only)
The specified following distance for ACC can be set by varying the distance setting
between four bars (longest), three bars (long), two bars (medium) and one bar (short).
Using this distance setting and the vehicle speed, ACC calculates and sets the distance to
the vehicle ahead. This distance setting displays in the DID.
•Toincreasethedistancesetting,pushtheDistanceSetting—Increasebuttonand
release. Each time the button is pushed, the distance setting increases by one bar
(longer).
•Todecreasethedistancesetting,pushtheDistanceSetting—Decreasebuttonand
release. Each time the button is pushed, the distance setting decreases by one bar
(shorter).
ACC Operation At Stop
If the ACC system brings your vehicle to a standstill while following a target vehicle, if the
target vehicle starts moving within two seconds of your vehicle coming to a standstill, your
vehicle will resume motion without the need for any driver action.
If the target vehicle does not start moving within two seconds of your vehicle coming to a
standstill, the driver will either have to push the RES (resume) button, or apply the
accelerator pedal to reengage the ACC to the existing Set Speed.
While the ACC system is holding your vehicle at a standstill, if the driver seatbelt is
unbuckled or the driver door is opened, the parking brake will be activated, and the ACC
system will be cancelled.
OPERATING YOUR VEHICLE
46
Page 58 of 236
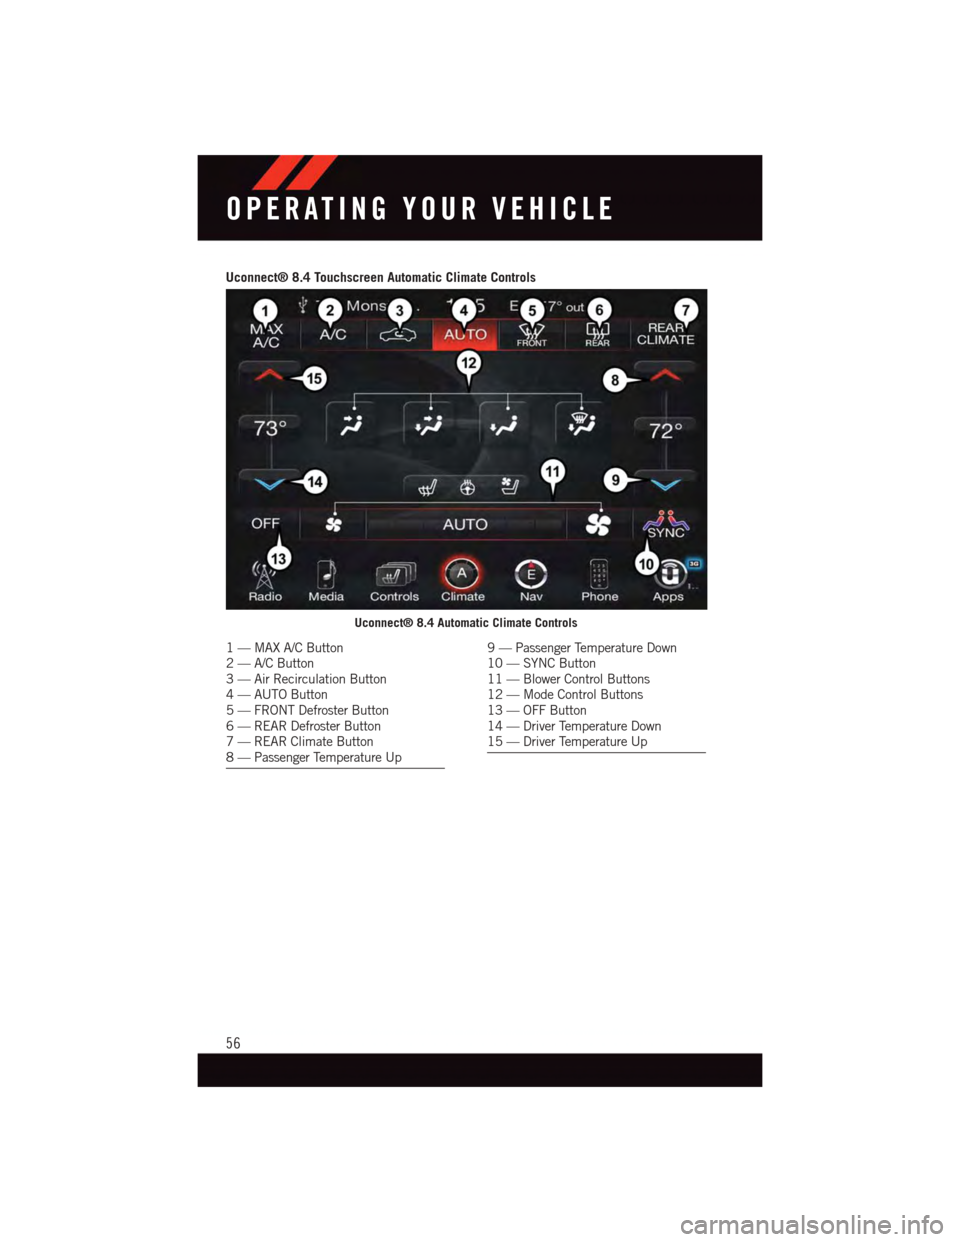
Uconnect® 8.4 Touchscreen Automatic Climate Controls
Uconnect® 8.4 Automatic Climate Controls
1—MAXA/CButton2—A/CButton3—AirRecirculationButton4—AUTOButton5—FRONTDefrosterButton6—REARDefrosterButton7—REARClimateButton8—PassengerTemperatureUp
9—PassengerTemperatureDown10 — SYNC Button11 — Blower Control Buttons12 — Mode Control Buttons13 — OFF Button14 — Driver Temperature Down15 — Driver Temperature Up
OPERATING YOUR VEHICLE
56
Page 60 of 236
Automatic Operation
•PresstheAUTObutton.
•SelectthedesiredtemperaturebypressingtheTemperatureControlbuttons.
•Thesystemwillmaintainthesettemperatureautomatically.
Air Conditioning (A/C)
•IftheairconditioningbuttonispressedwhileinAUTOmode,thesystemwillexitAUTO
mode and stay in A/C. The mode and blower will be set at the closest mode and blower
position that the system was operating in AUTO.
MAX A/C
•MAXA/Csetsthecontrolformaximumcoolingperformance.
•PressandreleasetotogglebetweenMAXA/Candthepriorsettings.Thebuttononthe
touchscreen illuminates when MAX A/C is ON.
•InMAXA/C,theblowerlevelandmodepositioncanbeadjustedtodesireduser
settings. Pressing other settings will cause the MAX A/C operation to switch to the prior
settings and the MAX A/C indicator will turn off.
SYNC Temperature Button
•Pressthe“SYNC”buttonontheUconnect®radio touchscreen to control the driver and
passenger temperatures simultaneously. Press the “SYNC” button on the touchscreen
asecondtimetocontrolthetemperaturesindividually.
Air Recirculation
•UseRecirculationformaximumA/Coperation.
•Forwindowdefogging,turntheRecirculationbuttonoff.
•IftheRecirculationbuttonispressedwhileinfrontdefrostmode,theindicatorwill
flash three times to indicate that recirculation state is not allowed in front defrost mode.
Heated Mirrors
The mirrors are heated to melt frost or ice. This feature is activated whenever you turn on
the rear window defroster.
OPERATING YOUR VEHICLE
58
Page 68 of 236
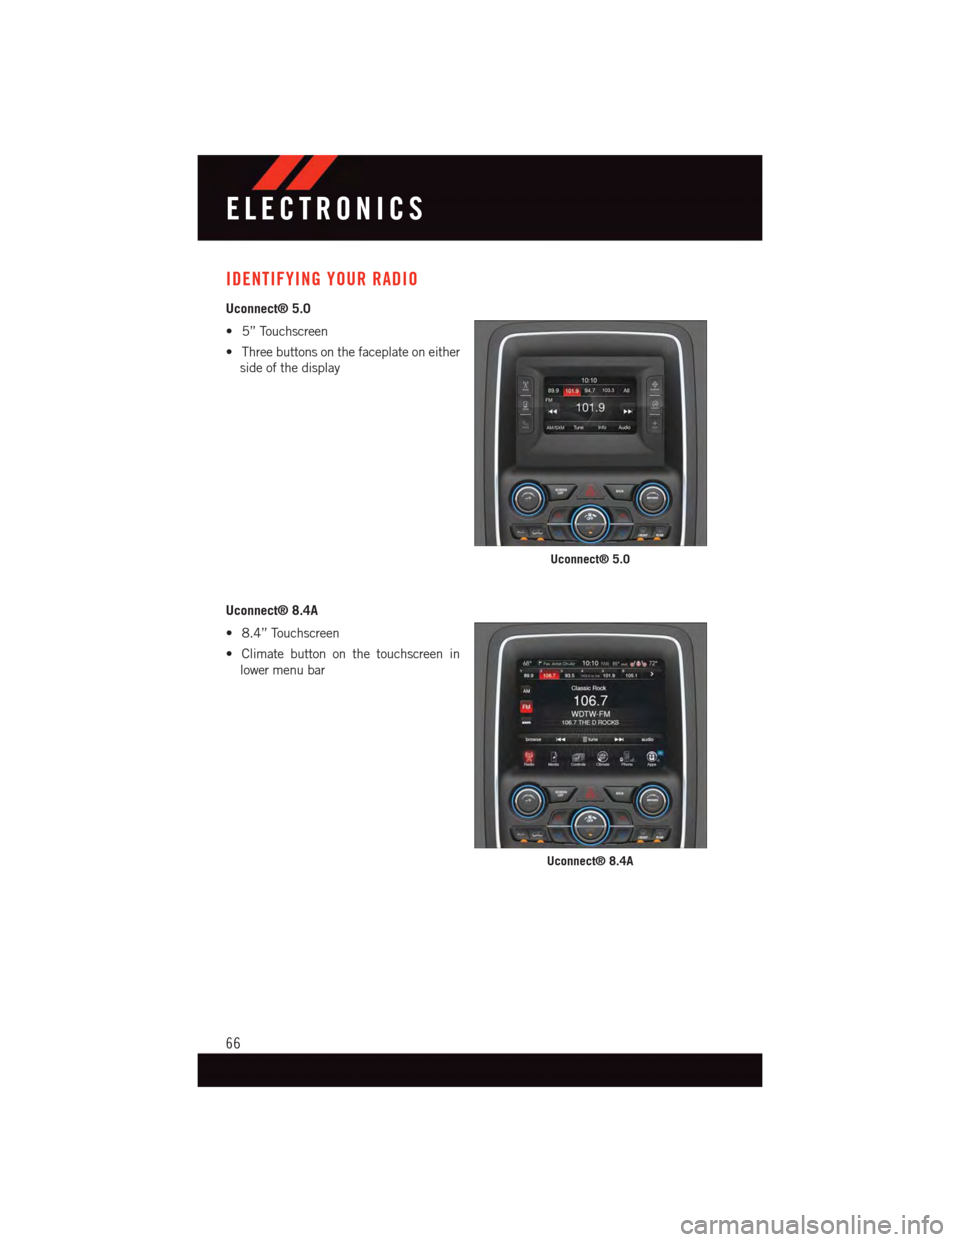
IDENTIFYING YOUR RADIO
Uconnect® 5.0
•5”Touchscreen
•Threebuttonsonthefaceplateoneither
side of the display
Uconnect® 8.4A
•8.4”Touchscreen
•Climatebuttononthetouchscreenin
lower menu bar
Uconnect® 5.0
Uconnect® 8.4A
ELECTRONICS
66
Page 70 of 236
•Receivestolenvehicleassistance,usingGPStechnologytohelpauthoritieslocateyour
vehicle if it is stolen.
•Listentoyourtextmessagesorsendfree-formtextmessageswithyourvoicewhile
keeping your hands on the wheel, using the Voice Texting feature. Requires a cell phone
that supports Bluetooth Message Access Profile (MAP).
•Searchforplacestoeat,shop,relaxandplaywithYelp®,usingyourvoiceoron-screen
menu. Then navigate to them (navigation standard on Uconnect®8.4AN, optional on
Uconnect®8.4A).
•GetoperatorassistanceusingtheASSISTbuttononyourinteriorrearviewmirror.
Before you drive, familiarize yourself with the easy-to-use Uconnect® Access.
1. The ASSIST and 9-1-1 buttons are located on your rearview mirror. The ASSIST button
is used for contacting Roadside Assistance, Vehicle Care and Uconnect®Care. The
9-1-1 button connects you to emergency services.
NOTE:
Vehicles sold in Canada and Mexico DO NOT have 9-1-1 Call system capabilities. 9-1-1
or other emergency line operators in Canada and Mexico may not answer or respond to
9-1-1 system calls.
2. The Uconnect®“Apps” button on the menu bar at the bottom right corner of the radio
touchscreen. This is where you can begin your registration process, manage your Apps
and purchase WiFi on demand.
3. The Uconnect®Voice Command and Uconnect®Phone buttons are located on the left
side of your steering wheel. These buttons let you use your voice to give commands,
make phone calls, send and receive text messages hands-free, enter navigation
destinations, and control your radio and media devices.
Included Trial Period For New Vehicles
Yo u r n e w v e h i c l e m a y c o m e w i t h a n i n c l u d e d t r i a l p e r i o d f o r u s e o f t h e U c o n n e c t®Access
Services starting at the date of vehicle purchase (date based on vehicle sales notification
from your dealer).To activate the trial, you must first register with Uconnect® Access.
After the trial period, if you wish to continue your Uconnect®Access Services you can
choose to purchase a subscription.
Features And Packages
•After the trial period, you can subscribe to continue your service by visiting the Uconnect®
Store located within the Mopar Owner Connect websitemoparownerconnect.com. If you
need assistance, U.S. residents can call Uconnect®Care at 1-855-792-4241.
•Forthelatestinformationonpackagesandpricinginformation:U.S.residentsvisit
DriveUconnect.com.
ELECTRONICS
68