manual radio set DODGE DURANGO 2015 3.G User Guide
[x] Cancel search | Manufacturer: DODGE, Model Year: 2015, Model line: DURANGO, Model: DODGE DURANGO 2015 3.GPages: 236, PDF Size: 35.01 MB
Page 31 of 236
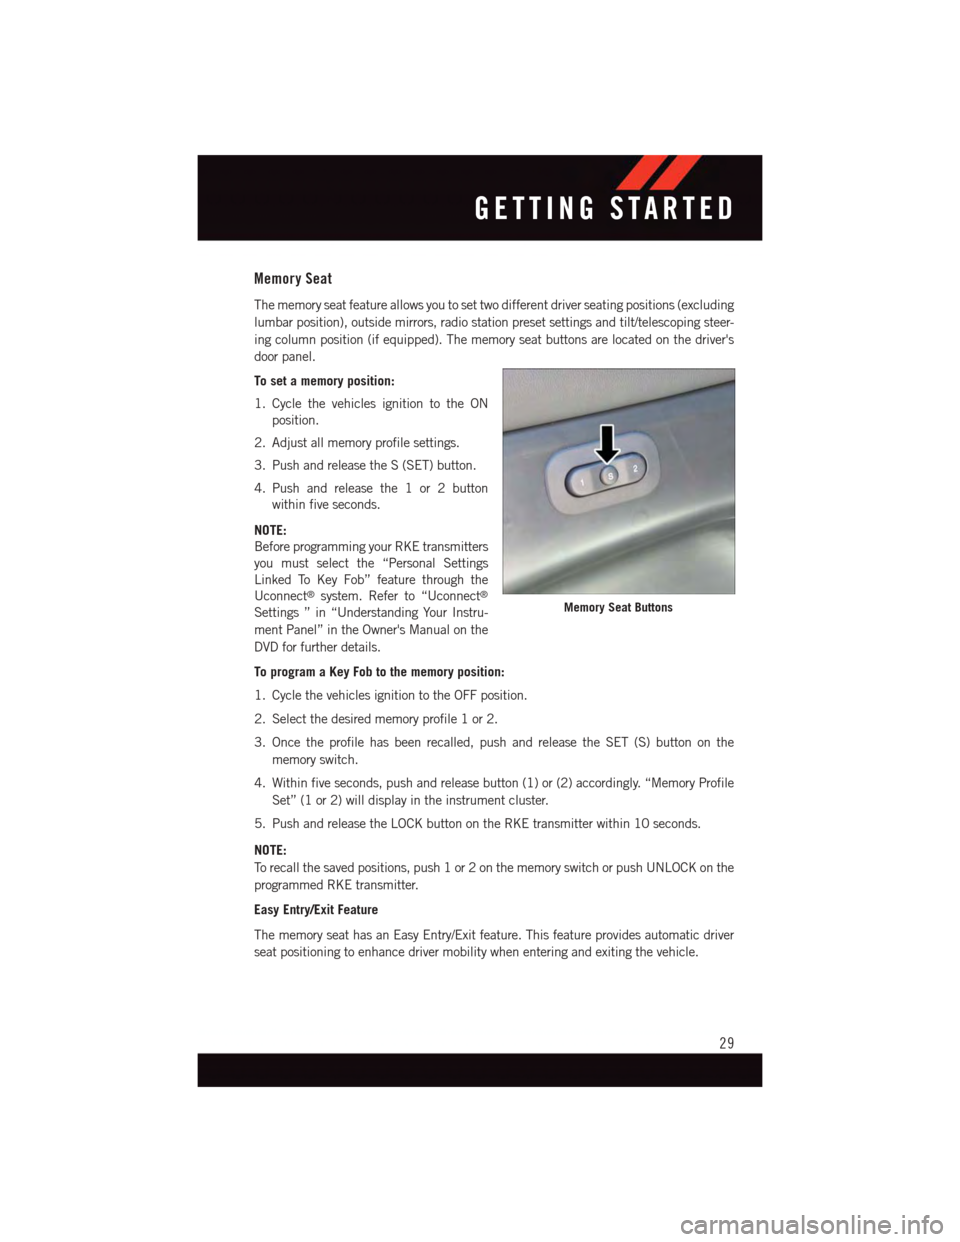
Memory Seat
The memory seat feature allows you to set two different driver seating positions (excluding
lumbar position), outside mirrors, radio station preset settings and tilt/telescoping steer-
ing column position (if equipped). The memory seat buttons are located on the driver's
door panel.
To set a memory position:
1. Cycle the vehicles ignition to the ON
position.
2. Adjust all memory profile settings.
3. Push and release the S (SET) button.
4. Push and release the 1 or 2 button
within five seconds.
NOTE:
Before programming your RKE transmitters
you must select the “Personal Settings
Linked To Key Fob” feature through the
Uconnect®system. Refer to “Uconnect®
Settings ” in “Understanding Your Instru-
ment Panel” in the Owner's Manual on the
DVD for further details.
To program a Key Fob to the memory position:
1. Cycle the vehicles ignition to the OFF position.
2. Select the desired memory profile 1 or 2.
3. Once the profile has been recalled, push and release the SET (S) button on the
memory switch.
4. Within five seconds, push and release button (1) or (2) accordingly. “Memory Profile
Set” (1 or 2) will display in the instrument cluster.
5. Push and release the LOCK button on the RKE transmitter within 10 seconds.
NOTE:
To r e c a l l t h e s a v e d p o s i t i o n s , p u s h 1 o r 2 o n t h e m e m o r y s w i t c h o r p u s h U N L O C K o n t h e
programmed RKE transmitter.
Easy Entry/Exit Feature
The memory seat has an Easy Entry/Exit feature. This feature provides automatic driver
seat positioning to enhance driver mobility when entering and exiting the vehicle.
Memory Seat Buttons
GETTING STARTED
29
Page 44 of 236
Instrument Panel Dimmer
•Rotatethedimmercontroltotheextremebottompositiontofullydimtheinstrument
panel lights and prevent the interior lights from illuminating when a door is opened.
•Rotatethedimmercontroluptoincreasethebrightnessoftheinstrumentpanelwhen
the parking lights or headlights are on.
•Rotatethedimmercontroluptothenextdetentpositiontofullybrightentheodometer
and radio when the parking lights or headlights are on.
•Rotatethedimmercontroluptothelastdetentpositiontoturnontheinteriorlighting.
If your vehicle is equipped with a touchscreen, the dimming is programmable through the
Uconnect®system. Refer to “Uconnect®Settings ” in “Understanding Your Instrument
Panel” in the Owner's Manual on the DVD for further details.
ELECTRONIC SPEED CONTROL
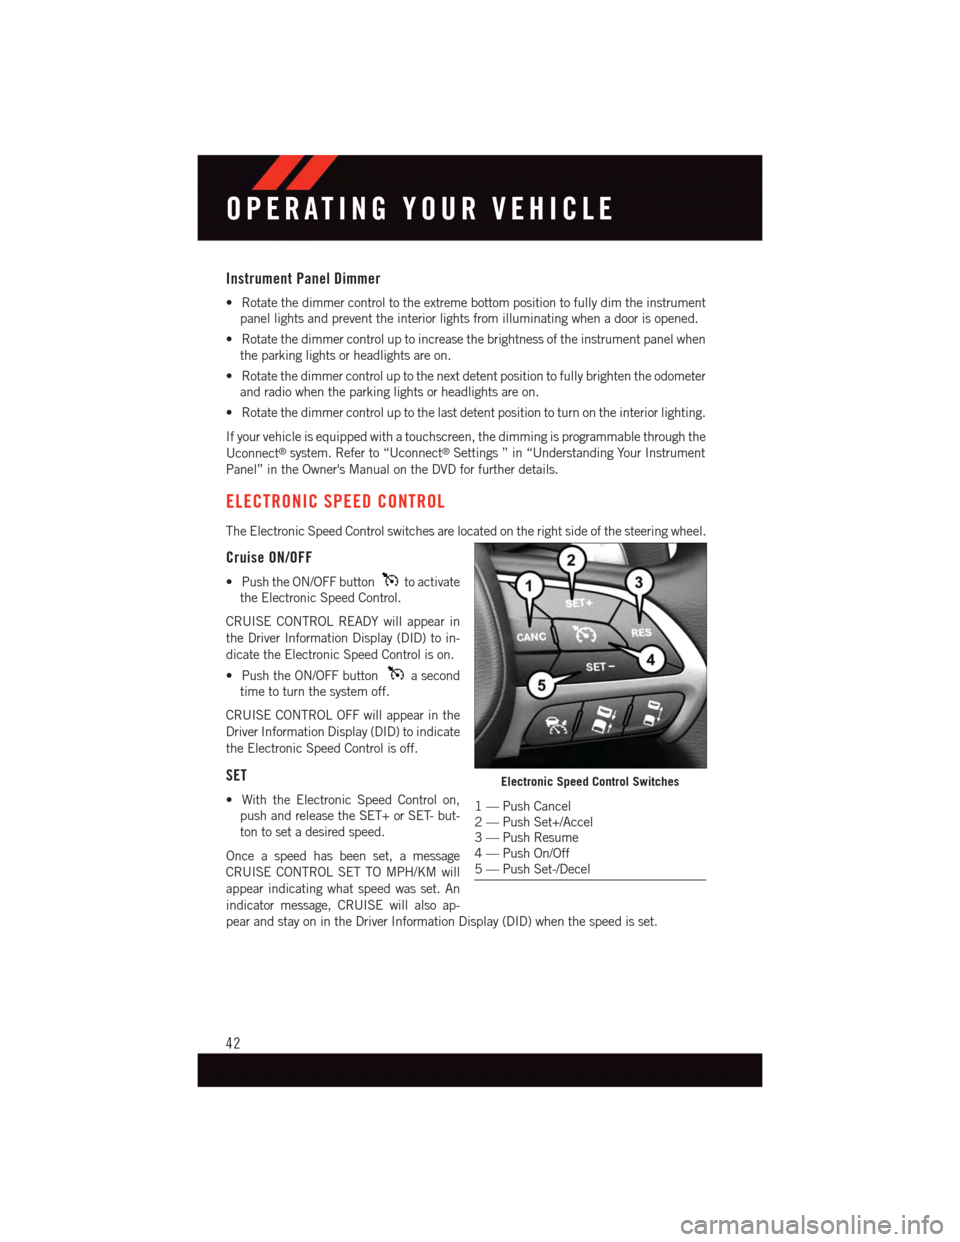
The Electronic Speed Control switches are located on the right side of the steering wheel.
Cruise ON/OFF
•PushtheON/OFFbuttonto activate
the Electronic Speed Control.
CRUISE CONTROL READY will appear in
the Driver Information Display (DID) to in-
dicate the Electronic Speed Control is on.
•PushtheON/OFFbuttonasecond
time to turn the system off.
CRUISE CONTROL OFF will appear in the
Driver Information Display (DID) to indicate
the Electronic Speed Control is off.
SET
•WiththeElectronicSpeedControlon,
push and release the SET+ or SET- but-
ton to set a desired speed.
Once a speed has been set, a message
CRUISE CONTROL SET TO MPH/KM will
appear indicating what speed was set. An
indicator message, CRUISE will also ap-
pear and stay on in the Driver Information Display (DID) when the speed is set.
Electronic Speed Control Switches
1—PushCancel2—PushSet+/Accel3—PushResume4—PushOn/Off5—PushSet-/Decel
OPERATING YOUR VEHICLE
42
Page 99 of 236
Setting The Time
Model 8.4AN synchronizes time automatically via GPS, so it should not require any time
adjustment. If you do need to set the time manually, follow the instructions below for
Model 8.4A.
1. Turn the unit on, then press the “Time Display” at the top of the screen. Press “Yes.”
NOTE:
If the time is not displayed at the top of the screen, press the “Controls” or the “Apps”
button on the touchscreen, then the “Settings” button on the touchscreen. In the Settings
screen, press the “Clock” button on the touchscreen.
2. Press “+” or “–” next to Set Time Hours and Set Time Minutes to adjust the time.
3. If these features are not available, uncheck the Sync with GPS box.
4. Press “X” to save your settings and exit out of the Clock Setting screen.
Audio Settings
To a d j u s t t h e A u d i o s e t t i n g s :
1. Press the “Media” or “Radio” button on the touchscreen.
2. Press the “Audio” button on the touchscreen to activate the Audio settings screen to
adjust Balance/Fade, Equalizer and Speed Adjusted Volume.
3. You can return to the Radio screen by pressing the “X” located at the top right.
Balance/Fade
To a d j u s t t h e B a l a n c e / F a d e s e t t i n g s :
1. Press the “Media” or “Radio” button on the touchscreen.
2. Press the “Audio” button on the touchscreen to activate the Audio settings screen to
adjust Balance/Fade, Equalizer and Speed Adjusted Volume.
3. Press the “Balance/Fade” button on the touchscreen to Balance audio between the
front speakers or fade the audio between the rear and front speakers.
4. Pressing the “Front,” “Rear,” “Left” or “Right” button on the touchscreens or press
and drag the Speaker Icon to adjust the Balance/Fade.
ELECTRONICS
97
Page 127 of 236
Setting The Time
Model 8.4AN synchronizes time automatically via GPS, so it should not require any time
adjustment. If you do need to set the time manually, follow the instructions below for
Model 8.4A.
1. Turn the unit on, then press the “Time Display” at the top of the screen. Press “Yes.”
NOTE:
If the time is not displayed at the top of the screen, press the “Controls” or the “Apps”
button on the touchscreen, then the “Settings” button on the touchscreen. In the Settings
screen, press the “Clock” button on the touchscreen.
2. Press “+” or “–” next to Set Time Hours and Set Time Minutes to adjust the time.
3. If these features are not available, uncheck the Sync with GPS box.
4. Press “X” to save your settings and exit out of the Clock Setting screen.
Audio Settings
To a d j u s t t h e A u d i o s e t t i n g s :
1. Press the “Media” or “Radio” button on the touchscreen.
2. Press the “Audio” button on the touchscreen to activate the Audio settings screen to
adjust Balance/Fade, Equalizer and Speed Adjusted Volume.
3. You can return to the Radio screen by pressing the “X” located at the top right.
Balance/Fade
To a d j u s t t h e B a l a n c e / F a d e s e t t i n g s :
1. Press the “Media” or “Radio” button on the touchscreen.
2. Press the “Audio” button on the touchscreen to activate the Audio settings screen to
adjust Balance/Fade, Equalizer and Speed Adjusted Volume.
3. Press the “Balance/Fade” button on the touchscreen to Balance audio between the
front speakers or fade the audio between the rear and front speakers.
4. Pressing the “Front,” “Rear,” “Left” or “Right” button on the touchscreens or press
and drag the Speaker Icon to adjust the Balance/Fade.
Equalizer
To a d j u s t t h e e q u a l i z e r s e t t i n g s :
1. Press the “Media” or “Radio” button on the touchscreen.
2. Press the “Audio” button on the touchscreen to activate the Audio settings screen to
adjust Balance/Fade, Equalizer and Speed Adjusted Volume.
3. Press the “Equalizer” button on the touchscreen to activate the Equalizer screen.
4. Press the “+” or “–” button on the touchscreens, or by pressing and dragging over the
“level bar” for each of the equalizer bands. The level value, which spans between plus
or minus 9, is displayed at the bottom of each of the Bands.
ELECTRONICS
125
Page 145 of 236
Phonebook
The Uconnect®system will automatically sync your phonebook from your paired phone, if
this feature is supported by your phone. Phonebook contacts are updated each time that
the phone is connected. If your phone book entries do not appear, check the settings on
your phone. Some phones require you to enable this feature manually.
•YourphonebookcanbebrowsedontheUconnect®system touchscreen, but editing
can only be done on your phone. To browse, press the “Phone” button on the
touchscreen, then the “Phonebook” button on the touchscreen.
Favorite phonebook entries can be saved as Favorites for quicker access. Favorites are
shown at the top of the main phone screen.
Voice Command Tips
•Speakingcompletenames(i.e;CallJohnDoevs.CallJohn)willresultingreatersystem
accuracy.
•Youcan“link”commandstogetherforfasterresults.Say“CallJohnDoe,mobile,”for
example.
•Ifyouarelisteningtoavailablevoicecommandoptions,youdonothavetolistentothe
entire list. When you hear the command that you need, push thebutton on the
steering wheel, wait for the beep and say your command.
Changing The Volume
•StartadialoguebypushingthePhonebutton,thensayacommandforexample
-"Help".
•UsetheradioVOLUME/MUTErotaryknobtoadjustthevolumetoacomfortablelevel
while the Uconnect®system is speaking. Please note the volume setting for Uconnect®
is different than the audio system.
NOTE:
To a c c e s s h e l p , p u s h t h e U c o n n e c t®Phonebutton on the steering wheel and say
"help." Press the display or press either the Phoneor VRbutton and say
"cancel" to cancel the help session.
Incoming Text Messages
After pairing your Uconnect®system with a Bluetooth®enabled mobile device with the
Message Access Profile (MAP), the Uconnect®system can announce a new incoming text
message and read it to you over the vehicle’s audio system.
ELECTRONICS
143
Page 149 of 236
•Verifyyouareselecting“Uconnect”inthediscoveredBluetooth®devices on your
mobile phone.
•Ifyourvehiclesystemgeneratesapincodethedefaultis0000.
Mobile Phonebook didn’t download:
•Check“Donotaskagain,”thenacceptthe“phonebookdownload”requestonyour
mobile phone.
•Upto5,000contactnameswithfournumberspercontactwilltransfertothe
Uconnect®8.4A/8.4AN system phonebook.
•Upto2,000contactnameswithsixnumberspercontactwilltransfertothe
Uconnect®5.0 system phonebook.
Te x t m e s s a g i n g w o n ’ t w o r k :
•Check“Donotaskagain,”thenacceptthe“connecttoyourmessages”requestonyour
mobile phone.
•VerifythatyourmobilephonehastheBluetooth®feature (Message Access Profile).
Can’t make a conference call:
•CDMA(Code-DivisionMultipleAccess)carriersdonotsupportconferencecalling.
Refer to your mobile phone user’s manual for further information.
Making calls while connected to AUX:
•Plugging in your mobile phone to AUX while connected to Bluetooth®will disable Hands-
Free Calling. Do not make calls while your mobile phone is plugged into the AUX jack.
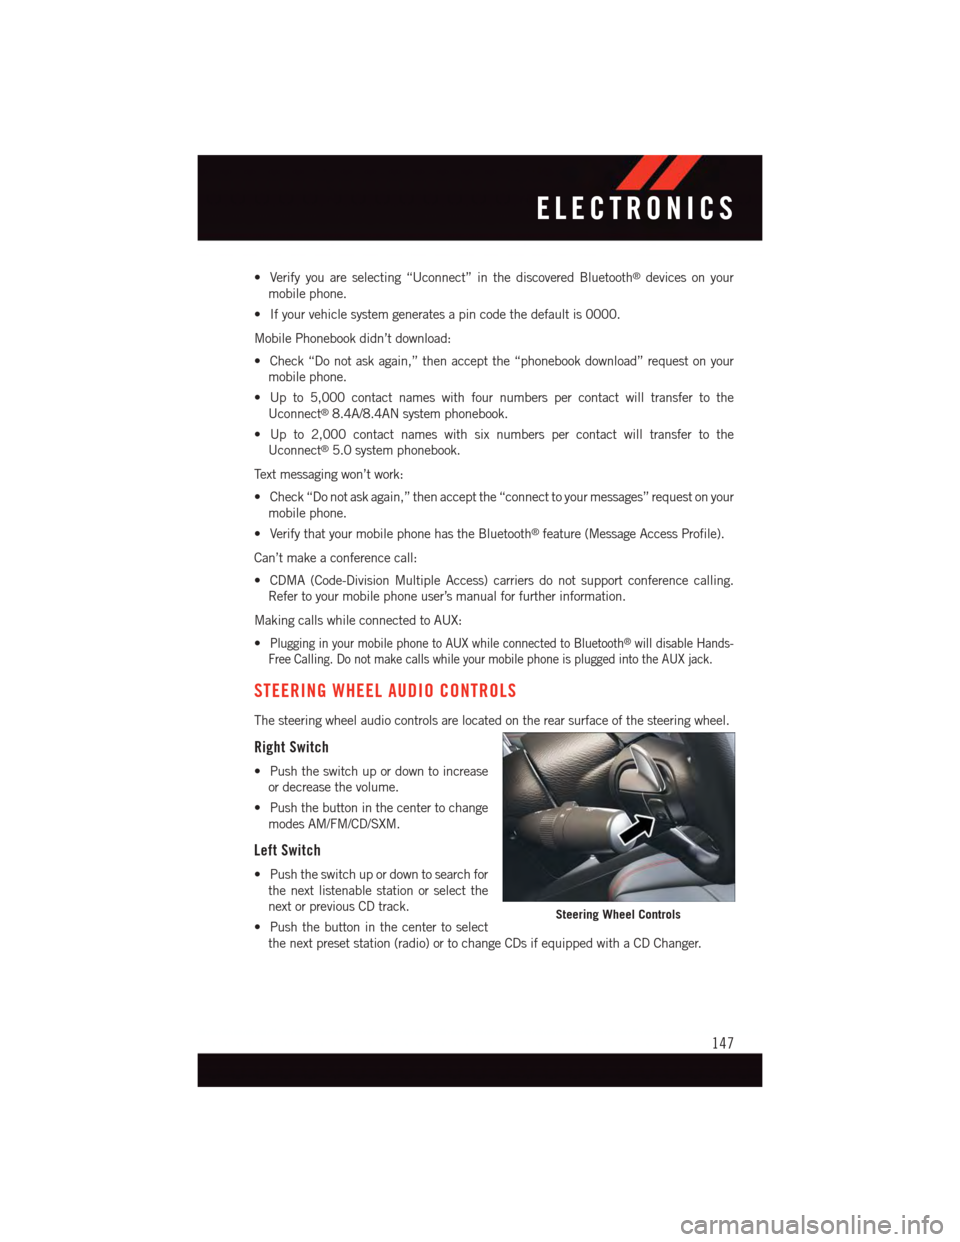
STEERING WHEEL AUDIO CONTROLS
The steering wheel audio controls are located on the rear surface of the steering wheel.
Right Switch
•Pushtheswitchupordowntoincrease
or decrease the volume.
•Pushthebuttoninthecentertochange
modes AM/FM/CD/SXM.
Left Switch
•Pushtheswitchupordowntosearchfor
the next listenable station or select the
next or previous CD track.
•Pushthebuttoninthecentertoselect
the next preset station (radio) or to change CDs if equipped with a CD Changer.
Steering Wheel Controls
ELECTRONICS
147