DODGE DURANGO 2017 3.G Owners Manual
Manufacturer: DODGE, Model Year: 2017, Model line: DURANGO, Model: DODGE DURANGO 2017 3.GPages: 584, PDF Size: 5.14 MB
Page 541 of 584
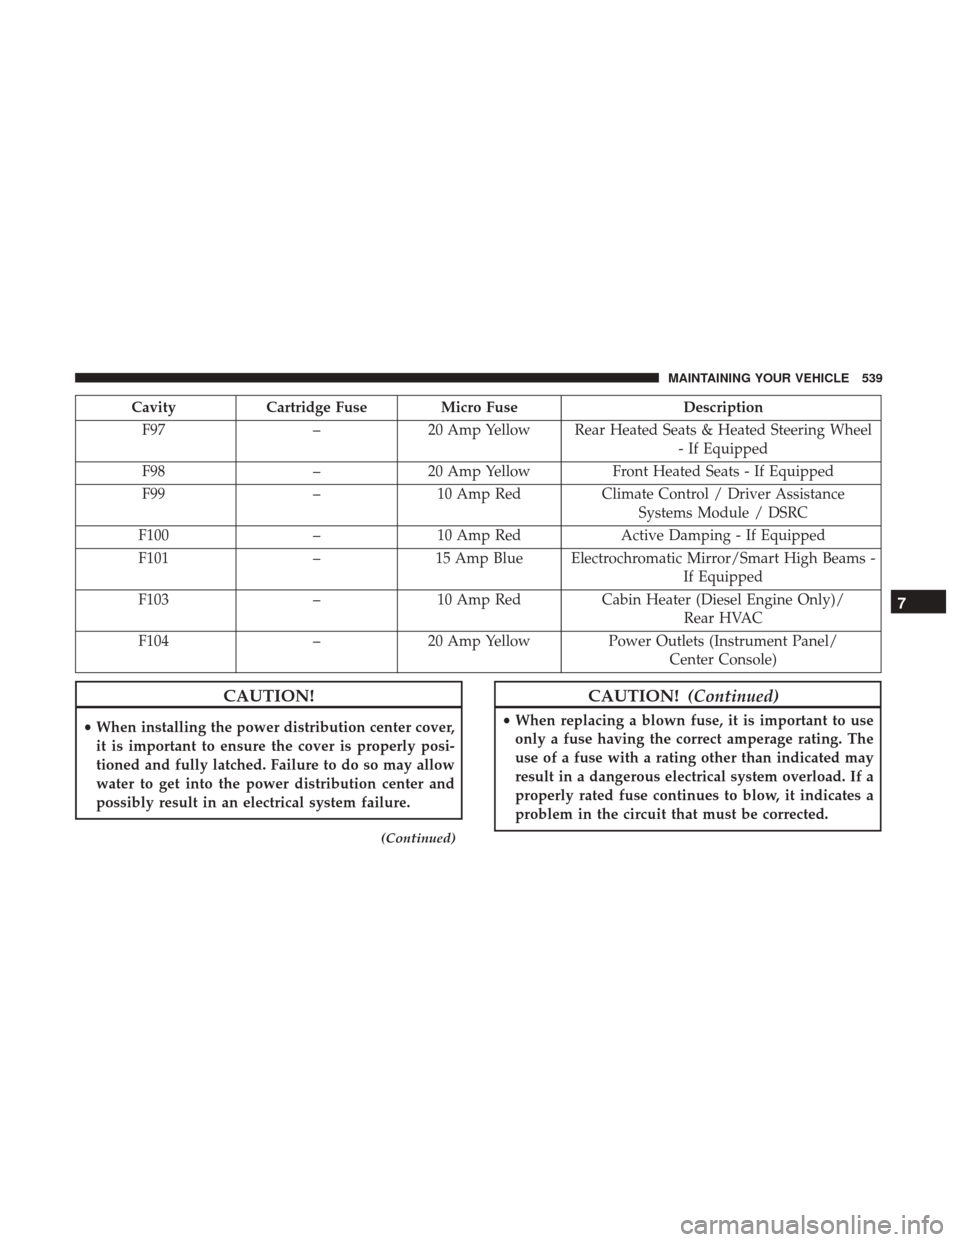
CavityCartridge Fuse Micro Fuse Description
F97 –20 Amp Yellow Rear Heated Seats & Heated Steering Wheel
- If Equipped
F98 –20 Amp Yellow Front Heated Seats - If Equipped
F99 –10 Amp Red Climate Control / Driver Assistance
Systems Module / DSRC
F100 –10 Amp Red Active Damping - If Equipped
F101 –15 Amp Blue Electrochromatic Mirror/Smart High Beams -
If Equipped
F103 –10 Amp Red Cabin Heater (Diesel Engine Only)/
Rear HVAC
F104 –20 Amp Yellow Power Outlets (Instrument Panel/
Center Console)
CAUTION!
•When installing the power distribution center cover,
it is important to ensure the cover is properly posi-
tioned and fully latched. Failure to do so may allow
water to get into the power distribution center and
possibly result in an electrical system failure.
(Continued)
CAUTION! (Continued)
•When replacing a blown fuse, it is important to use
only a fuse having the correct amperage rating. The
use of a fuse with a rating other than indicated may
result in a dangerous electrical system overload. If a
properly rated fuse continues to blow, it indicates a
problem in the circuit that must be corrected.
7
MAINTAINING YOUR VEHICLE 539
Page 542 of 584
VEHICLE STORAGE
If you are leaving your vehicle dormant for more than 21
days you may want to take steps to protect your battery.
You may:
•Disconnect the negative cable from the battery. •
Anytime you store your vehicle, or keep it out of service
(i.e. vacation) for two weeks or more, run the air
conditioning system at idle for about five minutes in the
fresh air and high blower setting. This will ensure
adequate system lubrication to minimize the possibility
of compressor damage when the system is started again.
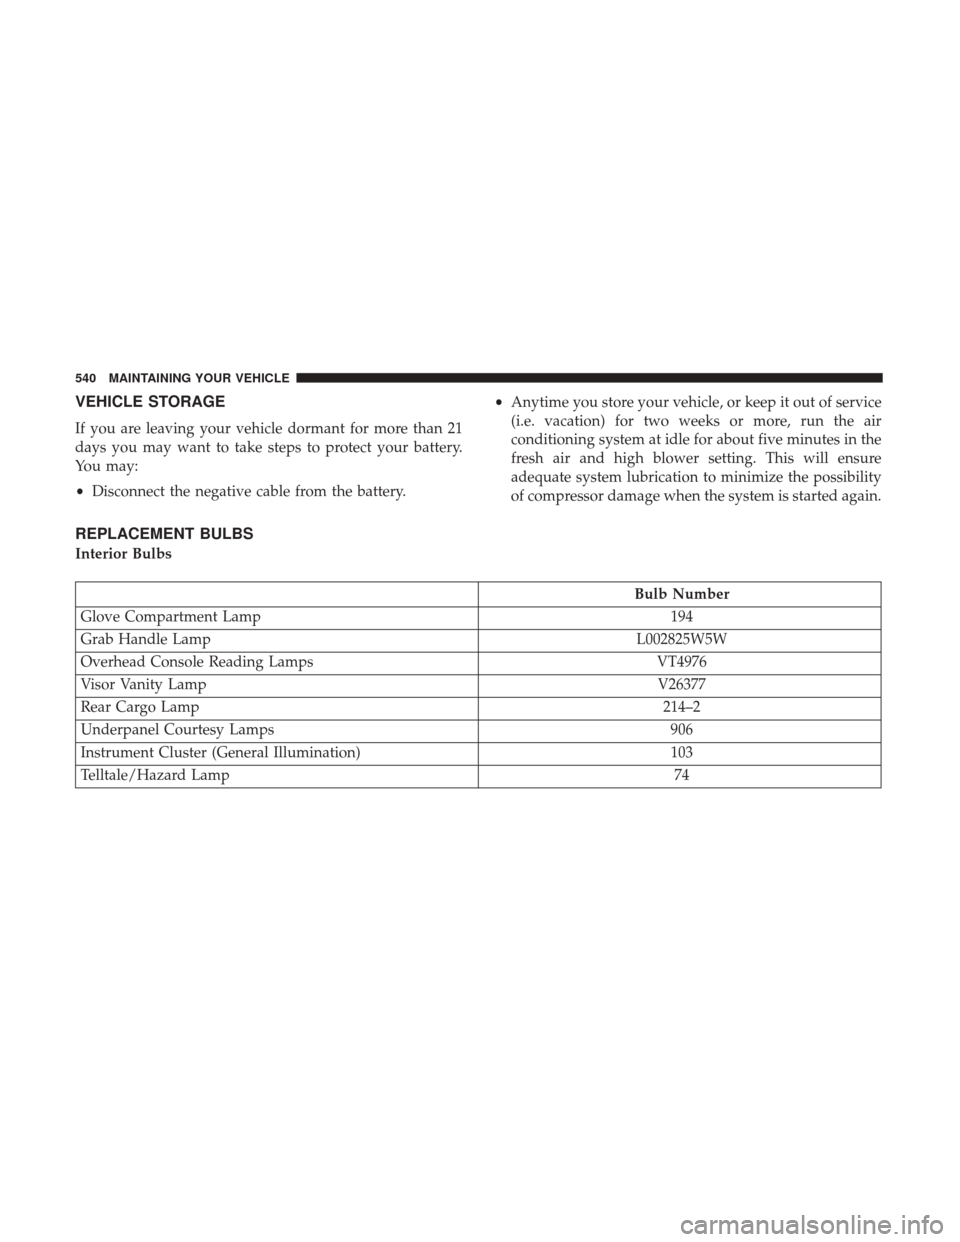
REPLACEMENT BULBS
Interior Bulbs
Bulb Number
Glove Compartment Lamp 194
Grab Handle Lamp L002825W5W
Overhead Console Reading Lamps VT4976
Visor Vanity Lamp V26377
Rear Cargo Lamp 214–2
Underpanel Courtesy Lamps 906
Instrument Cluster (General Illumination) 103
Telltale/Hazard Lamp 74
540 MAINTAINING YOUR VEHICLE
Page 543 of 584
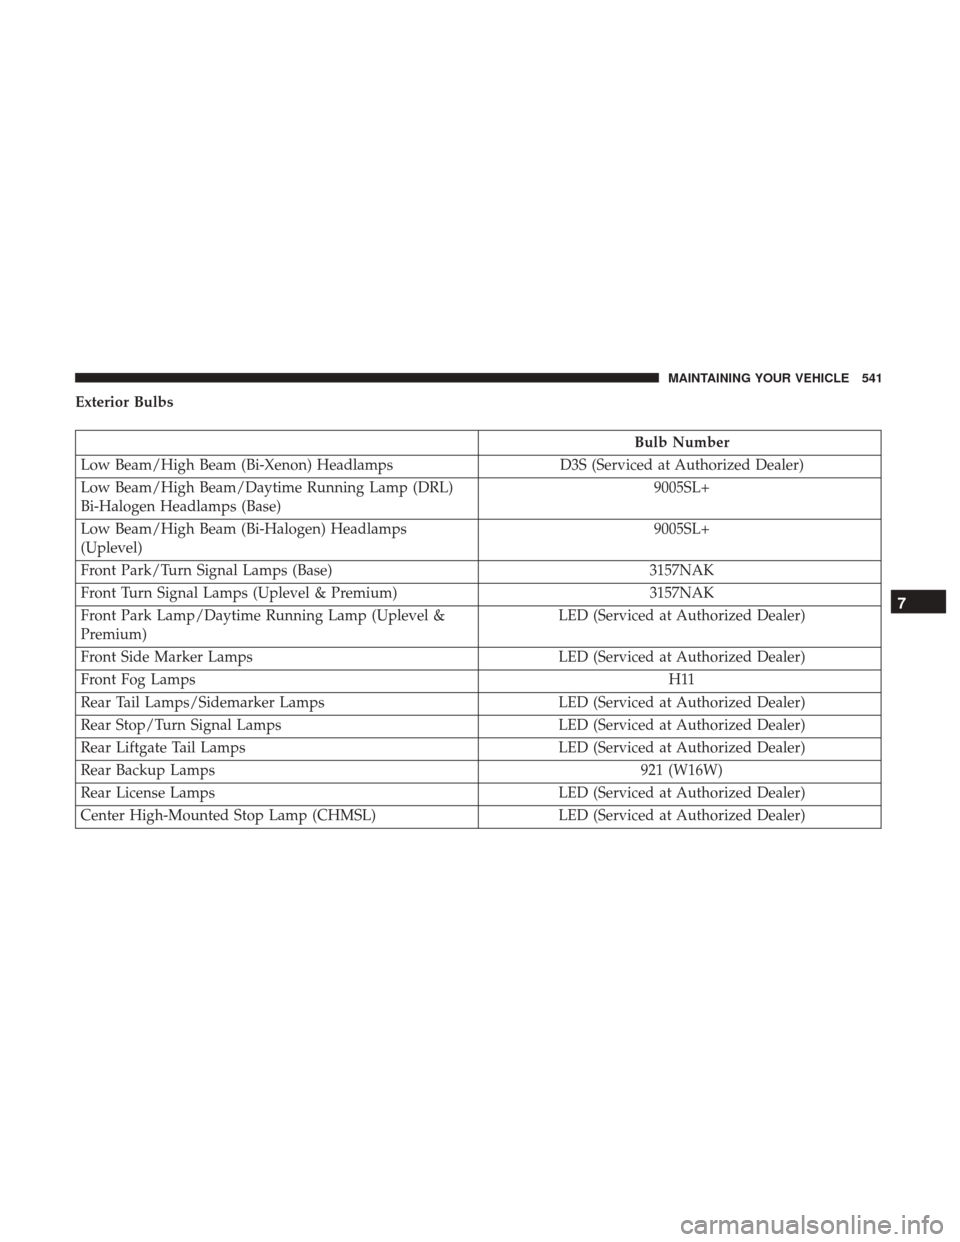
Exterior Bulbs
Bulb Number
Low Beam/High Beam (Bi-Xenon) Headlamps D3S (Serviced at Authorized Dealer)
Low Beam/High Beam/Daytime Running Lamp (DRL)
Bi-Halogen Headlamps (Base) 9005SL+
Low Beam/High Beam (Bi-Halogen) Headlamps
(Uplevel) 9005SL+
Front Park/Turn Signal Lamps (Base) 3157NAK
Front Turn Signal Lamps (Uplevel & Premium) 3157NAK
Front Park Lamp/Daytime Running Lamp (Uplevel &
Premium) LED (Serviced at Authorized Dealer)
Front Side Marker Lamps LED (Serviced at Authorized Dealer)
Front Fog Lamps H11
Rear Tail Lamps/Sidemarker Lamps LED (Serviced at Authorized Dealer)
Rear Stop/Turn Signal Lamps LED (Serviced at Authorized Dealer)
Rear Liftgate Tail Lamps LED (Serviced at Authorized Dealer)
Rear Backup Lamps 921 (W16W)
Rear License Lamps LED (Serviced at Authorized Dealer)
Center High-Mounted Stop Lamp (CHMSL) LED (Serviced at Authorized Dealer)
7
MAINTAINING YOUR VEHICLE 541
Page 544 of 584
BULB REPLACEMENT
NOTE:Lens fogging can occur under certain atmospheric
conditions. This will usually clear as atmospheric condi-
tions change to allow the condensation to change back into
a vapor. Turning the lamps on will usually accelerate the
clearing process.
High Intensity Discharge Headlamps (Bi-Xenon) —
If Equipped
The headlamps are a type of high voltage discharge tube.
High voltage can remain in the circuit even with the
headlamp switch off. Because of this, you should not
attempt to service a headlamp bulb yourself. If a head-
lamp bulb fails, take your vehicle to an authorized dealer
for service.
WARNING!
A transient high voltage occurs at the bulb sockets of
High Intensity Discharge (HID) headlamps when the
headlamp switch is turned ON. It may cause serious
electrical shock or electrocution if not serviced prop-
erly. See your authorized dealer for service. NOTE:
On vehicles equipped with High Intensity Dis-
charge (HID) headlamps, when the headlamps are turned
on, there is a blue hue to the lamps. This diminishes and
becomes more white after approximately 10 seconds, as the
system charges.
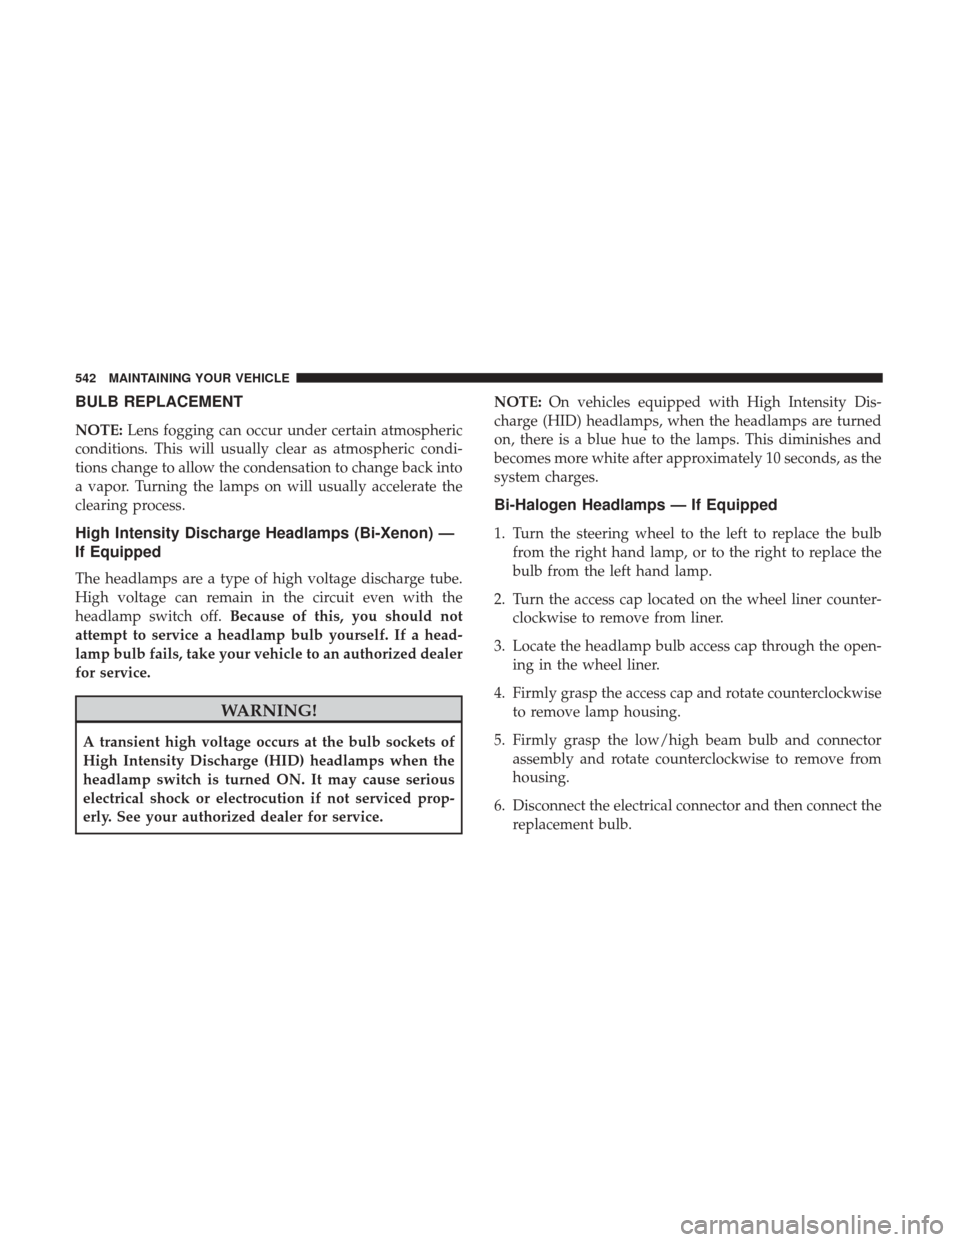
Bi-Halogen Headlamps — If Equipped
1. Turn the steering wheel to the left to replace the bulb from the right hand lamp, or to the right to replace the
bulb from the left hand lamp.
2. Turn the access cap located on the wheel liner counter- clockwise to remove from liner.
3. Locate the headlamp bulb access cap through the open- ing in the wheel liner.
4. Firmly grasp the access cap and rotate counterclockwise to remove lamp housing.
5. Firmly grasp the low/high beam bulb and connector assembly and rotate counterclockwise to remove from
housing.
6. Disconnect the electrical connector and then connect the replacement bulb.
542 MAINTAINING YOUR VEHICLE
Page 545 of 584
7. Install the bulb and connector assembly into the head-lamp housing and rotate clockwise to lock in place.
8. Install the bulb access cap in the headlamp housing and rotate clockwise to lock it in place.
9. Install the access cap in the wheel liner and rotate clockwise to lock it in place.
CAUTION!
Do not touch the new bulb with your fingers. Oil
contamination will severely shorten bulb life. If the
bulb comes in contact with any oily surface, clean the
bulb with rubbing alcohol.
Front Turn Signal
1. Open the hood.
2. Turn the turn signal bulb one–quarter turn counter-clockwise to remove from housing.
3. Disconnect the electrical connector and replace the bulb.
CAUTION!
Do not touch the new bulb with your fingers. Oil
contamination will severely shorten bulb life. If the
bulb comes in contact with any oily surface, clean the
bulb with rubbing alcohol.
7
MAINTAINING YOUR VEHICLE 543
Page 546 of 584
Front Fog Lamps
1. Reach through the cutout in the splash shield and rotatethe bulb’s electrical connector one-quarter turn counter-
clockwise and remove it from the fog lamp housing.
2. Remove the bulb from the connector and install the replacement bulb.
3. Install the bulb and connector assembly into the fog lamp housing and rotate the connector one-quarter turn
clockwise to lock it in place.
CAUTION!
•Do not touch the new bulb with your fingers. Oil
contamination will severely shorten bulb life. If the
bulb comes in contact with any oily surface, clean the
bulb with rubbing alcohol.
• Always use the correct bulb size and type for replace-
ment. An incorrect bulb size or type may overheat
and cause damage to the lamp, the socket or the lamp
wiring.
Rear Tail, Stop And Turn Signal Lamps
The rear tail, stop, and turn signal lamps are LED. See your
authorized dealer for replacement.
Rear Liftgate Mounted Back-up Lamps
1. Raise the liftgate.
2. Use a fiber stick or flat blade screw driver to pry the lower trim from the liftgate.
3. Back-up lamps are now visible. Rotate socket(s) counter clockwise.
4. Remove/replace bulb(s).
5. Reinstall the socket(s).
6. Reverse process to reinstall the liftgate trim.
Center High-Mounted Stop Lamp (CHMSL)
The center high-mounted stop lamp is an LED assembly.
See your authorized dealer for replacement.
Rear License Lamp
The rear license lamps are LED. See your authorized dealer
for replacement.
544 MAINTAINING YOUR VEHICLE
Page 547 of 584
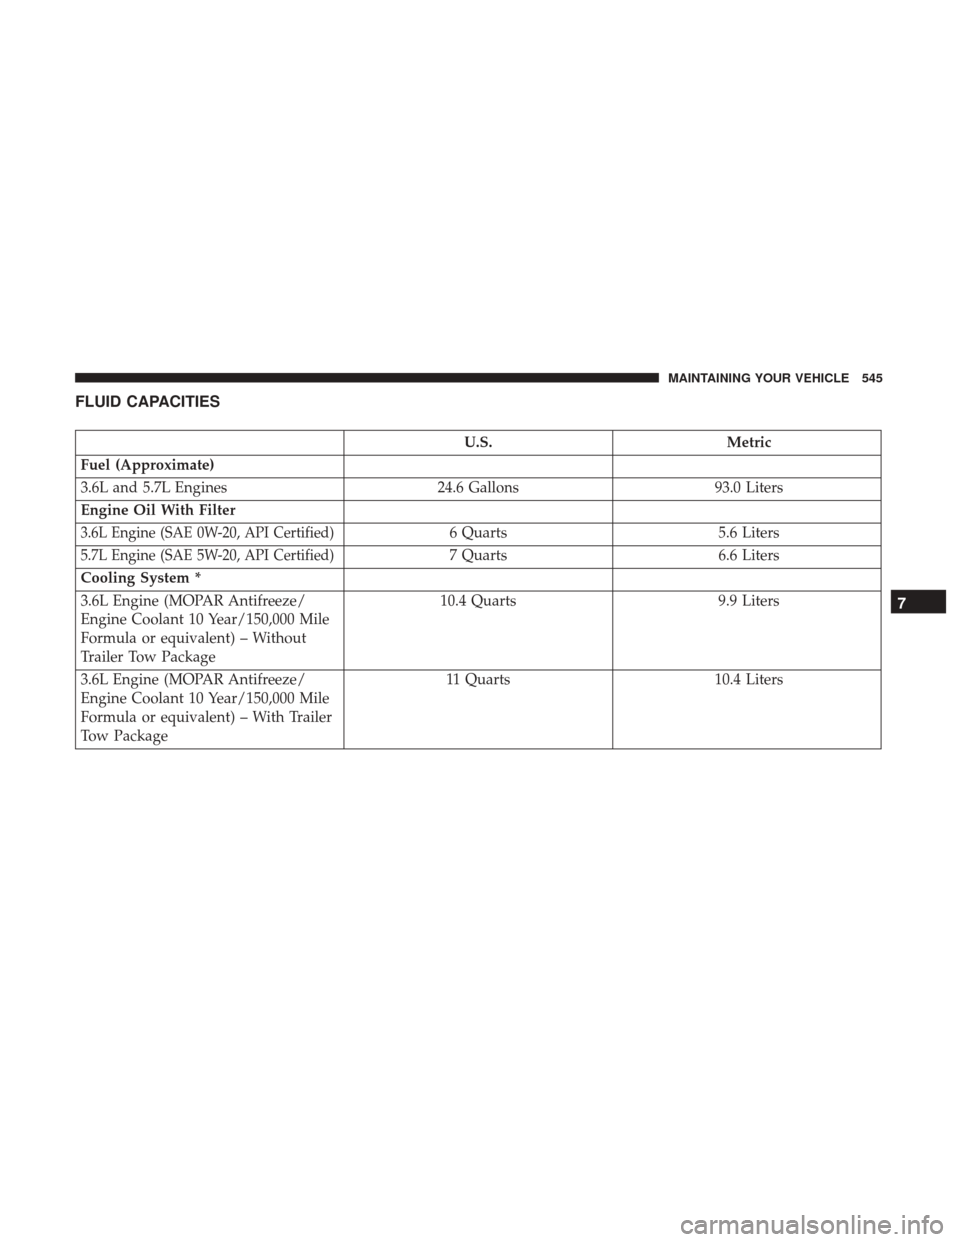
FLUID CAPACITIES
U.S.Metric
Fuel (Approximate)
3.6L and 5.7L Engines 24.6 Gallons93.0 Liters
Engine Oil With Filter
3.6L Engine (SAE 0W-20, API Certified)6 Quarts 5.6 Liters
5.7L Engine (SAE 5W-20, API Certified)7 Quarts6.6 Liters
Cooling System *
3.6L Engine (MOPAR Antifreeze/
Engine Coolant 10 Year/150,000 Mile
Formula or equivalent) – Without
Trailer Tow Package 10.4 Quarts
9.9 Liters
3.6L Engine (MOPAR Antifreeze/
Engine Coolant 10 Year/150,000 Mile
Formula or equivalent) – With Trailer
Tow Package 11 Quarts
10.4 Liters
7
MAINTAINING YOUR VEHICLE 545
Page 548 of 584
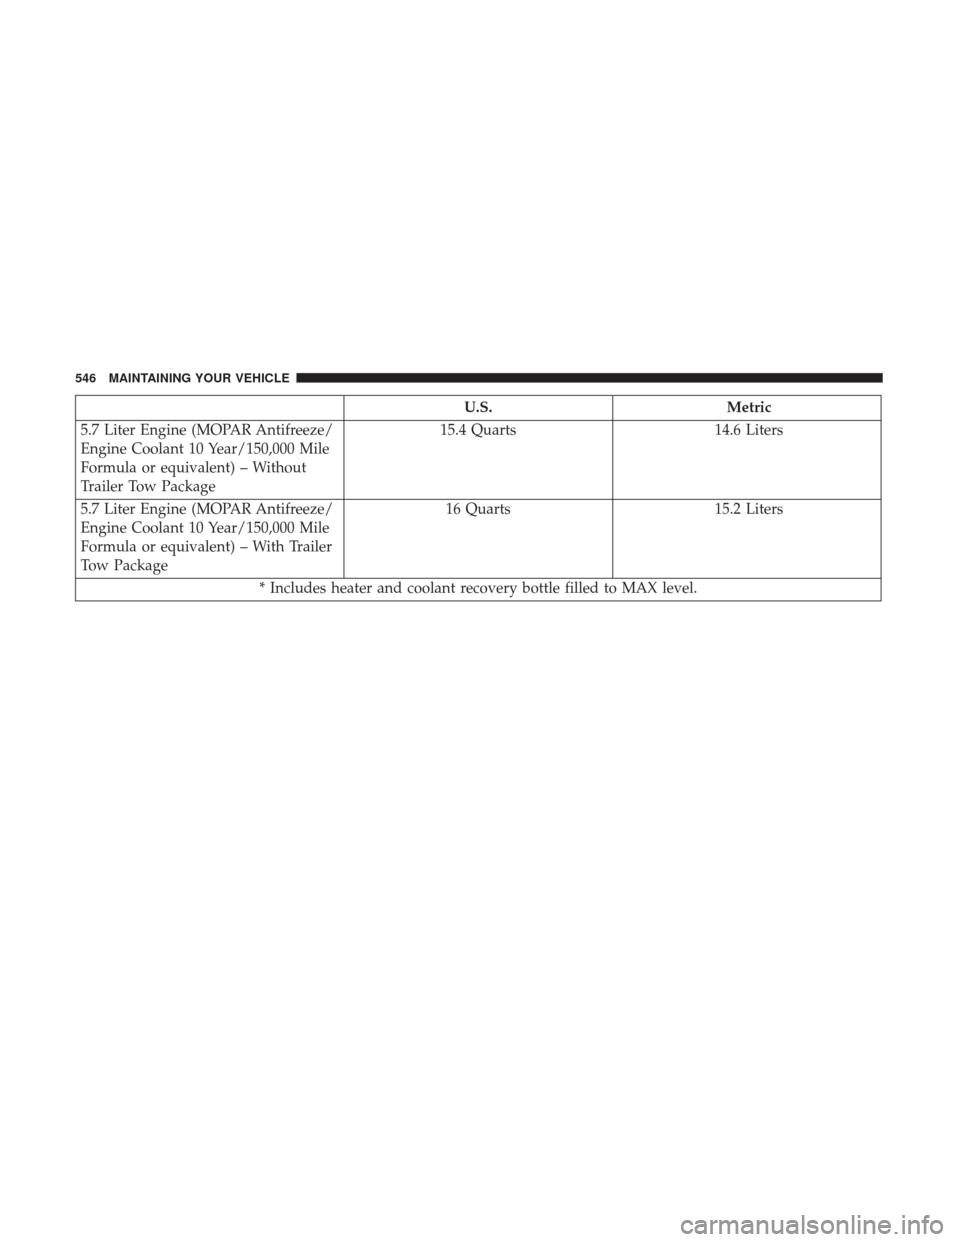
U.S.Metric
5.7 Liter Engine (MOPAR Antifreeze/
Engine Coolant 10 Year/150,000 Mile
Formula or equivalent) – Without
Trailer Tow Package 15.4 Quarts
14.6 Liters
5.7 Liter Engine (MOPAR Antifreeze/
Engine Coolant 10 Year/150,000 Mile
Formula or equivalent) – With Trailer
Tow Package 16 Quarts
15.2 Liters
* Includes heater and coolant recovery bottle filled to MAX level.
546 MAINTAINING YOUR VEHICLE
Page 549 of 584
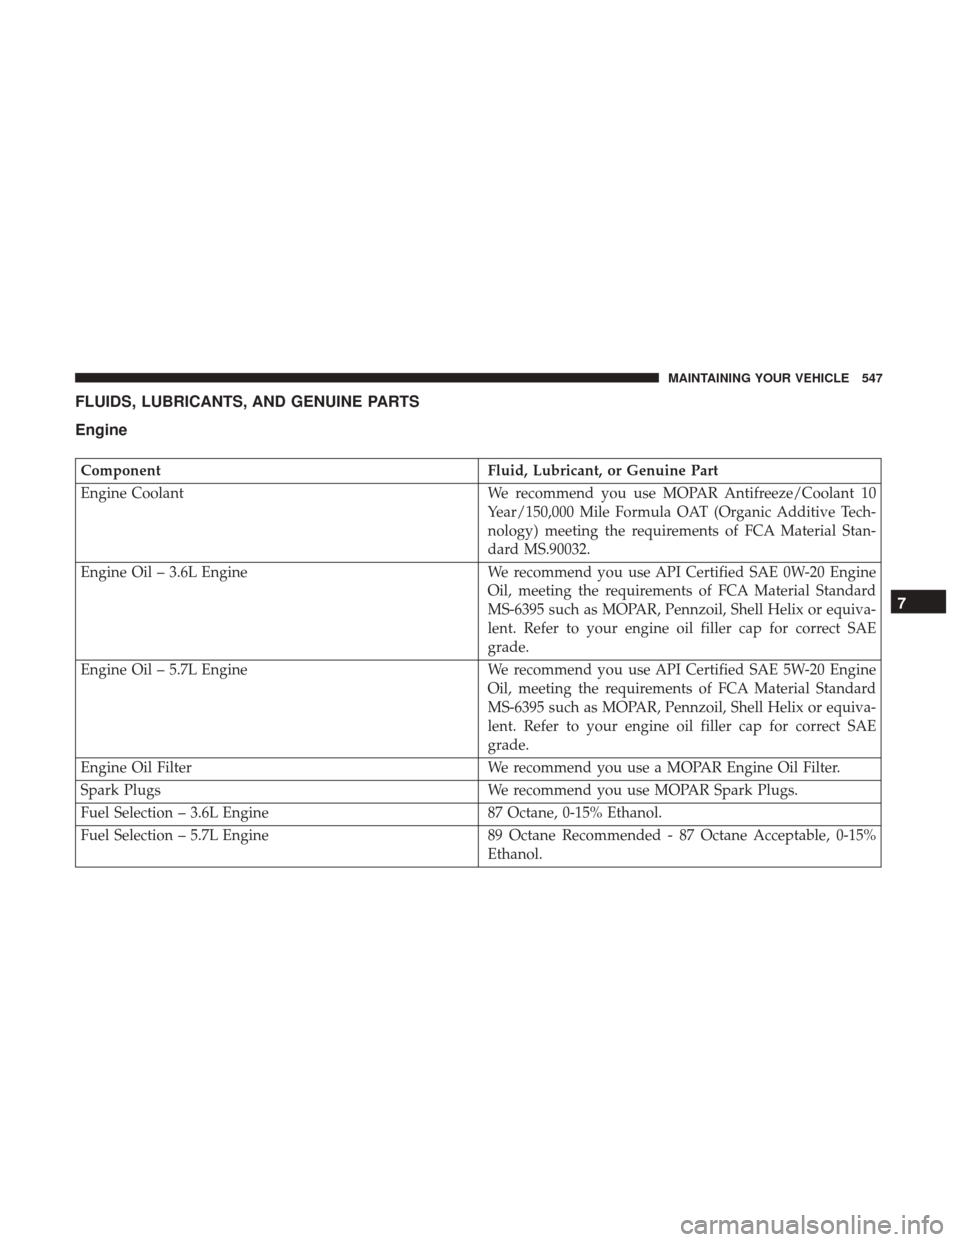
FLUIDS, LUBRICANTS, AND GENUINE PARTS
Engine
ComponentFluid, Lubricant, or Genuine Part
Engine Coolant We recommend you use MOPAR Antifreeze/Coolant 10
Year/150,000 Mile Formula OAT (Organic Additive Tech-
nology) meeting the requirements of FCA Material Stan-
dard MS.90032.
Engine Oil – 3.6L Engine We recommend you use API Certified SAE 0W-20 Engine
Oil, meeting the requirements of FCA Material Standard
MS-6395 such as MOPAR, Pennzoil, Shell Helix or equiva-
lent. Refer to your engine oil filler cap for correct SAE
grade.
Engine Oil – 5.7L Engine We recommend you use API Certified SAE 5W-20 Engine
Oil, meeting the requirements of FCA Material Standard
MS-6395 such as MOPAR, Pennzoil, Shell Helix or equiva-
lent. Refer to your engine oil filler cap for correct SAE
grade.
Engine Oil Filter We recommend you use a MOPAR Engine Oil Filter.
Spark Plugs We recommend you use MOPAR Spark Plugs.
Fuel Selection – 3.6L Engine 87 Octane, 0-15% Ethanol.
Fuel Selection – 5.7L Engine 89 Octane Recommended - 87 Octane Acceptable, 0-15%
Ethanol.
7
MAINTAINING YOUR VEHICLE 547
Page 550 of 584
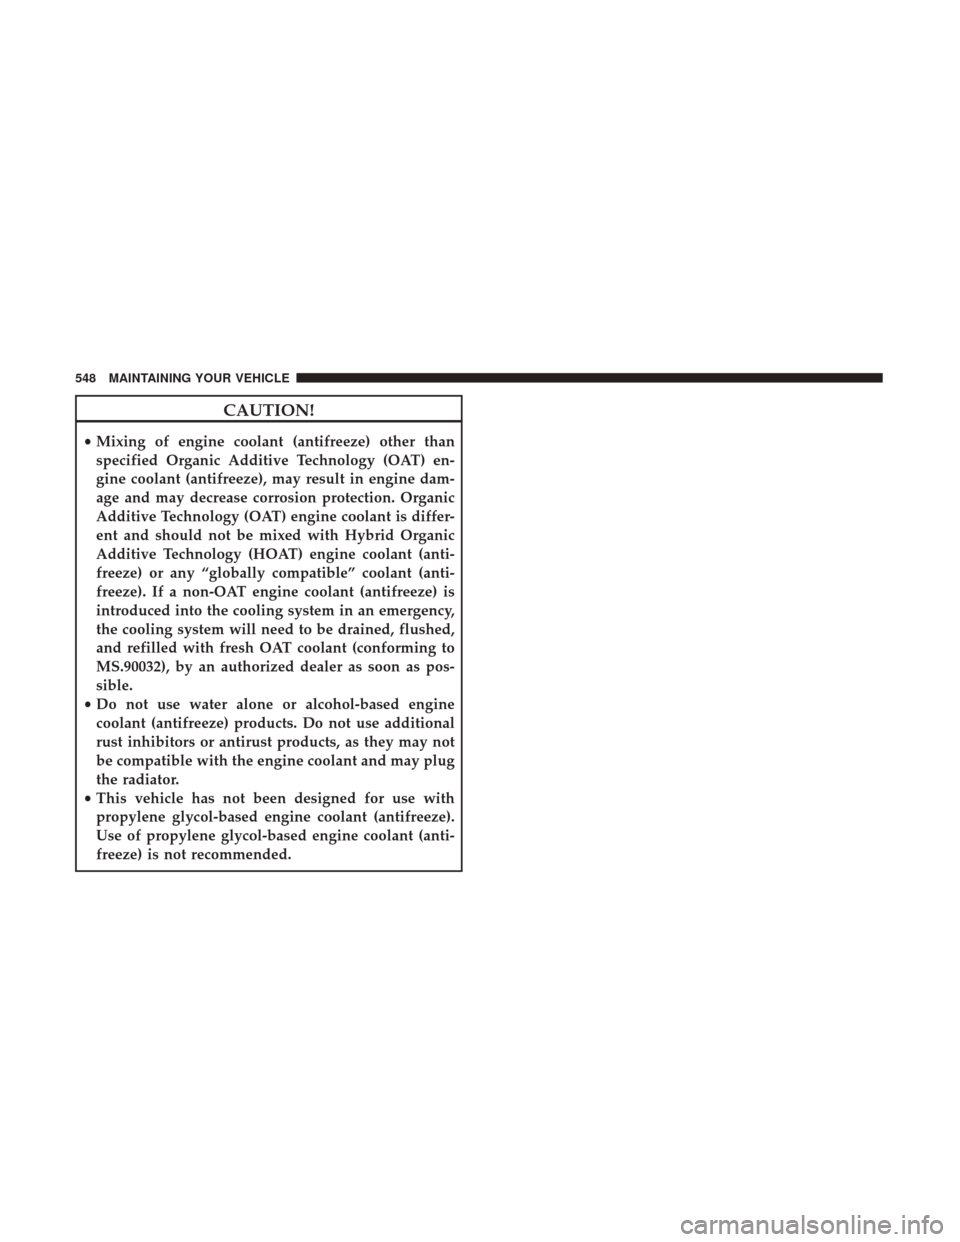
CAUTION!
•Mixing of engine coolant (antifreeze) other than
specified Organic Additive Technology (OAT) en-
gine coolant (antifreeze), may result in engine dam-
age and may decrease corrosion protection. Organic
Additive Technology (OAT) engine coolant is differ-
ent and should not be mixed with Hybrid Organic
Additive Technology (HOAT) engine coolant (anti-
freeze) or any “globally compatible” coolant (anti-
freeze). If a non-OAT engine coolant (antifreeze) is
introduced into the cooling system in an emergency,
the cooling system will need to be drained, flushed,
and refilled with fresh OAT coolant (conforming to
MS.90032), by an authorized dealer as soon as pos-
sible.
• Do not use water alone or alcohol-based engine
coolant (antifreeze) products. Do not use additional
rust inhibitors or antirust products, as they may not
be compatible with the engine coolant and may plug
the radiator.
• This vehicle has not been designed for use with
propylene glycol-based engine coolant (antifreeze).
Use of propylene glycol-based engine coolant (anti-
freeze) is not recommended.
548 MAINTAINING YOUR VEHICLE