lock DODGE DURANGO 2020 Owners Manual
[x] Cancel search | Manufacturer: DODGE, Model Year: 2020, Model line: DURANGO, Model: DODGE DURANGO 2020Pages: 464, PDF Size: 22.14 MB
Page 318 of 464
316SERVICING AND MAINTENANCE
Any belt with cracks running along a rib must be
replaced. Also have the belt replaced if it has
excessive wear, frayed cords or severe glazing.
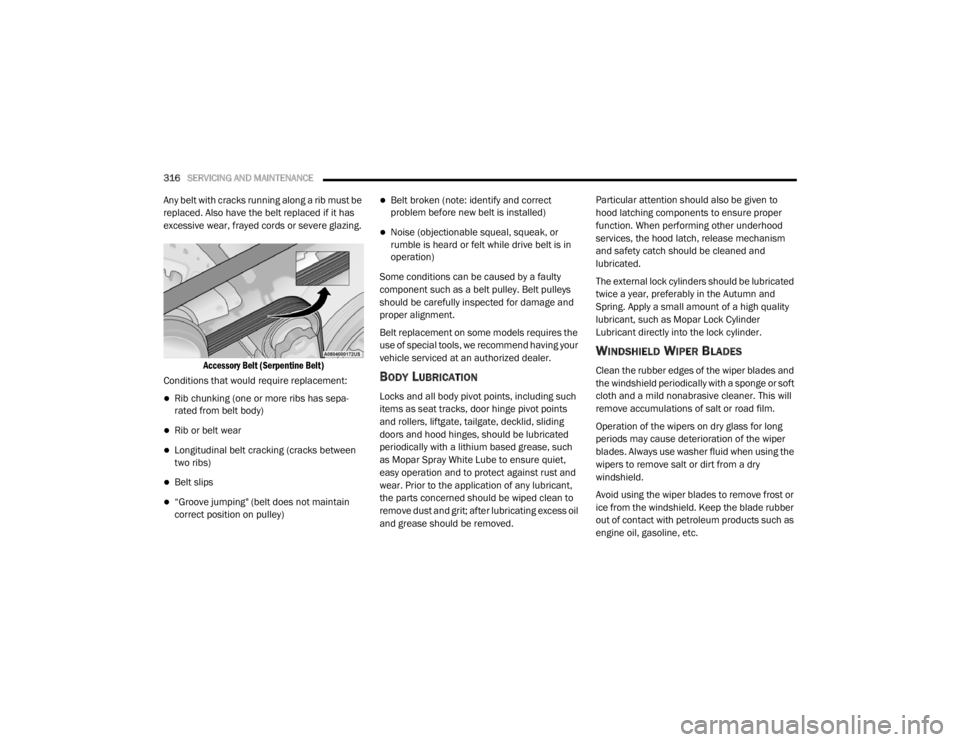
Accessory Belt (Serpentine Belt)
Conditions that would require replacement:
Rib chunking (one or more ribs has sepa -
rated from belt body)
Rib or belt wear
Longitudinal belt cracking (cracks between
two ribs)
Belt slips
“Groove jumping" (belt does not maintain
correct position on pulley)
Belt broken (note: identify and correct
problem before new belt is installed)
Noise (objectionable squeal, squeak, or
rumble is heard or felt while drive belt is in
operation)
Some conditions can be caused by a faulty
component such as a belt pulley. Belt pulleys
should be carefully inspected for damage and
proper alignment.
Belt replacement on some models requires the
use of special tools, we recommend having your
vehicle serviced at an authorized dealer.
BODY LUBRICATION
Locks and all body pivot points, including such
items as seat tracks, door hinge pivot points
and rollers, liftgate, tailgate, decklid, sliding
doors and hood hinges, should be lubricated
periodically with a lithium based grease, such
as Mopar Spray White Lube to ensure quiet,
easy operation and to protect against rust and
wear. Prior to the application of any lubricant,
the parts concerned should be wiped clean to
remove dust and grit; after lubricating excess oil
and grease should be removed. Particular attention should also be given to
hood latching components to ensure proper
function. When performing other underhood
services, the hood latch, release mechanism
and safety catch should be cleaned and
lubricated.
The external lock cylinders should be lubricated
twice a year, preferably in the Autumn and
Spring. Apply a small amount of a high quality
lubricant, such as Mopar Lock Cylinder
Lubricant directly into the lock cylinder.
WINDSHIELD WIPER BLADES
Clean the rubber edges of the wiper blades and
the windshield periodically with a sponge or soft
cloth and a mild nonabrasive cleaner. This will
remove accumulations of salt or road film.
Operation of the wipers on dry glass for long
periods may cause deterioration of the wiper
blades. Always use washer fluid when using the
wipers to remove salt or dirt from a dry
windshield.
Avoid using the wiper blades to remove frost or
ice from the windshield. Keep the blade rubber
out of contact with petroleum products such as
engine oil, gasoline, etc.
20_WD_OM_EN_USC_t.book Page 316
Page 319 of 464

SERVICING AND MAINTENANCE317
NOTE:
Life expectancy of wiper blades varies
depending on geographical area and frequency
of use. Poor performance of blades may be
present with chattering, marks, water lines or
wet spots. If any of these conditions are
present, clean the wiper blades or replace as
necessary.
The wiper blades and wiper arms should be
inspected periodically, not just when wiper
performance problems are experienced. This
inspection should include the following points:
Wear or uneven edges
Foreign material
Hardening or cracking
Deformation or fatigue
If a wiper blade or wiper arm is damaged,
replace the affected wiper arm or blade with a
new unit. Do not attempt to repair a wiper arm
or blade that is damaged.
Front Wiper Blade Removal/Installation
1. Lift the wiper arm to raise the wiper blade off of the glass, until the wiper arm is in the
full up position.
Wiper Blade With Release Tab In Locked Position
2. To disengage the wiper blade from the wiper
arm, flip up the release tab on the wiper
blade, and while holding the wiper arm with
one hand, slide the wiper blade down
towards the base of the wiper arm.
Wiper Blade With Release Tab In Unlocked Position
CAUTION!
Do not allow the wiper arm to spring back
against the glass without the wiper blade in
place or the glass may be damaged.
1 — Wiper
2 — Release Tab
3 — Wiper Arm
1 — Wiper Blade
2 — Release Tab
3 — Wiper Arm7
20_WD_OM_EN_USC_t.book Page 317
Page 320 of 464
318SERVICING AND MAINTENANCE
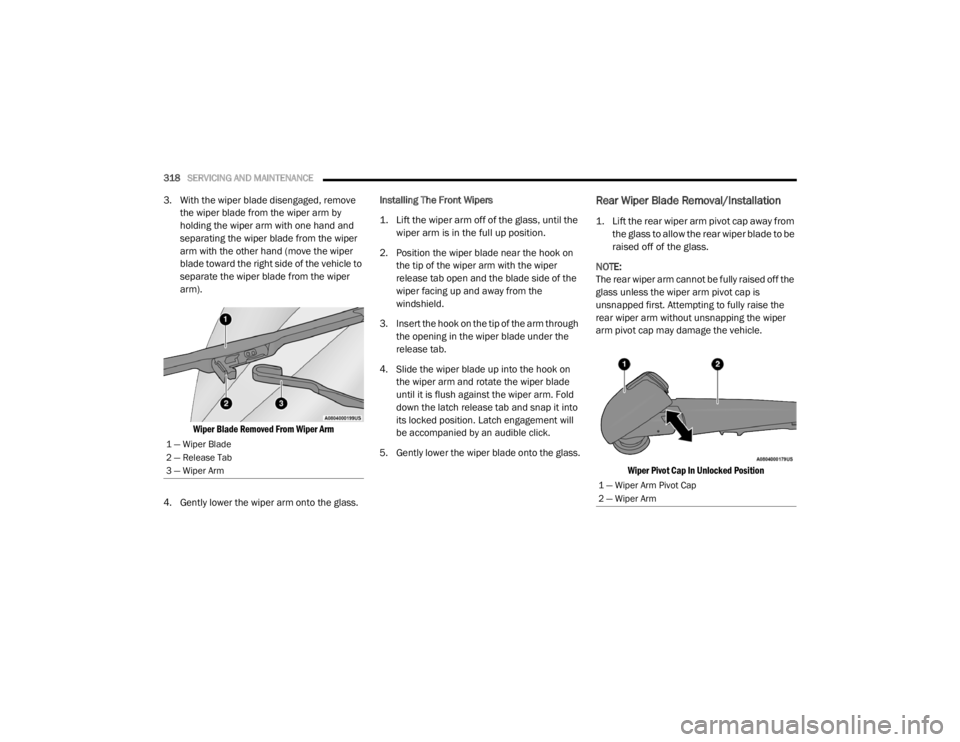
3. With the wiper blade disengaged, remove
the wiper blade from the wiper arm by
holding the wiper arm with one hand and
separating the wiper blade from the wiper
arm with the other hand (move the wiper
blade toward the right side of the vehicle to
separate the wiper blade from the wiper
arm).
Wiper Blade Removed From Wiper Arm
4. Gently lower the wiper arm onto the glass. Installing The Front Wipers
1. Lift the wiper arm off of the glass, until the
wiper arm is in the full up position.
2. Position the wiper blade near the hook on the tip of the wiper arm with the wiper
release tab open and the blade side of the
wiper facing up and away from the
windshield.
3. Insert the hook on the tip of the arm through the opening in the wiper blade under the
release tab.
4. Slide the wiper blade up into the hook on the wiper arm and rotate the wiper blade
until it is flush against the wiper arm. Fold
down the latch release tab and snap it into
its locked position. Latch engagement will
be accompanied by an audible click.
5. Gently lower the wiper blade onto the glass.Rear Wiper Blade Removal/Installation
1. Lift the rear wiper arm pivot cap away from the glass to allow the rear wiper blade to be
raised off of the glass.
NOTE:
The rear wiper arm cannot be fully raised off the
glass unless the wiper arm pivot cap is
unsnapped first. Attempting to fully raise the
rear wiper arm without unsnapping the wiper
arm pivot cap may damage the vehicle.
Wiper Pivot Cap In Unlocked Position
1 — Wiper Blade
2 — Release Tab
3 — Wiper Arm
1 — Wiper Arm Pivot Cap
2 — Wiper Arm
20_WD_OM_EN_USC_t.book Page 318
Page 365 of 464
MULTIMEDIA363
CUSTOMER PROGRAMMABLE FEATURES
— U
CONNECT 4 SETTINGS
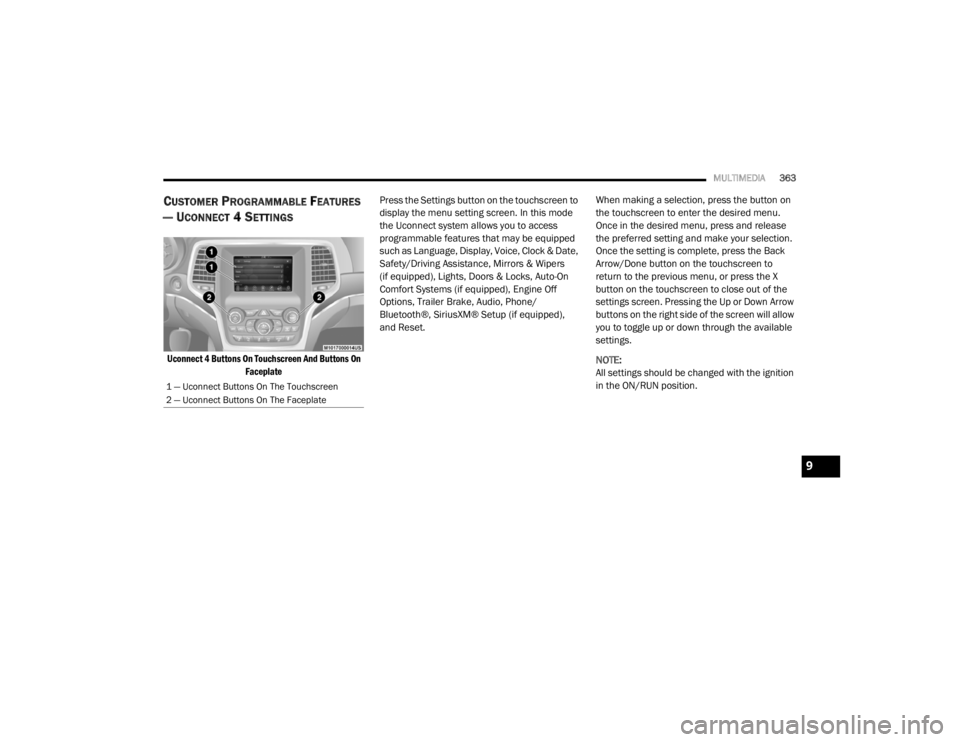
Uconnect 4 Buttons On Touchscreen And Buttons On
Faceplate
Press the Settings button on the touchscreen to
display the menu setting screen. In this mode
the Uconnect system allows you to access
programmable features that may be equipped
such as Language, Display, Voice, Clock & Date,
Safety/Driving Assistance, Mirrors & Wipers
(if equipped), Lights, Doors & Locks, Auto-On
Comfort Systems (if equipped), Engine Off
Options, Trailer Brake, Audio, Phone/
Bluetooth®, SiriusXM® Setup (if equipped),
and Reset.
When making a selection, press the button on
the touchscreen to enter the desired menu.
Once in the desired menu, press and release
the preferred setting and make your selection.
Once the setting is complete, press the Back
Arrow/Done button on the touchscreen to
return to the previous menu, or press the X
button on the touchscreen to close out of the
settings screen. Pressing the Up or Down Arrow
buttons on the right side of the screen will allow
you to toggle up or down through the available
settings.
NOTE:
All settings should be changed with the ignition
in the ON/RUN position.
1 — Uconnect Buttons On The Touchscreen
2 — Uconnect Buttons On The Faceplate
9
20_WD_OM_EN_USC_t.book Page 363
Page 367 of 464
MULTIMEDIA365
Voice
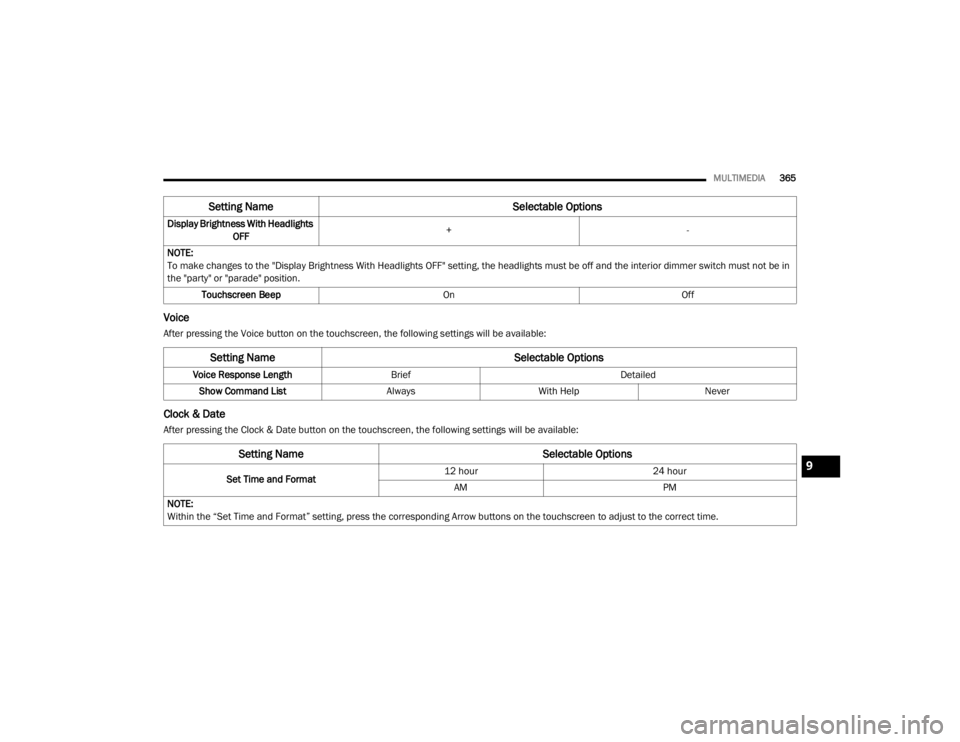
After pressing the Voice button on the touchscreen, the following settings will be available:
Clock & Date
After pressing the Clock & Date button on the touchscreen, the following settings will be available:Display Brightness With Headlights
OFF +
-
NOTE:
To make changes to the "Display Brightness With Headlights OFF" setting, the headlights must be off and the interior dimmer switch must not be in
the "party" or "parade" position. Touchscreen Beep OnOff
Setting Name Selectable Options
Setting NameSelectable Options
Voice Response LengthBrief Detailed
Show Command List AlwaysWith Help Never
Setting Name Selectable Options
Set Time and Format12 hour
24 hour
AM PM
NOTE:
Within the “Set Time and Format” setting, press the corresponding Arrow buttons on the touchscreen to adjust to the correct time.
9
20_WD_OM_EN_USC_t.book Page 365
Page 371 of 464
MULTIMEDIA369
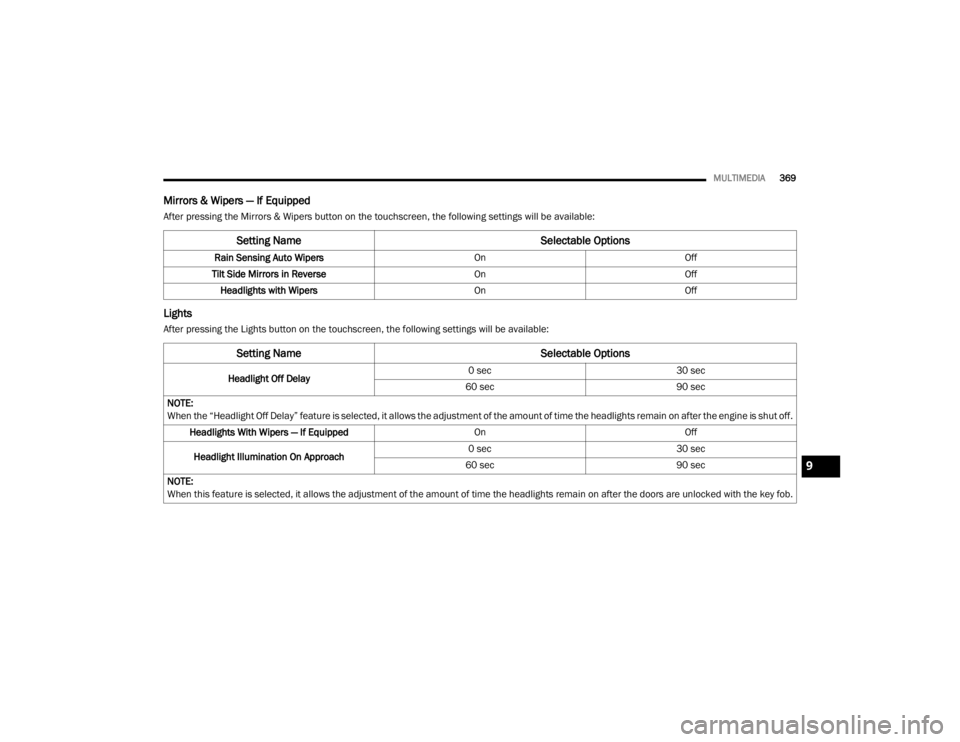
Mirrors & Wipers — If Equipped
After pressing the Mirrors & Wipers button on the touchscreen, the following settings will be available:
Lights
After pressing the Lights button on the touchscreen, the following settings will be available:
Setting Name Selectable Options
Rain Sensing Auto WipersOnOff
Tilt Side Mirrors in Reverse OnOff
Headlights with Wipers OnOff
Setting Name Selectable Options
Headlight Off Delay0 sec
30 sec
60 sec 90 sec
NOTE:
When the “Headlight Off Delay” feature is selected, it allows the adjustment of the amount of time the headlights remain on after the engine is shut off. Headlights With Wipers — If Equipped OnOff
Headlight Illumination On Approach 0 sec
30 sec
60 sec 90 sec
NOTE:
When this feature is selected, it allows the adjustment of the amount of time the headlights remain on after the doors are unlocked with the key fob.
9
20_WD_OM_EN_USC_t.book Page 369
Page 372 of 464

370MULTIMEDIA
Doors & Locks
After pressing the Doors & Locks button on the touchscreen, the following settings will be available:Auto High Beam — If Equipped
OnOff
NOTE:
When the “Auto High Beam” is selected, the high beam headlights will activate/deactivate automatically under certain conditions. Daytime Running Lights — If Equipped OnOff
NOTE:
When the “Daytime Running Lights” feature is selected, the daytime running lights can be turned On or Off. The feature is only available if allowed by
law in the country of the vehicle purchase. Flash Lights With Lock OnOff
Setting Name Selectable Options
Setting NameSelectable Options
Auto Unlock On ExitOn Off
NOTE:
When the “Auto Unlock On Exit” feature is selected, all doors unlock when the vehicle is stopped and the transmission is in the PARK or NEUTRAL
position and the driver's door is opened. Flash Lights With Lock On Off
Horn With Lock Off1st Press 2nd Press
20_WD_OM_EN_USC_t.book Page 370
Page 373 of 464
MULTIMEDIA371
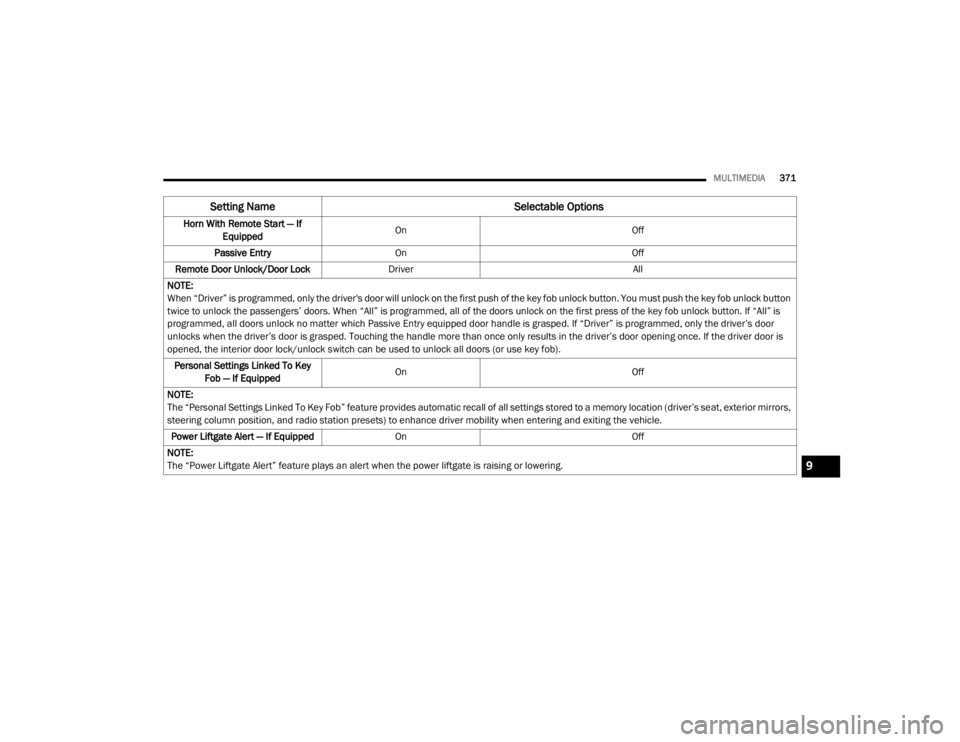
Horn With Remote Start — If
Equipped On
Off
Passive Entry On Off
Remote Door Unlock/Door Lock Driver All
NOTE:
When “Driver” is programmed, only the driver's door will unlock on the first push of the key fob unlock button. You must push the key fob unlock button
twice to unlock the passengers’ doors. When “All” is programmed, all of the doors unlock on the first press of the key fob unlock button. If “All” is
programmed, all doors unlock no matter which Passive Entry equipped door handle is grasped. If “Driver” is programmed, only the driver’s door
unlocks when the driver’s door is grasped. Touching the handle more than once only results in the driver’s door opening once. If the driver door is
opened, the interior door lock/unlock switch can be used to unlock all doors (or use key fob). Personal Settings Linked To Key Fob — If Equipped On
Off
NOTE:
The “Personal Settings Linked To Key Fob” feature provides automatic recall of all settings stored to a memory location (driver’s seat, exterior mirrors,
steering column position, and radio station presets) to enhance driver mobility when entering and exiting the vehicle. Power Liftgate Alert — If Equipped On Off
NOTE:
The “Power Liftgate Alert” feature plays an alert when the power liftgate is raising or lowering.
Setting Name Selectable Options
9
20_WD_OM_EN_USC_t.book Page 371
Page 379 of 464
MULTIMEDIA377
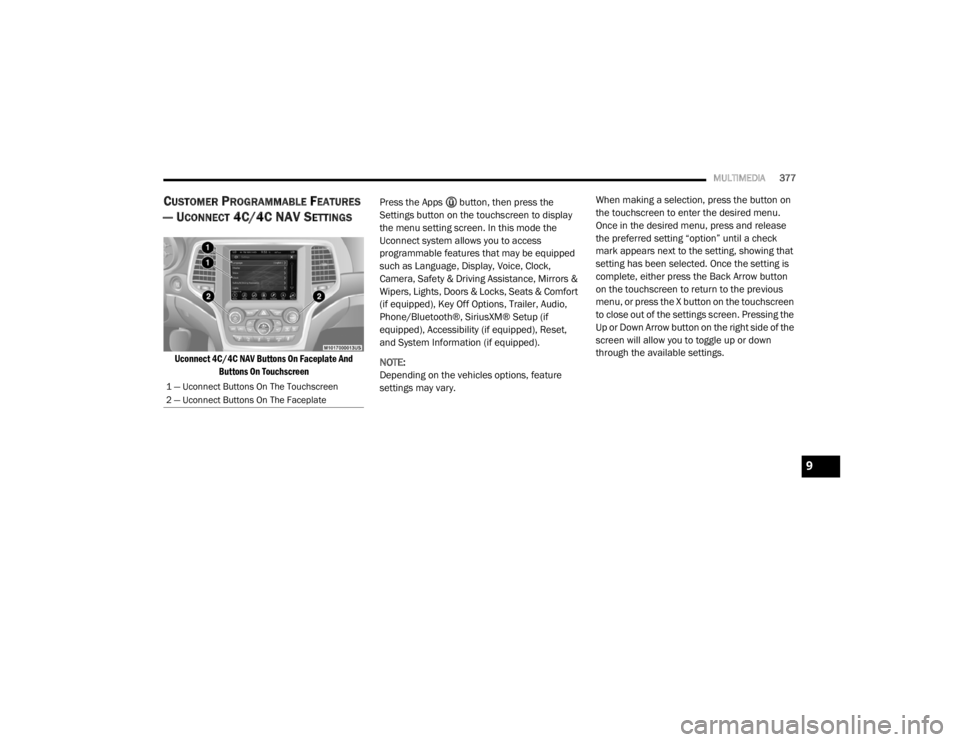
CUSTOMER PROGRAMMABLE FEATURES
— U
CONNECT 4C/4C NAV SETTINGS
Uconnect 4C/4C NAV Buttons On Faceplate And
Buttons On Touchscreen
Press the Apps button, then press the
Settings button on the touchscreen to display
the menu setting screen. In this mode the
Uconnect system allows you to access
programmable features that may be equipped
such as Language, Display, Voice, Clock,
Camera, Safety & Driving Assistance, Mirrors &
Wipers, Lights, Doors & Locks, Seats & Comfort
(if equipped), Key Off Options, Trailer, Audio,
Phone/Bluetooth®, SiriusXM® Setup (if
equipped), Accessibility (if equipped), Reset,
and System Information (if equipped).
NOTE:
Depending on the vehicles options, feature
settings may vary. When making a selection, press the button on
the touchscreen to enter the desired menu.
Once in the desired menu, press and release
the preferred setting “option” until a check
mark appears next to the setting, showing that
setting has been selected. Once the setting is
complete, either press the Back Arrow button
on the touchscreen to return to the previous
menu, or press the X button on the touchscreen
to close out of the settings screen. Pressing the
Up or Down Arrow button on the right side of the
screen will allow you to toggle up or down
through the available settings.
1 — Uconnect Buttons On The Touchscreen
2 — Uconnect Buttons On The Faceplate
9
20_WD_OM_EN_USC_t.book Page 377
Page 382 of 464

380MULTIMEDIA
Clock
After pressing the Clock button on the touchscreen, the following settings will be available:
Camera
After pressing the Camera button on the touchscreen, the following settings will be available:
Setting Name Selectable Options
Sync Time With GPS OnOff
Set Time Hours +-
NOTE:
The “Set Time Hours” feature allows you to adjust the hours. The Sync Time With GPS button on the touchscreen must be unchecked. Set Time Minutes +-
NOTE:
The “Set Time Minutes” feature allows you to adjust the minutes. The Sync Time With GPS button on the touchscreen must be unchecked.
Time Format 12 hrs
24 hrs
AM PM
Show Time in Status Bar — If Equipped OnOff
Setting Name Selectable Options
ParkView Backup Camera Delay OnOff
NOTE:
The “ParkView Backup Camera Delay” setting determines whether or not the screen will display the rear view image with dynamic grid lines for up to
10 seconds after the vehicle is shifted out of REVERSE. This delay will be canceled if the vehicle’s speed exceeds 8 mph (13 km/h), the transmission
is shifted into PARK, or the ignition is switched to the OFF position.
20_WD_OM_EN_USC_t.book Page 380