warning DODGE DURANGO 2020 Owners Manual
[x] Cancel search | Manufacturer: DODGE, Model Year: 2020, Model line: DURANGO, Model: DODGE DURANGO 2020Pages: 464, PDF Size: 22.14 MB
Page 162 of 464
160SAFETY
Knee Impact Bolsters
Driver and Front Passenger Air Bags
Seat Belt Buckle Switch
Supplemental Side Air Bags
Supplemental Knee Air Bags
Front and Side Impact Sensors
Seat Belt Pretensioners
Seat Track Position Sensors
If A Deployment Occurs
The front air bags are designed to deflate
immediately after deployment.
NOTE:
Front and/or side air bags will not deploy in all
collisions. This does not mean something is
wrong with the air bag system. If you do have a collision which deploys the air
bags, any or all of the following may occur:
The air bag material may sometimes cause
abrasions and/or skin reddening to the occu
-
pants as the air bags deploy and unfold. The
abrasions are similar to friction rope burns or
those you might get sliding along a carpet or
gymnasium floor. They are not caused by
contact with chemicals. They are not perma -
nent and normally heal quickly. However, if
you haven’t healed significantly within a few
days, or if you have any blistering, see your
doctor immediately.
As the air bags deflate, you may see some
smoke-like particles. The particles are a
normal by-product of the process that gener -
ates the non-toxic gas used for air bag
inflation.
These airborne particles may irritate the skin,
eyes, nose, or throat. If you have skin or eye
irritation, rinse the area with cool water. For
nose or throat irritation, move to fresh air. If
the irritation continues, see your doctor. If
these particles settle on your clothing, follow
the garment manufacturer’s instructions for
cleaning. Do not drive your vehicle after the air bags have
deployed. If you are involved in another
collision, the air bags will not be in place to
protect you.
NOTE:
Air bag covers may not be obvious in the inte
-
rior trim, but they will open during air bag
deployment.
After any collision, the vehicle should be
taken to an authorized dealer immediately.
WARNING!
Deployed air bags and seat belt
pretensioners cannot protect you in another
collision. Have the air bags, seat belt
pretensioners, and the seat belt retractor
assemblies replaced by an authorized dealer
immediately. Also, have the Occupant
Restraint Controller System serviced as well.
20_WD_OM_EN_USC_t.book Page 160
Page 163 of 464
SAFETY161
(Continued)
Enhanced Accident Response System
In the event of an impact, if the communication
network remains intact, and the power remains
intact, depending on the nature of the event,
the Occupant Restraint Controller (ORC) will
determine whether to have the Enhanced
Accident Response System perform the
following functions:
Cut off fuel to the engine (if equipped)
Cut off battery power to the electric motor (if
equipped)
Flash hazard lights as long as the battery has
power
Turn on the interior lights, which remain on
as long as the battery has power or for
15 minutes from the intervention of the
Enhanced Accident Response System
Unlock the power door locks
Your vehicle may also be designed to perform
any of these other functions in response to the
Enhanced Accident Response System:
Turn off the Fuel Filter Heater, Turn off the
HVAC Blower Motor, Close the HVAC Circula -
tion Door
Cut off battery power to the:
Engine
Electric Motor (if equipped)
Electric power steering
Brake booster
Electric park brake
Automatic transmission gear selector
Horn
Front wiper
Headlamp washer pump
NOTE:
After an accident, remember to cycle the igni -
tion to the STOP (OFF/LOCK) position and
remove the key from the ignition switch to avoid
draining the battery. Carefully check the vehicle
for fuel leaks in the engine compartment and on
the ground near the engine compartment and
fuel tank before resetting the system and
starting the engine. If there are no fuel leaks or
damage to the vehicle electrical devices (e.g.
headlights) after an accident, reset the system
by following the procedure described below. If you have any doubt, contact an authorized
dealer.
Enhanced Accident Response System
Reset Procedure
In order to reset the Enhanced Accident
Response System functions after an event, the
ignition switch must be changed from ignition
START or ON/RUN to ignition OFF. Carefully
check the vehicle for fuel leaks in the engine
compartment and on the ground near the
engine compartment and fuel tank before
resetting the system and starting the engine.
Maintaining Your Air Bag System
WARNING!
Modifications to any part of the air bag
system could cause it to fail when you need
it. You could be injured if the air bag system
is not there to protect you. Do not modify
the components or wiring, including adding
any kind of badges or stickers to the
steering wheel hub trim cover or the upper
passenger side of the instrument panel. Do
not modify the front bumper, vehicle body
structure, or add aftermarket side steps or
running boards.
4
20_WD_OM_EN_USC_t.book Page 161
Page 164 of 464
162SAFETY
Event Data Recorder (EDR)
This vehicle is equipped with an event data
recorder (EDR). The main purpose of an EDR is
to record, in certain crash or near crash-like
situations, such as an air bag deployment or
hitting a road obstacle, data that will assist in
understanding how a vehicle’s systems
performed. The EDR is designed to record data
related to vehicle dynamics and safety systems
for a short period of time, typically 30 seconds
or less. The EDR in this vehicle is designed to
record such data as:
How various systems in your vehicle were
operating;
Whether or not the driver and passenger
safety belts were buckled/fastened;
How far (if at all) the driver was depressing
the accelerator and/or brake pedal; and,
How fast the vehicle was traveling.
These data can help provide a better
understanding of the circumstances in which
crashes and injuries occur. NOTE:
EDR data are recorded by your vehicle only if a
non-trivial crash situation occurs; no data are
recorded by the EDR under normal driving
conditions and no personal data (e.g., name,
gender, age, and crash location) are recorded.
However, other parties, such as law enforce
-
ment, could combine the EDR data with the type
of personally identifying data routinely acquired
during a crash investigation.
To read data recorded by an EDR, special
equipment is required, and access to the
vehicle or the EDR is needed. In addition to the
vehicle manufacturer, other parties, such as
law enforcement, that have the special
equipment, can read the information if they
have access to the vehicle or the EDR.
It is dangerous to try to repair any part of
the air bag system yourself. Be sure to tell
anyone who works on your vehicle that it
has an air bag system.
Do not attempt to modify any part of your
air bag system. The air bag may inflate acci -
dentally or may not function properly if
modifications are made. Take your vehicle
to an authorized dealer for any air bag
system service. If your seat, including your
trim cover and cushion, needs to be
serviced in any way (including removal or
loosening/tightening of seat attachment
bolts), take the vehicle to an authorized
dealer. Only manufacturer approved seat
accessories may be used. If it is necessary
to modify the air bag system for persons
with disabilities, contact an authorized
dealer.
WARNING! (Continued)
20_WD_OM_EN_USC_t.book Page 162
Page 165 of 464
SAFETY163
CHILD RESTRAINTS
Everyone in your vehicle needs to be buckled up
at all times, including babies and children. Every
state in the United States, and every Canadian
province, requires that small children ride in
proper restraint systems. This is the law, and
you can be prosecuted for ignoring it.
Children 12 years or younger should ride
properly buckled up in a rear seat, if available.
According to crash statistics, children are safer
when properly restrained in the rear seats
rather than in the front. There are different sizes and types of restraints
for children from newborn size to the child
almost large enough for an adult safety belt.
Always check the child seat Owner’s Manual to
make sure you have the correct seat for your
child. Carefully read and follow all the
instructions and warnings in the child restraint
Owner’s Manual and on all the labels attached
to the child restraint.Before buying any restraint system, make sure
that it has a label certifying that it meets all
applicable Safety Standards. You should also
make sure that you can install it in the vehicle
where you will use it.
NOTE:
For additional information, refer to http://
www.nhtsa.gov/parents-and-caregivers or
call: 1–888–327–4236
Canadian residents should refer to Transport
Canada’s website for additional information:
http://www.tc.gc.ca/en/services/road/
child-car-seat-safety.html
WARNING!
In a collision, an unrestrained child can
become a projectile inside the vehicle. The
force required to hold even an infant on your
lap could become so great that you could not
hold the child, no matter how strong you are.
The child and others could be badly injured or
killed. Any child riding in your vehicle should
be in a proper restraint for the child’s size.
4
20_WD_OM_EN_USC_t.book Page 163
Page 167 of 464
SAFETY165
(Continued)
Older Children And Child Restraints
Children who are two years old or who have
outgrown their rear-facing convertible child seat
can ride forward-facing in the vehicle.
Forward-facing child seats and convertible child
seats used in the forward-facing direction are
for children who are over two years old or who
have outgrown the rear-facing weight or height
limit of their rear-facing convertible child seat. Children should remain in a forward-facing child
seat with a harness for as long as possible, up
to the highest weight or height allowed by the
child seat.
All children whose weight or height is above the
forward-facing limit for the child seat should use
a belt-positioning booster seat until the
vehicle’s seat belts fit properly. If the child
cannot sit with knees bent over the vehicle’s
seat cushion while the child’s back is against
the seatback, they should use a belt-positioning
booster seat. The child and belt-positioning
booster seat are held in the vehicle by the seat
belt.
WARNING!
Never place a rear-facing child restraint in
front of an air bag. A deploying passenger
front air bag can cause death or serious
injury to a child 12 years or younger,
including a child in a rear-facing child
restraint.
Never install a rear-facing child restraint in
the front seat of a vehicle. Only use a
rear-facing child restraint in the rear seat. If
the vehicle does not have a rear seat, do
not transport a rear-facing child restraint in
that vehicle.
WARNING!
Improper installation can lead to failure of
an infant or child restraint. It could come
loose in a collision. The child could be badly
injured or killed. Follow the child restraint
manufacturer’s directions exactly when
installing an infant or child restraint.
After a child restraint is installed in the
vehicle, do not move the vehicle seat
forward or rearward because it can loosen
the child restraint attachments. Remove
the child restraint before adjusting the
vehicle seat position. When the vehicle seat
has been adjusted, reinstall the child
restraint.
When your child restraint is not in use,
secure it in the vehicle with the seat belt or
LATCH anchorages, or remove it from the
vehicle. Do not leave it loose in the vehicle.
In a sudden stop or accident, it could strike
the occupants or seatbacks and cause
serious personal injury.
WARNING!
(Continued)
4
20_WD_OM_EN_USC_t.book Page 165
Page 168 of 464
166SAFETY
Children Too Large For Booster Seats
Children who are large enough to wear the
shoulder belt comfortably, and whose legs are
long enough to bend over the front of the seat
when their back is against the seatback, should
use the seat belt in a rear seat. Use this simple
5-step test to decide whether the child can use
the vehicle’s seat belt alone:
1. Can the child sit all the way back against
the back of the vehicle seat?
2. Do the child’s knees bend comfortably over the front of the vehicle seat – while the child
is still sitting all the way back? 3. Does the shoulder belt cross the child’s
shoulder between the neck and arm?
4. Is the lap part of the belt as low as possible, touching the child’s thighs and not the
stomach?
5. Can the child stay seated like this for the whole trip?
If the answer to any of these questions was
“no,” then the child still needs to use a booster
seat in this vehicle. If the child is using the lap/
shoulder belt, check seat belt fit periodically
and make sure the seat belt buckle is latched. A child’s squirming or slouching can move the
belt out of position. If the shoulder belt contacts
the face or neck, move the child closer to the
center of the vehicle, or use a booster seat to
position the seat belt on the child correctly.
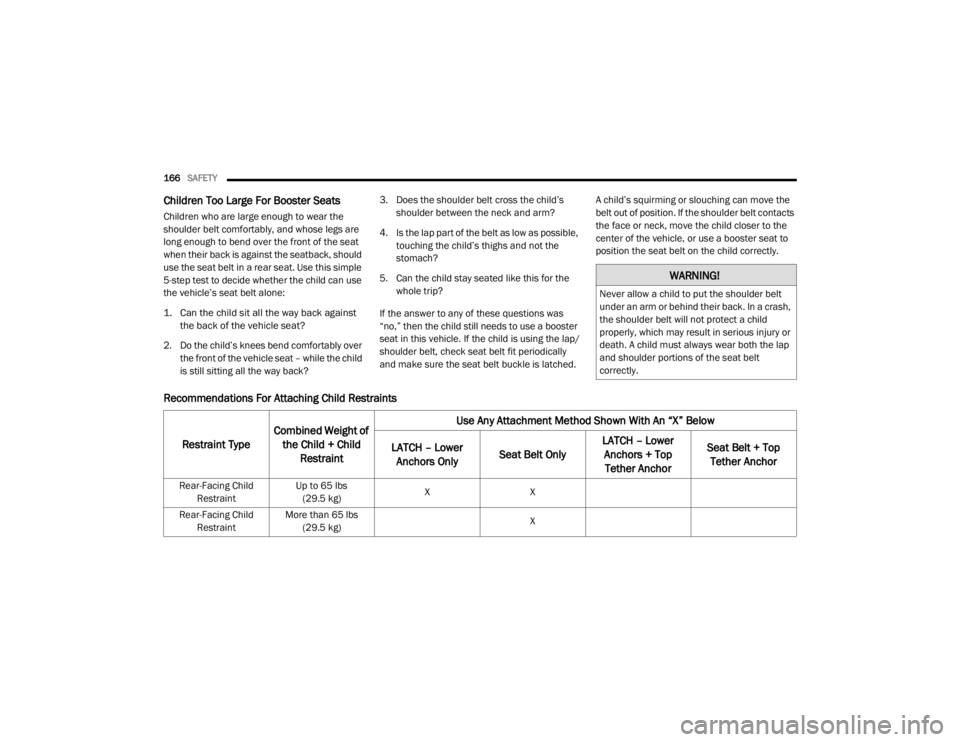
Recommendations For Attaching Child Restraints
WARNING!
Never allow a child to put the shoulder belt
under an arm or behind their back. In a crash,
the shoulder belt will not protect a child
properly, which may result in serious injury or
death. A child must always wear both the lap
and shoulder portions of the seat belt
correctly.
Restraint Type
Combined Weight of
the Child + Child Restraint Use Any Attachment Method Shown With An “X” Below
LATCH – Lower Anchors Only Seat Belt Only LATCH – Lower
Anchors + Top Tether Anchor Seat Belt + Top
Tether Anchor
Rear-Facing Child
Restraint Up to 65 lbs
(29.5 kg) X
X
Rear-Facing Child Restraint More than 65 lbs
(29.5 kg) X
20_WD_OM_EN_USC_t.book Page 166
Page 175 of 464
SAFETY173
LATCH-compatible child restraint systems will
be equipped with a rigid bar or a flexible strap
on each side. Each will have a hook or
connector to attach to the lower anchorage and
a way to tighten the connection to the
anchorage. Forward-facing child restraints and
some rear-facing child restraints will also be
equipped with a tether strap. The tether strap
will have a hook at the end to attach to the top
tether anchorage and a way to tighten the strap
after it is attached to the anchorage.
Center Seat LATCH — Five Or Seven
Second Row Passenger Seating Only Vehicle With A Center Arm Rest Tether —
Five Or Seven Passenger Seating Only
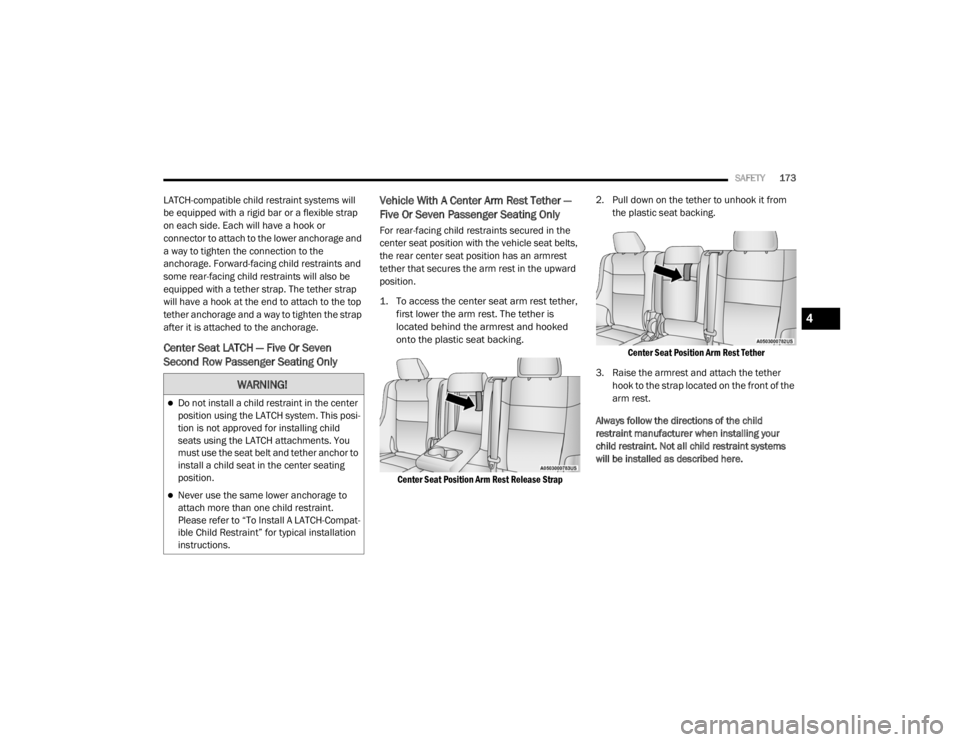
For rear-facing child restraints secured in the
center seat position with the vehicle seat belts,
the rear center seat position has an armrest
tether that secures the arm rest in the upward
position.
1. To access the center seat arm rest tether,
first lower the arm rest. The tether is
located behind the armrest and hooked
onto the plastic seat backing.
Center Seat Position Arm Rest Release Strap
2. Pull down on the tether to unhook it from
the plastic seat backing.
Center Seat Position Arm Rest Tether
3. Raise the armrest and attach the tether hook to the strap located on the front of the
arm rest.
Always follow the directions of the child
restraint manufacturer when installing your
child restraint. Not all child restraint systems
will be installed as described here.
WARNING!
Do not install a child restraint in the center
position using the LATCH system. This posi -
tion is not approved for installing child
seats using the LATCH attachments. You
must use the seat belt and tether anchor to
install a child seat in the center seating
position.
Never use the same lower anchorage to
attach more than one child restraint.
Please refer to “To Install A LATCH-Compat -
ible Child Restraint” for typical installation
instructions.
4
20_WD_OM_EN_USC_t.book Page 173
Page 176 of 464
174SAFETY
To Install A LATCH-Compatible Child
Restraint
If the selected seating position has a
Switchable Automatic Locking Retractor (ALR)
seat belt, stow the seat belt, following the
instructions below. See the section “Installing
Child Restraints Using the Vehicle Seat Belt” to
check what type of seat belt each seating
position has.
1. Loosen the adjusters on the lower straps
and on the tether strap of the child seat so
that you can more easily attach the hooks
or connectors to the vehicle anchorages.
2. Place the child seat between the lower anchorages for that seating position. For
some second row seats, you may need to
recline the seat and / or raise the head
restraint (if adjustable) to get a better fit. If
the rear seat can be moved forward and
rearward in the vehicle, you may wish to
move it to its rear-most position to make
room for the child seat. You may also move
the front seat forward to allow more room
for the child seat. 3. Attach the lower hooks or connectors of the
child restraint to the lower anchorages in
the selected seating position.
4. If the child restraint has a tether strap, connect it to the top tether anchorage. See
the section “Installing Child Restraints
Using the Top Tether Anchorage” for
directions to attach a tether anchor.
5. Tighten all of the straps as you push the child restraint rearward and downward into
the seat. Remove slack in the straps
according to the child restraint
manufacturer’s instructions.
6. Test that the child restraint is installed tightly by pulling back and forth on the child
seat at the belt path. It should not move
more than 1 inch (25.4 mm) in any
direction.
How To Stow An Unused Switchable-ALR
(ALR) Seat Belt:
When using the LATCH attaching system to
install a child restraint, stow all ALR seat belts
that are not being used by other occupants or
being used to secure child restraints. An unused belt could injure a child if they play
with it and accidentally lock the seat belt
retractor. Before installing a child restraint
using the LATCH system, buckle the seat belt
behind the child restraint and out of the child’s
reach. If the buckled seat belt interferes with
the child restraint installation, instead of
buckling it behind the child restraint, route the
seat belt through the child restraint belt path
and then buckle it. Do not lock the seat belt.
Remind all children in the vehicle that the seat
belts are not toys and that they should not play
with them.
WARNING!
Improper installation of a child restraint to
the LATCH anchorages can lead to failure of
the restraint. The child could be badly
injured or killed. Follow the child restraint
manufacturer’s directions exactly when
installing an infant or child restraint.
Child restraint anchorages are designed to
withstand only those loads imposed by
correctly-fitted child restraints. Under no
circumstances are they to be used for adult
seat belts, harnesses, or for attaching other
items or equipment to the vehicle.
20_WD_OM_EN_USC_t.book Page 174
Page 177 of 464
SAFETY175
Installing Child Restraints Using The
Vehicle Seat Belt
Child restraint systems are designed to be
secured in vehicle seats by lap belts or the lap
belt portion of a lap/shoulder belt.
The seat belts in the passenger seating
positions are equipped with a Switchable
Automatic Locking Retractor (ALR) that is
designed to keep the lap portion of the seat belt
tight around the child restraint so that it is not
necessary to use a locking clip. The ALR
retractor can be “switched” into a locked mode
by pulling all of the webbing out of the retractor
and then letting the webbing retract back into
the retractor. If it is locked, the ALR will make a
clicking noise while the webbing is pulled back
into the retractor. Refer to the “Automatic Locking Mode”
description in “Switchable Automatic Locking
Retractors (ALR)” under “Occupant Restraint
Systems” for additional information on ALR.
Please see the table below and the following
sections for more information.
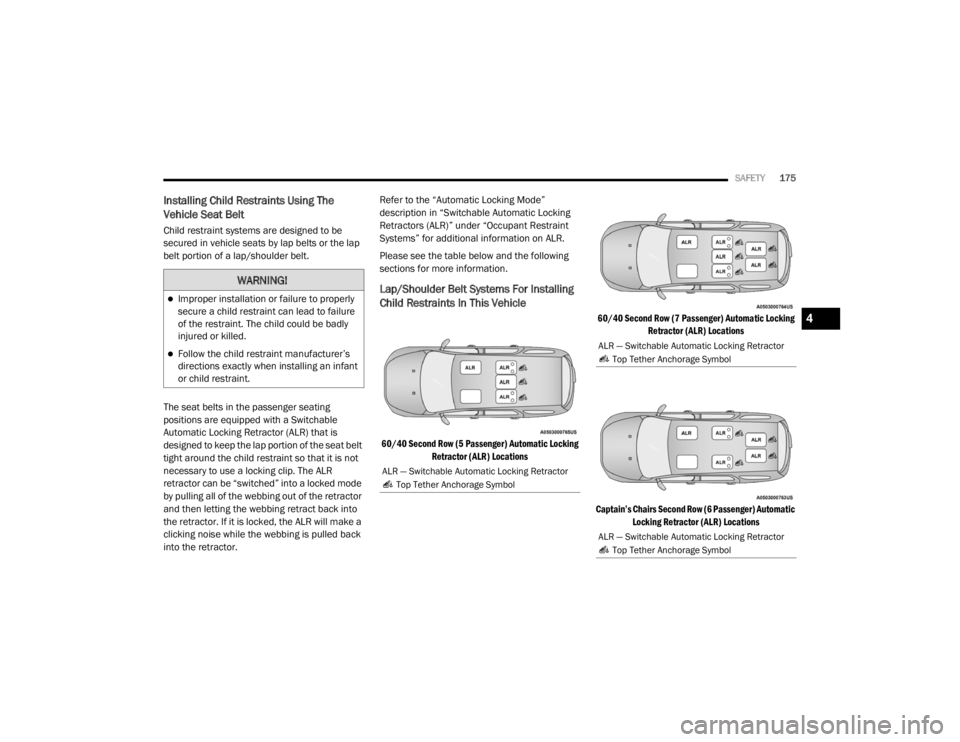
Lap/Shoulder Belt Systems For Installing
Child Restraints In This Vehicle
60/40 Second Row (5 Passenger) Automatic Locking
Retractor (ALR) Locations 60/40 Second Row (7 Passenger) Automatic Locking
Retractor (ALR) Locations
Captain’s Chairs Second Row (6 Passenger) Automatic Locking Retractor (ALR) Locations
WARNING!
Improper installation or failure to properly
secure a child restraint can lead to failure
of the restraint. The child could be badly
injured or killed.
Follow the child restraint manufacturer’s
directions exactly when installing an infant
or child restraint.
ALR — Switchable Automatic Locking Retractor
Top Tether Anchorage Symbol
ALR — Switchable Automatic Locking Retractor Top Tether Anchorage Symbol
ALR — Switchable Automatic Locking Retractor Top Tether Anchorage Symbol
4
20_WD_OM_EN_USC_t.book Page 175
Page 179 of 464
SAFETY177
Installing A Child Restraint With A
Switchable Automatic Locking Retractor
(ALR):
Child restraint systems are designed to be
secured in vehicle seats by lap belts or the lap
belt portion of a lap/shoulder belt.
1. Place the child seat in the center of the
seating position. For some second row
seats, you may need to recline the seat
and/or raise the head restraint (if
adjustable) to get a better fit. If the rear
seat can be moved forward and rearward
in the vehicle, you may wish to move it to its
rear-most position to make room for the
child seat. You may also move the front
seat forward to allow more room for the
child seat.
2. Pull enough of the seat belt webbing from
the retractor to pass it through the belt path
of the child restraint. Do not twist the belt
webbing in the belt path.
3. Slide the latch plate into the buckle until you hear a “click.”
4. Pull on the webbing to make the lap portion tight against the child seat.
5. To lock the seat belt, pull down on the shoulder part of the belt until you have
pulled all the seat belt webbing out of the
retractor. Then, allow the webbing to retract
back into the retractor. As the webbing
retracts, you will hear a clicking sound. This
means the seat belt is now in the Automatic
Locking mode.
6. Try to pull the webbing out of the retractor. If it is locked, you should not be able to pull
out any webbing. If the retractor is not
locked, repeat step 5. 7. Finally, pull up on any excess webbing to
tighten the lap portion around the child
restraint while you push the child restraint
rearward and downward into the vehicle
seat.
8. If the child restraint has a top tether strap and the seating position has a top tether
anchorage, connect the tether strap to the
anchorage and tighten the tether strap. See
the section “Installing Child Restraints
Using the Top Tether Anchorage” for
directions to attach a tether anchor.
9. Test that the child restraint is installed tightly by pulling back and forth on the child
seat at the belt path. It should not move
more than 1 inch (25.4 mm) in any
direction.
Any seat belt system will loosen with time, so
check the belt occasionally, and pull it tight if
necessary.
WARNING!
Improper installation or failure to properly
secure a child restraint can lead to failure
of the restraint. The child could be badly
injured or killed.
Follow the child restraint manufacturer’s
directions exactly when installing an infant
or child restraint.
4
20_WD_OM_EN_USC_t.book Page 177