start stop button DODGE DURANGO 2020 Owners Manual
[x] Cancel search | Manufacturer: DODGE, Model Year: 2020, Model line: DURANGO, Model: DODGE DURANGO 2020Pages: 464, PDF Size: 22.14 MB
Page 15 of 464
GETTING TO KNOW YOUR VEHICLE13
Features/Benefits
Pre-installed on your Uconnect touchscreen
radio
Enhanced search and browsing capability
Robust NAV application (if equipped)
Add selected topics to a fast-access Favor -
ites category
Icon and symbol glossary
Warranty information
Crucial driver information and assistance:
Operating Instructions
Warranty Information
Fluid Level Standards
Maintenance Schedules
Emergency Procedures
911 Contact and More TIP:
When viewing a topic, tap the star icon to add it
to your Favorites, for easy access in the future.
KEYS
KEY FOB
Your vehicle uses a keyless ignition system. The
ignition system consists of a key fob with
Remote Keyless Entry (RKE) and a START/STOP
push button ignition system. The RKE system
consists of a key fob and Keyless Enter-N-Go
feature (if equipped).
NOTE:
The key fob may not be found if it is located next
to a mobile phone, laptop or other electronic
device; these devices may block the key fob’s
wireless signal.
The key fob also includes an emergency key,
which stores in the rear of the key fob.
The emergency key allows for entry into the
vehicle should the battery in the vehicle or the
key fob become depleted. The emergency key is
also for locking the glove compartment. You can
keep the emergency key with you when valet
parking.
To remove the emergency key, slide the
mechanical latch at the top of the key fob
sideways with your thumb and then pull the key
out with your other hand.
2
20_WD_OM_EN_USC_t.book Page 13
Page 16 of 464
14GETTING TO KNOW YOUR VEHICLE
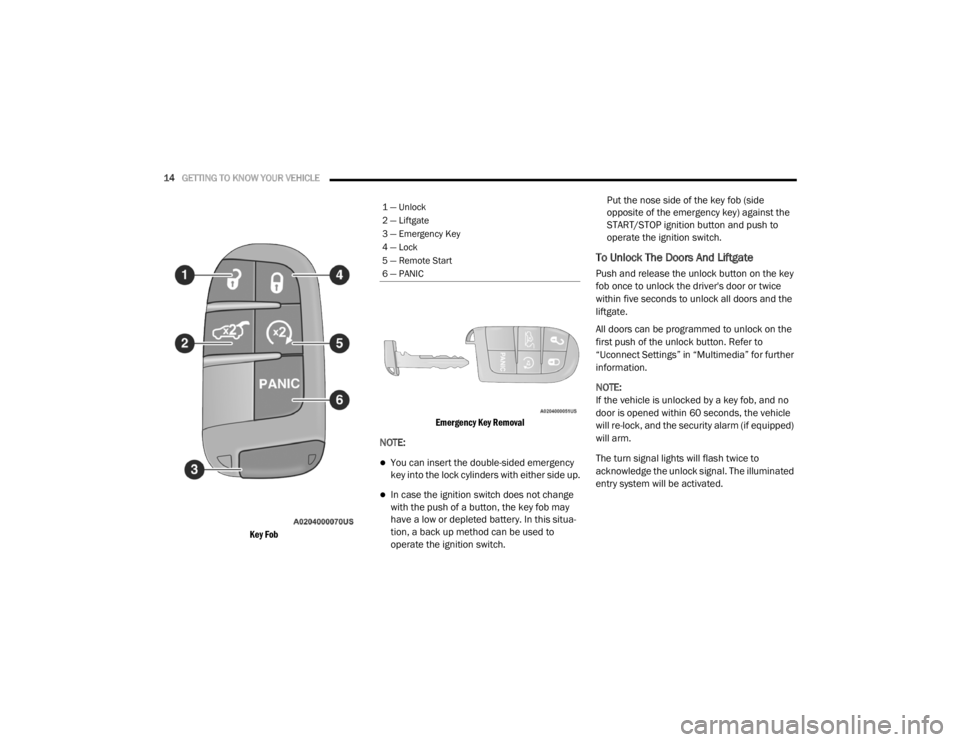
Key Fob Emergency Key Removal
NOTE:
You can insert the double-sided emergency
key into the lock cylinders with either side up.
In case the ignition switch does not change
with the push of a button, the key fob may
have a low or depleted battery. In this situa -
tion, a back up method can be used to
operate the ignition switch. Put the nose side of the key fob (side
opposite of the emergency key) against the
START/STOP ignition button and push to
operate the ignition switch.
To Unlock The Doors And Liftgate
Push and release the unlock button on the key
fob once to unlock the driver's door or twice
within five seconds to unlock all doors and the
liftgate.
All doors can be programmed to unlock on the
first push of the unlock button. Refer to
“Uconnect Settings” in “Multimedia” for further
information.
NOTE:
If the vehicle is unlocked by a key fob, and no
door is opened within 60 seconds, the vehicle
will re-lock, and the security alarm (if equipped)
will arm.
The turn signal lights will flash twice to
acknowledge the unlock signal. The illuminated
entry system will be activated.
1 — Unlock
2 — Liftgate
3 — Emergency Key
4 — Lock
5 — Remote Start
6 — PANIC
20_WD_OM_EN_USC_t.book Page 14
Page 20 of 464
18GETTING TO KNOW YOUR VEHICLE
(Continued)
NOTE:
In case the ignition switch does not change with
the push of a button, the key fob may have a low
or depleted battery. In this situation, a back up
method can be used to operate the ignition
switch. Put the nose side of the key fob (side
opposite of the emergency key) against the
START/STOP ignition button and push to
operate the ignition switch.
IGNITION OR ACCESSORY ON MESSAGE
Upon opening the driver's door when the
ignition is in ACC or ON (engine not running), a
chime will sound to remind you to place the
ignition in the OFF position. In addition to the
chime, the ignition or accessory on message will
display in the cluster.
NOTE:
With the Uconnect system, the power window
switches, radio, power sunroof (if equipped),
and power outlets will remain active for up to
10 minutes after the ignition is placed in the
OFF position. Opening either front door will
cancel this feature. The timing for this feature is programmable.
Refer to “Uconnect Settings” in “Multimedia”
for further information.
DEPLETED KEY FOB BATTERY
Key Not Detected Feature
If the ignition position does not change with a
push of the ignition button, and the instrument
cluster display message “Key Fob Not
Detected” is being displayed, the key fob may
have a low or depleted battery. In this situation,
a back up method can be used to operate the
keyless push button ignition.
WARNING!
Before exiting a vehicle, always shift the
automatic transmission into PARK and
apply the parking brake. Always make sure
the keyless ignition node is in the “OFF”
mode, remove the key fob from the vehicle
and lock the vehicle.
Never leave children alone in a vehicle, or
with access to an unlocked vehicle.
Allowing children to be in a vehicle unat
-
tended is dangerous for a number of
reasons. A child or others could be seriously
or fatally injured. Children should be
warned not to touch the parking brake,
brake pedal or the gear selector.
Do not leave the key fob in or near the
vehicle, or in a location accessible to chil-
dren, and do not leave the ignition of a
vehicle equipped with Keyless Enter-N-Go
in the ACC or ON/RUN mode. A child could
operate power windows, other controls, or
move the vehicle.
Do not leave children or animals inside
parked vehicles in hot weather. Interior
heat build-up may cause serious injury or
death.
CAUTION!
An unlocked vehicle is an invitation. Always
remove the key fobs from vehicle, place the
ignition in the OFF position and lock all doors
when leaving the vehicle unattended.
WARNING! (Continued)
20_WD_OM_EN_USC_t.book Page 18
Page 21 of 464
GETTING TO KNOW YOUR VEHICLE19
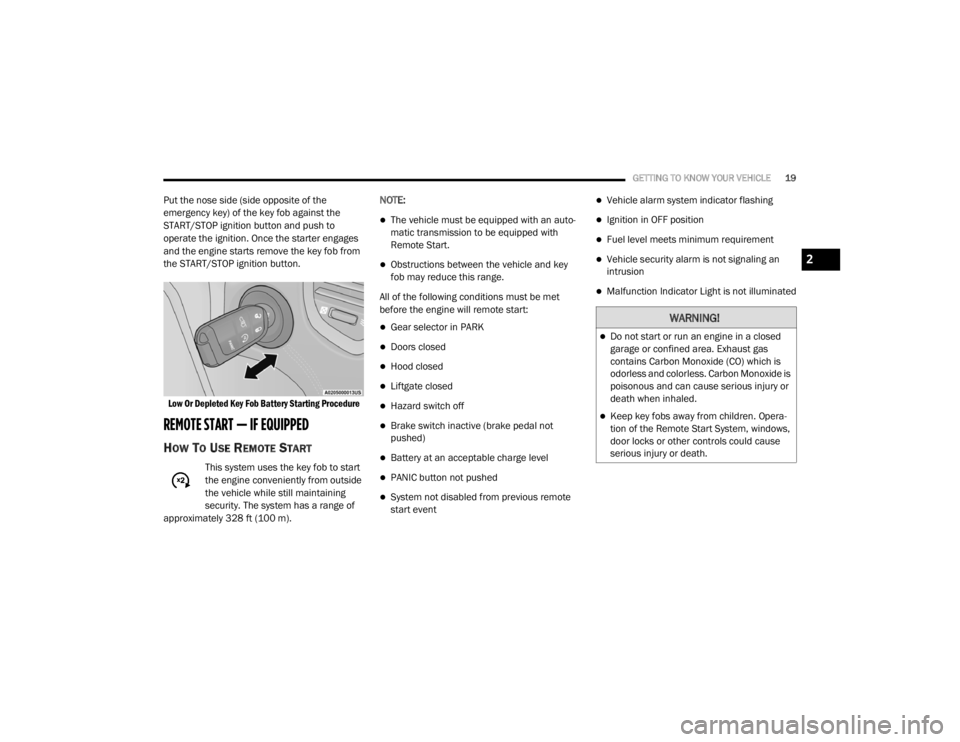
Put the nose side (side opposite of the
emergency key) of the key fob against the
START/STOP ignition button and push to
operate the ignition. Once the starter engages
and the engine starts remove the key fob from
the START/STOP ignition button.
Low Or Depleted Key Fob Battery Starting Procedure
REMOTE START — IF EQUIPPED
HOW TO USE REMOTE START
This system uses the key fob to start
the engine conveniently from outside
the vehicle while still maintaining
security. The system has a range of
approximately 328 ft (100 m). NOTE:
The vehicle must be equipped with an auto
-
matic transmission to be equipped with
Remote Start.
Obstructions between the vehicle and key
fob may reduce this range.
All of the following conditions must be met
before the engine will remote start:
Gear selector in PARK
Doors closed
Hood closed
Liftgate closed
Hazard switch off
Brake switch inactive (brake pedal not
pushed)
Battery at an acceptable charge level
PANIC button not pushed
System not disabled from previous remote
start event
Vehicle alarm system indicator flashing
Ignition in OFF position
Fuel level meets minimum requirement
Vehicle security alarm is not signaling an
intrusion
Malfunction Indicator Light is not illuminated
WARNING!
Do not start or run an engine in a closed
garage or confined area. Exhaust gas
contains Carbon Monoxide (CO) which is
odorless and colorless. Carbon Monoxide is
poisonous and can cause serious injury or
death when inhaled.
Keep key fobs away from children. Opera -
tion of the Remote Start System, windows,
door locks or other controls could cause
serious injury or death.
2
20_WD_OM_EN_USC_t.book Page 19
Page 22 of 464
20GETTING TO KNOW YOUR VEHICLE
REMOTE START ABORT MESSAGE — IF
E
QUIPPED
The following messages will display in the
instrument cluster display if the vehicle fails to
remote start or exits remote start prematurely:
Remote Start Aborted — Door Open
Remote Start Aborted — Hood Open
Remote Start Aborted — Liftgate Open
Remote Start Aborted — Fuel Low
Remote Start Disabled — Start Vehicle To
Reset
The Remote Start Abort message stays active
until the ignition is placed in the ON/RUN
position.
TO ENTER REMOTE START MODE
Push and release the remote start button on the
key fob twice within five seconds. The vehicle
doors will lock, the parking lights will flash, and
the horn will chirp twice (if programmed). Then,
the engine will start, and the vehicle will remain
in the Remote Start mode for a 15 minute cycle. NOTE:
If an engine fault is present or fuel level is
low, the vehicle will start and then shut down
in 10 seconds.
The park lamps will turn on and remain on
during Remote Start mode.
For security, power window and power
sunroof operation (if equipped) are disabled
when the vehicle is in the Remote Start
mode.
The engine can be started two consecutive
times with the key fob. However, the ignition
must be cycled by pushing the START/STOP
ignition button twice (or the ignition switch
must be placed in the ON/RUN position)
before you can repeat the start sequence for
a third cycle.
TO EXIT REMOTE START MODE
W
ITHOUT DRIVING THE VEHICLE
Push and release the remote start button one
time or allow the engine to run for the entire
15 minute cycle. NOTE:
To avoid unintentional shutdowns, the system
will disable for two seconds after receiving a
valid Remote Start request.
TO EXIT REMOTE START MODE AND
D
RIVE THE VEHICLE
Before the end of 15 minute cycle, push and
release the unlock button on the key fob to
unlock the doors, or unlock the vehicle using
Keyless Enter-N-Go — Passive Entry via the door
handles, and disarm the vehicle security alarm
(if equipped). Then, prior to the end of the
15 minute cycle, push and release the START/
STOP ignition button.
NOTE:
For vehicles equipped with the Keyless
Enter-N-Go — Passive Entry feature, the
message “Remote Start Active — Push Start
Button” will display in the instrument cluster
display until you push the ignition START/STOP
ignition button.
20_WD_OM_EN_USC_t.book Page 20
Page 33 of 464
GETTING TO KNOW YOUR VEHICLE31
PROGRAMMING THE MEMORY FEATURE
To create a new memory profile, perform the
following:
1. Place the vehicle’s ignition in the ON/RUN
position (do not start the engine).
2. Adjust all memory profile settings to desired preferences (i.e., seat, side mirror, power tilt
and telescopic steering column [if
equipped], and radio station presets).
3. Push the set (S) button on the memory switch, and then push the desired memory
button (1 or 2) within five seconds. The
instrument cluster display will display which
memory position has been set.
NOTE:
Memory profiles can be set without the vehicle
in PARK, but the vehicle must be in PARK to
recall a memory profile.
LINKING AND UNLINKING THE REMOTE
K
EYLESS ENTRY KEY FOB TO MEMORY
Your key fobs can be programmed to recall one
of two saved memory profiles by pushing the
unlock button on the key fob.
NOTE:
Before programming your key fobs you must
select the “Memory Linked To Fob” feature
through the Uconnect system settings. Refer to
“Uconnect Settings” in “Multimedia” for further
information.
To program your key fobs, perform the following:
1. Place the vehicle’s ignition in the OFF
position.
2. Select a desired memory profile, 1 or 2.
3. Once the profile has been recalled, push and release the set (S) button on the
memory switch. Then, within five seconds,
push and release button (1) or (2)
accordingly. “Memory Profile Set” (1 or 2)
will display in the instrument cluster display.
4. Push and release the lock button on the key fob within 10 seconds. NOTE:
Your key fobs can be unlinked from your
memory settings by pushing the set (S) button,
and within 10 seconds, followed by pushing the
unlock button on the key fob.
MEMORY POSITION RECALL
NOTE:
If a recall is attempted when the vehicle is not in
PARK, a message will be displayed in the instru
-
ment cluster display.
To recall the memory settings for driver one or
two, push the desired memory button (1 or 2) or
the unlock button on the key fob linked to the
desired memory position.
A recall can be canceled by pushing any of the
memory buttons during a recall (S, 1, or 2), or by
pushing any of the seat adjustment switches.
When a recall is canceled, the driver's seat and
telescopic steering column (if equipped) will
stop moving. A delay of one second will occur
before another recall can be selected.
2
20_WD_OM_EN_USC_t.book Page 31
Page 73 of 464
GETTING TO KNOW YOUR VEHICLE71
WINDOWS
POWER WINDOWS
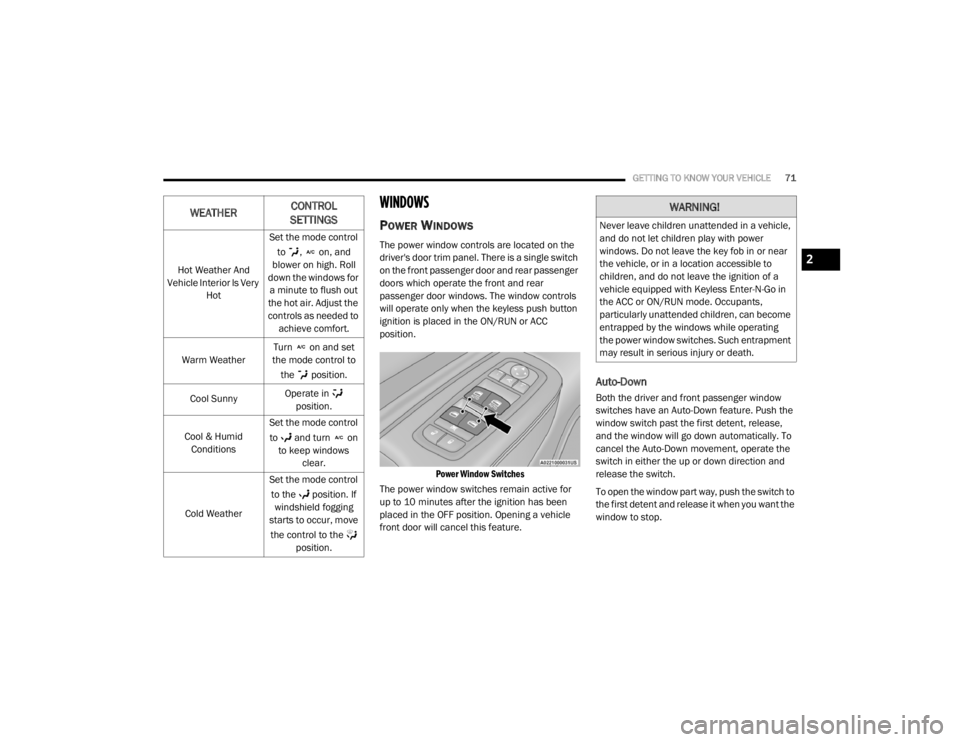
The power window controls are located on the
driver's door trim panel. There is a single switch
on the front passenger door and rear passenger
doors which operate the front and rear
passenger door windows. The window controls
will operate only when the keyless push button
ignition is placed in the ON/RUN or ACC
position.
Power Window Switches
The power window switches remain active for
up to 10 minutes after the ignition has been
placed in the OFF position. Opening a vehicle
front door will cancel this feature.
Auto-Down
Both the driver and front passenger window
switches have an Auto-Down feature. Push the
window switch past the first detent, release,
and the window will go down automatically. To
cancel the Auto-Down movement, operate the
switch in either the up or down direction and
release the switch.
To open the window part way, push the switch to
the first detent and release it when you want the
window to stop.
WEATHER CONTROL
SETTINGS
Hot Weather And
Vehicle Interior Is Very Hot Set the mode control
to , on, and
blower on high. Roll
down the windows for a minute to flush out
the hot air. Adjust the
controls as needed to achieve comfort.
Warm Weather Turn on and set
the mode control to
the position.
Cool Sunny Operate in
position.
Cool & Humid Conditions Set the mode control
to and turn on to keep windows clear.
Cold Weather Set the mode control
to the position. If windshield fogging
starts to occur, move
the control to the position.
WARNING!
Never leave children unattended in a vehicle,
and do not let children play with power
windows. Do not leave the key fob in or near
the vehicle, or in a location accessible to
children, and do not leave the ignition of a
vehicle equipped with Keyless Enter-N-Go in
the ACC or ON/RUN mode. Occupants,
particularly unattended children, can become
entrapped by the windows while operating
the power window switches. Such entrapment
may result in serious injury or death.
2
20_WD_OM_EN_USC_t.book Page 71
Page 103 of 464
GETTING TO KNOW YOUR INSTRUMENT PANEL101
Five Second Stored Messages
When the appropriate conditions occur, this
type of message takes control of the main
display area for five seconds and then
returns to the previous screen. Most of the
messages of this type are then stored (as
long as the condition that activated it
remains active) and can be reviewed from
the “Messages” main menu item. Examples
of this message type are “Right Front Turn
Signal Lamp Out” and “Low Tire Pressure.”
Unstored Messages
This message type is displayed indefinitely or
until the condition that activated the
message is cleared. Examples of this
message type are “Turn Signal On” (if a turn
signal is left on) and “Lights On” (if driver
leaves the vehicle with the lights on).
Unstored Messages Until RUN
These messages deal primarily with the
Remote Start feature. This message type is
displayed until the ignition is in the RUN
state. Examples of this message type are
“Remote Start Canceled - Door Ajar” and
“Press Brake Pedal and Push Button to
Start.”
Five Second Unstored Messages
When the appropriate conditions occur, this
type of message takes control of the main
display area for five seconds and then
returns to the previous screen. An example of
this message type is “Automatic High Beams
On.”
ENGINE OIL LIFE RESET
Oil Change Required
Your vehicle is equipped with an engine oil
change indicator system. The “Oil Change
Required” message will display in the
instrument cluster display for five seconds after
a single chime has sounded, to indicate the next
scheduled oil change interval. The engine oil
change indicator system is duty cycle based,
which means the engine oil change interval may
fluctuate, dependent upon your personal
driving style.
Unless reset, this message will continue to
display each time the ignition is placed in the
ON/RUN position. To turn off the message
temporarily, push and release the OK or arrow
buttons. To reset the oil change indicator system (after
performing the scheduled maintenance), refer
to the following procedure.
Vehicles Equipped With Keyless Enter-N-Go —
Ignition
Use the steering wheel instrument cluster
display controls for the following procedure(s):
1. Without pressing the brake pedal, push the
ENGINE START/STOP button and place the
ignition in the ON/RUN position (do not
start the engine).
2. Push and release the down arrow button to
scroll downward through the main menu to
“Vehicle Info.”
3. Push and release the right arrow button to
access the ”Oil Life” screen.
4. Push and hold the OK button to reset oil life.
If conditions are met, the gauge and
numeric display will update to show 100%.
If conditions are not met a pop-up message
of “To reset oil life engine must be off with
ignition in run” will be displayed (for five
seconds), and the user will remain at the Oil
Life screen.
3
20_WD_OM_EN_USC_t.book Page 101
Page 104 of 464
102GETTING TO KNOW YOUR INSTRUMENT PANEL
5. Push and release the up or down arrow
button to exit the submenu screen.
NOTE:
If the indicator message illuminates when you
start the vehicle, the oil change indicator
system did not reset. If necessary, repeat this
procedure.
Secondary Method Of Resetting Engine Oil Life
1. Without pressing the brake pedal, push the ENGINE START/STOP button and place the
ignition to the ON/RUN position (do not
start the engine).
2. Fully press the accelerator pedal, slowly, three times within 10 seconds.
3. Without pushing the brake pedal, push the ENGINE START/STOP button once to return
the ignition to the OFF/LOCK position.
NOTE:
If the indicator message illuminates when you
start the vehicle, the oil change indicator
system did not reset. If necessary, repeat this
procedure.DISPLAY AND MESSAGES
Includes the following, but not limited to:
Front Seat Belts Unbuckled
Driver Seat Belt Unbuckled
Passenger Seat Belt Unbuckled
Traction Control Off
Washer Fluid Low
Oil Pressure Low
Oil Change Due
Fuel Low
Service Anti-lock Brake System
Service Electronic Throttle Control
Service Power Steering
Cruise Off
Cruise Ready
ACC Override
Cruise Set To XXX mph or km/h
Tire Pressure Screen With Low Tire(s)
Service Tire Pressure System
Park Brake Engaged
Brake Fluid Low
Engine Temperature Hot
Lights On
Right Front Turn Signal Light Out
Right Rear Turn Signal Light Out
Left Front Turn Signal Light Out
Left Rear Turn Signal Light Out
Ignition or Accessory On
Vehicle Not In Park
Remote Start Active Push Start Button
Remote Start Canceled Fuel Low
Remote Start Canceled Door Open
Remote Start Canceled Hood Open
Remote Start Canceled Liftgate Open
Remote Start Canceled Time Expired
Remote Start Disabled Start To Reset
20_WD_OM_EN_USC_t.book Page 102
Page 108 of 464
106GETTING TO KNOW YOUR INSTRUMENT PANEL
Trip
Push and release the up or down arrow button
until the Trip icon/title is highlighted in the
instrument cluster display, then push and
release the left or right arrow button to select
Trip A or Trip B.
The Trip A and Trip B information will display the
following:
Distance
Average Fuel Economy
Elapsed Time
Hold the OK button to reset all the information.
Trailer Tow — If Equipped
Push and release the up or down arrow button
until the Trailer Tow Menu icon/title is
highlighted in the instrument cluster display.
Push and release the left or right arrow button
to select Trailer Trip or Trailer Brake.
Trailer Trip will display the following:
Distance
NOTE:
Press and hold the OK button to reset all the
information. Trailer Brake will display the following:
Output
Type
Gain
Stop/Start – If Equipped
Push and release the
up or down
arrow button on the steering wheel to
scroll to the Stop/Start menu in the
driver interactive display.
For further information on the use and different
modes of the Stop/Start System, refer to “Stop/
Start System – If Equipped” in “Starting And
Operating”.
Audio
Push and release the up or down arrow button
until the Audio Menu icon/title is highlighted in
the instrument cluster display. This menu will
display the audio source information, including
the Song name, Artist name, and audio source
with an accompanying graphic.
Stored Messages
Push and release the up or down arrow button
until the Messages Menu item is highlighted. This feature shows the number of stored
warning messages. Pushing the
left or right
arrow button will allow you to see what the
stored messages are.
When no messages are present, main menu
icon will be a closed envelope.
Screen Setup
Push and release the up or down arrow button
until the Screen Setup Menu icon/title is
highlighted in the instrument cluster display.
Push and release the OK button to enter the
submenus and follow the prompts on the
screen as needed. The Screen Setup feature
allows you to change what information is
displayed in the instrument cluster as well as
the location that information is displayed.
Current Gear
On
Off (default setting)
Gear Display
Full (default setting)
Single
20_WD_OM_EN_USC_t.book Page 106