display DODGE DURANGO 2020 User Guide
[x] Cancel search | Manufacturer: DODGE, Model Year: 2020, Model line: DURANGO, Model: DODGE DURANGO 2020Pages: 464, PDF Size: 22.14 MB
Page 65 of 464
GETTING TO KNOW YOUR VEHICLE63
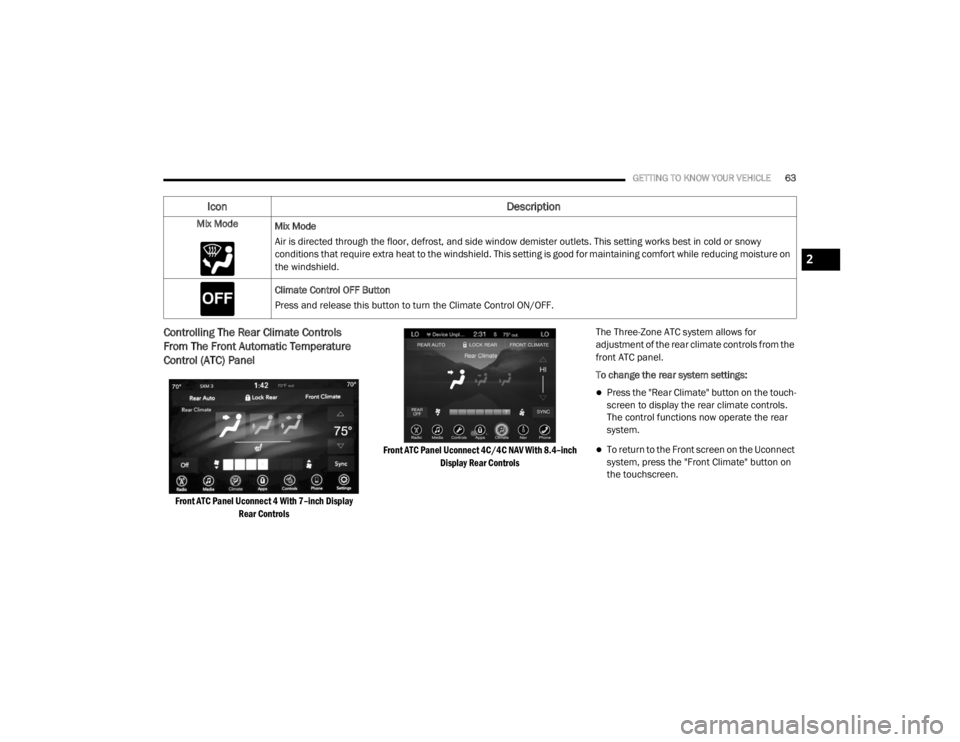
Controlling The Rear Climate Controls
From The Front Automatic Temperature
Control (ATC) Panel
Front ATC Panel Uconnect 4 With 7–inch Display
Rear Controls Front ATC Panel Uconnect 4C/4C NAV With 8.4–inch
Display Rear Controls
The Three-Zone ATC system allows for
adjustment of the rear climate controls from the
front ATC panel.
To change the rear system settings:
Press the "Rear Climate" button on the touch
-
screen to display the rear climate controls.
The control functions now operate the rear
system.
To return to the Front screen on the Uconnect
system, press the "Front Climate" button on
the touchscreen.
Mix Mode
Mix Mode
Air is directed through the floor, defrost, and side window demister outlets. This setting works best in cold or snowy
conditions that require extra heat to the windshield. This setting is good for maintaining comfort while reducing moisture on
the windshield.
Climate Control OFF Button
Press and release this button to turn the Climate Control ON/OFF.
Icon Description
2
20_WD_OM_EN_USC_t.book Page 63
Page 68 of 464
66GETTING TO KNOW YOUR VEHICLE
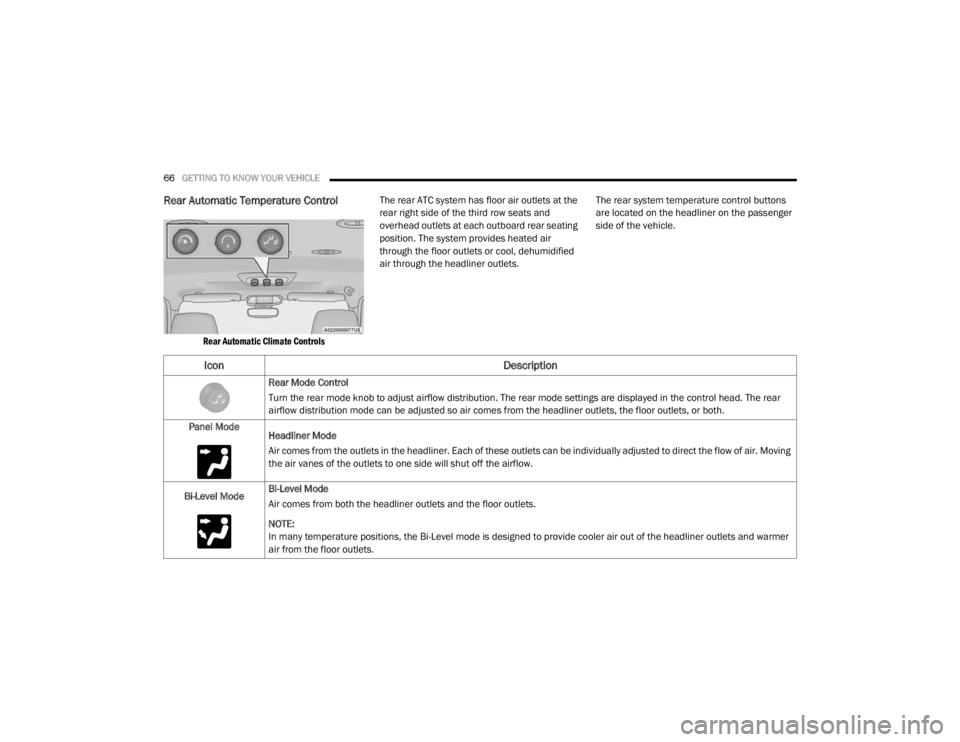
Rear Automatic Temperature Control
Rear Automatic Climate Controls
The rear ATC system has floor air outlets at the
rear right side of the third row seats and
overhead outlets at each outboard rear seating
position. The system provides heated air
through the floor outlets or cool, dehumidified
air through the headliner outlets.
The rear system temperature control buttons
are located on the headliner on the passenger
side of the vehicle.
Icon
Description
Rear Mode Control
Turn the rear mode knob to adjust airflow distribution. The rear mode settings are displayed in the control head. The rear
airflow distribution mode can be adjusted so air comes from the headliner outlets, the floor outlets, or both.
Panel Mode Headliner Mode
Air comes from the outlets in the headliner. Each of these outlets can be individually adjusted to direct the flow of air. Moving
the air vanes of the outlets to one side will shut off the airflow.
Bi-Level Mode Bi-Level Mode
Air comes from both the headliner outlets and the floor outlets.
NOTE:
In many temperature positions, the Bi-Level mode is designed to provide cooler air out of the headliner outlets and warmer
air from the floor outlets.
20_WD_OM_EN_USC_t.book Page 66
Page 69 of 464
GETTING TO KNOW YOUR VEHICLE67
Floor Mode
Floor Mode
Air comes from the floor outlets.
Rear Temperature Control
Turn the rear temperature knob to adjust the temperature. Turn it to the right (clockwise) to raise the temperature. Turn it to
the left (counterclockwise) to lower the temperature. The rear temperature setting is displayed in the control head.
Rear Blower Control
Turn the rear blower knob to regulate the amount of air forced through the system in any mode you select. The blower speed
increases as you move the knob clockwise from the off position. The rear blower setting is displayed in the control head.
Rear AUTO Setting
Turn the blower knob to the AUTO setting. This feature automatically controls the rear interior cabin temperature by adjusting
airflow distribution and amount. Changing the blower knob to any other blower setting will cause the rear system to switch to
manual mode. Refer to “Automatic Operation” within this section for further information.
Rear Temperature Lock
The Rear Temperature Lock symbol on the control head is illuminated when the rear controls are locked by the front system.
Icon Description
2
20_WD_OM_EN_USC_t.book Page 67
Page 70 of 464
68GETTING TO KNOW YOUR VEHICLE
Rear Lock
Pressing the Rear Temperature Lock button on
the Uconnect touchscreen, illuminates a lock
symbol in the rear display. The rear temperature
and air source are controlled from the front
Uconnect system.
Rear second row occupants can only adjust the
rear ATC control when the Rear Temperature
Lock button is turned off.
The rear ATC is located in the headliner, near
the center of the vehicle.
Press the Rear Temperature Lock button on
the Uconnect touchscreen. This turns off the
Rear Temperature Lock icon in the rear
temperature knob.
Rotate the Rear Blower, Rear Temperature
and the Rear Mode Control knobs to suit your
comfort needs.
ATC is selected by adjusting the rear blower
knob counterclockwise to AUTO.
Once the desired temperature is displayed, the
ATC System will automatically achieve and
maintain that comfort level. When the system is
set up for your comfort level, it is not necessary
to change the settings. You will experience the greatest efficiency by
simply allowing the system to function
automatically.
CLIMATE CONTROL FUNCTIONS
A/C (Air Conditioning)
The A/C (Air Conditioning) button allows the
operator to manually activate or deactivate the
air conditioning system. When the air
conditioning system is turned on, cool
dehumidified air will flow through the outlets
into the cabin. For improved fuel economy,
press the A/C button to turn off the air
conditioning and manually adjust the blower
and airflow mode settings. Also, make sure to
select only Panel, Bi-Level, or Floor modes.
NOTE:
For Manual Climate Controls, if the system is
in Mix, Floor or Defrost Mode, the A/C can be
turned off, but the A/C system shall remain
active to prevent fogging of the windows.
If fog or mist appears on the windshield or
side glass, select Defrost mode, and increase
blower speed if needed.
If your A/C performance seems lower than
expected, check the front of the A/C
condenser (located in front of the radiator),
for an accumulation of dirt or insects. Clean
with a gentle water spray from the front of the
radiator and through the condenser.
MAX A/C
MAX A/C sets the control for maximum cooling
performance.
Press and release to toggle between MAX A/C
and the prior settings. The button illuminates
when MAX A/C is on.
In MAX A/C, the blower level and mode position
can be adjusted to desired user settings.
Pressing other settings will cause the MAX A/C
operation to switch to the selected setting and
MAX A/C to exit.
Recirculation
In cold weather, use of Recirculation mode may
lead to excessive window fogging. The
Recirculation feature may be unavailable
(button on the touchscreen greyed out) if
conditions exist that could create fogging on the
inside of the windshield.
20_WD_OM_EN_USC_t.book Page 68
Page 71 of 464

GETTING TO KNOW YOUR VEHICLE69
AUTOMATIC TEMPERATURE CONTROL
(ATC)
Automatic Operation
1. Push the AUTO button on the front
Automatic Temperature Control (ATC)
Panel and the word “AUTO” will illuminate
in the front ATC display, along with two
temperatures for the driver and front
passenger. The system will then automat -
ically regulate the amount of airflow.
2. Adjust the temperature you would like the system to maintain, by adjusting the driver,
passenger, and rear temperatures. Once
the desired temperature is displayed, the
system will achieve and automatically
maintain that comfort level.
3. When the system is set up for your comfort level, it is not necessary to change the
settings. You will experience the greatest
efficiency by simply allowing the system to
function automatically. NOTE:
It is not necessary to move the temperature
settings. The system automatically adjusts the
temperature, mode and fan speed to provide
comfort as quickly as possible.
To provide you with maximum comfort in the
automatic mode, during cold start-ups, the
blower fan will remain on low until the engine
warms up. The fan will engage immediately if
the Defrost mode is selected, or by changing the
front blower knob setting.
Manual Operation Override
This system offers a full complement of manual
override features. The AUTO symbol in the front
ATC display will be turned off when the system
is being used in the manual mode.
NOTE:
The system will not automatically sense the
presence of fog, mist or ice on the windshield.
Defrost mode must be manually selected to
clear the windshield and side glass.
OPERATING TIPS
NOTE:
Refer to the chart at the end of this section for
suggested control settings for various weather
conditions.
Summer Operation
The engine cooling system must be protected
with a high-quality antifreeze coolant to provide
proper corrosion protection and to protect
against engine overheating. A solution of 50%
OAT (Organic Additive Technology) coolant that
meets the requirements of FCA Material
Standard MS.90032 and 50% water is
recommended. Refer to “Fluids and Lubricants”
in “Technical Specifications” for proper coolant
selection.
Winter Operation
Use of the Air Recirculation mode during Winter
months is not recommended because it may
cause window fogging.
2
20_WD_OM_EN_USC_t.book Page 69
Page 98 of 464
96GETTING TO KNOW YOUR INSTRUMENT PANEL
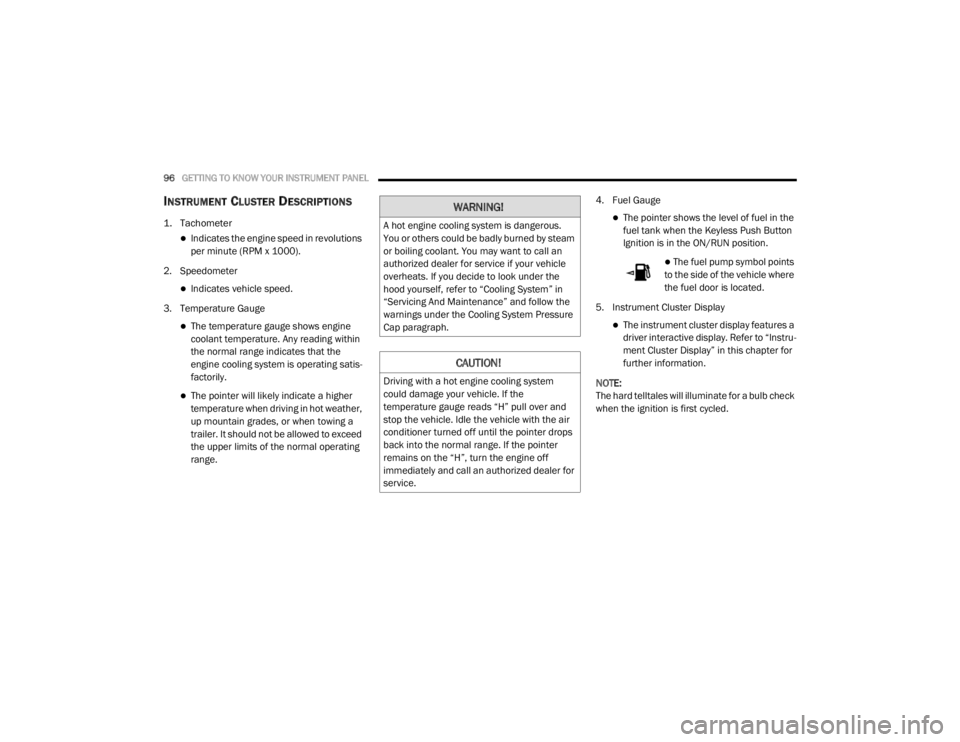
INSTRUMENT CLUSTER DESCRIPTIONS
1. Tachometer
Indicates the engine speed in revolutions
per minute (RPM x 1000).
2. Speedometer
Indicates vehicle speed.
3. Temperature Gauge
The temperature gauge shows engine
coolant temperature. Any reading within
the normal range indicates that the
engine cooling system is operating satis -
factorily.
The pointer will likely indicate a higher
temperature when driving in hot weather,
up mountain grades, or when towing a
trailer. It should not be allowed to exceed
the upper limits of the normal operating
range. 4. Fuel Gauge
The pointer shows the level of fuel in the
fuel tank when the Keyless Push Button
Ignition is in the ON/RUN position.
The fuel pump symbol points
to the side of the vehicle where
the fuel door is located.
5. Instrument Cluster Display
The instrument cluster display features a
driver interactive display. Refer to “Instru -
ment Cluster Display” in this chapter for
further information.
NOTE:
The hard telltales will illuminate for a bulb check
when the ignition is first cycled.
WARNING!
A hot engine cooling system is dangerous.
You or others could be badly burned by steam
or boiling coolant. You may want to call an
authorized dealer for service if your vehicle
overheats. If you decide to look under the
hood yourself, refer to “Cooling System” in
“Servicing And Maintenance” and follow the
warnings under the Cooling System Pressure
Cap paragraph.
CAUTION!
Driving with a hot engine cooling system
could damage your vehicle. If the
temperature gauge reads “H” pull over and
stop the vehicle. Idle the vehicle with the air
conditioner turned off until the pointer drops
back into the normal range. If the pointer
remains on the “H”, turn the engine off
immediately and call an authorized dealer for
service.
20_WD_OM_EN_USC_t.book Page 96
Page 100 of 464
98GETTING TO KNOW YOUR INSTRUMENT PANEL
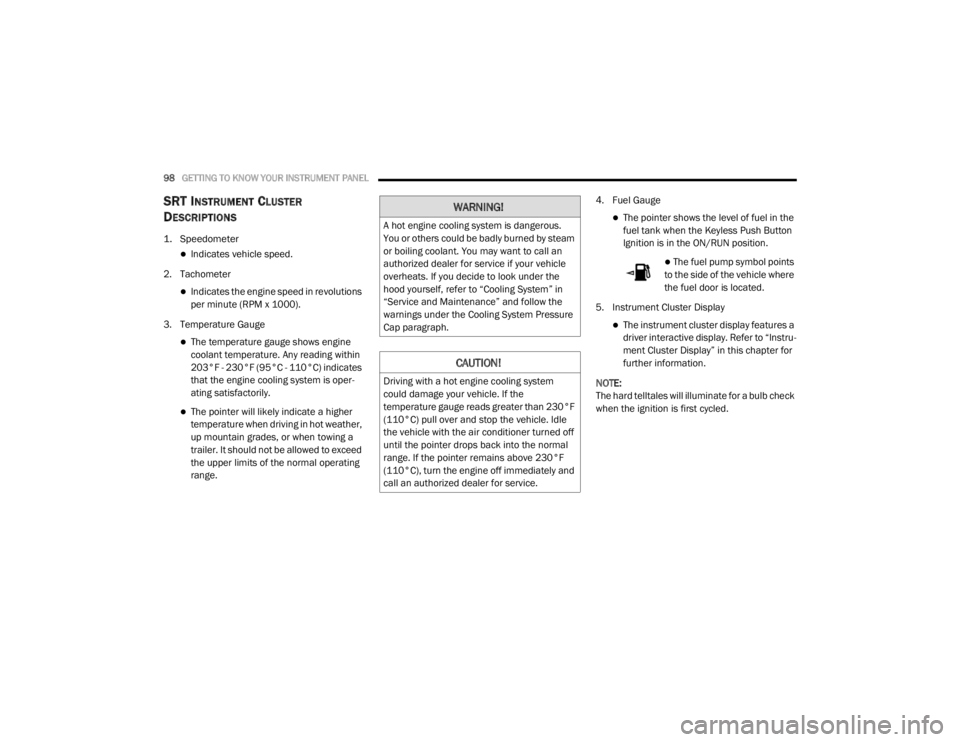
SRT INSTRUMENT CLUSTER
D
ESCRIPTIONS
1. Speedometer
Indicates vehicle speed.
2. Tachometer
Indicates the engine speed in revolutions
per minute (RPM x 1000).
3. Temperature Gauge
The temperature gauge shows engine
coolant temperature. Any reading within
203°F - 230°F (95°C - 110°C) indicates
that the engine cooling system is oper -
ating satisfactorily.
The pointer will likely indicate a higher
temperature when driving in hot weather,
up mountain grades, or when towing a
trailer. It should not be allowed to exceed
the upper limits of the normal operating
range. 4. Fuel Gauge
The pointer shows the level of fuel in the
fuel tank when the Keyless Push Button
Ignition is in the ON/RUN position.
The fuel pump symbol points
to the side of the vehicle where
the fuel door is located.
5. Instrument Cluster Display
The instrument cluster display features a
driver interactive display. Refer to “Instru -
ment Cluster Display” in this chapter for
further information.
NOTE:
The hard telltales will illuminate for a bulb check
when the ignition is first cycled.
WARNING!
A hot engine cooling system is dangerous.
You or others could be badly burned by steam
or boiling coolant. You may want to call an
authorized dealer for service if your vehicle
overheats. If you decide to look under the
hood yourself, refer to “Cooling System” in
“Service and Maintenance” and follow the
warnings under the Cooling System Pressure
Cap paragraph.
CAUTION!
Driving with a hot engine cooling system
could damage your vehicle. If the
temperature gauge reads greater than 230°F
(110°C) pull over and stop the vehicle. Idle
the vehicle with the air conditioner turned off
until the pointer drops back into the normal
range. If the pointer remains above 230°F
(110°C), turn the engine off immediately and
call an authorized dealer for service.
20_WD_OM_EN_USC_t.book Page 98
Page 101 of 464
GETTING TO KNOW YOUR INSTRUMENT PANEL99
INSTRUMENT CLUSTER DISPLAY
Your vehicle will be equipped with an
instrument cluster display, which offers useful
information to the driver. With the ignition in the
OFF mode, opening/closing of a door will
activate the display for viewing, and display the
total miles, or kilometers, in the odometer. Your
instrument cluster display is designed to display
important information about your vehicle’s
systems and features. Using a driver interactive
display located on the instrument panel, your
instrument cluster display can show how
systems are working and give you warnings
when they are not. The steering wheel mounted
controls allow you to scroll through the main
menus and submenus. You can access the
specific information you want and make
selections and adjustments.
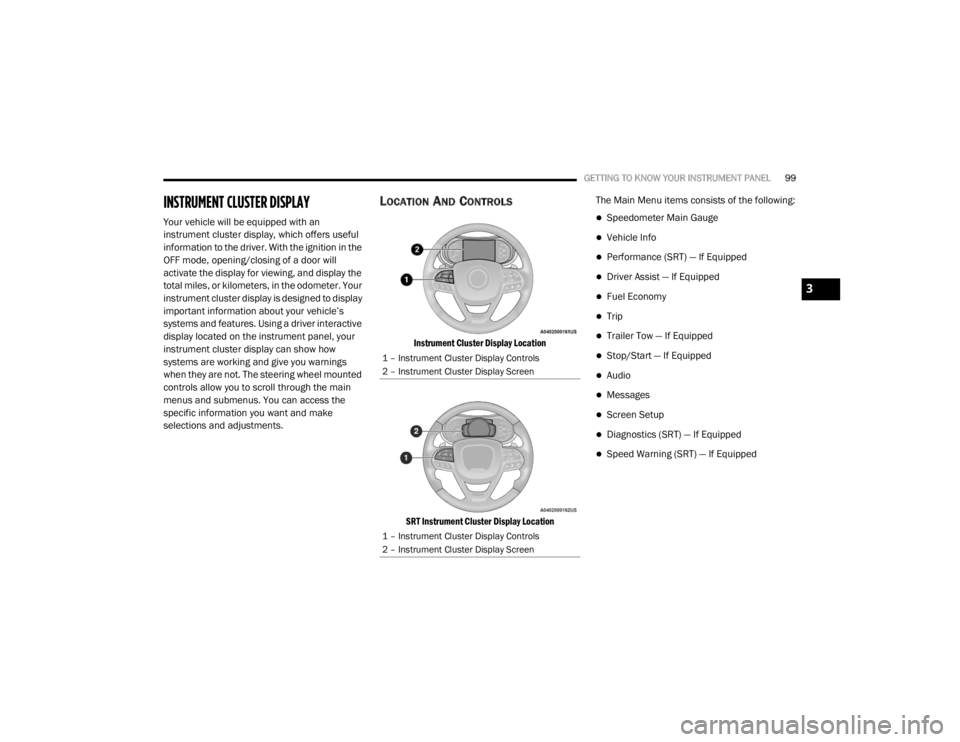
LOCATION AND CONTROLS
Instrument Cluster Display Location
SRT Instrument Cluster Display Location
The Main Menu items consists of the following:
Speedometer Main Gauge
Vehicle Info
Performance (SRT) — If Equipped
Driver Assist — If Equipped
Fuel Economy
Trip
Trailer Tow — If Equipped
Stop/Start — If Equipped
Audio
Messages
Screen Setup
Diagnostics (SRT) — If Equipped
Speed Warning (SRT) — If Equipped
1 – Instrument Cluster Display Controls
2 – Instrument Cluster Display Screen
1 – Instrument Cluster Display Controls
2 – Instrument Cluster Display Screen
3
20_WD_OM_EN_USC_t.book Page 99
Page 102 of 464
100GETTING TO KNOW YOUR INSTRUMENT PANEL
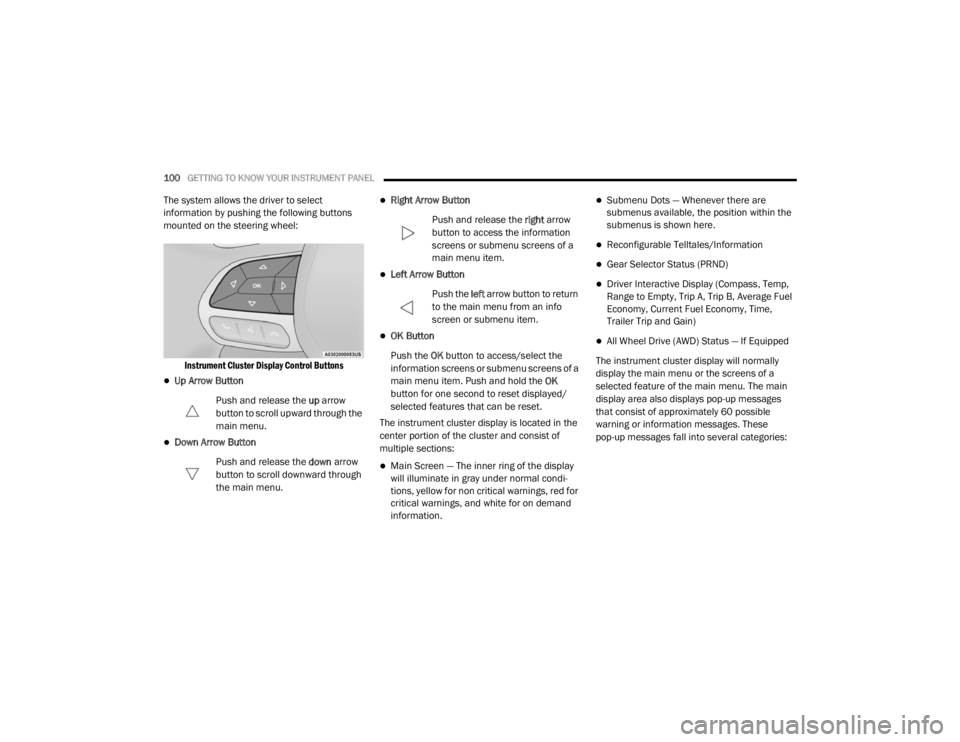
The system allows the driver to select
information by pushing the following buttons
mounted on the steering wheel:
Instrument Cluster Display Control Buttons
Up Arrow Button
Push and release the up arrow
button to scroll upward through the
main menu.
Down Arrow Button
Push and release the down arrow
button to scroll downward through
the main menu.
Right Arrow Button
Push and release the right arrow
button to access the information
screens or submenu screens of a
main menu item.
Left Arrow Button
Push the left arrow button to return
to the main menu from an info
screen or submenu item.
OK Button
Push the OK button to access/select the
information screens or submenu screens of a
main menu item. Push and hold the OK
button for one second to reset displayed/
selected features that can be reset.
The instrument cluster display is located in the
center portion of the cluster and consist of
multiple sections:
Main Screen — The inner ring of the display
will illuminate in gray under normal condi -
tions, yellow for non critical warnings, red for
critical warnings, and white for on demand
information.
Submenu Dots — Whenever there are
submenus available, the position within the
submenus is shown here.
Reconfigurable Telltales/Information
Gear Selector Status (PRND)
Driver Interactive Display (Compass, Temp,
Range to Empty, Trip A, Trip B, Average Fuel
Economy, Current Fuel Economy, Time,
Trailer Trip and Gain)
All Wheel Drive (AWD) Status — If Equipped
The instrument cluster display will normally
display the main menu or the screens of a
selected feature of the main menu. The main
display area also displays pop-up messages
that consist of approximately 60 possible
warning or information messages. These
pop-up messages fall into several categories:
20_WD_OM_EN_USC_t.book Page 100
Page 103 of 464

GETTING TO KNOW YOUR INSTRUMENT PANEL101
Five Second Stored Messages
When the appropriate conditions occur, this
type of message takes control of the main
display area for five seconds and then
returns to the previous screen. Most of the
messages of this type are then stored (as
long as the condition that activated it
remains active) and can be reviewed from
the “Messages” main menu item. Examples
of this message type are “Right Front Turn
Signal Lamp Out” and “Low Tire Pressure.”
Unstored Messages
This message type is displayed indefinitely or
until the condition that activated the
message is cleared. Examples of this
message type are “Turn Signal On” (if a turn
signal is left on) and “Lights On” (if driver
leaves the vehicle with the lights on).
Unstored Messages Until RUN
These messages deal primarily with the
Remote Start feature. This message type is
displayed until the ignition is in the RUN
state. Examples of this message type are
“Remote Start Canceled - Door Ajar” and
“Press Brake Pedal and Push Button to
Start.”
Five Second Unstored Messages
When the appropriate conditions occur, this
type of message takes control of the main
display area for five seconds and then
returns to the previous screen. An example of
this message type is “Automatic High Beams
On.”
ENGINE OIL LIFE RESET
Oil Change Required
Your vehicle is equipped with an engine oil
change indicator system. The “Oil Change
Required” message will display in the
instrument cluster display for five seconds after
a single chime has sounded, to indicate the next
scheduled oil change interval. The engine oil
change indicator system is duty cycle based,
which means the engine oil change interval may
fluctuate, dependent upon your personal
driving style.
Unless reset, this message will continue to
display each time the ignition is placed in the
ON/RUN position. To turn off the message
temporarily, push and release the OK or arrow
buttons. To reset the oil change indicator system (after
performing the scheduled maintenance), refer
to the following procedure.
Vehicles Equipped With Keyless Enter-N-Go —
Ignition
Use the steering wheel instrument cluster
display controls for the following procedure(s):
1. Without pressing the brake pedal, push the
ENGINE START/STOP button and place the
ignition in the ON/RUN position (do not
start the engine).
2. Push and release the down arrow button to
scroll downward through the main menu to
“Vehicle Info.”
3. Push and release the right arrow button to
access the ”Oil Life” screen.
4. Push and hold the OK button to reset oil life.
If conditions are met, the gauge and
numeric display will update to show 100%.
If conditions are not met a pop-up message
of “To reset oil life engine must be off with
ignition in run” will be displayed (for five
seconds), and the user will remain at the Oil
Life screen.
3
20_WD_OM_EN_USC_t.book Page 101