key DODGE DURANGO 2020 Workshop Manual
[x] Cancel search | Manufacturer: DODGE, Model Year: 2020, Model line: DURANGO, Model: DODGE DURANGO 2020Pages: 464, PDF Size: 22.14 MB
Page 389 of 464
MULTIMEDIA387
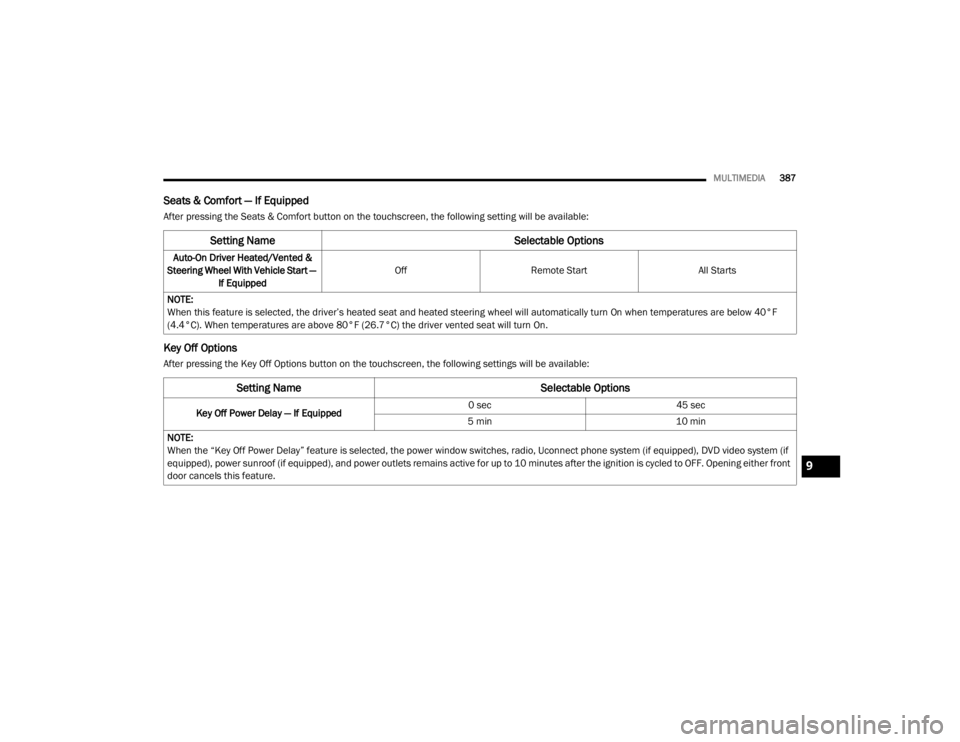
Seats & Comfort — If Equipped
After pressing the Seats & Comfort button on the touchscreen, the following setting will be available:
Key Off Options
After pressing the Key Off Options button on the touchscreen, the following settings will be available:
Setting Name Selectable Options
Auto-On Driver Heated/Vented &
Steering Wheel With Vehicle Start — If Equipped Off
Remote Start All Starts
NOTE:
When this feature is selected, the driver’s heated seat and heated steering wheel will automatically turn On when temperatures are below 40°F
(4.4°C). When temperatures are above 80°F (26.7°C) the driver vented seat will turn On.
Setting Name Selectable Options
Key Off Power Delay — If Equipped 0 sec
45 sec
5 min 10 min
NOTE:
When the “Key Off Power Delay” feature is selected, the power window switches, radio, Uconnect phone system (if equipped), DVD video system (if
equipped), power sunroof (if equipped), and power outlets remains active for up to 10 minutes after the ignition is cycled to OFF. Opening either front
door cancels this feature.
9
20_WD_OM_EN_USC_t.book Page 387
Page 400 of 464
398MULTIMEDIA
When you are receiving a station that you wish
to commit into memory, press and hold the
desired numbered button on the touchscreen
for more than two seconds or until you hear a
confirmation beep.
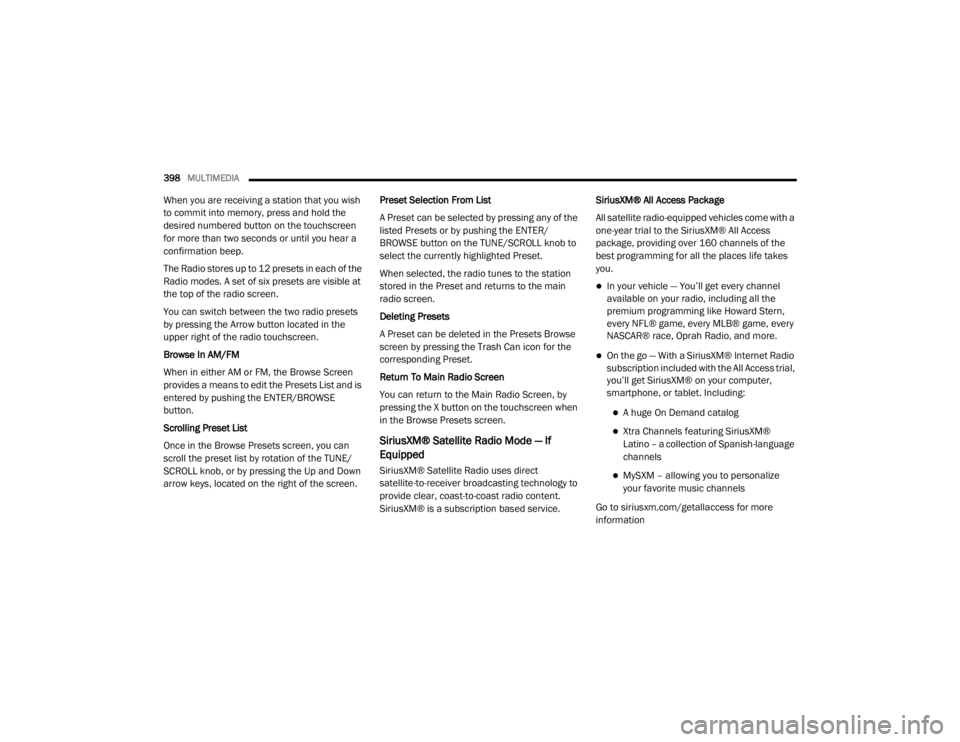
The Radio stores up to 12 presets in each of the
Radio modes. A set of six presets are visible at
the top of the radio screen.
You can switch between the two radio presets
by pressing the Arrow button located in the
upper right of the radio touchscreen.
Browse In AM/FM
When in either AM or FM, the Browse Screen
provides a means to edit the Presets List and is
entered by pushing the ENTER/BROWSE
button.
Scrolling Preset List
Once in the Browse Presets screen, you can
scroll the preset list by rotation of the TUNE/
SCROLL knob, or by pressing the Up and Down
arrow keys, located on the right of the screen. Preset Selection From List
A Preset can be selected by pressing any of the
listed Presets or by pushing the ENTER/
BROWSE button on the TUNE/SCROLL knob to
select the currently highlighted Preset.
When selected, the radio tunes to the station
stored in the Preset and returns to the main
radio screen.
Deleting Presets
A Preset can be deleted in the Presets Browse
screen by pressing the Trash Can icon for the
corresponding Preset.
Return To Main Radio Screen
You can return to the Main Radio Screen, by
pressing the X button on the touchscreen when
in the Browse Presets screen.
SiriusXM® Satellite Radio Mode — If
Equipped
SiriusXM® Satellite Radio uses direct
satellite-to-receiver broadcasting technology to
provide clear, coast-to-coast radio content.
SiriusXM® is a subscription based service.SiriusXM® All Access Package
All satellite radio-equipped vehicles come with a
one-year trial to the SiriusXM® All Access
package, providing over 160 channels of the
best programming for all the places life takes
you.
In your vehicle — You’ll get every channel
available on your radio, including all the
premium programming like Howard Stern,
every NFL® game, every MLB® game, every
NASCAR® race, Oprah Radio, and more.
On the go — With a SiriusXM® Internet Radio
subscription included with the All Access trial,
you’ll get SiriusXM® on your computer,
smartphone, or tablet. Including:
A huge On Demand catalog
Xtra Channels featuring SiriusXM®
Latino – a collection of Spanish-language
channels
MySXM – allowing you to personalize
your favorite music channels
Go to siriusxm.com/getallaccess for more
information
20_WD_OM_EN_USC_t.book Page 398
Page 414 of 464
412MULTIMEDIA
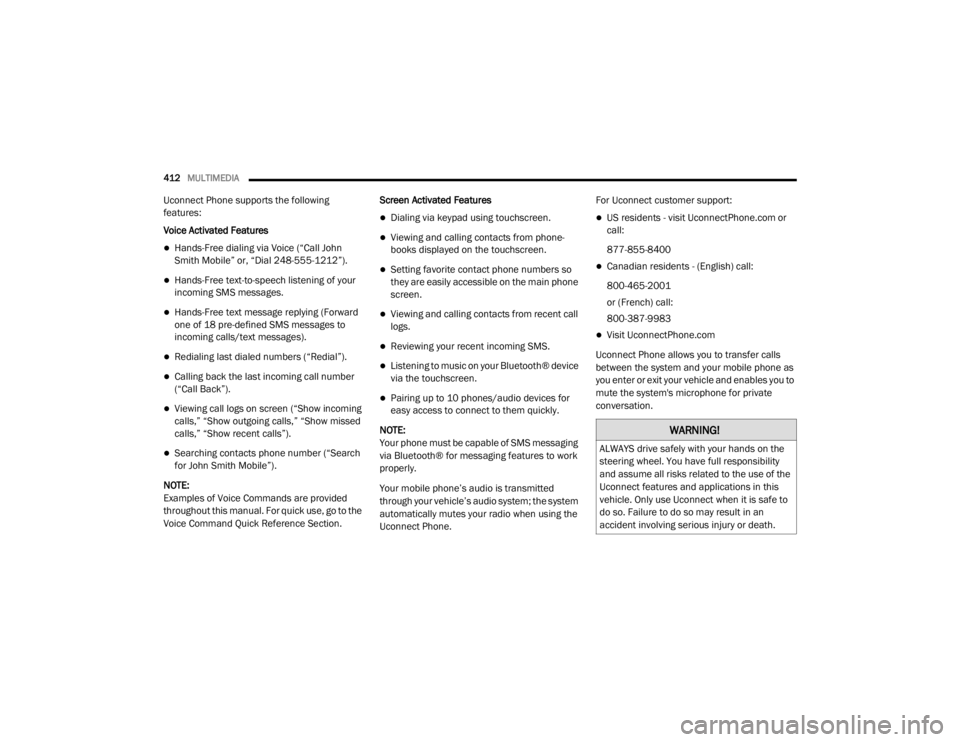
Uconnect Phone supports the following
features:
Voice Activated Features
Hands-Free dialing via Voice (“Call John
Smith Mobile” or, “Dial 248-555-1212”).
Hands-Free text-to-speech listening of your
incoming SMS messages.
Hands-Free text message replying (Forward
one of 18 pre-defined SMS messages to
incoming calls/text messages).
Redialing last dialed numbers (“Redial”).
Calling back the last incoming call number
(“Call Back”).
Viewing call logs on screen (“Show incoming
calls,” “Show outgoing calls,” “Show missed
calls,” “Show recent calls”).
Searching contacts phone number (“Search
for John Smith Mobile”).
NOTE:
Examples of Voice Commands are provided
throughout this manual. For quick use, go to the
Voice Command Quick Reference Section. Screen Activated Features
Dialing via keypad using touchscreen.
Viewing and calling contacts from phone -
books displayed on the touchscreen.
Setting favorite contact phone numbers so
they are easily accessible on the main phone
screen.
Viewing and calling contacts from recent call
logs.
Reviewing your recent incoming SMS.
Listening to music on your Bluetooth® device
via the touchscreen.
Pairing up to 10 phones/audio devices for
easy access to connect to them quickly.
NOTE:
Your phone must be capable of SMS messaging
via Bluetooth® for messaging features to work
properly.
Your mobile phone’s audio is transmitted
through your vehicle’s audio system; the system
automatically mutes your radio when using the
Uconnect Phone. For Uconnect customer support:
US residents - visit UconnectPhone.com or
call:
877-855-8400
Canadian residents - (English) call:
800-465-2001
or (French) call:
800-387-9983
Visit UconnectPhone.com
Uconnect Phone allows you to transfer calls
between the system and your mobile phone as
you enter or exit your vehicle and enables you to
mute the system's microphone for private
conversation.
WARNING!
ALWAYS drive safely with your hands on the
steering wheel. You have full responsibility
and assume all risks related to the use of the
Uconnect features and applications in this
vehicle. Only use Uconnect when it is safe to
do so. Failure to do so may result in an
accident involving serious injury or death.
20_WD_OM_EN_USC_t.book Page 412
Page 423 of 464
MULTIMEDIA421
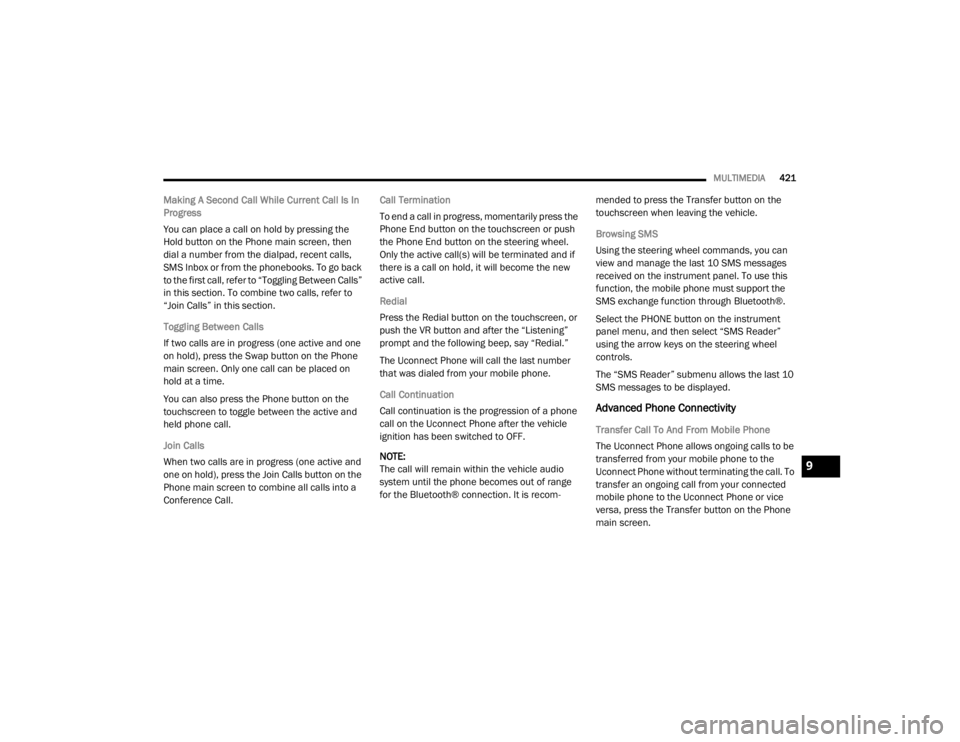
Making A Second Call While Current Call Is In
Progress
You can place a call on hold by pressing the
Hold button on the Phone main screen, then
dial a number from the dialpad, recent calls,
SMS Inbox or from the phonebooks. To go back
to the first call, refer to “Toggling Between Calls”
in this section. To combine two calls, refer to
“Join Calls” in this section.
Toggling Between Calls
If two calls are in progress (one active and one
on hold), press the Swap button on the Phone
main screen. Only one call can be placed on
hold at a time.
You can also press the Phone button on the
touchscreen to toggle between the active and
held phone call.
Join Calls
When two calls are in progress (one active and
one on hold), press the Join Calls button on the
Phone main screen to combine all calls into a
Conference Call. Call Termination
To end a call in progress, momentarily press the
Phone End button on the touchscreen or push
the Phone End button on the steering wheel.
Only the active call(s) will be terminated and if
there is a call on hold, it will become the new
active call.
Redial
Press the Redial button on the touchscreen, or
push the VR button and after the “Listening”
prompt and the following beep, say “Redial.”
The Uconnect Phone will call the last number
that was dialed from your mobile phone.
Call Continuation
Call continuation is the progression of a phone
call on the Uconnect Phone after the vehicle
ignition has been switched to OFF.
NOTE:
The call will remain within the vehicle audio
system until the phone becomes out of range
for the Bluetooth® connection. It is recom
-mended to press the Transfer button on the
touchscreen when leaving the vehicle.
Browsing SMS
Using the steering wheel commands, you can
view and manage the last 10 SMS messages
received on the instrument panel. To use this
function, the mobile phone must support the
SMS exchange function through Bluetooth®.
Select the PHONE button on the instrument
panel menu, and then select “SMS Reader”
using the arrow keys on the steering wheel
controls.
The “SMS Reader” submenu allows the last 10
SMS messages to be displayed.
Advanced Phone Connectivity
Transfer Call To And From Mobile Phone
The Uconnect Phone allows ongoing calls to be
transferred from your mobile phone to the
Uconnect Phone without terminating the call. To
transfer an ongoing call from your connected
mobile phone to the Uconnect Phone or vice
versa, press the Transfer button on the Phone
main screen.
9
20_WD_OM_EN_USC_t.book Page 421
Page 425 of 464
MULTIMEDIA423
Performance such as audio clarity, echo, and
loudness to a large degree rely on the phone
and network, and not the Uconnect Phone.
Echo at the far end can sometimes be reduced
by lowering the in-vehicle audio volume.
Bluetooth® Communication Link
Mobile phones have been found to lose
connection to the Uconnect Phone. When this
happens, the connection can generally be
re-established by switching the mobile phone
OFF/ON. Your mobile phone is recommended to
remain in Bluetooth® ON mode.
Power-Up
After switching the ignition key from OFF to
either the ON/RUN or ACC position, or after a
language change, you must wait at least
15 seconds prior to using the system.
STEERING WHEEL AUDIO CONTROLS
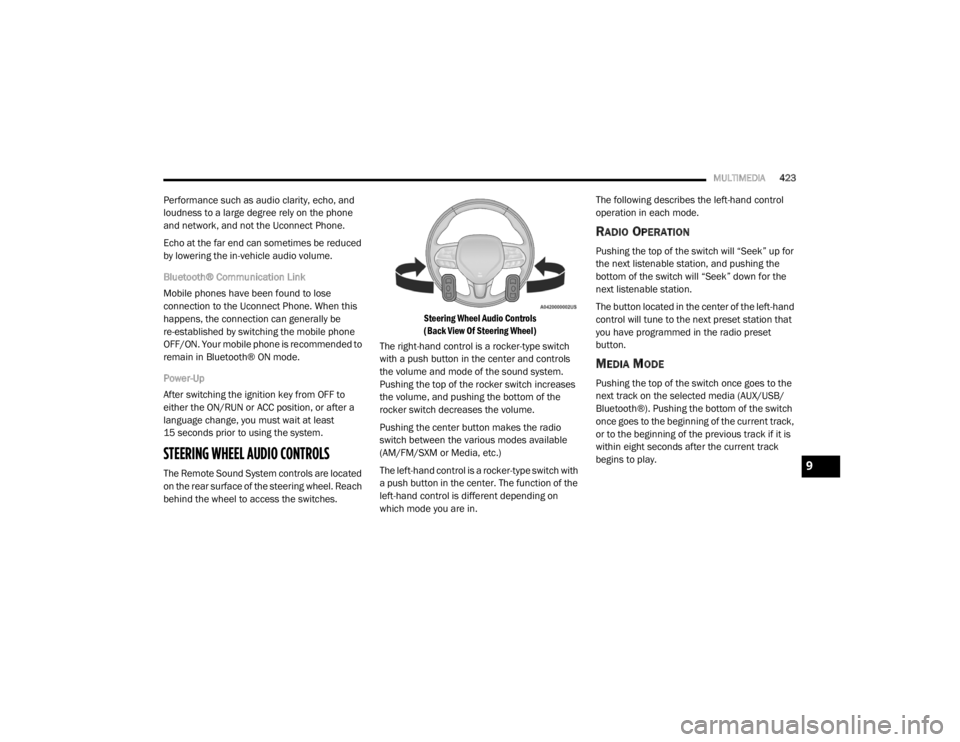
The Remote Sound System controls are located
on the rear surface of the steering wheel. Reach
behind the wheel to access the switches.
Steering Wheel Audio Controls
(Back View Of Steering Wheel)
The right-hand control is a rocker-type switch
with a push button in the center and controls
the volume and mode of the sound system.
Pushing the top of the rocker switch increases
the volume, and pushing the bottom of the
rocker switch decreases the volume.
Pushing the center button makes the radio
switch between the various modes available
(AM/FM/SXM or Media, etc.)
The left-hand control is a rocker-type switch with
a push button in the center. The function of the
left-hand control is different depending on
which mode you are in. The following describes the left-hand control
operation in each mode.
RADIO OPERATION
Pushing the top of the switch will “Seek” up for
the next listenable station, and pushing the
bottom of the switch will “Seek” down for the
next listenable station.
The button located in the center of the left-hand
control will tune to the next preset station that
you have programmed in the radio preset
button.
MEDIA MODE
Pushing the top of the switch once goes to the
next track on the selected media (AUX/USB/
Bluetooth®). Pushing the bottom of the switch
once goes to the beginning of the current track,
or to the beginning of the previous track if it is
within eight seconds after the current track
begins to play.
9
20_WD_OM_EN_USC_t.book Page 423
Page 430 of 464
428MULTIMEDIA
6. Radio Full Screen Mode
Select this button to change to Full Screen
Mode.
7. Cabin Audio Mode Select this button to change the cabin audio
to the rear entertainment source currently
shown on the rear media control screen.
8. RSE Mode Select this button to change the source for
the active (highlighted) rear Screen/Chan -
nel on the rear media control screen.
Press the Media button on the touchscreen,
and then press the rear media button on the
touchscreen.
Press the OK button on the touchscreen to
begin playing the Blu-ray™ disc on the touch -
screen radio.
Using The Remote Control
Select an audio channel (Rear 1 for driver’s
side rear screen and Rear 2 for passenger’s
side rear screen), and then press the source
key. Using the Up and Down arrows, highlight
disc from the menu and press the OK button.
Press the POPUP/MENU key to navigate the
disc menu and options.
PLAY VIDEO GAMES
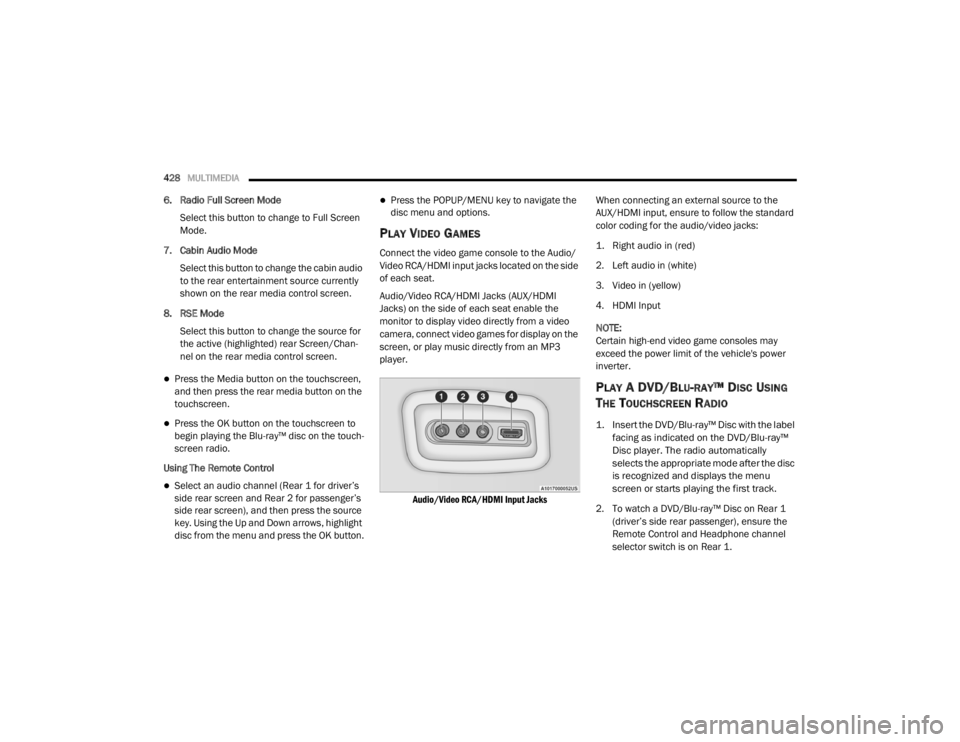
Connect the video game console to the Audio/
Video RCA/HDMI input jacks located on the side
of each seat.
Audio/Video RCA/HDMI Jacks (AUX/HDMI
Jacks) on the side of each seat enable the
monitor to display video directly from a video
camera, connect video games for display on the
screen, or play music directly from an MP3
player.
Audio/Video RCA/HDMI Input Jacks
When connecting an external source to the
AUX/HDMI input, ensure to follow the standard
color coding for the audio/video jacks:
1. Right audio in (red)
2. Left audio in (white)
3. Video in (yellow)
4. HDMI Input
NOTE:
Certain high-end video game consoles may
exceed the power limit of the vehicle's power
inverter.
PLAY A DVD/BLU-RAY™ DISC USING
T
HE TOUCHSCREEN RADIO
1. Insert the DVD/Blu-ray™ Disc with the label
facing as indicated on the DVD/Blu-ray™
Disc player. The radio automatically
selects the appropriate mode after the disc
is recognized and displays the menu
screen or starts playing the first track.
2. To watch a DVD/Blu-ray™ Disc on Rear 1 (driver’s side rear passenger), ensure the
Remote Control and Headphone channel
selector switch is on Rear 1.
20_WD_OM_EN_USC_t.book Page 428
Page 433 of 464
MULTIMEDIA431
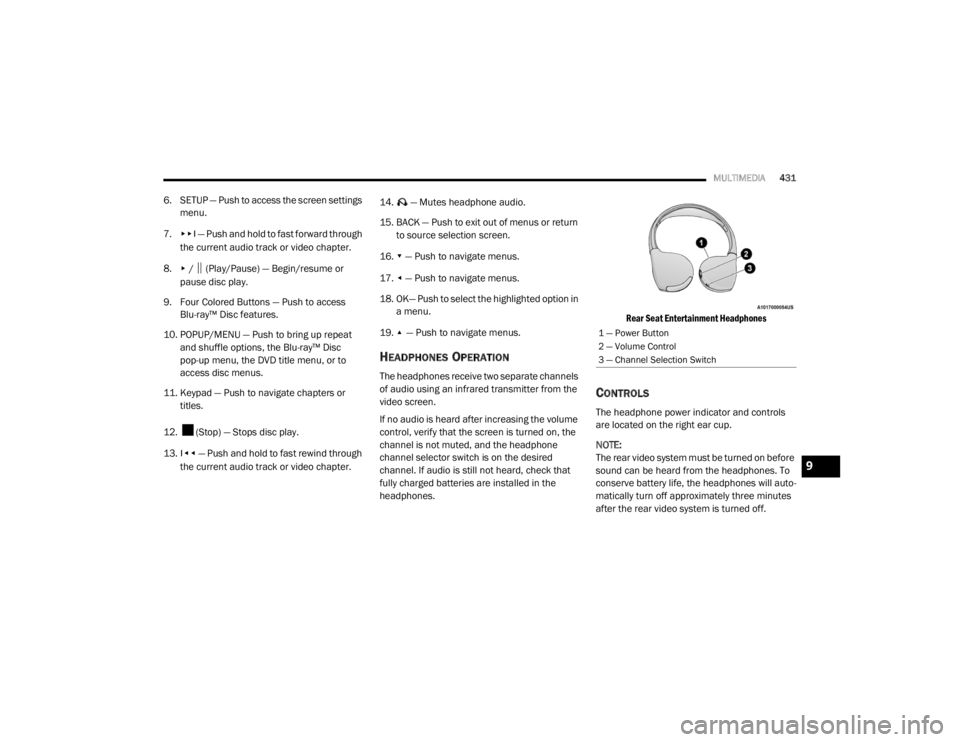
6. SETUP — Push to access the screen settings
menu.
7.
▸▸׀ — Push and hold to fast forward through
the current audio track or video chapter.
8.
▸ / ‖ (Play/Pause) — Begin/resume or
pause disc play.
9. Four Colored Buttons — Push to access Blu-ray™ Disc features.
10. POPUP/MENU — Push to bring up repeat and shuffle options, the Blu-ray™ Disc
pop-up menu, the DVD title menu, or to
access disc menus.
11. Keypad — Push to navigate chapters or titles.
12. (Stop) — Stops disc play.
13.
׀◂◂ — Push and hold to fast rewind through
the current audio track or video chapter. 14. — Mutes headphone audio.
15. BACK — Push to exit out of menus or return
to source selection screen.
16.
▾ — Push to navigate menus.
17.
◂ — Push to navigate menus.
18. OK— Push to select the highlighted option in a menu.
19.
▴ — Push to navigate menus.
HEADPHONES OPERATION
The headphones receive two separate channels
of audio using an infrared transmitter from the
video screen.
If no audio is heard after increasing the volume
control, verify that the screen is turned on, the
channel is not muted, and the headphone
channel selector switch is on the desired
channel. If audio is still not heard, check that
fully charged batteries are installed in the
headphones.
Rear Seat Entertainment Headphones
CONTROLS
The headphone power indicator and controls
are located on the right ear cup.
NOTE:
The rear video system must be turned on before
sound can be heard from the headphones. To
conserve battery life, the headphones will auto
-
matically turn off approximately three minutes
after the rear video system is turned off.
1 — Power Button
2 — Volume Control
3 — Channel Selection Switch
9
20_WD_OM_EN_USC_t.book Page 431
Page 440 of 464
438MULTIMEDIA
UCONNECT VOICE RECOGNITION QUICK TIPS
INTRODUCING UCONNECT
Start using Uconnect Voice Recognition (VR)
with these helpful quick tips. It provides the key
Voice Commands and tips you need to know to
control your Uconnect system.
NOTE:
If you see the NAV icon on the bottom bar, or in
the Apps menus, of your touchscreen, you have
the Uconnect 4C NAV system. If not, you have a
Uconnect 4C system.
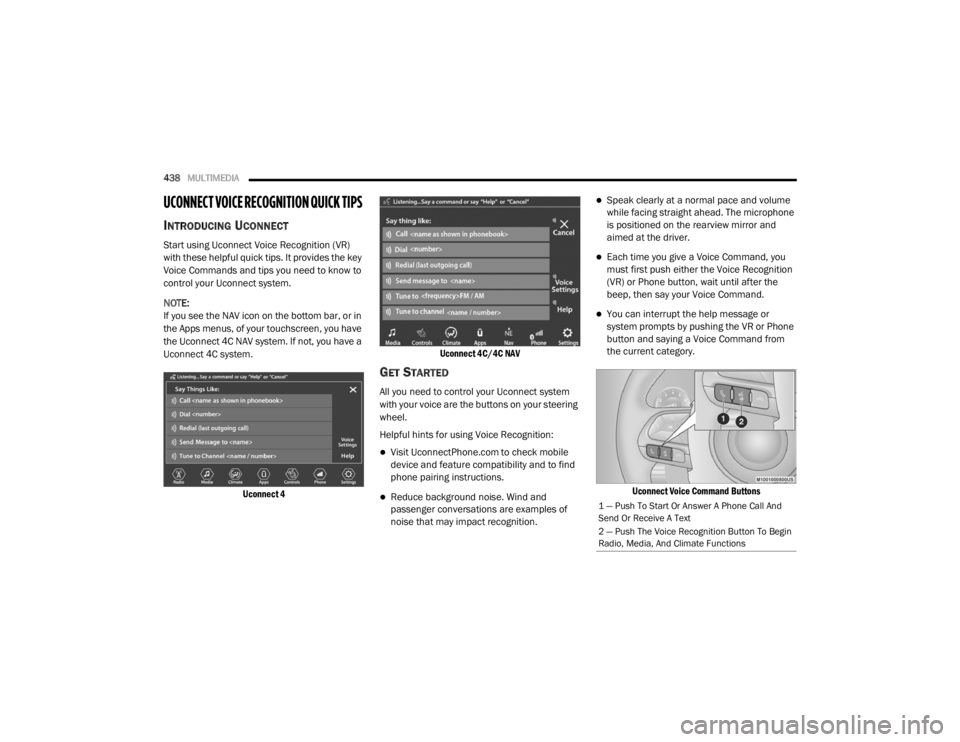
Uconnect 4 Uconnect 4C/4C NAV
GET STARTED
All you need to control your Uconnect system
with your voice are the buttons on your steering
wheel.
Helpful hints for using Voice Recognition:
Visit UconnectPhone.com to check mobile
device and feature compatibility and to find
phone pairing instructions.
Reduce background noise. Wind and
passenger conversations are examples of
noise that may impact recognition.
Speak clearly at a normal pace and volume
while facing straight ahead. The microphone
is positioned on the rearview mirror and
aimed at the driver.
Each time you give a Voice Command, you
must first push either the Voice Recognition
(VR) or Phone button, wait until after the
beep, then say your Voice Command.
You can interrupt the help message or
system prompts by pushing the VR or Phone
button and saying a Voice Command from
the current category.
Uconnect Voice Command Buttons
1 — Push To Start Or Answer A Phone Call And
Send Or Receive A Text
2 — Push The Voice Recognition Button To Begin
Radio, Media, And Climate Functions
20_WD_OM_EN_USC_t.book Page 438
Page 451 of 464

449
B
Battery
................................................. 111, 307Charging System Light............................... 111Keyless Key Fob Replacement.................... 15Battery Saver Feature...................................... 53Belts, Seat..................................................... 181Blind Spot Monitoring.................................... 131Bluetooth Connect Or Disconnect Link Betweenthe Uconnect Phone And Mobile
Phone
................................................... 422Connecting To A Particular Mobile Phone Or Audio Device After Pairing..... 417Bluetooth Mode............................................. 406Body Mechanism Lubrication........................ 316B-Pillar Location............................................. 332Brake Assist System...................................... 123Brake Control System, Electronic.................. 123Brake Fluid................................. 325, 358, 360Brake System...................................... 325, 350Anti-Lock (ABS).......................................... 350Fluid Check..................................... 325, 360Master Cylinder......................................... 325Parking...................................................... 190Warning Light............................................ 110Brake/Transmission Interlock....................... 192Bulb Replacement............................... 266, 268Bulbs, Light.................................................... 183
C
Camera, Rear................................................ 237Capacities, Fluid.................................. 355, 356Caps, FillerOil (Engine)............................. 304, 309, 310Radiator (Coolant Pressure)..................... 323Car Washes................................................... 347Carbon Monoxide Warning................... 180, 354Cargo Area Cover............................................. 77Cargo Compartment........................................ 77Light............................................................ 77Luggage Carrier........................................... 90Cargo Light....................................................... 77Cargo Tie-Downs.............................................. 78Cellular Phone.............................................. 436Center High Mounted Stop Light................... 269Chains, Tire.......................................... 343, 344Changing A Flat Tire...................................... 327Chart, Tire Sizing........................................... 329Check Engine Light
(Malfunction Indicator Light)......................... 121Checking Your Vehicle For Safety................. 180Checks, Safety.............................................. 180Child Restraint.............................................. 163Child RestraintsBooster Seats........................................... 166Child Seat Installation.............................. 177
How To Stow An unused ALR Seat Belt..... 174Infant And Child Restraints....................... 164Locating The LATCH Anchorages.............. 171Lower Anchors And Tethers For Children................................................ 167Older Children And Child Restraints.......... 165Seating Positions...................................... 166Child Safety Locks............................................29Clean Air Gasoline......................................... 352CleaningWheels...................................................... 342Climate Control................................................58Automatic....................................................58Cold Weather Operation................................ 188Compact Spare Tire...................................... 341Contract, Service........................................... 445Cooling Pressure Cap (Radiator Cap)............ 323Cooling System............................................. 321Adding Coolant (Antifreeze)...................... 322Coolant Level................................... 323, 324Cooling Capacity.............................. 355, 356Disposal Of Used Coolant......................... 323Drain, Flush, And Refill............................. 321Inspection............................... 321, 323, 324Points To Remember................................ 324Pressure Cap............................................ 323
11
20_WD_OM_EN_USC_t.book Page 449
Page 453 of 464
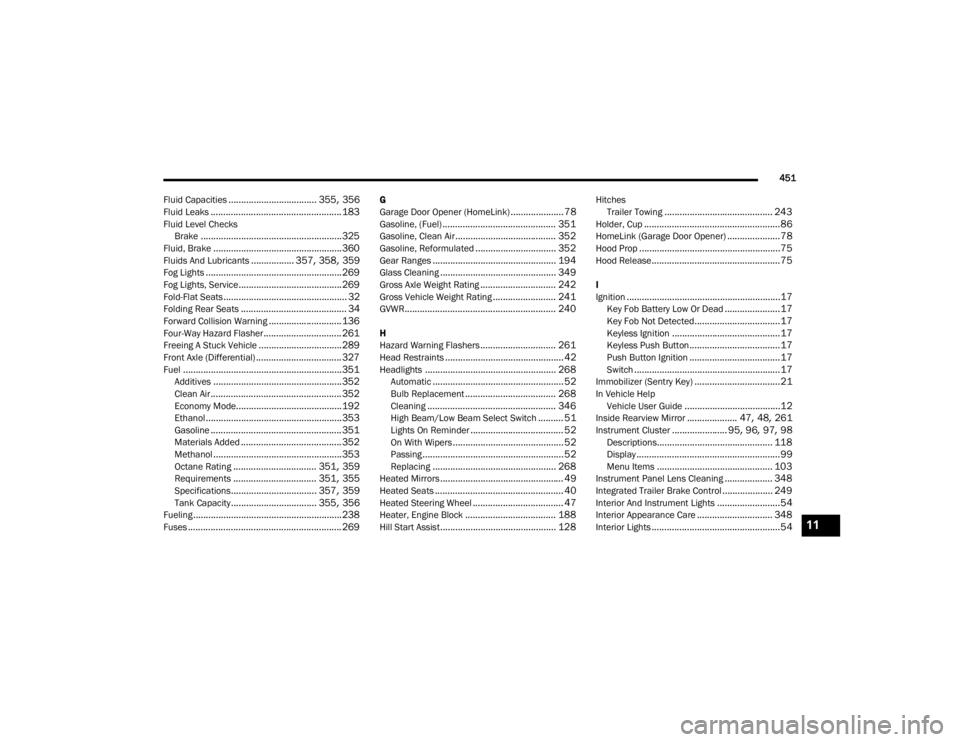
451
Fluid Capacities
................................... 355, 356Fluid Leaks.................................................... 183Fluid Level Checks Brake........................................................ 325Fluid, Brake................................................... 360Fluids And Lubricants................. 357, 358, 359Fog Lights...................................................... 269Fog Lights, Service......................................... 269Fold-Flat Seats................................................. 32Folding Rear Seats.......................................... 34Forward Collision Warning............................. 136Four-Way Hazard Flasher............................... 261Freeing A Stuck Vehicle................................. 289Front Axle (Differential).................................. 327Fuel............................................................... 351Additives................................................... 352Clean Air.................................................... 352Economy Mode.......................................... 192Ethanol...................................................... 353Gasoline.................................................... 351Materials Added........................................ 352Methanol................................................... 353Octane Rating................................. 351, 359Requirements................................. 351, 355Specifications.................................. 357, 359Tank Capacity.................................. 355, 356Fueling........................................................... 238Fuses............................................................. 269
G
Garage Door Opener (HomeLink)..................... 78Gasoline, (Fuel)............................................. 351Gasoline, Clean Air........................................ 352Gasoline, Reformulated................................ 352Gear Ranges................................................. 194Glass Cleaning.............................................. 349Gross Axle Weight Rating.............................. 242Gross Vehicle Weight Rating......................... 241GVWR............................................................ 240
H
Hazard Warning Flashers.............................. 261Head Restraints............................................... 42Headlights.................................................... 268Automatic.................................................... 52Bulb Replacement.................................... 268Cleaning................................................... 346High Beam/Low Beam Select Switch.......... 51Lights On Reminder..................................... 52On With Wipers............................................ 52Passing........................................................ 52Replacing................................................. 268Heated Mirrors................................................. 49Heated Seats................................................... 40Heated Steering Wheel.................................... 47Heater, Engine Block.................................... 188Hill Start Assist.............................................. 128
HitchesTrailer Towing........................................... 243Holder, Cup......................................................86HomeLink (Garage Door Opener).....................78Hood Prop........................................................75Hood Release...................................................75
I
Ignition.............................................................17Key Fob Battery Low Or Dead......................17Key Fob Not Detected..................................17Keyless Ignition...........................................17Keyless Push Button....................................17Push Button Ignition....................................17Switch..........................................................17Immobilizer (Sentry Key)..................................21In Vehicle HelpVehicle User Guide......................................12Inside Rearview Mirror.................... 47, 48, 261Instrument Cluster...................... 95, 96, 97, 98Descriptions.............................................. 118Display.........................................................99Menu Items.............................................. 103Instrument Panel Lens Cleaning................... 348Integrated Trailer Brake Control.................... 249Interior And Instrument Lights.........................54Interior Appearance Care.............................. 348Interior Lights...................................................5411
20_WD_OM_EN_USC_t.book Page 451