ESP DODGE DURANGO 2020 Repair Manual
[x] Cancel search | Manufacturer: DODGE, Model Year: 2020, Model line: DURANGO, Model: DODGE DURANGO 2020Pages: 464, PDF Size: 22.14 MB
Page 367 of 464
MULTIMEDIA365
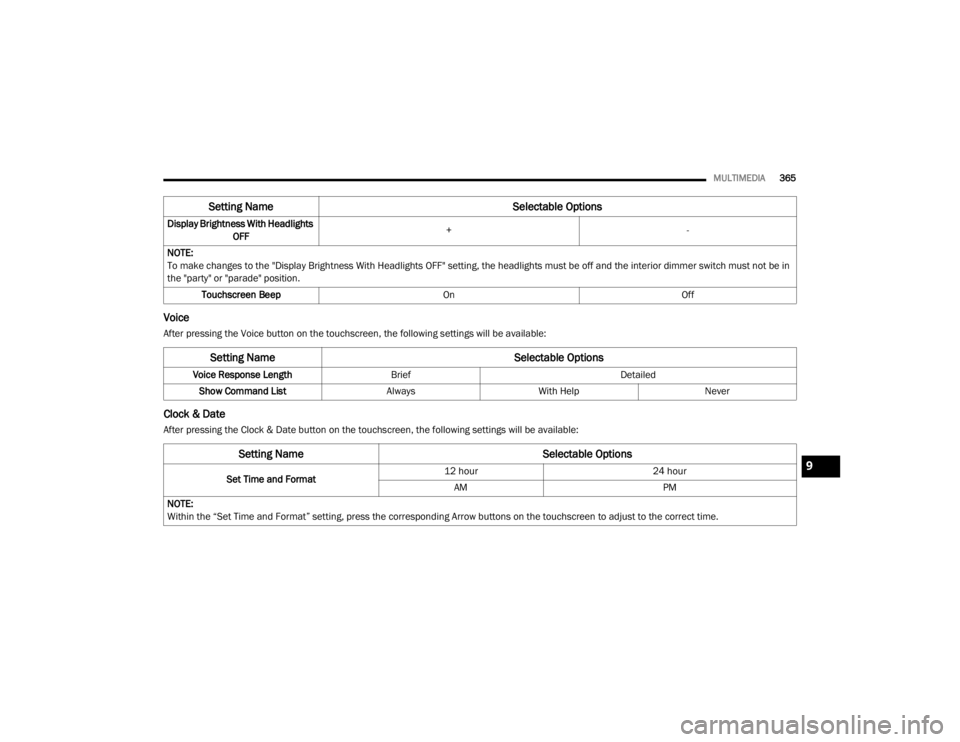
Voice
After pressing the Voice button on the touchscreen, the following settings will be available:
Clock & Date
After pressing the Clock & Date button on the touchscreen, the following settings will be available:Display Brightness With Headlights
OFF +
-
NOTE:
To make changes to the "Display Brightness With Headlights OFF" setting, the headlights must be off and the interior dimmer switch must not be in
the "party" or "parade" position. Touchscreen Beep OnOff
Setting Name Selectable Options
Setting NameSelectable Options
Voice Response LengthBrief Detailed
Show Command List AlwaysWith Help Never
Setting Name Selectable Options
Set Time and Format12 hour
24 hour
AM PM
NOTE:
Within the “Set Time and Format” setting, press the corresponding Arrow buttons on the touchscreen to adjust to the correct time.
9
20_WD_OM_EN_USC_t.book Page 365
Page 368 of 464
366MULTIMEDIA
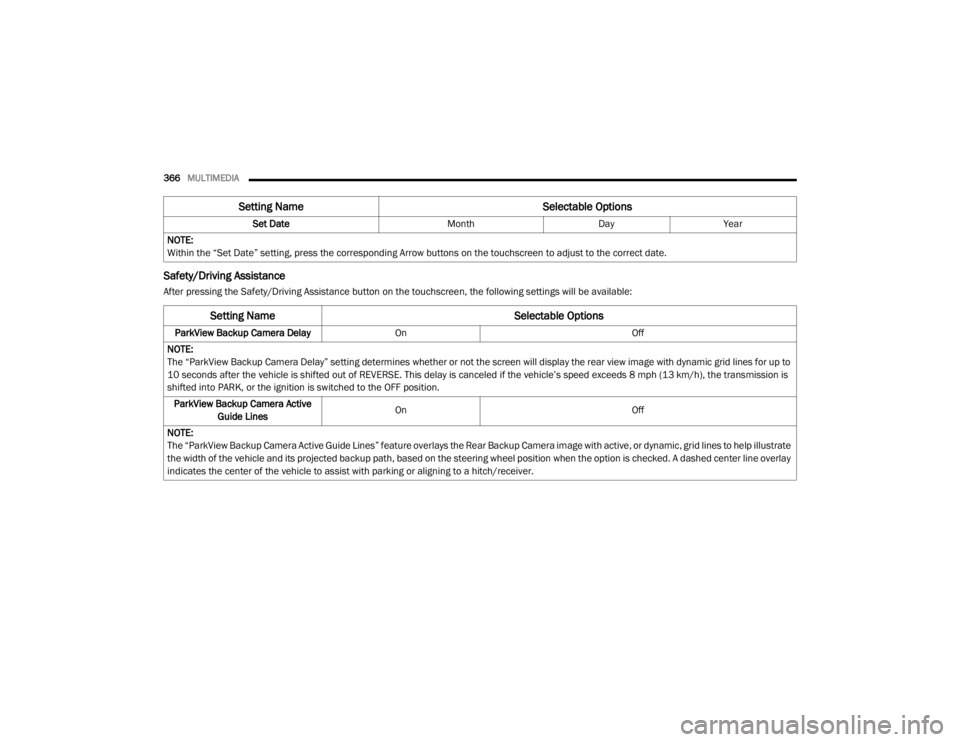
Safety/Driving Assistance
After pressing the Safety/Driving Assistance button on the touchscreen, the following settings will be available: Set Date
MonthDayYear
NOTE:
Within the “Set Date” setting, press the corresponding Arrow buttons on the touchscreen to adjust to the correct date.
Setting Name Selectable Options
Setting NameSelectable Options
ParkView Backup Camera DelayOn Off
NOTE:
The “ParkView Backup Camera Delay” setting determines whether or not the screen will display the rear view image with dynamic grid lines for up to
10 seconds after the vehicle is shifted out of REVERSE. This delay is canceled if the vehicle’s speed exceeds 8 mph (13 km/h), the transmission is
shifted into PARK, or the ignition is switched to the OFF position. ParkView Backup Camera Active Guide Lines On
Off
NOTE:
The “ParkView Backup Camera Active Guide Lines” feature overlays the Rear Backup Camera image with active, or dynamic, grid lines to help illustrate
the width of the vehicle and its projected backup path, based on the steering wheel position when the option is checked. A dashed center line overlay
indicates the center of the vehicle to assist with parking or aligning to a hitch/receiver.
20_WD_OM_EN_USC_t.book Page 366
Page 380 of 464
378MULTIMEDIA
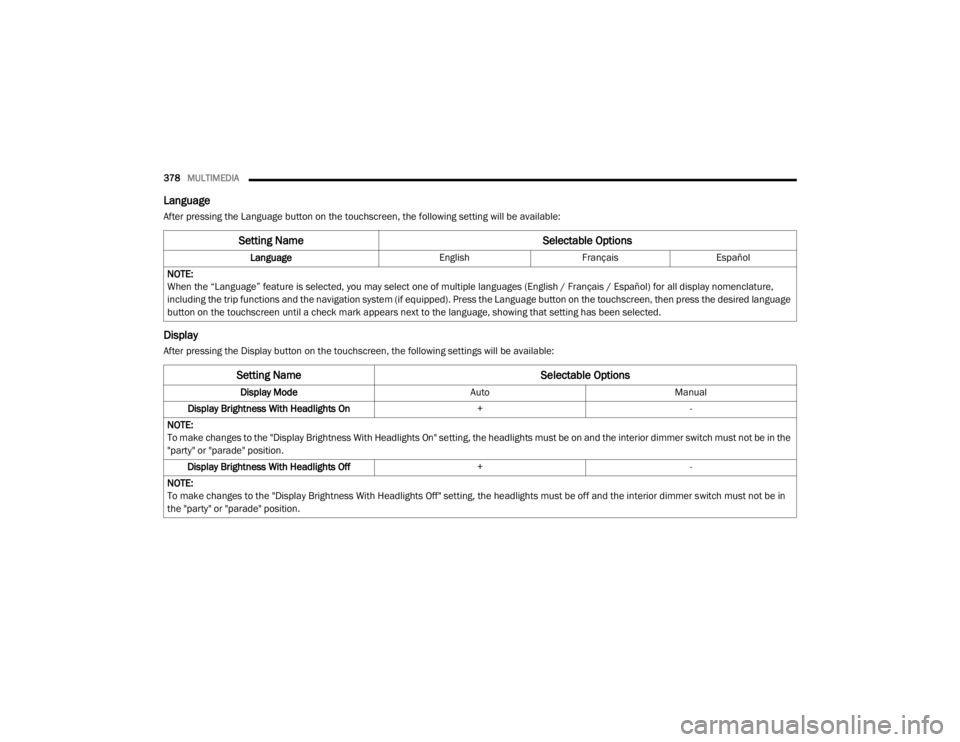
Language
After pressing the Language button on the touchscreen, the following setting will be available:
Display
After pressing the Display button on the touchscreen, the following settings will be available:
Setting Name Selectable Options
LanguageEnglishFrançaisEspañol
NOTE:
When the “Language” feature is selected, you may select one of multiple languages (English / Français / Español) for all display nomenclature,
including the trip functions and the navigation system (if equipped). Press the Language button on the touchscreen, then press the desired language
button on the touchscreen until a check mark appears next to the language, showing that setting has been selected.
Setting Name Selectable Options
Display ModeAutoManual
Display Brightness With Headlights On +-
NOTE:
To make changes to the "Display Brightness With Headlights On" setting, the headlights must be on and the interior dimmer switch must not be in the
"party" or "parade" position. Display Brightness With Headlights Off +-
NOTE:
To make changes to the "Display Brightness With Headlights Off" setting, the headlights must be off and the interior dimmer switch must not be in
the "party" or "parade" position.
20_WD_OM_EN_USC_t.book Page 378
Page 381 of 464
MULTIMEDIA379
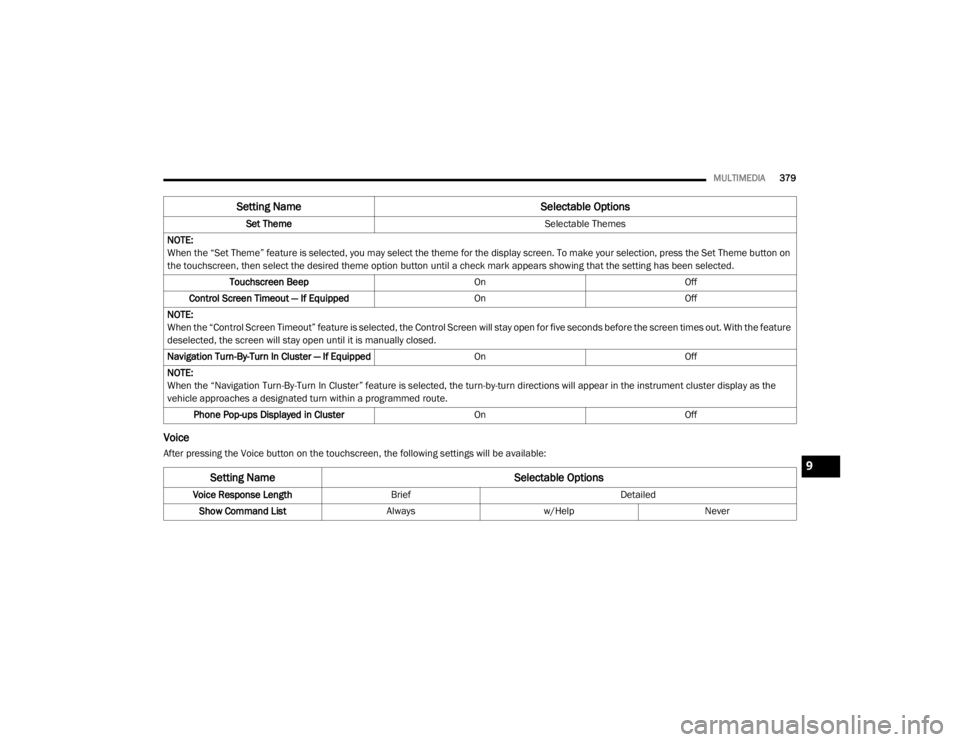
Voice
After pressing the Voice button on the touchscreen, the following settings will be available: Set Theme
Selectable Themes
NOTE:
When the “Set Theme” feature is selected, you may select the theme for the display screen. To make your selection, press the Set Theme button on
the touchscreen, then select the desired theme option button until a check mark appears showing that the setting has been selected. Touchscreen Beep OnOff
Control Screen Timeout — If Equipped OnOff
NOTE:
When the “Control Screen Timeout” feature is selected, the Control Screen will stay open for five seconds before the screen times out. With the feature
deselected, the screen will stay open until it is manually closed.
Navigation Turn-By-Turn In Cluster — If Equipped OnOff
NOTE:
When the “Navigation Turn-By-Turn In Cluster” feature is selected, the turn-by-turn directions will appear in the instrument cluster display as the
vehicle approaches a designated turn within a programmed route. Phone Pop-ups Displayed in Cluster OnOff
Setting Name Selectable Options
Setting NameSelectable Options
Voice Response LengthBrief Detailed
Show Command List Alwaysw/Help Never
9
20_WD_OM_EN_USC_t.book Page 379
Page 396 of 464
394MULTIMEDIA
SAFETY AND GENERAL INFORMATION
SAFETY GUIDELINES
Ensure that all persons read this manual
carefully before using the system. It contains
instructions on how to use the system in a safe
and effective manner.
Do NOT attach any object to the touchscreen.
Doing so can result in damage to the
touchscreen. Please read and follow these safety
precautions. Failure to do so may result in injury
or property damage.
Glance at the screen only when safe to do so.
If prolonged viewing of the screen is required,
park in a safe location and set the parking
brake.
Stop use immediately if a problem occurs.
Failure to do so may cause injury or damage
to the product. Return it to an authorized
dealer for repair.
Ensure the volume level of the system is set
to a level that still allows you to hear outside
traffic and emergency vehicles.
Safe Usage Of The Uconnect System
Read all instructions in this manual carefully
before using your system to ensure proper
usage.
The Uconnect system is a sophisticated elec
-
tronic device. Do not let young children use
the system.
Permanent hearing loss may occur if you play
your music or the system at loud volumes.
Exercise caution when setting the volume on
the system.
Keep drinks, rain and other sources of mois -
ture away from the system. Besides damage
to the system, moisture can cause electric
shocks as with any electronic device.
NOTE:
Many features of this system are speed depen -
dent. For your own safety, it is not possible to
use some of the touchscreen features while the
vehicle is in motion.
Exposure To Radio Frequency Radiation
The internal wireless radio operates within
guidelines found in radio frequency safety
standards and recommendations, which reflect
the consensus of the scientific community. The
radio manufacturer believes the internal
wireless radio is safe for use by consumers. The
level of energy emitted is far less than the
electromagnetic energy emitted by wireless
devices such as mobile phones. However, the
use of wireless radios may be restricted in some
situations or environments, such as aboard
airplanes. If you are unsure of restrictions, you
are encouraged to ask for authorization before
turning on the wireless radio.
WARNING!
ALWAYS drive safely with your hands on the
steering wheel. You have full responsibility
and assume all risks related to the use of the
Uconnect features and applications in this
vehicle. Only use Uconnect when it is safe to
do so. Failure to do so may result in an
accident involving serious injury or death.
20_WD_OM_EN_USC_t.book Page 394
Page 397 of 464
MULTIMEDIA395
Care And Maintenance
Touchscreen
Do not press the touchscreen with any hard
or sharp objects (pen, USB stick, jewelry,
etc.), which could scratch the touchscreen
surface!
Do not spray any liquid or caustic chemicals
directly on the screen! Use a clean and dry
microfiber lens cleaning cloth in order to
clean the touchscreen.
If necessary, use a lint-free cloth dampened
with a cleaning solution, such as isopropyl
alcohol or an isopropyl alcohol and water
solution ratio of 50:50. Be sure to follow the
solvent manufacturer's precautions and
directions.
UCONNECT 4 WITH 7-INCH DISPLAY
INTRODUCTION
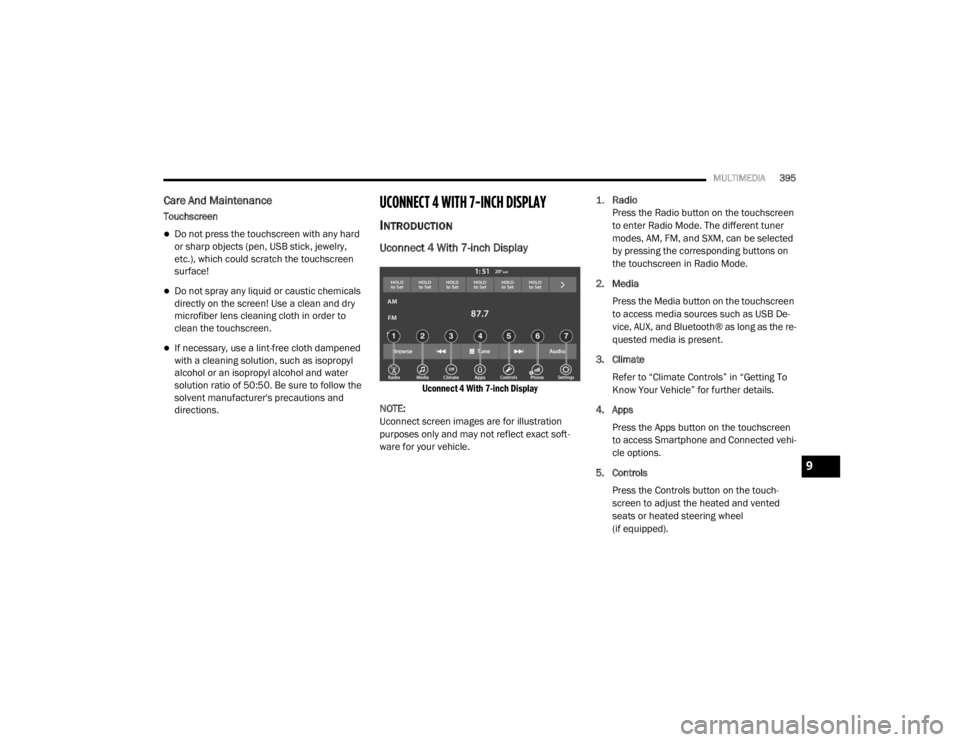
Uconnect 4 With 7-inch Display
Uconnect 4 With 7-inch Display
NOTE:
Uconnect screen images are for illustration
purposes only and may not reflect exact soft -
ware for your vehicle.
1.
Radio
Press the Radio button on the touchscreen
to enter Radio Mode. The different tuner
modes, AM, FM, and SXM, can be selected
by pressing the corresponding buttons on
the touchscreen in Radio Mode.
2. Media Press the Media button on the touchscreen
to access media sources such as USB De -
vice, AUX, and Bluetooth® as long as the re -
quested media is present.
3. Climate Refer to “Climate Controls” in “Getting To
Know Your Vehicle” for further details.
4. Apps Press the Apps button on the touchscreen
to access Smartphone and Connected vehi -
cle options.
5. Controls Press the Controls button on the touch -
screen to adjust the heated and vented
seats or heated steering wheel
(if equipped).
9
20_WD_OM_EN_USC_t.book Page 395
Page 398 of 464
396MULTIMEDIA
6. Phone
Press the Phone button on the touchscreen
to access the Uconnect Phone feature.
7. Settings Press the Settings button on the touch -
screen to access the Uconnect Settings
menu.
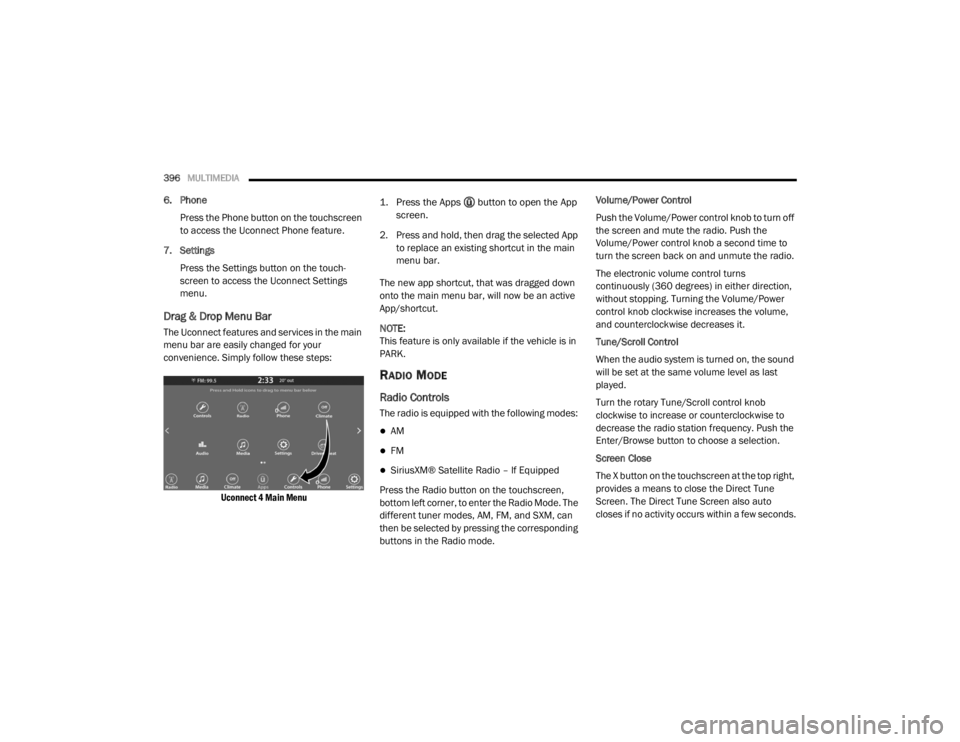
Drag & Drop Menu Bar
The Uconnect features and services in the main
menu bar are easily changed for your
convenience. Simply follow these steps:
Uconnect 4 Main Menu
1. Press the Apps button to open the App
screen.
2. Press and hold, then drag the selected App to replace an existing shortcut in the main
menu bar.
The new app shortcut, that was dragged down
onto the main menu bar, will now be an active
App/shortcut.
NOTE:
This feature is only available if the vehicle is in
PARK.
RADIO MODE
Radio Controls
The radio is equipped with the following modes:
AM
FM
SiriusXM® Satellite Radio – If Equipped
Press the Radio button on the touchscreen,
bottom left corner, to enter the Radio Mode. The
different tuner modes, AM, FM, and SXM, can
then be selected by pressing the corresponding
buttons in the Radio mode. Volume/Power Control
Push the Volume/Power control knob to turn off
the screen and mute the radio. Push the
Volume/Power control knob a second time to
turn the screen back on and unmute the radio.
The electronic volume control turns
continuously (360 degrees) in either direction,
without stopping. Turning the Volume/Power
control knob clockwise increases the volume,
and counterclockwise decreases it.
Tune/Scroll Control
When the audio system is turned on, the sound
will be set at the same volume level as last
played.
Turn the rotary Tune/Scroll control knob
clockwise to increase or counterclockwise to
decrease the radio station frequency. Push the
Enter/Browse button to choose a selection.
Screen Close
The X button on the touchscreen at the top right,
provides a means to close the Direct Tune
Screen. The Direct Tune Screen also auto
closes if no activity occurs within a few seconds.
20_WD_OM_EN_USC_t.book Page 396
Page 400 of 464
398MULTIMEDIA
When you are receiving a station that you wish
to commit into memory, press and hold the
desired numbered button on the touchscreen
for more than two seconds or until you hear a
confirmation beep.
The Radio stores up to 12 presets in each of the
Radio modes. A set of six presets are visible at
the top of the radio screen.
You can switch between the two radio presets
by pressing the Arrow button located in the
upper right of the radio touchscreen.
Browse In AM/FM
When in either AM or FM, the Browse Screen
provides a means to edit the Presets List and is
entered by pushing the ENTER/BROWSE
button.
Scrolling Preset List
Once in the Browse Presets screen, you can
scroll the preset list by rotation of the TUNE/
SCROLL knob, or by pressing the Up and Down
arrow keys, located on the right of the screen. Preset Selection From List
A Preset can be selected by pressing any of the
listed Presets or by pushing the ENTER/
BROWSE button on the TUNE/SCROLL knob to
select the currently highlighted Preset.
When selected, the radio tunes to the station
stored in the Preset and returns to the main
radio screen.
Deleting Presets
A Preset can be deleted in the Presets Browse
screen by pressing the Trash Can icon for the
corresponding Preset.
Return To Main Radio Screen
You can return to the Main Radio Screen, by
pressing the X button on the touchscreen when
in the Browse Presets screen.
SiriusXM® Satellite Radio Mode — If
Equipped
SiriusXM® Satellite Radio uses direct
satellite-to-receiver broadcasting technology to
provide clear, coast-to-coast radio content.
SiriusXM® is a subscription based service.SiriusXM® All Access Package
All satellite radio-equipped vehicles come with a
one-year trial to the SiriusXM® All Access
package, providing over 160 channels of the
best programming for all the places life takes
you.
In your vehicle — You’ll get every channel
available on your radio, including all the
premium programming like Howard Stern,
every NFL® game, every MLB® game, every
NASCAR® race, Oprah Radio, and more.
On the go — With a SiriusXM® Internet Radio
subscription included with the All Access trial,
you’ll get SiriusXM® on your computer,
smartphone, or tablet. Including:
A huge On Demand catalog
Xtra Channels featuring SiriusXM®
Latino – a collection of Spanish-language
channels
MySXM – allowing you to personalize
your favorite music channels
Go to siriusxm.com/getallaccess for more
information
20_WD_OM_EN_USC_t.book Page 398
Page 403 of 464
MULTIMEDIA401
Channel List
Press the Channel List, or Genre, to display all
the SiriusXM® Channel Numbers. You can
scroll the Channel list by pressing the Up and
Down arrows, located on the right side of the
screen. Scrolling can also be done by operating
the TUNE/SCROLL knob.
Genre
Press the Genre button on the touchscreen to
display a list of Genres. You can select any
desired Genre by pressing the Genre list, the
Radio tunes to a channel with the content in the
selected Genre.
Presets
Press the Presets button located at the left of
the Browse screen.
You can scroll the Presets list pressing the up
and down arrows located at the right side of the
screen. Scrolling can also be done by operating
the TUNE/SCROLL knob as well.
Preset Selection
A Preset can be selected by pressing any of the
listed Presets, or by pushing the ENTER/
BROWSE button on the TUNE/SCROLL knob to
select the currently highlighted Preset. When selected, the Radio tunes to the station
stored in the Preset, and returns to the main
Radio screen.
Deleting A Preset
A Preset can be deleted in the Presets Browse
screen by pressing the Trash Can Icon for the
corresponding Preset.
Favorites
Press the Favorites button located at the left of
the Browse screen.
The Favorites menu provides a means to Edit
the Favorites list and to configure the Alert
Settings, along with providing a list of Channels
currently airing any of the items in the Favorites
list.
You can scroll the Favorites list by pressing the
Up and Down arrows located at the right side of
the screen. Scrolling can also be done by
operating the TUNE/SCROLL knob as well.
Remove Favorites
Press the Remove Favorites tab at the top of the
screen. Press the Delete All button on the
touchscreen to delete all of the Favorites or
press the Trash Can icon next to the Favorite to
be deleted.Alert Settings
Press the Alert Setting tab at the top of the
screen. The Alert Settings menu allows you to
choose from a Visual alert or Audible and Visual
alert when one of your favorites is airing on any
of the SiriusXM® channels.
Game Zone
Press the Game Zone button, located at the left
of the Browse screen. This feature provides you
with the ability to select teams, edit the
selection, and set alerts.
On Air
Press the On-Air tab at the top of the screen. The
On-Air list provides a list of Channels currently
airing any of the items in the Selections list, and
pressing any of the items in the list tunes the
radio to that channel.
Select Teams
Press the Select Teams button on the
touchscreen to activate the League Scroll list.
Press the chosen league and a scroll list of all
teams within the league will appear, then you
can select a team by pressing the
corresponding box. A check mark appears for all
teams that are chosen.
9
20_WD_OM_EN_USC_t.book Page 401
Page 414 of 464
412MULTIMEDIA
Uconnect Phone supports the following
features:
Voice Activated Features
Hands-Free dialing via Voice (“Call John
Smith Mobile” or, “Dial 248-555-1212”).
Hands-Free text-to-speech listening of your
incoming SMS messages.
Hands-Free text message replying (Forward
one of 18 pre-defined SMS messages to
incoming calls/text messages).
Redialing last dialed numbers (“Redial”).
Calling back the last incoming call number
(“Call Back”).
Viewing call logs on screen (“Show incoming
calls,” “Show outgoing calls,” “Show missed
calls,” “Show recent calls”).
Searching contacts phone number (“Search
for John Smith Mobile”).
NOTE:
Examples of Voice Commands are provided
throughout this manual. For quick use, go to the
Voice Command Quick Reference Section. Screen Activated Features
Dialing via keypad using touchscreen.
Viewing and calling contacts from phone -
books displayed on the touchscreen.
Setting favorite contact phone numbers so
they are easily accessible on the main phone
screen.
Viewing and calling contacts from recent call
logs.
Reviewing your recent incoming SMS.
Listening to music on your Bluetooth® device
via the touchscreen.
Pairing up to 10 phones/audio devices for
easy access to connect to them quickly.
NOTE:
Your phone must be capable of SMS messaging
via Bluetooth® for messaging features to work
properly.
Your mobile phone’s audio is transmitted
through your vehicle’s audio system; the system
automatically mutes your radio when using the
Uconnect Phone. For Uconnect customer support:
US residents - visit UconnectPhone.com or
call:
877-855-8400
Canadian residents - (English) call:
800-465-2001
or (French) call:
800-387-9983
Visit UconnectPhone.com
Uconnect Phone allows you to transfer calls
between the system and your mobile phone as
you enter or exit your vehicle and enables you to
mute the system's microphone for private
conversation.
WARNING!
ALWAYS drive safely with your hands on the
steering wheel. You have full responsibility
and assume all risks related to the use of the
Uconnect features and applications in this
vehicle. Only use Uconnect when it is safe to
do so. Failure to do so may result in an
accident involving serious injury or death.
20_WD_OM_EN_USC_t.book Page 412