stop start DODGE DURANGO 2020 Repair Manual
[x] Cancel search | Manufacturer: DODGE, Model Year: 2020, Model line: DURANGO, Model: DODGE DURANGO 2020Pages: 464, PDF Size: 22.14 MB
Page 309 of 464
SERVICING AND MAINTENANCE307
(Continued)
CHECKING OIL LEVEL
To ensure proper lubrication of your vehicle's
engine, the engine oil must be maintained at
the correct level. Check the oil level at regular
intervals, such as every fuel stop. The best time
to check the engine oil level is about five
minutes after a fully warmed up engine is shut
off.
Checking the oil while the vehicle is on level
ground will improve the accuracy of the oil level
readings. Always maintain the oil level within
the SAFE zone on the dipstick. Adding one quart
of oil when the reading is at the bottom of the
SAFE zone will result in a reading at the top of
the safe zone on these engines.
ADDING WASHER FLUID
The instrument cluster display will indicate
when the washer fluid level is low. When the
sensor detects a low fluid level, the windshield
will light on the vehicle graphic outline and the
“WASHER FLUID LOW” message will be
displayed.
The fluid reservoir for the windshield washers
and the rear window washer is shared. The fluid
reservoir is located in the engine compartment,
be sure to check the fluid level at regular
intervals. Fill the reservoir with windshield
washer solvent only (not radiator antifreeze).
When refilling the washer fluid reservoir, take
some washer fluid and apply it to a cloth or
towel and wipe clean the wiper blades, this will
help blade performance. To prevent freeze-up
of your windshield washer system in cold
weather, select a solution or mixture that meets
or exceeds the temperature range of your
climate. This rating information can be found on
most washer fluid containers.
MAINTENANCE-FREE BATTERY
Your vehicle is equipped with a
maintenance-free battery. Water will never have
to be added, nor is periodic maintenance
required.
CAUTION!
Overfilling or underfilling will cause oil
aeration or loss of oil pressure. This could
damage your engine.
WARNING!
Commercially available windshield washer
solvents are flammable. They could ignite and
burn you. Care must be exercised when filling
or working around the washer solution.
WARNING!
Battery fluid is a corrosive acid solution and
can burn or even blind you. Do not allow
battery fluid to contact your eyes, skin, or
clothing. Do not lean over a battery when
attaching clamps. If acid splashes in eyes
or on skin, flush the area immediately with
large amounts of water. Refer to “Jump
Starting Procedure” in “In Case Of Emer -
gency” for further information.
7
20_WD_OM_EN_USC_t.book Page 307
Page 317 of 464
SERVICING AND MAINTENANCE315
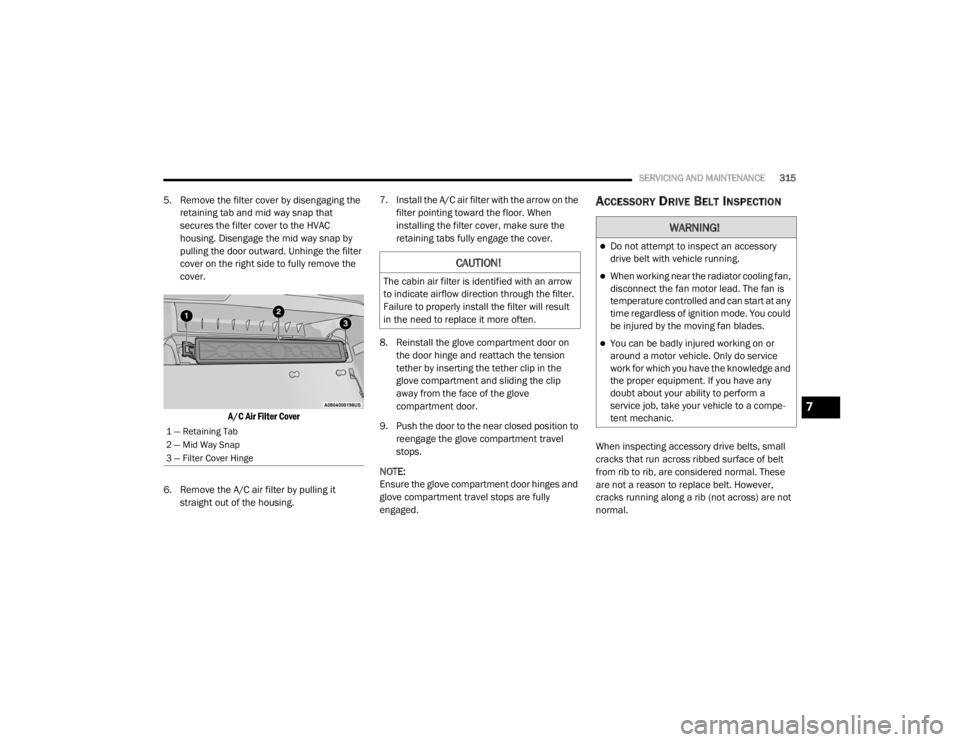
5. Remove the filter cover by disengaging the
retaining tab and mid way snap that
secures the filter cover to the HVAC
housing. Disengage the mid way snap by
pulling the door outward. Unhinge the filter
cover on the right side to fully remove the
cover.
A/C Air Filter Cover
6. Remove the A/C air filter by pulling it straight out of the housing. 7. Install the A/C air filter with the arrow on the
filter pointing toward the floor. When
installing the filter cover, make sure the
retaining tabs fully engage the cover.
8. Reinstall the glove compartment door on the door hinge and reattach the tension
tether by inserting the tether clip in the
glove compartment and sliding the clip
away from the face of the glove
compartment door.
9. Push the door to the near closed position to reengage the glove compartment travel
stops.
NOTE:
Ensure the glove compartment door hinges and
glove compartment travel stops are fully
engaged.ACCESSORY DRIVE BELT INSPECTION
When inspecting accessory drive belts, small
cracks that run across ribbed surface of belt
from rib to rib, are considered normal. These
are not a reason to replace belt. However,
cracks running along a rib (not across) are not
normal.
1 — Retaining Tab
2 — Mid Way Snap
3 — Filter Cover Hinge
CAUTION!
The cabin air filter is identified with an arrow
to indicate airflow direction through the filter.
Failure to properly install the filter will result
in the need to replace it more often.
WARNING!
Do not attempt to inspect an accessory
drive belt with vehicle running.
When working near the radiator cooling fan,
disconnect the fan motor lead. The fan is
temperature controlled and can start at any
time regardless of ignition mode. You could
be injured by the moving fan blades.
You can be badly injured working on or
around a motor vehicle. Only do service
work for which you have the knowledge and
the proper equipment. If you have any
doubt about your ability to perform a
service job, take your vehicle to a compe -
tent mechanic.
7
20_WD_OM_EN_USC_t.book Page 315
Page 323 of 464
SERVICING AND MAINTENANCE321
In unusual situations involving grossly
malfunctioning engine operation, a scorching
odor may suggest severe and abnormal catalyst
overheating. If this occurs, stop the vehicle, turn
off the engine and allow it to cool. Service,
including a tune-up to manufacturer's
specifications, should be obtained immediately.
To minimize the possibility of catalytic converter
damage:
Do not interrupt the ignition when the trans -
mission is in gear and the vehicle is in
motion.
Do not try to start the vehicle by pushing or
towing the vehicle.
Do not idle the engine with any ignition
components disconnected or removed, such
as when diagnostic testing, or for prolonged
periods during very rough idle or malfunc -
tioning operating conditions.
COOLING SYSTEMEngine Coolant Checks
Check the engine coolant (antifreeze)
protection every 12 months (before the onset of
freezing weather, where applicable). If the
engine coolant (antifreeze) is dirty, the system
should be drained, flushed, and refilled with
fresh OAT coolant (conforming to MS.90032) by
an authorized dealer. Check the front of the
A/C condenser for any accumulation of bugs,
leaves, etc. If dirty, clean by gently spraying
water from a garden hose vertically down the
face of the condenser.
Check the engine cooling system hoses for
brittle rubber, cracking, tears, cuts, and
tightness of the connection at the coolant
recovery bottle and radiator. Inspect the entire
system for leaks. DO NOT REMOVE THE
COOLANT PRESSURE CAP WHEN THE COOLING
SYSTEM IS HOT.
Cooling System — Drain, Flush And Refill
NOTE:
Some vehicles require special tools to add
coolant properly. Failure to fill these systems
properly could lead to severe internal engine
damage.
WARNING!
You or others can be badly burned by hot
engine coolant (antifreeze) or steam from
your radiator. If you see or hear steam
coming from under the hood, do not open
the hood until the radiator has had time
to cool. Never open a cooling system pres -
sure cap when the radiator or coolant bottle
is hot.
Keep hands, tools, clothing, and jewelry
away from the radiator cooling fan when
the hood is raised. The fan starts automati -
cally and may start at any time, whether the
engine is running or not.
When working near the radiator cooling fan,
disconnect the fan motor lead or turn the
ignition to the OFF mode. The fan is
temperature controlled and can start at any
time the ignition is in the ON mode.7
20_WD_OM_EN_USC_t.book Page 321
Page 370 of 464
368MULTIMEDIA
Rear ParkSense Braking Assist — If
Equipped On
Off
NOTE:
When the “Rear ParkSense Braking Assist” feature is selected, the Park Assist system detects objects located behind the vehicle and utilizes auton -
omous braking to stop the vehicle.
LaneSense Warning — If Equipped EarlyMedium Late
NOTE:
The “LaneSense Warning” setting determines at what distance the LaneSense system warns you, through steering wheel feedback, of a possible lane
departure. LaneSense Strength — If Equipped LowMedium High
Blind Spot Alert — If Equipped OffLightsLights & Chime
NOTE:
When the “Blind Spot Alert” feature is selected, the Blind Spot Monitor (BSM) system is activated and shows a visual alert in the outside mirrors, or
it shows a visual alert in the outside mirrors as well as plays an audible alert when the turn signal is on. When “Off” is selected, the BSM system is
deactivated.
If your vehicle has experienced any damage in the area where the sensor is located, even if the fascia is not damaged, the sensor may have become
misaligned. Take your vehicle to an authorized dealer to verify sensor alignment. A sensor that is misaligned results in the BSM not operating to spec -
ification.
Rain Sensing Auto Wipers — If Equipped On
Off
Hill Start Assist — If Equipped On Off
Tilt Side Mirrors in Reverse On Off
Paddle Shifters Enable Disable
Setting Name Selectable Options
20_WD_OM_EN_USC_t.book Page 368
Page 385 of 464
MULTIMEDIA383
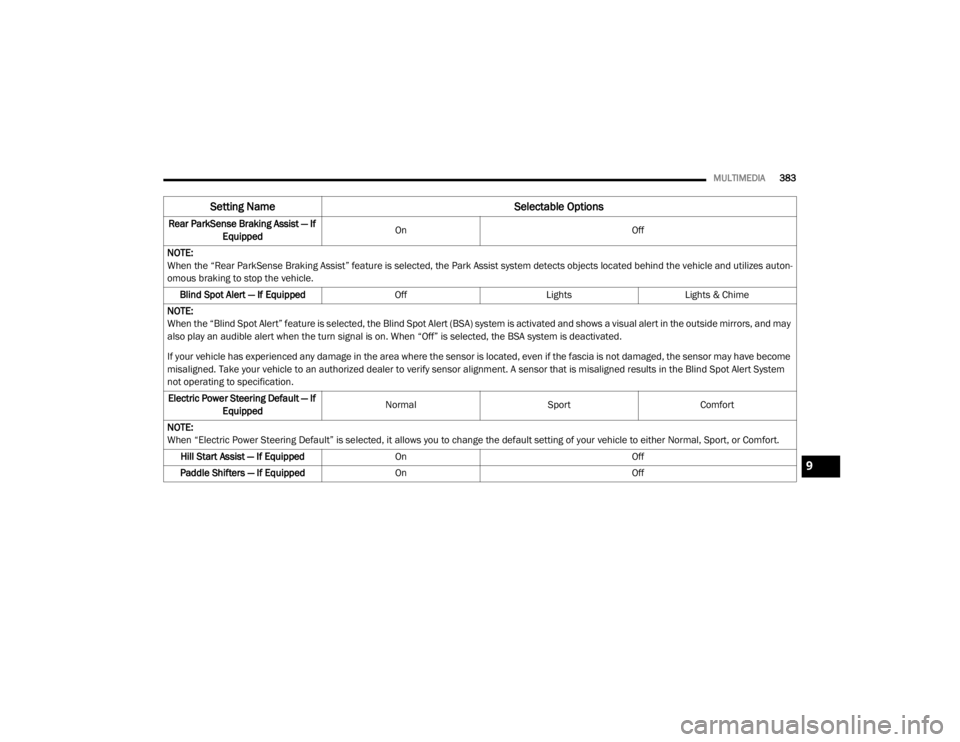
Rear ParkSense Braking Assist — If
Equipped On
Off
NOTE:
When the “Rear ParkSense Braking Assist” feature is selected, the Park Assist system detects objects located behind the vehicle and utilizes auton -
omous braking to stop the vehicle.
Blind Spot Alert — If Equipped OffLightsLights & Chime
NOTE:
When the “Blind Spot Alert” feature is selected, the Blind Spot Alert (BSA) system is activated and shows a visual alert in the outside mirrors, and may
also play an audible alert when the turn signal is on. When “Off” is selected, the BSA system is deactivated.
If your vehicle has experienced any damage in the area where the sensor is located, even if the fascia is not damaged, the sensor may have become
misaligned. Take your vehicle to an authorized dealer to verify sensor alignment. A sensor that is misaligned results in the Blind Spot Alert System
not operating to specification. Electric Power Steering Default — If Equipped Normal
SportComfort
NOTE:
When “Electric Power Steering Default” is selected, it allows you to change the default setting of your vehicle to either Normal, Sport, or Comfort. Hill Start Assist — If Equipped On Off
Paddle Shifters — If Equipped On Off
Setting Name Selectable Options
9
20_WD_OM_EN_USC_t.book Page 383
Page 387 of 464
MULTIMEDIA385
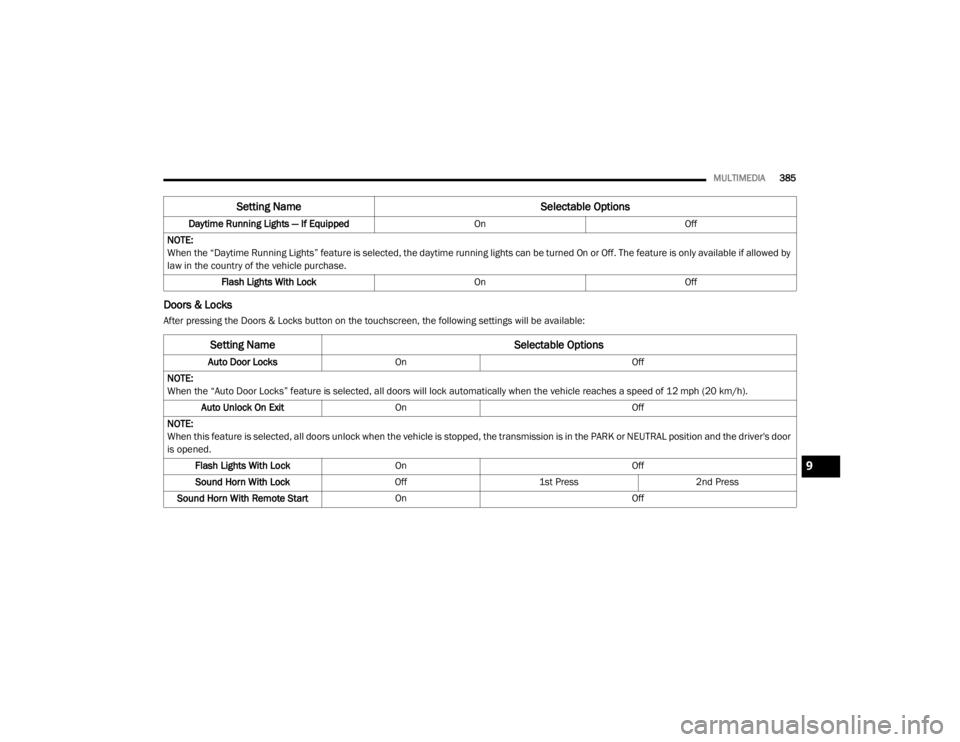
Doors & Locks
After pressing the Doors & Locks button on the touchscreen, the following settings will be available:Daytime Running Lights — If Equipped
OnOff
NOTE:
When the “Daytime Running Lights” feature is selected, the daytime running lights can be turned On or Off. The feature is only available if allowed by
law in the country of the vehicle purchase. Flash Lights With Lock OnOff
Setting Name Selectable Options
Setting NameSelectable Options
Auto Door LocksOn Off
NOTE:
When the “Auto Door Locks” feature is selected, all doors will lock automatically when the vehicle reaches a speed of 12 mph (20 km/h). Auto Unlock On Exit On Off
NOTE:
When this feature is selected, all doors unlock when the vehicle is stopped, the transmission is in the PARK or NEUTRAL position and the driver's door
is opened. Flash Lights With Lock On Off
Sound Horn With Lock Off1st Press 2nd Press
Sound Horn With Remote Start On Off
9
20_WD_OM_EN_USC_t.book Page 385
Page 399 of 464
MULTIMEDIA397
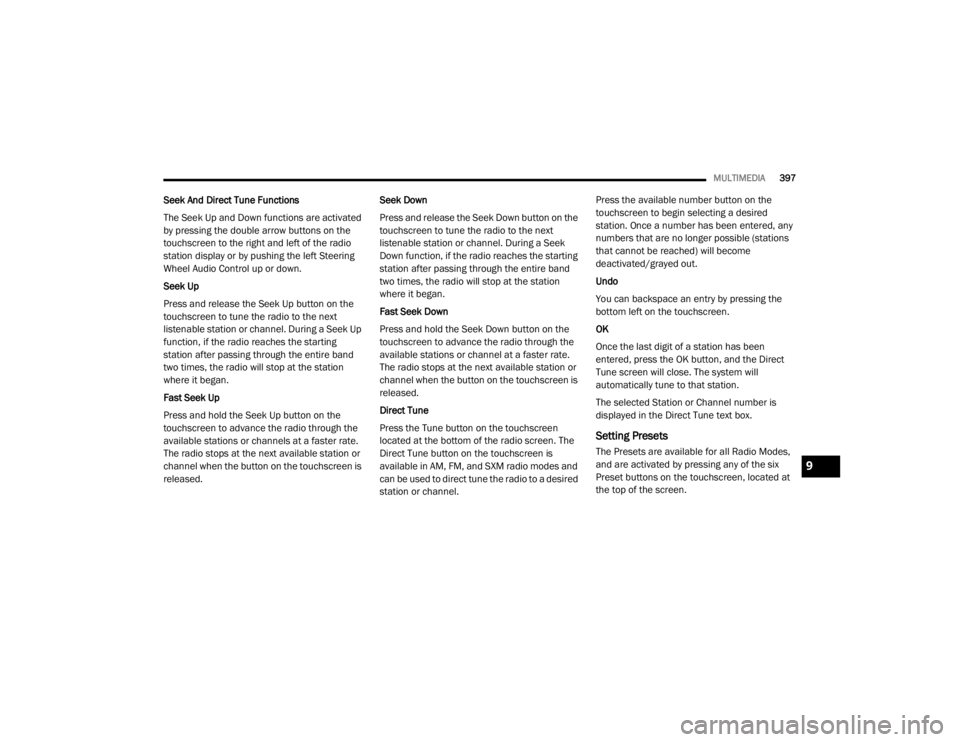
Seek And Direct Tune Functions
The Seek Up and Down functions are activated
by pressing the double arrow buttons on the
touchscreen to the right and left of the radio
station display or by pushing the left Steering
Wheel Audio Control up or down.
Seek Up
Press and release the Seek Up button on the
touchscreen to tune the radio to the next
listenable station or channel. During a Seek Up
function, if the radio reaches the starting
station after passing through the entire band
two times, the radio will stop at the station
where it began.
Fast Seek Up
Press and hold the Seek Up button on the
touchscreen to advance the radio through the
available stations or channels at a faster rate.
The radio stops at the next available station or
channel when the button on the touchscreen is
released. Seek Down
Press and release the Seek Down button on the
touchscreen to tune the radio to the next
listenable station or channel. During a Seek
Down function, if the radio reaches the starting
station after passing through the entire band
two times, the radio will stop at the station
where it began.
Fast Seek Down
Press and hold the Seek Down button on the
touchscreen to advance the radio through the
available stations or channel at a faster rate.
The radio stops at the next available station or
channel when the button on the touchscreen is
released.
Direct Tune
Press the Tune button on the touchscreen
located at the bottom of the radio screen. The
Direct Tune button on the touchscreen is
available in AM, FM, and SXM radio modes and
can be used to direct tune the radio to a desired
station or channel.Press the available number button on the
touchscreen to begin selecting a desired
station. Once a number has been entered, any
numbers that are no longer possible (stations
that cannot be reached) will become
deactivated/grayed out.
Undo
You can backspace an entry by pressing the
bottom left on the touchscreen.
OK
Once the last digit of a station has been
entered, press the OK button, and the Direct
Tune screen will close. The system will
automatically tune to that station.
The selected Station or Channel number is
displayed in the Direct Tune text box.
Setting Presets
The Presets are available for all Radio Modes,
and are activated by pressing any of the six
Preset buttons on the touchscreen, located at
the top of the screen.
9
20_WD_OM_EN_USC_t.book Page 397
Page 429 of 464
MULTIMEDIA427
BLU-RAY™ DISC PLAYER
Play A Blu-ray™ Disc
The Blu-ray™ disc player is located in the center
console.
Blu-ray™ Disc Player Location
1. Insert a Blu-ray™ disc into the disc player with the label facing as indicated on the
Blu-ray™ player. The radio automatically
selects the appropriate mode after the disc
is recognized and displays the menu
screen, the language screen, or starts
playing the first track.
2. To watch a Blu-ray™ disc on Rear 1 for driver's side rear passengers, ensure the
Remote Control and Headphone switch is
on Rear 1. 3. To watch a Blu-ray™ disc on Rear 2 for
passenger side rear passengers, ensure the
Remote Control and Headphone switch is
on Rear 2.
NOTE:
To view a Blu-ray™ disc on the radio, press
the Media button on the touchscreen, and
then press the Disc button. Press the Play
button, and then the Full Screen button.
Viewing a Blu-ray™ disc on the radio screen is
not available in all states/provinces. The
vehicle must be stopped, and the gear
selector must be in the PARK (P) position for
vehicles with automatic transmission.
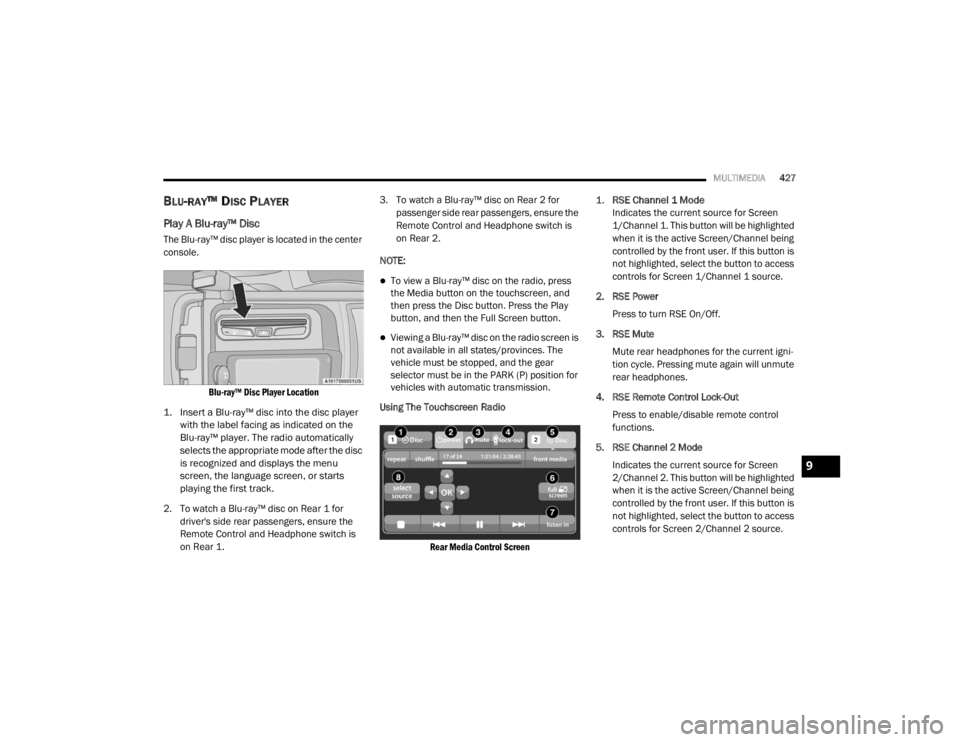
Using The Touchscreen Radio
Rear Media Control Screen
1.
RSE Channel 1 Mode
Indicates the current source for Screen
1/Channel 1. This button will be highlighted
when it is the active Screen/Channel being
controlled by the front user. If this button is
not highlighted, select the button to access
controls for Screen 1/Channel 1 source.
2. RSE Power Press to turn RSE On/Off.
3. RSE Mute Mute rear headphones for the current igni -
tion cycle. Pressing mute again will unmute
rear headphones.
4. RSE Remote Control Lock-Out Press to enable/disable remote control
functions.
5. RSE Channel 2 Mode Indicates the current source for Screen
2/Channel 2. This button will be highlighted
when it is the active Screen/Channel being
controlled by the front user. If this button is
not highlighted, select the button to access
controls for Screen 2/Channel 2 source.
9
20_WD_OM_EN_USC_t.book Page 427
Page 431 of 464
MULTIMEDIA429
3. To watch a DVD/Blu-ray™ Disc on Rear 2
(passenger’s side rear passenger), ensure
the Remote Control and Headphone
channel selector switch is on Rear 2.
Play A DVD/Blu-ray™ Disc Using The
Touchscreen Radio
1. Insert the DVD/Blu-ray™ Disc with the label facing as indicated on the DVD/Blu-ray™
Disc player. The radio automatically
selects the appropriate mode after the disc
is recognized and displays the menu
screen or starts playing the first track.
2. To watch a DVD/Blu-ray™ Disc on Rear 1 (driver’s side rear passenger), ensure the
Remote Control and Headphone channel
selector switch is on Rear 1.
3. To watch a DVD/Blu-ray™ Disc on Rear 2 (passenger’s side rear passenger), ensure
the Remote Control and Headphone
channel selector switch is on Rear 2.
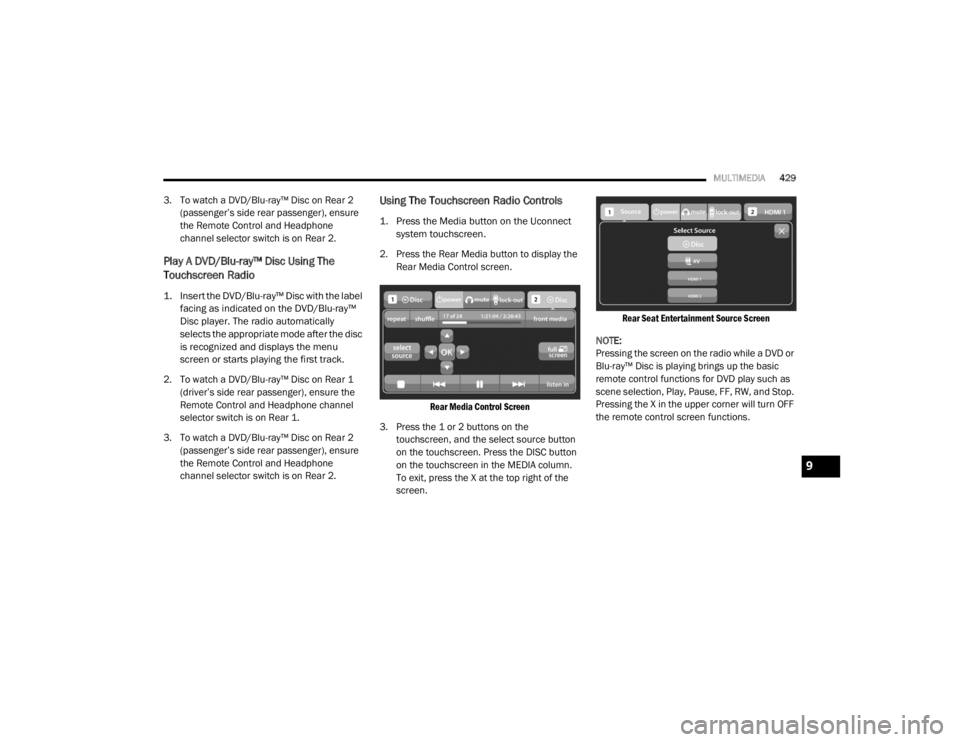
Using The Touchscreen Radio Controls
1. Press the Media button on the Uconnect system touchscreen.
2. Press the Rear Media button to display the Rear Media Control screen.
Rear Media Control Screen
3. Press the 1 or 2 buttons on the touchscreen, and the select source button
on the touchscreen. Press the DISC button
on the touchscreen in the MEDIA column.
To exit, press the X at the top right of the
screen.
Rear Seat Entertainment Source Screen
NOTE:
Pressing the screen on the radio while a DVD or
Blu-ray™ Disc is playing brings up the basic
remote control functions for DVD play such as
scene selection, Play, Pause, FF, RW, and Stop.
Pressing the X in the upper corner will turn OFF
the remote control screen functions.
9
20_WD_OM_EN_USC_t.book Page 429
Page 454 of 464

452
Intermittent Wipers (Delay Wipers)
.................. 56Introduction....................................................... 9Inverter Power.......................................................... 90iPod/USB/MP3 Control....................... 404, 424
J
Jack Location................................................. 276Jack Operation..................................... 279, 327Jacking And Tire Changing Instructions......... 279Jacking Instructions....................................... 279Jump Starting................................................ 283
K
Key Fob........................................................... 13Arm The System.......................................... 23Disarm The System..................................... 24Programming Additional Key Fobs....... 16, 22Key Fob Battery Service (Remote
Keyless Entry).................................................. 15Key Fob Programming (Remote
Keyless Entry).................................................. 16Key-In Reminder.............................................. 18Keyless Enter-N-Go........................................ 184Passive Entry............................................... 26Passive Entry Programming................ 26, 370Keys................................................................. 13Replacement........................................ 16, 22Sentry (Immobilizer).................................... 21
L
Lane Change Assist......................................... 53LaneSense.................................................... 234Lap/Shoulder Belts....................................... 145Latches......................................................... 183Hood............................................................ 75Lead Free Gasoline....................................... 351Leaks, Fluid.................................................. 183Life Of Tires................................................... 338Liftgate............................................................ 75Liftgate Window Wiper/Washer....................... 58Light Bulbs.................................................... 183Lights............................................................ 183Air Bag.................................... 110, 153, 181Automatic Headlights.................................. 52Brake Assist Warning............................... 127Brake Warning.......................................... 110Bulb Replacement........................... 266, 268Cargo........................................................... 77Center Mounted Stop............................... 269Cruise.............................................. 117, 119Daytime Running......................................... 51Dimmer Switch, Headlight........................... 50Electronic Stability Program(ESP) Indicator............................................... 112Exterior...............................................50, 183Fog........................................................... 269Hazard Warning Flasher........................... 261
Headlights................................................ 268Headlights On With Wipers..........................52High Beam/Low Beam Select......................51Interior.........................................................54Lights On Reminder.....................................52Malfunction Indicator (Check Engine)....... 113Park................................................... 52, 118Passing........................................................52Reading.......................................................54Rear Servicing.......................................... 269Rear Tail Lamps........................................ 269Seat Belt Reminder.................................. 110Security Alarm.......................................... 113Service............................................. 266, 268Side Marker.............................................. 269Traction Control........................................ 127Turn Signals..................... 50, 118, 183, 269Vanity Mirror................................................50Warning Instrument ClusterDescriptions................................ 112, 118Load Shed Battery Saver Mode..................... 108Load Shed Battery Saver On......................... 108Load Shed Electrical Load Reduction........... 108Load Shed Intelligent Battery Sensor............ 108Loading Vehicle............................................. 240Tires.......................................................... 332
20_WD_OM_EN_USC_t.book Page 452