diagram DODGE DURANGO 2021 Owners Manual
[x] Cancel search | Manufacturer: DODGE, Model Year: 2021, Model line: DURANGO, Model: DODGE DURANGO 2021Pages: 340, PDF Size: 20.38 MB
Page 186 of 340

184MULTIMEDIA
HEADPHONES OPERATION
The headphones receive two separate channels of
audio using an infrared transmitter from the video
screen.
If no audio is heard after increasing the volume
control, verify that the screen is turned on, the
channel is not muted, and the headphone channel
selector switch is on the desired channel. If audio
is still not heard, check that the batteries are
charged.
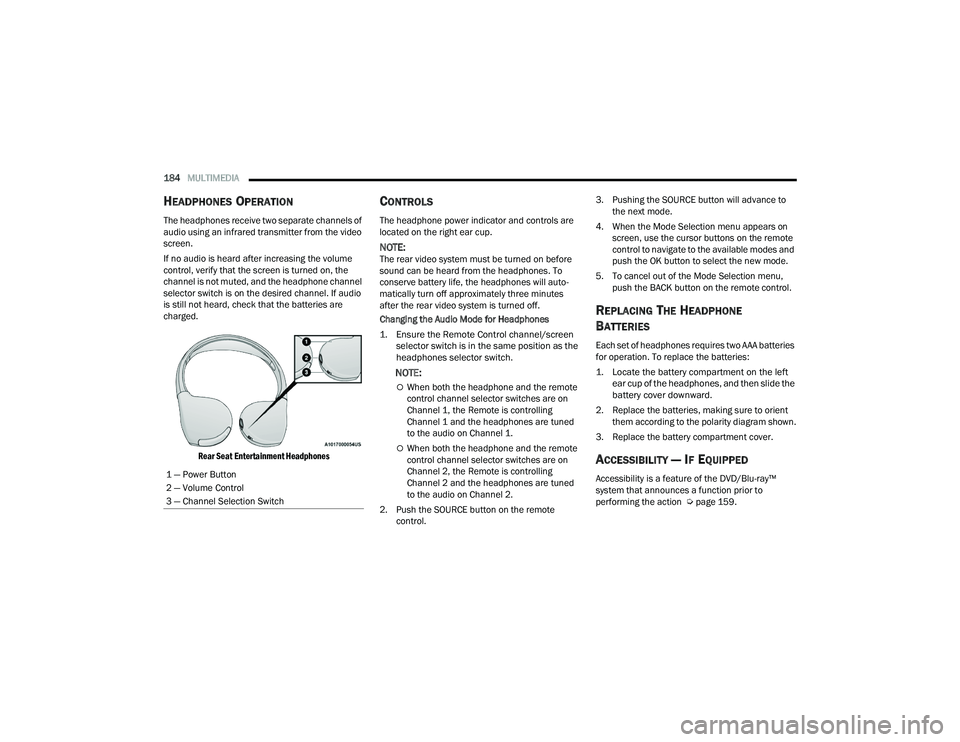
Rear Seat Entertainment Headphones
CONTROLS
The headphone power indicator and controls are
located on the right ear cup.
NOTE:The rear video system must be turned on before
sound can be heard from the headphones. To
conserve battery life, the headphones will auto -
matically turn off approximately three minutes
after the rear video system is turned off.
Changing the Audio Mode for Headphones
1. Ensure the Remote Control channel/screen selector switch is in the same position as the
headphones selector switch.
NOTE:
When both the headphone and the remote
control channel selector switches are on
Channel 1, the Remote is controlling
Channel 1 and the headphones are tuned
to the audio on Channel 1.
When both the headphone and the remote
control channel selector switches are on
Channel 2, the Remote is controlling
Channel 2 and the headphones are tuned
to the audio on Channel 2.
2. Push the SOURCE button on the remote control. 3. Pushing the SOURCE button will advance to
the next mode.
4. When the Mode Selection menu appears on screen, use the cursor buttons on the remote
control to navigate to the available modes and
push the OK button to select the new mode.
5. To cancel out of the Mode Selection menu, push the BACK button on the remote control.
REPLACING THE HEADPHONE
B
ATTERIES
Each set of headphones requires two AAA batteries
for operation. To replace the batteries:
1. Locate the battery compartment on the left
ear cup of the headphones, and then slide the
battery cover downward.
2. Replace the batteries, making sure to orient them according to the polarity diagram shown.
3. Replace the battery compartment cover.
ACCESSIBILITY — IF EQUIPPED
Accessibility is a feature of the DVD/Blu-ray™
system that announces a function prior to
performing the action Ú page 159.
1 — Power Button
2 — Volume Control
3 — Channel Selection Switch
21_WD_OM_EN_USC_t.book Page 184
Page 240 of 340

238SAFETY
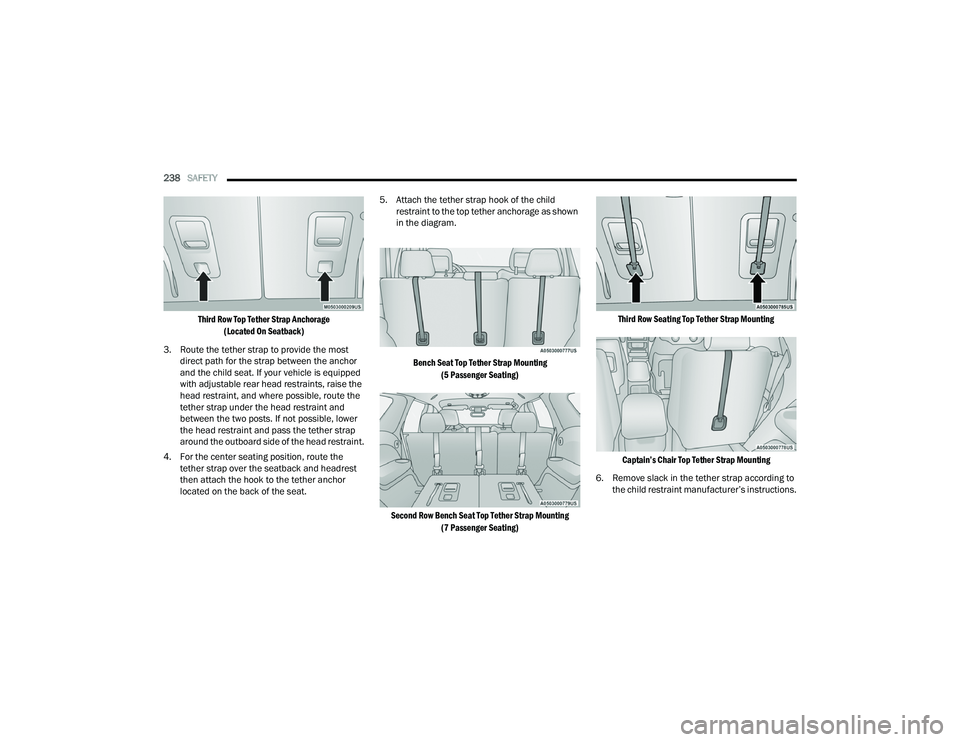
Third Row Top Tether Strap Anchorage (Located On Seatback)
3. Route the tether strap to provide the most direct path for the strap between the anchor
and the child seat. If your vehicle is equipped
with adjustable rear head restraints, raise the
head restraint, and where possible, route the
tether strap under the head restraint and
between the two posts. If not possible, lower
the head restraint and pass the tether strap
around the outboard side of the head restraint.
4. For the center seating position, route the tether strap over the seatback and headrest
then attach the hook to the tether anchor
located on the back of the seat. 5. Attach the tether strap hook of the child
restraint to the top tether anchorage as shown
in the diagram.
Bench Seat Top Tether Strap Mounting (5 Passenger Seating)
Second Row Bench Seat Top Tether Strap Mounting (7 Passenger Seating) Third Row Seating Top Tether Strap Mounting
Captain’s Chair Top Tether Strap Mounting
6. Remove slack in the tether strap according to the child restraint manufacturer’s instructions.
21_WD_OM_EN_USC_t.book Page 238
Page 314 of 340

312SERVICING AND MAINTENANCE
TIRE ROTATION RECOMMENDATIONS
The tires on the front and rear of your vehicle
operate at different loads and perform different
steering, handling, and braking functions. For
these reasons, they wear at unequal rates.
These effects can be reduced by timely rotation of
tires. The benefits of rotation are especially
worthwhile with aggressive tread designs such as
those on On/Off-Road type tires. Rotation will
increase tread life, help to maintain mud, snow,
and wet traction levels, and contribute to a
smooth, quiet ride.
For the proper maintenance intervals Úpage 265.
The reasons for any rapid or unusual wear should
be corrected prior to rotation being performed.
NOTE:The Tire Pressure Monitoring System will automat -
ically locate the pressure values displayed in the
correct vehicle position following a tire rotation.
The suggested rotation method is the “rearward
cross” shown in the following diagram.
Tire Rotation (Rearward Cross)
DEPARTMENT OF TRANSPORTATION
UNIFORM TIRE QUALITY GRADES
The following tire grading categories
were established by the National
Highway Traffic Safety Administration.
The specific grade rating assigned by the tire's manufacturer in each category is
shown on the sidewall of the tires on
your vehicle.
All passenger vehicle tires must conform
to Federal safety requirements in
addition to these grades.
TREADWEAR
The Treadwear grade is a comparative
rating, based on the wear rate of the tire
when tested under controlled conditions
on a specified government test course.
For example, a tire graded 150 would
wear one and one-half times as well on
the government course as a tire graded
100. The relative performance of tires
depends upon the actual conditions of
their use, however, and may depart
significantly from the norm due to
variations in driving habits, service
practices, and differences in road
characteristics and climate.
Observe the traction device manufacturer’s
instructions on the method of installation,
operating speed, and conditions for use.
Always use the suggested operating speed of
the device manufacturer’s if it is less than
30 mph (48 km/h).
Do not use traction devices on a compact
spare tire.
CAUTION!
21_WD_OM_EN_USC_t.book Page 312
Page 329 of 340

CUSTOMER ASSISTANCE327
PUBLICATION ORDER FORMS
To order the following manuals, you may use either
the website or the phone numbers listed below.
Service Manuals
These comprehensive Service Manuals provide a
complete working knowledge of the vehicle,
system, and/or components and is written in
straightforward language with illustrations,
diagrams, and charts.
Diagnostic Procedure Manuals
Diagnostic Procedure Manuals are filled with
diagrams, charts and detailed illustrations. These
manuals make it easy to find and fix problems on
computer-controlled vehicle systems and features.
They show exactly how to find and correct
problems, using step-by-step troubleshooting and
drivability procedures, proven diagnostic tests and
a complete list of all tools and equipment.
To order a hard copy of your Service or Diagnostic
Procedure manuals, visit:
www.techauthority.com (US and Canada).
Owner's Manuals
These Owner's Manuals have been prepared with
the assistance of service and engineering
specialists to acquaint you with specific
FCA vehicles. To access your Owner's Information online, visit
www.mopar.com/om (US) or www.owners.mopar.ca (Canada).
Or
Call Tech Authority toll free at:
1-800-890-4038 (US)
Owner's Manuals, Radio Manuals and Warranty
Information Books can be ordered through
Archway at:
1-800-387-1143 (Canada)
GENERAL INFORMATION
The following regulatory statement applies to all
Radio Frequency (RF) devices equipped in this
vehicle:
This device complies with Part 15 of the FCC Rules
and with Innovation, Science and Economic
Development Canada license-exempt RSS
standard(s). Operation is subject to the following
two conditions:
1. This device may not cause harmful interference, and
2. This device must accept any interference received, including interference that may
cause undesired operation. Le présent appareil est conforme aux CNR
d`Innovation, Science and Economic Development
applicables aux appareils radio exempts de
licence. L'exploitation est autorisée aux deux
conditions suivantes:
1. l'appareil ne doit pas produire de
brouillage, et
2. l'utilisateur de l'appareil doit accepter tout brouillage radioélectrique subi, même si le
brouillage est susceptible d'en compromettre
le fonctionnement.
La operación de este equipo está sujeta a las
siguientes dos condiciones:
1. es posible que este equipo o dispositivo no cause interferencia perjudicial y
2. este equipo o dispositivo debe aceptar cualquier interferencia, incluyendo la que
pueda causar su operación no deseada.
NOTE:Changes or modifications not expressly approved
by the party responsible for compliance could void
the user’s authority to operate the equipment.
10
21_WD_OM_EN_USC_t.book Page 327