mirror DODGE DURANGO 2022 Owners Manual
[x] Cancel search | Manufacturer: DODGE, Model Year: 2022, Model line: DURANGO, Model: DODGE DURANGO 2022Pages: 332, PDF Size: 19.82 MB
Page 5 of 332
3
MIRRORS ............................................................... 41 Inside Rearview Mirror .....................................41
Illuminated Vanity Mirrors ...............................41
Outside Mirrors ................................................42
Outside Automatic Dimming Mirror—
If Equipped........................................................42
Power Mirrors ..................................................42
Heated Mirrors — If Equipped..........................42
Tilt Side Mirrors In Reverse — If Equipped......42
UNIVERSAL GARAGE DOOR OPENER
(HOMELINK®)
b
.................................................. 43
Before You Begin Programming
HomeLink®.......................................................43
Erasing All The HomeLink® Channels ............43
Identifying Whether You Have A Rolling
Code Or Non-Rolling Code Device ...................43
Programming HomeLink® To A Garage
Door Opener .....................................................44
Programming HomeLink® To A
Miscellaneous Device ......................................45
Reprogramming A Single HomeLink®
Button ...............................................................45
Canadian/Gate Operator Programming .........45
Security .............................................................46
Troubleshooting Tips ........................................46 EXTERIOR LIGHTS ................................................47
Multifunction Lever ..........................................47
Headlight Switch .............................................47
Daytime Running Lights (DRLs) .....................48
High/Low Beam Switch....................................48
Automatic High Beam — If Equipped ..............48
Flash-To-Pass .................................................49
Automatic Headlights ......................................49
Parking Lights And Panel Lights ......................49
Automatic Headlights With Wipers .................49
Headlight Delay ................................................49
Lights-On Reminder .........................................49
Fog Lights — If Equipped..................................49
Turn Signals ......................................................50
Lane Change Assist — If Equipped ..................50
Automatic Headlight Leveling —
If Equipped........................................................50
Battery Saver ....................................................50
INTERIOR LIGHTS ................................................... 50
Courtesy Lights .................................................51
WINDSHIELD WIPERS AND WASHERS............... 52
Windshield Wiper Operation ...........................52
Rain Sensing Wipers — If Equipped ...............53
Rear Window Wiper/Washer ..........................54 CLIMATE CONTROLS ............................................. 54
Automatic Climate Control Descriptions
And Functions................................................... 54
Automatic Temperature Control (ATC) ............ 60
Climate Voice Recognition............................... 60
Operating Tips .................................................61
INTERIOR STORAGE AND EQUIPMENT ............... 62
Storage ............................................................. 62
USB/AUX Control ............................................. 64
Lighted Cupholders — If Equipped .................. 66
Electrical Power Outlets .................................. 66
Power Inverter — If Equipped .......................... 68
Wireless Charging Pad — If Equipped ............. 69
WINDOWS ............................................................. 69
Power Windows ................................................ 69
Wind Buffeting .................................................71
POWER SUNROOF — IF EQUIPPED ..................... 71
Opening And Closing The Sunroof .................. 72
Sunshade Operation ........................................ 72
Pinch Protect Feature ...................................... 72
Sunroof Maintenance ...................................... 72
Ignition Off Operation....................................... 72
HOOD....................................................................... 73
Opening The Hood ........................................... 73
Closing The Hood ............................................. 73
22_WD_OM_EN_USC_t.book Page 3
Page 8 of 332
6
OCCUPANT RESTRAINT SYSTEMS .................... 196 Occupant Restraint Systems Features ........ 196
Important Safety Precautions....................... 197
Seat Belt Systems ........................................ 197
Supplemental Restraint Systems (SRS) ...... 203
Child Restraints ........................................... 216
SAFETY TIPS ......................................................... 231
Transporting Passengers .............................. 231Transporting Pets ....................................... 232
Connected Vehicles....................................... 232
Safety Checks You Should Make
Inside The Vehicle ........................................ 232
Periodic Safety Checks You Should
Make Outside The Vehicle ............................ 233
Exhaust Gas ................................................... 234Carbon Monoxide Warnings ......................... 234
IN CASE OF EMERGENCY
HAZARD WARNING FLASHERS ......................... 235
SOS AND ASSIST MIRROR — IF EQUIPPED...... 235
JACKING AND TIRE CHANGING.......................... 239 Preparations For Jacking .............................. 239Jack Location ................................................. 240
Spare Tire Stowage ....................................... 240
Spare Tire Removal ....................................... 241
Jacking Instructions ...................................... 242 JUMP STARTING ................................................. 246
Preparations For Jump Start ........................ 246
Jump Starting Procedure .............................. 247
REFUELING IN EMERGENCY –
IF EQUIPPED ........................................................ 248
IF YOUR ENGINE OVERHEATS ........................... 249
MANUAL PARK RELEASE ................................... 250
FREEING A STUCK VEHICLE .............................. 252
TOWING A DISABLED VEHICLE ........................ 253
Rear Wheel Drive Models ............................. 254
All Wheel Drive Models ................................. 254
ENHANCED ACCIDENT RESPONSE SYSTEM
(EARS) .................................................................. 254
EVENT DATA RECORDER (EDR) ........................ 254
SERVICING AND MAINTENANCE
SCHEDULED SERVICING..................................... 255
Maintenance Plan ......................................... 256
ENGINE COMPARTMENT .................................... 259
3.6L Engine ................................................... 259
5.7L Engine ................................................... 260
Checking Oil Level ......................................... 261
Adding Washer Fluid .................................... 261
Maintenance-Free Battery ........................... 261Pressure Washing ......................................... 262 VEHICLE MAINTENANCE ..................................... 262
Engine Oil ...................................................... 262
Engine Oil Filter ............................................ 263
Engine Air Cleaner Filter ............................... 263
Air Conditioner Maintenance ....................... 264
Accessory Drive Belt Inspection ................... 267Body Lubrication .......................................... 267Windshield Wiper Blades ............................. 268Exhaust System ............................................ 271
Cooling System.............................................. 272
Brake System ............................................... 274Automatic Transmission ............................... 275
Front/Rear Axle Fluid ................................... 276
Transfer Case ............................................... 276Fuses.............................................................. 277
Bulb Replacement ...................................... 284
TIRES ..................................................................... 286
Tire Safety Information ................................. 286
Tires — General Information ......................... 293
Tire Types....................................................... 296Spare Tires — If Equipped ............................ 297
Wheel And Wheel Trim Care ........................ 299Snow Traction Devices ................................ 300Tire Rotation Recommendations ................ 302
22_WD_OM_EN_USC_t.book Page 6
Page 29 of 332
GETTING TO KNOW YOUR VEHICLE27
Use the four-way control to adjust the steering
column.
NOTE:For vehicles equipped with Driver Memory Settings
Ú page 27, you can use your key fob or the
memory switch on the driver's door trim panel to
return the tilt/telescopic steering column to saved
positions.
HEATED STEERING WHEEL —
I
F EQUIPPED
The steering wheel contains a heating
element that helps warm your hands in
cold weather. The heated steering wheel
has only one temperature setting. Once
the heated steering wheel has been turned on, it
will stay on until the operator turns it off. The
heated steering wheel may not turn on when it is
already warm. The heated steering wheel control button is
located on the center stack below the radio screen,
or within the Uconnect system.
Push the heated steering wheel button once to
turn the heating element on.
Push the heated steering wheel button a second
time to turn the heating element off.
NOTE:The engine must be running for the heated
steering wheel to operate.
For information on use with the Remote Start
system, see Ú
page 20.
DRIVER MEMORY SETTINGS — IF EQUIPPED
This feature allows the driver to save up to two
different memory profiles for easy recall through a
memory switch. Each memory profile saves
desired position settings for the following features:
Driver seat
Easy Entry/Exit seat (if equipped)
Side mirrors
Power tilt and telescopic steering column
(if equipped)
A set of desired radio station presets
NOTE:
Your vehicle is equipped with two key fobs, each
can be linked to either memory position 1 or 2.
Be sure to program the radio presets prior to
programming the memory settings.
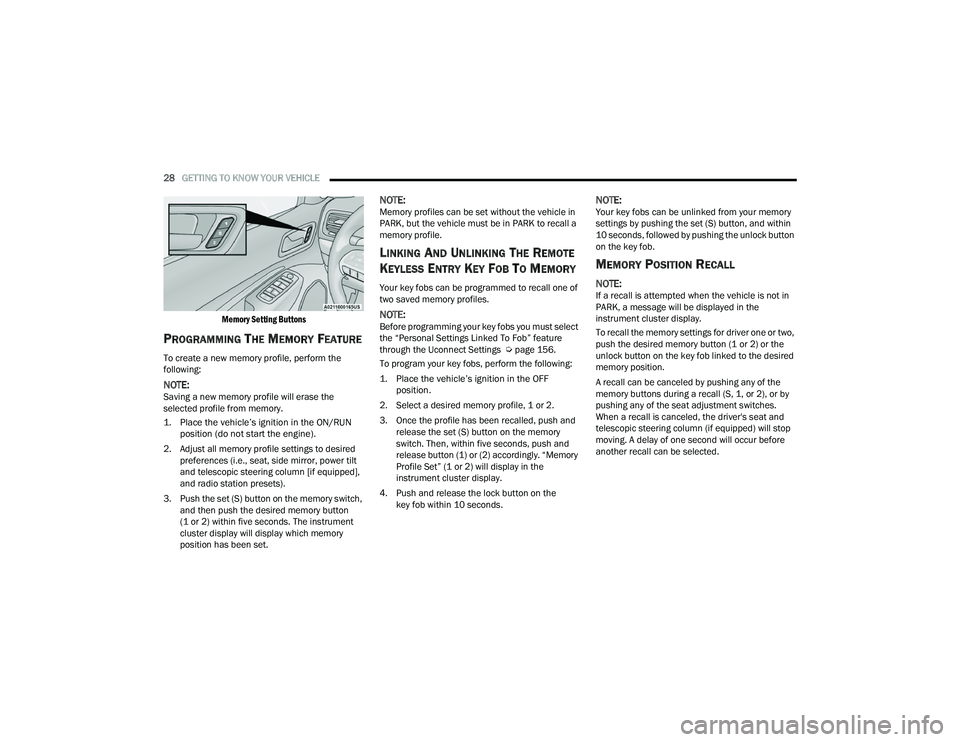
The memory setting switch is located on the
driver’s door trim panel. The switch consists of
three buttons:
The set (S) button, which is used to activate the
memory save function.
The (1) and (2) buttons which are used to recall
either of two saved memory profiles.
WARNING!
Do not adjust the steering column while driving.
Adjusting the steering column while driving or
driving with the steering column unlocked, could
cause the driver to lose control of the vehicle.
Failure to follow this warning may result in
serious injury or death.
WARNING!
Persons who are unable to feel pain to the
skin because of advanced age, chronic illness,
diabetes, spinal cord injury, medication,
alcohol use, exhaustion, or other physical
conditions must exercise care when using the
steering wheel heater. It may cause burns
even at low temperatures, especially if used
for long periods.
Do not place anything on the steering wheel
that insulates against heat, such as a blanket
or steering wheel covers of any type and mate -
rial. This may cause the steering wheel heater
to overheat.
2
22_WD_OM_EN_USC_t.book Page 27
Page 30 of 332
28GETTING TO KNOW YOUR VEHICLE
Memory Setting Buttons
PROGRAMMING THE MEMORY FEATURE
To create a new memory profile, perform the
following:
NOTE:Saving a new memory profile will erase the
selected profile from memory.
1. Place the vehicle’s ignition in the ON/RUN position (do not start the engine).
2. Adjust all memory profile settings to desired preferences (i.e., seat, side mirror, power tilt
and telescopic steering column [if equipped],
and radio station presets).
3. Push the set (S) button on the memory switch, and then push the desired memory button
(1 or 2) within five seconds. The instrument
cluster display will display which memory
position has been set.
NOTE:Memory profiles can be set without the vehicle in
PARK, but the vehicle must be in PARK to recall a
memory profile.
LINKING AND UNLINKING THE REMOTE
K
EYLESS ENTRY KEY FOB TO MEMORY
Your key fobs can be programmed to recall one of
two saved memory profiles.
NOTE:Before programming your key fobs you must select
the “Personal Settings Linked To Fob” feature
through the Uconnect Settings Ú page 156.
To program your key fobs, perform the following:
1. Place the vehicle’s ignition in the OFF position.
2. Select a desired memory profile, 1 or 2.
3. Once the profile has been recalled, push and release the set (S) button on the memory
switch. Then, within five seconds, push and
release button (1) or (2) accordingly. “Memory
Profile Set” (1 or 2) will display in the
instrument cluster display.
4. Push and release the lock button on the key fob within 10 seconds.
NOTE:Your key fobs can be unlinked from your memory
settings by pushing the set (S) button, and within
10 seconds, followed by pushing the unlock button
on the key fob.
MEMORY POSITION RECALL
NOTE:If a recall is attempted when the vehicle is not in
PARK, a message will be displayed in the
instrument cluster display.
To recall the memory settings for driver one or two,
push the desired memory button (1 or 2) or the
unlock button on the key fob linked to the desired
memory position.
A recall can be canceled by pushing any of the
memory buttons during a recall (S, 1, or 2), or by
pushing any of the seat adjustment switches.
When a recall is canceled, the driver's seat and
telescopic steering column (if equipped) will stop
moving. A delay of one second will occur before
another recall can be selected.
22_WD_OM_EN_USC_t.book Page 28
Page 43 of 332
GETTING TO KNOW YOUR VEHICLE41
ADDITIONAL INFORMATION
© 2022 FCA US LLC. All rights reserved. Mopar and
Uconnect are registered trademarks and Mopar
Owner Connect is a trademark of FCA US LLC.
SiriusXM® and all related marks and logos are
trademarks of SiriusXM® Radio Inc. Ú page 316.
Uconnect System Support:
US residents visit www.DriveUconnect.com or
call: 1-877-855-8400 (24 hours a day 7 days
a week)
Canadian residents visit www.DriveUcon -
nect.ca or call: 1-800-465-2001 (English) or
1-800-387-9983 (French)
SiriusXM Guardian™ services support:
US residents visit www.driveuconnect.com/
sirius-xm-guardian or call: 1-844-796-4827
Canadian residents visit https://www.driveu -
connect.ca/en/sirius-xm-guardian or call:
1-877-324-9091
MIRRORS
INSIDE REARVIEW MIRROR
Automatic Dimming Mirror
The rearview mirror can be adjusted up, down, left,
and right. The mirror should be adjusted to center
on the view through the rear window. This mirror automatically adjusts for headlight
glare from vehicles behind you.
NOTE:The Automatic Dimming Mirror feature is disabled
when the vehicle is in REVERSE to improve rear
view viewing.
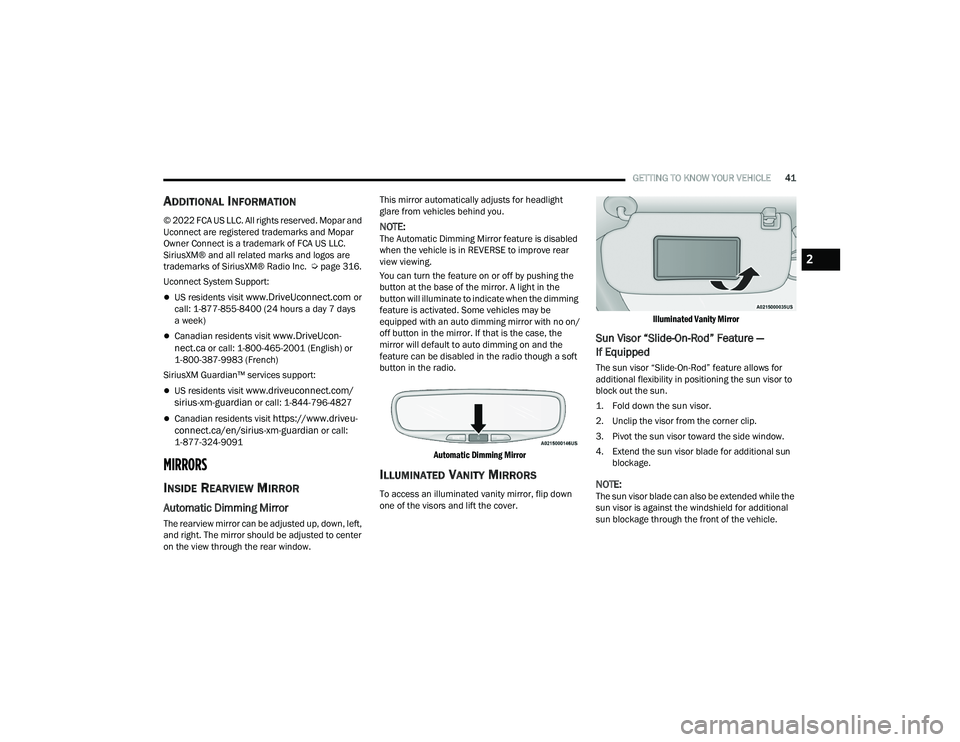
You can turn the feature on or off by pushing the
button at the base of the mirror. A light in the
button will illuminate to indicate when the dimming
feature is activated. Some vehicles may be
equipped with an auto dimming mirror with no on/
off button in the mirror. If that is the case, the
mirror will default to auto dimming on and the
feature can be disabled in the radio though a soft
button in the radio.
Automatic Dimming Mirror
ILLUMINATED VANITY MIRRORS
To access an illuminated vanity mirror, flip down
one of the visors and lift the cover.
Illuminated Vanity Mirror
Sun Visor “Slide-On-Rod” Feature —
If Equipped
The sun visor “Slide-On-Rod” feature allows for
additional flexibility in positioning the sun visor to
block out the sun.
1. Fold down the sun visor.
2. Unclip the visor from the corner clip.
3. Pivot the sun visor toward the side window.
4. Extend the sun visor blade for additional sun
blockage.
NOTE:The sun visor blade can also be extended while the
sun visor is against the windshield for additional
sun blockage through the front of the vehicle.
2
22_WD_OM_EN_USC_t.book Page 41
Page 44 of 332
42GETTING TO KNOW YOUR VEHICLE
OUTSIDE MIRRORS
The outside mirror(s) can be adjusted to the center
of the adjacent lane of traffic to achieve the
optimal view.
Outside Mirrors Folding Feature
All outside mirrors are hinged and may be moved
either forward or rearward to resist damage.
The hinges have three detent positions:
Full forward position
Full rearward position
Normal position
OUTSIDE AUTOMATIC DIMMING
M
IRROR— IF EQUIPPED
The driver’s side outside mirror will automatically
adjust for glare from vehicles behind you. This
feature is controlled by the inside automatic dimming mirror. The mirror will automatically
adjust for headlight glare when the inside mirror
adjusts.
POWER MIRRORS
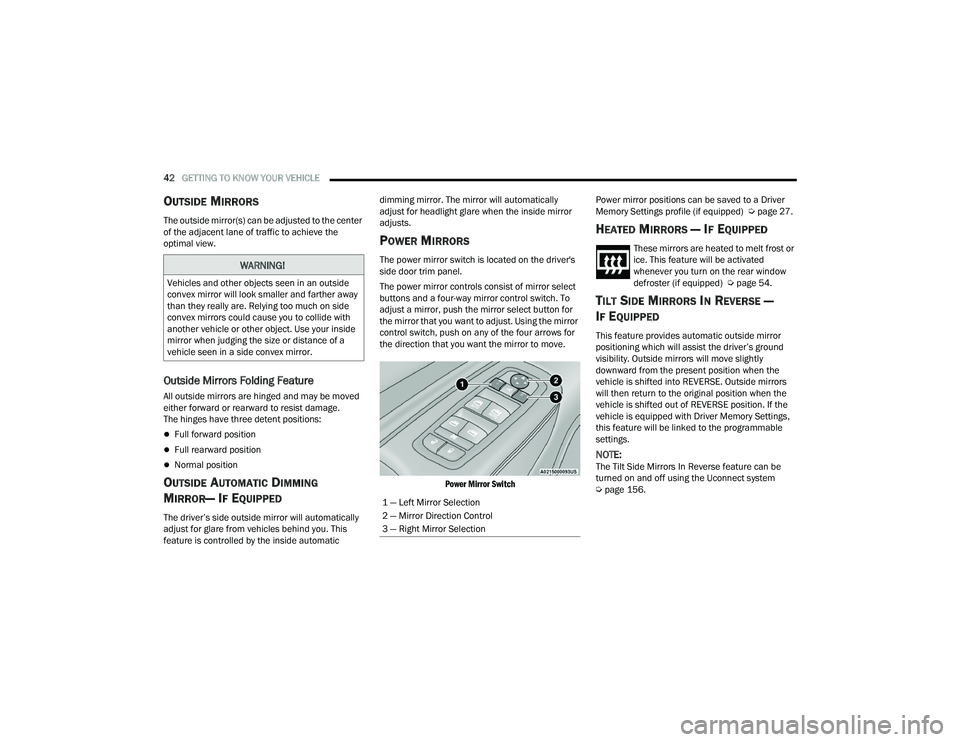
The power mirror switch is located on the driver's
side door trim panel.
The power mirror controls consist of mirror select
buttons and a four-way mirror control switch. To
adjust a mirror, push the mirror select button for
the mirror that you want to adjust. Using the mirror
control switch, push on any of the four arrows for
the direction that you want the mirror to move.
Power Mirror Switch
Power mirror positions can be saved to a Driver
Memory Settings profile (if equipped) Ú
page 27.
HEATED MIRRORS — IF EQUIPPED
These mirrors are heated to melt frost or
ice. This feature will be activated
whenever you turn on the rear window
defroster (if equipped) Úpage 54.
TILT SIDE MIRRORS IN REVERSE —
I
F EQUIPPED
This feature provides automatic outside mirror
positioning which will assist the driver’s ground
visibility. Outside mirrors will move slightly
downward from the present position when the
vehicle is shifted into REVERSE. Outside mirrors
will then return to the original position when the
vehicle is shifted out of REVERSE position. If the
vehicle is equipped with Driver Memory Settings,
this feature will be linked to the programmable
settings.
NOTE:The Tilt Side Mirrors In Reverse feature can be
turned on and off using the Uconnect system
Ú page 156.
WARNING!
Vehicles and other objects seen in an outside
convex mirror will look smaller and farther away
than they really are. Relying too much on side
convex mirrors could cause you to collide with
another vehicle or other object. Use your inside
mirror when judging the size or distance of a
vehicle seen in a side convex mirror.
1 — Left Mirror Selection
2 — Mirror Direction Control
3 — Right Mirror Selection
22_WD_OM_EN_USC_t.book Page 42
Page 50 of 332
48GETTING TO KNOW YOUR VEHICLE
To turn off the headlights, rotate the headlight
switch back to the O (off) position.
NOTE:For vehicles sold in Canada, rotate the headlight
switch clockwise from the parking lights and
instrument panel lights position to the first detent
to turn on headlights, parking lights, and
instrument panel lights. Rotate the headlight
switch to the second detent for the AUTO position.
NOTE:
Your vehicle is equipped with plastic headlight
and fog light (if equipped) lenses that are lighter
and less susceptible to stone breakage than
glass lights. Plastic is not as scratch resistant as
glass and therefore different lens cleaning
procedures must be followed.
To minimize the possibility of scratching the
lenses and reducing light output, avoid wiping
with a dry cloth. To remove road dirt, wash with
a mild soap solution followed by rinsing.
DAYTIME RUNNING LIGHTS (DRLS)
The Daytime Running Lights (DRLs) come on
whenever the engine is running. The lights will
remain on until the ignition is placed in the OFF
position, or the parking brake is engaged. The
headlight switch must be used during normal
nighttime driving.
NOTE:
For vehicles sold in Canada, the Daytime
Running Lights will automatically deactivate
when the front fog lights are turned on.
If allowed by law in the country in which the
vehicle was purchased, the Daytime Running
Lights can be turned on and off using the
Uconnect system Ú page 156.
On some vehicles, the Daytime Running Lights
may deactivate or reduce intensity on one side
of the vehicle (when a turn signal is activated on
that side), or on both sides of the vehicle (when
the hazard warning lights are activated).
HIGH/LOW BEAM SWITCH
Push the multifunction lever toward the instrument
panel to switch the headlights to high beams. Pulling
the multifunction back will turn the low beams on.
AUTOMATIC HIGH BEAM — IF EQUIPPED
The Automatic High Beam Headlamp Control
system provides increased forward lighting at night
by automatically controlling the high beams
through the use of a camera mounted on the
inside rearview mirror. This camera detects vehicle
specific light and automatically switches from high
beams to low beams until the approaching vehicle
is out of view.
NOTE:
The Automatic High Beam Headlamp Control can
be turned on or off by selecting or deselecting
“Auto Dim High Beams” within your Uconnect
Settings
Ú
page 156, as well as turning the
headlight switch to the AUTO position.
Broken, muddy, or obstructed headlights and
taillights of vehicles in the field of view will
cause headlights to remain on longer (closer to
the vehicle). Also, dirt, film, and other obstruc -
tions on the windshield or camera lens will
cause the system to function improperly.
If the windshield or Automatic High Beam Head -
lamp Control mirror is replaced, the mirror must
be re-aimed to ensure proper performance.
See a local authorized dealer.CAUTION!
Do not use abrasive cleaning components,
solvents, steel wool or other abrasive materials
to clean the lenses.
22_WD_OM_EN_USC_t.book Page 48
Page 57 of 332
GETTING TO KNOW YOUR VEHICLE55
(Continued)
A/C Button
Press and release this button on the
touchscreen to change the current
setting. The A/C indicator illuminates
when A/C is on.
The Air Conditioning (A/C) button allows the
operator to manually activate or deactivate the air
conditioning system. When the air conditioning
system is turned on, cool dehumidified air will flow
through the outlets into the cabin.
NOTE:If fog or mist appears on the windshield or side
glass, select Defrost mode and increase blower
speed if needed. If your air conditioning perfor -
mance seems lower than expected, check the front
of the A/C condenser (located in front of the
radiator), for an accumulation of dirt or insects.
Clean with a gentle water spray from the front of
the radiator and through the condenser.
Recirculation Button
Press and release this button to change
the system between recirculation mode
and outside air mode. The Recirculation
indicator and the A/C indicator illuminate
when the Recirculation button is pressed.
Recirculation can be used when outside conditions
such as smoke, odors, dust, or high humidity are
present. Recirculation can be used in all modes.
Recirculation may be unavailable (button on the touchscreen greyed out) if conditions exist that
could create fogging on the inside of the
windshield. The A/C can be deselected manually
without disturbing the mode control selection.
Continuous use of Recirculation mode may make
the inside air stuffy and window fogging may occur.
Extended use of this mode is not recommended.
Recirculation mode may automatically adjust to
optimize customer experience for warming,
cooling, dehumidification, etc.
AUTO Button
Press and release this button on the
touchscreen, or push the button on the
faceplate, to change the current setting.
The AUTO button automatically controls
the interior cabin temperature by adjusting
distribution and amount of airflow. Air Conditioning
(A/C) may be active during AUTO operation to
improve performance. Performing this function will
cause the system to switch between manual mode
and automatic modes. AUTO mode is highly
recommended for efficiency Ú page 60.
Front Defrost Button
Press and release the touchscreen
button, or push and release the
button on the faceplate, to change the
current airflow setting to Defrost mode.
The Front Defrost indicator illuminates when
the Front Defrost is on. Air comes from the
windshield and side window demist outlets. When the defrost button is selected, the blower
level may increase. Use Defrost mode with
maximum temperature settings for best
windshield and side window defrosting and
defogging. When toggling the Front Defrost mode
button, the climate system will return to the
previous setting.
Rear Defrost Button
Press and release the button on the
touchscreen, or push and release the
button on the faceplate, to turn on the
rear window defroster and the heated
outside mirrors (if equipped). The Rear Defrost
indicator illuminates when the rear window
defroster is on. The rear window defroster
automatically turns off after 10 minutes.
CAUTION!
Failure to follow these cautions can cause
damage to the heating elements:
Use care when washing the inside of the rear
window. Do not use abrasive window cleaners
on the interior surface of the window. Use a
soft cloth and a mild washing solution, wiping
parallel to the heating elements. Labels can
be peeled off after soaking with warm water.
2
22_WD_OM_EN_USC_t.book Page 55
Page 90 of 332
88GETTING TO KNOW YOUR INSTRUMENT PANEL
NOTE:Menus with (show/hide) can push the OK button to
choose whether to show or hide this menu on the
instrument cluster display.
Defaults (Restores All Settings To Default Settings)
Restore
Cancel
BATTERY SAVER ON/BATTERY SAVER
M
ODE MESSAGE — ELECTRICAL LOAD
R
EDUCTION ACTIONS — IF EQUIPPED
This vehicle is equipped with an Intelligent Battery
Sensor (IBS) to perform additional monitoring of the
electrical system and status of the vehicle battery.
In cases when the IBS detects charging system
failure, or the vehicle battery conditions are
deteriorating, electrical load reduction actions will
take place to extend the driving time and distance
of the vehicle. This is done by reducing power to or
turning off non-essential electrical loads.
Load reduction is only active when the engine is
running. It will display a message if there is a risk
of battery depletion to the point where the vehicle
may stall due to lack of electrical supply, or will not
restart after the current drive cycle.
When load reduction is activated, the message
“Battery Saver On” or “Battery Saver Mode” will
appear in the instrument cluster.
These messages indicate the vehicle battery has a
low state of charge and continues to lose electrical
charge at a rate that the charging system cannot
sustain.
NOTE:
The charging system is independent from load
reduction. The charging system performs a diag -
nostic on the charging system continuously.
If the Battery Charge Warning Light is on it may
indicate a problem with the charging system
Ú page 90.
The electrical loads that may be switched off
(if equipped), and vehicle functions which can be
affected by load reduction:
Heated Seat/Vented Seats/Heated Wheel
Rear Defroster And Heated Mirrors
HVAC System
115 Volt AC Power Inverter System
Audio and Telematics System
Loss of the battery charge may indicate one or
more of the following conditions:
The charging system cannot deliver enough
electrical power to the vehicle system because
the electrical loads are larger than the capability
of the charging system. The charging system is
still functioning properly.
Turning on all possible vehicle electrical loads
(e.g. HVAC to max settings, exterior and interior
lights, overloaded power outlets +12 Volt,
115 Volt AC, USB ports) during certain driving
conditions (city driving, towing, frequent stop -
ping, etc.).
Installing options like additional lights, upfitter
electrical accessories, audio systems, alarms
and similar devices.
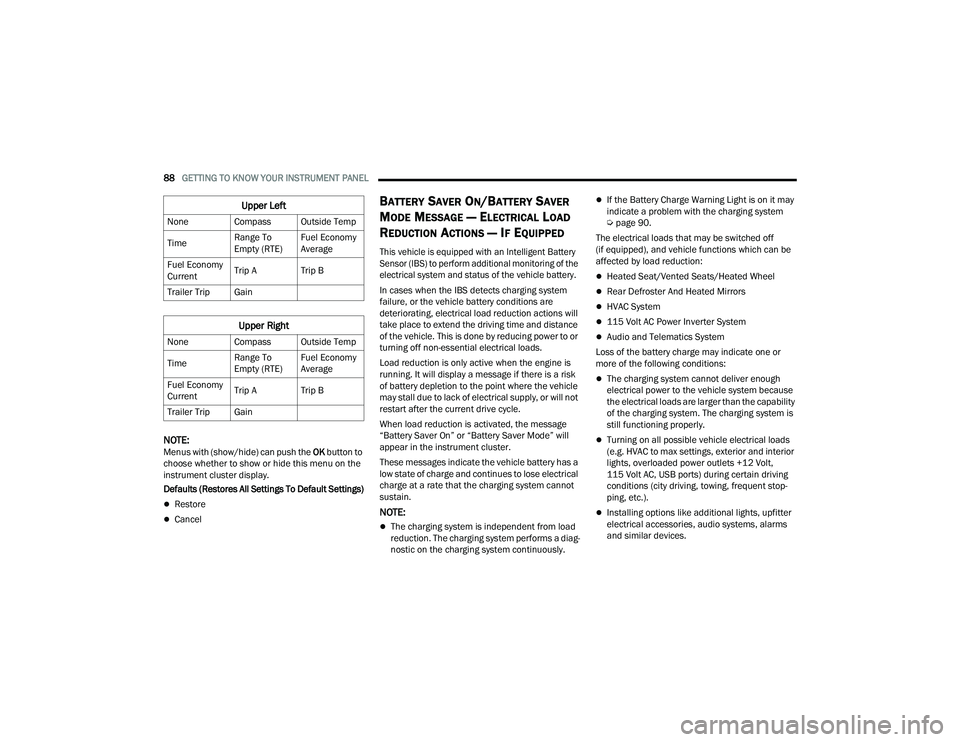
Upper Left
None Compass Outside Temp
Time Range To
Empty (RTE)Fuel Economy
Average
Fuel Economy
Current Trip A Trip B
Trailer Trip Gain
Upper Right
None Compass Outside Temp
Time Range To
Empty (RTE)Fuel Economy
Average
Fuel Economy
Current Trip A Trip B
Trailer Trip Gain
22_WD_OM_EN_USC_t.book Page 88
Page 101 of 332
99
(Continued)
(Continued)
STARTING AND OPERATING
STARTING THE ENGINE
Before starting your vehicle, adjust your seat,
adjust the inside and outside mirrors, fasten your
seat belt, and if present, instruct all other
occupants to buckle their seat belts.
AUTOMATIC TRANSMISSION
The gear selector must be in the NEUTRAL (N) or
PARK (P) position before you can start the engine.
Apply the brakes before shifting into any driving
gear.
NORMAL STARTING
To Turn On The Engine Using The ENGINE START/
STOP Button
1. The transmission must be in PARK (P).
2. Press and hold the brake pedal while pushing
the ENGINE START/STOP button once.
3. The system starts the vehicle. If the vehicle fails to start, the starter will disengage
automatically after 10 seconds.
4. If you wish to stop the cranking of the engine prior to the engine starting, push the ENGINE
START/STOP button again.
WARNING!
Before exiting a vehicle, always come to a
complete stop, then shift the automatic trans -
mission into PARK and apply the parking
brake.
Always make sure the keyless ignition node is
in the OFF position, key fob is removed from
the vehicle and vehicle is locked.
Never leave children alone in a vehicle, or with
access to an unlocked vehicle. Leaving chil -
dren in a vehicle unattended is dangerous for
a number of reasons. A child or others could
be seriously or fatally injured. Children should
be warned not to touch the parking brake,
brake pedal or the gear selector.
Do not leave the key fob in or near the vehicle,
or in a location accessible to children, and do
not leave the ignition of a vehicle equipped
with Keyless Enter ‘n Go™ in the ACC or ON/
RUN position. A child could operate power
windows, other controls, or move the vehicle.
Do not leave children or animals inside parked
vehicles in hot weather. Interior heat build-up
may cause serious injury or death.
CAUTION!
Damage to the transmission may occur if the
following precautions are not observed:
Do not shift from REVERSE (R), PARK, or
NEUTRAL into any forward gear when the
engine is above idle speed.
WARNING!
Shift into or out of PARK or REVERSE only after
the vehicle has come to a complete stop and
the engine is at idle speed.
Before shifting into any gear, make sure your
foot is firmly on the brake pedal.
CAUTION!
4
22_WD_OM_EN_USC_t.book Page 99