warning light DODGE DURANGO 2022 Owners Manual
[x] Cancel search | Manufacturer: DODGE, Model Year: 2022, Model line: DURANGO, Model: DODGE DURANGO 2022Pages: 332, PDF Size: 19.82 MB
Page 6 of 332
4
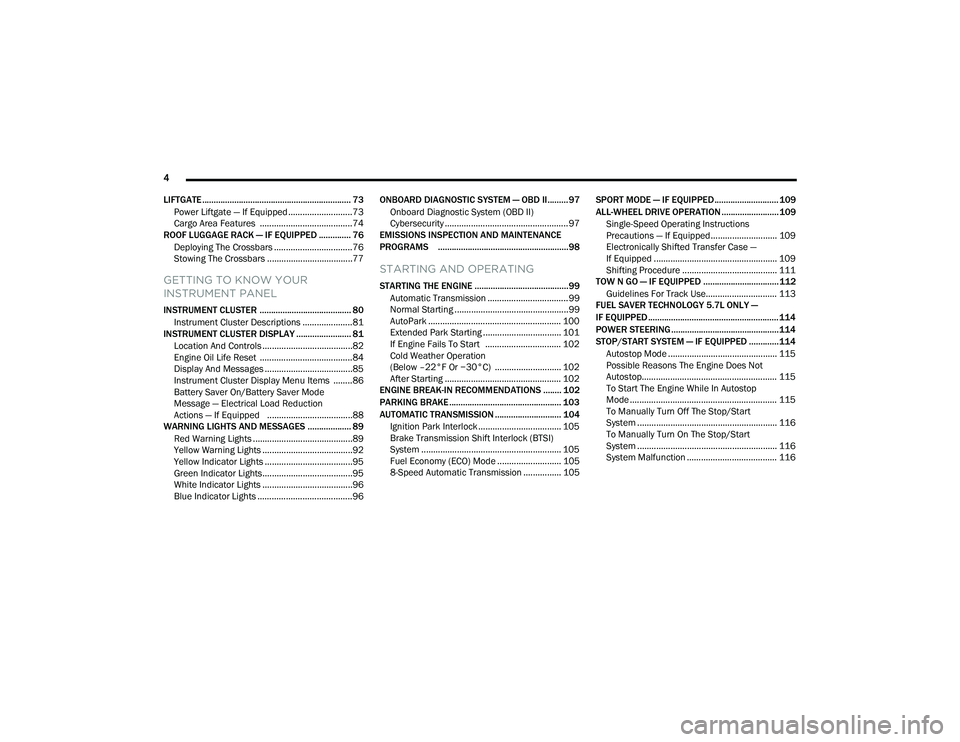
LIFTGATE ................................................................. 73 Power Liftgate — If Equipped ...........................73
Cargo Area Features .......................................74
ROOF LUGGAGE RACK — IF EQUIPPED .............. 76
Deploying The Crossbars .................................76
Stowing The Crossbars ....................................77
GETTING TO KNOW YOUR
INSTRUMENT PANEL
INSTRUMENT CLUSTER ........................................ 80Instrument Cluster Descriptions .....................81
INSTRUMENT CLUSTER DISPLAY ........................ 81
Location And Controls ......................................82
Engine Oil Life Reset .......................................84
Display And Messages .....................................85
Instrument Cluster Display Menu Items ........86
Battery Saver On/Battery Saver Mode
Message — Electrical Load Reduction
Actions — If Equipped ....................................88
WARNING LIGHTS AND MESSAGES ................... 89
Red Warning Lights ..........................................89
Yellow Warning Lights ......................................92
Yellow Indicator Lights .....................................95
Green Indicator Lights......................................95
White Indicator Lights ......................................96
Blue Indicator Lights ........................................96 ONBOARD DIAGNOSTIC SYSTEM — OBD II.........97
Onboard Diagnostic System (OBD II)
Cybersecurity ....................................................97
EMISSIONS INSPECTION AND MAINTENANCE
PROGRAMS .........................................................98
STARTING AND OPERATING
STARTING THE ENGINE .........................................99
Automatic Transmission ..................................99
Normal Starting ................................................99
AutoPark ........................................................ 100 Extended Park Starting ................................. 101
If Engine Fails To Start ................................ 102Cold Weather Operation
(Below –22°F Or −30°C) ............................ 102
After Starting ................................................. 102
ENGINE BREAK-IN RECOMMENDATIONS ........ 102
PARKING BRAKE ................................................. 103
AUTOMATIC TRANSMISSION ............................. 104
Ignition Park Interlock ................................... 105Brake Transmission Shift Interlock (BTSI)
System ........................................................... 105
Fuel Economy (ECO) Mode ........................... 1058-Speed Automatic Transmission ................ 105 SPORT MODE — IF EQUIPPED............................ 109
ALL-WHEEL DRIVE OPERATION ......................... 109
Single-Speed Operating Instructions
Precautions — If Equipped............................ 109
Electronically Shifted Transfer Case —
If Equipped .................................................... 109
Shifting Procedure ........................................ 111
TOW N GO — IF EQUIPPED ................................. 112
Guidelines For Track Use.............................. 113
FUEL SAVER TECHNOLOGY 5.7L ONLY —
IF EQUIPPED ......................................................... 114
POWER STEERING............................................... 114
STOP/START SYSTEM — IF EQUIPPED ............. 114 Autostop Mode .............................................. 115
Possible Reasons The Engine Does Not
Autostop......................................................... 115
To Start The Engine While In Autostop
Mode .............................................................. 115
To Manually Turn Off The Stop/Start
System ........................................................... 116
To Manually Turn On The Stop/Start
System ........................................................... 116
System Malfunction ...................................... 116
22_WD_OM_EN_USC_t.book Page 4
Page 12 of 332
10
VEHICLE MODIFICATIONS/ALTERATIONS
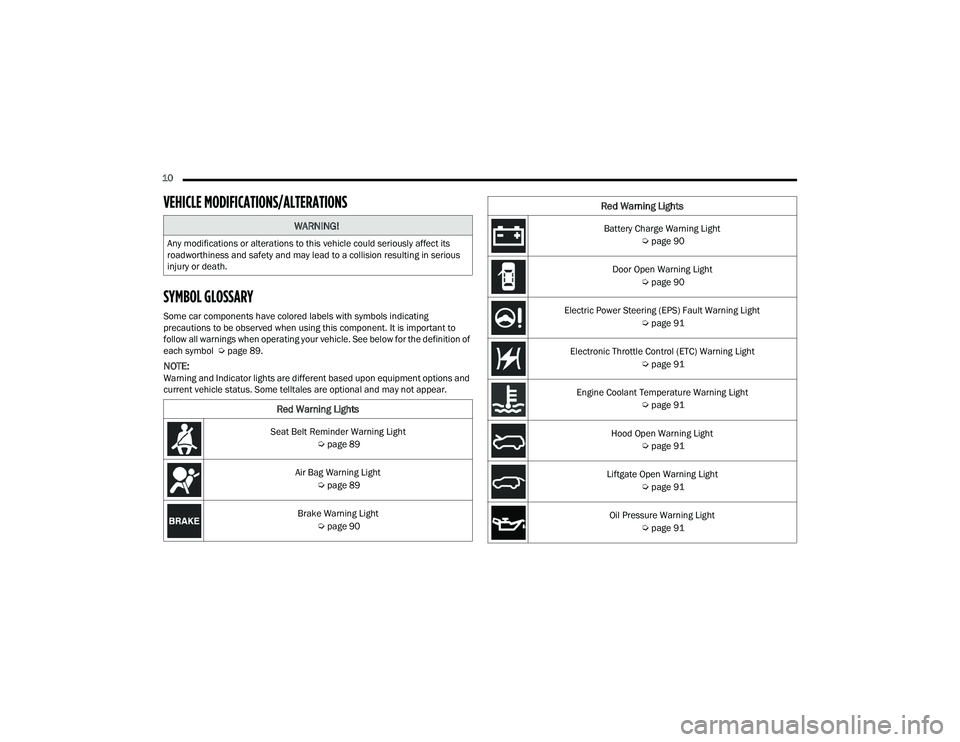
SYMBOL GLOSSARY
Some car components have colored labels with symbols indicating
precautions to be observed when using this component. It is important to
follow all warnings when operating your vehicle. See below for the definition of
each symbol Úpage 89.
NOTE:Warning and Indicator lights are different based upon equipment options and
current vehicle status. Some telltales are optional and may not appear.
WARNING!
Any modifications or alterations to this vehicle could seriously affect its
roadworthiness and safety and may lead to a collision resulting in serious
injury or death.
Red Warning Lights
Seat Belt Reminder Warning Light
Úpage 89
Air Bag Warning Light Úpage 89
Brake Warning Light Úpage 90
Battery Charge Warning Light
Úpage 90
Door Open Warning Light Úpage 90
Electric Power Steering (EPS) Fault Warning Light Úpage 91
Electronic Throttle Control (ETC) Warning Light Úpage 91
Engine Coolant Temperature Warning Light Úpage 91
Hood Open Warning Light Úpage 91
Liftgate Open Warning Light Úpage 91
Oil Pressure Warning Light Úpage 91
Red Warning Lights
22_WD_OM_EN_USC_t.book Page 10
Page 13 of 332
11
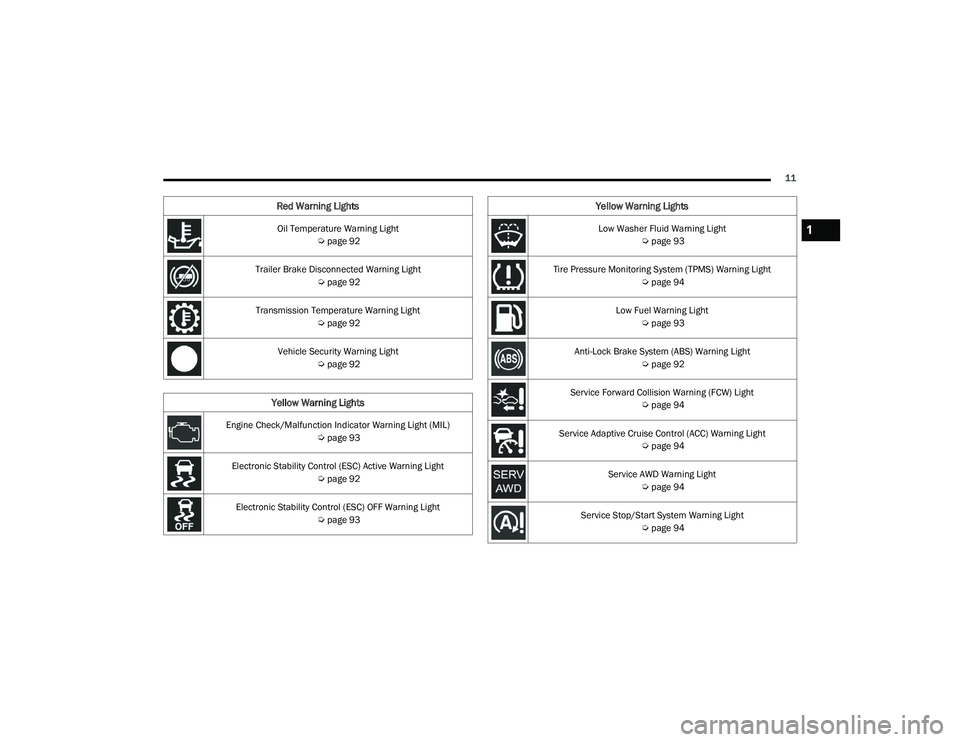
Oil Temperature Warning Light Úpage 92
Trailer Brake Disconnected Warning Light Úpage 92
Transmission Temperature Warning Light Úpage 92
Vehicle Security Warning Light Úpage 92
Yellow Warning Lights
Engine Check/Malfunction Indicator Warning Light (MIL)
Úpage 93
Electronic Stability Control (ESC) Active Warning Light Úpage 92
Electronic Stability Control (ESC) OFF Warning Light Úpage 93
Red Warning Lights
Low Washer Fluid Warning Light
Úpage 93
Tire Pressure Monitoring System (TPMS) Warning Light Úpage 94
Low Fuel Warning Light Úpage 93
Anti-Lock Brake System (ABS) Warning Light Úpage 92
Service Forward Collision Warning (FCW) Light Úpage 94
Service Adaptive Cruise Control (ACC) Warning Light Úpage 94
Service AWD Warning Light Úpage 94
Service Stop/Start System Warning Light Úpage 94
Yellow Warning Lights
1
22_WD_OM_EN_USC_t.book Page 11
Page 14 of 332
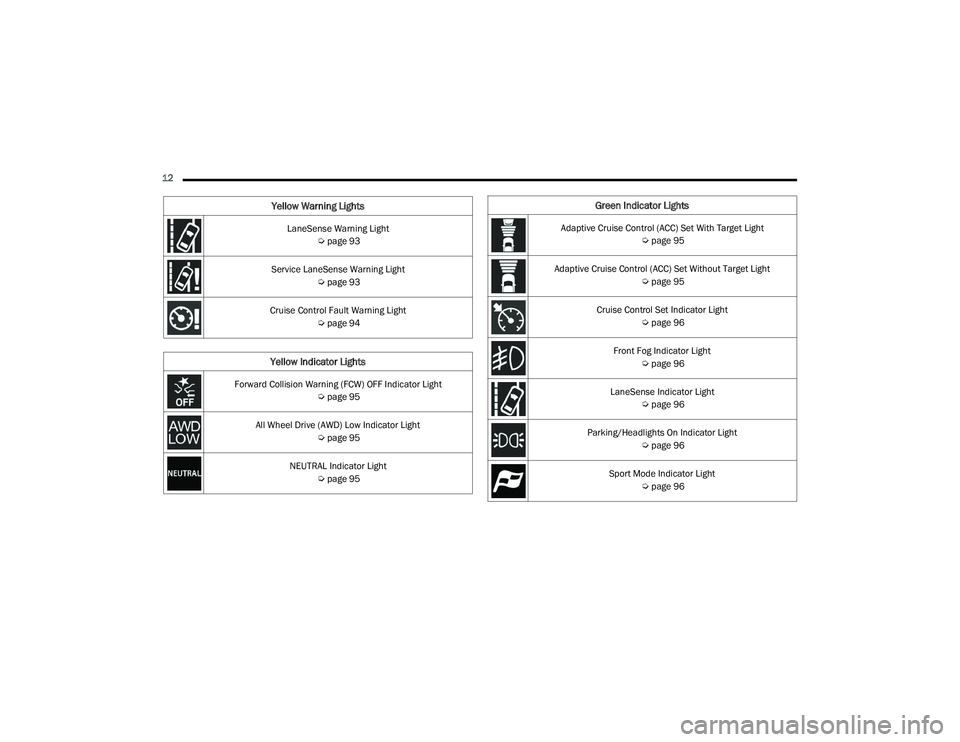
12 LaneSense Warning Light Úpage 93
Service LaneSense Warning Light Úpage 93
Cruise Control Fault Warning Light Úpage 94
Yellow Indicator Lights
Forward Collision Warning (FCW) OFF Indicator Light
Úpage 95
All Wheel Drive (AWD) Low Indicator Light Úpage 95
NEUTRAL Indicator Light Úpage 95
Yellow Warning LightsGreen Indicator Lights
Adaptive Cruise Control (ACC) Set With Target Light
Úpage 95
Adaptive Cruise Control (ACC) Set Without Target Light Úpage 95
Cruise Control Set Indicator Light Úpage 96
Front Fog Indicator Light Úpage 96
LaneSense Indicator Light Úpage 96
Parking/Headlights On Indicator Light Úpage 96
Sport Mode Indicator Light Úpage 96
22_WD_OM_EN_USC_t.book Page 12
Page 21 of 332
GETTING TO KNOW YOUR VEHICLE19
NOTE:Obstructions between the vehicle and key fob may
reduce this range Úpage 316.
HOW TO USE REMOTE START
Push and release the Remote Start button on the
key fob twice within five seconds. The vehicle
doors will lock, the parking lights will flash, and the
horn will chirp twice (if programmed). Then, the
engine will start, and the vehicle will remain in the
Remote Start mode for a 15 minute cycle. Pushing
the Remote Start button a third time shuts the
engine off.
To drive the vehicle, push the unlock button, and
with a valid Keyless Enter ‘n Go™ key fob in the
vehicle, place the ignition in the ON/RUN position.
NOTE:
With Remote Start, the engine will only run for
15 minutes.
Remote Start can only be used twice.
If an engine fault is present or fuel level is low,
the vehicle will start and then shut down in
10 seconds.
The parking lights will turn on and remain on
during Remote Start mode.
For security, power window and sunroof
(if equipped) operation is disabled when the
vehicle is in the Remote Start mode.
The ignition must be placed in the ON/RUN posi -
tion before the Remote Start sequence can be
repeated for a third cycle.
All of the following conditions must be met before
the engine will remote start:
Gear selector in PARK
Doors closed
Hood closed
Liftgate closed
Hazard switch off
Brake pedal not pressed
Battery at an acceptable charge level
PANIC button not pressed
System not disabled from previous remote start
event
Vehicle Security system indicator flashing
Ignition in OFF position
Fuel level meets minimum requirement
Vehicle Security system is not signaling an intru -
sion
Malfunction Indicator Light (MIL) is not illumi -
nated
TO EXIT REMOTE START MODE
To drive the vehicle after starting the Remote Start
system, either push and release the unlock button
on the key fob to unlock the doors, or unlock the
vehicle using Keyless Enter ‘n Go™ — Passive
Entry via the door handles, and disarm the
WARNING!
Do not start or run an engine in a closed
garage or confined area. Exhaust gas contains
Carbon Monoxide (CO) which is odorless and
colorless. Carbon Monoxide is poisonous and
can cause serious injury or death when
inhaled.
Keep key fobs away from children. Operation
of the Remote Start system, windows, door
locks or other controls could cause serious
injury or death.WARNING!
Do not start or run an engine in a closed garage
or confined area. Exhaust gas contains Carbon
Monoxide (CO) which is odorless and colorless.
Carbon Monoxide is poisonous and can cause
serious injury or death when inhaled.
Keep key fobs away from children. Operation
of the Remote Start system, windows, door
locks or other controls could cause serious
injury or death.
2
22_WD_OM_EN_USC_t.book Page 19
Page 24 of 332
22GETTING TO KNOW YOUR VEHICLE
The Vehicle Security system is designed to protect
your vehicle. However, you can create conditions
where the system will give you a false alarm. If one
of the previously described arming sequences has
occurred, the Vehicle Security system will arm
regardless of whether you are in the vehicle or not.
If you remain in the vehicle and open a door, the
alarm will sound. If this occurs, disarm the Vehicle
Security system.
If the Vehicle Security system is armed and the
battery becomes disconnected, the Vehicle
Security system will remain armed when the
battery is reconnected; the exterior lights will flash,
and the horn will sound. If this occurs, disarm the
Vehicle Security system.
REARMING OF THE SYSTEM
If something triggers the alarm and no action is
taken to disarm it, the Vehicle Security system will
turn the horn off after a 29 second cycle (with five
seconds between cycles and up to eight cycles if
the trigger remains active) and then rearm itself.
SECURITY SYSTEM MANUAL OVERRIDE
The Vehicle Security system will not arm if you lock
the doors using the manual door lock.
TAMPER ALERT
If something has triggered the Vehicle Security
system in your absence, the horn will sound three
times and the exterior lights will blink three times
when you disarm the Vehicle Security system.
DOORS
MANUAL DOOR LOCKS
The power door locks can be manually locked from
inside the vehicle by using the door lock knob. To lock
each door, push the door lock knob on each door trim
panel downward. To unlock the front doors, pull the
inside door handle to the first detent. To unlock the
rear doors, pull the door lock knob on the door trim
panel upward. If the lock knob is down when the door
is closed, the door will lock. Make sure the key is not
inside the vehicle before closing the door.
Manual Door Lock Knob
WARNING!
For personal security and safety in the event
of a collision, lock the vehicle doors as you
drive as well as when you park and leave the
vehicle.
Never leave children alone in a vehicle, or with
access to an unlocked vehicle.
Allowing children to be in a vehicle unattended
is dangerous for a number of reasons. A child
or others could be seriously or fatally injured.
Children should be warned not to touch the
parking brake, brake pedal or the gear
selector.
Do not leave the key fob in or near the vehicle,
or in a location accessible to children, and do
not leave the ignition of a vehicle equipped
with Keyless Enter ‘n Go™ in the ACC or ON/
RUN position. A child could operate power
windows, other controls, or move the vehicle.
When leaving the vehicle, always make sure
the keyless ignition node is in the OFF posi -
tion, remove the key fob from the vehicle and
lock the vehicle. Unsupervised use of the
vehicle equipment may cause severe person
injuries and death.
22_WD_OM_EN_USC_t.book Page 22
Page 39 of 332
GETTING TO KNOW YOUR VEHICLE37
Rear Heated Seats — If Equipped
The two second row outboard seats may
be equipped with heated seats. There
are two heated seat switches that allow
the rear passengers to operate the seats
independently. The heated seat switches for each
heater are located on the rear of the center
console.
You can choose from HI, LO, or off heat settings.
Amber indicator lights in each switch indicate the
level of heat in use. Two indicator lights will
illuminate for HI, one for LO and none for off.
Push the switch once to turn the HI setting on.
Push the switch a second time to turn the
LO setting on.
Push the switch a third time to turn the heating
elements off.
The level of heat selected will stay on until the
operator changes it.
NOTE:The engine must be running for the heated seats to
operate.
FRONT VENTILATED SEATS —
I
F EQUIPPED
The ventilated seats control buttons are
located on the center stack below the
radio screen, or within the Uconnect
system. The fans operate at three
speeds: HI, MED, and LO.
Push the ventilated seat switch once to
choose HI.
Push the ventilated seat switch a second time to
choose MED.
Push the ventilated seat switch a third time to
choose LO.
Push the ventilated seat switch a fourth time to
turn the ventilation off.
NOTE:The engine must be running for the ventilated
seats to operate.
For information on use with the Remote Start
system, see Ú page 20.
HEAD RESTRAINTS
Head restraints are designed to reduce the risk of
injury by restricting head movement in the event of
a rear impact. Head restraints should be adjusted
so that the top of the head restraint is located
above the top of your ear.
Front Head Restraints
Your vehicle is equipped with front four-way driver
and passenger head restraints.
To raise the head restraint, pull upward on the
head restraint. To lower the head restraint, push
the adjustment button, located at the base of the
head restraint, and push downward on the head
restraint.
WARNING!
All occupants, including the driver, should not
operate a vehicle or sit in a vehicle’s seat until
the head restraints are placed in their proper
positions in order to minimize the risk of neck
injury in the event of a crash.
Head restraints should never be adjusted
while the vehicle is in motion. Driving a vehicle
with the head restraints improperly adjusted
or removed could cause serious injury or
death in the event of a collision.
2
22_WD_OM_EN_USC_t.book Page 37
Page 44 of 332
42GETTING TO KNOW YOUR VEHICLE
OUTSIDE MIRRORS
The outside mirror(s) can be adjusted to the center
of the adjacent lane of traffic to achieve the
optimal view.
Outside Mirrors Folding Feature
All outside mirrors are hinged and may be moved
either forward or rearward to resist damage.
The hinges have three detent positions:
Full forward position
Full rearward position
Normal position
OUTSIDE AUTOMATIC DIMMING
M
IRROR— IF EQUIPPED
The driver’s side outside mirror will automatically
adjust for glare from vehicles behind you. This
feature is controlled by the inside automatic dimming mirror. The mirror will automatically
adjust for headlight glare when the inside mirror
adjusts.
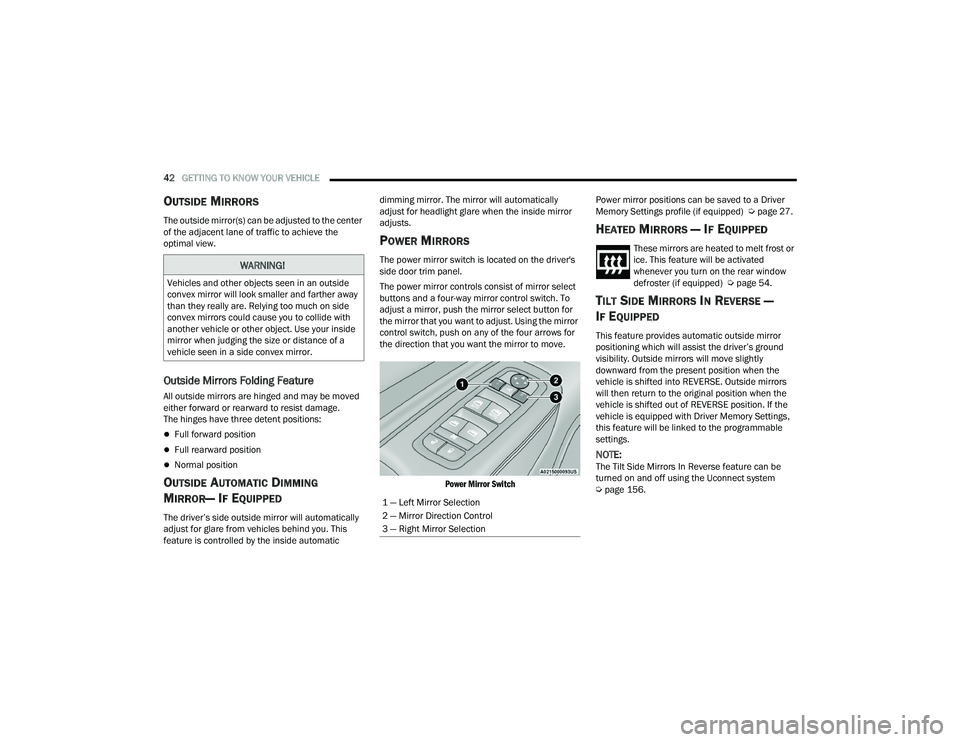
POWER MIRRORS
The power mirror switch is located on the driver's
side door trim panel.
The power mirror controls consist of mirror select
buttons and a four-way mirror control switch. To
adjust a mirror, push the mirror select button for
the mirror that you want to adjust. Using the mirror
control switch, push on any of the four arrows for
the direction that you want the mirror to move.
Power Mirror Switch
Power mirror positions can be saved to a Driver
Memory Settings profile (if equipped) Ú
page 27.
HEATED MIRRORS — IF EQUIPPED
These mirrors are heated to melt frost or
ice. This feature will be activated
whenever you turn on the rear window
defroster (if equipped) Úpage 54.
TILT SIDE MIRRORS IN REVERSE —
I
F EQUIPPED
This feature provides automatic outside mirror
positioning which will assist the driver’s ground
visibility. Outside mirrors will move slightly
downward from the present position when the
vehicle is shifted into REVERSE. Outside mirrors
will then return to the original position when the
vehicle is shifted out of REVERSE position. If the
vehicle is equipped with Driver Memory Settings,
this feature will be linked to the programmable
settings.
NOTE:The Tilt Side Mirrors In Reverse feature can be
turned on and off using the Uconnect system
Ú page 156.
WARNING!
Vehicles and other objects seen in an outside
convex mirror will look smaller and farther away
than they really are. Relying too much on side
convex mirrors could cause you to collide with
another vehicle or other object. Use your inside
mirror when judging the size or distance of a
vehicle seen in a side convex mirror.
1 — Left Mirror Selection
2 — Mirror Direction Control
3 — Right Mirror Selection
22_WD_OM_EN_USC_t.book Page 42
Page 46 of 332
44GETTING TO KNOW YOUR VEHICLE
The button may not be immediately visible when
looking at the device. The name and color of the
button may vary slightly by manufacturer.
NOTE:The “LEARN” or “TRAIN” button is not the button
you normally use to operate the device.
Non-rolling Code Devices
Most devices manufactured before 1995 will not
have a rolling code. These devices will also not
have a “LEARN” or “TRAIN” button.
PROGRAMMING HOMELINK® TO A
G
ARAGE DOOR OPENER
To program any of the HomeLink® buttons to
activate your garage door opener motor, refer to
the following steps:
NOTE:All HomeLink® buttons are programmed using this
procedure. You do not need to erase all channels
when programming additional buttons.
1. Place the ignition switch into the ON/RUN
position.
2. Place the garage door opener transmitter 1 to 3 inches (3 to 8 cm) away from the
HomeLink® button you wish to program,
while keeping the HomeLink® indicator light
in view. 3. Push and hold the HomeLink® button you
want to program while you push and hold the
garage door opener transmitter button you are
trying to replicate.
4. Continue to hold both buttons and observe the HomeLink® indicator light. The HomeLink®
indicator light will flash slowly and then rapidly.
Once this happens, release both buttons.
NOTE:Make sure the garage door opener motor is
plugged in before moving on to the rolling code/
non-rolling code final steps.
Rolling Code Garage Door Opener Final Steps
NOTE:You have 30 seconds in which to initiate rolling
code final step 2, after completing rolling code
final step 1.
1. At the garage door opener motor (in the garage), locate the “LEARN” or “TRAIN”
button. This can usually be found where the
hanging antenna wire is attached to the
garage door opener motor. Firmly push and
release the “LEARN” or “TRAIN” button.
2. Return to the vehicle and push the programmed HomeLink® button three times
(holding the button for two seconds each
time). If the garage door opener motor
operates, programming is complete. 3. Push the programmed HomeLink® button to
confirm that the garage door opener motor
operates. If the garage door opener motor
does not operate, repeat the final steps for the
rolling code procedure.
Non-Rolling Code Garage Door Opener Final Steps
1. Push and hold the programmed HomeLink® button and observe the HomeLink® indicator
light. If the HomeLink® indicator light stays
on constantly, programming is complete.
2. Push the programmed HomeLink® button to confirm that the garage door opener motor
operates. If the garage door opener motor
does not operate, repeat the steps from the
beginning.
WARNING!
Your motorized door or gate will open and close
while you are programming the universal trans -
ceiver. Do not program the transceiver if people
or pets are in the path of the door or gate.
Do not run your vehicle in a closed garage or
confined area while programming the trans -
ceiver. Exhaust gas from your vehicle contains
Carbon Monoxide (CO) which is odorless and
colorless. Carbon Monoxide is poisonous
when inhaled and can cause you and others to
be severely injured or killed.
22_WD_OM_EN_USC_t.book Page 44
Page 48 of 332
46GETTING TO KNOW YOUR VEHICLE
NOTE:
If the indicator light stays on constantly,
programming is complete and the garage
door/device should activate when the
HomeLink® button is pushed.
To program the two remaining HomeLink®
buttons, repeat each step for each
remaining button. DO NOT erase the chan -
nels.
If you unplugged the garage door opener/device
for programming, plug it back in at this time.
Reprogramming A Single HomeLink® Button
(Canadian/Gate Operator)
To reprogram a channel that has been previously
trained, follow these steps:
1. Place the ignition in the ON/RUN position.
2. Press and hold the desired HomeLink® button until the indicator light begins to flash after
20 seconds. Do not release the button.
3. Without releasing the button, proceed with “Canadian/Gate Operator Programming”
Step 2 and follow all remaining steps.
SECURITY
It is advised to erase all channels before you sell or
turn in your vehicle.
To do this, push and hold the two outside buttons
for 20 seconds until the indicator flashes.
NOTE:All channels will be erased. Individual channels
cannot be erased.
The HomeLink® Universal Transceiver is disabled
when the Vehicle Security system is active.
TROUBLESHOOTING TIPS
If you are having trouble programming
HomeLink®, here are some of the most common
solutions:
Replace the battery in the garage door opener
hand-held transmitter.
Push the LEARN button on the garage door
opener to complete the training for a rolling
code.
Did you unplug the device for programming and
remember to plug it back in? If you have any problems, or require assistance,
please call toll-free 1-800-355-3515 or, on the
Internet at
HomeLink.com for information or
assistance.
WARNING!
Vehicle exhaust contains carbon monoxide, a
dangerous gas. Do not run your vehicle in the
garage while programming the transceiver.
Exhaust gas can cause serious injury or death.
Your motorized door or gate will open and
close while you are programming the universal
transceiver. Do not program the transceiver if
people, pets or other objects are in the path of
the door or gate. Only use this transceiver with
a garage door opener that has a “stop and
reverse” feature as required by Federal safety
standards. This includes most garage door
opener models manufactured after 1982.
Do not use a garage door opener without
these safety features.
22_WD_OM_EN_USC_t.book Page 46