turn signal DODGE DURANGO 2023 Owners Manual
[x] Cancel search | Manufacturer: DODGE, Model Year: 2023, Model line: DURANGO, Model: DODGE DURANGO 2023Pages: 328, PDF Size: 13.82 MB
Page 4 of 328

2
INTRODUCTION
SYMBOLS KEY ...........................................................8
ROLLOVER WARNING ............................................. 8
VEHICLE MODIFICATIONS/ALTERATIONS .............9
SYMBOL GLOSSARY.................................................9
GETTING TO KNOW YOUR VEHICLE
KEYS ....................................................................... 13 Key Fob .............................................................13
SENTRY KEY .......................................................... 16
IGNITION SWITCH .................................................. 16
Keyless Enter ‘n Go™ Ignition .........................16
REMOTE START — IF EQUIPPED .......................... 17
How To Use Remote Start ................................18
To Exit Remote Start Mode ..............................19
Remote Start Front Defrost Activation —
If Equipped........................................................19
Remote Start Comfort Systems —
If Equipped........................................................19
Remote Start Windshield Wiper De-Icer
Activation — If Equipped ..................................20
Remote Start Cancel Message — If Equipped .. 20
VEHICLE SECURITY SYSTEM — IF EQUIPPED ..... 20
To Arm The System ..........................................20
To Disarm The System .....................................20
Rearming Of The System .................................21
Security System Manual Override ...................21
Tamper Alert .....................................................21 DOORS ....................................................................21
Manual Door Locks ..........................................21
Power Door Locks ............................................22
Keyless Enter ‘n Go™ — Passive Entry ...........22
Automatic Unlock On Exit Feature —
If Equipped........................................................25
Child-Protection Door Lock System —
Rear Doors .......................................................25
STEERING WHEEL ..................................................25
Manual Tilt/Telescoping Steering Column —
If Equipped .......................................................25
Power Tilt/Telescoping Steering Column —
If Equipped........................................................26
Heated Steering Wheel —
If Equipped .......................................................26
DRIVER MEMORY SETTINGS — IF EQUIPPED .....27
Programming The Memory Feature ................27
Linking And Unlinking The Remote Keyless
Entry Key Fob To Memory ................................27
Memory Position Recall ...................................28
SEATS ......................................................................28
Manual Adjustment (Front Seats) —
If Equipped........................................................28
Manual Adjustment (Rear Seats) ....................30
Power Adjustment (Front Seats) —
If Equipped .......................................................33
Heated Seats — If Equipped ...........................35
Front Ventilated Seats — If Equipped .............36
Head Restraints ...............................................36 UCONNECT VOICE RECOGNITION —
IF EQUIPPED .......................................................... 38
Introducing Voice Recognition ........................ 38
Basic Voice Commands ................................... 38
Get Started .......................................................39
Additional Information ..................................... 39
MIRRORS ............................................................... 40
Inside Rearview Mirror..................................... 40
Illuminated Vanity Mirrors .............................. 40
Outside Mirrors ................................................ 40
Outside Mirrors With Turn Signal —
If Equipped .......................................................41
Outside Automatic Dimming Mirror —
If Equipped .......................................................41
Power Mirrors .................................................. 41
Heated Mirrors — If Equipped ......................... 41
UNIVERSAL GARAGE DOOR OPENER
(HOMELINK®) — IF EQUIPPED ............................ 41
Before You Begin Programming HomeLink® ... 42
Erasing All The HomeLink® Channels ............ 42
Identifying Whether You Have A Rolling Code
Or Non-Rolling Code Device ............................ 42
Programming HomeLink® To A Garage Door
Opener ..............................................................42
Programming HomeLink® To A Miscellaneous
Device ............................................................... 43
Reprogramming A Single HomeLink® Button .. 44
Canadian/Gate Operator Programming ......... 44
Security ............................................................. 45
Troubleshooting Tips........................................ 45
23_WD_OM_EN_USC_t.book Page 2
Page 5 of 328

3
EXTERIOR LIGHTS.................................................. 45 Multifunction Lever ..........................................45
Headlight Switch ..............................................45
Daytime Running Lights (DRLs) ......................46
High/Low Beam Switch....................................46
Automatic High Beam — If Equipped ..............47
Flash-To-Pass....................................................47
Automatic Headlights ......................................47
Parking Lights And Panel Lights ......................47
Automatic Headlights With Wipers..................47
Headlight Delay ................................................48
Lights-On Reminder..........................................48
Fog Lights — If Equipped ..................................48
Turn Signals ......................................................48
Lane Change Assist — If Equipped ..................48
Automatic Headlight Leveling — If Equipped ..49
Battery Saver ....................................................49
INTERIOR LIGHTS ................................................. 49
Courtesy Lights .................................................49
Front Map/Reading Lights —If Equipped ........49
Ambient Light — If Equipped ............................50
Dimmer Control ................................................50
Illuminated Entry ..............................................51
WINDSHIELD WIPERS AND WASHERS .............. 51
Windshield Wiper Operation ...........................51
Rain Sensing Wipers — If Equipped ...............52
Rear Window Wiper/Washer ..........................53 CLIMATE CONTROLS..............................................53
Automatic Climate Control Descriptions
And Functions ...................................................53
Automatic Temperature Control (ATC) ............59
Climate Voice Recognition ...............................59
Operating Tips .................................................60
INTERIOR STORAGE AND EQUIPMENT ............... 61
Storage..............................................................61
USB/AUX Control .............................................63
Lighted Cupholders — If Equipped ..................65
Electrical Power Outlets ...................................65
Power Inverter — If Equipped ..........................67
Wireless Charging Pad —If Equipped .............68
WINDOWS ..............................................................68
Power Windows ................................................68
Wind Buffeting .................................................70
POWER SUNROOF — IF EQUIPPED ...................... 70
Opening And Closing The Sunroof...................70
Sunshade Operation ........................................71
Pinch Protect Feature ......................................71
Sunroof Maintenance ......................................71
Ignition Off Operation.......................................71
HOOD .......................................................................71
Opening The Hood............................................71
Closing The Hood .............................................72
LIFTGATE ................................................................. 72
Power Liftgate — If Equipped ...........................72
Cargo Area Features .......................................73
ROOF LUGGAGE RACK — IF EQUIPPED ............... 74
Deploying The Crossbars .................................75
Stowing The Crossbars ....................................76
GETTING TO KNOW YOUR
INSTRUMENT PANEL
INSTRUMENT CLUSTER ........................................ 78Instrument Cluster Descriptions ..................... 79
INSTRUMENT CLUSTER DISPLAY ........................ 79
Location And Controls...................................... 80
Engine Oil Life Reset ....................................... 82
Display And Messages ..................................... 83
Instrument Cluster Display Menu Items ........ 84
Battery Saver On/Battery Saver Mode
Message — Electrical Load Reduction
Actions — If Equipped ..................................... 87
WARNING LIGHTS AND MESSAGES ................... 88
Red Warning Lights ..........................................88
Yellow Warning Lights ...................................... 91
Yellow Indicator Lights ..................................... 94
Green Indicator Lights ..................................... 94
White Indicator Lights ...................................... 95
Blue Indicator Lights ........................................ 95
ONBOARD DIAGNOSTIC SYSTEM — OBD II ....... 96
Onboard Diagnostic System
(OBD II) Cybersecurity ...................................... 96
EMISSIONS INSPECTION AND MAINTENANCE
PROGRAMS ........................................................... 96
23_WD_OM_EN_USC_t.book Page 3
Page 14 of 328
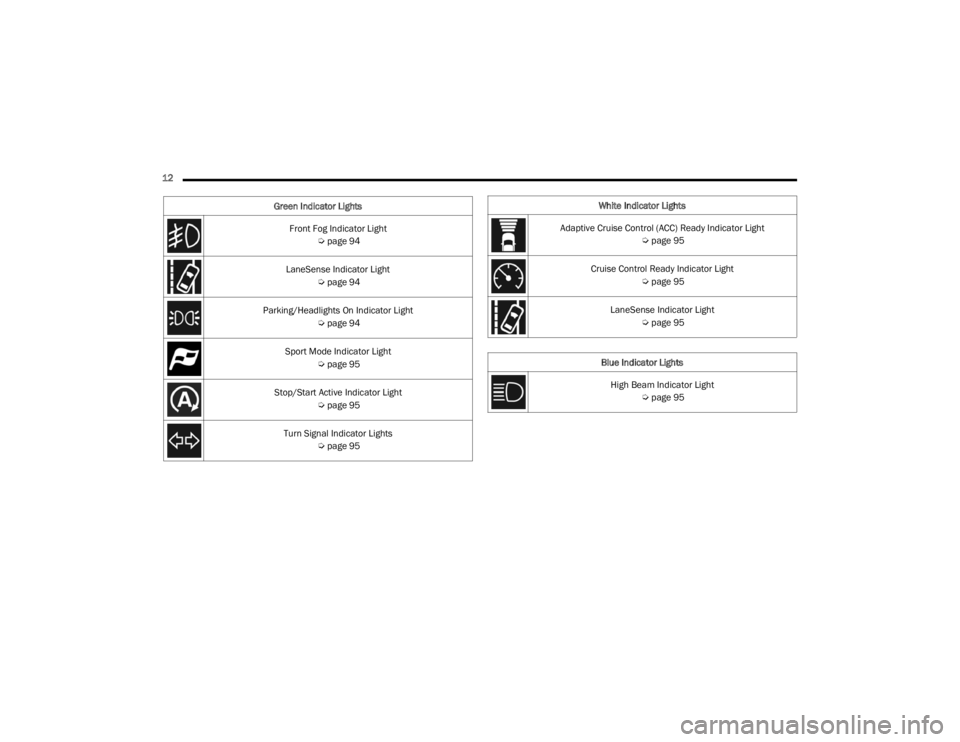
12 Front Fog Indicator Light Úpage 94
LaneSense Indicator Light Úpage 94
Parking/Headlights On Indicator Light Úpage 94
Sport Mode Indicator Light Úpage 95
Stop/Start Active Indicator Light Úpage 95
Turn Signal Indicator Lights Úpage 95
Green Indicator Lights
White Indicator Lights
Adaptive Cruise Control (ACC) Ready Indicator Light Úpage 95
Cruise Control Ready Indicator Light Úpage 95
LaneSense Indicator Light Úpage 95
Blue Indicator Lights High Beam Indicator Light Úpage 95
23_WD_OM_EN_USC_t.book Page 12
Page 15 of 328
13
GETTING TO KNOW YOUR VEHICLE
KEYS
KEY FOB
Your vehicle is equipped with a key fob which
supports Passive Entry, Remote Keyless Entry
(RKE), Keyless Enter ‘n Go™ (if equipped), Remote
Start (if equipped), and remote power liftgate
operation. The key fob allows you to lock or unlock
the doors and liftgate from distances up to
approximately 66 ft (20 m). The key fob does not need to be pointed at the vehicle to activate the
system. The key fob also contains an emergency
key, which is stored in the rear of the key fob.
NOTE:
The key fob’s wireless signal may be blocked if
the key fob is located next to a mobile phone,
laptop, or other electronic device. This may
result in poor performance.
With ignition in the ON position and the vehicle
moving at 2 mph (4 km/h), all RKE commands are disabled.
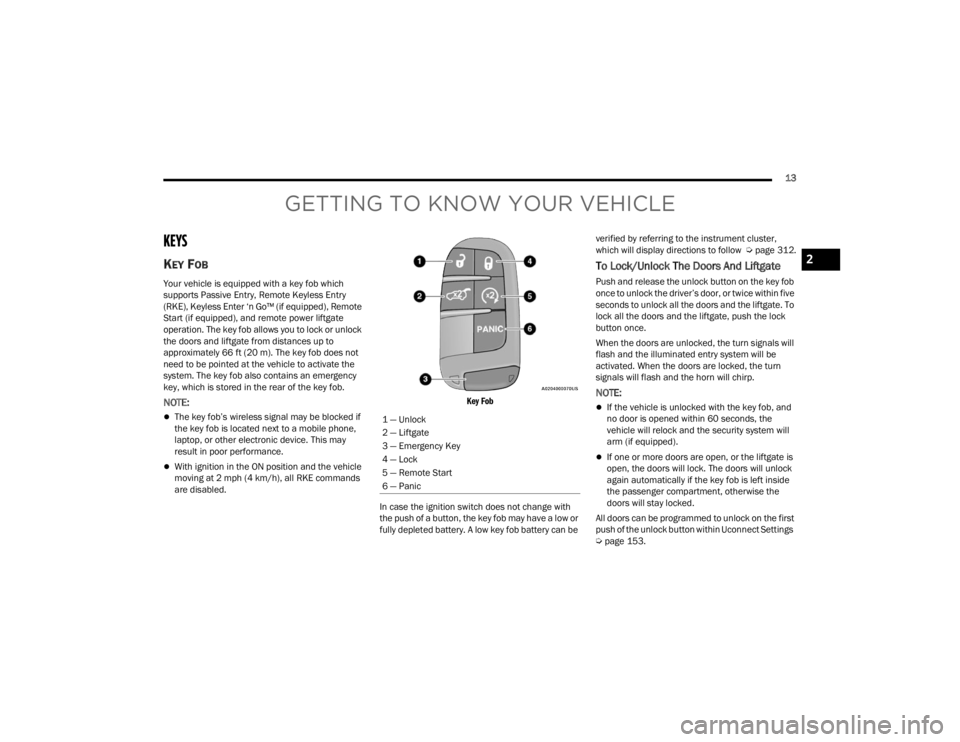
Key Fob
In case the ignition switch does not change with
the push of a button, the key fob may have a low or
fully depleted battery. A low key fob battery can be verified by referring to the instrument cluster,
which will display directions to follow
Úpage 312.
To Lock/Unlock The Doors And Liftgate
Push and release the unlock button on the key fob
once to unlock the driver’s door, or twice within five
seconds to unlock all the doors and the liftgate. To
lock all the doors and the liftgate, push the lock
button once.
When the doors are unlocked, the turn signals will
flash and the illuminated entry system will be
activated. When the doors are locked, the turn
signals will flash and the horn will chirp.
NOTE:
If the vehicle is unlocked with the key fob, and
no door is opened within 60 seconds, the
vehicle will relock and the security system will
arm (if equipped).
If one or more doors are open, or the liftgate is
open, the doors will lock. The doors will unlock
again automatically if the key fob is left inside
the passenger compartment, otherwise the
doors will stay locked.
All doors can be programmed to unlock on the first
push of the unlock button within Uconnect Settings
Ú page 153.
1 — Unlock
2 — Liftgate
3 — Emergency Key
4 — Lock
5 — Remote Start
6 — Panic
2
23_WD_OM_EN_USC_t.book Page 13
Page 20 of 328
18GETTING TO KNOW YOUR VEHICLE
NOTE:Obstructions between the vehicle and key fob may
reduce this range Úpage 312.
HOW TO USE REMOTE START
Push and release the Remote Start button on the
key fob twice within five seconds. The vehicle
doors will lock, the parking lights will flash, and the
horn will chirp twice (if programmed). Then, the
engine will start, and the vehicle will remain in the
Remote Start mode for a 15 minute cycle. Pushing
the Remote Start button a third time shuts the
engine off. To drive the vehicle, push the unlock button, and
with a valid Keyless Enter ‘n Go™ key fob in the
vehicle, place the ignition in the ON/RUN position.
NOTE:
With Remote Start, the engine will only run for
15 minutes.
Remote Start can only be used twice.
If an engine fault is present or fuel level is low,
the vehicle will start and then shut down in 10
seconds.
The parking lights will turn on and remain on
during Remote Start mode.
For security, power window and sunroof (if
equipped) operation is disabled when the
vehicle is in the Remote Start mode.
The ignition must be placed in the ON/RUN posi
-
tion before the Remote Start sequence can be
repeated for a third cycle.
All of the following conditions must be met before
the engine will remote start:
Gear selector in PARK
Doors closed
Hood closed
Liftgate closed
Hazard switch off
Brake pedal not pressed
Battery at an acceptable charge level
Panic button not pressed
System not disabled from previous Remote
Start event
Vehicle Security system indicator flashing
Ignition in OFF position
Fuel level meets minimum requirement
Vehicle Security system is not signaling an intru -
sion
Malfunction Indicator Light (MIL) is not illumi -
nated
WARNING!
Do not start or run an engine in a closed
garage or confined area. Exhaust gas contains
carbon monoxide (CO) which is odorless and
colorless. Carbon monoxide is poisonous and
can cause serious injury or death when
inhaled.
Keep key fobs away from children. Operation
of the Remote Start system, windows, door
locks or other controls could cause serious
injury or death.
23_WD_OM_EN_USC_t.book Page 18
Page 22 of 328

20GETTING TO KNOW YOUR VEHICLE
REMOTE START WINDSHIELD WIPER
D
E-ICER ACTIVATION — IF EQUIPPED
When Remote Start is active and the outside
ambient temperature is less than 33°F (0.6°C),
the Windshield Wiper De-Icer will activate. Exiting
Remote Start will resume its previous operation. If
the Windshield Wiper De-Icer was active, the timer
and operation will continue.
REMOTE START CANCEL MESSAGE —
I
F EQUIPPED
The following messages will display in the
instrument cluster display if the vehicle fails to
remote start or exits Remote Start prematurely:
Remote Start Cancelled — Door Open
Remote Start Cancelled — Hood Open
Remote Start Cancelled — Fuel Low
Remote Start Cancelled — Liftgate Open
Remote Start Cancelled — Timer Expired
Remote Start Disabled — Start Vehicle To Reset
The instrument cluster display message stays
active until the ignition is placed in the ON/RUN
position.
VEHICLE SECURITY SYSTEM — IF EQUIPPED
The Vehicle Security system monitors the vehicle
doors for unauthorized entry and the Keyless
Enter ‘n Go™ Ignition for unauthorized operation.
While the Vehicle Security system is armed, interior
switches for door locks and liftgate release are
disabled. If something triggers the alarm, the
Vehicle Security system will provide the following
audible and visible signals:
The horn will pulse
The parking lights and/or turn signals will flash
The Vehicle Security Light in the instrument
cluster will flash
TO ARM THE SYSTEM
Follow these steps to arm the Vehicle Security
system:
1. Make sure the vehicle’s ignition is placed in the OFF position.
For vehicles equipped with Keyless Entry,
make sure the vehicle’s keyless ignition
system is OFF.
2. Perform one of the following methods to lock the vehicle:
Push lock on the interior power door lock
switch with the driver and/or passenger
door open.
Push the lock button on the exterior Passive
Entry door handle with a valid key fob avail -
able in the same exterior zone Ú page 22.
Push the lock button on the key fob.
3. If any doors are open, close them.
TO DISARM THE SYSTEM
The Vehicle Security system can be disarmed using
any of the following methods:
Push the unlock button on the key fob.
Grab the Passive Entry unlock door handle
(if equipped) Ú page 22.
Cycle the vehicle ignition system out of the OFF
position.
NOTE:
The driver's door key cylinder cannot arm or
disarm the Vehicle Security system. Use of the
door key cylinder when the alarm is armed will
sound the alarm when the door is opened.
The Vehicle Security system remains armed
when the power liftgate is opened using the lift -
gate button on the key fob. If someone enters
the vehicle through the opened liftgate, then
opens any door from the inside, the alarm will
sound.
23_WD_OM_EN_USC_t.book Page 20
Page 24 of 328
22GETTING TO KNOW YOUR VEHICLE
POWER DOOR LOCKS
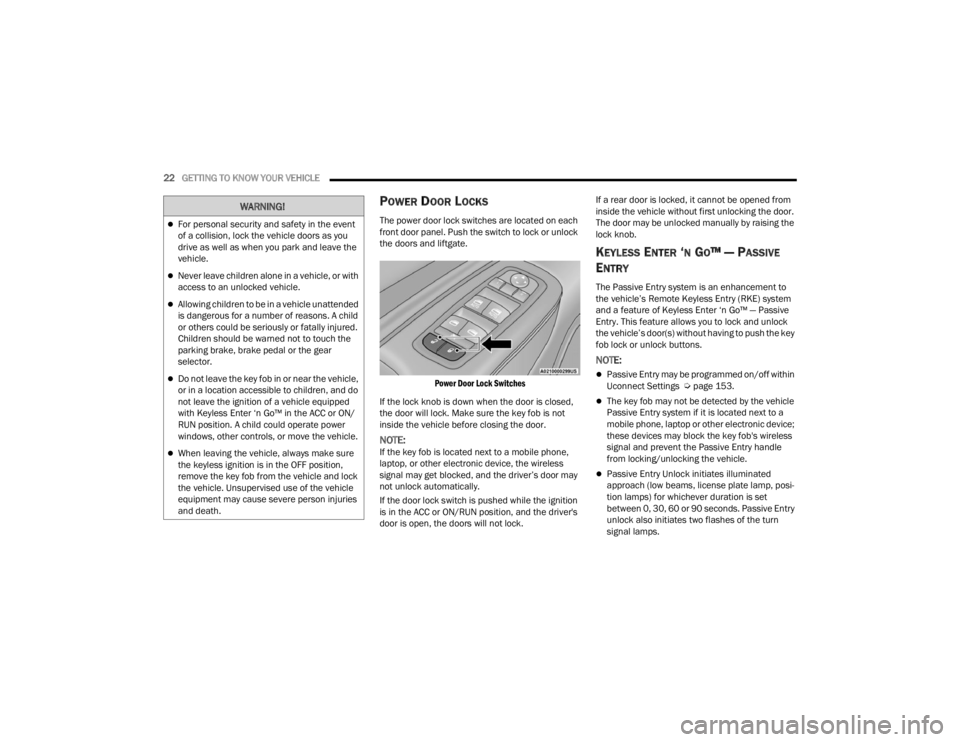
The power door lock switches are located on each
front door panel. Push the switch to lock or unlock
the doors and liftgate.
Power Door Lock Switches
If the lock knob is down when the door is closed,
the door will lock. Make sure the key fob is not
inside the vehicle before closing the door.
NOTE:If the key fob is located next to a mobile phone,
laptop, or other electronic device, the wireless
signal may get blocked, and the driver’s door may
not unlock automatically.
If the door lock switch is pushed while the ignition
is in the ACC or ON/RUN position, and the driver's
door is open, the doors will not lock. If a rear door is locked, it cannot be opened from
inside the vehicle without first unlocking the door.
The door may be unlocked manually by raising the
lock knob.
KEYLESS ENTER ‘N GO™ — PASSIVE
E
NTRY
The Passive Entry system is an enhancement to
the vehicle’s Remote Keyless Entry (RKE) system
and a feature of Keyless Enter ‘n Go™ — Passive
Entry. This feature allows you to lock and unlock
the vehicle’s door(s) without having to push the key
fob lock or unlock buttons.
NOTE:
Passive Entry may be programmed on/off within
Uconnect Settings Ú page 153.
The key fob may not be detected by the vehicle
Passive Entry system if it is located next to a
mobile phone, laptop or other electronic device;
these devices may block the key fob's wireless
signal and prevent the Passive Entry handle
from locking/unlocking the vehicle.
Passive Entry Unlock initiates illuminated
approach (low beams, license plate lamp, posi -
tion lamps) for whichever duration is set
between 0, 30, 60 or 90 seconds. Passive Entry
unlock also initiates two flashes of the turn
signal lamps.
WARNING!
For personal security and safety in the event
of a collision, lock the vehicle doors as you
drive as well as when you park and leave the
vehicle.
Never leave children alone in a vehicle, or with
access to an unlocked vehicle.
Allowing children to be in a vehicle unattended
is dangerous for a number of reasons. A child
or others could be seriously or fatally injured.
Children should be warned not to touch the
parking brake, brake pedal or the gear
selector.
Do not leave the key fob in or near the vehicle,
or in a location accessible to children, and do
not leave the ignition of a vehicle equipped
with Keyless Enter ‘n Go™ in the ACC or ON/
RUN position. A child could operate power
windows, other controls, or move the vehicle.
When leaving the vehicle, always make sure
the keyless ignition is in the OFF position,
remove the key fob from the vehicle and lock
the vehicle. Unsupervised use of the vehicle
equipment may cause severe person injuries
and death.
23_WD_OM_EN_USC_t.book Page 22
Page 43 of 328
GETTING TO KNOW YOUR VEHICLE41
OUTSIDE MIRRORS WITH TURN SIGNAL —
I
F EQUIPPED
Driver and passenger outside mirrors with turn
signal lighting contain LEDs, which are located in
the lower outer corner of each mirror.
The LEDs are turn signal indicators, which flash
with the corresponding turn signal lights in the
front and rear of the vehicle. Turning on the Hazard
Warning flashers will also activate these LEDs.
OUTSIDE AUTOMATIC DIMMING MIRROR —
I
F EQUIPPED
The driver’s side outside mirror will automatically
adjust for glare from vehicles behind you. This
feature is controlled by the inside automatic
dimming mirror. The mirror will automatically
adjust for headlight glare when the inside mirror
adjusts.
POWER MIRRORS
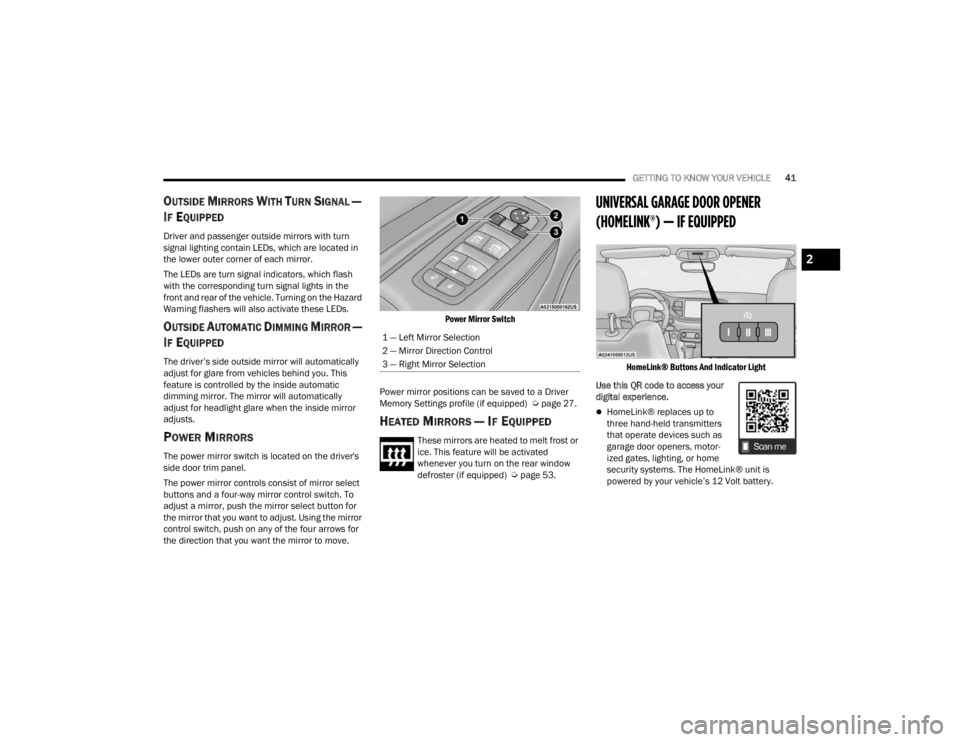
The power mirror switch is located on the driver's
side door trim panel.
The power mirror controls consist of mirror select
buttons and a four-way mirror control switch. To
adjust a mirror, push the mirror select button for
the mirror that you want to adjust. Using the mirror
control switch, push on any of the four arrows for
the direction that you want the mirror to move.
Power Mirror Switch
Power mirror positions can be saved to a Driver
Memory Settings profile (if equipped) Ú page 27.
HEATED MIRRORS — IF EQUIPPED
These mirrors are heated to melt frost or
ice. This feature will be activated
whenever you turn on the rear window
defroster (if equipped) Úpage 53.
UNIVERSAL GARAGE DOOR OPENER
(HOMELINK®) — IF EQUIPPED
HomeLink® Buttons And Indicator Light
Use this QR code to access your
digital experience.
HomeLink® replaces up to
three hand-held transmitters
that operate devices such as
garage door openers, motor -
ized gates, lighting, or home
security systems. The HomeLink® unit is
powered by your vehicle’s 12 Volt battery.
1 — Left Mirror Selection
2 — Mirror Direction Control
3 — Right Mirror Selection
2
23_WD_OM_EN_USC_t.book Page 41
Page 45 of 328
GETTING TO KNOW YOUR VEHICLE43
(Continued)
3. Push and hold the HomeLink® button you
want to program while you push and hold the
garage door opener transmitter button you are
trying to replicate.
4. Continue to hold both buttons and observe the HomeLink® indicator light. The HomeLink®
indicator light will flash slowly and then rapidly.
Once this happens, release both buttons.
NOTE:Make sure the garage door opener motor is
plugged in before moving on to the rolling code/
non-rolling code final steps.
Rolling Code Garage Door Opener Final Steps
NOTE:You have 30 seconds in which to initiate rolling
code final step 2, after completing rolling code
final step 1.
1. At the garage door opener motor (in the garage), locate the “LEARN” or “TRAIN”
button. This can usually be found where the
hanging antenna wire is attached to the
garage door opener motor. Firmly push and
release the “LEARN” or “TRAIN” button.
2. Return to the vehicle and push the
programmed HomeLink® button three times
(holding the button for two seconds each
time). If the garage door opener motor
operates, programming is complete.
3. Push the programmed HomeLink® button to confirm that the garage door opener motor
operates. If the garage door opener motor
does not operate, repeat the final steps for the
rolling code procedure.
Non-Rolling Code Garage Door Opener Final Steps
1. Push and hold the programmed HomeLink® button and observe the HomeLink® indicator
light. If the HomeLink® indicator light stays
on constantly, programming is complete.
2. Push the programmed HomeLink® button to confirm that the garage door opener motor
operates. If the garage door opener motor
does not operate, repeat the steps from the
beginning.
PROGRAMMING HOMELINK® TO A
M
ISCELLANEOUS DEVICE
The procedure on how to program HomeLink® to a
miscellaneous device follows the same procedure
as programming to a garage door opener
Ú page 42. Be sure to determine if the device has
a rolling code, or non-rolling code before beginning
the programming process.
NOTE:Canadian Radio Frequency (RF) laws require trans -
mitter signals to time-out (or quit) after several
seconds of transmission, which may not be long
enough for HomeLink® to pick up the signal during
programming. Similar to this Canadian law, some
U.S. gate operators are designed to time-out in the
same manner. The procedure may need to be
performed multiple times to successfully pair the
device to your HomeLink® buttons.
WARNING!
Your motorized door or gate will open and close
while you are programming the universal trans -
mitter. Do not program the transmitter if people
or pets are in the path of the door or gate.
Do not run your vehicle in a closed garage or
confined area while programming the trans -
mitter. Exhaust gas from your vehicle contains
carbon monoxide (CO) which is odorless and
colorless. Carbon monoxide is poisonous
when inhaled and can cause you and others to
be severely injured or killed.
WARNING!
2
23_WD_OM_EN_USC_t.book Page 43
Page 48 of 328
46GETTING TO KNOW YOUR VEHICLE
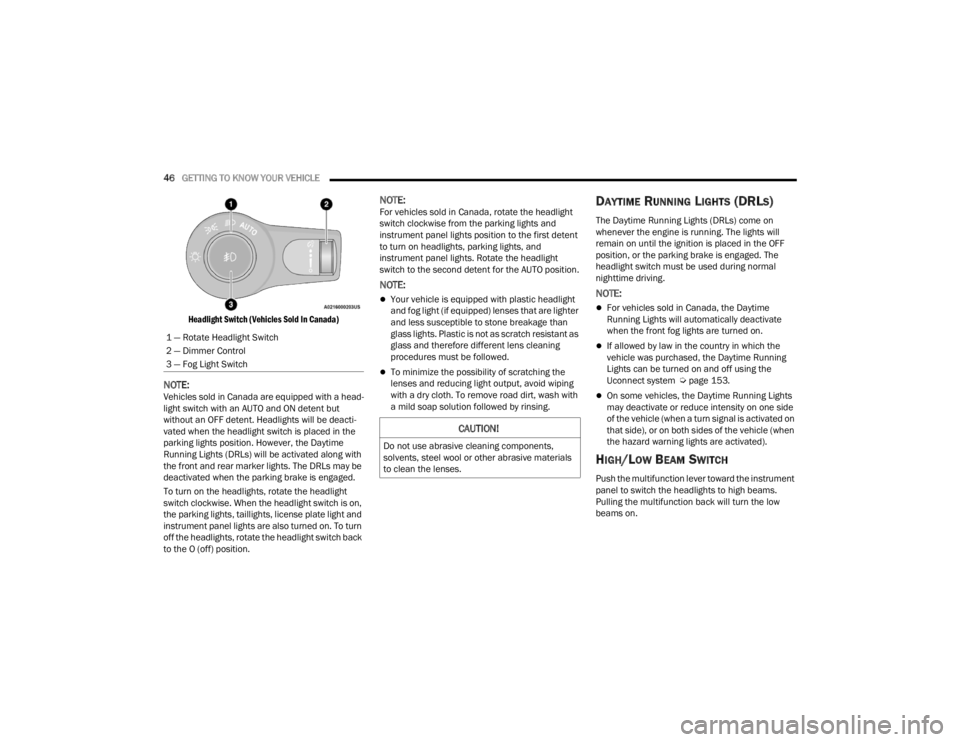
Headlight Switch (Vehicles Sold In Canada)
NOTE:Vehicles sold in Canada are equipped with a head -
light switch with an AUTO and ON detent but
without an OFF detent. Headlights will be deacti -
vated when the headlight switch is placed in the
parking lights position. However, the Daytime
Running Lights (DRLs) will be activated along with
the front and rear marker lights. The DRLs may be
deactivated when the parking brake is engaged.
To turn on the headlights, rotate the headlight
switch clockwise. When the headlight switch is on,
the parking lights, taillights, license plate light and
instrument panel lights are also turned on. To turn
off the headlights, rotate the headlight switch back
to the O (off) position.
NOTE:For vehicles sold in Canada, rotate the headlight
switch clockwise from the parking lights and
instrument panel lights position to the first detent
to turn on headlights, parking lights, and
instrument panel lights. Rotate the headlight
switch to the second detent for the AUTO position.
NOTE:
Your vehicle is equipped with plastic headlight
and fog light (if equipped) lenses that are lighter
and less susceptible to stone breakage than
glass lights. Plastic is not as scratch resistant as
glass and therefore different lens cleaning
procedures must be followed.
To minimize the possibility of scratching the
lenses and reducing light output, avoid wiping
with a dry cloth. To remove road dirt, wash with
a mild soap solution followed by rinsing.
DAYTIME RUNNING LIGHTS (DRLS)
The Daytime Running Lights (DRLs) come on
whenever the engine is running. The lights will
remain on until the ignition is placed in the OFF
position, or the parking brake is engaged. The
headlight switch must be used during normal
nighttime driving.
NOTE:
For vehicles sold in Canada, the Daytime
Running Lights will automatically deactivate
when the front fog lights are turned on.
If allowed by law in the country in which the
vehicle was purchased, the Daytime Running
Lights can be turned on and off using the
Uconnect system Ú page 153.
On some vehicles, the Daytime Running Lights
may deactivate or reduce intensity on one side
of the vehicle (when a turn signal is activated on
that side), or on both sides of the vehicle (when
the hazard warning lights are activated).
HIGH/LOW BEAM SWITCH
Push the multifunction lever toward the instrument
panel to switch the headlights to high beams.
Pulling the multifunction back will turn the low
beams on.
1 — Rotate Headlight Switch
2 — Dimmer Control
3 — Fog Light Switch
CAUTION!
Do not use abrasive cleaning components,
solvents, steel wool or other abrasive materials
to clean the lenses.
23_WD_OM_EN_USC_t.book Page 46