service DODGE DURANGO SRT 2019 Owners Manual
[x] Cancel search | Manufacturer: DODGE, Model Year: 2019, Model line: DURANGO SRT, Model: DODGE DURANGO SRT 2019Pages: 572, PDF Size: 6.59 MB
Page 6 of 572
INTRODUCTION
Dear Customer, congratulations on selecting your new
vehicle. Be assured that it represents precision workman-
ship, distinctive styling, and high quality.
This is a specialized utility vehicle. It can go places and
perform tasks that are not intended for conventional pas-
senger vehicles. It handles and maneuvers differently from
many passenger vehicles both on-road and off-road, so
take time to become familiar with your vehicle. If
equipped, the two-wheel drive version of this vehicle was
designed for on-road use only. It is not intended for
off-road driving or use in other severe conditions suited for
a four-wheel drive vehicle. Before you start to drive this
vehicle, read the Owner ’s Manual. Be sure you are familiar
with all vehicle controls, particularly those used for brak-
ing, steering, transmission, and transfer case shifting.
Learn how your vehicle handles on different road surfaces.
Your driving skills will improve with experience. When
driving off-road, or working the vehicle, don’t overload the
vehicle or expect the vehicle to overcome the natural laws
of physics. Always observe federal, state, provincial and
local laws wherever you drive. As with other vehicles of
this type, failure to operate this vehicle correctly may result
in loss of control or a collision. Refer to the “Driving Tips”
in “Starting and Operating” for further information.This Owner ’s Manual has been prepared with the assis-
tance of service and engineering specialists to acquaint you
with the operation and maintenance of your vehicle. It is
supplemented by Warranty Information, and customer
oriented documents. In the attached Warranty Booklet you
will find a description of the services that FCA offers to its
customers, the Warranty Certificate and the details of the
terms and conditions for maintaining its validity. Please
take the time to read all of these publications carefully
before driving your vehicle for the first time. Following the
instructions, recommendations, tips, and important warn-
ings in this manual will help assure safe and enjoyable
operation of your vehicle.
This Owner ’s Manual describes all versions of this vehicle.
Options and equipment dedicated to specific markets or
versions are not expressly indicated in the text. Therefore,
you should only consider the information which is related
to the trim level, engine, and version that you have
purchased. Any content introduced throughout the Own-
er ’s Information, that may or may not be applicable to your
vehicle, will be identified with the wording “If Equipped”.
All data contained in this publication are intended to help
you use your vehicle in the best possible way. FCA aims at
a constant improvement of the vehicles produced. For this
reason, it reserves the right to make changes to the model
4 INTRODUCTION
Page 7 of 572
described for technical and/or commercial reasons. For
further information, contact an authorized dealer.
If applicable, refer to the Owner ’s Manual Supplement for
related information.
NOTE:After reviewing the Owner ’s Information, it should
be stored in the vehicle for convenient referencing, and
remain with the vehicle when sold.
When it comes to service, remember that your authorized
dealer knows your vehicle best, has factory-trained techni-
cians and genuine MOPAR® parts, and cares about your
satisfaction.
HOW TO USE THIS MANUAL
Essential Information
Consult the Table of Contents to determine which section
contains the information you desire.
Since the specification of your vehicle depends on the items
of equipment ordered, certain descriptions and illustra-
tions may differ from your vehicle’s equipment.
The detailed index at the back of this Owner’s Manual
contains a complete listing of all subjects.
Symbols
Some vehicle components have colored labels whose sym-
bols indicate precautions to be observed when using this
component. Refer to “Warning Lights and Messages” in
“Getting To Know Your Instrument Panel” for further
information on the symbols used in your vehicle.
ROLLOVER WARNING
Utility vehicles have a significantly higher rollover rate
than other types of vehicles. This vehicle has a higher
ground clearance and a higher center of gravity than many
passenger vehicles. It is capable of performing better in a
wide variety of off-road applications. Driven in an unsafe
manner, all vehicles can go out of control. Because of the
higher center of gravity, if this vehicle is out of control it
may roll over while some other vehicles may not.
Do not attempt sharp turns, abrupt maneuvers, or other
unsafe driving actions that can cause loss of vehicle con-
trol. Failure to operate this vehicle safely may result in a
collision, rollover of the vehicle, and severe or fatal injury.
Drive carefully.
1
INTRODUCTION 5
Page 26 of 572
4. To assemble the key fob case, snap the two halvestogether.
Programming Additional Key Fobs
Programming the key fob may be performed by an autho-
rized dealer.
NOTE: Once a key fob is programmed to a vehicle, it
cannot be repurposed and reprogrammed to another ve-
hicle.
Request For Additional Remote Controls
NOTE: Only key fobs that are programmed to the vehicle
electronics can be used to start and operate the vehicle.
Once a key fob is programmed to a vehicle, it cannot be
programmed to any other vehicle.
WARNING!
• Always remove the key fobs from the vehicle and
lock all doors when leaving the vehicle unattended.
• For vehicles equipped with Keyless Enter-N-Go —
Ignition, always remember to place the ignition in
the OFF mode. Duplication of key fobs may be performed at an authorized
dealer. This procedure consists of programming a blank
key fob to the vehicle electronics. A blank key fob is one
that has never been programmed.
NOTE:
When having the Sentry Key Immobilizer System
serviced, bring all vehicle keys with you to an authorized
dealer.
General Information
The following regulatory statement applies to all radio
frequency (RF) devices equipped in this vehicle:
This device complies with Part 15 of the FCC Rules and
with Industry Canada license-exempt RSS standard(s).
Operation is subject to the following two conditions:
1. This device may not cause harmful interference, and
2. This device must accept any interference received, in- cluding interference that may cause undesired opera-
tion.
NOTE: Changes or modifications not expressly approved
by the party responsible for compliance could void the
user ’s authority to operate the equipment.
24 GETTING TO KNOW YOUR VEHICLE
Page 33 of 572
If the vehicle security light turns on during normal vehicle
operation (vehicle running for longer than 10 seconds), it
indicates that there is a fault in the electronics. Should this
occur, have the vehicle serviced as soon as possible by an
authorized dealer.
CAUTION!
The Sentry Key Immobilizer system is not compatible
with some aftermarket remote starting systems. Use of
these systems may result in vehicle starting problems
and loss of security protection.
All of the key fobs provided with your new vehicle have
been programmed to the vehicle electronics.
Key Programming
Programming key fobs may be performed at an authorized
dealer.
Replacement Keys
NOTE: Only key fobs that are programmed to the vehicle
electronics can be used to start and operate the vehicle.
Once a key fob is programmed to a vehicle, it cannot be
programmed to any other vehicle.
CAUTION!
• Always remove the key fobs from the vehicle and
lock all doors when leaving the vehicle unattended.
• For vehicles equipped with Keyless Enter-N-Go —
Ignition, always remember to place the ignition in
the OFF position.
NOTE: Duplication of key fobs may be performed at an
authorized dealer. This procedure consists of programming
a blank key fob to the vehicle electronics. A blank key fob
is one that has never been programmed.
When having the Sentry Key Immobilizer System serviced,
bring all vehicle keys with you to an authorized dealer.
General Information
The following regulatory statement applies to all radio
frequency (RF) devices equipped in this vehicle:
This device complies with Part 15 of the FCC Rules and
with Industry Canada license-exempt RSS standard(s).
Operation is subject to the following two conditions:
1. This device may not cause harmful interference, and
3
GETTING TO KNOW YOUR VEHICLE 31
Page 63 of 572
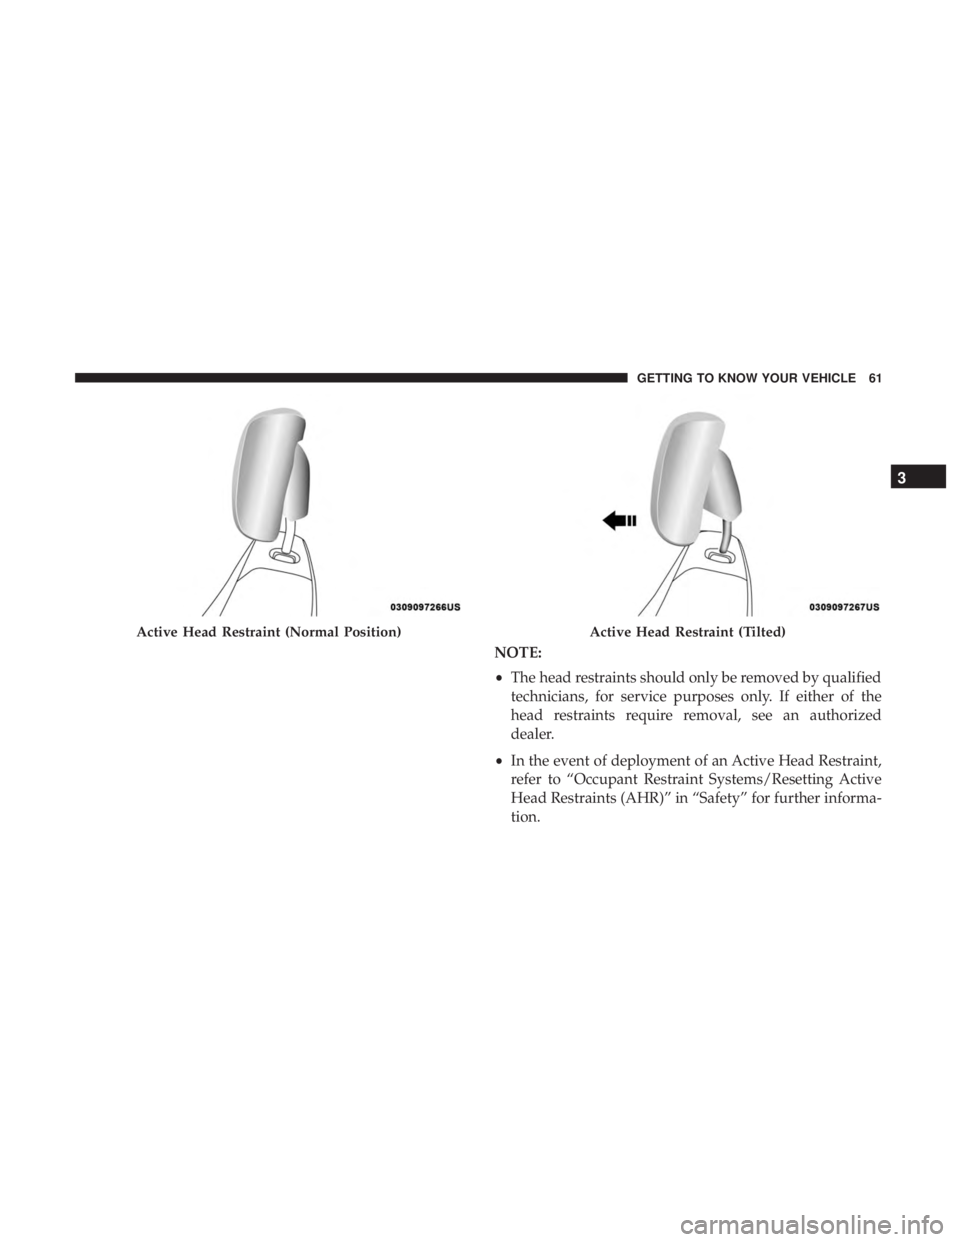
NOTE:
•The head restraints should only be removed by qualified
technicians, for service purposes only. If either of the
head restraints require removal, see an authorized
dealer.
• In the event of deployment of an Active Head Restraint,
refer to “Occupant Restraint Systems/Resetting Active
Head Restraints (AHR)” in “Safety” for further informa-
tion.
Active Head Restraint (Normal Position)Active Head Restraint (Tilted)
3
GETTING TO KNOW YOUR VEHICLE 61
Page 98 of 572
When the Sync feature is active, the rear temperature is
synchronized to the driver ’s temperature setting. If the rear
temperature is changed, the Sync feature will deactivate.
Operating Tips
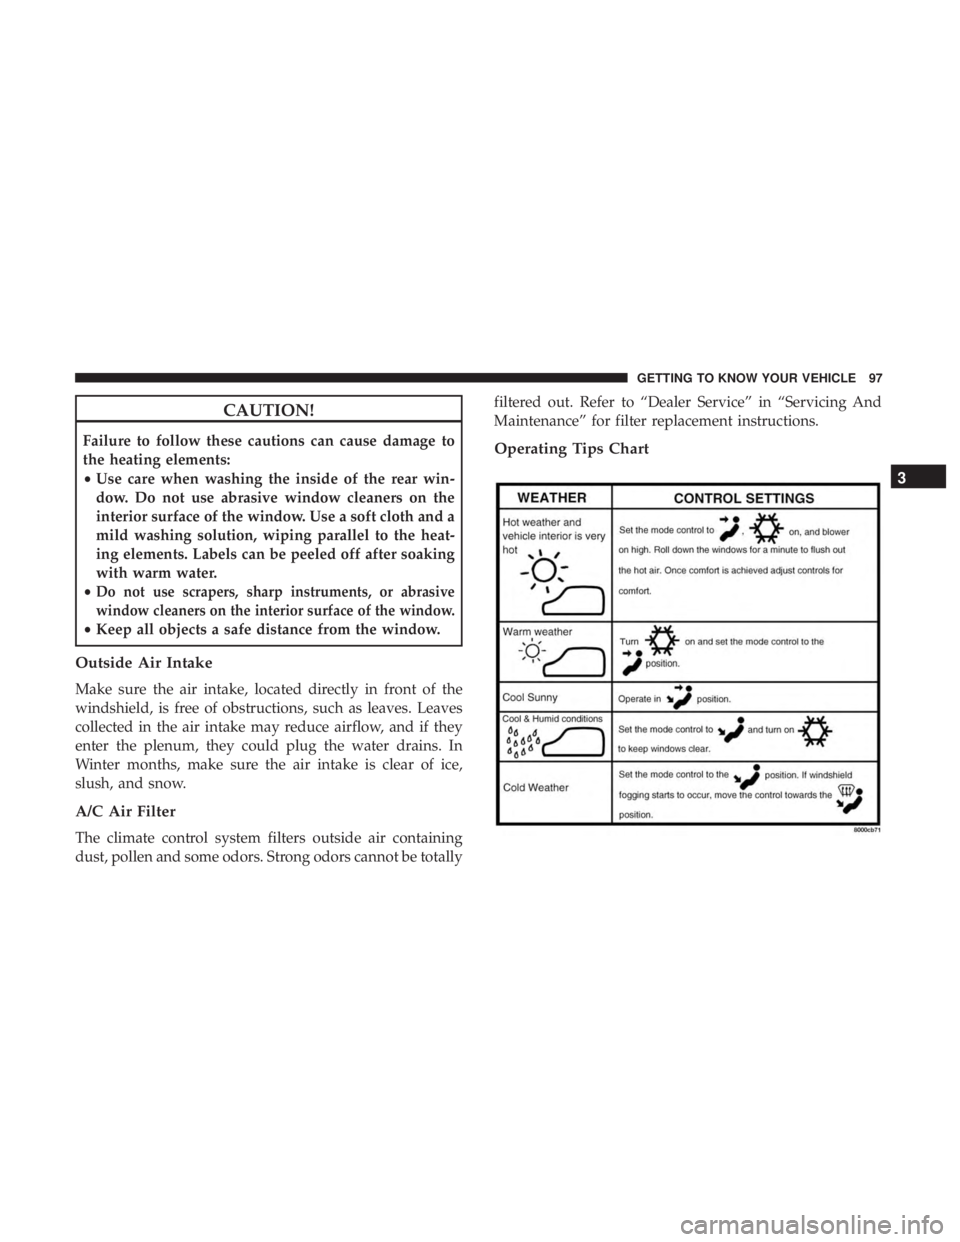
NOTE:Refer to the chart at the end of this section for
suggested control settings for various weather conditions.
Summer Operation
The engine cooling system must be protected with a
high-quality antifreeze coolant to provide proper corrosion
protection and to protect against engine overheating. A
solution of 50% OAT (Organic Additive Technology) cool-
ant that meets the requirements of FCA Material Standard
MS.90032 and 50% water is recommended. Refer to “Fluids
and Lubricants” in “Technical Specifications” for proper
coolant selection.
Winter Operation
Use of the Air Recirculation mode during winter months is
not recommended because it may cause window fogging.
Vacation/Storage
Before you store your vehicle, or keep it out of service (i.e.,
vacation) for two weeks or more, run the air conditioning
system at idle for about five minutes, in fresh air with the blower setting on high. This will ensure adequate system
lubrication to minimize the possibility of compressor dam-
age when the system is started again.
Window Fogging
Interior fogging on the windshield can be quickly removed
by turning the mode selector to Defrost. The Defrost/Floor
mode can be used to maintain a clear windshield and
provide sufficient heating. If side window fogging be-
comes objectionable, increase blower speed to improve
airflow and clearing of the side windows. Vehicle windows
tend to fog on the inside in mild but rainy or humid
weather.
NOTE:
•
Recirculate without A/C should not be used for long
periods, as fogging may occur.
• Automatic Temperature Controls (ATC) will automati-
cally adjust the climate control settings to reduce or
eliminate window fogging on the front windshield.
When this occurs, recirculation will be unavailable.
96 GETTING TO KNOW YOUR VEHICLE
Page 99 of 572
CAUTION!
Failure to follow these cautions can cause damage to
the heating elements:
•Use care when washing the inside of the rear win-
dow. Do not use abrasive window cleaners on the
interior surface of the window. Use a soft cloth and a
mild washing solution, wiping parallel to the heat-
ing elements. Labels can be peeled off after soaking
with warm water.
•
Do not use scrapers, sharp instruments, or abrasive
window cleaners on the interior surface of the window.
• Keep all objects a safe distance from the window.
Outside Air Intake
Make sure the air intake, located directly in front of the
windshield, is free of obstructions, such as leaves. Leaves
collected in the air intake may reduce airflow, and if they
enter the plenum, they could plug the water drains. In
Winter months, make sure the air intake is clear of ice,
slush, and snow.
A/C Air Filter
The climate control system filters outside air containing
dust, pollen and some odors. Strong odors cannot be totally filtered out. Refer to “Dealer Service” in “Servicing And
Maintenance” for filter replacement instructions.
Operating Tips Chart
3
GETTING TO KNOW YOUR VEHICLE 97
Page 141 of 572
Instrument Cluster Descriptions
1. Speedometer•Indicates vehicle speed.
2. Tachometer •Indicates the engine speed in revolutions per minute
(RPM x 1000).
3. Temperature Gauge •The temperature gauge shows engine coolant tem-
perature. Any reading within the normal range indi-
cates that the engine cooling system is operating
satisfactorily.
• The gauge pointer will likely indicate a higher tem-
perature when driving in hot weather, up mountain
grades, or when towing a trailer. It should not be
allowed to exceed the upper limits of the normal
operating range.
WARNING!
A hot engine cooling system is dangerous. You or
others could be badly burned by steam or boiling
coolant. You may want to call an authorized dealer for
(Continued)
WARNING! (Continued)
service if your vehicle overheats. If you decide to look
under the hood yourself, see “Maintaining Your Ve-
hicle”. Follow the warnings under the Cooling System
Pressure Cap paragraph.
CAUTION!
Driving with a hot engine cooling system could dam-
age your vehicle. If the temperature gauge reads “H”
pull over and stop the vehicle. Idle the vehicle with the
air conditioner turned off until the pointer drops back
into the normal range. If the pointer remains on the
“H”, turn the engine off immediately and call an
authorized dealer for service.
4. Fuel Gauge •The pointer shows the level of fuel in the fuel tank
when the Keyless Push Button Ignition is in the
ON/RUN position.
•
The fuel pump symbol points to the side of the
vehicle where the fuel door is located. 4
GETTING TO KNOW YOUR INSTRUMENT PANEL 139
Page 146 of 572
3. Without pushing the brake pedal, push the ENGINESTART/STOP button once to return the ignition to the
OFF/LOCK position.
NOTE: If the indicator message illuminates when you start
the vehicle, the oil change indicator system did not reset. If
necessary, repeat this procedure.
Display And Messages
Includes the following, but not limited to:
• Front Seatbelts Unbuckled
• Driver Seat Belt Unbuckled
• Passenger Seat Belt Unbuckled
• Traction Control Off
• Washer Fluid Low
• Oil Pressure Low
• Oil Change Due
• Fuel Low
• Service Anti-lock Brake System
• Service Electronic Throttle Control
• Service Power Steering •
Cruise Off
• Cruise Ready
• ACC Override
• Cruise Set To XXX MPH or km/h
• Tire Pressure Screen With Low Tire(s)
• Service Tire Pressure System
• Park Brake Engaged
• Brake Fluid Low
• Engine Temperature Hot
• Lights On
• Right Front Turn Signal Light Out
• Right Rear Turn Signal Light Out
• Left Front Turn Signal Light Out
• Left Rear Turn Signal Light Out
• Ignition or Accessory On
• Vehicle Not In Park
• Remote Start Active Push Start Button
• Remote Start Canceled Fuel Low
144 GETTING TO KNOW YOUR INSTRUMENT PANEL
Page 147 of 572
•Remote Start Canceled Too Cold
• Remote Start Canceled Door Open
• Remote Start Canceled Hood Open
• Remote Start Canceled Liftgate Open
• Remote Start Canceled Time Expired
• Remote Start Disabled Start To Reset
• Service Air Bag System
• Service Air Bag Warning Light
• Door Open
• Doors Open
• Liftgate Open
• Hood Open
• Shift Not Allowed
• Vehicle Speed Too High To Shift to D
• Vehicle Speed is Too High to Shift to R
• Vehicle Speed is Too High to Shift to P
• Service Transmission
• Service Shifter The Reconfigurable Telltales section is divided into the
white or yellow telltales area on the left, and the green or
red telltales area on the right.
Instrument Cluster Display Menu Items
The instrument cluster display can be used to view the
main menu items for several features. Use the
upand
down arrow buttons to scroll through the driver interactive
display menu options until the desired menu is reached.
NOTE: Depending on the vehicle’s options, feature set-
tings may vary.
Speedometer
Push and release the upordown arrow button until the
main gauge icon is displayed in the instrument cluster
display. Push and release the leftorright arrow button to
select the large or small speedometer display. Push and
release the OKbutton to toggle units (km/h or mph) of the
speedometer.
Vehicle Info
Push and release the upordown arrow button until the
Vehicle Info icon/title is highlighted in the instrument
cluster display. Push the leftorright arrow button to scroll
through the information submenus.
4
GETTING TO KNOW YOUR INSTRUMENT PANEL 145