ECO mode DODGE GRAND CARAVAN 2010 5.G User Guide
[x] Cancel search | Manufacturer: DODGE, Model Year: 2010, Model line: GRAND CARAVAN, Model: DODGE GRAND CARAVAN 2010 5.GPages: 88, PDF Size: 13.56 MB
Page 25 of 88
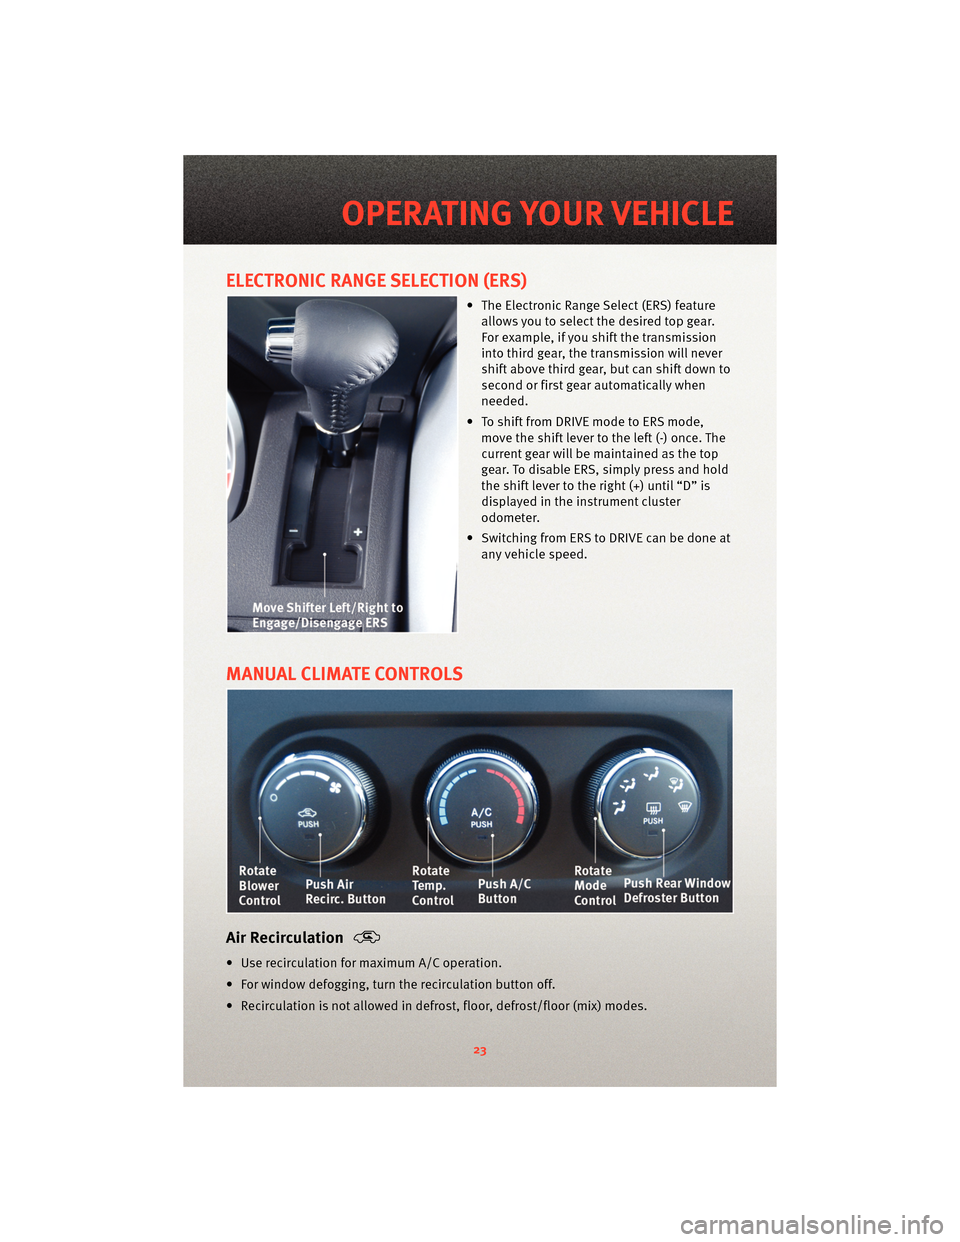
ELECTRONIC RANGE SELECTION (ERS)
• The Electronic Range Select (ERS) featureallows you to select the desired top gear.
For example, if you shift the transmission
into third gear, the transmission will never
shift above third gear, but can shift down to
second or first gear automatically when
needed.
• To shift from DRIVE mode to ERS mode, move the shift lever to the left (-) once. The
current gear will be maintained as the top
gear. To disable ERS, simply press and hold
the shift lever to the right (+) until “D” is
displayed in the instrument cluster
odometer.
• Switching from ERS to DRIVE can be done at any vehicle speed.
MANUAL CLIMATE CONTROLS
Air Recirculation
• Use recirculation for maximum A/C operation.
• For window defogging, turn the recirculation button off.
• Recirculation is not allowed in defrost, floor, defrost/floor (mix) modes.
23
OPERATING YOUR VEHICLE
Page 26 of 88
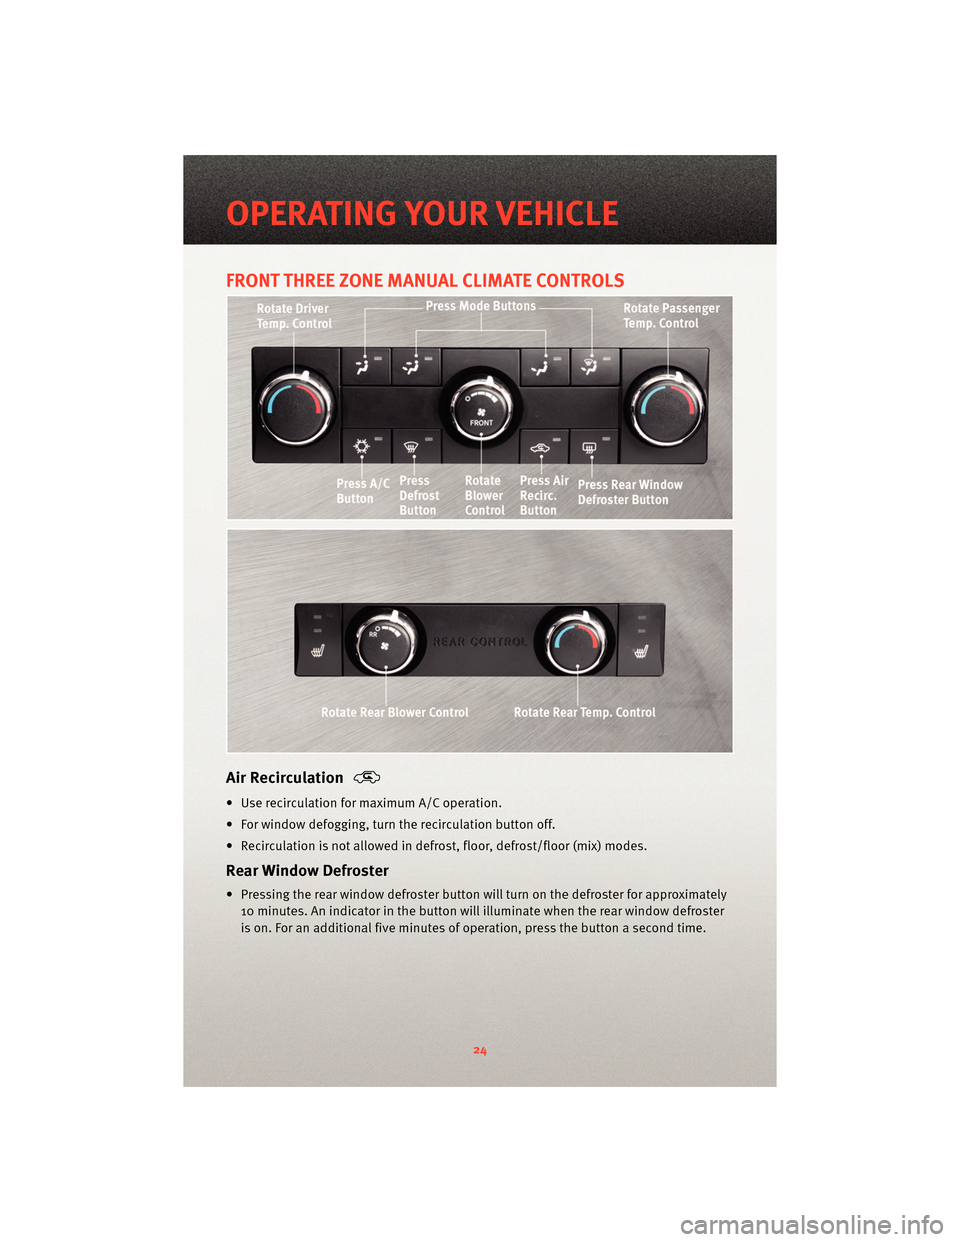
FRONT THREE ZONE MANUAL CLIMATE CONTROLS
Air Recirculation
• Use recirculation for maximum A/C operation.
• For window defogging, turnthe recirculation button off.
• Recirculation is not allowed in defrost, floor, defrost/floor (mix) modes.
Rear Window Defroster
• Pressing the rear window defroster button will turn on the defroster for approximately 10 minutes. An indicator in the button will illuminate when the rear window defroster
is on. For an additional five minutes of operation, press the button a second time.
OPERATING YOUR VEHICLE
24
Page 27 of 88
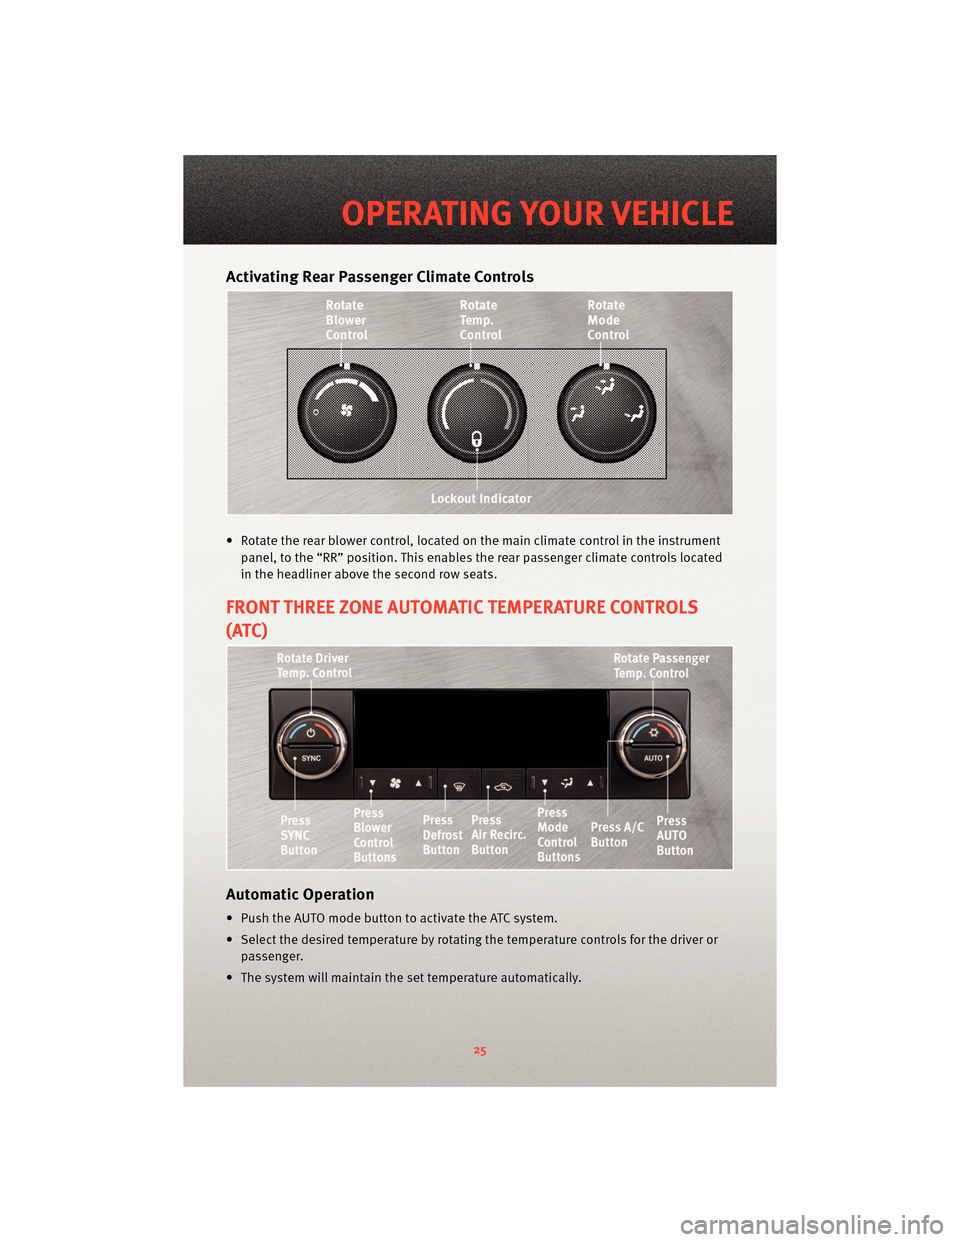
Activating Rear Passenger Climate Controls
• Rotate the rear blower control, located on the main climate control in the instrumentpanel, to the “RR” position. This enables the rear passenger climate controls located
in the headliner above the second row seats.
FRONT THREE ZONE AUTOMATIC TEMPERATURE CONTROLS
(ATC)
Automatic Operation
• Push the AUTO mode button to activate the ATC system.
• Select the desired temperature by rotatin g the temperature controls for the driver or
passenger.
• The system will maintain the set temperature automatically.
25
OPERATING YOUR VEHICLE
Page 28 of 88
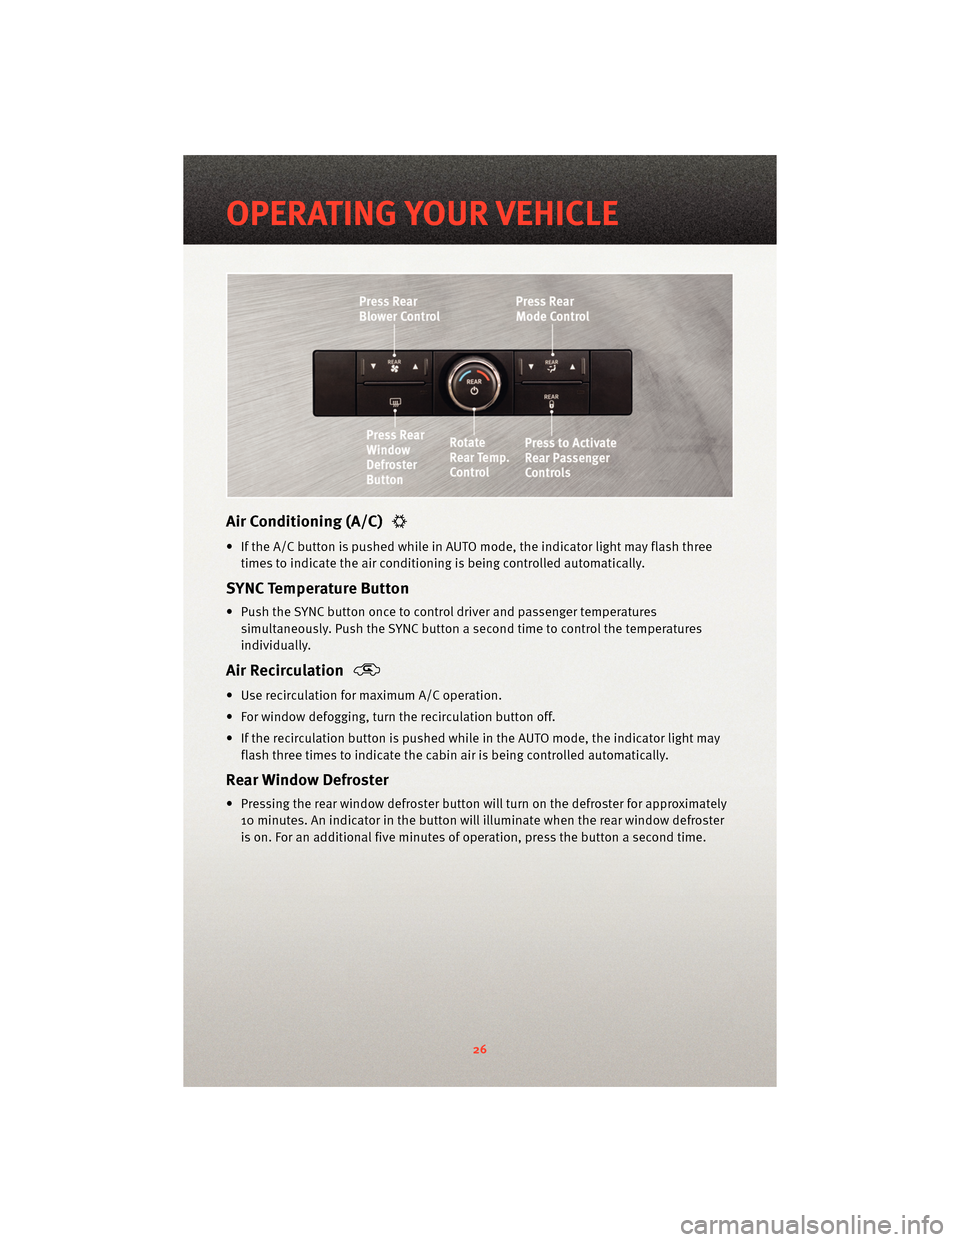
Air Conditioning (A/C)
• If the A/C button is pushed while in AUTO mode, the indicator light may flash threetimes to indicate the air conditioning is being controlled automatically.
SYNC Temperature Button
• Push the SYNC button once to control driver and passenger temperaturessimultaneously. Push the SYNC button a second time to control the temperatures
individually.
Air Recirculation
• Use recirculation for maximum A/C operation.
• For window defogging, turn the recirculation button off.
• If the recirculation button is pushed while in the AUTO mode, the indicator light may flash three times to indicate the cabin air is being controlled automatically.
Rear Window Defroster
• Pressing the rear window defroster button will turn on the defroster for approximately10 minutes. An indicator in the button will illuminate when the rear window defroster
is on. For an additional five minutes of operation, press the button a second time.
OPERATING YOUR VEHICLE
26
Page 37 of 88
NOTE:Uconnect™ Phone and Voice Command are vehicle options which must be
ordered separately. The butt ons on the radio will only be active if the vehicle has been
equipped with the option.
• Your radio has many features that add to the comfort and convenience of you and your passengers. Some of these radio featu res should not be used when driving because
they take your eyes from the road or your attention from driving.
• The radio sales code is located on the lower right side of the radio faceplate.
• Unless otherwise noted, the information provided on the operation and functionality of the radios in this section is common to all non-touch-screen radios.
Seek Up/Down Buttons
• Press to seek through radio stations in AM, FM, or SAT bands. Seek through tracks inCD mode.
• Hold either button to bypass stations without stopping.
Audio Settings
• Press the TUNE/SCROLL control knob and BASS, MID, TREBLE, BALANCE and FADE will display. Rotate the TUNE/SCROLL control knob to select the desired setting.
Auxiliary Mode
• The auxiliary (AUX) jack allows a portable device, such as an MP3 player or a cassetteplayer, to be plugged into the radio and uti lize the vehicle’s audio system to amplify
the source and play through the vehicle speakers.
• Pressing the AUX button will change the mode to auxiliary device if the AUX jack is connected.
• The control of the external device cannot be provided by the radio; use the device controls instead.
Clock Setting
• Press and hold the TIME button until the hours blink; turn the TUNE/SCROLL controlknob to set the hours.
• Press the TUNE/SCROLL control knob until the minutes begin to blink; turn the TUNE/SCROLL control knob to set the minutes.
• Press the TUNE/SCROLL control knob to save the time change.
• To exit, press any button/knob or wait five seconds.
Station Presets
• Press the SET/RND button once and SET 1 will show in the display. Then select the button (1–6).
• A second station may be added to each push button. Press the SET/RND button twice and SET 2 will show in the display, then select button (1–6).
35
ELECTRONICS
Page 42 of 88
REMOTE AUDIO CONTROLS
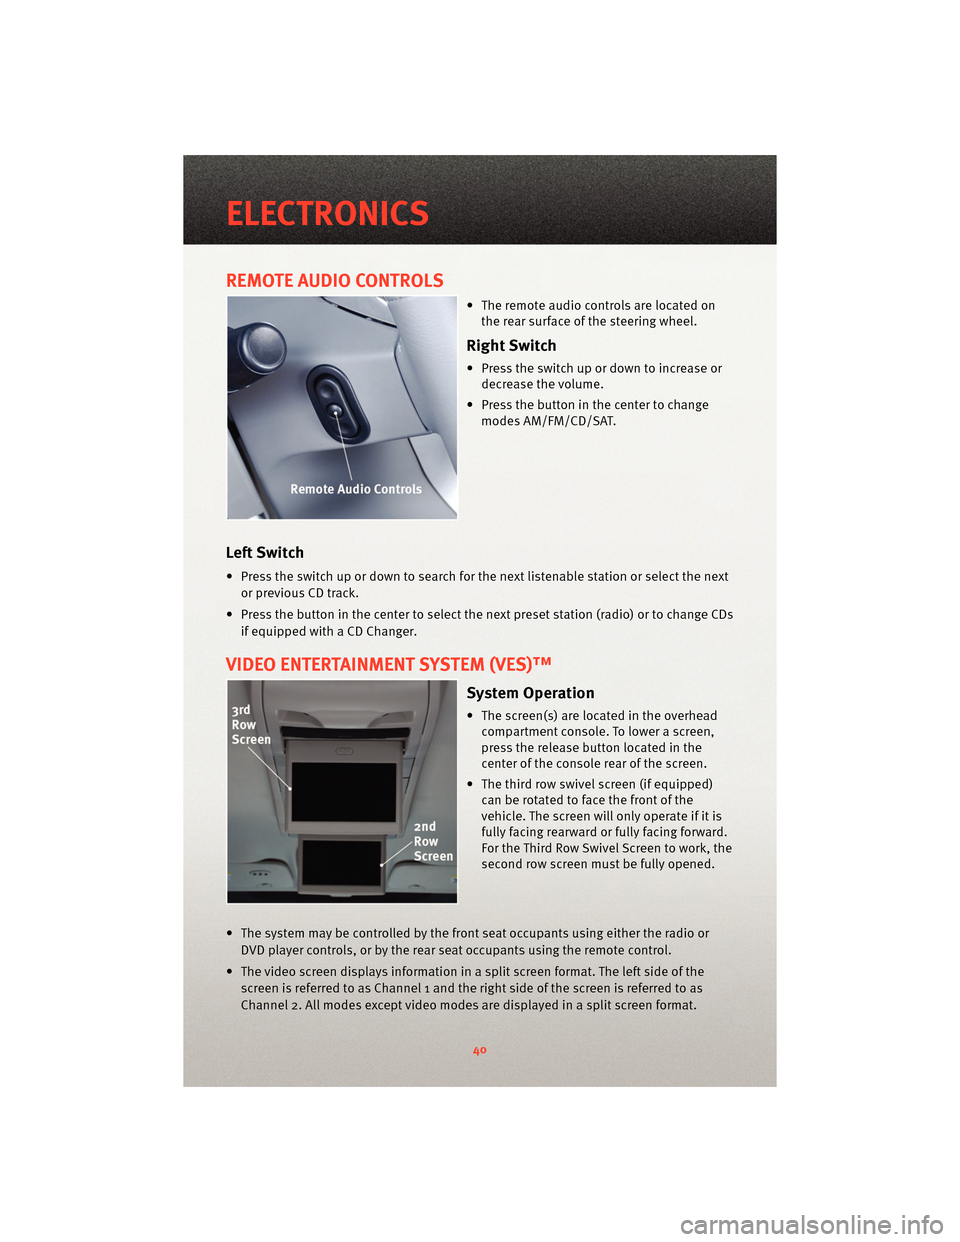
• The remote audio controls are located onthe rear surface of the steering wheel.
Right Switch
• Press the switch up or down to increase ordecrease the volume.
• Press the button in the center to change modes AM/FM/CD/SAT.
Left Switch
• Press the switch up or down to search for the next listenable station or select the next
or previous CD track.
• Press the button in the center to select the next preset station (radio) or to change CDs if equipped with a CD Changer.
VIDEO ENTERTAINMENT SYSTEM (VES)™
System Operation
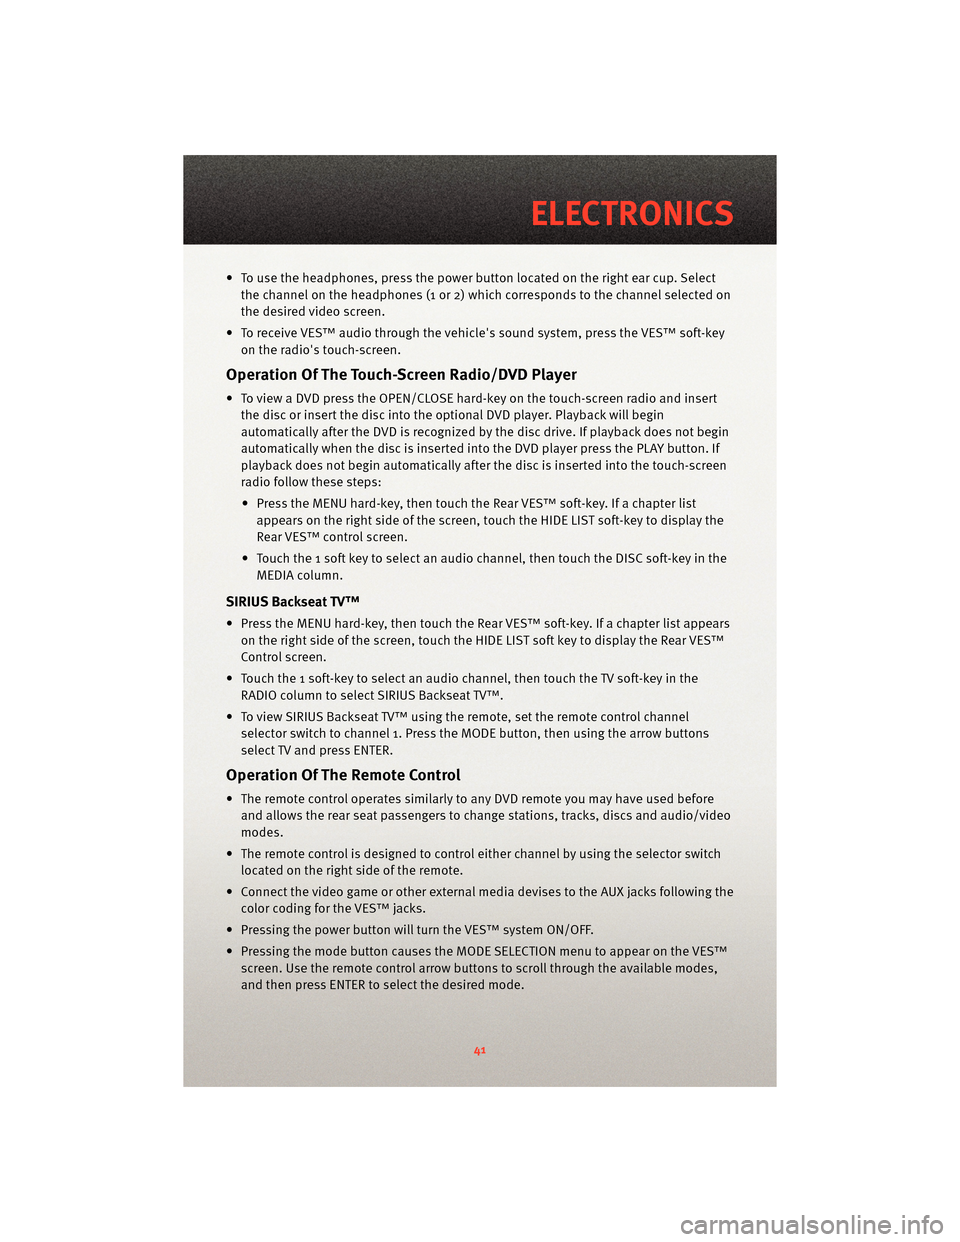
• The screen(s) are located in the overheadcompartment console. To lower a screen,
press the release button located in the
center of the console rear of the screen.
• The third row swivel screen (if equipped) can be rotated to face the front of the
vehicle. The screen will only operate if it is
fully facing rearward or fully facing forward.
For the Third Row Swivel Screen to work, the
second row screen must be fully opened.
• The system may be controlled by the front seat occupants using either the radio or DVD player controls, or by the rear seat occupants using the remote control.
• The video screen displays information in a split screen format. The left side of the screen is referred to as Channel 1 and the right side of the screen is referred to as
Channel 2. All modes except video modes are displayed in a split screen format.
ELECTRONICS
40
Page 43 of 88
• To use the headphones, press the power button located on the right ear cup. Selectthe channel on the headphones (1 or 2) whic h corresponds to the channel selected on
the desired video screen.
• To receive VES™ audio through the vehicle's sound system, press the VES™ soft-key on the radio's touch-screen.
Operation Of The Touch-Screen Radio/DVD Player
• To view a DVD press the OPEN/CLOSE hard-key on the touch-screen radio and insertthe disc or insert the disc into the optional DVD player. Playback will begin
automatically after the DVD is recognized by the disc drive. If playback does not begin
automatically when the disc is inserted into the DVD player press the PLAY button. If
playback does not begin automatically after the disc is inserted into the touch-screen
radio follow these steps:
• Press the MENU hard-key, then touch the Rear VES™ soft-key. If a chapter list appears on the right side of the screen, touch the HIDE LIST soft-key to display the
Rear VES™ control screen.
• Touch the 1 soft key to select an audio channel, then touch the DISC soft-key in the MEDIA column.
SIRIUS Backseat TV™
• Press the MENU hard-key, then touch the Rear VES™ soft-key. If a chapter list appearson the right side of the screen, touch the HIDE LIST soft key to display the Rear VES™
Control screen.
• Touch the 1 soft-key to select an audio channel, then touch the TV soft-key in the RADIO column to select SIRIUS Backseat TV™.
• To view SIRIUS Backseat TV™ using the remote, set the remote control channel selector switch to channel 1. Press the MODE button, then using the arrow buttons
select TV and press ENTER.
Operation Of The Remote Control
• The remote control operates similarly to any DVD remote you may have used before
and allows the rear seat passengers to change stations, tracks, discs and audio/video
modes.
• The remote control is designed to control either channel by using the selector switch
located on the right side of the remote.
• Connect the video game or other external media devises to the AUX jacks following the color coding for the VES™ jacks.
• Pressing the power button will turn the VES™ system ON/OFF.
• Pressing the mode button causes the MODE SELECTION menu to appear on the VES™ screen. Use the remote control arrow button s to scroll through the available modes,
and then press ENTER to select the desired mode.
41
ELECTRONICS
Page 44 of 88
Auxiliary Audio/Video Input Jacks
• The AUX jacks are located on the drivers side rear trim panel behind the sliding door.
• Connect the video game or other external media devises to the AUX jacks following thecolor coding for the VES™ jacks.
• Using either the touch-screen radio or remote control, select AUX from the REAR VES™ CONTROL or the MODE SELECTION screen.
• Refer to the Uconnect™ Multimedia – Video Entertainment System (VES)™ section in the Uconnect™ User's Manual on the DVD for further details.
UNIVERSAL CONSUMER INTERFACE
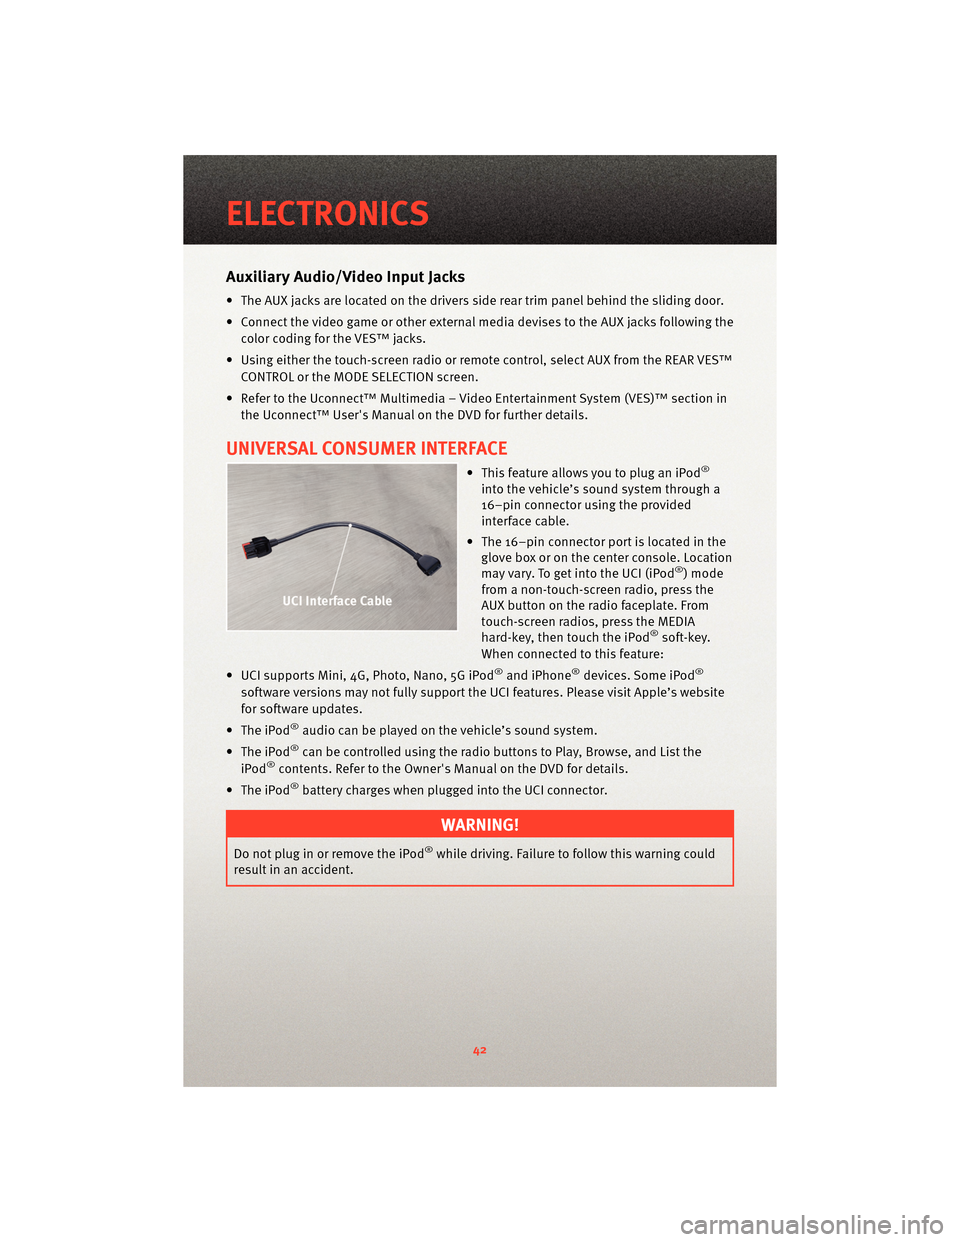
• This feature allows you to plug an iPod®
into the vehicle’s sound system through a
16–pin connector using the provided
interface cable.
• The 16–pin connector port is located in the glove box or on the center console. Location
may vary. To get into the UCI (iPod
®) mode
from a non-touch-screen radio, press the
AUX button on the radio faceplate. From
touch-screen radios, press the MEDIA
hard-key, then touch the iPod
®soft-key.
When connected to this feature:
• UCI supports Mini, 4G, Photo, Nano, 5G iPod
®and iPhone®devices. Some iPod®
software versions may not fully support the UCI features. Please visit Apple’s website
for software updates.
• The iPod
®audio can be played on the vehicle’s sound system.
• The iPod
®can be controlled using the radio buttons to Play, Browse, and List the
iPod®contents. Refer to the Owner's Manual on the DVD for details.
• The iPod
®battery charges when plug ged into the UCI connector.
WARNING!
Do not plug in or remove the iPod®while driving. Failure to follow this warning could
result in an accident.
ELECTRONICS
42
Page 45 of 88
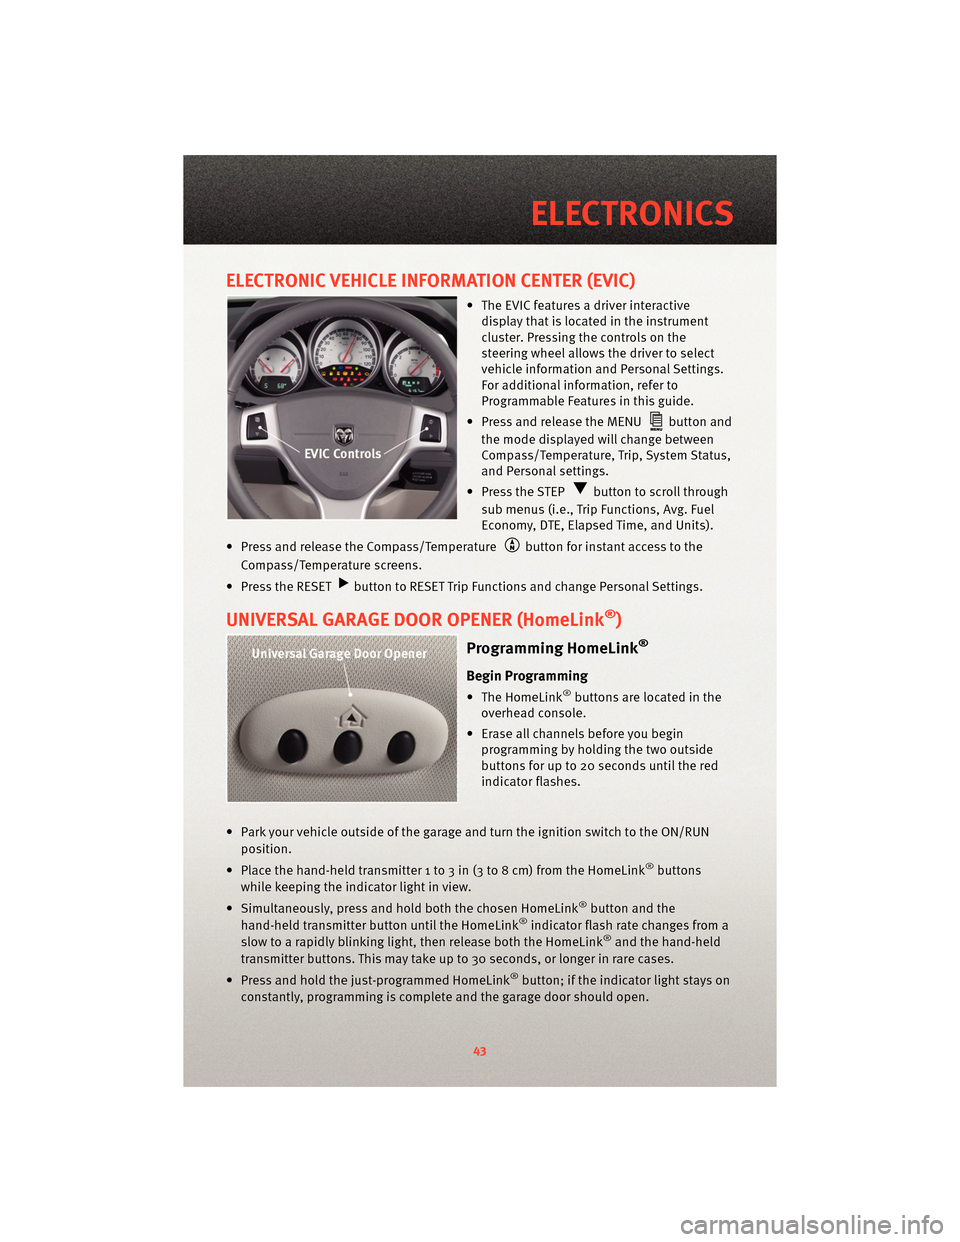
ELECTRONIC VEHICLE INFORMATION CENTER (EVIC)
• The EVIC features a driver interactivedisplay that is located in the instrument
cluster. Pressing the controls on the
steering wheel allows the driver to select
vehicle information and Personal Settings.
For additional information, refer to
Programmable Features in this guide.
• Press and release the MENU
button and
the mode displayed will change between
Compass/Temperature, Trip, System Status,
and Personal settings.
• Press the STEP
button to scroll through
sub menus (i.e., Trip Functions, Avg. Fuel
Economy, DTE, Elapsed Time, and Units).
• Press and release the Compass/Temperature
button for instant access to the
Compass/Temperature screens.
• Press the RESET
button to RESET Trip Functions and change Personal Settings.
UNIVERSAL GARAGE DOOR OPENER (HomeLink®)
Programming HomeLink®
Begin Programming
• The HomeLink®buttons are located in the
overhead console.
• Erase all channels before you begin programming by holding the two outside
buttons for up to 20 seconds until the red
indicator flashes.
• Park your vehicle outside of the garage and turn the ignition switch to the ON/RUN position.
• Place the hand-held transmitter 1 to 3 in (3 to 8 cm) from the HomeLink
®buttons
while keeping the indicator light in view.
• Simultaneously, press and hold both the chosen HomeLink
®button and the
hand-held transmitter button until the HomeLink®indicator flash rate changes from a
slow to a rapidly blinking light, then release both the HomeLink®and the hand-held
transmitter buttons. This may take up to 30 seconds, or longer in rare cases.
• Press and hold the just-programmed HomeLink
®button; if the indicator light stays on
constantly, programming is complete and the garage door should open.
43
ELECTRONICS
Page 46 of 88
WARNING!
• Your motorized door or gate will open and close while you are programming theuniversal transceiver. Do not program the transceiver if people or pets are in the
path of the door or gate.
• Do not run your vehicle in a closed garage or confined area while programming the transceiver. Exhaust gas from your vehicle contains Carbon Monoxide (CO) which is
odorless and colorless. Carbon Monoxide is poisonous when inhaled and can
cause you and others to be severely injured or killed.
NOTE:
• Only use this transceiver with a garage door opener that has a “stop and reverse” feature as required by Federal safety standards. This includes most garage door
opener models manufactured after 1982. Do not use a garage door opener without
these safety features. Call toll-free 1–800–355–3515 or, on the Internet, at
www.HomeLink.com for safety inf ormation orassistance.
• If you are having difficulty programming your HomeLink
®and your garage door opener
was manufactured after 1995, you may have a rolling code. Follow the steps below for
Programming A Rolling Code System.
Programming A Rolling Code System
• At the garage door opener motor (in the gara ge), locate the “learn” or “programming”
button. This can usually be found where the hanging antenna wire is attached to the
garage door opener motor (it is NOT the button normally used to open and close the
door).
• Firmly press and release the “learn” or “programming” button. The name and color of
the button may vary by manufacturer. Within 30 seconds, return to the vehicle and
press the programmed HomeLink
®button twice (holding the button for two seconds
each time). If the device is plugged in and activates, programming is complete.
• If the device does not activate, press the button a third time (for two seconds) to
complete the programming.
Using HomeLink®
• To operate, simply press and release the programmed HomeLink®button and the
programmed device will operate.
• Refer to your Owner’s Manual on the DVD for further details. If you have any problems programming HomeLink
®, or require assistance, please call toll-free 1–800–355–3515
or, on the Internet, at www.HomeLink.com.
ELECTRONICS
44